Universal Time Clock TM. QuickBooks Plug-in User Guide
|
|
|
- Hugh Chambers
- 6 years ago
- Views:
Transcription


1 Universal Time Clock TM QuickBooks Plug-in User Guide
2 Table of Contents Table of Contents...2 Chapter 1: Getting Started...3 Support and Troubleshooting... 3 System Requirements... 3 Installing the QuickBooks Plug-in... 3 QuickBooks Plug-in Menu Options... 4 Connecting Your Universal Time Clock TM to QuickBooks... 5 Chapter 2: Linking Employees and Employee Synchronization...6 Accessing the Time Clock Employee Synchronization Screen... 6 Advanced Employee Maintenance Screen... 7 Synchronizing Your Employees... 8 Exporting Existing Employees from QuickBooks into the Time Clock... 8 Manually Exporting a QuickBooks Employee to the Time Clock Importing Existing Employees from the Time Clock into QuickBooks Linking an Existing Employee in QuickBooks with an Existing Employee in the Time Clock Removing a Link between QuickBooks and the Time Clock Saving Your Changes Chapter 3: Importing Employee Hours from the Universal Time Clock TM to QuickBooks Verify the Hours Were Imported into QuickBooks Correctly Troubleshooting and How-to s How to Create a Payroll Item in QuickBooks Setting Up a Regular Time Pay Item Setting Up an Overtime Pay Item How to Assign a Static IP Address in Your Time Clock How to Handle Multiple Departments per Employee in QuickBooks Copyright 2009 Icon Time Systems, Inc. All rights reserved. Reproduction of this document in whole or in part is strictly prohibited. This document may contain typographical or copy errors. Universal Time Clock TM, Icon Time Systems, the Icon Time Systems logo, and all other Icon Time Systems product names mentioned in this document are registered trademarks Icon Time Systems. All other products, brand names, or company names mentioned in this document are properties and trademarks or registered trademarks of their respective companies. 2 P a g e

3 Chapter 1: Getting Started Congratulations on the purchase of your Universal Time Clock TM from Icon Time Systems! Your purchase includes a free software plug-in for QuickBooks that makes importing employee payroll hours easier than ever. This User Guide will instruct you on setting up the QuickBooks Plug-in for importing of employee hours, properly exporting employees from QuickBooks into your Universal Time Clock TM, and importing employees from the employee time clock into QuickBooks. For instructions on setting your employee time clock preferences please refer to the Universal Employee Time Clock User Guide. You can access this User Guide from the QuickBooks Plug-in menu in your QuickBooks File menu. Support and Troubleshooting For your convenience, troubleshooting tips and how-to s can be found on page 14 of this User Guide. In addition, our technical support site lists more troubleshooting tips and how-to s to assist you with the QuickBooks Plug-in and your employee time clock. You can reach this site at Upon product registration you receive a complimentary 30-day trial of our Gold Technical Support Plan which includes unlimited telephone support, troubleshooting and remote assistance. For those subscribers of our technical support plans, your dedicated support team can be reached Monday through Friday from 7:30am to 4:30pm (pacific coast time) at (800) option 1. System Requirements - Windows Based PC - Operating Systems Windows 2000, XP, Vista or Win7 (32 or 64 bit) - QuickBooks PRO or QuickBooks Premier (2006 and above) must be installed and setup - RTC , SB-100 PRO 2.0 Universal Time Clock or - RTC-1000, SB-100 PRO Universal Time Clock with Customize Pack Upgrade - An established connection to the computer running QuickBooks (Direct connection, network, VPN, or Internet) Installing the QuickBooks Plug-in Installing the QuickBooks Plug-in is simple and can be completed in just a few steps. NOTE: If the QuickBooks program is open on your computer, you must close it before beginning installation. 1. Download the QuickBooks Plug-in file to your Windows desktop from the link on our website: 2. Double-click on the QuickBooks Import.exe file to begin the installation. 3. Follow the installation wizard to complete the installation. 4. Log into your QuickBooks program using your QuickBooks Administrator account. VISTA AND WIN7 USERS: If your computer is running Windows Vista or Windows 7 Operating Systems you must run QuickBooks as an Administrator during the application certificate process. Follow the instructions below for running QuickBooks as an Administrator. i. Using your mouse pointer, Right-click on the QuickBooks icon that you typically use to open the QuickBooks application. ii. Select Run as administrator from the menu, shown to the right. 3 P a g e


4 iii. You must then log in to QuickBooks as the Admin. 5. An Application Certificate screen should appear as shown in Figure 1. Choose both of the following options: Select Yes, whenever the company file is open Select the Allow this application to access personal data checkbox Figure 2 Access Confirmation Window Figure 1 Application Certificate Screen 6. When the Access Confirmation window appears, Figure 2, select Done to allow the time clock to access the QuickBooks database. VISTA AND WIN7 USERS: Before using the QuickBooks Plug-in you must close the QuickBooks program down Open QuickBooks again by double-clicking on the QuickBooks shortcut, do not run as Administrator. Log in to QuickBooks using the Admin account. QuickBooks Plug-in Menu Options The QuickBooks Plug-in has now been installed. By selecting the File drop-down menu from QuickBooks you can now access the Icon Time Systems QuickBooks Plug-in menu; see below for a description of the menu options. a. Go To My Time Clock - Takes you directly to the Universal Time Clock TM Home page through your default Web browser. b. Import Time - Allows you to transfer employee hours from the Universal Time Clock TM into QuickBooks. c. Time Clock Preferences - Takes you directly to the employee time clock Preference Settings. d. Synchronize Employees - Allows you to synchronize your QuickBooks employee data Figure 3 QuickBooks Plug-in Menu Options with the employee data in the time clock including: adding employees from QuickBooks into the time clock, importing time clock employees into QuickBooks and data synchronization. e. User Guide - This option allows you to quickly access this User Guide for your convenience. 4 P a g e

5 Connecting Your Universal Time Clock TM to QuickBooks To begin using the Universal Time Clock TM QuickBooks Plug-in, you must first link the time clock to QuickBooks. 1. From the QuickBooks menu select File and the Icon Time Systems QuickBooks Plug-in menu, Figure Select Go To My Time Clock. 3. Enter in the time clock s IP address, to connect to the time clock. 4. Enter the Username and Password used to access your time clock, Figure Select the Login button to continue. NOTE: We recommend that you set a Static IP Address on your Universal Time Clock TM. If the dynamic IP address used to connect to the time clock changes, you will have to enter in a new IP Address to connect again. For instructions on programming a Static IP Address into the time clock, go to page 15 in the Troubleshooting section of this User Manual. 6. The Application Certificate window may appear again. Select the option Yes, whenever the company file is open Click Continue 7. Click Done in the Access Confirmation window, Figure 5. This will log you into your Universal Time Clock s TM Home page. Figure 4 Log In to Time Clock Figure 5 Access Confirmation 5 P a g e


6 Chapter 2: Linking Employees and Employee Synchronization In order to import employee hours into QuickBooks, the employees in QuickBooks must be synchronized with the employees in the time clock. Synchronization is done through the Time Clock Employee Synchronization screen and the Advanced Employee Maintenance screen. Accessing the Time Clock Employee Synchronization Screen All synchronization/linking of employees must be done through the Time Clock Employee Synchronization screen. Access this screen by following the instructions below. 1. From QuickBooks, go to the Icon Time Systems QuickBooks Plugin menu and select the Synchronize Employees option, as shown in Figure In the Log In to Time Clock screen, enter the correct IP address, Username, and Password. 3. Select the Login button to log into your time clock. Figure 6 Synchronize Employees The Time Clock Synchronization screen will appear, see Figure 7 below for a description of the menu options. Pin Number that has been/will be assigned to the employee List of Employees set up in QuickBooks Displays the Advanced Employee Maintenance Screen Print list of employees Takes you to the individual employee status screen. Figure 7 Time Clock Synchronization Sets the application to automatically synchronize employees in QuickBooks with the time clock Synchronization Status Icon The Import Status of each employee can easily be identified by the icon to the left of the employee name on the employee synchronization screen as shown on the following page. Synchronization Status Icon Synchronization Status Column Figure 8 Import Status 6 P a g e

7 Employees marked with a green check have been successfully synchronized/linked between QuickBooks and the time clock. Employees marked with the green arrows icon indicate that the employee name was found in both the time clock and in QuickBooks and the two records will be linked. Employees marked with the green plus will be added to the time clock. Employees marked with the yellow warning icon will be added to the time clock, however the employee has not been set up in the method that we recommend. Typically this is caused by an overtime 1 or 2 payroll item not being assigned or not set up correctly. Employees marked with the red x cannot be synchronized with the time clock due to an error. Synchronization Status Column The blue status column next to the Employee PIN number tells you the status of each employee and whether there are any issues with that particular employee being linked with the employee time clock. Checkbox The checkbox next to each employee name allows you to mark an employee to be added or synchronized with the employee time clock. If an employee is not checked off then they will not be synchronized or added. Additional Menu Options Additional menu options can be found by using your mouse pointer and Right clicking in the Time Clock Employee Synchronization window, as shown in Figure 9. o o o o Sync Status This option will display the employee status. Select All Choosing this option will mark all employees to be synchronized with the time clock. Select None Selecting this option will un-mark all employees from Figure 9 Additional Menu Options being synchronized with the time clock. Refresh This option downloads any new information from the time clock and QuickBooks and repopulates the list. Advanced Employee Maintenance Screen The Advanced Employee Maintenance screen allows you to view the employees; on the time clock, in QuickBooks, and linked employees in both the time clock and QuickBooks. Using the Advanced Employee Maintenance screen you can also link/unlink employees in the time clock from employees in QuickBooks, add employees from QuickBooks to the time clock, and add employees from the time clock to QuickBooks. Access this screen by clicking on the Advanced button from the Time Clock Employee Synchronization screen. 7 P a g e

8 QuickBooks Employees is a list of employees in QuickBooks that have not been linked with the time clock Linked Employees is a list of employees that have been linked between the time clock and QuickBooks Add to Time Clock allows you to select an employee and set them to be added to the time clock Link allows you to select an employee in QuickBooks and an employee in the time clock and link them Figure 10 Advanced Employee Maintenance Screen Remove Link allows you to remove the link between an employee in QuickBooks and the time clock Time Clock Employees is a list of employees and their ID numbers that are in the time clock but have not been linked with employees in QuickBooks Show Hidden allows you to view employees marked inactive in the time clock Add to QuickBooks allows you to select an employee and quickly add them to QuickBooks. Synchronizing Your Employees Now that you are familiar with the screens and their functionality, you are ready to synchronize your employees. The Universal Time Clock TM QuickBooks Plug-in allows you to easily synchronize employees using three separate methods. o o o Exporting Existing Employees from QuickBooks to Your Universal Time Clock TM If you have preexisting employees in QuickBooks and you would like to upload them to your time clock, please see below on page 8 for instructions on exporting employees to the time clock. This is typically used if you already have QuickBooks and you just purchased a new employee time clock. Importing Existing Employees from the Time Clock into QuickBooks If your employees are preexisting in your employee time clock and you would like to import them into QuickBooks, please go to page 10 for instructions on importing employees to QuickBooks. This is typically used if you already have the Universal Employee Time Clock and recently purchased QuickBooks. Manually Linking Existing Employees in QuickBooks to Existing Employees in your Universal Time Clock If your employees are preexisting in both the employee time clock and QuickBooks and you would like to start importing employee hours, please go to page 11 for instructions on linking employees. Exporting Existing Employees from QuickBooks into the Time Clock For those companies using the QuickBooks Plug-in whose employees are already setup in QuickBooks, employees can simply be exported (added) to the time clock. 1. Go to the Employee Synchronization screen as shown, Figure If not saved, enter your time clock Username, and Password. 3. Select the Login button to log into your time clock. 4. From the Employee Synchronization screen, review the employee synchronization status. 5. If any employee is marked with a or, double- click on the blue link in the Synchronization Status Column and open the individual employee status Figure 11 Synchronize Employees 8 P a g e

9 window to read why the error is occurring and how to fix it. From this window, Figure 12, you can read about what is causing the error for that particular employee. By clicking on Open Employee Edit Screen link, you will be taken directly to the Employee Edit screen in QuickBooks to make the appropriate changes to allow for proper employee synchronization. If the employee(s) status is marked with a, this indicates that the employee cannot be added to or linked to the time clock. See below for a list of the most common causes: - Regular time pay item has not been set for your employee. How to fix it: Go to the Employee Edit screen and change tabs to the Payroll and Compensation Info tab, Figure 13 Assign a standard time pay item to the employee under the Earnings field Figure 12 Employee Status Window Figure 13 Select Payroll and Compensation Figure 14 Earnings - The Regular pay item is not setup properly in QuickBooks, How to fix it: Go to How to Set Up a Pay Item in QuickBooks article in the Appendix, page 14, for instructions on properly setting up a payroll item. - Employee is not setup to use time data to create paychecks How to fix it: Go to the Employee Edit screen and change tabs to the Payroll and Compensation Info tab, Figure 13 above. Select the Use time data to create paychecks option from the Payroll and Compensation Info tab. If the employee(s) status is marked with a, this indicates that the employee can be added to the time clock, but has not been set up in the recommended method. This may cause hours to be imported incorrectly. See below for a list of the most common causes: - Overtime 1 (OT1) or Overtime 2 (OT2) pay item(s) has not been assigned; this means that all hours imported for the employee will be imported as standard hours. How to fix it: Go to the Employee Edit screen, change tabs to the Payroll and Compensation Info tab, Figure 15 Assign a OT1 time pay item to the employee under the Earnings field Figure 15 Earnings NOTE: If your company does not track overtime, you may choose not to set up any overtime pay items and all employee hours will be imported as standard hours. However, the icon will continue to appear on the 9 P a g e
 or Overtime 2 (OT2) pay item(s) is not setup properly in QuickBooks, How to fix it: Go to How to Set Up a Pay Item in QuickBooks article in the Appendix, page 14, for instructions")

10 Time Clock Employee Synchronization screen. In order to make the icon disappear, you will need to set up an overtime pay item. - Overtime 1 (OT1) or Overtime 2 (OT2) pay item(s) is not setup properly in QuickBooks, How to fix it: Go to How to Set Up a Pay Item in QuickBooks article in the Appendix, page 14, for instructions on properly setting up a payroll item. 6. After correcting any errors that appear in the employee Status column, select the employees to add or link to the time clock. Go back to the Employee Synchronization screen. Select the employees you wish to add/synchronize with the time clock, Figure 16. Click the OK button to add/synchronize your employees. 7. Once completed, an Update Complete message will appear, Figure 17; click the OK button. Figure 16 Synchronize Employees 8. Verify that the update was successful by logging into the time clock From the QuickBooks Plug-in menu in QuickBooks, select Go To My Time Clock. When the Log in to Time Clock window appears, enter the correct IP Address, Username, and Password in the Log in to Time Clock window Your web browser will open displaying the time clock homepage. From the time clock navigation menu, select the Reports option and then select Roster Report. Figure 17 Update Complete 9. Verify that the employees have been added to the Time clock by viewing them in the Roster Report list, Figure 18. Figure 18 Roster Report Manually Exporting a QuickBooks Employee to the Time Clock Exporting an employee to your time clock can be done in a few simple steps; 1. Open the Advanced Employee Maintenance screen by clicking on the Advanced button from the Employee Synchronization window 2. Select the employee you wish to add to the time clock in the QuickBooks Employee list 3. Click the Add to Time Clock button Figure 19 Advanced Button 4. This will transfer the employee to the Linked Employees section and assign the employee to the next available ID number on the clock Importing Existing Employees from the Time Clock into QuickBooks 1. Open the Advanced Employee Maintenance screen by clicking on the Advanced button from the Employee Synchronization window 2. Select the employee in the Time Clock Employees section of the Maintenance screen 3. Click the Add to QuickBooks button 10 P a g e
11 4. In the Edit Employee window, add the required personal information for that employee. 5. Go to the Employee Edit screen and change tabs to the Payroll and Compensation Info tab, Figure Assign a standard time pay item to the employee under the Earnings field. Figure 20 Payroll and Compensation Figure 21 Earnings 7. Be sure that the use time data to create paychecks box is checked 8. Click OK, you will see that the employee will now appear in the Linked employee list. Linking an Existing Employee in QuickBooks with an Existing Employee in the Time Clock Manually linking your employees can be helpful in correcting mistakes made when setting up employees. Here s how to do it: 1. Select the employee you wish to link in the QuickBooks Employees section 2. Next Select that same employee in the Time Clock Employees section 3. Click the Link button. Removing a Link between QuickBooks and the Time Clock 1. Select the employee in the Linked Employees section 2. Click the Remove Link button. Saving Your Changes 1. Click OK in the Advanced Employee Maintenance screen to save your link changes. 2. Selecting Cancel will undo any links created but does not undo employees added to QuickBooks or the time clock. 11 P a g e


12 Chapter 3: Importing Employee Hours from the Universal Time Clock TM to QuickBooks With the QuickBooks Plug-in, importing employee total hours can be done in a few simple steps. 1. Before importing employee time, we recommend that you review your employee time cards in your Universal Time Clock TM. NOTE: If employee hours need to be corrected after the hours have been imported into QuickBooks, then you will have to manually edit the hours in QuickBooks. 2. From QuickBooks go to the Icon Time Systems QuickBooks Plug-in menu and select the Import Time option, as shown in Figure Enter the correct IP address, Username, and Password in the Log in to Time Clock window 4. Select the Login button to log into your time clock 5. The Select Time Frame window will appear. Select the pay period or custom date range for the hours that you wish to import into QuickBooks Figure 22 Import Time Figure 23 Select Time Frame 6. The Select Employees window will appear; select the employees whose hours you wish to import, Figure 24. Figure 24 Select Employees 7. Click the Next button to continue 8. In the Confirmation window, Figure 25, review the information that will be imported and verify that this is the correct date range and set of employees for whom you wish to import hours. NOTE: If incorrect data is imported, you must manually delete the data from the QuickBooks time sheets before importing the data again. Figure 25 Confirmation 12 P a g e


13 9. Click the Next button to continue 10. The Import Finished window will display a summary of the import results. If the import was successful, you will see a message that states QuickBooks payroll import was successful! Example: In Figure 26, one week of data was successfully imported for one employee Dennis Johnson. The window also lists a summary of the regular and overtime hours imported into the QuickBooks Timesheets for this employee. Figure 26 Hours Import Confirmation Window 11. Click Finish Verify the Hours Were Imported into QuickBooks Correctly The employee hours are automatically entered into the QuickBooks Weekly Timesheet. To go to the employee Time Sheets, follow the instructions below: 1. In QuickBooks, select Employees menu. 2. Then select Enter Time and then select Use Weekly Timesheet. 3. In the Timesheet window, select the desired employee and the proper pay period. 4. Verify that the hours were imported correctly. Figure 27 Use Weekly Time Sheet Figure 28 Employee Timesheet 13 P a g e


14 Troubleshooting and How-to s Listed here are some of the most commonly asked questions and their solutions. More answers to commonly asked questions are listed on our website at Registering your Universal Employee Time Clock guarantees you free 30-day telephone support, from the date of registration, to assist you with installation procedures. Assistance and support after the 30-day period is offered through annual support contracts. If you need additional troubleshooting assistance, please call our technical support department at option 1. How to Create a Payroll Item in QuickBooks It is very important that payroll items in QuickBooks are set up properly to assure that employee hours information is imported correctly. The Universal Employee Time Clock can support up to 2 different payroll items; STD (Standard) and OT1 (time-and-a half overtime) hours. With the purchase of Rules Pack upgrade, you can also track OT2 (double-time overtime) hours. In order to assure proper importing of employee hours into QuickBooks, each employee needs to have a standard time and overtime 1, and if applicable overtime 2 pay item assigned to them in QuickBooks. Setting Up a Regular Time Pay Item In order to set up a payroll item in QuickBooks, follow the instructions below: 1. In the QuickBooks Employee Center, double-click on the employee name to open the Edit Employee window. If necessary, add a new employee. 2. Select the Payroll and Compensation Info option from the Change tabs drop-down menu, Figure In the Earnings window, select <Add New> in the Item Name column. Figure 29 Payroll and Compensation Figure 30 Add New Payroll Item 4. In the Add new payroll item window, select the Wages as Hourly Wages and click the Next button, Figure 31. Figure 31 Select Hourly Wages 5. Select Regular Pay in the Hourly Wage window and click the Next button, Figure 32. Figure 32 Regular Pay 14 P a g e


, select Overtime Pay in the Hourly Wage window and click the Next button.")


15 6. In the next screen, enter a name for this payroll item. In this example, the name Regular is used. Click the Next button. Figure 33 Payroll Item Name 7. Select the proper Expense Account for the payroll item and click the Finish button. Setting Up an Overtime Pay Item 1. Follow instructions 1-4 in setting up a Standard Pay Item, on page Select Overtime Pay in the Hourly Wage window and click the Next button, Figure Select Overtime pay rate (OT1 or OT2 hours), select Overtime Pay in the Hourly Wage window and click the Next button. Figure 34 Expense Account Figure 35 Overtime Pay Figure 36 Name Payroll Item 4. In the next screen, enter a name for this payroll item. In this example, the name Overtime 1 is used. Click the Next button. 5. Select the appropriate overtime rate for this pay item, Figure 37. Figure 37 Define Overtime Rate 6. Select the proper Expense Account for the payroll item and click the Finish button. How to Assign a Static IP Address in Your Time Clock To prevent the IP Address from changing on the employee time clock, a static IP Address can be assigned to the employee time clock. 1. First determine an available IP address to be assigned to the employee time clock. 15 P a g e
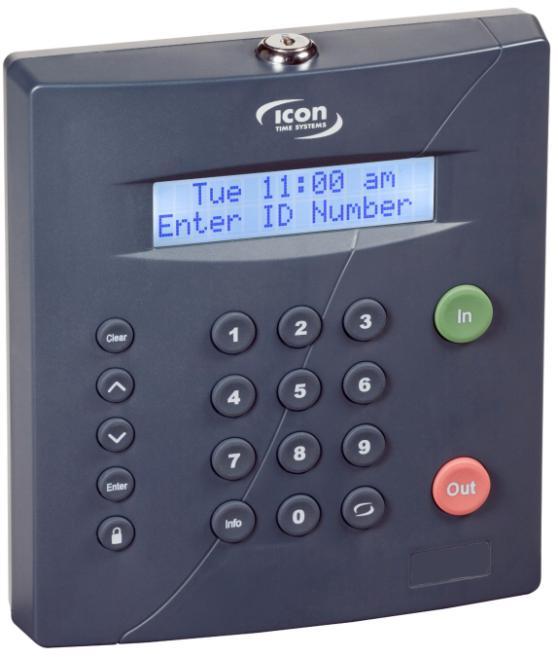
16 NOTE: Your network supervisor can provide you with this information or help with these steps. 2. Press the Lock key on the keypad of the clock. 3. Enter the security code. If you have not customized this code, the default is Press the Up Arrow key on the keypad until the View IP Address option appears. 5. Press the Enter key. 6. The current IP address of the clock will appear. 7. Press the Enter key again. 8. Enter the desired IP address including leading zeros. Example: An IP address of would be entered in at Press the Enter key on the clock. 10. If the IP Address was set successfully, a message stating "IP Address set successfully" will appear on the time clock display. 11. If you also need to update the settings for the Subnet mask, Gateway, or DNS server follow the instructions below, otherwise jump to step 12. NOTE: If the clock is on the same local subnet as your computer, you should not have to change the settings for Subnet mask, Gateway, or DNS server. Your network supervisor will know how to set this up if needed. Setting the Subnet Mask, Gateway, and DNS: After programming the IP address described in Step 6 above, press the Enter key. Enter the correct Subnet mask by typing in the appropriate numbers. o A message will appear on the time clock display "Subnet Address set successfully". Repeat the procedure for the Gateway and DNS server addresses. 12. Press the Clear key on the clock to exit out of Supervisor mode. 13. IMPORTANT! In order for your changes to populate, unplug the power source from the clock and then plug it back in to power cycle the time clock. Your time clock will then reboot. 14. Once the time clock has rebooted, you can access your time clock using your web browser or the QB Plug-in menu by typing in the IP Address assigned to your time clock. How to Handle Multiple Departments per Employee in QuickBooks The QuickBooks Plug-in only imports total hours information and does not import Department information. If you have employees that work in multiple departments and you would like to track the time spent in each department using QuickBooks, you will have to manually edit the employee s Timesheets. Here s how: 1. Import the total hours for your employee(s) into QuickBooks, shown in Figure 38 on the next page. The total hours will automatically be imported into the default payroll item set up for STD, OT1, and OT2 in the QuickBooks Timesheet for that employee. NOTE: The default payroll item is automatically set to the first payroll item in the list in the Payroll and Compensation tab for that employee. To change which item is set as default, simply change the order that the items are listed. 16 P a g e
 in which to reassign the hours.")

17 Example: In this example, the hours have been assigned to Overtime1 and Regular payroll item 2. From the Payroll Item list choose the appropriate payroll item (department) in which to reassign the hours. Figure 36 Timesheet Example: In this example, the STD hours were assigned from the Regular to the Hourly_Production department. 3. If you would like to split the hours between two pay items, simply add a line item for the second pay item and assign the appropriate total hours to that payroll item. Don t forget to subtract the total hours from the original payroll item. 4. When your changes are complete, click Save & Close to save your changes in QuickBooks. Figure 37 Editing a Payroll Item 17 P a g e
Lesson 12. Doing Payroll with QuickBooks
 QUICKBOOKS 2016 STUDENT GUIDE Lesson 12 Doing Payroll with QuickBooks Copyright Copyright 2016 Intuit, Inc. All rights reserved. Intuit, Inc. 5601 Headquarters Drive Plano, TX 75024 Trademarks 2016 Intuit
Chapter 9. Paying Employees and Taxes and Tracking Time
 How to Activate Payroll in Preferences Select a Payroll Service Comparing Payroll Options Set Up Company Information Enter and Review Employee Information Set Up Payroll Taxes Setting Year-to-Date Amounts
Using Enterprise etime
 Using Enterprise etime Handout Manual Appendix Automatic Data Processing, Inc. Roseland V11090972216ET61 2009 ADP, Inc. Appendix Using Hyperfind Queries with QuickNavs When your ADP representative sets
Sage 100 Direct Deposit. Getting Started Guide
 Sage 100 Direct Deposit Getting Started Guide This is a publication of Sage Software, Inc. 2017 The Sage Group plc or its licensors. All rights reserved. Sage, Sage logos, and Sage product and service
UNIVERSITY OF NORTH FLORIDA. Office of Human Resources & Office of the Controller. Employee Self Service Part I
 UNIVERSITY OF NORTH FLORIDA Office of Human Resources & Office of the Controller Employee Self Service Part I OFFICE OF HUMAN RESOURCES & OFFICE OF THE CONTROLLER Employee Self Service Part I University
ALLDAY TIME SYSTEMS LTD. Allday Time Manager Lite User Guide
 Allday Time Manager Lite User Guide 1 Table of Contents Table of Contents... 2 Starting Allday Time Manager... 3 Logging In... 3 Adding a New Employee... 4 Viewing / Editing an Employees Record... 5 General
Board of Regents of the University System of Georgia etime Employee User Guide
 Board of Regents of the University System of Georgia etime Employee User Guide Project View Time Card for Benefited BiWeekly Employees Manager or Supervisor Updated 08/01/2009 Contents REGISTERING FOR
EMPCENTER 9.6 USER GUIDE
 January 2016 Oregon State University EMPCENTER 9.6 USER GUIDE Policy Profile Students/Temps Hourly Table of Contents EmpCenter Overview... 3 Accessing EmpCenter... 3 Employee Dashboard... 3 Employee Timesheet
Kronos Timesheet & Workforce Management Guide for Employees
 Kronos Timesheet & Workforce Management Guide for Employees Version 1.0 05/27/2015 Table of Contents I. Introduction..1 II. Getting Started 2 Logging On Changing Your Password Common Icons and Screen Functions
Enhanced Time & Attendance
 Enhanced Time & Attendance Part 1 Handout Manual V12211772260ET8] Copyright 2015 2017 ADP, LLC ADP Trademarks The ADP logo and ADP are registered trademarks of ADP, LLC. Enterprise etime and Pay expert
TimePilot PC Time and Attendance System. Instruction Manual. TimePilot Corporation 340 McKee Street, Batavia, Illinois
 TimePilot PC Time and Attendance System Instruction Manual TimePilot Corporation 340 McKee Street, Batavia, Illinois 60510 www.timepilot.com Table of Contents Introduction... 3 Installing and Setting up
Essential Time & Attendance Supervisor Basics
 ADP Workforce Now Essential Time & Attendance Supervisor Basics Handout Manual V09021480778WFN70 Copyright 2012 2014 ADP, LLC ADP Trademarks The ADP logo and ADP are registered trademarks of ADP, LLC.
Before you work in Kronos, you should have a Payroll Calendar available to you. From the Ferris
 Before you work in Kronos, you should have a Payroll Calendar available to you. From the Ferris State University Web page (ferris.edu), search "Admin Finance". 1 Click on the link that says "Welcome to
Advanced Scheduling Introduction
 Introduction The Advanced Scheduling program is an optional standalone program that works as a web site and can reside on the same server as TimeForce. This is used for the purpose of creating schedules
RUN Powered by ADP Getting Started
 RUN Powered by ADP Getting Started REGSG - V0416A Trademarks The ADP Logo, ADP, Employee Access, and RUN Powered by ADP are registered trademarks of ADP, LLC. ADP A more human resource is a service mark
KRONOS EMPLOYEE TRAINING GUIDE
 KRONOS EMPLOYEE TRAINING GUIDE C o n t e n t s Navigating Through Workforce Central... Lesson 1 Timecard Edits... Lesson 2 Approvals... Lesson 3 Reporting... Lesson 4 Editing & Scheduling PTO... Lesson
TimeClick QuickBooks Pro Integration Manual
 1 TimeClick QuickBooks Pro Integration Manual TimeClick LE 16 2016 Manual v. 1.0 - Last updated Mar 2016 QuickBooks is a registered trademark of Intuit, Inc. Hawkeye Technology LLC is not affiliated with
Table of Contents. Login Screen Introduction...2 Login Screen Navigation...2 Passwords Requirements...3 Logging Into People First...
 Table of Contents Login Screen... 2 Introduction...2 Login Screen Navigation...2 Passwords Requirements...3 Logging Into People First...3 Home Page... 3 Introduction...3 Home Page Description...4 Updating
Contents OVERVIEW... 3
 Contents OVERVIEW... 3 Feature Summary... 3 CONFIGURATION... 4 System Requirements... 4 ConnectWise Manage Configuration... 4 Configuration of a ConnectWise Manage Login... 4 Configuration of GL Accounts...
Contents OVERVIEW... 3
 Contents OVERVIEW... 3 Feature Summary... 3 CONFIGURATION... 4 System Requirements... 4 ConnectWise Manage Configuration... 4 Configuration of Manage Login... 4 Configuration of GL Accounts... 5 Configuration
Connecting Time Matters/Billing Matters and QuickBooks. 35*45 Consulting - Global 7 Second System
 Why Choose QuickBooks... 3 Why Use Billing Matters... 3 Question to Ask... 3 Getting Started in Billing Matters... 4 Getting Started in QuickBooks... 11 Linking Billing Matters and QuickBooks... 14 Using
Time Reporting Quick Reference For Non-Exempt Employees
 Time Reporting Quick Reference For Non-Exempt Employees August 2017 Accessing the Time Reporting System Navigate to the ecampus login page (https://ecampus.scu.edu). Log in to ecampus using your SCU User
Enterprise etime. Getting Started Participant Guide V.6.1. ADP Time & Labor Management
 Enterprise etime Getting Started Participant Guide V.6.1 ADP Time & Labor Management Copyright Copyright Notice Copyright 2009 by Automatic Data Processing, Inc. All Rights Reserved The Getting Started
Minutes Hundredths
 Manager Self-Service (MSS) Approving Temporary and Student Employees Timesheet Reference Guide Reference Materials and Approval Schedules Reference materials and approval schedules can be found on the
Editing an Existing Account on an Invoice Payment Creating a New Account on an Invoice Payment... 47
 ebilling User Guide Table of Contents About This Guide Chapter 1 ebilling Basics... 6 Getting Started with ebilling... 6 Logging into ebilling... 6 Working with the ebilling Home Page... 8 Updating Your
Administrator Quick Reference Virtual TimeClock 18 Pro Edition
 Administrator Quick Reference Virtual TimeClock 18 Pro Edition Your time clock program runs in either User or Administration mode. User mode is where workers clock in and out and view their timecard. Administration
Administrator Quick Reference Virtual TimeClock 15 Network Edition
 Virtual TimeClock Administrator Quick Reference Virtual TimeClock 15 Network Edition Your time clock program consists of a user status window and an administration window. The user status window is used
Contents OVERVIEW... 3 CONFIGURATION... 4
 Contents OVERVIEW... 3 Feature Summary... 3 CONFIGURATION... 4 System Requirements... 4 ConnectWise Manage Configuration... 4 Configuration of Manage Login... 4 Configuration of GL Accounts... 5 Configuration
PlatinumPay Xpress. User Manual. Created: Thursday, November 01, Copyright Execupay Software, LLC.. All Rights Reserved.
 PlatinumPay Xpress User Manual Created: Thursday, November 01, 2012 Copyright Execupay Software, LLC.. All Rights Reserved. 1 Contents Getting Started... 4 System Requirements... 5 Signing In... 5 The
ACD MIS Supervisor Manual
 Notice Note that when converting this document from its original format to a.pdf file, some minor font and format changes may occur. When viewing and printing this document, we cannot guarantee that your
Manager Self Service Training Guide
 2017-2018 Time and Attendance Manager Self Service Training Guide Revised: September 2017 University of Massachusetts Boston Human Resources Department Training Guide Time and Attendance Manager Self Service
User Guide. Introduction. What s in this guide
 User Guide TimeForce Advanced Scheduling is the affordable employee scheduling system that lets you schedule your employees via the Internet. It also gives your employees the ability to view and print
Attendance on Demand. Agenda
 1 Attendance on Demand Supervisor Training Aiken County School District Aug 2017 1 Agenda Login to Attendance Enterprise Changing Password Locating Employee Calendar Dashboard Employee Messages Editing
Essential Time & Attendance
 ADP Workforce Now Essential Time & Attendance Handout Manual Need support after training? To exchange tips and best practices with fellow users, get on The Bridge an online community built exclusively
WEB TIME EMPLOYEE GUIDE
 Revised 10/27/2017 WEB TIME EMPLOYEE GUIDE CLIENT RESOURCE PAYLOCITY.COM TABLE OF CONTENTS Web Time... 3 Web Kiosk... 10 Home... 29 My Timesheet... 43 My Pay Adjustments... 57 Employee Time Off Calendar...
ServicePRO + PartsPRO User Guide
 ServicePRO + PartsPRO User Guide ServicePRO Version 2.0 PartsPRO Version 1.0 Page 1 of 82 1 WHAT IS SERVICEPRO + PARTSPRO?... 4 1.1 What is ServicePRO?... 4 1.2 What are the benefits of using ServicePRO?...
Log into my JPSO and sign in as you would normally sign on to view pay stubs, etc.
 Accessing NOVAtime You can access NOVAtime from any computer. You will however need a standard Internet browser (preferably Windows Internet Explorer or Mozilla Firefox ). Log into my JPSO and sign in
EMPLOYEE SELF SERVICE
 EMPLOYEE SELF SERVICE Version 5.8 ESS SmartLinx Solutions Employee Self Service is as easy as accessing the internet. Your employees will be able to access a secure Web page that provides them access to
Deltek Touch Time & Expense for Vision. User Guide
 Deltek Touch Time & Expense for Vision User Guide September 2017 While Deltek has attempted to verify that the information in this document is accurate and complete, some typographical or technical errors
Contents OVERVIEW... 3
 Contents OVERVIEW... 3 Feature Summary... 3 CONFIGURATION... 4 System Requirements... 4 ConnectWise Manage Configuration... 4 Configuration of Manage Login... 4 Configuration of GL Accounts... 5 Configuration
Version /2/2017. Offline User Guide
 Version 3.3 11/2/2017 Copyright 2013, 2018, Oracle and/or its affiliates. All rights reserved. This software and related documentation are provided under a license agreement containing restrictions on
Essential Time & Attendance Supervisor Timecard Basics
 ADP Workforce Now Essential Time & Attendance Supervisor Timecard Basics Handout Manual Need support after training? To exchange tips and best practices with fellow users, get on The Bridge an online community
Student Web Time Entry Instructions
 Student Web Time Entry Instructions Many students will be responsible for reporting and submitting their time worked via the Employee Self Service application within the Dickinson Gateway. The following
Enhanced Time & Attendance
 Enhanced Time & Attendance Part1: Managing Timecards Handout Manual V01131472250_1ET7 Copyright 2014 ADP, Inc. ADP Trademarks The ADP logo and ADP are registered trademarks of ADP, Inc. Enterprise etime
Virtual Terminal User Guide
 Virtual Terminal User Guide Table of Contents Introduction... 4 Features of Virtual Terminal... 4 Getting Started... 4 3.1 Logging in and Changing Your Password 4 3.2 Logging Out 5 3.3 Navigation Basics
EmpowerTime Supervisor User Guide Table of Contents
 EmpowerTime Supervisor User Guide Table of Contents Supervisor Quick Guide. 1-2 Timecard Edits...3 Daily Tasks - Dashboard...4 Absences 5-6 Time Off Requests. 7-8 Approving Employee Timecards.9-10 Exceptions...
Kuali Time: Employee Guide
 Kuali Time: Employee Guide Contents Overview... 1 Logging into your Timesheet in One.IU... 2 Logging into your Timesheet via a Kiosk... 2 Timesheet Overview and Navigation... 2 Clock-Entry Timekeeping...
Contents OVERVIEW... 3
 Contents OVERVIEW... 3 Feature Summary... 3 CONFIGURATION... 4 System Requirements... 4 ConnectWise Manage Configuration... 4 Configuration of Manage Login... 4 Configuration of GL Accounts... 5 Configuration
CHAPTER 12 - REMOTE TIME ENTRY ADD-ON OPTION
 CHAPTER 12 - REMOTE TIME ENTRY ADD-ON OPTION PRODUCTION MANAGEMENT OVERVIEW The Production Management subsystem manages all daily production activities. If you are using the Remote Job Card Data Collection
myhr Oracle Human Capital Management
 Facilitator s Guide myhr Oracle Human Capital Management Employee Self-Service (About Me - Personal Information) In Association with: How To Use This Guide This guide provides step-by-step instructions
INSTRUCTIONAL GUIDE. Timekeeping For Non-Exempt RealTime Employees who use a computer to record time MARCH 7, 2017
 INSTRUCTIONAL GUIDE Timekeeping For Non-Exempt RealTime Employees who use a computer to record time MARCH 7, 2017 UNIVERSITY OF CALIFORNIA, BERKELEY Kronos Version 8 TABLE OF CONTENTS INTRODUCTION...2
Inventory Control Receive Inventory from McKesson
 ................................................................................................... Inventory Control Receive Inventory from McKesson Pharmacy Technology Solutions Issued July 2014 Downloading
Entering & Adjusting Time and Leave: Non-Exempt TEAMS & USPS
 Instruction Guide Entering & Adjusting Time and Leave: Non-Exempt TEAMS & USPS This instruction guide describes the process for entering time and leave, and the process for making adjustments to time and
Sage ERP Accpac Online 5.6
 Sage ERP Accpac Online 5.6 Integration Resource Guide for Sage ERP Accpac And Sage CRM (Updated: December 1, 2010) Thank you for choosing Sage ERP Accpac Online. This Resource Guide will provide important
Kronos Workforce Timekeeper. Time and Attendence System Computer Training Manual
 Kronos Workforce Timekeeper Time and Attendence System Computer Training Manual Prepared by: Amelia Griggs, Information Management 6/14/2005 Table of Contents: A. Introduction...4 Punch to Payroll Process
RUN Powered by ADP Getting Started
 RUN Powered by ADP Getting Started RCGSG - V0816A Trademarks The ADP Logo, ADP, RUN Powered by ADP, ADP Health & Benefits Advantage, ALINE Card by ADP, Employee Access, ezlabormanager, HR411, Pay-by-Pay,
QUICKBOOKS ONLINE ACCOUNTANT. QuickBooks Online Certification Training Guide
 QUICKBOOKS ONLINE ACCOUNTANT QuickBooks Online Certification Training Guide QuickBooks Online Certification Training Legal Notices 2017 Intuit Inc. All rights reserved. Intuit, the Intuit logo, QuickBooks,
UC Davis Time Reporting System (TRS) User Guide for Department Time Administrators (DTAs)
 User Guide for Department Time Administrators (DTAs)") UC Davis Time Reporting System (TRS) User Guide for Department Time Administrators (DTAs) Last Revised: 11/30/16 1 Table of Contents Welcome to TRS!... 3 Four Roles in the TRS... 3 Becoming a DTA... 4
UC Davis Time Reporting System (TRS) User Guide for Department Time Administrators (DTAs) Last Revised: 11/30/16 1 Table of Contents Welcome to TRS!... 3 Four Roles in the TRS... 3 Becoming a DTA... 4
Web Time New Hire Packet
 Web Time New Hire Packet As a new Web Time user, quickly learn how to: Register your user account to access Web Time. Learn how to log into Web Time. See how to navigate the Employee Dashboard to perform
Supervisor Overview for Staffing and Scheduling Log In and Home Screen
 Supervisor Overview for Staffing and Scheduling Log In and Home Screen On the login screen, enter your Active Directory User Name and Password, and click the Sign-in button. You will then be taken to your
Sage Abra SQL HRMS Sage Abra HRMS Payroll. Getting Started
 Sage Abra SQL HRMS Sage Abra HRMS Payroll Getting Started 2010 Sage Software, Inc. All rights reserved. Sage, the Sage logos, and the Sage product and service names mentioned herein are registered trademarks
TimeSaver for Project Timesheet Employees
 Project Timesheet Employees TIMESAVER FOR PROJECT TIMESHEET EMPLOYEES Table of Contents GETTING STARTED LOG-ON AND NAVIGATION... 1 LOGGING ON TO TIMESAVER... 1 INTRODUCING TIMESAVER... 3 USING FULL SCREEN
INSTRUCTIONAL GUIDE. Timekeeping For Non-Exempt AnyTime Employees MARCH 7, UNIVERSITY OF CALIFORNIA, BERKELEY Kronos Version 8
 INSTRUCTIONAL GUIDE Timekeeping For Non-Exempt AnyTime Employees MARCH 7, 2017 UNIVERSITY OF CALIFORNIA, BERKELEY Kronos Version 8 TABLE OF CONTENTS INTRODUCTION... 2 TRAINING... 2 ROLES AND RESPONSIBILITIES...
BillQuick-QuickBooks Advanced Integration Guide 2016
 BillQuick-QuickBooks Advanced Integration Guide 2016 CONTENTS INTRODUCTION 1 HOW TO USE THIS GUIDE 1 SOFTWARE EDITIONS SUPPORTED 2 HOW INTEGRATION WORKS 2 MODES OF SYNCHRONIZATION 3 INTEGRATION RULES 4
GETTING STARTED WITH QUICKEN with Online Bill Pay 2010, 2009, and for Windows
 GETTING STARTED WITH QUICKEN with Online Bill Pay 2010, 2009, and 2008-2007 for Windows Refer to this guide for instructions on how to use Quicken s online account services to save time and automatically
UltraTime Student Supervisor User Guide
 Name: User ID: UltraTime Student Supervisor User Guide This guide will explain how to use the WebTime supervisor view of UltraTime to approve student employee hours. 8/22/2012L:\PAYROLL\Student Resources
Where Do I Go to Approve?
 Manager Self-Service (MSS) Approving University Staff Continuous Absence and Timesheet Reference Guide HRS Self-Service Reference Website: http://www.uwosh.edu/hr/hrs/hrs-self-service Includes approval
Employee Self-Service in Workday
 Employee Self-Service in Workday Contents Overview Getting Started in Workday Configuring Workday for You Employee Self-Service Processes Summary Overview Configuring Workday for You Summary Employee Self-Service
user guide phone 2014 by Sysco. All rights reserved.
 user guide phone 2014 by Sysco. All rights reserved. welcome to sysco counts Time is money in the foodservice business and every second counts literally! Sysco Counts simplifies taking inventory and ordering
Web Time Entry Time Approver
 UIW Department of Instructional Technology Web Time Entry Time Approver In this training session, Banner users will learn to approve time through the Web Approve Time through the Web 1. Open Internet Explorer
Dayforce Location Administrator Guide. HR and Payroll Administration Overview
 Dayforce Location Administrator Guide HR and Payroll Administration Overview My HR Overview 3 HR Administration - My HR From the main menu, choose My HR. Here you will see a list of employees. You can:
TimeClock Plus Manager
 TimeClock Plus Manager Manager Approval Using the Dashboard Follow the approval instructions listed in Using the Toolbar below. Using the Toolbar From the toolbar select HOURS, then Group Hours. You need
Unit4 PSA Suite Business Performance Edition
 for Microsoft Dynamics CRM Unit4 PSA Suite Business Performance Edition Release Notes Unit4 PSA Suite Business Performance Edition July 2017 v.31.07.2017 - MvB (C) Copyright 2017 Unit4 Table of Contents...
Mobile for Android User Guide
 Version 1.7 Copyright 2013, 2017, Oracle and/or its affiliates. All rights reserved. This software and related documentation are provided under a license agreement containing restrictions on use and disclosure
Attendance Enterprise
 Attendance Enterprise Supervisor Training July 22, 2013 Agenda Login to Attendance Enterprise Updating Your Account Information Locating Employee Calendar Dashboard Employee Messages Editing Time Cards
NOVAtime Attendance Application Employee Training Manual
 NOVAtime Attendance Application Employee Training Manual Last Revised: 7/22/2013 1 Copyright 2012 NOVAtime Technology, Inc. This documentation was first written 7/27/09 by Kevin Nielsen for and is maintained
Western Michigan University. User Training Guide
 Western Michigan University User Training Guide Index Significant Changes in Kronos Workforce Central 2 Accessing Kronos 3 Logging Off Kronos 4 Navigating Kronos 6.2 4-5 Timecard Basics 6-7 Visual Cues
Manager Dashboard User Manual
 Manager Dashboard User Manual Manager User Guide The Manager User Guide is designed to provide a supervisor or a manager with step-by-step instructions for their daily tasks. Although every database will
APPROVE AND VIEW TIME FOR SALARIED EXEMPT EMPLOYEES USER GUIDE
 APPROVE AND VIEW TIME FOR SALARIED EXEMPT EMPLOYEES USER GUIDE If you have questions about information in this user guide, please e-mail Payroll Services. TABLE OF CONTENTS Background... 3 General Information...
MYOB EXO Business. Timesheet
 MYOB EXO Business EXO Headstart Training Timesheet Momentum Software Solutions support@momentumss.com.au Momentum provide Support for all MYOB EXO Business and Employer Services modules Suite 22, Ocean
Bank Staff Employee Online User Guide
 Bank Staff Employee Online User Guide Are you using the most up to date guide? The latest versions can be found on our intranet site at the following address: http://www.dchs.nhs.uk/dchs_staff_zone/human_resources/e-rostering
, Pacific Timesheet. Timesheet Help.
 Timesheet Help www.pacifictimesheet.com p1 Table of Contents Introduction 4 System Requirements 5 Setup Quick Start 7 Home 10 Change Password 11 My Account 12 Preferences 13 Announcements 15 My Timesheet
QuickBooks Integrator for PostalMate VSoftwareTools.com
 Page 1 IMPORTANT Please, carefully read these Instructions fully, BEFORE trying to setup the QuickBooks Integrator (QBI) in PMTools. The QuickBooks Connector (QBC) is a separate program installed on the
George Washington University Workforce Timekeeper 6.0 Upgrade Training
 Workforce Timekeeper 6.0 Upgrade Training Table of Contents Topic 1: Workforce Timekeeper 6.0 New Features...4 Topic 2: Logging On and Off...5 Topic 3: Navigating in Workforce Timekeeper...7 Topic 4: Reviewing
Los Angeles Unified School District M&O POLARIS Work Management System Assignment and Time Reporting Guide rev.4
 Los Angeles Unified School District M&O POLARIS Work Management System rev.4 1 POLARIS Work Management System introduced: Polaris is a new Maintenancee and Operations Work Management System that will allow
user guide Tablet 2013 by Sysco. All rights reserved
 user guide Tablet 2013 by Sysco. All rights reserved welcome to sysco counts Time is money in the foodservice business and every second counts literally! Sysco Counts simplifies taking inventory and ordering
KRONOS TRAINING MANUAL
 KRONOS TRAINING MANUAL Student and Temporary Employees PILOT (TEST) GROUP Department of Human Resources 210 East First Street Greenville, NC 27853-4353 Table of Contents Introduction to Kronos... 2 Logging
Quick Reference Card for Payroll Administrator
 Time & Attendance Quick Reference Card for Payroll Administrator Per Pay Period Navigator isi Version 7.0 The following instructions describe a typical Navigator configuration. The names and location of
Deltek Ajera Release Notes
 Deltek Ajera 8 8.08 Release Notes October 21, 2015 While Deltek has attempted to verify that the information in this document is accurate and complete, some typographical or technical errors may exist.
Price Setup Wizard: How to Make Global Updates to the Pricebook
 Price Setup Wizard: How to Make Global Updates to the Pricebook ServiceTitan Best Practices When it s time to update prices in your Pricebook, ServiceTitan can automate the process for you. Using the Price
Timekeeper s Manual. for. Using the. Time and Attendance System (TAS)
") September 29, 2006 Timekeeper s Manual for Using the Time and Attendance System (TAS) Table of Contents Introduction... 3 Part I: Accessing the System Logging into the Faculty/Staff portal... 4 Adding
September 29, 2006 Timekeeper s Manual for Using the Time and Attendance System (TAS) Table of Contents Introduction... 3 Part I: Accessing the System Logging into the Faculty/Staff portal... 4 Adding
OroTimesheet User Guide
 OroTimesheet User Guide www.orotimesheet.com Copyright 1996-2018 OroLogic Inc. Revision 8.57.0 Table des matières I Contents Contents...I OroTimesheet User Guide...1 Presentation...1 Starting off on the
Time, Attendance and Leave (TAL) Training Guide For Supervisors and Payroll Coordinators
 Training Guide For Supervisors and Payroll Coordinators") Time, Attendance and Leave (TAL) Training Guide For Supervisors and Payroll Coordinators Last Updated 5/29/2015 Page 1 Table of Contents 1 Overview... 3 2 Supervisor s Responsibility... 3 3 Payroll Coordinator
Time, Attendance and Leave (TAL) Training Guide For Supervisors and Payroll Coordinators Last Updated 5/29/2015 Page 1 Table of Contents 1 Overview... 3 2 Supervisor s Responsibility... 3 3 Payroll Coordinator
ACD MIS SUPERVISOR S GUIDE
 Notice Note that when converting this document from its original format to a.pdf file, some minor font and format changes may occur. When viewing and printing this document, we cannot guarantee that your
DESKTOP PAYROLL Getting Started Guide
 DESKTOP PAYROLL Getting Started Guide DESKTOP PAYROLL Getting Started Guide Welcome to QuickBooks Desktop Payroll QuickBooks Desktop Payroll gives you the tools you need to efficiently manage your payroll.
INSTRUCTIONAL GUIDE. Timekeeping for Supervisors: Managing Non-Exempt Employees Time MARCH 17, 2017
 INSTRUCTIONAL GUIDE Timekeeping for Supervisors: Managing Non-Exempt Employees Time MARCH 17, 2017 UNIVERSITY OF CALIFORNIA, BERKELEY Kronos Version 8 TABLE OF CONTENTS INTRODUCTION...2 TRAINING...2 ROLES
Managing Your Basic General Ledger Interface Tasks
 General Ledger Interface Managing Your Basic General Ledger Interface Tasks Handout Manual Need support after training? To exchange tips and best practices with fellow users, get on The Bridge an online
Advanced Payroll Release 2015
 Advanced Payroll Release 2015 Disclaimer This document is provided as-is. Information and views expressed in this document, including URL and other Internet Web site references, may change without notice.
CCM 1.1 Field Staff User Guide
 2015 CCM 1.1 Field Staff User Guide COMMON QUESTIONS FOR FIELD STAFF USING CCM ON IPAD ELLIOT CHOCRON CENTRIA HEALTHCARE 41521 W. 11 Mile Rd., Novi MI 248-299-0030 Table of Contents How Do I Sign In?...
Access and explore your company s Directory and organizational structure. Review and download your paystubs and tax forms
 Welcome to Paylocity! We are happy to be able to provide you with all the tools needed to be able to successfully utilize all the features Web Pay and Web Time have to offer. Within this New Hire Packet,