Tivoli Workload Scheduler
|
|
|
- Rebecca Mosley
- 5 years ago
- Views:
Transcription
1 Tivoli Workload Scheduler Dynamic Workload Console Version 9 Release 2 Quick Reference for Typical Scenarios
2 Table of Contents Introduction... 4 Intended audience... 4 Scope of this publication... 4 User interface overview... 4 Using the Dynamic Workload Console... 5 Displaying lists of objects in the plan... 7 Creating and managing workload definitions... 8 Entry points for typical tasks... 8 Typical Scenarios Scenario 1: Creating a Job (Add Time and File dependencies, Edit, Delete) Add Time and File dependencies to a job Edit or Delete a job Scenario 2: Creating a Job Stream (Add Time and File dependencies, Edit, Delete) Adding time dependencies to the job stream To add dependencies to a job stream, you must open the job stream in edit mode in Workload Designer Adding job dependencies to the job stream Edit or Delete a Job Stream Scenario 3: Submitting an Ad Hoc Job into a Specific Job Stream Instance Scenario 4: Defining, Modifying, Deleting workstations, workstation classes (with time zones) Create, Edit or Delete Workstation Classes Scenario 5: Defining, Modifying, Deleting Windows Users Scenario 6: Defining, Modifying, Deleting Calendars and Variables Defining, modifying, and deleting a calendar Defining, modifying, and deleting variable tables Scenario 7: Workstations Handling (Link, Unlink, Limit) Scenario 8: Job Handling (Change Time Dependencies, Cancel, Rerun, and Log) Changing time restrictions Cancelling a job instance Rerunning a job instance Browsing the job log Scenario 9: Job Streams Handling (Resubmit, Change, Time Dependencies) Resubmitting a job stream Modifying a job stream Setting time dependencies Scenario 10: Managing Dependencies (Delete, Release) Deleting a dependency Releasing a dependency Scenario 11: Creating Forecast Plans Reporting with the Dynamic Workload Console Scenario 12: Creating Historical Reports Creating a task to generate a Job Run Statistics report
3 Creating a task to generate a Job Run History report
4 Introduction Intended audience This document is mainly addressed to operators who are not directly involved in configuration and planning activities and are used to work with Tivoli Workload Scheduler using the Job Scheduling Console as the user interface. Scope of this publication The goal of this document is to provide users with basic and quick information to help them run the most common and frequent scenarios using the Dynamic Workload Console. Tivoli Workload Scheduler concepts, configuration and administration tasks are out of scope for the current document. Information about these topics can be found at the following URLs: Information Source URL Description Dynamic Workload Console User s Guide Link to the complete product library Tivoli Workload Automation Media Gallery Tivoli Workload Scheduler wiki A collection of short video to help you be rapidly up and running with the user interface covering the most important scenarios. Frequently updated information about product best practices, scenarios, troubleshooting. IBM Workload Automation Youtube channel loadautomation2 Continuously updated with Workload Automation video demos that show new features and capabilities. User interface overview If you are used to managing the workload using the Job Scheduling Console, this section will help you get familiar with the new interface, the Dynamic Workload Console. The Dynamic Workload Console has the following characteristics: 4
5 It is a Web Portal application It can manage the workload on both z/os and distributed systems at the same time. No need to install and maintain components on each user s PC: only a web browser is required to access the interface. It allows many concurrent users and up to the minute real time monitoring You can share multiple users, engines, and tasks, connecting from multiple workstations without having to install an application on each workstation. Using the Dynamic Workload Console The Dynamic Workload Console interface consists of the following main sections: Page bar Navigation bar Content area 5
6 Content area It is your working area. It displays the panels that you selected in the navigation tree. From each panel you can refer to the contextual online help by clicking in the upperright corner of each page. The opening content area of the Console includes the three hyperlinks shown in the figure above. Select VIDEOS to navigate to a Wiki media gallery where you can find a wide range of how-to videos that show you how to run tasks. Select TOUR to view an orientation tutorial that gets you started on the features of the Console. Select COMMUNITY to navigate to the UI Services community that includes forums, wikis, blogs, and more. Page bar It contains a tab for each active function that you called from the navigation bar. Each time you click an entry of the navigation bar, the corresponding panel is opened in the content area. When you open a new panel, the preceding panels are minimized to tabs on the task bar and you can switch between the panels by clicking on these tabs. Optionally, you can define a list of panels that are automatically opened as startup pages in the task bar each time you log in to the console. To add a panel to your startup pages, open the panel and click Page Actions > Add To My Startup Pages on the upper-right corner of the page bar. Navigation bar It is located on the left, has a tree structure, and contains all the entries to launch Dynamic Workload Console functions. Use the navigation tree to navigate to the panels: Search: Click the icon and provide search criteria to quickly find particular tasks. Search results are dynamically returned and filtered as you type. Favorites: Use to access your daily tasks. Entries previously displayed in the My Tasks list are automatically added to Favorites. To add a task to Favorites, simply drag it to the Favorites icon. Administration: Define and manage object definitions and event rules; submit jobs and job streams; create and list workstations; create and manage jobs and resources on Broker. Planning: Click to work with plans (including trial, forecast, and preproduction). Reporting: Click to create historical, plan, and custom SQL reports and to manage workload reports. System Configuration: Click to manage scheduling engines and settings, set user preferences, and to manage Broker server connection and user preferences. System Status and Health: Select to monitor jobs and job streams, other scheduling objects, event rules, workstations and domains. Select also to monitor objects on Broker. Troubleshooting and Support: Click to open the Workload Support Landing Page. Username: Select to add tasks to the Favorites list, create Credential store keys, view your startup pages, change your password, and log out of the Console. Views: Click to change the current view. Views dictate which product tasks, or pages, are displayed and which pages should open automatically. Administrators can manage views through Console Settings -> General -> Views. Help: Click to access help contents for the console and any installed products and to find details of the version, as well as details for installed products. Contextual help for each panel can be displayed by clicking the same icon on the upper righthand corner of the panel. 6


7 Displaying lists of objects in the plan The Job Scheduling Console used lists as filters that allow objects in the plan to be filtered. There were standard default lists available, or you could create lists specific to your needs. When you created a list, you gave it a name and specified the filtering criteria. When you ran a list, it displayed a filtered table of objects. Almost the same concepts apply to Tasks in the Dynamic Workload Console. In the Dynamic Workload Console, you create and run monitor tasks to obtain a list of objects on which you can perform monitoring and control actions. Creating and running a monitor task means creating a filter and running a search on it. This search returns a list of objects whose attributes satisfy the criteria that are defined in the task. From this list, you can click an item to view its properties or to run actions against it. In this way you can easily change some settings and the processing of the plan. For all the objects in the plan, click System Status and Health Tasks:, then All Configured A set of default predefined tasks is provided under All Configured Tasks: Here you can create a new task that will be saved and added to the list, or edit an existing task modifying its filters. You can also share your tasks to allow other users to run them. 7

8 Creating and managing workload definitions Use Workload Design to create and manage workload definitions and event rules, and to manage SAP jobs and criteria profiles. Select Administration to access the Workload Design menu. Create new and open existing objects. Open existing objects to view and edit Definition and editing of objects Entry points for typical tasks The following table lists some typical tasks you can perform on both the Job Scheduling Console and the Dynamic Workload Console, and the entry points on the user interface for each. This is quick way to get started on critical or frequent tasks for new users to the Dynamic Workload Console who are used to working with the Job Scheduling Console. The Actions list in the Job Scheduling Console is comparable to the portfolio available in the Dynamic Workload Console. The Workload Designer user interface is used for the creation and modification of scheduling objects in the database. To manage scheduling objects in the plan, use the Monitor tasks available in the Dynamic Workload Console portfolio. You can customize the portfolio and the startup page of the Dynamic Workload Console to include only the entries and the pages that you really need to access, reducing the number of clicks required to perform frequent or critical tasks. For more information about customizing the console, refer to 8
9 Table 1. Task Entry point mapping for typical tasks Job Scheduling Dynamic Workload Console Console Creating and Defining Objects in the Database Creating workstations Creating job streams Creating resources Creating job definitions Creating workstation classes Creating domains Creating Windows users Creating calendars Creating prompts Creating parameters Actions list New Workstation Administrator Workload Environment Design Create Workstations Actions list New Job Stream Administrator Workload Design Manage Workload Definitions New Job Stream Actions list New Resource Administrator Workload Design Manage Workload Definitions New Resource Actions list New Job Definition Administrator Workload Design Manage Workload Definitions New Job Definition Actions list New Workstation Class Administrator Workload Design Manage Workload Definitions New Workstation Class Actions list New Domain Not Available Actions list New Windows User Administrator Workload Design Manage Workload Definitions New User Actions list New Calendar Administrator Workload Design Manage Workload Definitions New Calendar Actions list New Prompt Administrator Workload Design Manage Workload Definitions New Prompt Actions list New Parameter Administrator Workload Design Manage Workload Definitions New Variable Table 9
10 Creating forecast and trial plans Actions list Generate New Plan Planning Workload Forecast Create Forecast Plan Planning Workload Forecast Create Trial Plan Generating reports Reporting Workload Reporting Create event rules Actions list Work with Event Rules Administrator Workload Design Create Event Rules Managing tasks (modifying, deleting, submitting) Managing engines Managing workstations Managing job streams In the Work with engines pane, right-click the engine and select Properties. Run a list of workstations do uble-click workstations rig htclick Properties Run a list of job streams doubleclick job stream System Configuration Workload Scheduler Settings Manage Engines Administrator Workload Environment Design List Workstations Administrator Workload Design Manage Workload Definitions Managing resources Managing job definitions Managing workstation classes Run a list of resources doubl e-click resource Run a list of job definitions rightclick Properties Run a list of workstation classes rightclick Properties Quick Open Search Edit Administrator Workload Design Manage Workload Definitions Quick Open Search Edit Administrator Workload Design Manage Workload Definitions Quick Open Search Edit Administrator Workload Design Manage Workload Definitions Quick Open Search Edit 10
11 Managing domains Managing Windows users Managing calendars Managing prompts Managing parameters Managing job stream instances in the plan Managing job instances in the plan Managing workstations in the plan Managing resources in the plan Run a list of domains rightclick Properties Run a list of Windows users rightclick Properties Run a list of calendars rightclick Properties Run a list of prompts rightclick Properties Run a list of parameters righ t- click Properties Run a job stream instance list rightclick select action Run a job instance list rightclick select action Run a Status of All Workstations plan list rightclick workstation sele ct action Run a Status of all Resources plan list rightclick resource select action System Status and Health Environment Monitoring Monitor Domains Administrator Workload Design Manage Workload Definitions Quick Open Search Edit Administrator Workload Design Manage Workload Definitions Quick Open Search Edit Administrator Workload Design Manage Workload Definitions Quick Open Search Edit Administrator Workload Design Manage Workload Definitions Quick Open Search Edit System Status and Health Workload Monitoring Monitor Job Streams System Status and Health Workload Monitoring Monitor Jobs System Status and Health Environment Monitoring Monitor Workstations System Status and Health Workload Monitoring Monitor Resources 11
12 Managing file dependencies in the plan Managing prompt dependencies in the plan Managing domains in the plan Setting an alternate plan Restore a plan Manage event rules Run a Status of All Files plan System Status and Health Workload Monitoring Monitor Jobs select All Jobs in plan and click Run select job and click Dependencies select File Dependencies Run a Status of all Prompts plan list. Run a Status of all Domains plan list right-click domain select action System Status and Health Workload Monitoring Monitor Jobs select All Jobs in plan and click Run select job and click Dependencies select Prompt Dependencies System Status and Health Environment Monitoring Monitor Domains Actions list Set alternate plan Planning Workload Forecast Manage Available Plans select All available plans and click Display Plans List Actions list Restore plan Planning Workload Forecast Manage Available Plans select All available plans and click Display Plans List Actions list Work with Event Rules Administrator Workload Design Manage Event Rules 12
13 Typical Scenarios The following sections outline typical scenarios which can include both critical and frequent tasks Tivoli Workload Scheduler operators carry out when performing their day-to-day tasks. Scenario Scenario 1: Creating a Job (Time and file dependencies) Description Create a job definition in the database, add time and file dependencies to a job, and edit or delete a job. Scenario 2: Creating a Job Stream (Add Time and File dependencies, Edit, Delete) Scenario 3: Submitting an Ad Hoc Job into a Specific Job Stream Instance Scenario 4: Defining, Modifying, Deleting workstations, workstation classes (with time zones) Scenario 5: Defining, Modifying, Deleting Windows Users Scenario 6: Defining, Modifying, Deleting Calendars and Variables Scenario 7: Workstations Handling (Link, Unlink, Limit) Scenario 8: Job Handling (Change Time Dependencies, Cancel, Rerun, and Browse Job Log) Scenario 9: Job Streams Handling (Resubmit, Change, Time Dependencies) Scenario 10: Managing Dependencies (Delete, Release) Scenario 11: Creating Forecast Plans Scenario 12: Creating Historical Reports Define a job stream in the database from the Workload Designer. Create a job from scratch that runs a script on a UNIX workstation, add it to a specific job stream instance scheduled to run the following day, and submit the job stream to run in the current plan from a single point of entry. Schedule a workload to run at any time of the day in geographic locations with different time zones. Define Windows Users in the database from the Workload Designer. Define a calendar or a list of dates which determine if and when a job stream runs. Run a query to display a list of the workstations and then you can navigate the properties and take actions on any of the items in the list. Modify time dependencies, cancel, rerun, and display the job log of a job instance that already exists in the database. Resubmit a job stream instance that already exists in the database into the plan, modify the properties of a job stream instance, and set time dependencies. Define dependencies for both jobs and job streams to ensure the correct order of processing. Create a forecast plan that represents a projection of what the production plan is for a chosen time frame, future, past or a time frame that overlaps with the current production plan. Create a task to generate a Job Run Statistics report or a Job Run History report. 13
14 Scenario 1: Creating a Job (Add Time and File dependencies, Edit, Delete) To create a job definition in the database you must access the Dynamic Workload Console from your web browser and open the Workload Designer. The Workload Designer opens in a separate window and provides an interface from which you can create, edit and delete all the object definitions in the database. In the database you can find definitions of objects that, once included in a plan, are instantiated and run. Follow these steps to create a new job definition in the database: 1. After logging in to the Dynamic Workload Console, Click the Administration icon in the Navigation bar. 2. Select Manage Workload Definitions in the Workload Design menu 3. In the panel that displays next, select an engine and click Go 4. The Workload Designer window opens. In the upper-left pane, click New > Job Definition and select the type of job you want to create, as shown below: 14


15 5. In the right-side pane specify the properties for the new job. Here you specify the general information about the job, the command or script run by the job, and, optionally, the recovery actions that must be taken in case the job fails. In each panel you can refer to the contextual online help by clicking in the action bar on top of the page. Add Time and File dependencies to a job To add time dependencies to a job, you must first include the job in a job stream. Then you add time properties to the job within the job stream. This scenario presumes that the job stream is already in place. To learn how to define a job stream, see the Scenario 2. Proceed as follows: 1. In the Quick Open pane of the Workload Designer window click the job stream icon, optionally enter all or part of the job stream name, using asterisk (*) as a wildcard, and click Search. Job stream icon 15


16 2. Select your job stream from the list and click Edit. The job stream opens in edit mode in the right pane: 3. The job stream opens in the Details view. Right-click on the job stream and select Add Jobs from the context menu: 16
17 4. In the displayed panel, click Search, select the newly created job and click Add to include it in the job stream. The job now appears selected within the job stream, in the Details view, and its properties are open below. 5. In the Job properties pane, open the Time restrictions tab, select Use as time dependency and specify a time. You select this option to indicate that the job must not start before the time you specify in the Time field. Optionally, click the icon to specify a time zone: 17

18 The Earliest start setting is mandatory when you choose to use time as a dependency. Optionally, you can also specify more time attributes, like Latest start, Minimum and Maximum Duration, Deadline and Repeat range. Also, under Delays for days, you can specify an offset in days from the Latest start. in the upper- From each panel you can refer to the contextual online help by clicking right corner. 6. To add a File dependency to the same job, from the Details view, with the same job stream open, right-click the job and select Add Dependencies > File: 7. In the File dependency property pane, specify the properties for the file, such as the file name and path, the workstation on which it is located, and the qualifiers (that are the conditions required to satisfy the dependency). From each panel you can refer to the contextual online help by clicking. 8. Finally, click the save icon on the toolbar to save your changes. Edit or Delete a job When you want to open an existing job definition to modify or to delete it, you must select the job that will then be opened in Workload Design, where you can edit or delete it, provided that you have the required authorizations. Follow these steps to open a job definition in edit mode: 1. In the Quick Open pane of the Workload Designer window click the job definition icon, optionally enter all or part of the job name, using asterisk (*) as a wildcard, and click Search. 18


19 Job Definition icon 2. Select the job from the list and click Edit. The job definition details are displayed in the right-hand pane of Workload Designer. 19
20 3. You can edit the job properties in this panel or you can delete the job definition by clicking the Delete icon. You can use the other icons in the action bar to run other actions on the job definition, like Save, Close, Create Like, Lock or Unlock, and Reload. 20
21 Scenario 2: Creating a Job Stream (Add Time and File dependencies, Edit, Delete) You define a job stream in the database in the Workload Designer panel. Workload Designer opens in a separate window and provides an interface where you can create, edit and delete all the objects definitions in the database. In the database you can find definitions of objects that, once included in a plan, are instantiated and run. Follow these steps to define a job stream: 1. Click the Administration icon in the Navigation bar. 2. Select Manage Workload Definitions in the Workload Design menu 3. In the panel that displays next, select an engine and click Go The Workload Designer window opens. In the Working List pane in the upper-left, click New > Job Stream to display the job stream properties pane. 21
22 4. Specify the properties of the new job stream, such as its name and the workstation where it runs, the validity dates, the variables it uses, whether it is to be monitored, the scheduling options, potential time dependencies and dependency resolution rules. The yellow fields are mandatory. Detailed information is available in the online help that you open by clicking. 5. Finally, click the save icon on the toolbar to save the definition. 22
 as a wildcard, and click Search. Job stream icon 2.")
23 Adding time dependencies to the job stream To add dependencies to a job stream, you must open the job stream in edit mode in Workload Designer. 1. In the Quick Open pane, in the bottom left side, click the job stream icon, optionally enter all or part of the job stream name, using asterisk (*) as a wildcard, and click Search. Job stream icon 2. Select your job stream from the list and click Edit. The job stream opens in edit mode in the right pane, displaying the tabs with the properties. 3. To add a time dependency, select the Time restrictions tab. 23

24 4. Select Use as time dependency and specify an Earliest start time to indicate the time when the job stream is positioned in the plan. Optionally, click the icon to specify a time zone: The Earliest start setting is mandatory when you choose to use time as a dependency. Optionally, you can also specify more time attributes, like Latest start, Deadline and what action must be taken if the job stream starts later than specified. Also, under Delay for days, you can specify an offset in days from the Latest start and the Deadline. From each panel you can refer to the contextual online help by clicking. 24


25 Adding job dependencies to the job stream Designing your workload, you normally create a job stream and then include jobs in it. Some of these jobs can be linked by dependency relationships. When you define a dependency between two jobs, you are saying that the successor job must not start until the predecessor job has completed successfully. Moreover, if in your job stream B you add a dependency on a job that is part of job stream A, you are actually creating an external dependency according to which job stream A is predecessor of job stream B and job stream B cannot start until the job of job stream A has completed successfully. To add a dependency in a job stream, you must open the job stream in edit mode in Workload Designer, as described before. From Workload Designer you can open the job stream in the Graphical View and work with the objects graphically. With respect to the Details view, this is an alternative way of handling objects. Instead of a tree view, you can work graphically, having the same actions and options available: 1. To add a dependency between two jobs of this job stream, select the dependency tool and draw a line from the predecessor job to the successor job: 25

: 3.")
26 The same configuration is displayed as follows in the Details view. 2. To add an external dependency between this job stream and another job stream (or a single job contained into another job stream), right-click the job stream and select Add Dependencies > Job Stream (or Job): 3. From the displayed panel, search for the required object and select it to add it. 26


27 The external dependency will be added in the graphical view as shown below: The same dependency is shown as follows in the Details view: 27

28 Edit or Delete a Job Stream To modify or to delete a job stream in the database, you first select the job stream in Workload Designer, and proceed with your action, provided that you have the required authorizations. Proceed as follows to select a job stream definition in the database: 1. In the Quick Open pane of Workload Designer click the job stream icon, optionally enter all or part of the job stream name, using asterisk (*) as a wildcard, and click Search. Job stream icon 2. Select your job stream from the list and click Edit. 28


29 The job stream opens in edit mode in the right pane, displaying the tabs with the properties. 3. You can now edit the job stream definition or click Delete to delete it. You can use the other icons in the action bar to run other actions on the job stream definition, like Save, Close, Create Like, Lock or Unlock, and Reload. 29

30 Scenario 3: Submitting an Ad Hoc Job into a Specific Job Stream Instance Ad Hoc jobs are jobs that are not defined in the database and that are created to run immediately or very soon. Ad Hoc jobs are used to run a script or command in production. In this scenario you create a job from scratch that runs a script on a UNIX workstation, add it to a specific job stream instance scheduled to run the following day, and submit the job stream to run in the current plan from a single point of entry. The scenario begins with the definition of the ad hoc job, the association with a specific job stream instance, and finally the job submission. This scenario demonstrates the more significant user interface (UI) elements when creating and submitting an ad hoc job into a job stream and does not go into detail for all available elements. Refer to the contextual online help for detailed information on each of the UI elements. 1. Select Submit Ad Hoc Jobs in the Workload Submission menu: 2. In the next panel select the engine and click Go. 30
31 3. The Submit Ad Hoc Job into Plan panel is displayed. Use the tabbed pages to define the job you want to add to the job stream instance. The panel consists of the following tabbed pages: General Task Time Restrictions Resources Prompts Files Internetwork Predecessors Predecessors Refer to the contextual online help for each of these tabbed pages by clicking upper-right corner of each tabbed page. in the a. Define the job as a UNIX job. In Task Type, select UNIX. 31
, skip the Job section and move to the Into section. 4.")

32 b. Specify a valid UNIX user ID that is used to launch the ad hoc job. c. Since you are submitting the Ad Hoc job into a job stream instance (that is, already planned to run), skip the Job section and move to the Into section. 4. In Job Stream, specify the job stream for your ad hoc job. Click to define search criteria that displays a list of job stream instances that correspond to your requirements. For example, to select a job stream instance that is scheduled to run the following day between 3 am and 9 am, define the following criteria: a. Enter tomorrow s date in both From Date and To Date and specify 3:00 am in From Date and 9:00 pm in To Date. b. Click Search to display the job stream instances that match the search criteria specified. c. Select a job stream instance and click OK. 5. Click the Task page to define the UNIX script to be invoked when the ad hoc job runs. 32
.")
33 Type the path and name of the script in the text field including any options and arguments required. 6. Click the Time Restrictions page to specify time restrictions for the ad hoc job. Specify that the job must not run earlier than 3:00 a.m. and at the latest, at 8 a.m. (otherwise it will not complete on time before the working day begins). Also, in the case where the job does not run by the latest start time specified, cancel the job. a. In Earliest Start, select Specify date and time, and specify tomorrow s date 3/19/2015 and time 3:00:00 AM. b. In Latest Start, select Specify date and time and set the date to 3/19/2015 and time 8:00:00 AM. c. In Action, select Cancel. 33


34 d. Click OK. A confirmation message is displayed to indicate the ad hoc job has been submitted into the job stream instance. 34

35 Scenario 4: Defining, Modifying, Deleting workstations, workstation classes (with time zones) You can take advantage of the Time Zone feature to schedule workload to run at any time of the day in geographic locations with different time zones. Thus, from a single location you can view at what time a job or job stream will start or complete without converting the time dependencies to local time. Once enabled, time zones can be specified in the definitions of workstations. To properly resolve time, the time zone specified in the workstation definition must match with the time zone defined on the operating system. If no time zone is specified for a workstation, it will default to the time zone of the master domain manager (referred to as the engine in the DWC); if the master domain manager does not have a time zone specified, it will default to the operating system time zone. Proceed as follows to define a workstation with a specific time zone: 1. On the master domain manager, issue the following command to ensure that the time zone feature is active: optman chg tz=yes 2. On the Dynamic Workload Console, click Administration> Workload Environment Design > Create Workstations, as shown below: 35
36 3. In the panel that follows, select an engine and click Create Workstation: In the Workstation properties panel, together with other information like the name, domain, and type, specify the time zone of the workstation. You must also specify the workstation hostname or IP address to allow Tivoli Workload Scheduler to communicate with it. Refer to the contextual online help for each of these tabbed pages by clicking corner of the page. in the upper-right 36
37 4. If later on, you want to open this or another workstation definition to modify or to delete it, select List Workstations in the Workload Environment Design menu: 5. In the List Workstations panel enter some filtering criteria to find your workstation and click Display: 6. From the displayed list of workstations, select your workstation and click More Actions to create another workstation with the same properties, delete or unlock the workstation. 37

38 Select Edit to edit the workstation definition, New to define another workstation, and so on. Create, Edit or Delete Workstation Classes After creating a workstation, you may want to include it in a workstation class, which is a group of workstations with similar job scheduling characteristics. Jobs and job streams can be assigned to run on a specific workstation class and this makes the running of jobs and job streams across multiple workstations easier. For example, you can set up the following types of workstation classes: Workstation classes that group workstations according to your internal departmental structure, so that you can define a job to run on all the workstations in a department Workstation classes that group workstations according to the software installed on them, so that you can define a job to run on all the workstations that have a particular application installed Workstation classes that group workstations according to the role of the user, so that you can define a job to run on all the workstations belonging to, for example, managers Follow these steps to create a new job definition in the database: 1. Click the Administration icon in the Navigation bar. 2. Select Manage Workload Definitions in the Workload Design menu 38
39 3. In the panel that displays next, select an engine and click Go 4. The Workload Designer window opens. In the Working List pane in the upper-left, select New > Workstation Class, as shown below: 39
40 5. In the right pane, General page, specify a name for the new class and optionally a description that identifies the class characteristics. 6. In the Workstation page, specify the workstations that will be included in the class. Click to add a workstation by entering its exact name or click window to find the workstations you want to add to the class. to open a search 7. If you want to remove workstations from a class, click next to the workstation to remove, or to remove all the workstations. 40
41 Scenario 5: Defining, Modifying, Deleting Windows Users You define Windows Users in the database in Workload Designer. Workload Designer opens in a separate window and provides an interface from where you can create, edit and delete object definitions in the database. In the database you can find definitions of objects that, once included in a plan, are instantiated and run. Follow these steps to define a Windows User. 1. Click the Administration icon in the Navigation bar. 2. Select Manage Workload Definitions in the Workload Design menu 3. In the panel that displays next, select an engine and click Go 4. The Workload Designer window opens. In the upper-left side pane, click New > User as shown below: 41

42 5. In the right pane, specify the properties for the new Windows user. Here, you specify the new user credentials, and, optionally, the workstation where the user can launch jobs. For all the details about each field, click the screen help icon in the Properties bar: 6. Click the Save icon in the action bar. 7. To edit or delete a Windows User definition, open it in edit mode from the Quick Open pane of the Workload Designer by clicking the User icon: 42


43 and clicking the Search button, optionally entering additional data. 8. Select the User and click Edit to modify its properties in the panel that displays on the right. 9. Select the Delete icon to delete the User definition, or one of the other icons in the Action bar for the corresponding action. 43
44 Scenario 6: Defining, Modifying, Deleting Calendars and Variables A calendar is a list of dates which define if and when a job stream runs. A calendar can also be designated for use as a non-working days calendar in a job stream. A nonworking days calendar is a calendar that is assigned to a job stream to represent the days when the job stream and its jobs do not run. Or, it can be used within an inclusive run cycle to define when a job stream runs, or within an exclusive run cycle to define when a job stream does not run. Defining, modifying, and deleting a calendar Follow these steps to define a Windows User. 1. Click the Administration icon in the Navigation bar. 2. Select Manage Workload Definitions in the Workload Design menu 44
45 3. In the panel that displays next, select an engine and click Go 4. The Workload Designer window opens. In the upper-left side pane, click New > Calendar as shown below: A Properties window for the new calendar is displayed: 45


46 5. Specify your requirements as necessary in the panel. a. Type a name for the calendar. b. Type a description. c. Click on one or more days to generate a list of dates that define the calendar. You can also click on Select days of month icon month and repeat them in a specific range. to select days of the 6. Click to save the calendar. 7. To edit or delete the calendar definition, open it in edit mode from the Quick Open pane of the Workload Designer by clicking the Calendar icon: 8. Click Search to list all the calendar definitions 9. Select the definition from the list and click Edit. 46


47 10. When the Calendar definition is open in the Workload Designer, you can edit its properties in the right-side pane or delete it by clicking the Delete icon: Defining, modifying, and deleting variable tables You can customize your workload using variable tables that group global parameters, or variables. Variable definitions are contained in variable tables. A variable table is an object that groups together multiple variables. Using variable tables you can assign different values to the same variable for use in run cycles, job streams, and workstations. This is particularly useful when a job definition is used as a template for a job that belongs to more than one job stream. For example, you can assign different values to the same variable and reuse the same job definition in different job streams saving therefore time and money. 47


48 When you define a variable, you assign it to a variable table because the same variable can be defined in different variable tables with different values. Or a better approach is to create one or more variable tables, specifying a list of variable names and values for each table. To create, modify, and delete a variable table, perform the following steps: 1. Log in to the Dynamic Workload Console 2. Select Manage Workload Definitions in the Workload Design menu: 3. In the displayed panel, select an engine and click Go: 4. The Workload Designer window opens. In the upper-left side pane, click New>Variable Table. 5. In the Properties Variable Table pane, define the variable table. a. On the General tabbed page, enter a name for the variable table and indicate if the table is the default variable table to be used. Enter a description. b. On the Variables tabbed page, click to enter variable name and value pairs to the table. 48


49 6. When you are finished defining variables for the table, click save to save the variable table definition. 7. To edit or delete a variable table, open it in edit mode from the Quick Open pane of the Workload Designer by clicking the Variable Table icon: 8. Search for the variable table you want to edit or delete. 9. Select the variable table from the results and click Edit. 10. When the variable table definition is open in the Workload Designer, you can edit its properties in the right-side pane or delete it by clicking the Delete icon: 49


50 Scenario 7: Workstations Handling (Link, Unlink, Limit) To manage workstations in the plan, you must run a query to display a list of the workstations and then you can navigate the properties and take actions on any of the items in the list. These queries, which in the Job Scheduling Console were called lists, in the Dynamic Workload Console are named Monitor tasks. For more information, see: Displaying lists of objects in the plan. To do it, perform the following steps: 1. Log in to the Dynamic Workload Console 2. Select Monitor Workstations in the Environment Monitoring menu: 3. The displayed table shows all the saved tasks to list workstations. Select a task and click Run to run it as it is. Click Task Properties if you want to customize it editing its filter criteria. 4. If the task is not associated to a specific engine, the engine name is Ask when needed. In this case, you will be now asked to specify the engine connection against which the task must be run (that is, the engine associated to the workstations you want to list). 5. Specify an engine, and optionally save it for the current session to use it for all the tasks you will perform until you log out. 6. The result of the task is shown in the displayed table, whose content depend on the filtering criteria chosen in the task. 50


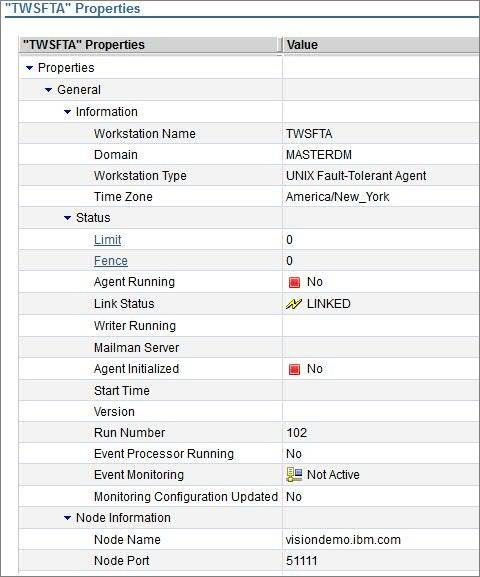
51 Refer to the contextual online help for information about all the options available by clicking in the upper-right corner of the page. 7. Select a workstation from the list to act on it. The most common actions can be done by using the buttons above. Further actions are available in the drop down menu. For example, click More Actions > Limit to set the maximum number of simultaneous jobs on a workstation: System An infinite number of jobs are allowed to run concurrently. Value Indicates the maximum number of jobs that are allowed to run concurrently. Enter values from 0 through If you set this value to 0, no jobs, other than those with High and Go priority contained in job streams in READY status, are launched on the workstation. 8. From the table of workstations, you can also click the workstation name hyperlink to navigate to the workstation properties: 51
52 52


53 Scenario 8: Job Handling (Change Time Dependencies, Cancel, Rerun, and Browse Job Log) There are several ways in which you can manage job instances in the plan. This scenario demonstrates how you can modify time dependencies, cancel, rerun, and display the job log of a job instance that already exists in the database. This scenario demonstrates the more significant user interface (UI) elements when performing these tasks and does not go into detail for all available elements. Refer to the contextual online help for detailed information on each of the UI elements. You can perform the majority of actions on a job instance in the plan from a single view. Run a list of job instances that contains the job instance you want to manage and then select the appropriate action. Follow these steps to perform an action on a job instance in the plan: To cancel a job instance in the plan, perform the following steps: 1. Log in to the Dynamic Workload Console. 2. Select Monitor Jobs in the Workload Monitoring menu, to display list of defined job instances as shown below: 3. The Monitor Jobs panel is displayed. Click the All Jobs in plan (Distributed) task in the Task Name column to run it. This task lists the job instances in the plan. 4. Select the engine associated to the job instances you want to list and click OK. 53

54 The list of job instances associated with the specified engine is displayed in the All Jobs in plan (Distributed) panel. 5. You can perform a number of actions on selected job instances in this view. Select the job instance you want to manage and then perform one of the following actions: Set time restrictions: Click More Actions>Properties. Cancel a job instance: Click More Actions>Cancel. Rerun a job instance: Click Rerun. Browse the log of a specific job: Click Job Log. List job dependencies: Click Dependencies. Release a job from all its dependencies. Click Release Dependencies. Display a list of jobs that have been rerun. Click Show Rerun Instances. Changing time restrictions The following procedure modifies the time restrictions for a job. It demonstrates how to define a time within which a job must start (latest start) and an action to be performed (cancel the job all together) if this latest start time lapses and the job has not yet started. 1. Select the job instance for which you want to set or modify time dependencies and click More Actions>Properties. 54

 if the latest start time lapses and the job has not yet")

55 The properties and the corresponding values for the selected job instance are displayed. From this view, you can edit the following properties related to time restrictions: a. Earliest Start b. Latest Start c. Action d. Deadline 2. Scroll down to the Time Restrictions section. Only an earliest start time has been defined. Define a latest start time and respective action to be performed (Cancel) if the latest start time lapses and the job has not yet started. Click Latest Start. The Time Restrictions panel is displayed. 3. In Latest Start select Specify date and time. 4. Click the calendar button and specify a date and in the time field, enter the time of day for the latest start time. 5. In Action, select Cancel. 6. Click OK to save the changes and return to the properties view. 55


56 7. The time restrictions have been updated on the properties panel. 8. Alternatively, you can edit Time Restrictions if you open the job definition in the Workload Designer. a. Select a job instance from the list of job instances and then click Graphical Views>Job Stream View. b. Right-click the selected job highlighted in the job stream and click Open>Job Stream Definition. The Workload Designer window opens and displays the job stream and its contents. c. Select the job for which you want to set time restrictions and then click the Time Restrictions tab. Select the job Click the Time Restrictions tab d. Make the changes necessary. e. Click the save icon on the toolbar to save the changes. Cancelling a job instance Cancelling a job instance in the plan prevents the job from running. A cancelled job instance can be submitted anytime during the production cycle using an alias name. To cancel a job instance, perform the following steps: 1. From the list of job instances, select the job instance you want to cancel. 56


57 2. From the table toolbar, select More Actions>Cancel. 3. A confirmation message is displayed prompting you to confirm. Click Yes to proceed with the cancel action on the job. Rerunning a job instance To rerun a job instance, perform the following steps: 1. From the list of job instances, select the job instance you want to rerun. 2. From the toolbar, select Rerun. 3. On the job rerun panel, you can optionally specify to substitute the job definition with another one, to rerun the job from a specific step, or specify a date and time from which 57

58 the job can start. You can also assign a priority to the job. Click Rerun. 4. The job instance is submitted to be rerun. Browsing the job log A log file is created for each job instance launched by Tivoli Workload Scheduler. Log files contain header and trailer banners, echoed commands, errors and warnings, and other system information relating to the job instance. You can also choose to print and download the job log details. To view the job instance log, perform the following steps: 1. From the list of job instances, select the job instance for which you want to browse the log file. 58

59 2. The job log is displayed in a new window. You can choose to print the job log, download it, refresh the view, or jump to the end of the job log details. Actions you can perform on the job log 59
60 Scenario 9: Job Streams Handling (Resubmit, Change, Time Dependencies) There are several ways in which you can manage a job stream instance in the plan. This scenario demonstrates how you can resubmit a job stream instance that already exists in the database into the plan, how to modify the properties of a job stream instance, and how to set time dependencies. This scenario demonstrates the more significant user interface (UI) elements when performing these tasks and does not go into detail for all available elements. Refer to the contextual online help for detailed information on each of the UI elements. Resubmitting a job stream You might have the necessity to resubmit a job stream instance for a job stream that was cancelled. A cancelled job stream instance can be resubmitted using an alias. To resubmit a job stream instance in the plan, perform the following steps: 1. Log in to the Dynamic Workload Console. 2. Select Monitor Job Streams in the Workload Monitoring menu, to display list of defined job streams as shown below: 3. The Monitor Job Streams panel is displayed. Click the All Job Streams in plan (Distributed) task in the Task Name column to run it. 4. Select the engine associated to the job stream instances you want to list and click OK. 60

61 The list of job stream instances associated with the specified engine is displayed in the All Job Streams in plan (Distributed) panel. 5. You can perform a number of actions on selected job instances in this view. Select the job instance you want to resubmit and then click Re-Submit. 61
62 The Monitor Job Streams panel displays. 6. Specify an alias for the resubmitted job stream instance in Alias. Click Submit. A message confirms that the job stream instance was submitted successfully. Modifying a job stream To display and modify the properties of a job stream instance in the plan, perform the following steps: 1. Log in to the Dynamic Workload Console. 2. To run a list of job stream instances that contains the job stream instance you want to modify, select Monitor Job Streams in the Workload Monitoring menu. 62
63 3. The Monitor Job Streams panel is displayed. Click the All Job Streams in plan (Distributed) task in the Task Name column to run it. 4. Select the engine associated to the job stream instances you want to list and click OK. The list of job stream instances associated with the specified engine is displayed in the All Job Streams in plan (Distributed) panel. 63


64 5. You can perform a number of actions on selected job instances in this view. Select the job instance you want to modify and then click Graphical View>Job Stream View. A graphical representation of the jobs in the job stream in the plan is displayed. 6. Right-click the job stream instance in the blue area of the larger rectangle containing the jobs and select Open>Job Stream Definition. The Workload Designer displays the job stream instance definition preloaded. From this view, you can edit the job stream definition from the following tabs: General Scheduling options Time restrictions Dependency resolution Setting time dependencies The time restrictions set on a job stream define the times before which, after which, or both, that a job stream cannot be run. Setting both an earliest start time and latest start time defines a timeframe within which a job stream runs. You can also establish a deadline within which a job stream must complete. Job streams that have not yet started, or that are still running when the deadline time lapses, are considered late in the plan. The deadline does not prevent job streams from starting. 64
65 In the following procedure, we will list the job streams available in the plan and then define the latest start time for a job instance. We will also define an action to be performed in the event the latest start time lapses and the job has not yet run. In this particular case, the job stream will be cancelled. To modify the time dependencies of a job stream instance in the plan, perform the following steps: 1. Log in to the Dynamic Workload Console. 2. To run a list of job stream instances that contains the job stream instance you want to modify, select Monitor Job Streams in the Workload Monitoring menu. 3. The Monitor Job Streams panel is displayed. Click the All Job Streams in plan (Distributed) task in the Task Name column to run it. 65
 panel. 5.")
66 4. Select the engine associated to the job stream instances you want to list and click OK. The list of job stream instances associated with the specified engine is displayed in the All Job Streams in plan (Distributed) panel. 5. Select the job stream for which you want to set or modify time dependencies and click More Actions>Properties. The properties and the corresponding values for the selected job stream instance are displayed. From this view, you can edit the following properties: f. Limit 66
 to be performed if the latest start time lapses and the job stream has not yet started.")


67 g. Priority h. Carry Forward i. Monitored j. Start Time k. Latest Start Time l. Action m. Deadline 6. Scroll down to the Time Restrictions section. Only an earliest start time has been defined. Click Latest Start to set the latest time within with the job stream must start and define the action (Cancel) to be performed if the latest start time lapses and the job stream has not yet started. Click Latest Start. The Time Restrictions panel is displayed. 7. In Latest Start select Specify date and time. 8. Click the calendar button and specify a date and in the time field, enter the time of day for the latest start time. 9. In Action, select Cancel. 10. Click OK to save the changes and return to the properties view. 11. The time restrictions have been updated on the properties panel. 12. Alternatively, you can edit Time Restrictions if you open the job stream definition in the Workload Designer. n. From the list of job stream instances, select Graphical Views>Job Stream View. o. Right-click the blue area surrounding the jobs in the large rectangle and select Open>Job Stream Definition. p. Select the Time Restrictions tab and make your changes. q. Click the save icon on the toolbar to save the changes. 67
68 Scenario 10: Managing Dependencies (Delete, Release) A dependency is a prerequisite that must be satisfied before processing can proceed. You can define dependencies for both jobs and job streams to ensure the correct order of processing. In a Tivoli Workload Scheduler network, dependencies can cross workstation and network boundaries. This scenario demonstrates the steps to delete and release dependencies set on job streams. Deleting a dependency 1. Log in to the Dynamic Workload Console. 2. To list job stream instances, select Monitor Job Streams in the Workload Monitoring menu. 3. The Monitor Job Streams panel is displayed. Click the All Job Streams in plan (Distributed) task in the Task Name column to run it. 68
 panel. 5.")
69 4. Select the engine associated to the job stream instances you want to list and click OK. The list of job stream instances associated with the specified engine is displayed in the All Job Streams in plan (Distributed) panel. 5. Select a job stream instance for which you want to delete dependencies and click Dependencies. 69

70 6. A list of dependencies which have not been satisfied for the selected job stream instance is displayed according to the type of dependency. Expand the section for the type of dependency you want to delete. 7. Select the dependency and click Delete. Releasing a dependency To release a job stream instance from its dependencies, perform the following steps: 1. Log in to the Dynamic Workload Console. 2. To list job stream instances, select Monitor Job Streams in the Workload Monitoring menu. 70
71 3. The Monitor Job Streams panel is displayed. Click the All Job Streams in plan (Distributed) task in the Task Name column to run it. 4. Select the engine associated to the job stream instances you want to list and click OK. The list of job stream instances associated with the specified engine is displayed in the All Job Streams in plan (Distributed) panel. 5. Select a job stream instance for which you want to release its dependencies and click Release Dependencies. 71

72 6. A message prompts you to confirm the action of releasing the dependencies. Click Yes to proceed with the action. 72

73 Scenario 11: Creating Forecast Plans The forecast plan is a projection of what the production plan is for a chosen time frame, whether it be a future time frame, a past time frame, or a time frame that overlaps with the current production plan. Forecast plans cannot be run but serve the purpose of providing impact analysis of changes to plans and workloads while reducing trial and error production changes. This scenario demonstrates the more significant user interface (UI) elements when performing these tasks and does not go into detail for all available elements. Refer to the contextual online help for detailed information on each of the UI elements. 1. Log in to the Dynamic Workload Console. 2. To begin defining a forecast plan, select Create Forecast Plan in the Workload Forecast menu, as shown below: The Generate Forecast Plan panel is displayed. 3. Select an engine name and type a plan filename or use the automatically generated plan file name. 4. Optionally, specify the plan start and end date and times and the plan time zone. a. In Plan Start, assign the date and time when the plan starts. If you selected to create a new trial plan and a current plan is available on the selected engine, the plan start fields are grayed out and their value is set equal to the current plan end date and time. b. In Plan End, choose one of the following ways to specify the plan: 73

74 Indicate the date and a time when the plan ends. Indicate the number of days and hours the plan lasts. By default the plan is set to cover a one-day time frame beginning at noon on the following day. c. In Plan Time Zone, choose the time zone to use in the plan. This option is not selectable if you have disabled the management of time zones for your Tivoli Workload Scheduler engine using the optman command line interface (entimezone=no global option setting). 5. Click Generate Plan to generate the forecast plan. A message confirms the plan was created successfully. Click OK. 6. View the forecast plan. To view the forecast plan you just generated, select Manage Available Plans in the Workload Forecast menu: The List Available Plans panel displays. 74


75 7. Select an engine and in Select Plan Type, select Forecast plans. 8. Click Display Plans List to display a list of forecast plans. 9. Select the forecast plan you created from the list and click Set as active. This action sets the selected forecast plan as a temporary active plan that remains valid until the current session expires or until you set another active plan. This setting temporarily supersedes the default plan specified in the engine connection settings. All the tasks run on this engine during the current session are run against this plan. The working plan can be changed at any time. 10. Click Close View to return to the List of Available Plans panel. 11. To view a graphical representation of the forecast plan, select Show Plan View in the Workload Monitoring menu: 75


76 12. The Show Plan View panel displays. Click Show Plan View (Distributed) from the list. 13. Use the selected engine and the default plan specified is the current plan which, for the current session, is the forecast plan you created. Click OK. 14. The Plan View window opens in a separate browser window and displays the Forecast Plan in graphical format. The graphical representation provides a view of the job streams in the plan, indicating information such as the status of the job streams and jobs, and dependency relationships between job streams. 76

77 15. Right-click a job stream to view the actions you can perform. Right-click a job stream to display available actions Some of the actions you can perform are: View the job stream definition. Open the impact view to analyze the impact a job stream and jobs can have on the rest of the plan. Cancel a job stream. View the associated workstation properties. 16. Click to export this graphical representation in a Scalable Vector Graphics (SVG) file. 77
IBM. Dynamic Workload Console User s Guide. IBM Workload Automation. Version 9 Release 4
 IBM Workload Automation IBM Dynamic Workload Console User s Guide Version 9 Release 4 IBM Workload Automation IBM Dynamic Workload Console User s Guide Version 9 Release 4 Note Before using this information
IBM. Mobile Applications User s Guide. IBM Workload Automation. Version 9 Release 4
 IBM Workload Automation IBM Mobile Applications User s Guide Version 9 Release 4 IBM Workload Automation IBM Mobile Applications User s Guide Version 9 Release 4 Note Before using this information and
IBM i Version 7.2. Systems management Advanced job scheduler IBM
 IBM i Version 7.2 Systems management Advanced job scheduler IBM IBM i Version 7.2 Systems management Advanced job scheduler IBM Note Before using this information and the product it supports, read the
KeyedIn Projects Project Manager User Guide
 KeyedIn Projects Project Manager User Guide Version 2.0 July 27, 2012 Project Manager User Guide 1 2012 KeyedIn Solutions, Inc. Welcome to the Project Manager User Guide. This user guide will provide you
Introduction to IBM Cognos for Consumers. IBM Cognos
 Introduction to IBM Cognos for Consumers IBM Cognos June 2015 This training documentation is the sole property of EKS&H. All rights are reserved. No part of this document may be reproduced. Exception:
Chapter Contents. Manage Employers Option Screen
 16: Manage Employers Chapter Contents Create an Employer Account (Registration)... 16-2 Add Employer Locations... 16-6 Assign a Case Manager... 16-8 Add Contacts... 16-9 Assist an Employer... 16-13 Search
ServicePRO + PartsPRO User Guide
 ServicePRO + PartsPRO User Guide ServicePRO Version 2.0 PartsPRO Version 1.0 Page 1 of 82 1 WHAT IS SERVICEPRO + PARTSPRO?... 4 1.1 What is ServicePRO?... 4 1.2 What are the benefits of using ServicePRO?...
Introduction to Cognos Analytics and Report Navigation Training. IBM Cognos Analytics 11
 Introduction to Cognos Analytics and Report Navigation Training IBM Cognos Analytics 11 Applicable for former IBM Cognos 10 report users who access CBMS Cognos to run and view reports March 2018 This training
e-invoicing on the e-prior Supplier Portal
 EUROPEAN COMMISSION DIRECTORATE-GENERAL INFORMATICS Information Systems Directorate e-invoicing on the e-prior Supplier Portal User Manual Version 1.42 Date: 29/02/2012 Author: European Commission, Directorate-
KRONOS EMPLOYEE TRAINING GUIDE
 KRONOS EMPLOYEE TRAINING GUIDE C o n t e n t s Navigating Through Workforce Central... Lesson 1 Timecard Edits... Lesson 2 Approvals... Lesson 3 Reporting... Lesson 4 Editing & Scheduling PTO... Lesson
Change Management. ServiceNow User Guide. Version 2.0 Novmeber, November 2015
 1 Change Management ServiceNow User Guide November 2015 Contact: ITSM@harvard.edu Version 2.0 Novmeber, 2015 Document Change Control VERSION DATE AUTHOR(S) BRIEF DESCRIPTION 1.0 9/30/13 ITSM Team & Third
Table of Contents HOL CMP
 Table of Contents Lab Overview - HOL-1834-CMP - vrealize Suite Lifecycle Manager... 2 Lab Guidance... 3 Module 1 - Introduction to vrealize Suite Lifecycle Manager (30 minutes)...10 Introduction... 11
Deltek Touch Time & Expense for Vision. User Guide
 Deltek Touch Time & Expense for Vision User Guide September 2017 While Deltek has attempted to verify that the information in this document is accurate and complete, some typographical or technical errors
KeyedIn Projects Timesheet Only User Guide
 KeyedIn Projects Timesheet Only User Guide Version 2.0 July 27, 2012 Timesheet Only User Guide 1 2012 KeyedIn Solutions, Inc. Welcome to the Timesheet User Guide. This user guide will provide you with
Scheduler Book Mode User Guide Version 4.81
 Scheduler Book Mode User Guide Version 4.81 Contents Introduction...2 Scheduler Active Tab...2 Appointment Colors and Markings...2 Setting Book Mode...3 Active Tab Options...3 Active Tab Use...3 Active
Deltek Touch for Maconomy. Touch 2.2 User Guide
 Deltek Touch for Maconomy Touch 2.2 User Guide July 2017 While Deltek has attempted to verify that the information in this document is accurate and complete, some typographical or technical errors may
Mobile for Android User Guide
 Version 1.7 Copyright 2013, 2017, Oracle and/or its affiliates. All rights reserved. This software and related documentation are provided under a license agreement containing restrictions on use and disclosure
BI Workspaces User Guide SAP BusinessObjects Business Intelligence platform 4.0
 BI Workspaces User Guide SAP BusinessObjects Business Intelligence platform 4.0 Copyright 2011 SAP AG. All rights reserved.sap, R/3, SAP NetWeaver, Duet, PartnerEdge, ByDesign, SAP Business ByDesign, and
PAYGLOBAL EXPLORER USER GUIDE
 PAYGLOBAL EXPLORER USER GUIDE Table of Contents Revised March 2002 by Ian Johnson (PayGlobal Pty Ltd) to include changes for rate over-rides and breaks. Revised June 2002 by Ian Johnson (PayGlobal Pty
Product Documentation SAP Business ByDesign August Product Development
 Product Documentation PUBLIC Product Development Table Of Contents 1 Product Specifications View... 4 1.1 Product Specifications Quick Guide... 4 1.2 Tasks... 7 Export Business Data Using Microsoft Excel...
Completing an Internal Audit User Guide For the Reliance Assessment Database
 Completing an Internal Audit User Guide For the Reliance Assessment Database Contents Logging into Reliance... 2 Creating an Audit Plan: Planning Your Internal Audit... 4 Approving an Audit Plan... 20
NetSuite OpenAir Mobile for iphone User Guide Version 2.2
 NetSuite OpenAir Mobile for iphone User Guide Version 2 General Notices Attributions NetSuite OpenAir includes functionality provided by HighCharts JS software, which is owned by and licensed through Highsoft
April Microsoft Corp. All rights reserved
 Select the right tools for today and tomorrow. Microsoft Project 2010 offers flexibility and choice by providing tailored work management solutions for individuals, teams and the enterprise. April 2010
Training Guide UAccess Employee. Please Note:
 Please Note: The lessons in this workbook are designed to guide users through specific examples. You will not have the same examples and information in front of you if you are using this material outside
DCC Kronos Supervisor Handbook
 Logging in You can log into Kronos through MYDCC. Select the Working @ DCC tab and then click on the Kronos link located in the upper left hand corner of the screen. If you use the MYDCC portal, you will
DATABASICS Time User s Guide v3.1
 DATABASICS Time User s Guide v3.1 A Guide to CALIBRE s Time Reporting Website July 2016 CALIBRE 6354 Walker Lane, Suite 300 Alexandria VA 22310 1 Table of Contents Before You Get Started... 3 Accessing
IBM Cognos 8 IBM COGNOS CONFIGURATION USER GUIDE
 IBM Cognos 8 IBM COGNOS CONFIGURATION USER GUIDE Product Information This document applies to IBM Cognos 8 Version 8.4 and may also apply to subsequent releases. To check for newer versions of this document,
15/01/2014 Panasonic Parts Ordering User Guide
 15/01/2014 Panasonic Parts Ordering User Guide Panasonic UK, a branch of Panasonic Marketing Europe GmbH 1 15/01/14 Table of Contents Welcome to the Spare Parts Ordering System Bulk Orders 3 Parts Deliveries
Table of Contents HOL CMP
 Table of Contents Lab Overview - - vrealize Business for Cloud - Getting Started... 2 Lab Guidance... 3 Module 1 - Computing the Cost of your Private Cloud (30 Minutes)... 9 Introduction... 10 Overview
RELEASE NOTES MEX V (Build ) MEX Ipswich Road Annerley QLD PO BOX 6118 Buranda QLD 4102
 MEX Ipswich Road Annerley QLD PO BOX 6118 Buranda QLD 4102") RELEASE NOTES MEX V14.0.2.0 (Build 1.0.0.0) MEX 320-326 Ipswich Road Annerley QLD 4103 PO BOX 6118 Buranda QLD 4102 Ph: +61 7 3392 4777 Fax: +61 7 3392 4888 support@mex.com.au www.mex.com.au 1 MEX Version
RELEASE NOTES MEX V14.0.2.0 (Build 1.0.0.0) MEX 320-326 Ipswich Road Annerley QLD 4103 PO BOX 6118 Buranda QLD 4102 Ph: +61 7 3392 4777 Fax: +61 7 3392 4888 support@mex.com.au www.mex.com.au 1 MEX Version
Systems Management Advanced job scheduler
 IBM i Systems Management Advanced job scheduler 7.1 IBM i Systems Management Advanced job scheduler 7.1 Note Before using this information and the product it supports, read the information in Notices,
Product Documentation SAP Business ByDesign February Business Configuration
 Product Documentation PUBLIC Business Configuration Table Of Contents 1 Business Configuration.... 4 2 Business Background... 5 2.1 Configuring Your SAP Solution... 5 2.2 Watermark... 7 2.3 Scoping...
California Institute of Technology
 California Institute of Technology Human Resources Using Kronos Workforce Timekeeper A User Guide for Getting Started with Workforce Timekeeper A Guide for A guide that summarizes the most common manager
Oracle Risk Management Cloud. Release 13 (updates 18A 18C) What s New
 What s New") Oracle Risk Management Cloud Release 13 (updates 18A 18C) What s New TABLE OF CONTENTS DOCUMENT HISTORY 4 UPDATE 18C 4 Revision History 4 Overview 4 Feature Summary 5 Risk Management 8 Common 8 Monitor
Oracle Risk Management Cloud Release 13 (updates 18A 18C) What s New TABLE OF CONTENTS DOCUMENT HISTORY 4 UPDATE 18C 4 Revision History 4 Overview 4 Feature Summary 5 Risk Management 8 Common 8 Monitor
Integrating PPC s SMART Practice Aids with Engagement CS (Best Practices)
") Integrating PPC s SMART Practice Aids with Engagement CS (Best Practices) Select a SMART Practice Aids client engagement for the first time in Engagement CS Prior to launching SMART Practice Aids, open
Integrating PPC s SMART Practice Aids with Engagement CS (Best Practices) Select a SMART Practice Aids client engagement for the first time in Engagement CS Prior to launching SMART Practice Aids, open
Supervisor Overview for Staffing and Scheduling Log In and Home Screen
 Supervisor Overview for Staffing and Scheduling Log In and Home Screen On the login screen, enter your Active Directory User Name and Password, and click the Sign-in button. You will then be taken to your
UPS WorldShip TM 2010
 UPS WorldShip TM 2010 Version 12.0 User Guide The UPS WorldShip software provides an easy way to automate your shipping tasks. You can quickly process all your UPS shipments, print labels and invoices,
Copyright Basware Corporation. All rights reserved.. Vendor Portal User Guide Basware P2P 17.3
 Copyright 1999-2017 Basware Corporation. All rights reserved.. Vendor Portal User Guide Basware P2P 17.3 Table of Contents 1 Vendor Portal Registration... 4 1.1 Register for Vendor Portal...4 2 Vendor
Version /2/2017. Offline User Guide
 Version 3.3 11/2/2017 Copyright 2013, 2018, Oracle and/or its affiliates. All rights reserved. This software and related documentation are provided under a license agreement containing restrictions on
SUPPLEMENTS MANAGEMENT PROGRAM v2.1 Administrator User Guide. Table of contents
 1 SUPPLEMENTS MANAGEMENT PROGRAM v2.1 Administrator User Guide Table of contents Menu Functions Page(s) Pay dates 2-4 Category / Subcategory 5-7 Organizations 7-8 Program Settings 8-9 User Management 10-11
Angus AnyWhere. Reports User Guide AUGUST 2012
 Angus AnyWhere Reports User Guide AUGUST 2012 Table of Contents About Reports... 1 Generating a Report... 2 Exporting Reports... 4 Printing Reports... 5 Tenant Request... 6 Labor Utilization... 6 Lists...
TRUST. Technology Reporting Using Structured Templates for the FCH JU. User Manual for data providers. Version 1.00
 TRUST Technology Reporting Using Structured Templates for the FCH JU User Manual for data providers Version 1.00 Table of contents TRUST ----------------------------------------------------------------------------------------------------------------------------
Costpoint Training Guide: Employee Training Manual. Electronic Timekeeping
 Costpoint Training Guide: Employee Training Manual Electronic Timekeeping Table of Contents: Welcome:... 3 Activating Your Account:... 4 Password Requirements:... 5 Accessing the Portal:... 6 Logging into
Mobile for iphone User Guide
 Version 2.5 Copyright 2013, 2018, Oracle and/or its affiliates. All rights reserved. This software and related documentation are provided under a license agreement containing restrictions on use and disclosure
New World Technologies, Inc Invoice Importer
 New World Technologies, Inc Invoice Importer The Invoice Importer is a tool that allows users of QuickBooks Pro, Premier, Accountant's and Enterprise editions 2010 or greater to import Invoices, Sales
HR Recruiting Solutions
 HR Recruiting Solutions Automated Request to Advertise User Guide Contact Us: web www.csus.edu/irt/acs/services/cms/training/reference.stm phone (916) 278-7337 Service Desk Last updated 4/29/2015 Overview
Bridge. Billing Guide. Version
 Bridge Billing Guide Version 2.5.112 Table of Contents Page i Table of Contents Table Of Contents I Introduction 2 Managing Bill To Parties 3 Creating a New Bill to Party 3 Viewing and Navigating Bill
Exact Synergy Service Management. User Guide
 Exact Synergy Service Management User Guide Exact Synergy Service Management Despite the continued efforts of Exact to ensure that the information in this document is as complete and up-to-date as possible,
BEST PRACTICES. SMART Audit Suite with Engagement CS. Table of Contents. Integrating SMART Audit Suite Working with the SMART Suite...
 BEST PRACTICES SMART Audit Suite with Engagement CS Table of Contents Integrating SMART Audit Suite... 2 Working with the SMART Suite... 4 Create SMART Docs... 7 Using Checkpoint Tools and SMART Audit
Table of contents. Reports...15 Printing reports Resources...30 Accessing help...30 Technical support numbers...31
 WorldShip 2018 User Guide The WorldShip software provides an easy way to automate your shipping tasks. You can quickly process all your UPS shipments, print labels and invoices, electronically transmit
Supervisor and Time Approver Guide to Kronos Time and Attendance
 Supervisor and Time Approver Guide to Kronos Time and Attendance For questions regarding HMC students, please contact: Chi Herrington, SHRM-CP, FPC Human Resources Associate 909.607.79 cherrington@hmc.edu
Productivity. PPS Cart: PulseNet Production Systems. Powerful Tools for Better Performance
 Productivity : PulseNet Production Systems Powerful Tools for Better Performance This page intentionally left blank. I Contents Introduction 1 What is 1 Using this Manual 1 System Setup 2 Open PPS Monitor
Table of Contents. 2 P a g e
 Skilldex Training Manual October 2012 Table of Contents Introduction to Skilldex... 3 Skilldex Access... 4 Sections of Skilldex... 5 Current Program... 6 Toolbox... 7 Employers... 8 New Employer... 9 All
Table of Contents. Bulk General Timesheets Creating Bulk General Timesheets Entering bulk timesheets... 2
 Web Kiosk User Guide Bulk General Timesheets Table of Contents Bulk General Timesheets... 1 1. Creating Bulk General Timesheets... 1 2. Entering bulk timesheets... 2 a. Job Details (Section 1)... 4 b.
ExpressMaintenance Release Notes
 ExpressMaintenance Release Notes ExpressMaintenance Release 9 introduces a wealth exciting features. It includes many enhancements to the overall interface as well as powerful new features and options
Usermanual Active Tracing 3.0. Full Visibility. Complete chain of consignment tracking and paperless proof of delivery
 Usermanual Active Tracing 3.0 Full Visibility Complete chain of consignment tracking and paperless proof of delivery Benutzerhandbuch, November 2009 Seite 2 Table of contents Introduction... 3 1. Access...
Initiating an Equipment Surplus Workflow
 Initiating an Equipment Surplus Workflow Initiator User Guide December, 2014 NOTE: contact assets@gmu.edu for all workflow issues other than access issues ( For access issue, take a look at Accessing Banner
Notice: Falsification of timesheets, whether submitting or approving, can be grounds for immediate termination.
 Employee Functions Time & Attendance Experience the Workforce system from the employee perspective. Learn Workforce navigation fundamentals and functions related to reporting time, activities, and absences
Sage ERP Accpac Online 5.6
 Sage ERP Accpac Online 5.6 Integration Resource Guide for Sage ERP Accpac And Sage CRM (Updated: December 1, 2010) Thank you for choosing Sage ERP Accpac Online. This Resource Guide will provide important
HYPERION SYSTEM 9 PLANNING
 HYPERION SYSTEM 9 PLANNING RELEASE 4.1, 4.1.1, AND 9.2 NEW FEATURES This document describes the new features included in Hyperion System 9 Planning Release 4.1, 4.1.1, and 9.2. This release expands functionality
Aesop QuickStart Guide for Employees
 Aesop QuickStart Guide for Employees This guide will show you how to: -Log on to the Aesop system -Navigate your Aesop home page -Create an absence online -Assign a substitute to an absence* -Attach a
Department of Management Services People First. People First! New Employee Orientation. Working together to put People First! Last Updated
 ! New Employee Orientation Last Updated 09-19-08 Working together to put! Table of Contents Click on the topic to jump to that section. Service Center EEO-Veterans-AAP How to Log in to Emergency Contact
02/13/2017 Scott Baron. 03/23/2017 Scott Baron. 03/23/2017 Scott Baron
 Title: Effective: 09/01/2016 UCF IT Change Management Change Record Procedure Revised: 03/21/2019 Approved By: Michael Sink, Associate VP & COO, UCF IT Page 1 of 56 Revision History Revision (Rev) Date
Using Enterprise etime
 Using Enterprise etime Handout Manual Appendix Automatic Data Processing, Inc. Roseland V11090972216ET61 2009 ADP, Inc. Appendix Using Hyperfind Queries with QuickNavs When your ADP representative sets
Introduction to PtMS IS - the Interactive Scheduler
 Introduction to PtMS IS - the Interactive Scheduler Introduction to PtMS IS - the Interactive Scheduler The PTMS Interactive Scheduler is an automated schedule tool for PtMS for Windows that allows users
Oracle Argus Mart. Administrator s Guide Release 1.0 E
 Oracle Argus Mart Administrator s Guide Release 1.0 E38589-01 April 2013 Oracle Argus Mart Administrator's Guide, Release 1.0 E38589-01 Copyright 2011, 2013 Oracle and/or its affiliates. All rights reserved.
George Washington University Workforce Timekeeper 6.0 Upgrade Training
 Workforce Timekeeper 6.0 Upgrade Training Table of Contents Topic 1: Workforce Timekeeper 6.0 New Features...4 Topic 2: Logging On and Off...5 Topic 3: Navigating in Workforce Timekeeper...7 Topic 4: Reviewing
Table of Contents. Contents. Introduction. Program Setup. Locations. Warehouses. Company Settings. PM Schedule Templates.
 Contents I Table of Contents Introduction...1 Program Setup...1 Locations...1 Warehouses...3 Company Settings...5 PM Schedule Templates...8 Adding Equipment...13 Configuring Last...15 PM Data The Home
Employer Self Service Portal. Employer Self-Service Handbook AASIS Employer Users Version
 Employer Self Service Portal Employer Self-Service Handbook AASIS Employer Users Version June 2017 Blank Page Contents OVERVIEW... 5 How to Use This Manual...7 ESS Roles and Tasks...8 Accessing COMPASS
New Features in EnterpriseTrack 16.1
 New Features in EnterpriseTrack 16.1 COPYRIGHT & TRADEMARKS Copyright 2016, Oracle and/or its affiliates. All rights reserved. Oracle is a registered trademark of Oracle Corporation and/or its affiliates.
Analytics Cloud Service Administration Guide
 Analytics Cloud Service Administration Guide Version 17 November 2017 Contents About This Guide... 5 About Primavera Analytics... 5 About Primavera Data Warehouse... 6 Overview of Oracle Business Intelligence...
IBM TRIRIGA Version Getting Started User Guide
 IBM TRIRIGA Version 10.3.1 Getting Started User Guide Note Before using this information and the product it supports, read the information in Notices on page 82. This edition applies to version 10, release
PIMS User Guide USER GUIDE. Polaris Interview Management System. Page 1
 USER GUIDE Polaris Interview Management System Page 1 September 2017 Additional PIMS Resources Job Aid: Competency Identification Worksheet Job Aid: Legal Considerations When Interviewing Video: How to
A. Locating the Job Requisition:
 Keep in Mind Hiring managers are assigned the role of recruiting screener in Workday, which allows access to review all applicant information. If you do not have access for the job(s) you re hiring for
Scheduling Work at IPSC
 Scheduling Work at IPSC Overview The purpose of this document is to describe and lay out the specific steps for how Work Orders will be scheduled in Maximo at IPSC. In general, Work Orders will be planned
DCC Kronos PC Users Handbook
 Logging in You can log into Kronos through MYDCC. Select the Working @ DCC tab and then click on the Kronos link located in the upper left hand corner of the screen. If you use the MYDCC portal, you will
CCC Wallboard Manager User Manual
 CCC Wallboard Manager User Manual 40DHB0002USBF Issue 2 (17/07/2001) Contents Contents Introduction... 3 General... 3 Wallboard Manager... 4 Wallboard Server... 6 Starting the Wallboard Server... 6 Administering
Pepperi Plugin for SAP Business One
 Pepperi Plugin for SAP Business One April. 2015 Ver 1.1 Contents 1 Introduction...4 1.1 System Requirements... 4 1.2 Glossary... 4 2 System Architecture...5 3 Overview...6 3.1 Installation and Setup...
How to get started with HDPOSsmart? HDPOS smart Tutorials
 How to get started with HDPOSsmart? HDPOS smart Tutorials Now that you have installed HDPOSsmart, you would like to get started with the basics of working with the application. In this document, you get
Warehouse Management System for Adagio Accounting
 Warehouse Management System for Adagio Accounting 1. Create PO in Purchase Orders for Adagio Receiving 2. Import PO from Purchase Orders for Adagio into WMS using ERP Light for Adagio Console 3. Check
Oracle. SCM Cloud Getting Started with Your Manufacturing and Supply Chain Materials Management Implementation. Release 13 (update 18B)
") Oracle SCM Cloud Getting Started with Your Manufacturing and Supply Chain Materials Management Implementation Release 13 (update 18B) Release 13 (update 18B) Part Number E94278-01 Copyright 2011-2018,
Oracle SCM Cloud Getting Started with Your Manufacturing and Supply Chain Materials Management Implementation Release 13 (update 18B) Release 13 (update 18B) Part Number E94278-01 Copyright 2011-2018,
Western Michigan University. User Training Guide
 Western Michigan University User Training Guide Index Significant Changes in Kronos Workforce Central 2 Accessing Kronos 3 Logging Off Kronos 4 Navigating Kronos 6.2 4-5 Timecard Basics 6-7 Visual Cues
ANZ TRANSACTIVE USER GUIDE
 TRANS-TASMAN ANZ TRANSACTIVE USER GUIDE AUSTRALIA AND NEW ZEALAND 02.2013 Version 1.03 Simplifying and connecting your transaction banking across Australia and New Zealand contents INTRODUCTION TO THE
Universal Time Clock TM. QuickBooks Plug-in User Guide
 Universal Time Clock TM QuickBooks Plug-in User Guide Table of Contents Table of Contents...2 Chapter 1: Getting Started...3 Support and Troubleshooting... 3 System Requirements... 3 Installing the QuickBooks
KRONOS ESP SYSTEM MANAGER SELF SERVICE QUICK REFERENCE. Manager Home Page. Sample Manager Home Page
 Manager Home Page When a manager logs in to Workforce ESP Self Service, the first page displayed is the Manager Home Page, which provides: An overview of scheduling-related information Easy access to Credentials,
PJM ExSchedule User Guide
 PJM ExSchedule User Guide Revision: 07 Effective Date: July 13, 2017 Prepared by Transmission Service Department PJM 2017 i Approval and Revision History PJM User Guide: ExSchedule Table of Contents Table
Project Scheduler for Smart Project Management XLGantt User Manual
 Project Scheduler for Smart Project Management XLGantt User Manual Version 1.1.0 http://xlworks.net/ Jun 6, 2017 Contents XLGantt Update History -------------------------------------------------------------
DRM DISPATCHER USER MANUAL
 DRM DISPATCHER USER MANUAL Overview: DRM Dispatcher provides support for creating and managing service appointments. This document describes the DRM Dispatcher Dashboard and how to use it to manage your
A Xymphonic Systems White Paper Anyplan Product Overview
 A Xymphonic Systems White Paper Anyplan Product Overview http://anyplan.co Page 1 2014 Xymphonic Systems AS Contents Contents... 2 Introduction... 2 Who Uses Anyplan?... 3 Common Features, Common Resources...
Tabs3 Quick Start Guide
 Tabs3 Quick Start Guide Tabs3 Quick Start Guide Copyright 2017 Software Technology, LLC 1621 Cushman Drive Lincoln, NE 68512 (402) 423-1440 Tabs3.com Tabs3, PracticeMaster, and the pinwheel symbol ( )
Training Guide. isupplier Training Guide. Oracle E-Business Suite eprocurement Training isupplier Portal for End-Users. Page i
 Oracle E-Business Suite eprocurement Training isupplier Portal for End-Users Revision date: August 22, 2016 Page i Table of Contents Introduction... 1 Objectives... 2 Topic 1: Topic 2: Topic 3: Topic 4:
Kronos Workforce Timekeeper. Time and Attendence System Computer Training Manual
 Kronos Workforce Timekeeper Time and Attendence System Computer Training Manual Prepared by: Amelia Griggs, Information Management 6/14/2005 Table of Contents: A. Introduction...4 Punch to Payroll Process
Shift Swapping Quick-Guide
 Shift Swapping Quick-Guide (v 3.6.0) Shift Swapping Quick-Guide Login to Lawson Workforce Management Self Service: 1. Open Internet Explorer and type in http:// in the address bar to access the Lawson
BlackBerry User Guide
 Version 1.0 Copyright 2013, 2017, Oracle and/or its affiliates. All rights reserved. This software and related documentation are provided under a license agreement containing restrictions on use and disclosure
PeopleSoft Financials epro Process Guide
 epro Process Guide General Stores Requisitions Information Management Client Support Services DCATS 210 567 7777 / Option 5 epro Process Guide Version 2 May 2011 Introduction to the PeopleSoft Financials
Jacksonville Aviation Authority (JAA)
") Oracle Training isupplier for End Users Jacksonville Aviation Authority (JAA) Page i Table of Contents Introduction... 1 Objectives... 3 Topic 1: isupplier Portal and Home Page Review... 4 Topic 2: isupplier
Oracle Training isupplier for End Users Jacksonville Aviation Authority (JAA) Page i Table of Contents Introduction... 1 Objectives... 3 Topic 1: isupplier Portal and Home Page Review... 4 Topic 2: isupplier
EASY HELP DESK REFERENCE GUIDE
 EASY HELP DESK REFERENCE GUIDE Last Updated: May 18, 2017 Contents Chapter 1: Introduction and Solution Overview... 3 Learning Objectives... 4 Navigation and Tool Bars... 4 Accessing Easy Help Desk in
AiM User Guide Work Management Module
 AiM User Guide 2010 AssetWorks Inc. 1777 NE Loop 410, Suite 1250 San Antonio, Texas 78217 (800) 268-0325 Table of Contents AiM User Guide INTRODUCTION... 6 CHAPTER 1: WORK ORDER SCREEN... 7 CHAPTER 1 PART
PowerTrack ios Timesheet Client. Installation and Quick Guide
 PowerTrack ios Timesheet Client Installation and Quick Guide Compsee, a Business Unit of Control Solutions Copyright 2015 1 PowerTrack ios Timesheet Installation The PowerTrack Timesheet installation begins
PeopleAdmin Navigation Reference Guide
 PeopleAdmin Navigation Reference Guide PeopleAdmin Navigation Reference Guide Table of Contents General System Information... 2 System Roles... 3 Non-HR System Roles... 3 How to log-in to PeopleAdmin (PA7)...