Ball State University HR-TMS Training Guide: Staff
|
|
|
- Osborn Preston
- 5 years ago
- Views:
Transcription
1 PeopleAdmin Ball State University HR-TMS Training Guide: Staff Human Resource s Talent Management System March 16, 2017
2 Human Resource s Talent Management System (HR-TMS) and PeopleAdmin As we embrace our role as a model 21st century public research university, we envision our recruitment and hiring practices to be more efficient and convenient for both applicants and hiring managers at Ball State University. We are therefore pleased to have implemented Human Resource s online Talent Management System (HR-TMS). HR-TMS enhances the applicant experience by giving those interested in employment opportunities at Ball State University the ability to apply for positions 24/7 anytime, anywhere, through an online applicant portal. It will also allow hiring managers the online ability to create and maintain job descriptions for their areas, create job postings, view a candidate s application materials, and hire employees. The online system, HR-TMS, is hosted by PeopleAdmin. PeopleAdmin s mission is To help government and education build a better future by providing leading talent management solutions that connect the right people to the right jobs. They focus exclusively on education and government and have cultivated a deep understanding of the needs within these two sectors, which has enabled them to add value to their customers and the communities they support. They are proud to be a recognized leader in talent management solutions designed specifically for education and government. PeopleAdmin works with more than 700 institutions of higher education and has received numerous awards ( We are pleased to offer you this step-by-step training manual for Staff. Other employee groups have their own guides (professional, faculty and service). Should you have any questions about this exciting HR online recruitment initiative or need assistance in completing an action in the HR-TMS, please ERPHR@bsu.edu 1
3 Table of Contents Login Information... 3 Introduction & Home Page... 4 Module Type Definitions... 5 User Group Definitions... 5 Position Management Module... 6 Core Functions of the Position Management Module... 6 Creating a New Position Description (New Position Request)... 7 Modifying an Existing Position Description... 9 Approving a Position Description Action Applicant Tracking Module Core Functions of the Applicant Tracking Module Creating a New Posting Posting Details Supplemental Questions Applicant Documents Posting Documents Guest User Search Committee Members Summary View Job Posting Viewing Applicants/Changing Applicant Statuses Creating a Hiring Proposal Staff Decision Tree Guides Create/Modify New Position Postings Applicant Hiring Proposal

4 Login Information: 1. Website address: or you can find the HR-TMS link on under Additional Tools. 2. You can log in by clicking on the yellow Click Here to log in with your BSU Computer User Name and Password link or you can click on the white SSO Authentication link. Please note: the username and password fields will only be used if you, as an employee, have applied to an open position through the Applicant Portal and set up an account username and password. 3
5 Introduction & Home Page: Ball State University HR-TMS Training Guide: Staff Once you have logged into PeopleAdmin, the Home Page will display an inbox, watch list, and other items where you easily navigate to actions which need your attention. Below is a detailed list of the Home Page and the functions available: Functional Area Location Definition CENTER of Home Page upon log in BOTTOM of Home Page upon log in Displays all items requesting your attention (approval/review). Displays any request you are watching (postings, position actions) for easy access. Columns at TOP of screen Used to update your user account details and online help for using the system. Module Type Selection Upper RIGHT hand corner of screen Used to toggle between the Position Management and Applicant Tracking modules. User Group Selection Upper RIGHT hand corner next to your name Displays the user groups available to you and the arrow will toggle you to each user group. Watch for the following Icons: This icon indicates that there is missing information in a section which must be completed before next action in workflow can be taken. This icon indicates a section is complete, but will still allow editing in some instances. 4
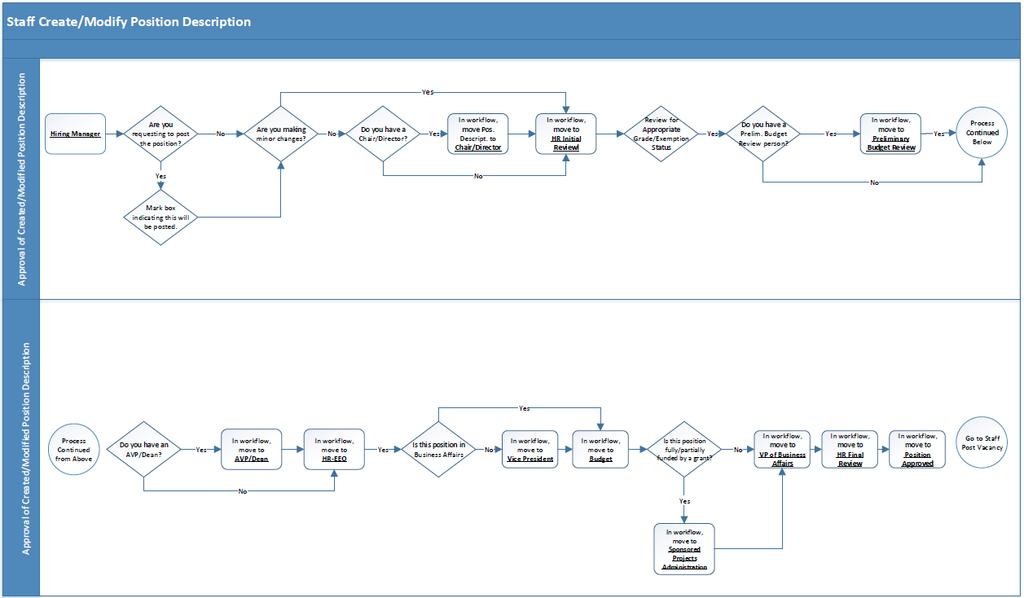
6 Module Type Definitions User Group Definitions Ball State University HR-TMS Training Guide: Staff Used to view Position Descriptions, submit New Position Actions, and Modify Position Descriptions. Used to view Postings, Applicants, and complete Hiring Proposals. Applicant Reviewer: Reviews applicants per posting and forwards actions to Hiring Manager. Hiring Manager: Create a new position action or modify position description. Reviews applicants per posting and approves hiring proposals for new hires. Forwards action to Chair/Director, depending on workflow. Chair/Director: Can initiate a new position action or modify position description. Approves actions sent from the Hiring Manager user group. Forwards action to AVP/Dean user group, depending on workflow. HR-EEO: Reviews applicant pool before campus interviews for candidates are approved. AVP/Dean: Can initiate a new position action or modify position description. Approves actions sent from the Chair/Director user group. Forwards actions to Vice President for review. Vice President: Can initiate a new position action or modify position description. Approves actions sent from the AVP/Dean user group. Forwards actions to Human Resources for initial review. Sponsored Projects Administration: Reviews and approves grant funded position actions. Budget: Reviews and approves all position actions for budget confirmation. Forwards action to the President/VP of Business Affairs user group. President/VP of Business Affairs: Reviews and approves position actions on behalf of the President. Search Committee member: Invited by Hiring Manager to participate in review of candidates and/or interviews. **Please note: Individuals may have only one user group or may be assigned to more, depending on their role within the approval process for actions. Position actions can include: creating or modifying a position description, or approving a position and/or hiring proposal. REMEMBER: if you want to post a position the approval to post is done by creating or modifying a position description in Position Management 5


7 Position Management Module (Orange header background changes to blue when you are in Applicant Tracking module) To select the position management module, click on the drop-down menu button located in the top right corner of the home page and select Position Management. Make sure you are logged in as the correct user group. If not, use the drop-down menu to select correct group and click on the refresh button. Core Functions of the Position Management Module View, create, or modify your Staff position descriptions Access active position description requests 6
8 Creating a New Position Description (New Position Request): Position Management Module 1. Verify you are in the Position Management module and either Hiring Manager, Chair/Director, or AVP/Dean user group. 2. Hover over Position Descriptions and click Staff. 3. Click the button at the top right corner. 4. You will receive a pop-up window to choose the action you would like to start. Click on New Position Description. 5. Enter the proposed Position Title. 6. The Organization Unit section will default unless you have responsibility for more than one department. You will then select from the drop down list. 7. If you have an existing position description within your department(s) you wish to copy or clone, choose that position description from the list at the bottom of the page. This will pull in pertinent information from the cloned position description into this action and allow for edits. 8. Click the Start Position Request button. 9. Complete all required information in each of the sections which are listed on the left hand side of the screen. Please note that if you cloned from an existing position description many of the fields will be prepopulated and ready for you to edit if applicable. 7


9 10. The following is a list of the sections within a new position action that will need to be completed. The sections with a check mark next to the section indicate all required fields have been completed. State justification for new position request. Enter position details such as hours per week, position function, essential job duties, education, and experience required. If a new position is being created, Human Resources will create and enter new position number after position request has been moved to HR in the approval workflow. Identify funding sources for this position. Grant funding is also identified in this section. Select supervisor s position from list. Upload optional supporting documents for the new position action. On the Position Request Summary page, prior to taking action, you will review for accuracy all of the information you entered into the request or make additional edits if necessary. 11. To take action, hover over the Take Action on Position Request button at the top right hand corner of the page and select one of the following: *Please note, to save this request and submit later, please select Keep working on this Position Request. If there are additional approvers within the department, you will need to select the appropriate action per the workflow. 12. You will receive a Take Action pop up window which will send an in Outlook to the next approver to notify them they have an action pending. Please note, comments will be tied to the historical record of this action. Check the box to include the action on your watch list and then click Submit. 13. You will receive a green bar on the top of your page that will state the action was successfully transitioned. 8

10 Modifying an Existing Position Description: Position Management Module 1. Verify you are in the Position Management module and either Hiring Manager, Chair/Director, or AVP/Dean user group. 2. Hover over Position Descriptions menu and select Staff. 3. Search for and select the position description you wish to update. 4. Click the Modify Position Description link within the position summary (upper right hand corner). 5. Click on the modify position description page. 9


11 6. The following is a list of the sections within the Modify Position Description Action that will need to be completed. The sections that have a check mark next to the section indicate all required fields have been completed. Enter your reason for position modification. Update position details. Identify funding sources for this position. Grant funding is also identified in this section. If you are preparing the position description for posting due to a vacancy, you can vacate the current employee that is currently linked to the position description. Select supervisor s position from list. Upload optional supporting documents for the new position action. On the Position Request Summary page, prior to taking action, you will review for accuracy all of the information you entered into the request or make additional edits if necessary. 7. To take action, hover over the Take Action on Position Request button at the top right hand corner of the page and select one of the following: Please note, to save this request and submit it later, please select Keep working on this action. If there are additional approvers within the department, you will need to select the appropriate action per the workflow. 8. You will receive a Take Action pop up window which will send an in Outlook to the next approver to notify him/her an action is pending. Please note, comments will be tied to the historical record of this action. Check the box to include the action on your watch list and then click Submit. 9. You will receive a green bar on the top of your page that will state the action was successfully transitioned. 10
. 3. Locate the title of the Position Description in your Inbox you wish to take action on. Click on the title. 4.")

12 Position Management Module Approving a Position Description Action: 1. Verify you are in the Position Management module and in the correct user group for approval. 2. Click on the Position Requests tab in the Inbox (located on Home Page). 3. Locate the title of the Position Description in your Inbox you wish to take action on. Click on the title. 4. You will then be directed to a Summary Page where you can review for accuracy. 5. To take action, hover over the Take Action on Position Request button at the top right hand corner of the page and select one of the following: *Please note, to save this request and submit later, please select Keep working on this Position Request. If there are additional approvers within the department, you will need to select appropriate action per the workflow. 11
13 6. You will receive a Take Action pop up window which will send an to the next approver to notify him/her an action is pending. Please note comments will be tied to the historical record of this action. Check the box to include the action on your watch list and then click Submit. 7. You will receive a green bar on the top of your page that will state the action was successfully transitioned. 12


14 Applicant Tracking Module (Blue background changes to orange when you are in the Position Management module) To select the Applicant Tracking module, click on the drop-down menu button located in the top right corner of the home page and select Applicant Tracking. Make sure you are logged in as the correct user group. If not, use the drop-down menu to select correct group. Core Functions of the Applicant Tracking Module: 1. Create a posting for recruitment 2. View job postings and applicant materials 3. Create Hiring Proposals Remember you can begin the posting once the position is fully approved or HR can begin the posting for you. 13

15 Applicant Tracking Module Creating a New Posting: 1. Verify you are in the Applicant Tracking module as the Hiring Manager. 2. Hover over Postings and click Staff. 3. In the upper, right corner of the page, click button. 4. A box will appear that will give two options: Create from Posting This option uses an existing posting as a template and automatically copies in most information. Create From Position Description This option copies in most of the information from a position description. *Most positions will be created from a Position Description. Please note: If you are creating a posting for the first time, you will only see the Create from Position Description option. After you have completed a posting, you will from then on have the two options listed above. 14

16 5. Select Create from Position Description to create a posting. This will take you to a page where you may enter a title into a search box or select from a list of approved position descriptions in your department. Once you have located your desired position description, click on the Title. 6. This will take you to a page with the Position Summary. Select button at the top right corner of the page to start your posting. 7. The Position Title and Organizational Unit Division and Department will default automatically from the Position Management module. 8. The Accept Online Applications will be automatically selected. Do not change it. 9. Staff postings will not use the Special Offline Application Instructions feature. 10. Select the checkbox. 11. Click at the top or bottom right side of the page. This will take you to the Editing Posting menu and Position Details page. Hiring Manager must certify posting. Justification for hiring must be completed along with appropriate fields in Posting Detail Information section. Screening questions candidates will be asked when they apply for the position. This section allows you to select which documents will be required to be uploaded with application. Optional - you may upload additional information regarding the posting in this section. Gives guests access to view the posting. Allows you to assign search committee members to the posting. This section allows you to set up evaluative questions for use by you and/or search committee to assist with the selection decision. 15

17 Posting Details 1. Hiring Manager Certification Questions must be completed and are used to certify that the hiring manager has discussed the posting with the appropriate offices. 2. Posting Information: most information is this section will default into the page from the position description. Some fields are either optional or required. Required information will be indicated by a red asterisk and a red box. Editable fields: Position Title; Optional Department Information, and Justification (which is required). Position Function, Duties and Responsibilities, Minimum Education/Experience, and Preferred Education/Experience are not editable. If you would like to edit any of these fields, you will need to follow the Modify Position Description process in the Position Management module. 3. Posting Detail Information: 16

18 Number of Vacancies number of candidates you are looking to hire for this position will usually be one (1). Desired Start Date date that you would like to have someone begin working. Position End Date used for temporary assignments that have an end date. If no end date, leave field blank. Hiring Manager person who will be entering the hiring proposal. Type in last name and select from list. Applicant Reviewer person responsible for managing the applicants through the screening and selection process may or may not be the same as the Hiring Manager can select more than one person. Open Date this is the preferred date to post the position. Close Date indicate the preferred closing date for the posting. (Normally it is 10 days for staff.) Open Until Filled typically you will select No in this field for a staff position. Contact your HR Representative for further information. Special Instructions Summary optional input specific instructions to help the applicant fully complete his/her application. Information may also be entered here to help the applicant understand your department. For staff, the position salary grade can be entered here. Quick Link for Internal Posting link to the posting in the applicant portal. Application Confirmation Message this message is what will be sent via to the applicant once he/she has successfully submitted an application for the position. Supplemental Questions 1. Supplemental questions are available for you to use in order to do some screening of the applicants. If you would like to use a supplemental question, please click on questions from those available by category or by keyword.. You may choose 17

19 2. If you do not see an existing question you would like to ask, Supplemental Questions can be added here. Click on in the bottom right corner of the box. A new Add a Question box will pop up. 3. Enter your name. 4. Status will remain as pending until the questions have been reviewed and approved by Human Resources. 5. Select a category for your question from the drop down list (Education, Experience, Service, Staff, Professional, or Faculty). 6. Enter the question you would like to use in the Question text box. 7. You will need to select which type of answer will be needed for your question: 8. Open ended answers allow the applicants to respond with whatever answers they choose. 18

20 9. Predefined answers allow you to choose the possible responses. Once you select Predefined Answers the Possible Answer boxes will appear. You may enter the possible answers. The default has two answers, but there is no limit. As soon as you enter the first answer in Possible Answer 1 and hit Tab, then a new line will appear as Possible Answer 3 and so on. 10. Once you have selected the supplemental questions you would like to ask, click on submit. 11. In order to make sure the supplemental question required, you must select the required box. 12. If a question has already been approved by Human Resources and is active, you may assign points to each predefined answer. To do so, click on the question name in blue: 13. Enter points for each answer. *You can also choose to make an answer automatically disqualifying. HR recommends that you not use disqualifying, as you will not be able to see applications of the applicants whose answers disqualified them. *If you want to use this option, please consult with HR first. 19

21 Applicant Documents Ball State University HR-TMS Training Guide: Staff Applicant Documents are the documents and information the applicant is required to submit with his or her application. The use of the Optional selection is not recommended, as it may create inconsistency amongst applicants. Select the Required selection for any documents that you would like the applicant to submit for evaluation. Posting Documents Attaching posting documents is optional - you may upload additional information regarding the posting in this section by clicking on the Actions drop down menu and selecting the appropriate action. 20

22 Guest User The Guest User feature is intended for those individuals who are not a Staff or Faculty member of Ball State University but will be serving on a committee for a specific search. You will usually use this feature if you have an outside community member or BSU student on your search committee. A Guest User will be able to view the applicants and application materials for the search he/she is given access to. He/she will not have the ability to make any actions on applicants. 1. To add a Guest User, select Create Guest User Account. 2. A Username and Password fields will appear with a username and password already assigned. If you would like to change the password, update the information in the Password field and select the Update Password button. Enter the address of the guest user and the Username and Password will be automatically sent to them. All Guest Users that are assigned will have the same Username and Password to access the specific posting. 21
23 Search Committee Members Ball State University HR-TMS Training Guide: Staff Search Committee Members will be able to view applicants and application materials of the applicants in the posting they are assigned. 1. To add search committee members, you may search for someone in the database by entering the first name, last name, and/or address under Search. 2. Once you see the employee you would like to add to the search committee, click on the Add Member button. 3. If the employee will also serve as the Committee Chair, you can select the checkbox next to the Add Member button. 22


24 Summary Allows you to take a final look at the posting for accuracy. After you have entered the posting information and have reviewed the Summary: 1. You may then take action on the Posting by using the drop-down menu on the upper right hand side of the page. *Please note, to save this request and submit later, please select Keep working on this Posting. If there are additional approvers within the department, you will need to select appropriate action per the workflow. 2. You will receive a pop up window Take Action which will send an in Outlook to HR to notify them they have an action pending. Please do not select the General HR Account as shown below, but rather the name of your HR Representative. Note: Comments will be tied to the historical record of this action. Check the box to include the action on your watch list and then click Submit. 3. You will receive a green bar on the top of your page that will state the posting was successfully transitioned. 23

25 Applicant Tracking Module View Job Posting: 1. Verify you are in the Applicant Tracking module in the Applicant Reviewer user group. 2. Hover over Postings and select Staff. 3. Locate the posting and click the Actions menu. You have two options view posting or view applicants. Select View Posting. 4. The following tabs are available with additional information associated with your posting: History, Settings, Applicants, Reports, Hiring Proposals, and Associated Position Description. 24


26 Summary shows a summary of your posting. History see the workflow, attached notes or you can add a note, and s associated with the posting. Applicants - to view a single applicant s application, click on the applicant name. To perform bulk functions on applicants, select multiple applicants by checking the boxes to the left of the applicant s name. Click the Actions button in the upper right hand corner of the table for more applicant review options. Review Supplemental Question Answers allows you to see an applicant s results. Download Supplemental Questions Answers allows you to export into Excel for further review. Export Results allows you to export the table of selected applicants into Excel. To update the status of multiple applications in the workflow. Download Applications as PDF will let you choose which documents to combine into a single PDF file (from the selected applicants). Create Document PDF per Applicant will take the selected applications and create one PDF document with their applications and documents. Reports will show you any available reports for that position. To access a report, click on report name. Once the report has run, you will have two options: View Report or Download to Excel. Click on the Actions tab and select how you would like to view the report. If you click on View Report, it will open in a new window. Hiring Proposals will show any hiring proposal(s) associated with the posting. Associated Position Description shows you the position description associated with this posting. If you are logged in as an Applicant Reviewer, this tab is not available. 25

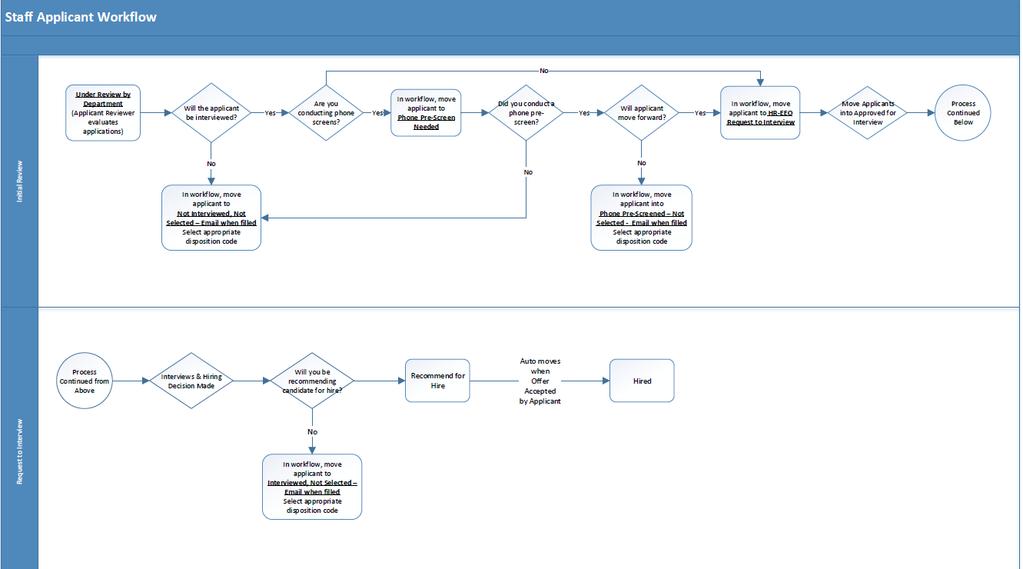
27 Applicant Tracking Module Viewing Applicants/Changing Applicant Statuses: 1. Verify you are in the Applicant Tracking module and either the Applicant Reviewer or Search Committee Member user group. 2. Hover over Postings and select Staff. 3. Locate the posting and click the Actions menu and choose view applicants. 4. Either click on the applicant s name or click the Actions menu for each application and select View Application. 5. Select Take Action on Job Application and select the state you wish to change the applicant to from the menu. 26
, a Take Action box will pop up; and you will need to select the reason.")

 in the Take action on Job Application drop-down menu.")
28 If you choose Select (move to interview), a Take Action pop up window will appear; and you will need to select the appropriate interview type Phone, Campus, or Skype. If you select Do Not Select (move to Not Interviewed, Not Selected when filled), a Take Action box will pop up; and you will need to select the reason. The drop-down menu button will not show; you can either click where it says please select and the reasons will appear or you can click and drag the lower right-hand corner of the box to make the box bigger and the menu button will appear. 6. Make your selection and then confirm by clicking submit in the Take Action pop-up window. 7. Continue the steps until all applicants have been reviewed and moved through appropriate workflow actions to update their status. See workflows on pages for guidance. 8. Once an Applicant Reviewer has identified the candidate to hire, select Recommend (move to Recommend for Hire) in the Take action on Job Application drop-down menu. An will be sent to Human Resources which will initiate the background check. Human Resources will then notify the Hiring Manager when the background check is complete and the Hiring Proposal can be entered. 27

29 9. You can also move candidates in bulk. Make sure the candidates you are moving in bulk are in the same workflow status by using the filter options. Click in the box by each name for the candidates you would like to move. Click on the Actions drop down menu and select Move in Workflow. 10. You can change all applicants at once by clicking on the drop down button and choosing correct workflow. 11. Or, you can change each applicant individually by clicking on the drop down button and choosing correct workflow. 28
30 12. If the action was successful, you will see a green bar indicating the Application was successfully transitioned. 29

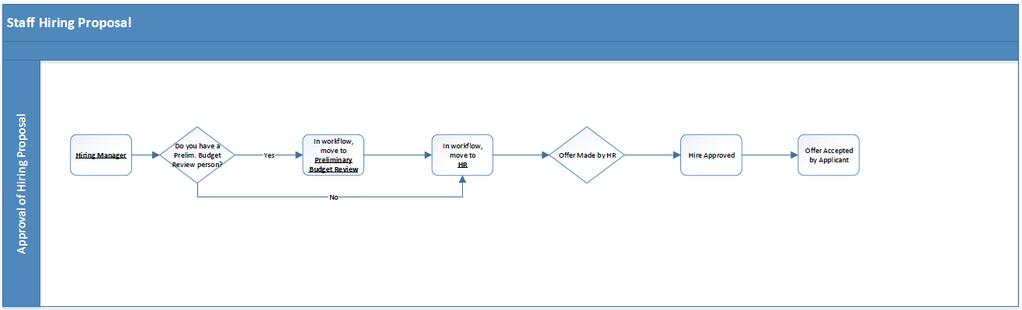
31 Applicant Tracking Module Creating a New Hiring Proposal: 1. Verify you are in the Applicant Tracking module in the Hiring Manager user group and that Human Resources has notified you that the background check is complete and that you may proceed with the hiring proposal. 2. Hover over Postings and select Staff. 3. Locate the posting and click the Actions menu and choose view applicants. 4. Select applicant you would like to start the hiring proposal for by either clicking on his/her name or using the Actions button at the end of his/her line and selecting View Application. This workflow replaces the New Person Identity Form. 30
32 5. Click on Start Hiring Proposal. 6. Position should already be selected; if not, click on the button beside the correct position title. 7. Then click on. 8. The Hiring Proposal will appear in an editing state so that required fields can be filled in. Click on the applicant s name to review the summary and make edits if needed. If you don t know the information listed as optional below, Human Resources will update the Hire Information once the candidate has verbally accepted the position. Employee ID optional - if selected candidate is a current employee and you have the BSU ID number, you can enter it here. Hourly Hire Rate optional if you know the hourly hire rate, you may enter it here. Shift required indicate the appropriate shift: 1, 2, or 3. HR Rep Phone Number optional if you know the HR Rep s phone number you may enter it here using the XXX-XXX-XXXX format beginning with area code. Job Change Reason required select appropriate job change reason from the using the drop-down button. Start Date first day of work for the selected candidate. End Date optional for use if this is a temporary position. Justification for Selection of Candidate required specific reasons for selecting this candidate. If applicable, how does this meet your department s diversity plan? Employee s Building/Room enter the building and room number the new employee will be working in. Employee s Phone enter the telephone number for the new employee. Supervisor Certification required - the Chairperson/Administrative Head of the department needs to certify that the work experience, employment, references, and education requirements have been met, as well as indicate if this candidate will be working with minors. 31

33 9. Hiring Proposal Documents optional this can be used to add any additional documents requested by Human Resources. 10. The Hiring Proposal Summary allows you to review the hiring proposal and make any necessary edits before you take action on it. Once all fields have been checked and the required fields completed, click on Take Action On Hiring Proposal. You can either keep it at your stage of the workflow if you are waiting on additional information or you can move it to Human Resources for approval. 11. If there is not a Preliminary Budget Review level for your area, select Submit (move to Human Resources), 12. When you Take Action a box will pop up in which you can add an optional comment or just click submit. You can also add the Hiring Proposal to you watch list at this point. 13. If the action was successful, you will see a green bar indicating the Hiring Proposal was successfully transitioned. 32
34 33
35 34
36 35
37 36
38 37