How to Enter a Purchase Requisition. On the Cal Poly Portal click CSU Portal- Financial Administration
|
|
|
- Shavonne Gibson
- 5 years ago
- Views:
Transcription
1 How to Enter a Purchase Requisition On the Cal Poly Portal click CSU Portal- Financial Administration Pro Tip: Internet Explorer is the recommended web browser for optimal system function. 1

2 Click on the diamondshaped NavBar icon at the top right of the homepage, then follow this path: Navigator 2
3 Purchasing 3
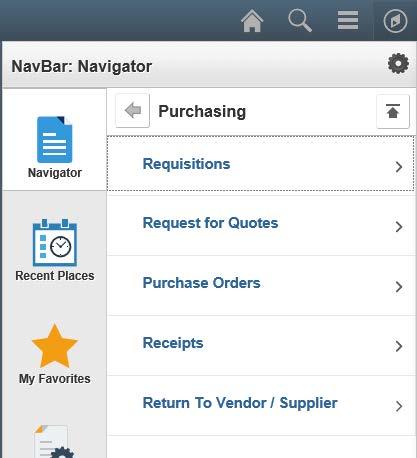
4 Requisitions 4
5 Add/Update Requisitions 5

6 This is the Add/Update Requisitions page. Pro Tip: To find this page easily next time, use this drop down found at the top right of this screen and choose Homepage or Favorites. On the Add a New Value tab click on Add (Do Not change the Business Unit or Requisition ID fields) Click OK through this message 6

7 This is the main requisition page. Pro Tip: Use the Personalize hyperlink to show only what you need to see here. On the pop-up screen scroll down and click Copy Settings. Click the magnifying glass and choose SLO_REQ_ PERSONALI ZATION then click OK and then OK again. You will only have to do this once. Back on the main requisition page click the Requisition Defaults hyperlink to begin entering the required information. 7
8 Complete the highlighted fields using the magnifying glasses and the pop-up screens. Pro Tips: 1. Your Buyer (Procurement Specialist) is easily found by typing 15 in the Buyer begins with field and then clicking Look Up. 2. When in doubt choose No Vendor in the Supplier field (it is the first one listed). 3. In the Category search, services begin with a 9 and all other numbers (1-8) designate a physical item. Enter your designated Procurement Specialist here for fast assignment to the correct person. Do not enter more than four letters or characters when searching for a Supplier Common Units of Measure are LOT or EA You can also use the Personalize hyperlink to change the way the Distribution fields appear here. In the pop-up screen select Fund, Dept, etc. on the left side and use the up and down arrows to rearrange their order, then click OK. You MUST enter a Fund and Dept here. Account is optional and will default to If your funding source has an optional Program, Project or Class number, enter them here. 4. Only enter a Due Date if a certain date is important. Once this page is completed click OK 8
9 You will be back on the main requisition page. After populating the fields highlighted in red, click Refresh. This will autopopulate the remaining fields. This is the minimum amount of information to click Save and obtain a Requistion number. The word NEXT will be replaced with the requisition number. Requisition numbers begin with the number 1. For example Please make note of your requisition number. Pro Tip: The system times out often so it is important to save at this point. 9

10 You can add more lines to the requisiton by selecting the + at the far right side. In the pop-up screen enter in the number of lines you would like to add then click OK. Pro Tip: Use a minimal number of lines, but enough to be clear and also reflect the vendor s quote. Use separate lines for unique types of items such as goods vs. services vs. shipping. You do not need to add a line for sales tax. Sales tax will be reviewed and assigned by your Procurement Specialist to applicable lines. 10

11 The lines will be added. Continue populating the required fields and clicking Refresh to auto-populate the remaining fields. When finished adding lines, click Save. For a line item with a different category type than entered in Requisition Defaults, change the category number on that specific line at this time. Click on the Add Comments hyperlink to attach backup paperwork. Pro Tips: 1. Backup paperwork includes items such as: the vendor s quote, other quotes you received for comparison, an approved building permit, or new vendor form/w Do not use line comments. 11

12 Use the blank space to type anything you would like your Procurement Specialist to know about your purchase. Pro Tips: 1. This is a great location for the vendor contact name, address and phone number. 2. It is not necessary to select the Send/Show checkboxes. Click Attach to add your backup. Click Browse first to find your file and once the file is selected, click Upload. 12
13 If you have another file to attach Click the + at the right side to add another comment box. Pro Tip: If View All displays as a hyperlink, there is more than one comment box. Click the View All hyperlink to show all boxes. If you are finished attaching all backup documentation, click OK. 13
14 You will now be back on the main requisition page. Click Save. Your requisiton is complete. Pro Tip: If you need to update something specific later in the requisition, select the Hold From Further Processing checkbox. It will not be made available to your approving official and you will be able to come back and make the update. Once you are finished with the update, unselect Hold From Further Processing and click Save. The requisition will now be available to your approving official. 14
15 Communicate the requisition number to your approving official with your approval request. They will not receive an automatic notification. Your approving official must approve and budget check the requisition before your Procurement Specialist can see it in their workflow. When the requisition is fully approved the Status will show as Approved and the Budget Status as Valid. If the requisition shows Status Open and/or Budget Status Not Chk d, it is not fully approved by the approving official. If you do not know who your approving official is call Valerie Maijala at Please allow approximately 10 days for processing. Call your designated Procurement Specialist or with any questions. If you or your approving official receive an error message when accessing a requisition, you might need to update the Accounting Date on the main page before proceeding. The Accounting Date must always be a date within the current month. 15
, or by Requisition ID.")
16 Bonus Pro Tips: 1. Requisition numbers start with a 1, and Purchase Order numbers start with a Once a requisition is saved, you can search for it from the Add/Update Requisitions page on the Find an Existing Value tab. Search by Requester Name (last name), or by Requisition ID. To avoid typing all of the digits of the requisition number in the Requisition ID field, type a % and only the last 5 digits of the requisition number. This is also where your approving official will search to approve your requisition. 16
17 3. You can also search for a requisition in Requisition Inquiry using this path on the NavBar: Purchasing, Requisitions, Review Requisition Information, Requisitions. Searchable fields include: Requisition ID, Requester Name, or Supplier Name. Please note, this is not where your approving official approves your requisition. It is for inquiries only and contains very limited information. 17
18 4. To cancel a requisition, go to Add/Update Requisitions and search for it on the Find an Existing Value tab. On the main requisition page, click on the red X in the upper righthand corner and then click Yes at the popup message. You may not have the ability to cancel the requisition if your approving official has accessed or approved the requisition. If your approving official is also unable to cancel the requisition, please request assistance from your designated Procurement Specialist. 18
19 5. To update the chartfield on a specific requisition line, click the Schedule icon on the main requisition page for the line you want to update. On the Schedule page click the Distribution icon. Make any updates to the chartfield on the Distributions page. This only affects the chartfield for the selected line item. Use the Personalize hyperlink on this page to rearrange the order of fields here. 19

 you would like to use.")

20 6. To split a requisition line amount using two or more chartfields, follow the directions from tip #5 on the previous page. On the Distributions page, use the + at the far right of the screen to add one or more rows at the prompt. Then add the other chartfield(s) you would like to use. If you would like to split by a dollar amount rather than a percentage, click on the Distribute By drop down. Change from Quantity to Amount. Adjust the Merchandise Amount fields to reflect the desired split. 20