Code: [MU-HR-8-A] Title: Separations and Terminations
|
|
|
- Clifford Parrish
- 5 years ago
- Views:
Transcription
![Code: [MU-HR-8-A] Title: Separations and Terminations Description: W-2 s are processed, electronic files have been submitted, or will be on their way shortly.](/docs-images/87/96190540/images/1-1.jpg "This is about the time that we begin to think about moving those employees that were terminated or inactivated in 2011 into the Munis Terminated files.")
1 Code: [MU-HR-8-A] Title: Separations and Terminations Description: W-2 s are processed, electronic files have been submitted, or will be on their way shortly. This is about the time that we begin to think about moving those employees that were terminated or inactivated in 2011 into the Munis Terminated files. This session will review that process as well as some of the concerns that come with this move. We will also review the Separations and Terminations menu, including the Early Teacher Leave Payout program. When the participant has completed this course, they will have a better understanding of the Munis Terminated files and how they are used.
2 Table of Contents Section 1: Separations and Terminations Overview:... 3 Prerequisites:... 3 Concerns of Terminating Employees:... 4 Saving vs. Deleting Pay and Deduction Records:... 4 Tracking a termination through Personnel Actions:... 4 Timing of the termination process:... 7 Terminating Employees:... 7 Terminated Employee Programs... 9 Checklists for Terminating Employees:... 9 Rehire Process: Section 2: Early Teacher Leave Payout Overview: Prerequisites: Process:
3 Section 1: Separations and Terminations Overview: The process of terminating employees is designed to remove the employee from the daily live payroll tables and send all of the employee records and history to the Terminated Employee files. The terminated files are reflected on the Munis data tables with a proj code of 1, whereas live data has a proj code of 0. When you choose to move an employee into the Terminated files, you are essentially telling the system that you no longer need to include this employee in any Munis processing. Choosing to move the data into the Terminated Employee files, as opposed to deleting the employee, allows you to retain those employee records for the number of years required, without cluttering current employee information. Subsequently, there is no inactive employee data left to mingle with current employee records. Once an employee has been terminated, the data and history can only be accessed from the Terminated Employee programs. The only exception to this is accumulator data. Accumulator data can optionally be included in an Accumulators Report using the Terminated Employees option found under the Report Options toolbar Menu. What this flag does is toggle the Accumulators Report back and forth between the current employee set or the Terminated Employee set. Note that you are still unable to report on the two sets simultaneously. The software does have a safety net in place to protect the integrity of your W-2 reporting. As such, Munis will not allow you to move an employee into the Terminated files when that employee has received pay in the current calendar year. Munis is only able to program this type of behavior at the federal level, as state specific reporting obviously differs vastly from state to state. However, the logic behind this safety net should be included in standard business practices that have been developed involving the Terminate functionality. It is very important that employees are not terminated until after all of their checks have been cleared by the bank and the audit completed from the last year in which the employee was paid. With the exception of the previously mentioned Accumulator Report, payroll reports will no longer include information for terminated employees. Performing an audit after terminating can lead to discrepancies caused by the missing data. The termination process is performed in the Employee Master program using the Terminate option on the toolbar Menu. The event can optionally be recorded to history beforehand by processing the employee through a Personnel Action with an action code that has an action category of T Terminate. Prerequisites: Before you can successfully terminate an employee, you will need to ensure that all of the proper access has been granted to your user account and the employee has been accounted for in all audits and year end processes. You will need to contact your Munis System Administration to obtain the proper permissions if you do not currently have them. Permissions to the Separations and Terminations menu and any Terminated Employee programs that will need to be accessed. Category access to particular information within the Terminated Employees program. A user could have greater or lesser access to live information compared to terminated employee information. Any employee that is being terminated cannot have any accumulator records in the current year. Process is typically done after W-2s have been printed and you are confident that the employee will not be returning. 3
4 Concerns of Terminating Employees: There are some processes and procedures that should be taken into consideration when terminating employees that can help prevent future issues and save you from extra work if a terminated employee should be re-hired. Saving vs. Deleting Pay and Deduction Records: It is not necessary to delete pay and deduction records when moving an employee to the terminated set. It is also not necessary to retain them. Ultimately, the choice is yours. Any issues that arise typically come from rehiring. For instance, one issue that you may find with keeping pays on employee records in the terminated set is that the employee is likely to be changing positions if re-hired. A change in position likely means that pay records need to be revamped and hold the potential for changes in deduction and accrual records as well. G/L account errors could occur if changes to accounts have been made since the last time the employee was paid as well. If rehiring employees isn t done on a regular basis, it s unlikely that you ll encounter these issues on a scale large enough to make them problematic, and it s generally safe to move employee records untouched. If these issues are a concern for you, you may need to take additional steps before terminating an employee, as there is no functionality available that will allow you to move just the Employee Master record. You will only have the option to mass delete or globally end date pay and deduction records prior to moving employees to the terminated set, as the global options do not exist on the terminated side. As such, you may find it easier to perform any desired mass maintenance functions prior to terminating. Deleting on the terminated side means deleting individual records. You do have the ability to setup checklists for the terminate process, which could include a step that ensures pay and deduction records are maintained prior to completing the checklist, if that is your preference. Tracking a termination through Personnel Actions: Employee terminations can be tracked by creating an action that utilizes an action category of T. The process will not actually move the employee to the terminated set for you, but will provide an historical record of when the Employee Master was inactivated and details about the associated termination. Once the action is posted to live, the records in Actions Inquiry and Actions History will supply you with detail about the changes that were made. If you decide to set the specific dates on the records or go through the process of removing pays and deductions, you will have an audit of the changes made. Personnel Actions is a great feature to use to set the dates and remove any unnecessary data that doesn t need to transfer over to the terminated set prior to actually terminating the employee through the Employee Master. Any additional audit trail you can make beyond the Payroll Audit Inquiry program will serve as beneficial if the data ever needs to be reviewed. This will provide a specific date and contain all changes made to that employee in one location rather than checking a number of different tables through the Payroll Audit Inquiry program. To process through employee actions, ensure that you have an Actions Code setup that uses the category of T. You will also want to be sure that the Action History Default option is selected on the Action Code(s). This will ensure that an Action History record is created when the action is processed. 4

5 Once all necessary codes have been established, proceed to the Actions Entry program. Click add to add the employee who is going to be terminated into the Actions Entry program, define the proper action code, and save the record. You now have the option to go into the Pending Employee Master record and populate any dates or make any changes necessary to note that this employee is going to be terminated (for example, changing the Status from Active to Inactive and/or populating a Terminated date on the Dates tab). You can also go into the Pending Employee Deductions and Pending Employee Job/Salary to remove any pays and deductions that don t need to be retained. 5

6 After all changes have been made, close the Pending Employee Master program and release the action. If workflow is used, the record will go through the workflow process and if not, it can then be output-posted, giving you a proof of the changes made. 6
7 After reviewing the proof, you can say no to posting and make any further changes, or you can say yes and post the new information over to the Employee Master record for this employee. Timing of the termination process: The timing of the termination is important. You will want to ensure that all year end processes, audits, and check reconciliation information has been finished and gather before moving the employee to the terminated set. The termination process is going to move the employee period and history information from the current live set to the terminated set, which means any reports beyond the Accumulators Report, or any information that needs to be gathered from the payroll process will need to be obtained prior to the termination. The audit piece is particularly important since all employee history and period information will no longer exist in the live dataset, meaning history reports and any payroll reports will no longer include this employee, potentially throwing amounts off. If information does need to be gathered for this employee, you can either activate the employee again, or run the specific reports for that employee s information from the terminated menu. Lastly, all of the employee s check information will move with them to the terminated set, so if any checks for an employee have not been cleared, once they are in the terminated set, the only way to clear those checks would be to activate the employee again, clear the checks, then terminate them again. Terminating Employees: The process for terminating employees is quite simple. Open the Employee Master program and perform a find for the employee or employees that need to be terminated. This can be accomplished by entering a range of employee numbers, searching on a Status of Inactive, or searching by dates in either the Terminated or Inactive date fields, assuming they were previously populated. Next, you ll select the Terminate option from the toolbar Menu. 7
8 This process is a proof/post process, meaning the system is going to give you a proof of the action taking place on all employees in the active set before prompting you to post the employees over to the terminated set. A code in the Reason column on the proof indicates an error. Employees with an error cannot be terminated. There are 3 different reasons why an employee cannot be terminated: CY An employee with pay or deductions in the current calendar year cannot be terminated. LY Employee has pay or deductions from the prior year. For W2/1099 reasons this employee cannot be terminated until February 1. EC Employee has an incomplete checklist. (Checklists can be added to ensure all proper steps are covered for employees being terminated) If the employee can be terminated, the proof will look like this: 8

9 You can confirm if the employees on the report should be moved to the terminated set. The system will also allow you to terminate even if there are employees with errors. These groups of employees will be split up on the proof. Once you select the option to post the information, all employee records and the history for those employees will be moved over to the terminated files. This will also include payroll data for the employee. You will find going back into a payroll and performing a find in Earnings and Deductions will not return any information for this employee since that information has been moved to the terminated set. Terminated Employee Programs Information for employees that have been moved into the terminated employee files can still be accessed from Munis using the Separations and Terminations menu. The Terminated Employee Master, Terminated Employee Job/Salary, Terminated Employee Recurring Pay, Terminated Employee Deductions and Benefits, Terminated Employee Accruals, Terminated Employee User Defined Fields, Terminated Employee Detail History and Terminated Employee Mailing Labels programs allow you to view and maintain terminated employee data, depending on your Category permissions. These programs look and behave just like their live counterparts. The only difference is the fact that they reference that proj code of 1 on the Munis data tables, thereby pulling information for terminated employees only. Checklists for Terminating Employees: You have the ability to setup checklists for employees, which can ensure an employee has gone through the proper procedure for retiring/termination and also can be used as an additional safety net to verify that all steps have been taken for removing certain Munis data before running the termination process. The first step is to setup a checklist in the Checklists program. 9

10 Field Checklist Short Description Long Description Type Job Checklist Steps Step Required Description This box contains a user-defined code that identifies the checklist. Codes can contain up to four characters. This box contains an abbreviated description of the checklist. The short description can contain up to 10 characters. This box contains a full description of the checklist. The long description can contain up to 30 characters. This list specifies the category of the checklist. A checklist can be a Case Management, Personnel Action, Applicant, or Employee Type. This box identifies the job class associated with the checklist. Type the job class or click the help button to select a job class from a list of valid job class codes. This list indicates the step in the Checklist Steps table. Checklist step codes (CLST) must exist in the Payroll Miscellaneous Codes program. Click the folder button to open Payroll Miscellaneous Codes to maintain codes. You can enter multiple checklist steps. Use the arrow buttons next to the table to change step order. This check box indicates when a checklist step is required. If the check box is selected, you must complete that step in the process before moving to the next step. Once the checklist has been added into the system, you have the ability to add the checklist to the employees that you already know will be terminated. To accomplish this, find the employee in the Employee Master, click the Checklist button at the bottom of the screen, and add the new checklist to the employee. 10

11 After the checklist is attached to the employee, you will be required to update the record as the steps are completed and select the Complete checkbox. Since they are all required in this example, the system won t allow you to terminate this particular employee until all are marked as complete. Rehire Process: Moving an employee into the Terminated files doesn t mean they can never work for you again and it doesn t mean that you need to create another employee number for them if they do. If you rehire an employee that you had previously moved into the Terminated files, you have a couple of different options. You can either process the reinstatement through an action using an action code with the R Reinstatement action category on it, or you can add them back directly through the Employee Master. The action process and Employee Master add process will function the exact same way. The only difference between the two is the additional history records provided with the actions process. These can be used to illustrate the termination and reinstatement history for this employee in one location. When processing the employee through an action, you will want to make sure that the action code that is being used is attached to the R Reinstatement action category, which is specifically designed to check and see if the employee you are entering the action for exists in the terminated set and not in the live set. If the employee is not in the terminated set, the system will display an error message and will not let you proceed. 11


12 A common misuse of this action category is when someone is trying to rehire an employee that is not in the terminated set. The active employee piece of the error message is not specifically checking the status of the employee; it is confirming that they exist in the terminated set... The screenshot below is indicating that the employee is terminated and that the re-hire action code will work. 12


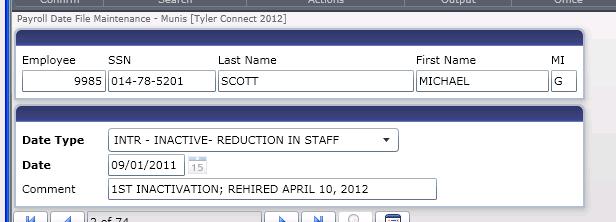
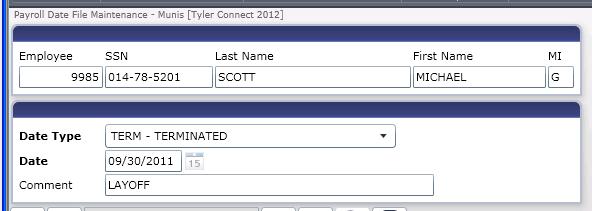
13 At this point, the process of re-hiring an employee is the same whether you re doing it from the Pending Employee Master within an action or you ve accessed the Employee Master program directly. Select the Add icon and enter the employee number of the employee who is currently terminated. If the employee does exist in the terminated set, the following message is received: If you say yes, the system will move the employee from the terminated set to the live set and will allow you to continue updating the record to make any changes to information and remove any dates and reason codes. **NOTE** Munis does not recommend leaving Inactive or Terminated Dates and/or Reason codes in the Employee Master when you re-hire someone from the Terminated files. Doing so can cause problems once the employee is rehired; most often with state specific reporting. If you d like to retain this data for historical purposes, it should be recorded to Payroll Date File Maintenance using the Other Dates folder on the Dates tab in the Employee Master program. You have the ability to record this information in Payroll Date File Maintenance using a custom date type. Custom date types are created in the Miscellaneous Codes program with a Miscellaneous Type of DATE- User Defined Date Type. If Reason code is meaningful to you, the recommendation would be to create one custom code for each Inactive and Terminated Reason code or to utilize the Comment field available in the Payroll Date File Maintenance program. The Comment field can be useful whether Reason code is meaningful or not. This information can be pulled into Excel through an export from the Payroll Date File Maintenance program for a single employee or incorporated into Crystal or SSRS reports using the prdatefl table. Example: 13

14 14
15 Section 2: Early Teacher Leave Payout Overview: The final program available from the Separations and Terminations menu is the Early Teacher Leave Payout program. This program allows you to calculate the amount owed to a teacher who leaves mid-year. The process is generally used by schools and primarily for teacher salaries. The system will use the earnings history records for the employee to determine the amount that has already been paid to the employee. The program is a proof/post program, allowing a user to review the information that is going to be posted for the employee prior to accepting it. The processing done by this program will work with any calc codes that can function with calendars, and if calendars are not in use, then a default calendar can be setup and utilized for this process. Prerequisites: Before you can successfully use this program and process an Early Teacher Leave Payout, the proper permissions and menu access needs to be established by your Munis System Administrator. Access to the Pay Master program will be necessary to setup a new pay type specific to this process. Access to the Early Teacher Leave Payout program under the Separations and Terminations menu. Access to the Calendars program to add any default calendars or maintain current calendars. Access to Employee Job/Salary to review information posted over by the proof/post process. Process: You will want to start by creating a pay type that is specific to this process and will identify their final lump sum payment. This pay can be setup as a flat amount lump sum with a category of additional comp or miscellaneous/other pay. 15
16 Next, go to the Employee Job/Salary program, find the employee, and update the base pay record s end date to reflect their final day of work. Once the employee pay records have been updated to ensure the employee won t be paid past their end date, you will need to go to the Employee Teacher Leave Payout program to begin the payout process. 16
17 Field Employee Last Name First Name M I Contract Start Date Termination Date Earnings Start Date Earnings End Date Default Calendar Additional Pays Description This box contains the employee number. This number must exist in the Employee Master program. These boxes contain the employee's last name, first name, and middle initial. This box contains the first accountable contract date. This box identifies the termination date. This box indicates the earnings start date. The program uses this date and the Earnings Start Date to gather earnings history information to calculate the Amount Paid on the Detail Maintenance screen. The default value is blank. If you press Tab to move through the box, the program automatically completes it with the Contract Start Date, but you can change it. The program retains the date until you close it. You can update it each time you define the program. This box indicates the earnings end date. The program uses this date and the Earnings End Date to gather earnings history information to calculate the Amount Paid on the Detail Maintenance screen. The default value is blank. If you press Tab to move through the box, the program automatically completes it with the value of the Termination Date, but you can change it. The program retains the date until you close it. You can update it each time you define the program. If you are not using employee calendars, the optional default master calendar. The calendar must exist in the Calendars program. These boxes define the range or ranges of additional pays to include. You can enter up to five ranges of pays. Click Define to open up the fields to enter in the information for the employee who is going to be paid out. See above for the specific information pertaining to the dates. The earnings start and end dates will default in with the contract start and termination date if not defined. The default calendar should also be selected. If calendars are used for specific teachers, ensure that the calendar they are attached to in Employee Job/Salary is defined here. You can also include any additional pays that should be factored into the payout amount. After the define screen is completed and saved, the process defaults you over to the next screen, which is the Early Teacher Leave Detail screen. This process allows you to make changes to the detail records that the system finds and thinks should be paid out to the employee. The detail screen also allows for a report to be displayed that will give detailed information for all job classes, amounts paid, rates, and any days docked. 17

18 The 85 days are gathered from the total work days on the calendar between 07/01/2011 through 10/31/2011, minus any non-work days (weekends, in this case) and holidays. Field Daily Rate Days Worked Days Docked Amount Earned Amount Paid Amount Owed Payout Description The Daily Rate will come from the Employee Job Salary The Days Worked is processed by using the defined Calendar, termination date and the defined contract start date. By subtracting the termination date, the contract start date and using the Calendar, this will give the user the number of days the employee has worked This looks for docked pays that are part of the employee s record. It will determine if it is hours or days depending on the setup. This amount is calculated by the number of days worked * daily rate and, if needed, subtracts docked information This amount is from the contract start date and will include all money paid to the employee since the contract start date. It will look at the employee s earnings history and the check history. This is the calculation between the amount earned and the amount paid This button will take the user to the Early Leave Payout Screen Once the information has been confirmed on this screen and all amounts are correct, select the Payout button to process to the Early Leave Payout screen. You have the ability to pay out all of the jobs the employee works under one pay code, or multiple pay codes can be used and will pay out the defined job class ranges. Up to three different pay codes can be used to pay out different job classes. 18

19 Field Payout Code Job Class Start Date/End Date Description This list indicates the pay type code to use for paying out the contract. Three lists are available; you must select at least one code. The default value is blank. Pay type codes are established in the Pay Master program. The payout codes must be pay type codes with calculation code 60 - Flat Amount - Lump Sum. These boxes indicate the range or ranges of job class codes to define for each payout code. Job class codes are established in the Job Class Master program and are linked to employees through various programs. To include all job class codes, leave the default values (blank to all Z's) in the first set of boxes and leave the remaining boxes blank. These boxes indicate the start and end dates for the pay record for the payout. Click the calendar button in each box to select the dates or you can accept the default dates. After all of the pays are defined and the start and end dates for the new pay records are entered, the system will prompt you to verify that the pay records should be created. 19
20 After yes is selected, the system will display the pays added and which job class they are paying out. This pay records will now display in Employee Job/Salary with the defined start and end dates. 20