Training/User Manual Personnel & Labor Crafts
|
|
|
- Johnathan Dixon
- 5 years ago
- Views:
Transcription


1 Training/User Manual Personnel & Labor Crafts
2 Table of Contents Labor Crafts... 2 Overview... 2 Details... 2 Employees... 3 To add an Employee to a Labor Craft:... 3 Exercises... 4 Employees... 5 Details... 5 Details Tab... 6 Working Hours... 6 Labor Planner... 9 Image Upload Icon (Employees) Work Orders Supervisors Non-Working Days Attachments Exercises

3 Labor Crafts Overview The Labor Craft page in the Personnel Functional Area is used to record and continually maintain all classifications of maintenance personnel by a specific craft, skill level, or function. Through this page, labor crafts are also associated with employees. The fields listed in the Record Navigator are: Labor Craft Code, Description, Rate 1, Rate 2, Rate 3, Rate 4, and Rate 5. Record Navigator (Labor Craft) The Labor Craft designates a single craft or skill level. Implement a numbering scheme that best meets the needs of the departments. For example: MECH01 Mechanic, entry level HVAC02 Heating/Air Conditioning Technician, expert ELEC03 Electrician, supervisor OC01 Outside Contractor Details The Details Tab consists of only labor craft fields. These fields are: Labor Craft Code, Description, Rate 1, Rate 2, Rate 3, Rate 4, and Rate 5. There may be up to five (5) different labor rates for each employee, such as regular time, overtime, and double time. Conversely, each rate could be assigned to a shift. For example: use Rate 1 as first shift, Rate 2 as second shift, Rate 3 as third shift, Rate 4 as time and a half, and Rate 5 as double time or holiday time. Each employee may be assigned to multiple labor crafts. Each labor craft will likely have more than one employee assigned to it. 2


4 Work Orders use labor rates along with hours worked to calculate maintenance costs. Labor crafts are also assigned to tasks and used to link labor and tasks on a work order. For generic-type tasks, all employees should be assigned a general labor craft. Details Tab Employees The Employees Tab consists of a field to add employees to an existing or newly created labor craft. Many employees can be assigned to a single labor craft. 2 Employees Tab To add an Employee to a Labor Craft: 1. Open Labor Crafts from the Personnel Functional Area. 2. Under the Employees tab, select Add and select an Employee from the pop-up. 3. Confirm your selection. 3

5 Exercises Add 3 records to the Labor Craft Master File using the examples below: HVAC Heating/Air Conditioning Technician Rate 1 Rate 2 Rate 3 Rate 4 Rate ELEC Electrician Rate 1 Rate 2 Rate 3 Rate 4 Rate MECH-V Vehicle Mechanic Rate 1 Rate 2 Rate 3 Rate 4 Rate

6 Employees The Employees page in the Personnel area is used to record and continually maintain all personal employee information. Each employee that is to use Proteus MMX should have their information entered in this section. This page is also used to associate existing labor crafts to employees. Before the employee can access Proteus MMX, the Administrator should: 1. Set up the employee in Personnel > Employees 2. Assign a User Login that is established and configured through Rights > Users The fields listed in the Record Navigator are: Employee Number, Employee Name, Start Date, Address 1, Address 2, City, State, Zip Code, Phone Number, Fax Number, Mobile Number, Address, Web Page, Facility, Division, and Department. Record Navigator (Employees) Details The Details Tab consists of an employee s personal and contact information. The fields on this page are: Employee Number, Employee Name, Start Date, Division, Department, Address 1, Address 2, City, State, Zip Code, Country, Phone Number, Mobile Number, Fax Number, Address, Facility, and Web Page. 5

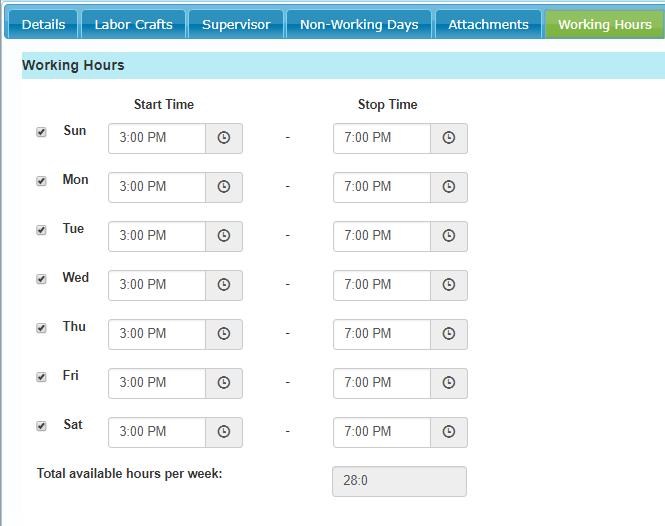
7 Details Tab Working Hours This function gives you the ability to track the schedule of individual employees. You re able to view days of the week the employee works, you can also view the Start Time & Stop Time of each of those days. At the bottom of the page, there s a field named Total available hours per week:. This field gives you the sum number of hours an employee works a week. Proteus MMX gives you the ability to alter the days and hours of work, for an employee. You can do this by: 1. Going to the Personnel module 2. Clicking on Employees, from the drop-down menu 3. Selecting an employee s record from the Employees Navigator 4. Clicking on the Edit icon 5. Clicking on the Work Hours tab (located to the right; next to the Attachments tab) Once you ve reached the Work Hours interface, you can configure the days of work by marking or unmarking the checkboxes, located to the left of the listed days. You can configure the hours of work, by clicking the clock icon, located to the right of the entry field. A pop-up will appear, enabling you to configure the work hours. 6
8
9 5 8
10 Labor Planner The Labor Planner gives you an overview of all employees and their associated labor crafts. It also shows you fields such as Available Hours, Non-Working Days, Hours Remaining, Shift Hours, and Work Day. You can access the Labor Planner in Proteus MMX, by following these steps: 1. Go to the Personnel module 2. Click on Labor Planner Once you ve accessed the Labor Planner, you ll have the option to utilize drop-down menus to narrow your search results for Facility, Location, Week, and Shift. (1) You can also utilize the Search bar, located under the drop-down menus, to find a specific employee. (3) To print the Labor Planner, you will simply press the Print icon located in the top-right corner of the page. (3) (Instructions on next page) 9

11 1 3 2 Labor Planner 10
12 Image Upload Icon (Employees) This ability gives you the option to upload an image of the employee, directly from the detail page. How to Access the Image Upload Icon: 1. Go to the Personnel module drop-down 2. Select Employees, from the drop-down 3. Select an employee s record 4. Click the Edit icon 5. Scroll to the right, to locate the Image icon

13
14 Related Information Work Orders The Work Orders link consists of a read-only listing of the work orders and schedules that have the selected employee assigned to a task. The fields on this page are: Job Number, Work Order Number, Start Date, Activation Date, and Required Date. Labor Crafts Work Orders The Labor Crafts Tab consists of a location to add labor crafts to an employee. Multiple labor crafts can be added to a single employee. The fields on this page are Labor Craft Code and Description 13


15 Labor Craft Tab To add a Labor Craft to an Employee: 1. Open the Employees page from the Personnel Functional Area. 2. Under the Labor Crafts tab, select Add and select a Labor Craft from the pop-up. 3. Confirm your selection and select the Add icon. 14

16 Supervisors The Supervisors tab allows the user to assign a supervisor to the selected employee. The available supervisor list comes from the employees already entered into the system. Note: Employees can only have one Supervisor. To add a Supervisor to an Employee: 1. Open the Employees page from the Personnel Functional Area. 2. Under the Supervisor tab, select Add and select a name from the drop-down list. 3. Confirm your selection and select the Save icon. Add Supervisor Non-Working Days The Non-Working Days Tab allows the user to select specific non-working days for this employee. By default, the Company Non-Working Days that are set up in settings will reschedule the entire work order if it falls on a non-working day. However, the Employee Non-Working Days will change the start date of the labor/tasks specific to that employee if it falls on his/her non-working day if the Work Order is assigned to the associate. 15

 icon in the top left of the window.")
17 If a day is highlighted, it is marked as a non-working day. To change the status of a day, simply select the date. Non-Working Days Tab Attachments The Attachments tab allows the user to attachment documents associated with the new or current user. To add an Attachment, on the Attachments tab, select the green + sign (1). Find the file you want to attach (just like adding an attachment to an . If the attachment is in the current attachments folder, you can Attach (paperclip) icon in the top left of the window. If it is not in the current folder, you can select choose file (2), which allows you to search any drive/folder and add a file to 1 16
 The attachment will be uploaded to the asset attachments, and appear in the attachments folder in the future. Any type of file can be attached to an asset.")
18 the asset attachments. Selecting the file to be attached, and then select the upload icon. (3) The attachment will be uploaded to the asset attachments, and appear in the attachments folder in the future. Any type of file can be attached to an asset. It can be viewed if the person trying to view the attachment has the proper tool to view the file type on their specific device. There is no limit to the number of attachments on an asset. An asset attachment is automatically added to the work order associated with the asset
19 Exercises Add 3 records to the Employee Master File using the examples below: W. Main St. Allen Henkle Menomonee Falls, WI May 01, 2002 (262) Division 002 allenh@omni.com Maintenance N. 35 th St. Walter Smith Milwaukee, WI August 25, 2000 (414) Division 002 walters@omni.com Maintenance W. Hilgore Ct. Gordan Kaysen Brookfield, WI January 01, 2002 (414) Division 002 gordank@omni.com Maintenance 18