Human Capital Management: Step-by-Step Guide
|
|
|
- Silas Morris
- 5 years ago
- Views:
Transcription


1 Human Capital Management: Step-by-Step Guide My Leave Basics: Setting Preferences and Entering Time This document describes basic features of My Leave, the university s time-keeping system. The procedures in this guide can be performed by all users of My Leave. All My Leave users, including supervisors and HCM Community Members, should become familiar with the basic procedures described in this guide. Additional procedures can be performed by supervisors and HCM Community Members. Refer to the appropriate guide for additional information: My Leave for Supervisors Step-by-Step Guide contains procedures for approving leave requests, approving timesheets, and assigning or updating a proxy, who can enter approvals on your behalf. My Leave for HCM Community Members Step-by-Step Guide contains procedures for entering time on behalf of an employee, assigning a proxy on behalf of a supervisor, loading timesheets, and running reports and queries. Note: If you are not using My Leave, but would like to know more about it before implementing it, refer to My Leave: Considerations Before Implementation Job Aid. Contents My Leave Basics: Setting Preferences and Entering Time... 1 What is My Leave?... 2 Setting Preferences... 2 Setting Preferences as a First-Time User... 3 Updating Preferences after First Login... 5 Entering Time on Your Calendar... 6 Entering Exception Time Exempt Employees... 8 Entering All Time Worked Non-Exempt Employees and Students... 9 Submitting a Timesheet at the End of the Pay Period Additional Views of My Leave Calendar Overview of Comp Time and Overtime Reading My Leave Balances Setting Up a Flexible Work Schedule My Leave Flex Week Layout 1 (9 days/80 hours) My Leave Flex Week Layout 2 (9 days/80 hours) hcm_sbs-my-leave-basics-preferences-time-and-leave.docx


2 What is My Leave? My Leave is a time-keeping system available to all departments and to all four campuses. All university employees can access My Leave through the employee portal ( My Leave provides the following features: Tracks all types of employees leave: o o o o Monthly salaried exempt, non-exempt employees and faculty Bi-weekly - hourly student and temporary employees Bi-weekly - salaried employees Essential Services Employees (Defined in the Non-Person Profile under Additional Duties, vacation and sick hours add to the work hours in the week for these employees. Overtime is paid when the sum of all hours is over 40 for the standard week.) Displays leave balances Provides a built-in approval workflow for supervisors Note: If you are not using My Leave, but would like to know more about it before implementing it, refer to My Leave: Considerations Before Implementation Job Aid. Setting Preferences All employees who use My Leave, including supervisors and approvers, need to set up their preferences in My Leave before they can enter time, request leave or approve timesheets. To set your preferences in My Leave: 1. From the portal, open My Leave using one of the following options: Click the My Leave tile: Click CU Resources Home> My Info and Pay> My Leave: Setting preferences differs depending on whether this is your first time accessing My Leave. First time you access: My Leave displays the My Leave Preferences page so that you set them up before you enter time or leave requests. Subsequent times you access: My Leave displays the Calendar-Month page and you can enter leave requests, as well as update your settings by clicking the Preferences button. 2 hcm_sbs-my-leave-basics-preferences-time-and-leave.docx
3 Setting Preferences as a First-Time User The first time you log into My Leave, the My Leave Preferences page appears with a message containing a link to this step-by-step guide. To set preferences the first time you access My Leave: 1. Click OK to close the message. The My Leave Preferences page appears: Important: You must set up preferences before entering any time into My Leave. Do not leave this page until you have completed it and saved your preferences. 2. From the Holiday Schedule drop-down list, select the correct holiday schedule for your campus. If you are employed in a position that is not paid holidays (such as a student), select No Holiday Schedule. 3. Click Select Notifications. The first time you log into my leave, this button appears. You must click this button in order to save the preferences. The notification options will display default values. 4. Select triggers for which you want to receive notifications, either as an employee or as a supervisor. 5. From the Overtime/Comp Time Eligible drop-down list, select an option. If you are in a non-exempt position, select whether you receive compensatory time or paid overtime (CompTime). If you are in an exempt position and not eligible for comp or overtime, select Not Applicable. Students will default to Overtime. 3 hcm_sbs-my-leave-basics-preferences-time-and-leave.docx
4 6. In the My Leave Start Date box, type your start date. If you are a new employee, enter your hire date as your start date. This directs My Leave when to start tracking time. If you are a rehired employee, the My Leave start date can be changed to your current rehire date. Note: If you are a CU employee, but new to My Leave, your start date is the date for My Leave to start tracking your time. For example, if you have been an employee since 01/01/2008 but you have never used My Leave before and your department has decided that your department will start using My Leave with the 12/1/2017 pay period, then your start date is 12/1/ Leave the Weekly Schedule drop-down value as Standard Week. 8. From the Week Begin Day drop-down list, select the value as Sunday, except for UCCS where it is Saturday. 9. In the scheduling grid, enter your regular schedule by selecting Work Days and Hours for each. You can set up the weekly schedule to reflect the normal hours you work. Setting up the default schedule lets you add time to My Leave using the Add Time button in My Leave Calendar View for a range of dates. If you are approved to work a flexible schedule, see Setting Up a Flexible Work Schedule on page 15. Note: Hours are entered using military time (24-hour clock). 10. If you do not use your work regularly, you may want to add your personal in the CC All s To box. 11. From the triggers grid, select the activities for which you would like to receive messages, both as an employee and as a supervisor. 12. Click Save & Return for your changes or additions to take effect. Preferences can be changed at any time if your job information has changed. 4 hcm_sbs-my-leave-basics-preferences-time-and-leave.docx

5 Updating Preferences after First Login If you have previously logged into My Leave and defined preferences, My Leave displays the Calendar-Month page when you open it. To update your settings, click Preferences. 5 hcm_sbs-my-leave-basics-preferences-time-and-leave.docx

6 Entering Time on Your Calendar My Leave calendar view lets you enter time and leave events. If you have a set schedule, and it has been entered in your preferences, you can click the Add Time button, to enter your time for a range of dates. If you do not have a set schedule, you can double-click the date that you worked, and add an event to the individual day. 6 hcm_sbs-my-leave-basics-preferences-time-and-leave.docx
7 To add an event on your calendar: 1. Click Add Time to the right of the current date, or double-click the specific date from the calendar. The Add/Edit Event window appears: 2. Select a From Date and a To Date, indicating the range of days for the time or leave you are requesting. 3. Next to the From Date, indicate at what Time this request begins. Hours are entered using Military Time. 4. Similarly, next to the To Date, indicate at what Time the request ends. 5. Select Include Lunch if the time you entered includes lunch. If not, deselect this box. 6. If you have multiple jobs, select the correct job number and Reporting To (supervisor) to ensure your hours are recorded correctly. 7. Select the Earnings Code for Regular Earnings Salary, Regular Hours or exception time being reported from the dropdown. Examples of exception time include vacation, sick, funeral leave and jury duty. 8. Select the Status from the drop down. This includes the option of Submit a Request or Taken. Vacation time is subject to approval and you would submit a request. Sick time can be submitted as requested or marked as taken. Vacation time should not be listed as not submitted. 9. In Description box, type an explanation, if necessary. 7 hcm_sbs-my-leave-basics-preferences-time-and-leave.docx
8 10. Do not enter anything in SpeedType, unless you have been advised by your HCM Community Member (payroll liaison) or supervisor. 11. Select Save to submit your reported action. 12. Click OK. When you return to the Calendar view, you see the submitted request for vacation or sick time as requested until they are approved and the days marked as worked or holidays marked as taken. Entering Exception Time Exempt Employees Exempt employees only enter and submit exception time. Examples of exception time include, vacation, sick, funeral leave and jury duty. After you submit a request for exception time, an will be sent to your supervisor for approval. Vacation time will need to be submitted for approval and cannot be marked as taken until approved. Sick time can be marked as taken or submitted for approval. If you submit a request for leave prior to the event, and have not seen an approving or denying your request, follow-up with your supervisor. 8 hcm_sbs-my-leave-basics-preferences-time-and-leave.docx


9 The following is an example of an exempt employee calendar: Entering All Time Worked Non-Exempt Employees and Students Non-exempt employees must enter and submit all days and hours worked in the pay period. This includes regular hours worked and exception time. Examples of exception time include, vacation, sick, funeral leave and jury duty. The following is an example of a non-exempt employee monthly calendar. 9 hcm_sbs-my-leave-basics-preferences-time-and-leave.docx
10 Non-exempt university staff full time should record all hours worked as Regular Earnings Salary or the earnings code of RGS. If you worked additional hours over 40 hours a week, My Leave will automatically calculate overtime (OTM) and additional time straight (ATS). If you are a non-exempt employee and receive comp time instead of overtime, you would also record all hours worked as Regular Earnings Salary and My Leave will calculate any additional time straight and compensatory time earned (CME). If you use your compensatory time, you should record the usage as compensatory time taken (CMP). Non-exempt university staff less than 100% should record all hours worked as Regular Earnings Salary or the code RGS. My Leave analyzes the standard hours in job data, and then adds Additional Regular Hours (XRG) for any hours recorded in excess of standard hours. For example, if an employee is set to work 20 standard hours a week and then recorded working 23 hours as Regular Earnings Salary, My Leave would add three XRG hours to the timesheet to be sent for additional pay. Temporary hourly employees should record all hours worked as Regular Earnings (earnings code REG). Student hourly employees should record all hours worked as Student Hourly (earnings code STH). The earnings codes for Shift Hours should only be used when instructed by your department payroll administrator. Submitting a Timesheet at the End of the Pay Period At the end of the pay period, all employees using My Leave will need to review and submit their timesheet. Non-exempt monthly employees should submit a timesheet to their supervisor by the 5 th of each month. Bi-weekly employees should check with their department. Before creating your timesheet, be sure to review all hours recorded on your calendar. 1. Select Timesheet at the top of the page. The timesheet displays a week-by-week snapshot of the hours you reported on the Calendar tab. If the pay period ends in the middle of the week, it is possible that some overtime hours will be carried over to 10 hcm_sbs-my-leave-basics-preferences-time-and-leave.docx

11 the next pay cycle. Weekly Adjustments are listed for each week and time is split into Regular Earnings Salary, Vacation, Sick, and Overtime or Additional Regular hours. At the bottom of the timesheet, a summary of the hours for the pay period is listed along with the hours that will be submitted to HCM for pay. All hours should be reviewed carefully to make sure they are correct. If you see a DK1 (or dock) listed, your pay will be docked for the number of hours listed. 11 hcm_sbs-my-leave-basics-preferences-time-and-leave.docx

12 In the example below, the Totals section indicates which hours will be sent to CU Time for payroll processing. The Y indicates that the sum of the hours will be sent. In the Speed Types section, you can see that this employee will have 32 vacation hours and overtime hours sent for processing. Note: If you see DK1 in the summary, this means a dock and you will be missing money from your pay. If you worked the entire month or had enough exception time to cover your time off, you do not want to see a dock in your pay. Review each week in your timesheet to find the dock in pay, and go to your Calendar view to correct it. 2. Once you agree with what is reported on your timesheet, select the certification checkbox. 3. Click Submit to submit your timesheet for review and approval by your supervisor. If you have errors on the timesheet before it is approved, you can select the option to cancel and rebuild. This would allow you to make changes, recertify and submit. If errors are discovered after a timesheet is posted but before payroll department users may deny the timesheet, employees may make changes and resubmit. 12 hcm_sbs-my-leave-basics-preferences-time-and-leave.docx


13 Additional Views of My Leave Calendar In addition to the monthly view of your calendar, you can choose to view it as weekly or daily. Calendar-Week view: Calendar-Day view: 13 hcm_sbs-my-leave-basics-preferences-time-and-leave.docx
14 Overview of Comp Time and Overtime Overtime Pay: FLSA requires that an employee in an FLSA non-exempt (eligible for overtime) position is paid overtime or granted compensatory time when hours worked exceed 40 hours in a scheduled workweek. Both overtime and compensatory time must be paid at a rate of not less than one and one-half hours for each hour of overtime/compensatory time worked. State personnel rules consider all work time for overtime calculation, excluding holidays and authorized paid leaves such as annual leave, sick leave, jury duty, funeral leave, administrative leave, etc. For example, an employee works 36 hours, takes 4 hours of vacation leave, and then works 4 additional hours. This employee is paid 44 hours at the regular rate of pay, since the total hours at work are equal to 40. When you physically work over 40 hours in a week, record the hours as Regular Earnings Salary. My Leave will calculate your comp time/overtime. If you worked 44 hours in one week My Leave will calculate 4 hours of OTM or Overtime. Comp time is currently tracked manually within your department. Reading My Leave Balances Balances listed in My Leave are updated after each monthly payroll cycle and off-cycle process (if your balances have been updated). Balances: Identifies Sick and Vacation rows. Act/ Proj: Differentiates between past months, current month and future months. o Actual = past months. o Open = current month, not processed yet. o Projected = future months. Begin Date: Displays the month and year that you are currently viewing on your Calendar tab. Previous Earnings: Displays what accrued in the last monthly payroll run, or if status is Projected, what would normally be accrued from the previous month s work. If you work less than 100% of time, this will reflect in the amount earned. If you are unsure of your accrual rate, review these details on the Employee Services web page. Begin Balance: Displays the amount at the end of the previous month, not including the amount to be processed for that previous month. Exception time is processed one month after the fact. Prior Month Posted: Displays the number of hours to be processed in the next payroll process. Adjustments: Department Payroll contacts have the ability, if needed, to update balances in an off-cycle payroll process. If this occurs, you will see those hours listed in this column. Usable Balance: Displays the amount of the beginning balance minus Prior Month Posted and Adjustment hours. Not Taken: Displays sick and/or vacation hours that have been requested but not yet approved or processed. Taken: Displays sick hours only that are marked as Taken rather than being submitted and approved through a request to the supervisor. Ending Balance: Displays the total remaining balance after deducting Taken/Not Taken from the useable balance. 14 hcm_sbs-my-leave-basics-preferences-time-and-leave.docx
 A flexible schedule is set up as 9 days with 80 hours, or 9/80.")
15 Setting Up a Flexible Work Schedule If you are approved to work a flexible schedule, you can define your default hours from the My Leave Preferences page. (Navigation from the portal: My Leave> Preferences.) A flexible schedule is set up as 9 days with 80 hours, or 9/80. The key to a 9/80 Work Schedule is to set the Week Begin Day as Friday, because Friday is the flex day. If your flex day is different, such as Monday being the flex day, your Work Begin Day would be Monday. The From Hour starting at 12 noon splits the flex day between the two weeks for FLSA regulations. My Leave has two flex week layouts: one using the first Friday in a two-week cycle as a flex day, the other using the second Friday in a two-week cycle as a flex day. My Leave Flex Week Layout 1 (9 days/80 hours) If your first week of the month is actually your week with four days working nine hours a day and the second week is your five-day week, you can select Flex Week Layout 1 (9 days/80 hours) as your Weekly Schedule. The following is an example of My Leave Preferences for Flex Week Layout hcm_sbs-my-leave-basics-preferences-time-and-leave.docx

16 The following is a sample timesheet with the Flex Week Layout 1 Schedule: 16 hcm_sbs-my-leave-basics-preferences-time-and-leave.docx

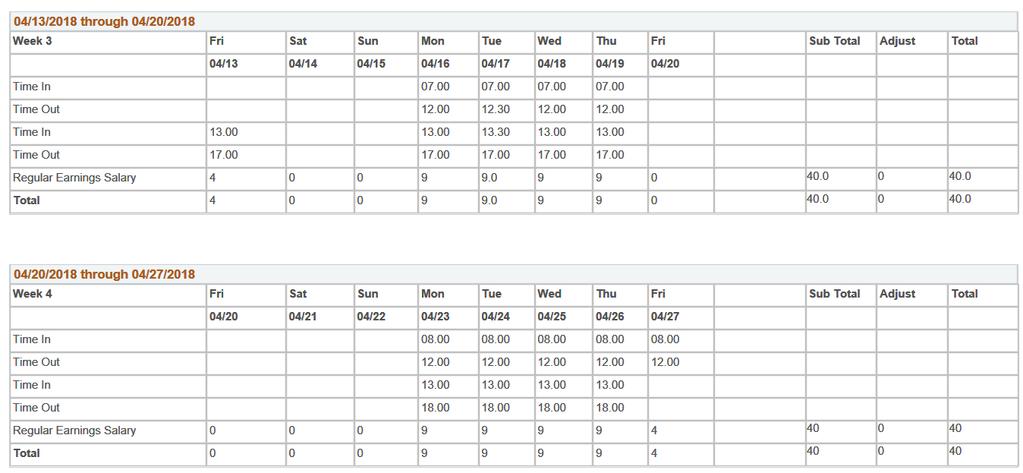
17 My Leave Flex Week Layout 2 (9 days/80 hours) In Layout 2, the first week would be four days with nine hours a day, and eight hours on Friday. The second week would have nine hours a day for Monday through Thursday and zero hours on Friday. The Week Begin Day would be Friday, and the From Hour should be 12 noon. The following is an example of My Leave Preferences for Flex Week Layout 2, which has five days the first week and four days the following week. 17 hcm_sbs-my-leave-basics-preferences-time-and-leave.docx

18 The following is a sample timesheet with the Flex Week Layout 2 Schedule: 18 hcm_sbs-my-leave-basics-preferences-time-and-leave.docx

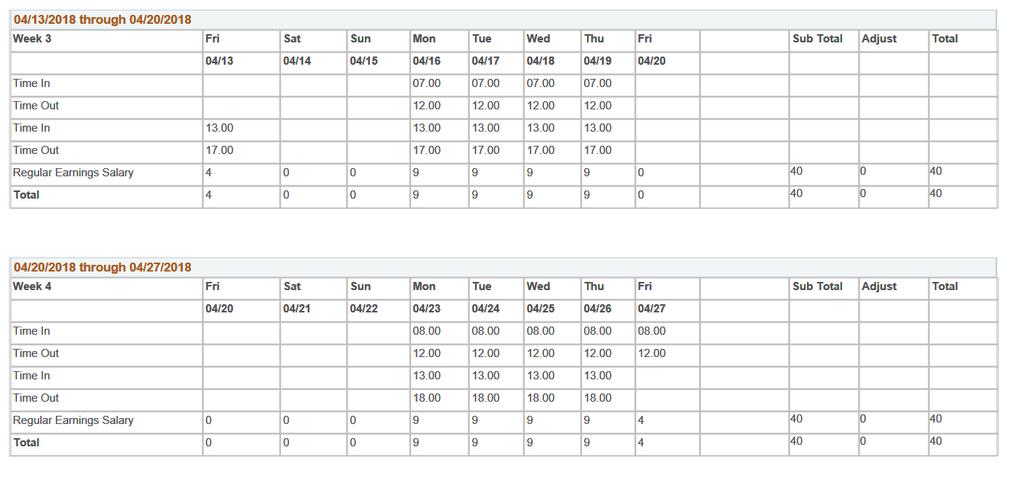
19 The Overtime is coming over from the previous month, prior to the flex schedule. Below is an example of Flex 2 Scheduled Hours displayed in the Calendar view: 19 hcm_sbs-my-leave-basics-preferences-time-and-leave.docx