Contents Payroll... 4
|
|
|
- Hugo Curtis Floyd
- 5 years ago
- Views:
Transcription
1 Contents Payroll... 4 OVERVIEW (PR)... 4 Payroll Module Flow... 7 EMPLOYEES (PR)... 8 Employee Master - Data Entry Screens... 8 Employee Master General Employee Master Salary Tab Employee Master Tax Tab Employee Master - Deductions Tab Employee Master - Notes Tab Employee Master Leave Tab Employee Master Direct Deposit Tab Employee Master Savings Bonds Tab Employee Master Salary Accounts Tab Employee Master Salary Accounts (MS clients only) Employee Master Salary Accounts (GA clients only) Entering a New Employee Editing Employee Master File Information Inquire Employee Information Employee Master List Employee Master Sheets Employee Labels Inactivate Employee Activate Employee PROCESS (PR) Processing Overview Print Payroll Registers/Prelist Close Payroll Period Void Payroll Check Recreate Direct Deposit Enter Special Compensation Special Compensation Report MONITOR Direct Deposit Notification Special Situations FRINGE (PR) Employer Fringe and Contributions Overview Employer Contributions Processing Employer Fringe Report Employer Contributions/Fringe Posting Rollback Verify Fringe Setup Report DEDUCTIONS (PR) Employee Deduction Report Insurance Cost Report Deduction Verification Report Electronic Submission of Payroll Deduction Information Retirement Report/File FBMC/Money Plus File/Report Savings Bond File/Report Deferred Comp File/Report
2 2 Deferred Comp Maximum Limit Report (SC Clients Only) SLTD Report for OIS Benefits File for OIS Create State ORP Withholdings Report/File Create 401K Report/File for NC Update Payroll Deduction Amounts Global Delete Old Deductions B Remittance File/Report Colonial Supplemental Insurance Interface TAXES (PR) Multiple Worksite Report Quarterly Tax Reports Payroll Summary Report W-2 Summarization Report Print W-2 s REPORTS (PR) Labor History Reports Salary Allocation Report Earnings Report Employee Check Detail Report Leave Detail Report Leave Summary Report Leave History Report Time Sheets Direct Deposit Master List Employees Not Paid Report New Hire Report/File Pay Type Report Labor Statistics Report EEOC-4 Labor Statistics Report Enumeration Verification System File Worker s Comp Report Compare Checks to Labor History Terminated Employee Report Employees with Current Hours but No Pay Report Average Days Missed by Employee Category Attendance Report by Employee Type and School MAINTENANCE (PR) Rollback Payroll Check Update Void Check Rollback Edit Payroll Posting File Edit Quarterly Tax Record Edit Direct Deposit History File Leave Maintenance Set/Reset Salaries Set Pay Rate Globally Set Direct Deposit Global Update to Current Hours Update Years of Experience Special Maintenance PARAMETERS (PR) Category Class Deduction Department
3 EEOC Leave Setup Tab Accumulation Schedules Tab Location Note Title Pay Group Pay Type Salary Class WC Reason codes Enter/Edit Templates Tax Table Update Federal Tax Tables State Tax Tables Payroll System File PR Parameter Reports ENTER/EDIT CUSTOM REPORTS (PR) APPENDIX A APPENDIX B APPENDIX C: PRINTING PAYROLL CHECKS ON BLANK CHECK STOCK

4 Payroll Overview (PR) The Payroll module allows you to track employee information including demographics, salary and W-4 information, deductions, leave, and pay history. Pay information may be input in a variety of ways in order to generate payroll checks. The system produces the various required reports such as quarterly federal and state tax reports and deduction reports as well as W-2 s at year end. A wide variety of other reports are available including leave reports, earnings history, labor history, and many more. Access to the Payroll module is established for users in the Enter/Edit User Security option within the CSI Setup/Options. The access to edit social security number and tax ID allows the user to view and edit the employee s social security number on the payroll master. Replace part of SSN, tax ID, and bank account info with * If this flag is checked, the system shows only the last few digits of the employee s social security number, tax ID, and direct deposit info on the master screens and reports. 4

5 A variety of security settings are also available to restrict access to the information in the payroll system. Users may be restricted to editing and/or viewing employees in certain departments or locations. This feature may be used if you wish to give department heads or principals access to employees under their supervision. 5


6 Users may also be restricted to which payroll screens they may access in the Enter/Edit Employee Master. Screens may be made available for data entry or for inquiry only. If the Show salary information on employee master list checkbox is not selected, the Include salary on report field will not be visible on the Employee Master List. 6
7 Payroll Module Flow This section is an overview of SmartFusion flow within modules. Payroll salary and employer contributions expense is posted to ledger from the payroll module. Employee withholdings are updated to Accounts Payable and subsequently posted to ledger. 7


8 Employees (PR) The Employees menu on the payroll menu bar provides access to menu options to add, edit, inquire and change employee master file information as well as to print reports based on the information stored in the employee master files. Employee Master - Data Entry Screens Access to the employee master file is provided through the payroll Employees menu option named Enter/Edit Employee Master. Depending on your selection of the information that you want to track, the data entry screen can have up to nine tabs that allow you to go directly to your area of interest to add or edit information: General Salary Tax Deductions Notes * Leave * Direct Deposit * Savings Bonds * Salary Accounts * The Notes, Leave, Direct Deposit, and Savings Bonds tabs are conditionally displayed depending on your selections to track or not to track these items. These selections are made on Ppage 3 of the Payroll System File. Note that as you move from tab to tab, the following employee information above the tabs remains unchanged. Employee id -- The employee s unique identification number. It is system-assigned and cannot be edited.. Last/First/Middle/Suffix can be edited by clicking on the button that is labeled with the field name. The fields are initially grayed to prevent the name from accidentally being changed. 8


9 SSN - This button toggles between the full SSN number (e.g., ) and a partially obscured SSN (e.g., ***-**-5555). It appears only if the user has rights to this field. The rights can be assigned to a user in the Enter/Edit User Security menu under Security Rights PR tab. Pay Group This parameter tells the system the number of checks that the employee should normally receive for the calendar year. An employee cannot receive a payroll check until they have been assigned to a Pay Group. History -- The History button appears if the Access Employee Information History flag is selected on the Enter/Edit User Security Security Rights PR tab. When information is changed in Payroll on the General, Salary and Tax tabs, the system creates a history record of the employee s information. Click the detail icon (magnifying glass) on the Employee History screen to display the fiscal year-end date history record, along with the dates of any other updates to the employee record. The system displays history only for active employees and employees who were inactivated in the last year. Editing is not allowed on the Employee History screen. 9

10 Employee Master General This tab shows the most commonly accessed information for an employee. Enter the following information, as needed: Nickname The name by which the employee is commonly addressed. This value does not print on reports or checks. Title Mr., Mrs., Miss, etc. This value does not print on reports or checks. Address1, Address2, and City/State/Zip -- Two address lines can be used to track an employee s address. This is helpful if an employee also has a post office box and a street address, or if an apartment number needs to be noted. Both addresses will print on reports and checks. County Print foreign address on W2 -- A foreign address can be entered for the employee s W-2. The foreign address will print only on the W-2. To add the foreign address, you must select this checkbox before you can click on the magnifying glass icon. If a W-2 needs to be reprinted with the local address, uncheck the Print foreign address on W2 checkbox. Supervisor address Direct deposit This field is visible if your organization uses the direct deposit notifications feature. See the Direct Deposit section for more information. Phone number Alternate phone -- An alternate phone number can be tracked on employees along with the normal Phone number. This can be used as a place to track a cell phone number or an emergency number. 10

11 Race -- The button beside the Race field opens the Ethnicity window, which allows you to select more than one ethnicity. If you do not wish to track multiple race categories, you can continue to use the Race drop-down list. Sex Date of birth notification Date employed This is a required field. When an employee has been rehired via the Activate Employee screen, the Date Employed field will be relabeled as Date rehired and will show the rehire date. The date history can be viewed by selecting the Inactivation/Reactivation Notes icon next to the Reason field. Leave accrual date The date when an employee will start accruing leave; it defaults to the date employed. This can be changed, however, to reflect your organization's policy. Date inactivated PR Automatically updated if the employee has been inactivated via the Payroll module s Inactivate Employee screen. Date inactivated PE -- Automatically updated if the employee has been inactivated via the Personnel module s Inactivate Employee screen. Class Department Location Category Salary class EEOC Workers Comp BP years experience/step -- If you are using the Budget Prep module, the category and salary class codes along with the BP Year Experience/Step are used to identify the employee s salary schedule and compute the budgeted salary. If the Budget Prep module is not being used to compute the budgeted salary, this item can be left blank. Organization years experience -- Indicates the local years of experience working in your organization. This field is for informational purposes only. Total years experience Indicates the employee s total experience working for any and all organizations. This field is for informational purposes only. Include in budget prep -- If the payroll demographic information is to be shared with the Budget Prep module, select this checkbox. Update Vendor Master -- The button can be used to create the employee in the Enter/Edit Vendor Master file. This button creates new records and updates existing records with any address changes. If an employee has been added to the vendor master, the system places a check mark in the Vendor field. When you click on the button, it prompts you for a vendor number. If your organization has system-assigned vendor numbers, click OK. The Alpha Sort field is created with the employee s last name first. If the vendor s address is changed in Payroll or Personnel, you will click on the Update Vendor Master button again to update the new address change in the vendor master. 11

12 Employee Master Salary Tab Enter the following information, as needed: Type of Employee For active employees, this normally indicates if the employee is Salaried or is paid on a Daily or Hourly basis. This field can also be used to indicate if the employee is Inactive, Deceased, or on Leave of absence. Employees are set to Inactive on the Employees Inactivate Employee screen. Hours per pay period If an employee is paid on an hourly basis, use this field to enter the number of hours in the pay group assigned to the employee. For salaried employees whose pay is not based on the number of hours worked, leave this field blank. Pay rate Enter the pay rate that matches the employee s pay group assignment. Enter the hourly rate for hourly paid employees, the weekly rate for weekly paid employees, etc. If this item is left blank, the system computes the pay rate based on the hours per pay period and/or the annual salary. If a pay rate is changed on the Salary/Tax page, you will be prompted to also update the pay rates on the Salary Account page. The system will update all rates on the Salary Account page that match the old rate on the Salary/Tax page and will also reset any overtime rates. If an employee is salaried and paid from multiple accounts or if there are pay types with odd hourly rates, the system will display a message that the user will need to manually adjust these rates/amounts. Annual taxable wages Calculated by multiplying the pay rate by the number of checks specified in the pay group file that is assigned to the employee. If the annual tax wage is entered, the pay rate will be computed. This amount is used as a basis for calculating tax withholdings. Overtime factor Employment status Full Time, Part time, Retiree, Temporary. 12
13 TERI Select this flag if the employee participates in the TERI (Teacher Retirement System) program. TERI date The date that the employee entered the TERI program. FTE The FTE field that located on the personnel master can also be accessed here. If this field is edited, the change will also be reflected on the personnel master. Std/current contract days If the Budget Prep module is being used, this can be automatically transferred to Payroll. Otherwise, this information can be entered manually. Budgeted annual salary If the Budget Prep module is being used, this can be automatically transferred to Payroll. Otherwise, this information can be entered manually. Daily rate Computed only if the number of current contract days and the annual salary have been entered. Hours worked daily and Hourly Rate These fields are used along with the Daily Rate field to determine the true hourly rate of a salaried employee. The Hourly Rate field is a calculated field that automatically calculates when something is keyed in the Daily Rate and Hours Worked Daily fields. This is for informational purposes only. It does not display on any other screens or reports. State Pay Rate Georgia clients only. This rate is normally based on the contract days, Hours worked daily, and the base salary located in Enter/Edit Budget Prep Profiles. Statutory Select this flag if the employee is a Statutory employee. If this flag is checked, information prints on a W2 form. This option appears only if the Track Statutory Employees flag is checked on Page 3 of the Payroll System File. Certified Is the employee certified. Select Approved Substitute in the accompany dropdown list if the employee will be used in the Absentee Sub module as a substitute. If this is not selected, the employee will not show be available for selection in the Absentee Sub module. Note -- An unlimited character note field. This note will not be printed on any reports; it is for informational purposes only. Right-click in the note box and select Zoom to open the unlimited box. Include on CPI Report Georgia clients only. Set this flag only if you want this employee to show up on the CPI Report. The same flag can be set on the Personnel module s Enter/Edit Personnel Master screen. Export to Time & Attendance Set this flag for employees that need to be exported to a time and attendance interface system that is supported by CSI. Contact CSI Support for details on time and attendance interface programs. Print direct deposit notification Select this checkbox if the employee is to receive an actual printed notification of direct deposit. This is particularly helpful if your organization uses the ESS feature where employees have access to view their direct deposit history online. A notification number is still assigned in the payroll files for report purposes. 403b eligible If your organization uses a 403b interface program, select this flag for any employees who may be eligible. Salary net furlough Matches the Net salary on the Budget Prep module s Employee Profile screen. This is for informational purposes only. Also, no furlough information is transferred to the Payroll module. Daily pay net furlough The Salary net furlough divided by the number of contract days. This is for informational purposes only. Also, no furlough information is transferred to the Payroll module. 13
. Information selected here should be based on the employee s W-4 form. Exempt Select this checkbox if the employee wants no federal tax withheld.")
14 Employee Master Tax Tab Enter the following information, as needed: Federal Withholding Section Federal Tax Status Single, Married, Head of Household (Old Status, Use Single), or Married, but withhold at higher single rate). Information selected here should be based on the employee s W-4 form. Exempt Select this checkbox if the employee wants no federal tax withheld. Exemptions The number of tax exemptions that the employee is entitled to claim. Additional federal tax Enter the amount of any extra federal tax that will be withheld for the employee. FICA Select one of the following values: o FICA/MEDI Withheld -- Amounts paid to the employee are subject to FICA & Medicare tax. o No FICA/MEDI Withheld o o MEDI Withheld FICA/MEDI No Unemployment Rpt -- The employee s pay is subject to FICA but not subject to show on the unemployment report. This could apply to board members or other persons who have taxable earnings but who are not employees and are therefore not eligible for unemployment. o MEDI no Unemployment Report o No FICA/MEDI, Gross on Unemployment Report EIC Use the EIC field to indicate an employee s Earned Income Credit status. If you have employees that are eligible for EIC, make sure that the account number to debit for the EIC advance to the employee has been identified in the Payroll System File. Since the advanced EIC reduces the employer s payroll tax liability, it is recommended that the EIC be debited to the federal tax withholding account. NOTE: As of 2012, the IRS no longer allows EIC advanced EIC payments to employees. Even if they have information set up here, no advance credit will be calculated during the payroll register process. SmartFusion will not inadvertently calculate these EIC credits that are no longer allowed. 14
15 State Withholding Section Tax State The state in which the employee is being taxed. Tax Code Select one of the following: o Single o Married Filing Joint, both spouses working o Married Filing Joint, one spouse working o Married Filing Separate o Head of Household Exempt Select this checkbox if the employee wants no state tax withheld. Employee/spouse allowances Enter the number of allowances that the employee is entitled to claim. Additional state tax Enter the amount of any extra state tax that will be withheld for the employee. Dependent allowances Enter the number of allowances the employee is entitled to claim for any dependents. Months worked (retirement) Computed by the system and used for reporting to the retirement system. The number of months is incremented by one the first time an employee is paid during a month. When the payroll quarter is closed, the number of months will be reset to zero. 15

16 Employee Master - Deductions Tab Once a deduction has been defined in the Deduction parameter file, use the Deduction tab on the employee master record to assign an unlimited number of deductions to each employee. When a deduction code is entered, the Abbreviation, Priority code, Tax Code, Emp Cost, Std Amt, and Curr Amt. are pulled in from the Deduction parameter. Once they populate the Deductions tab, you can change several default amounts to match the amount applicable to each employee. This tab contains the following information: Deduction and Abbreviation The Deduction code and abbreviated name, taken from the parameter file. Priority If the employee s net check amount is not sufficient to cover all deductions, the Priority code determines which deductions get covered first. Priority 1 deductions will be covered before Priority 2 deductions, and so on. Tax Code The codes are Annuity, Non-taxable, and Taxable. For more information about the tax codes, please refer to the deduction code notes in the Parameters section of this manual. Emp Cost The amount that the employer pays into the deduction. Ceiling If the deduction parameter file indicates that a Deduction Ceiling is allowed, the ceiling amount can be entered here. The system withholds the current deduction amount from the employee s checks until the ceiling amount is reached. When cumulative deductions have reached the ceiling, the standard and current deduction amounts are automatically set to zero. Balance Reflects the ceiling amount minus deductions that have been made to date. Click the Edit button beside this field to adjust this value. Std Amt -- Reflects the percentage or dollar amount that should normally be withheld from each of the employee s checks. If a deduction is no longer applicable, enter a zero in this field. Curr Amt -- Normally, the Curr Amt matches the standard amount. However, the current amount always reflects the percentage or dollar amount that will be deducted from the next check. By changing the current amount, a non-standard amount can be deducted from the next check. When the next payroll is run and files have been updated, the system resets the current amount back to equal the standard amount. If the Insurance & Benefits module is being used, the Emp Cost, Std Amt, and Curr Amt fields may be updated from I&B. 16

17 Employee Master - Notes Tab Use the Notes tab to enter employee information not otherwise provided by pre-defined fields. Once Note Titles have been defined in the Note Title parameter, an unlimited number of notes can be assigned to an employee. Use the drop-down list on the data entry screen to select the pre-defined titles that are available. The Note field allows a short note to be entered but the Additional Note field can be used to enter unlimited text. 1. Click the button. 2. Select a Title. 3. Enter a short Note or a name for the Note. 4. Enter longer note text in the Additional Note field. 5. Select a Note. 17

 appears on the right side of the Leave tab. This icon runs an Absentee report for the selected employee.")
18 Employee Master Leave Tab Use the Leave tab to enter specific leave information for each employee. The types of leave must be set up in the Leave parameter before they can be entered here. The leave amounts will be expressed and tracked in hours or days as specified in the Leave parameter. When the leave code is entered, the abbreviation and the accumulation rate from the parameter file display. The Active flag lets you activate/inactivate leave codes for a specific employee. If your organization uses the Absentee Subs module, the Show Employee Absences icon ( ) appears on the right side of the Leave tab. This icon runs an Absentee report for the selected employee. The default Accum Rate from the Leave parameter displays when the Leave code is entered. However, the default amount can be changed to meet each employee s needs. The Current Used column reflects the amount of leave used since the last payroll update was run. Leave amounts used during a pay period can be entered directly into this column. However, if the Absentee Sub module is used to enter absences, the Current Used amounts will be automatically updated when absences are updated to payroll. If a Pay Type code is associated with a leave code, the Current Used amount will also be updated when the pay is recorded. If you are correcting a leave balance and need to give back days/hours, enter them in the Current Earned field. When entering Salary Account information, this field is also updated by any pay types that are defined to increase leave (e.g., Comp Time Earned). To see an employee s leave balance for a particular leave code, click the Abbreviation columns. between the Leave and 18

19 Employee Master Direct Deposit Tab The payroll system supports direct deposit of an employee s net pay plus specific amounts to other checking or savings accounts. There is no limit to the number of direct deposit accounts that an employee can have. The available direct deposit Codes are: 0 - not participating 1 - pre-notification 2 no longer participating 3 - Participating 4 not participating temporarily 5 pre-notification/temporarily not participating 6 not deposited. When an employee initially signs up for direct deposit, the code should be entered as 1 (pre-note). After the deposit disk has been created, the system changes Code 1 s to Code 3 s (participating). If a code is set to 4 (not participating temporarily) the system sets any Code 4 s back to Code 3 after the payroll is run. Code 6 indicates that no deposit was made and if this was the result of a negative check, the Code 6 will be reset to a Code 3 when the payroll is updated. The Bank Account Number is used to identify the employee s account in the bank or institution receiving the direct deposit. The Bank Routing Number identifies the bank or institution receiving the direct deposit on behalf of the employee. The Bank Name is not a required field but can be used to store the name of the bank for informational purposes only. The Account Type codes are Checking and Savings. The Primary account designation identifies the direct deposit account that will receive the net pay balance after all other fixed direct deposit amounts have been satisfied. In other words, it is the account that will receive what is left. The deposit amount for the primary account should be left blank. The Deposit Amount should be entered for accounts that are to receive a specific amount. Again, leave the deposit amount blank if the deposit amount is to equal the net check amount. 19
 in this list, additional information appears to the right. The Denom. amounts identify the denomination of the bonds that are to be purchased.")
20 Employee Master Savings Bonds Tab The left side (list area) of the savings bond screen shows all savings bonds that an employee has elected to purchase. When a bond is selected (highlighted) in this list, additional information appears to the right. The Denom. amounts identify the denomination of the bonds that are to be purchased. Available amounts are $100, $200, $500, $1,000, $5,000, $10,000. The Owner Name is displayed in the list and additional information about each owner is entered and displayed on the right side of the screen. If there is a beneficiary, enter POD (Pay On Death) in the POD field and enter the name of the Beneficiary. The Deduction Amount field specifies the amount to be withheld from each payroll check. When the cumulative deduction amounts equal or exceed the bond denomination amount, a bond is purchased on behalf of the employee. The Purchase Date automatically updates to show the last purchase date and the Purchase Denom shows the denomination of the last bond purchased. The Accumulated Amt shows the amount accumulated and available to purchase bonds. When a bond has been purchased, the accumulated amount is reduced by the purchase amount. In addition to setting up the bond information on the page, the employee must also have a savings bond deduction set up on the Deduction Page. The amount of the deduction should equal the deduction amount for all of the employee s savings bonds. Also the Savings Bond File Report option on the Deductions menu is to create the file to purchase bonds from the Federal Reserve. 20

21 Employee Master Salary Accounts Tab Use the Salary Accounts tab to enter the employee s types of pay and distribute them to the salary accounts. There are no limits to the number of pay types or the salary distribution accounts. After the master record has been established, changes that affect the employee s next check can be entered directly to this screen or they can be entered through the temporary pay option and globally updated. The Note field is not a part of the master record and is normally left blank when setting up a new employee. If changes affecting the employee s next check are entered directly to this screen, the note field can be used to enter a brief note (32 characters) that appears on the check. The note field resets to blank after the payroll is updated. The pay rate field at the top of this page is for information purposes only. The Budget/FYTD button can be used to display the paid-to-date salary and the contract remaining to be paid. This can be used if your organization uses the Budget Prep module. Use the field beside the (+) button to enter the Pay Type. If you do not know the pay type code, click on the down arrow to display a list of available codes. An employee can have an unlimited number of pay types and each type can be distributed to as many different accounts as necessary. If a pay code needs to be edited or added, go to the parameter menu and choose the item called Pay Type Codes. Enter the ledger Account Number where the salary is to be charged. If you do not know the account number, click on the down arrow to display a list of available accounts. If you key part of the account number and click on the down arrow, you get closer to your desired account. If you key nothing before clicking on the down arrow, the first account number in the system displays. 21

22 There is a button to re-compute the pay rate. Once the pay rate is changed on the Salary Tax tab, the system usually recalculates the pay rates (including the O/T rates) on the Salary Accounts tab. This option is available if for some reason the rate did not recalculate automatically, that you could do it manually. Just highlight the line on the Salary Accounts tab, and click the Recalculate Pay Rate button located above the pay rate field. If the employee is an hourly employee, the Pay Rate defaults to the pay rate from the Salary/Tax page multiplied by the factor from the pay type parameter file. For example, in the illustration above, the overtime pay rate is computed by multiplying the pay rate * 1.5. If the employee is a salaried employee, the pay rate will be left blank unless the Hrs/Pay Periods has been entered on the Salary/Tax page. If the employee has standard hours, then the system computes the pay rate, just as it does for an hourly employee. If changes are made to the pay information on the Salary/Tax page, the system prompts for whether to update the pay rates and amounts on this page. The pay-rate will be multiplied by the number of standard and current hours to calculate the standard and current pay amounts. Please note that each pay type can have a different pay rate if necessary. Enter the FTE (full time equivalency) or percentage of the employee s salary to be charged to this salary account and pay type. In the Fringe field, enter the percentage of the employee s health, dental, and other insurance cost that is to be charged to a fringe account in the department/functional area that matches the department/functional code in the salary account number. In the Std Hrs and Std Amt fields, enter the amounts that are normally charged to this account. During the initial set up, the Curr Hrs and Curr Amt fields will automatically match the standard amounts. When you press enter to exit the last field in the grid, the information that you have entered on the data entry line above the list box will be saved and displayed in the list box. Employee Master Salary Accounts (MS clients only) The Report wage field is used in conjunction with pay types that have a wage code of 15, 16, or 17. This is for elected officials who take a reduction in pay but still need to report the full amount to the retirement system. The full pay amount to the reported to the retirement system will be entered in the Report Wage field, but the amount that the employee is actually being paid for is still maintained in the Std/Curr Amt fields. 22

23 Employee Master Salary Accounts (GA clients only) The State Merit Eligible flag is used to flag any pay type/account that needs to be reported on the GA State Health Rpt/File/Fringe. 23

24 Set/Reset Exceptions There are times when you need to run a payroll for a selected group of employees or include employee(s) in a payroll that is not their normal payroll. The Payroll system lets you set an employee for Exceptions pay, which then allows them to be automatically included on the next payroll register. The temporary pay screen allows an employee to be flagged for exceptions pay, but the Set/Reset Exceptions button allows an employee to be flagged without using the Temporary Pay option. Use this window to create and clear exceptions for salary payments. For example, you may have an employee who forgot to turn in his hotel fees and missed the cut-off date for getting reimbursed in the current pay period. You can create an exception that allows the employee to be reimbursed in the current pay period instead of waiting until the next one. It also gives you a quick visual by displaying in red (Exceptions) on the top right hand of the Employee Master, Salary Accounts screen if the employee has been flagged for exception pay. To utilize this feature, you must have a pay group set up and flagged as an exceptions pay group. When running a prelist or payroll register, you will select this exceptions pay group and the system will include all employees that have been set for exceptions pay. If you set someone for exceptions pay and then determine that they should not be included on the special payroll, you may use the Reset option to remove the employee from the exceptions group. The Set option allows an employee s deductions to be cleared, direct deposit disabled, and additional federal and state tax zeroed. Once you have run and updated the exceptions payroll, all of the employees will be reset back to their standard information. 24


25 Allocated Salaries This feature allows an employee s pay to be expensed to one account on the Salary Accounts page but allocated to multiple accounts when the payroll is updated. To utilize this feature you must first set the Track Account Allocations flag on page 2 in the PR System File. Once this flag is set, the Allocate option appears on the Salary Accounts page. The Allocation option is related to each account on the Salary Accounts page. This allows a portion of an employee s pay to be allocated while any additional pay may be expensed to an account with no allocations. You may want to designate a main account for allocated salaries to be used when setting up the employee information on the Salary Accounts screen. This account is the one reflected on payroll registers, but once the payroll is run and updated, the employee history shows the expenses allocated to the proper accounts that were set up from the allocation screen. To enter the allocated accounts, you must first select the payroll account to be linked to the allocation. Once that is highlighted, select the Allocate checkbox, and click the magnifying glass (detail) icon. (See example above) Then the list to enter the allocated accounts appears. Notice it has the main account number referenced at the top of the screen. You can either press the <enter> key or click on the + to activate the grid. You will then enter the first account to be allocated and the percentage to allocate. Repeat. Note: When you enter the percentage amounts 25
26 on this screen, they must be keyed as (example) 25.00% (not.25%). Your total allocated amount must equal % (not 1.000%). You cannot exit the screen if your allocated total is less than 100%. Once you have completed the allocation distribution, click the X in the upper right hand corner to exit. It will take you back to the Salary Accounts screen. To edit an allocated account number or percentage amount, select the main account on the Salary accounts screen. Click the Allocate (detail) icon. Then select/highlight the account to be edited, make your changes, save and exit. To set up an employee with Regular, Sick, and Vacation Pay Types to be allocated, you will enter a line for each Pay Type with a salary account associated on the Salary Accounts screen. For each of these lines, select the Allocate Option and set up the allocation distribution. Again the allocated distribution must equal 100%. Be sure to set up the allocation for each line (account) that should be allocated. 26

27 Entering a New Employee To add a new employee, select Employees Enter/Edit Employee Master from the menu bar. Click the New toolbar icon to display the available data entry screens. This takes your cursor to the detail area for you to key the employee information. CSI recommends using the Enter key to move from field to field. Once you have keyed the name, and pay group, you can use the mouse to skip over the history tab if this is activated on your screen. As you move from tab to tab, the information on each tab will need to be saved as a separate record. If an employee has been added to the system through the Personnel module, they will already be available when you access the payroll system. Simply locate the employee by Name or Employee ID number and add the appropriate payroll information. 27

28 Editing Employee Master File Information To edit employee master records, select Employees Enter/Edit Employee Master from the menu bar. From the search area you can click on the Search button to select all employees or you may narrow your search by selecting a specific employee or a group of employees that share the same pay group, class, department, location, category, or salary class. If you can select smaller groups of employees, it will be easier to find the specific records that you need to edit. Employees can also be found by searching based on a certain group such as Location or based on multiple groups such as Pay group and Location. Once the selection has been made, click on the Search button. While on the detail area, you can use the Next and Prior icons on the tool bar or Ctrl + Page Dn/Up to move between records, or you can click on the List area to display a list of all employees included in your initial selection. 28


29 Click on the employee that you need to edit and then the record will display below in the Detail area. Then make your edits and click the Save toolbar icon. 29

30 Inquire Employee Information To inquire employee information, choose the payroll Employees menu option and then select Inquire Employee Information. The Inquire Employee Information option will not allow you to save any changes to the employee s record. From the search area you, can click on the Search button to select all employees or you may narrow your search by selecting a specific employee or a group of employees that share the same pay group, class, department, location, category, or salary class. Information available through this option includes all of the information that is entered through the various tabs available under the Enter/Edit Employee Master menu option. The recommended way to find employees is by Last Name, First Name, or by Employee ID number. If the social security number is hidden, you cannot click the SSN button to display the full number. Employees can also be found by searching based on a certain group such as Location or based on multiple groups such as Pay group and Location. Once the selection has been made, click Search. Click on the employee that you need to inquire and then click on Detail area. Then click in the tab that you wish to view. 30

. Payroll Check Information. From the Checks inquiry tab, you can display a list of all checks written to an employee.")
31 These tabs include Demographics, Salary/Tax information, Deductions, Notes, Leave, Direct Deposit, Savings Bonds, and Pay Account Distribution. These tabs are the same tabs that can be found on the Enter/Edit Employee Master. In addition, the inquiry option can display the following information: Month, Quarter, Year, and Fiscal Year information for Wages, Withholdings, Deductions, Pay Types and Leave (which also displays days docked if applicable). Payroll Check Information. From the Checks inquiry tab, you can display a list of all checks written to an employee. After selecting the check, you can click on the magnifying glass or detail icon to see more detailed check information. Detail icons are also provided for gross pay and deductions. 31
32 Employee Master List The report can be printed in sequence by department, location, or name by selecting the Select report sequence option. It can include all employees, or specifically selected employees. Also selections can be made based on employee groups to include everyone within a single group, a range of groups, or randomly selected groups. The group selections include employees assigned to a common class, location, department, or pay group. Use the drop-down boxes in the Include All section to select specific classes, locations, employees, etc. 32
33 Employee Master Sheets To print the Employee Master Sheet, select Employees Employee Master Sheet from the menu bar. This detailed report shows everything that is saved on the employee master screen. The report can be printed in sequence by department, location, or name by selecting the Select report sequence option. You can also select Years of Experience to print Budget Prep year s exp, Total years exp, or both on the report. Master sheets can be printed for prior year history using the option below. However, this option is available only if the user has security rights for the History option on the PR tab of Enter/Edit User Security. The Include on report option allows you to make the report a detailed report. 33
34 34

35 Employee Labels Options are included to print a mailing label or a file label. Both label types use the standard Avery label number 5260, which prints 3 labels across the page and 10 labels down the page. The mailing label includes the employee name and address with the option to include the employee s social security number and/or the employee s pay period ending date. The file label includes only the employee name with the option to include the employee social security number. Both labels can be printed for all employees or active employees only. Selections regarding which employees to include can be made based on employee groups. The group selections include individual employees or employees assigned to a common class, location, department, or pay group. Mailing Label 35

36 Inactivate Employee The only way to inactivate an employee is to choose the payroll Employees menu option and then select Inactivate Employee. The following screen will be displayed. Inactivating an employee does not delete them from the payroll system. Inactivating just prevents them from receiving a payroll check and from showing up on various reports. Payroll history is kept. Choose the employee to be inactivated and enter the date the employee is to be inactivated along with a note giving the reason for termination or inactivation. Note that you have additional options to 1) clear leave balances, 2) clear accumulation rates, 3) inactivate the employee in Personnel, and 4) inactivate employee benefits. When you click the OK button, the Employee s Master record will be updated and the employee s Type of Employee Status will be set to Inactive. NOTE: You can inactivate an employee in Personnel and leave them active in Payroll until they receive their last check. Once their last payroll has been run, then you can set them to inactive in Payroll. Inactivate in Absence and Subs Select this checkbox to also deactivate the employee in the Available Subs module. 36

37 Activate Employee In the event that an inactivated employee needs to be reactivated, the following screen must be completed. After an employee has been reactivated, a magnifying glass button appears on the Enter/Edit Payroll Master and Enter/Edit Personnel Master that, when clicked, displays all of the termination/reactivation notes for that employee. The Activate in Personnel and Activate in Budget Prep checkboxes are selected by default when this window opens. 37

38 Process (PR) The Process option on the payroll menu bar provides access to menu options related to the periodic processing of payrolls. Processing Overview The Payroll module is designed to process payroll by exception. This means that if there were no changes or exceptions the payroll process would be as simple as printing a payroll register to compute the pay, and then printing the paycheck. In the real world, however, there are usually exceptions to deal with. Therefore, we have provided a Payroll Processing Checklist to assist you. It is located in the Appendix of this manual insert. Normal periodic (weekly (52 checks per year), bi-weekly (26 checks per year), monthly (12 checks per year), semi-monthly (24 checks per year)) payroll processing typically involves the following steps: Printing a pre-list for the group of employees that need to be paid. This list reflects the amount of pay that each employee receives if there are no changes or exceptions to deal with. Recording pay changes that are the result of changes in pay rates, deductions, tax exemptions, etc. Entering changes in the hours worked or pay changes that result from the amount of time worked during the pay period. There are a number of options for making these types of changes. a) Enter the changes direct to the employee master record. b) Enter the changes to a temporary file and globally update the employee master record. c) Enter the changes in the Employee Absence/Sub application (if it has been installed) and globally update the employee master record. Printing a second pre-list to compare with the original pre-list that was printed before any changes were made. This assumes that the original pre-list was marked up to reflect any changes. This step is intended to verify that all updates were made properly. The difference between the first pre-list and the second should be the changes that you made to the employee s salary therefore making it easier to balance the payroll before printing the register. Printing a payroll register to compute the net pay and create a file that will be used to process the checks. Any of the register reporting options, including printing the report to the screen, will cause the net pay to be computed and the file to be created. If you need a printed payroll register, there are several options regarding the amount of detail that is included on the register. Printing checks and direct deposit notifications, and creating direct deposit transmission file. 38

39 Posting payroll to ledger. Creating a matching employer contributions file for FICA, retirement, and worker s comp. This step calculates the employer share of the matching costs and allocates them to the ledger accounts in the appropriate cost areas. Post matching employer contributions to ledger. Recording Pay Changes and Master File Changes Pay changes include anything affecting the employee s net pay except changes related to the amount of time worked. Examples include changes in the rate of pay, changes to employee deductions, changes in the number of exemptions or withholding amounts, etc. These changes should be made directly to the employee master file before the payroll is processed. Other master file changes can include things such as name change, address change, direct deposit change, etc. Entering Time Worked Changes Changes that result from the amount of time worked or temporary variations in the amount of pay can be made directly to the employee master record or they can be made through a temporary file and globally updated to the employee master record. Changes entered through the Absentee Sub module can also be globally updated to the employee master record, but procedures related to this application are not discussed here. Entering Time/Pay Directly to Employee Master Record To enter time and temporary pay changes directly to the employee master record, select Employees Enter/Edit Employee Master from the Payroll menu bar. When the screen appears, you may select all records, select a specific employee, or select all employees that belong to one of the available groups such as department, category, pay group, class, etc. Once the selection is made, click the Search button or press the Enter key a couple of times to bring up the employee master record. Then select the Salary Accounts tab to display the following screen. If the employee has an hourly rate set up in the Pay Rate field, you can simply key in the standard and/or current hours and the system calculates the amount. Hours and/or amounts are keyed in the current column for the upcoming payroll to be processed. If this is a permanent change to the hours or amount, it should also be entered in the standard column. 39
40 Note: Changes entered through any other options (temporary pay, employee absence/subs) are also reflected on this screen after the print and update step has been run from those options. Regardless of where or how the changes are entered, they all end up here. When the payroll register is run, the employee s pay and pay distribution will reflect the information recorded and displayed on this screen. The following guidelines apply when entering changes directly to the Employee Master Record. To locate a specific employee, you can use the List area to display an alphabetical list and select from the list or you can scroll back and forth through the screens using the next and prior icon on the tool bar or CTRL + Page Dn/Up keys. Remember that you can restrict the number of employees in your list by using the search area to pick smaller groups. For example, if you are working with a specific location, you can select only those employees who are assigned to that specific location. Use the note field to enter a note specific to that employee. The note appears on the employee s next payroll check. Next, press enter until the cursor is on the plus (+) button and when you press Enter you will be in the data entry area where you can add an additional line of information to the grid. If you want to edit an existing line instead of adding a new one, select the line of information that you want to edit. This causes the information to be displayed in the data entry area where it can be edited. After making your changes and exiting the data entry area, the changes are reflected in the grid lines below. To add a new line in the grid area, click the plus (+) button. To delete an existing line, click the Delete toolbar icon. 40

41 Enter Hours/Pay Temporary File If time and pay changes are entered in the temporary file, reports that reflect the changes can be printed and edited before the payroll master file is updated. Typically, this option is used to enter changes that add to or take from the employee s standard pay rather than make changes to the standard pay. NOTE: Hours and/or pay cannot be entered for an employee who does not have an employee type or pay group assigned. To enter time and pay changes to a temporary file, go to the Process menu and choose the option named Enter Hours/Pay Temporary File. Click the New toolbar icon or press Ctrl + N to select a new record. Note: Unless the option to Create Temporary Pay from Payroll has been run the search area will not be applicable. The following screen displays. To select an employee, start keying the employee ID number or name and as you type the system will begin a search of the file and automatically fill the balance of the name. When enough of the name has been keyed to identify the correct employee, press Enter and the pay group, class, department, 41
42 location, salary class, category, and pay rate will be displayed for informational purposes. All other information will need to be entered. 1) Enter the Pay Period Date. This is normally the pay period ending date. This is a required field. Please note that the ability to enter a date makes it possible to enter changes for a current pay period as well as for a future pay period. However, if you have entered changes for multiple dates and later decide to edit one of the changes, take note of the date to avoid changing the wrong record. 2) The Transferred to payroll flag is set by the system after temp pay records are updated to the employee master. 3) Enter a Pay Note if you want an explanatory note to appear on the employee s check stub. 4) If you want to replace the employee s standard pay with the pay you are keying, use the space bar or the mouse to check the Zero Regular Pay box. Otherwise, any pay amounts that you enter on this screen will be added to the amounts that are already reflected in the employee s master record. If you are entering additional or supplemental pay that is in addition to the standard pay, do not check this box. 5) To set an employee for exceptions pay, use the space bar or the mouse to check the Exceptions box. Making this selection allows an employee to be paid regardless of his or her normal pay group. If the exceptions box is checked, you can Disable the normal deductions, direct deposit and additional tax withholdings. 6) Click the Salary Accounts button to view the employee s salary accounts that are on his/her salary accounts tab on the Enter/Edit Employee Master. 7) Once you press <Enter> from the Salary Accounts field, the system asks you to save the top part of the screen. The cursor then advances to the plus button in the lower grid. Press <Enter> on the green plus button to add a record. 8) Enter the Pay Type or use the drop-down select list to choose the pay type. The pay type is a user-defined parameter file to identify the type of pay. This pay type prints on the employee s check stub. 9) Enter or change the Pay Rate as applicable. This rate will be multiplied by the current hours to compute the total pay. 10) Enter the expenditure Account Number where the pay is to be charged. If the pay is to be charged to multiple accounts, simply enter multiple records that add to the total amount of the payment. 11) Enter the Curr Hrs if the employee pay is based on the number of hours worked. 12) The Curr Amt will be calculated if you enter a pay rate along with current hours. If the employee s pay is not based on the number of hours worked, enter the current amount of pay. 13) When all changes have been made, run the Print Reports/Update Temporary Pay to Payroll screen to update the employee s master file. 42

43 Print Reports/Update Temporary Pay to Payroll Changes entered into the temporary file have no impact on the employee s pay until the employee master file is updated using this screen. After this step is run, the system sets the transferred to payroll flag on the temp pay record. Use this screen to print a report (Print Only) to review the changes before the master file is updated or you can choose to print the report and update (Print & Update) the files in a single step. After the update step has been completed, any subsequent changes should be made directly to the Salary Accounts tab in the Employee Master. If the exceptions only flag is checked, the system displays any employees who have a temp pay record but have been inactivated in payroll since the record was keyed. NOTE: If you create more than one group of temp pay records from payroll (e.g., a set for each payroll week), be sure to update these back to payroll in one group (use the range of dates). If you do not, the second update will overwrite the first one. If you did not create temp pay from payroll, this is not an issue. 43

44 Create Temporary Pay from Payroll Typically, this option works well when all or most all employees within a selected group require that the amount of time worked be keyed. A good example would be hourly employees, where the number of hours worked must be entered for every employee within the group. Running this option will create a temporary file record based on the Employee Master record that can be edited through the Enter Hours/Pay-Temporary File option. This option must be used with caution. This option is not recommended for all organizations. If you want the system to create a temporary file that you can edit: 1) Select Process Create Temporary Pay from Payroll from the menu bar. Enter a date for that payroll and you can also chose to globally set this payroll up front to Exceptions and disable direct deposit, deductions, and additional taxes, if applicable. 2) Using the include all section, choose the group or groups of employees that you want to include in the temporary file. It is recommended that you create temp pay based on specific criteria such as for hourly employees only and/or by Class, Dept, Pay Group, etc. This will reduce the risk of creating a temp record for EVERY employee from the employee master. 3) Click on the checkbox at the bottom of the screen to create the temporary file. 4) Return to the menu option named Enter Hours/Pay Temporary File and using the search area for this option choose the employee groups that you want to work with. 5) Press <Enter>, or click on the search button to display the first employee in your selection. The data entry screen will be populated with the current payroll information from the employee s master file record and you can now begin to edit. 44
45 Purge Temporary Pay This option deletes records from the Enter Hours/Pay Temporary File based on the selections that are made. ***Caution: There is no rollback for this option. 45
46 Accumulate Leave Use this screen to advance days/hours to the employee s leave balance based on how the Leave Parameter file is set up. To accumulate leave, go to the Process menu and choose the option named Accumulate Leave. The Select frequency depends on how your organization tracks leave. This can be determined from the "Leave" Parameter file. The Processing Date and Date used to record leave accruals is very important. The processing date is checked against the Leave Accrual Date on the demographics tab in the employee master to determine if the employee should be advanced days/hours. If the leave accrual date is before the processing date, then the leave will be accumulated for the employee. Certain groups of employees can be selected to have leave accumulated by a range of current contract days, departments, locations, pay groups, etc. An update number will be assigned every time leave is accumulated. This can be used to roll back the accumulation using the Rollback Leave Processing option located on the Maintenance menu if leave was accumulated in error. 46
47 Print Payroll Registers/Prelist Printing a Pre-list Report Use this screen to print a pre-list. Printing the pre-list is not a required step but it serves as a good tool to preview all employees who will be included on the payroll register for the selected group. The pre-list picks up only those employees with an amount in the Current Amount column on the Salary Accounts tab of the employee master. Click on the "Payroll Prelist" box and then select the sequence in which you would like the report to be sorted. The most common sequence is by Location or Department. Group selections can be based on pay groups or on individual employees by clicking on the Data Selections tab. The pay period ending date and current pay date are required fields. The pay period ending date and current pay date do not have to be the same date. Normally, the pay period end date is the cutoff date for submitting payroll changes and timesheets. The current pay date is the date that needs to be printed on the checks. The include SSN on Report checkbox is active only if the user has rights to view social security numbers. 47
48 The Pre-list report shows the employee s pay rate, hours, gross pay amount, and the account distribution. This report also prints sub-totals by Department, Locations, or Class. If changes affecting the employee s pay are indicated, it is recommended that the changes be made to the employee s master file and noted on the pre-list. Then print a final pre-list and compare the results with a second pre-list that can be printed to verify that all changes have been made correctly. 48

49 Printing a Second Pre-list Printing a second pre-list is an optional step that will provide a report that can be compared with the original pre-list to make sure that all changes have been entered correctly. The pre-list will provide a preview of the amount of gross pay for each employee as well as the ledger accounts where the gross pay will be charged. See Printing a Prelist Report section for more details. Printing the Payroll Register When the payroll register is printed, the net pay for each employee will be computed. The payroll register can be printed as many times as necessary. The important thing to remember is that the employee s payroll check will reflect the amounts printed on the last payroll register. Running the step to print the register is required before printing checks but it is not necessary to actually print a hard copy of the register; it can be previewed to the screen but it is recommended to print a hard copy for your records. The payroll register is printed from the Process menu option Print Payroll Registers/Pre-list. Two tabs are provided to enter print options and make selections regarding the data to be included. This report will also print sub-totals by Department, Locations, or Class. You can preset your sequence by setting this as a default setting in the Payroll System File on page 3 called Default code to print on checks. You may also select in the PR System File the option to omit the subtotal pages if you print the payroll register by location or department. See the Payroll System File section of this manual for more information. From the Report Selections tab, you can: Choose to print the register in sequence by Employee Name, Class, Department, or Location. The most common way to print the register is by Department or Location. The sequence that is selected will also be the sequence in which the checks with print. Choose to include or exclude W-4 Information, Hours/Pay Distribution, Deductions, and Leave. This is not required but it is recommended. 49
50 Choose to print selected deduction reports along with the payroll register. Failure to print these reports along with the payroll register does not preclude them from being printed at a later date. It is recommended that this report be printed after checks have been printed and updated. From the Data Selections tab, you can: Select the pay period ending date (cut-off date) and the current pay date (date the checks are to be given out). The system will alert you if the current pay date is prior to the pay period ending date and if the current pay date is not within the current calendar year. Choose to print the register for a single pay period or multiple pay periods. Choose to print the register for a single employee or multiple pay periods. Enter the pay period for deductions. This is significant if deductions are not withheld during every pay period (for example, deductions for biweekly employees may only be withheld during the first two pay periods each month). 50
51 Example of payroll register with W-4 information, hours/pay, deductions, and leave included. Example of payroll register without W-4 information, hours/pay, deductions and leave included. 51

52 Print/Update Payroll Checks Printing Checks and/or Creating Direct Deposit File After the Payroll Registers have been printed and approved, it is time to print checks. Remember that the checks will match the information shown on the last payroll register. To print checks and direct deposit notifications, select Payroll Process Print/Update Payroll Checks from the menu bar. The following screen will be displayed. This message box should agree with the last payroll register that was run. Compare this information to the grand totals page and click Yes to continue if the information agrees. Then the following screen appears. See next page for details. 52
53 If your organization uses CSI s Document Services feature for check printing, you will also have the ability to include sub slips from the Absence Sub module on the employee s check stub by clicking on the Sub Slips tab on the Print/Update Payroll Checks screen. This requires a special 8 ½ x 14 check stock that can be ordered through CSI Technology Outfitters. 1) Select the Process Method: a) Bypass Checks and Create Direct Deposit - Use this option if you are pressed for time and want to get the direct deposit file to the bank before you take time to print checks and/or direct deposit notifications. b) Print & Update Use this option to print checks and update employee records. This option also creates the direct deposit file. c) Print & Update/Bypass Direct Deposit Disk Use this option if you have already created the direct deposit file using option a) and are now ready to print payroll checks and notifications. d) Update Only Use this option to update files after a check has been typed or handwritten outside the system or if you have printed checks but not updated them for some reason. 2) Enter the beginning check number and beginning notification number. Based on the last check and notification printed, the beginning numbers will be automatically displayed. These numbers can be changed if necessary. 3) If this is check restart, see section in Special Situations for detailed instructions on check print restart. 4) Select the code to be printed on the checks. The options are Class, Department, or Location. This can be preset as a default on page 3 of the PR System File located under the Parameters menu. 5) Enter the Leave Balance Ending Date. 6) Enter any note that you want to appear on all payroll checks or direct deposit notifications. This note will appear on checks or notifications for all employees except those employees for which you have entered a special note in the Salary Account tab of the Employee Master. 7) If you are creating a direct deposit, enter the file creation date and file effective date (normally the pay date that was used when the payroll register was printed) as well as the name of the file that will be created. Those are set up in the Payroll System File. NOTE: If the FICA flag is set to Y on the employee master but the pay type is not subject to FICA and is flagged as non-taxable, the FICA/MEDICARE does not distribute correctly on the labor history tab of the Enter/Edit Earning History screen. NOTE: You can print up to seven (7) lines of Pay Types and fifteen (15) lines of deductions on your pay stub. 53
54 Create AP Vouchers from Payroll This is an optional feature that you can use if your Deduction parameter file is set up to accommodate this feature. To create vouchers from payroll, go to the payroll Process menu and choose the option named Create AP Vouchers from Payroll. In order to use the Create AP Vouchers from Payroll option, the vendor number must be identified on the deduction in the Deduction parameter file. You can pick selected deductions to use this feature. After payroll checks and notifications have been updated, you can use this option to automatically create vouchers for voluntary deductions in Accounts Payable module. Enter payroll update number that was assigned at the time the payroll checks and notifications were updated. If you are not sure what the update number is, simply preview the Payroll Check Register for the check dates. If your Accounts Payable Department uses the pay groups feature to group vouchers for payment, enter pay group to be used on this voucher. Enter pay date for vouchers if the Accounts Payable Department needs the date to be different from the check date that was used on the payroll checks. If your organization uses the posting month for open vouchers feature in Accounts Payable, you will also have the option to select the posting month when you create the vouchers from payroll. This option will appear only if you have the require open voucher posting month option set in the Accounts Payable System File. 54

55 Example of Deduction parameter: In order to use the Create AP Vouchers from Payroll option, the vendor number must be identified on the deduction in the Deduction parameter file. You can pick selected deductions to use this feature. 55
56 Payroll Check Register The payroll check register can be printed as needed, but is normally run after the payroll update is complete. This is not a required step in the payroll process but it is recommended. The register reflects the checks and notifications that have been printed. The period to report for will default to the most recent payroll that was run. Normally, you simply select based on the payroll date or the update number unless you wish to print a specific range of checks or notifications. You have the options to include voided checks only and to add an Authorized signature line. 56
57 57
58 Post Payroll to Ledger The payroll should be posted to the fund ledger at least by the end of the month but we recommend it be posted after each payroll. To post the payroll, go to the payroll Process menu and choose the option called Post Payroll to Ledger. The following screen illustrates your posting options. 1) Select the posting process. The options are: a) Print Only Use this option to print or preview the posting register before posting to ledger actually takes place. If you choose this option you will be able to choose a summary or totals only report. It is recommended that the Print Only register be printed or previewed to check for out of balance situations prior to the Print and Post version is printed. b) Print and Post When this option is chosen, it will automatically balance between funds. 2) Choose the range of payroll dates that you want to post. 3) Enter the posting date. This date determines the accounting period that will be updated so make sure the posting date falls within the accounting period that you want to update. The entire payroll will be posted to the period specified. If you wish to accrue part of the payroll to a prior period, please refer to the Fund Ledger documentation JE Accrual for Payroll. 4) If the payroll cost is distributed to multiple funds, be sure to check the option to Automatically balance funds after posting is complete. Failure to select this option may result in your ledger being out of balance. 58
59 Print Only version of payroll posting register: 59
60 Close Payroll Period To close the payroll period, go to the payroll Process menu and choose the option called Close Payroll Period. When the payroll period(s) is closed, the only thing the system does is reset the dates in the payroll system file except for closing the fiscal year so that various screens and reports will default to the new dates. If closing the quarter, the system also closes the month. If closing the calendar year, the system closes the month and quarter. When the fiscal year is closed, this is the only process that also writes a payroll history record of each employee along with changing the dates in the payroll system file. Select the period to close out from the drop-down box. Then click OK to run procedure. Note: This feature does not prohibit you from going back into prior periods or months even though they have been closed out. This option basically just changes the dates to the current period (month, quarter, year) dates. 60
61 Closing the Month 1. Run Month-end Reports (All monthly reports that are mentioned below are optional reports to run. All monthly reports can be run after the month is closed.) 1. From the Reports menu, print an Earnings report for the month. This can be a totals only version. Compare to the payroll registers for the month. If tracking leave, Print a Leave Detail or Leave Summary report for the month from the Reports menu and verify leave balances. Print Retirement File/Report for the month from the Deductions menu and compare to payroll registers for the month. Print Employee Deduction Report for the month if they were not printed along with the payroll registers. Also print any other deduction reports and create any necessary disks that are needed. 2. Employer Fringe (if your organization uses SmartFusion to track the employer s portion of fringe, you will need to do the following steps for example Health & Dental) Print the Employer Fringe Report for the month ending date. Then Create Employer Fringe Posting File for the month ending date. Both options are located under the Fringe menu. Post Contributions and Fringe to Ledger. This is located under the Fringe menu. 3. Close Month 1. If accumulating leave on a monthly basis, run the Accumulate Leave option under the Process menu. Select Monthly under the select frequency option. Close month by selecting the Close Payroll Period located under the Process menu. Select month only for period to process. **Note: If the end of the month is also the end of a quarter or end of calendar year, do not select the month only. Close the quarter, which also closes the month or the calendar year, which also closes month and quarter. 61
62 Closing the Quarter I. Run Quarter-end and Month-end Reports (All reports that are mentioned below are optional reports to run. All reports can be run after the month & quarter is closed.) ***Note: When you choose to close the quarter, this also closes the month. You will also want to print all the reports for the month as well. 2. From the Reports menu, print an Earnings report for the month and quarter. This can be a totals only version. Compare to the payroll registers for the month and quarter. If tracking leave, Print a Leave Detail or Leave Summary report for the month and quarter from the Reports menu and verify leave balances. Print Retirement File/Report for the month and quarter from the Deductions menu and compare to payroll registers for the month and quarter. Print Employee Deduction Report for the month and quarter if they were not printed along with the payroll registers. Also print any other deduction reports and create any necessary disks that are needed. 1. Print Quarterly Tax Reports for the quarter from the Taxes menu and compare to the payroll registers for the quarter. 2. Employer Fringe (if your organization uses SmartFusion to track the employer s portion of fringe, you will need to do the following steps for example Health & Dental) Print the Employer Fringe Report for the month ending date. Then Create Employer Fringe Posting File for the month ending date. Both options are located under the Fringe menu. Post Contributions and Fringe to Ledger. This is located under the Fringe menu. 3. Close Quarter (this will also close the month) 2. If accumulating leave on a monthly basis, run the Accumulate Leave option under the Process menu. Select Monthly under the select frequency option. Close month and quarter by selecting the Close Payroll Period located under the Process menu. Select month and quarter option for period to process. **Note: If the end of the month is also the end of a quarter or end of calendar year, do not select the month only. Close the quarter, which also closes the month or the calendar year, which also closes month and quarter. 62
63 Void Payroll Check To void payroll checks, go to the payroll Process menu and choose the option called Void Payroll Check. When the system voids a payroll check, revering entries will be made to a deduction history, labor history, the payroll posting file, and the quarterly tax file. The check will remain in the payroll check file but will be flagged as voided. If you are using the feature to create an AP voucher for deductions withheld, the void check routine will create a credit voucher when a check is voided if the box is checked to do so. Enter the period for the void check or simply type in the original check date. Select process of Print Only or Print and Void and then enter the void date in which you need for the void record to appear. Keep in mind if you have already printed Quarterly Tax reports showing the original check date, the void date will be very important to when you need to the void to show up. Click on the Select checks to void button to display the list of checks in the period to report. You can select one check by highlighting the one you want to void or select multiple checks by holding down the CTRL key and highlighting multiple names. Click the printer icon at the bottom of the screen to run the process. Once the check has been voided, you must also post the reversing entries to the Fund Ledger module using the Post Payroll to Ledger option located under Process menu. Then you will need to record the employer contributions for the reversing entries. First print the Employer Contributions Report and compare to the void register. Then Create Employer Contributions Posting File for the void check date and finally Post Contributions and Fringe to Ledger. Enter the period for the void check. Select Process and then enter the Void date. You can select one check by highlighting the one you want to void or select multiple checks by holding down the Ctrl. Key and highlighting multiple names. Press the printer icon at the bottom of the screen to run process. 63
64 Recreate Direct Deposit If the bank has a problem reading the file that was created for direct deposit, you may not be aware of this problem until after you have updated the payroll. Use this screen to create a new direct deposit file after the payroll is updated. Enter the Recreate date, verify the Filename, and select the Update to recreate. If you do not know the update number, run a check register for that payroll to find the number. The deposit date will be the date of the payroll and the date entered will be the file creation date. In some cases, you are recreating the direct deposit file because of an invalid bank account or routing number for an employee. Before recreating the file, correct the bank information in the payroll master and also in the direct deposit history file (Edit Direct Deposit History File on the Payroll Maintenance Menu). If you are recreating direct deposit for an accrued payroll, make sure you use the update number from the second half of the accrual process (when checks were actually printed/updated). 64

65 Enter Special Compensation The following are a list of items that can be recorded through the Enter Special Compensation menu located under the Process menu in order for them to appear in box 12 on W-2 s, on employee s wages/withholdings and on various payroll reports. These items must be set up as a pay type in the Pay Type parameter file and flagged with the appropriate W-2 code in the W-2 Pay Type field. See example on next page. When a new record is entered in the Enter Special Compensation screen, this information is stored in a special compensation file behind the scenes (not the employee check file) and also in the quarterly tax file. Records can be edited if mistakes are found by using the search area to find the record and make the correction. The Gross Wage checkbox becomes active if you select a Pay Type with a W-2 code of J, X, L, or P. The Pay Type drop-down list will display any pay type that is flagged in the pay type parameter as special compensation type as well as the normal pay types that are coded with W-2 codes. This will allow for any special compensation to be recorded such as Bailiffs that are being paid by court system. See Pay Type Parameter for more details. 65

66 1. Group Term Life 2. Third Party Sick Pay (non-taxable) 3. Third Party Sick Pay (taxable) -- *This type of third party sick pay will not appear in box 12 of W-2 s. 4. Qualified Moving Expense 5. Non Taxable Business Expense 6. Personal Use -- *This prints in box 14. This can also be keyed in the Enter/Edit Employee Master if the employer needs to record employer contributions on this portion of wages and/or withholdings. Follow the steps below to enter wages and/or withholdings. 1. Verify that you have set up a pay type under the Pay Type option located under the Parameter menu. Verify that the pay type has been flagged appropriately under the W-2 Pay Type field. 2. Access the employee under the Enter Special Compensation menu located under the Process menu. 3. Key in the appropriate information and click on the Save toolbar icon. 4. Records can be edited if mistakes are found by using the search area to find the record and make the correction. 66

67 Special Compensation Report To print the special compensation report, go to the payroll Process menu and choose the option called Special Compensation Report. You can use this report to view items that where keyed under the Enter Special Compensation menu. Example of special compensation report: 67
68 Monitor Click on the batch and click on Start button to send the s. To delete a batch from the monitor, click on batch and then click on Remove. If errors are given, please contact CSI Support for assistance. 68

69 Direct Deposit Notification If your organization will be ing direct deposit notifications, you will need to use this option to send a batch process. Setup is required before using this option. The steps below outline the steps for setup and how this option is used. 1. Access the CSI System File Setup and add the following type of information. ***This is only an example. The SMTP Server and SMTP From will vary. The port will be set to Access the Payroll System File and set the direct deposit notifications flag on the Direct Deposit Settings tab. 3. The direct deposit address will need to be set up on the employees in the Enter/Edit Employee Master. 69

70 70 4. When checks/notifications option is run, the system exports notifications in.pdf files for each employee and also creates an.xml file containing all the employee s address information.


71 5. Access the direct deposit notifications option when you are ready to send the s to the employees. Select the date of the payroll to transmit and click on OK. Once you click OK, the following message box should appear. 71
72 Special Situations This section will provide step-by-step instructions on situations that happen frequently, or which merit additional explanation. Recording a Tax Deposit The following steps are used to record the tax deposit for EFT (electronic funds transfer) of payroll taxes. 1. Access the Enter/Edit Journal Entry option located under Journal Entry menu in fund ledger. 2. Click on the New icon located on the toolbar. 3. Leave the JE Type Code set to N for normal. Type in the posting reference such as Tax Deposit. This reference will appear in fund ledger as part of the detail. If reading in a Journal Entry Template, you can simply click on the JE Template button or press F Enter a debit record to record the tax liability accounts and a credit to the cash account. ***Note: Both the debit and credit entries are keyed on the same JE. Credit entries are keyed with a negative sign in front of the dollar amount. ***Note: A Journal Entry Template can be set up with zero dollar amounts and read in each time the tax deposit needs to be recorded. 72
.")
73 Refund a Deduction 1. Access the employee in the Enter/Edit Employee Master option located under the Employees menu. 2. Click on the Deductions tab and then highlight the deduction you need to refund. Then click in the Curr Amt column on the edit line and enter the refund amount as a negative amount (for example: -9.86). ***Note: This does not apply to deductions, such as retirement, that are based on percentages. ***Note: Once the payroll check is printed and updated, the system will reset the current amount column back to the standard amount automatically. 73
 called Retirement Adjustment. 2. Set the Computation Method to V for variable.")

74 Refund a Deduction based on a Percentage Using the state SC Retirement deduction as an example: 1. Set up a new deduction in the Deduction parameter file (if one doesn t already exist) called Retirement Adjustment. 2. Set the Computation Method to V for variable. The Deduction Tax Status will be set as an A for annuity. The Deduction Type will be set as N for normal. 3. Add the new deduction to the employee on the Deductions tab in the Enter/Edit Employee Master. 4. Manually calculate the amount that should have been withheld and enter that amount in as a negative amount in the Curr Amt column of the Deductions tab in the Enter/Edit Employee Master. 5. Once the checks have been printed and the payroll has been updated, the retirement wages and contribution will need to be edited before monthly or quarterly reports are printed. Contact CSI support for assistance. 74
75 Printing a Single Check 1. Enter the employee s hours or pay in the Salary Accounts page of the Enter/Edit Employee Master option located under the Employees menu option. 2. Make other master file changes that are needed such as deduction changes, direct deposit changes, etc. 3. Print a detail payroll register located under the Process menu. Make the normal selections on the Report Selections page of the Print Payroll Registers/Pre-list option. On Data Selections page of the payroll register, make normal date selections and pay period for deductions selection. Select a single employee from the Employees drop-down. Click on the printer icon located at the bottom of the screen and compare wages and net pay to the actual check. 4. If the payroll register is correct, choose the Print/Update Payroll Checks option located under the Process menu. Verify the information in the message box that appears. 5. Choose the Print & Update option in the Select Process drop-down box. Verify the check number that is to be printed. Click on the printer icon located at the bottom of the screen. 6. If the check printed correctly, verify the last check number to be updated and click on the check mark at the bottom of the screen to update the check information. 7. To verify that the information updated correctly, print a Payroll Check Register located under the Process menu. 8. Post the payroll to fund ledger by making normal selections on the Post Payroll to Ledger option located under the Process menu. 9. If you are using our system to record employer contributions for FICA and Retirement, follow the steps below. Print the Employer Contributions Report located under the Fringe menu and then verify totals. If totals are correct, select the option to Create Employer Contributions Posting File and then post the employer contributions to fund ledger through the Post Contributions and Fringe to Ledger. 75
76 Record a Typed or Handwritten Check 1. Enter the employee s hours or pay in the Salary Accounts page of the Enter/Edit Employee Master option located under the Employees menu option. 2. Make other master file changes that are needed such as deduction changes, direct deposit changes, etc. ***Note: If federal and state taxes where manually figured, you may need to temporarily adjust the federal and state exemptions. To do this, you will enter 99 s for the federal and state exemptions and key in the manually figured tax amounts under the Add l Fed Tax and Add l State Tax fields located under the Salary/Tax page of the Enter/Edit Employee Master screen. 3. Print a detail payroll register located under the Process menu. Follow the steps below to print the register for one employee. Make the normal selections on the Report Selections page of the Print Payroll Registers/Pre-list option. On Data Selections page of the payroll register, make normal date selections and pay period for deductions selection. Click in the box labeled Select specific employee to include and click on the employee you need to record the typed or hand-written check for. Click on the printer icon located at the bottom of the screen and compare wages and net pay to the actual check. 4. If the payroll register is correct, choose the Print/Update Payroll Checks. Verify the information in the message box that appears. 5. Choose the Update Only option in the Select Process drop-down box. Key in the check number that is on the hand-written or typed check. Click on the printer icon located at the bottom of the screen. 6. Verify the information that appears when the Update Employee Information box appears. If this is correct, click on the check mark at the bottom of the screen. 7. To verify that the information updated correctly, print a Payroll Check Register located under the Process menu. 8. Post the payroll to fund ledger by making normal selections on the Post Payroll to Ledger option located under the Process menu. 9. If you are using our system to record employer contributions for FICA and Retirement, follow the steps below. Print the Employer Contributions Report located under the Fringe menu and then verify totals. If totals are correct, select the option to Create Employer Contributions Posting File and then post the employer contributions to fund ledger through the Post Contributions and Fringe to Ledger. 76
77 Update a Check Without Printing a Check 1. Enter the employee s hours or pay in the Salary Accounts page of the Enter/Edit Employee Master option located under the Employees menu option. 2. Make other master file changes that are needed such as deduction changes, direct deposit changes, etc. 3. Print a detail payroll register located under the Process menu. Make the normal selections on the Report Selections page of the Print Payroll Registers/Pre-list option. On Data Selections page of the payroll register, make normal date selections and pay period for deductions selection. Click in the box labeled Select specific employee to include and click on the employee you need to pay a single check for. Click on the printer icon located at the bottom of the screen and compare wages and net pay to the actual check. 4. If the payroll register is correct, choose the Print/Update Payroll Checks option located under the Process menu. Verify the information in the message box that appears. 5. Choose the Update Only option in the Select Process drop-down box. Key in the check number that is on the hand-written or typed check. Click on the printer icon located at the bottom of the screen. 6. Verify the information that appears when the Update Employee Information box appears. If this is correct, click on the check mark at the bottom of the screen. 7. To verify that the information updated correctly, print a Payroll Check Register located under the Process menu. 8. Post the payroll to fund ledger by making normal selections on the Post Payroll to Ledger option located under the Process menu. 9. If you are using our system to record employer contributions for FICA and Retirement, follow the steps below. Print the Employer Contributions Report located under the Fringe menu and verify totals. If totals are correct, select the option to Create Employer Contributions Posting File and then post the employer contributions to fund ledger through the Post Contributions and Fringe to Ledger. Create a Direct Deposit without Printing or Updating Checks If you are short on time and need to get the direct deposit file created and transmitted to the bank, you can bypass printing checks and notifications in order to create the direct deposit file. Once direct deposit file has been created and transmitted to the bank, you can then print the checks and notifications. 1. Enter the employee s hours or pay in the Salary Accounts page of the Enter/Edit Employee Master option located under the Employees menu option. 2. Make other master file changes that are needed such as deduction changes, direct deposit changes, etc. 3. Print a detail payroll register located under the Process menu. Make the normal selections on the Report Selections page of the Print Payroll Registers/Pre-list option. On Data Selections page of the payroll register, make normal date selections and pay period for deductions selection. Click on the printer icon located at the bottom of the screen and compare wages and net pay to the actual check. 4. If the payroll register is correct, choose the Print and Update Payroll Checks option located under the Process menu. Verify the information in the message box that appears. 77
78 5. Choose the Bypass Checks and Create Direct Deposit option in the Select Process drop-down box. Verify the beginning check number and the beginning notification number. Click on the printer icon located at the bottom of the screen. Recording Personal Use Pay There are two options that can be used to record personal use pay. The first illustration is how to record personal use pay on the last payroll of the year if it has not been recorded on payrolls throughout the year. 1. Set up a pay type for personal use in the Pay Type parameter file if one does not already exist. Make sure the pay type is flagged with a W-2 Pay Type flag of U. 2. Access the employee in the Enter/Edit Employee Master menu. Click on the Salary Accounts tab and click on the plus button to add the new pay type to the employee. 3. Since all pay types are now associated with a salary account, you must key in an account number. This account number will not actually be expensed during the Post Payroll to Ledger process. Enter the dollar amount for the personal use in the Curr Amt column. 4. Print the payroll register as normal and complete the payroll process as normal. The steps below illustrate the second option that can be used to record personal use pay. This information will automatically update the employee s records once the information is saved. 1. Set up a pay type for personal use in the Pay Type parameter file if one does not already exist. Make sure the pay type is flagged with a W-2 Pay Type flag of U. 2. Access the Enter Special Compensation option located under the Process menu and pull up the employee that needs personal use pay recorded on. 3. Type in or drop-down the box labeled Pay type and select the personal use pay type. 4. Type in the W-2 note (if needed) and the period ending date. Then type in the wages and withholdings and click on the Save icon located on the toolbar. Force Taxes on a Check At this time, there is no special menu option to allow you to force taxes on a payroll check. Follow the steps below to force the federal and state taxes on a payroll check. 1. Once you have calculated the federal and state taxes that you need to force, access the employee in the Enter/Edit Employee Master option located under the Employees menu. 2. Access the Salary/Tax tab and jot down the current settings for federal/state exemptions and additional federal/state taxes. These will need to be manual reset once you have printed/updated this payroll. 3. Enter a 99 in the fields for Federal Exemptions and State Exemptions. Then enter the manually calculated tax figures in the Add l Fed Tax and Add l State Tax. 4. Complete the normal payroll process including running a detail payroll register and verifying the figures for this employee. 5. Once payroll has been printed and updated, reset the employee s federal/state exemptions and the additional federal/state taxes back to the original figures in the Enter/Edit Employee Master option. Producing a Check with a Net Pay of Zero At this time, there is no special menu option to allow you to force taxes or to produce a payroll check with zero net pay. Special steps may be needed in order to do this. Follow the steps below to force the federal and state taxes in order to produce a zero net pay payroll check. Contact CSI Support if you feel this is not the option for you. 1. Run a normal detailed payroll register for the employee to see what the net pay would normally be. The Print Payroll Register/Pre-list option is located under the Process menu. 78
79 2. Once you have calculated the federal and state taxes that you need to force, access the employee in the Enter/Edit Employee Master option located under the Employees menu. 3. Access the Salary/Tax tab and jot down the current settings for federal/state exemptions and additional federal/state taxes. These will need to be manual reset once you have printed/updated this payroll. 4. Enter a 99 in the fields for Federal Exemptions and State Exemptions. Then enter the manually calculated tax figures in the Add l Fed Tax and Add l State Tax. 5. Adjust deductions if needed under the Deduction tab located under the Enter/Edit Employee Master option located under the Employees menu. 6. Re-run the detail payroll register and verify the net pay before printing or updating the checks. 7. Once payroll has been printed and updated, reset the employee s federal/state exemptions and the additional federal/state taxes back to the original figures in the Enter/Edit Employee Master option. Setting up Employee Leave Balances You may need to manually enter leave balances if your organization decides to use SmartFusion to track leave information for employees. After leave codes setup in the Leave parameter file according to your leave policies, the leave codes will then need to be entered for each employee receiving the leave through the Enter/Edit Employee Master option. Next, the correct beginning leave balances may need to be entered manually for each of these employees. Follow the steps below to manually enter the leave balances. 1. Access the Enter/Edit Leave History option located on the Maintenance menu. 2. After selecting the employee you wish to edit, click on the leave code you wish to edit in the top grid. Then click on the + sign in the bottom grid to add a new record. Then enter over to Prior Balance field and key in the beginning balance. Then enter throughout the remaining fields for the system to save the entry. Correct Employee Leave Information There are several ways to correct employee leave information. You may correct a balance by either of the two options listed below. Option 1: To correct leave balances through the Enter/Edit Employee Master menu: 1. Go to the Enter/Edit Employee Master located on the Employees menu and pull up the employee that you need to adjust. 2. Click on the Leave tab and then highlight the line in the grid area that needs adjusting by clicking on the leave code. 3. Then click in the Current Used field located in the edit line just above the grid area. 4. If you need to take away leave or decrease the leave balance, simply key in the number of hours/days in the Current Used field and press enter for this entry to be saved. 5. If you need to give back leave or increase the leave balance, simply key the number of hours/days in the Current Earned field and press enter for this entry to be saved. The correct balances will be updated once the next payroll check is printed/updated for this employee. Option 2: To correct leave balances and OTHER leave information through the Enter/Edit Leave History menu. 1. Go to the Enter/Edit Leave History located on the Maintenance menu and pull up the employee that you need to adjust. 79
. 3.")
80 2. Highlight the leave code in the upper grid area that needs adjusting by clicking on the leave code. This will display that leave codes information in both the top grid and the bottom grid (which is where you will edit the record). 3. You can edit an existing leave record or create a new leave record. If you need to edit the prior balance, hours/days used or earned, it is recommended that you create a new record in order to maintain an accurate paper trail of the leave history. You may also enter a note explaining the change that is being made. 4. To create a new leave record to adjust the prior balance, hours/days used or leave earned, simply click on the + (plus) sign in the bottom grid and key in the information needed and press enter through the remaining fields until record saves automatically. You can also edit the current used and accumulation rate in the top grid at this time if needed. 5. To edit an existing leave record to adjust the prior balance, hours/days used or leave earned, simply click on the line you wish to adjust in the grid area. Then click in the field in the edit line just above the grid area that you need to adjust and key in the adjustment. You can also edit the current used, current earned and accumulation rate in the top grid at this time if needed. If the current used or current earned is adjusted, the correct balances will be updated once the next payroll check is printed/updated for this employee. Setting up a Retired Employee SC Clients If an employee has retired but is continuing to work for your organization, the following steps must be followed to assure proper identification and reporting of a retired employee to the State Retirement System. 1. Access the employee in the Enter/Edit Employee Master option located under the Employees menu option. 2. On the Salary/Tax tab, change the Employment Status field to R for retiree and click on the Save icon located on the toolbar. 3. On the Deductions tab, add or edit the deduction for SC Retirement System. Make sure you have the employer cost set to the appropriate percentage amount in the Emp Cost field and the Std Amt and Curr Amt field is set to the percentage that applies. 80

81 Paying Sick Pay to a Retired Employee When a retired employee is to receive sick pay upon retirement and that sick pay is not subject to retirement (according to the SC State Retirement System), a separate pay type must be set up for that employee. Follow the steps below to do this: 1. Set up a pay type for sick pay for the retiree in the Pay Type parameter file if one does not already exist. Make sure the retirement flag is not checked in the section labeled Is the pay subject to-. 2. Then access the employee in the Enter/Edit Employee Master menu. On the Salary Accounts tab, add the new pay type and salary account to the employee. Key in the hours/pay under the current column. The money paid under this pay type will not be subject to retirement based on the flag set in Step 1. 81

82 Changing a Social Security Number Only users with security rights to see the employee s SSN will have access to change or edit the SSN on an employee. This can be set up in the Enter Edit Users Security Right, Demographics tab. To change an employee s social security number choose the payroll Employees menu option named Enter/Edit Employee Master. Once you have selected the employee from the search area, click on the SSN title button to activate the social security number field. Type in the new number and then click on the Save icon located on the toolbar. The social security number will be updated throughout the system. 82

 have been defined, you can specify the federal and state rates that the employee should be taxed on. This should be done as a fixed percent.")
83 Special Pay (Paying an Employee 2 checks within 1 check) The special pay is taxed as if it was being paid in a separate check, but the employee will receive a single check. For example, you may use option to pay an employee his/her vacation pay in the same check with their regular pay. In accordance with IRS regulations, special pay should be calculated at a tax rate specified by the IRS. To accommodate this, you have to set up a Pay Type for special pay. Once this Pay Type(s) have been defined, you can specify the federal and state rates that the employee should be taxed on. This should be done as a fixed percent. The Federal number is currently 25% (but subject to change, so please verify with your auditor before setting this up). Each state rate is different and again you should check with your auditor before setting up this Pay Type. Note: The employer is free to disregard the IRS recommendation and set the tax rate to anything they want, including 0%. However, the employee may end up with penalties for underpaying their taxes. You can have more than one kind of special pay, for instance you can have *Bonus Pay, and *Holiday Pay. You just need to set up a pay type for each special pay option your organization uses. We also recommend that you use an asterisk before the pay type name used so that at a glance you can see which pay types are designated for special pay use. If the employee participates in the retirement system, it will be computed on the special pay (unless the retirement flag for that pay type is set to N in the pay type parameter file). Other deductions will only be withheld for the normal amount unless adjusted in the Enter/Edit Employee Master. To enter special pay, follow the steps below: 1. Access the employee in the Enter/Edit Employee Master and select the Salary/Accounts tab. 2. Enter the hours/salary amount under the appropriate pay type. Special Pay should be a separate pay type or entry from the pay type(s) used for regular salary. 83
84 84 When the payroll register is printed and you choose to include hours/pay distribution, if the pay types are defined with an asterisk before the special pay name you will see the Special Pay on the report will be designated by an *.
85 Exceptions Pay I. Include an employee on a payroll other than their regular payroll. 1. Enter the employee s hours/pay either through the Enter Hours/Pay Temporary Pay or use the Set/Reset Exceptions button on the Salary Account page. 2. Click in the box labeled Exceptions. Optionally select whether you would like to temporarily disable the deductions from being withheld, direct deposit temporarily disabled, or additional federal/state taxes temporarily disabled. 3. Then update the employee(s) from the temporary file to payroll using the option Print Reports/Update Temporary Pay to Payroll. Once payroll register and checks have been printed and updated, these options will automatically be reset back to the standard settings. 4. Access the Print Payroll Registers/Pre-list option located under Process menu. Make your normal selections on page 1 and on page 2, make the normal selections as you would do for the regular employees except that you will need to include the pay group that has been identified in the pay group file as the exception pay group. The system will automatically include the exceptions pay employees on the register. II. Print checks for a group of unrelated employees (exceptions pay) Unrelated employees refer to a group of employees to be included in a single payroll run that do not fit in a standard selection criteria. 1. If this group of checks is going to be printed without other checks, a pay group (i.e., exceptions pay) that will not be used for any employees needs to be set up in the pay group parameter file. This pay group will need to be flagged as exceptions pay group. 2. Enter the employee s hours/pay either through the Enter Hours/Pay Temporary Pay. (If you create your Temp File from the PR Master, there is a global setting that will allow you to set it as an Exception payroll and other disable options are available to set up initially, before you start keying hours/amounts.) You may also use the Set/Reset Exceptions option on the Salary Account page to set an employee for exceptions pay. 3. Click in the box labeled Exceptions. Optionally select whether you would like to temporarily disable the deductions from being withheld, direct deposit temporarily disabled, or additional federal/state taxes temporarily disabled. 4. Then update the employee(s) from the temporary file to payroll using the option Print Reports/Update Temporary Pay to Payroll. Once payroll register and checks have been printed and updated, these options will automatically be reset back to the standard settings. 5. Access the Print Payroll Registers/Pre-list option located under Process menu. Make your normal selections on page 1 and on page 2. Make the normal selections as you would do for the regular employees and select the Exceptions pay group from the Select Pay group to Include selection box. Note: If an employee is set for Special Pay and has an amount in the Standard Amount field, the standard amount will be retained as special pay for each payroll. 85

86 Payroll Accruals This section assumes that all modules have completely been closed out for the fiscal year. If you have not closed any modules yet but need to do payroll accruals, please contact CSI Support for the correct procedures for doing this. The following outlines the flow of how payroll accruals work in SmartFusion. Payroll accruals in SmartFusion are considered checks that will be issued in July/August (or dated with a July/August date) but the salaries should be accrued to the prior year s ledger. The cash account will be credited in the new fiscal year. These checks will also be reflected in the 3rd quarter. It is recommended that you complete one entire payroll accrual including the employer contributions before beginning on another. Note: If you plan to print your July/August checks in June before closing ledger fiscal year and date them with a June date, these are not considered payroll accruals. This will be handled just like a normal payroll run. Preparation for Payroll Accruals: Before beginning any payroll accrual step, the following things need to be verified. 1. Verify that you have a valid Payroll Accrual Account set up in the Payroll System File. See example below. You may optionally set the Payroll Accrual and FICA accrual up in the Fund Parameter file if the amounts need to be distributed to each fund. 86


87 2. Place a check mark by the Track Accruals checkbox in the Payroll System File. See example below. 3. Place a check mark by the Post salaries to relieve a Payroll Accrual Account checkbox for appropriate pay groups in the Pay Group parameter menu option. See example below. 87


88 Payroll Register for Payroll Accruals: Note: There cannot be a mixture of Accrual pay periods and Non-Accrual pay periods on a payroll register. These will need to be run separately. 4. From the Print Payroll Registers/Prelist option, place a check mark by the Accrual Payroll option. Enter the Accounting Period Ending Date for the period being accrued. This will be a date such as 06/30/2006. This is the date you want the salaries to be accrued with. Then make your normal selections on this screen. See example below. On page 2 of data selections page of the payroll register, use the appropriate July/August date for the actual checks. In the Select Pay Period to include box, you will find only those pay periods that were flagged for accruals in the pay period parameter file. Select the pay period you wish to accrue checks. 88

89 Accruing the payroll: 5. Once the payroll register has been run and verified, choose the Print/Update Payroll Checks option and the following screen will appear. Once you have selected Print Accrued Payroll Checks, the following option will appear. 89

90 You will need to choose to Update Accrued Payroll. This will actually update the accrual payroll run before you have printed checks or notifications. The following screen will appear for you to verify before the system actually updates the accrued payroll. The following files will be updated at this time: Payroll Check File records are written to the payroll check file with a temporary check number instead of a check number and a flag is set behind the scenes to show that this is an accrued check. A Payroll Check Register can be run in the current directory with the current pay dates to verify this. When checks are printed, the actual check numbers will be written in the temporary check numbers place. Labor History File records are written to the labor history file with an accrual flag. The Accounting Period Ending Date that was used when the payroll register was run is recorded on the labor history files. You must also select the check box to Include Accruals in order to print this report for the accrual payroll. Payroll Posting File a credit to the payroll accrual account (account number that is stored in the Payroll System file) and debits to the salary accounts are written to this file at this time. These entries will need to be posted in the prior year using the Post Payroll to Fund Ledger option in payroll and using a 06/30/???? date. (ex: 06/30/2004). Quarterly Tax File No records are written to this file at this time. Employer Contributions This step can be done now or after you have actually printed checks. o Run the Employer Contributions Report in current year using check dates and by selecting the check box to Include Accruals. o Create Employer Contributions Posting File in current year using check dates. o Post to Fund Ledger in prior year using the Accounting Period End Date. **All of the other files are handled the same as a regular payroll. Once the system has finished updating the accrued payroll run, the following screen will appear displaying the update number. Be sure to write this number down on the payroll register for future reference. This number will be used later to actually print your accrual checks. 90

91 Printing Accrual Payroll Checks: In the current directory, you can now print your accrual payroll checks. To do this, select the Process menu and choose the Print/Update Payroll Checks option. The following screen will appear: Select Print Accrued Payroll Checks and click OK. Once you click on Ok, select the Print accrued payroll checks option and click OK. Once you click OK, the normal print/update screen appears. Notice at the top of the screen you are prompted for the update number of the payroll accrual run that was just updated. It is very important that you use the correct update number. See example below: Print and update your payroll accrual checks just like a normal run at this point. If you are doing direct deposit, you also create your direct deposit file as normal. Once the checks/notifications have printed, update the checks/notifications as normal and a second update number will be assigned. During this process, the following files will be updated: Payroll Check File the temporary check numbers will now be replaced with the actual check or notification number. The accrual flag behind the scenes will now be set to false. Payroll Posting File In the current directory, a debit to the payroll accrual account (stored in the Payroll System file) and credits the cash and liability accounts. These entries will need to be posted in the current directory with normal dates. Quarterly Tax File a record will be written in this file so the accrual payrolls will reflect in the correct quarter. Check Rec checks and notifications are written to check reconciliation file at this time. 91
92 Recording Employer Fringe for payroll accruals: This is assuming Fund Ledger and Payroll modules have been closed for the year. 1. Print the Employer Fringe report in the Current year using current year dates. 2. Create the Employer Fringe Posting File in Current year using current year dates. NOTE: When creating the posting file, you will want to select the pay period that you have flagged as accrual if you only want to accrue fringe for people that are set to accrual. Then, when you create fringe for the regular payroll periods in the months of July/Aug, you will want to select for these pay periods at that time as well. If you create fringe for accruals and do not select pay periods and then create fringe for regular pay periods in July and do not select pay periods, you will create the fringe for accruals again. The system will not warn you that fringe has already been created for accruals because as long as the flag is set in the Payroll System file to track accruals, the system does not look to see if a posting file has already been created for fringe. We do not suggest turning that flag off or the flag in the pay period file for accruals until you are completely finished with payroll accruals. 3. Post Fringe to Fund Ledger using the Post Contributions & Fringe to Ledger option located under the Fringe menu in Payroll in PRIOR year using the prior year dates. (i.e., 06/30/2004) Recreating direct deposit for accruals: If you are recreating direct deposit for an accrued payroll, make sure you use the update number from the second half of the accrual process (when checks were actually printed/updated). 92

93 Restarting Check Print This option is used if you printed checks/notifications and had a printer jam or any other type of printer problem where you needed to restart a print job and restart check with a particular check or notification number. If you are using a 3 rd party vendor, you may be able to do a simple reprint from their software. Contact the vendor for more information. The restart steps are assuming that you have not updated the check/notification to payroll history files. There may also be other ways of doing a check print restart depending on the situation. The steps below are intended to help you salvage the good part of your check run without having to reprint all of the checks/notifications. If the steps below do not apply to you, contact CSI Support for help. 1. If you currently have the Update Employee Information screen up, click on the Cancel button (X) at the bottom of the screen. 2. Open Print/Update Payroll Checks option again. 3. Select Update Only. 4. Key the beginning check/notification numbers that printed with no problems so they can be updated to history. 5. When the Update Employee Information screen appears, type in the beginning and ending check/notification number range that printed with no problems. This is so you can update that range of check/notification numbers so they will not have to be reprinted. 6. After that group of checks updates, access the Print/Update Payroll Checks option again and select Print/Update and check the Is this a printing restart box. Enter the new beginning check/notification numbers of the checks to be reprinted. 7. Once those checks have printed, update that group of checks to history. Verify that the ending check numbers are correct on the screen compared to the actual checks that printed. 8. Print a Payroll Check Register for the payroll date to see if both sets of checks updated correctly. You should see two check runs. 93

 x number of days to be furloughed (2) = 346.64 346.")
94 Furlough There are several steps that need to take place in order to set an employee up for furlough and in order to report it to the retirement system. 1. Set up a furlough pay type and flag it as furlough pay type. 2. Set up a furlough deduction and flag it as furlough deduction 3. Add furlough pay type to employees. Typically the furlough pay is calculated as follows but may vary depending on your organization. Daily Rate from Salary Tab (173.32) x number of days to be furloughed (2) = / remaining pay periods of fiscal year (5 in this case) = per pay period 94
.")

95 4. Add furlough deduction to the employees (a maintenance menu is available under special maintenance to globally add and calculate the furlough deduction). The maintenance menu calculates the employer and employee contribution and inserts it in the employer contribution field. 5. Run payroll as normal. 6. When Retirement reports are printed a supplemental report also prints for the furlough employees. 95

96 Fringe (PR) The Fringe option on the payroll menu bar provides access to menu options related to the employer s portion of FICA, Medicare, Retirement, Worker s Comp, Health, Dental, and Other fringe. Employer Fringe and Contributions Overview The options on the Fringe menu allow the employer cost of employee benefits to be computed and posted to the appropriate ledger expenditure account. Because of the way these costs are computed and reported, they are divided into two groups. The two groups are defined as employer fringe and employer contributions. 1. Employer Contributions -- Employer contributions sometimes referred to as match includes the employer s matching contribution for FICA/Medicare and retirement. The employer cost for unemployment and workers compensation also fall within the employer contribution group. All costs in this group are assessed as a percentage of earnings and the information is computed and compiled at the time the payroll is updated. After the payroll is updated, the option to Create Employer Contributions Posting File should be run. The posting to ledger can take place each time the posting file is created, or all posting files can be posted at the end of the month. 2. Employer Fringe -- Employer fringe includes the employer cost of health, dental, and other insurance. All costs in this group are stated in terms of a fixed amount that varies with the type of coverage. Fringe cost are computed and posted to ledger at the end of each month. Before employer fringe and contributions can be processed, the system needs to know the following: The employer cost rate. The object code for the expenditure account where the employer cost will be charged. The liability account that will be credited for the accrued employer cost. For FICA, Medicare, Federal Unemployment, and State Unemployment, this information is recorded in the payroll system file. For all other fringe types, this information is associated with an employee deduction and is recorded in the payroll deduction parameter file. However, please note that some employer costs such as workers compensation are not associated with an employee deduction but a deduction record must be set up as a way to record the employer cost and account information. 96
97 Employer Contributions Processing CSI recommends that you run the Employer Contributions Report after each payroll. The steps are as follows: 1. Print the Employer Contributions report. To print this report, choose the payroll Fringe menu option named Employer Contributions Report. This report will show the wages and the employer cost for FICA/Medicare, Retirement, and Unemployment. When you choose to print the Employer Contributions report, you will be given several options as reflected on the following screen. Normally, the contributions report will be run for a specific payroll date and include everyone who was paid for that date. However, the options under the report criteria tab make it possible to run the report for selected account number ranges, locations, departments, etc. 97

98 This flexibility, along with the fact that the report can optionally include details for each employee, provides the ability to generate reports that could meet a variety of needs. The ability to include sub totals for locations and functions also enhances reporting flexibility. If you think you might have forgotten to create a posting file, the option to Include only records not in posting file could be a handy option. Running the report for the month and selecting this option is a good way to verify that nothing was omitted from the accrual. Also if you have more than one payroll with the same date, this option can be used to produce a separate report for each payroll. For example, if you have two payrolls on the same date, create the posting file for the first payroll and when you run the report for the second payroll choose the option to include only records not in the posting file. Compare the total wages against the wages shown on the payroll register for the same payroll period. If these totals match and the employer matching costs have been correctly calculated, you are ready to create the posting file. If not you can make the necessary corrections and reprint the report as many times as necessary. 98
99 Example of Payroll Register: Example of Employer Contribution Report 99

100 Run the option to Create Employer Contribution Posting File. It is recommended that this option be run after each payroll. Post the contributions cost to ledger. To post the employer matching contributions to the ledger, choose the payroll Fringe menu option named Post Contributions & Fringe to Ledger. Contributions can be posted each time the posting file is created or a single posting can be made at the end of the month. It is recommended that the employer contributions be posted after each time the posting file is created. 100

101 Employer Fringe Report Employer Fringe Processing Monthly The employer fringe cost (health & dental) should be calculated and posted to the ledger at the end of the month. The steps are as follows: 1. Print the employer fringe report. When this report runs, the system calculates the employer cost for health, dental, and other insurance cost based on the employer cost amount reflected on the Deductions screen in the employee s master record. This can also select on account criteria. 2. Create the posting file. To create the file, choose the payroll Fringe menu option named Create Employer Fringe Posting File. This step allocates the employer fringe cost to the fringe expenditure accounts in the functional areas where the employee s salary is charged. The costs will be allocated on the basis of the fringe percentage distribution reflected on the Salary Accounts screen in the employee master record. 101
102 NOTE: The system alerts you if fringe records have already been created for the date specified. However, if the pay groups are set up as accruals, then the fringe can be created more than one time for the same date. Employer Fringe Processing per Pay Period The employer fringe cost (health & dental) can be calculated and posted to the ledger after each payroll is updated. The steps are as follows: 1. Print the employer fringe report for the payroll check date. To print the report, choose the payroll Fringe menu option named Employer Fringe report. When this report is run, the program will calculate the employer cost for health, dental, and other insurance cost based on the employer cost amount at the time the payroll was updated. 2. Create the posting file for the payroll check date. To create the file, choose the payroll Fringe menu option named Create Employer Fringe Posting File. This step allocates the employer fringe cost to the fringe expenditure accounts in the functional areas where the employee s salary is charged. The costs are allocated on the basis of the fringe percentage distribution reflected on the Salary Accounts screen in the employee master record. 102
. ***Reminder: Please use the date range option with caution. Fringe amounts can easily be doubled.")
103 GA State Health Rpt/File/Fringe (State of Georgia version) This option allows fringe to be created for a date range. This defaults to the current month range (this is the recommended way of computing fringe). ***Reminder: Please use the date range option with caution. Fringe amounts can easily be doubled. Consider the following when calculating fringe: First, it pulls the certified merit insurance percent from the Employee Master Deduction Tab under the Emp Cost field. The employees in the selected pay groups are pulled from the Employee Master File (hr180). State Merit is calculated from labor history. The Only calculate fringe on deductions that have a fringe amount specified flag must be flagged on the Deduction parameter on State Merit deduction. State Merit flag must be set on the Employee Master Salary Account tab on the account(s) that are subject to state merit. Note: Furlough pay reductions may also need to be flagged as state merit. This information may be posted to ledger via the Post Contributions & Fringe to Ledger option under the Payroll Fringe menu. Post the Fringe cost to ledger. To post the cost to ledger, choose the payroll Fringe menu option named Post Match & Fringe to Ledger. 103
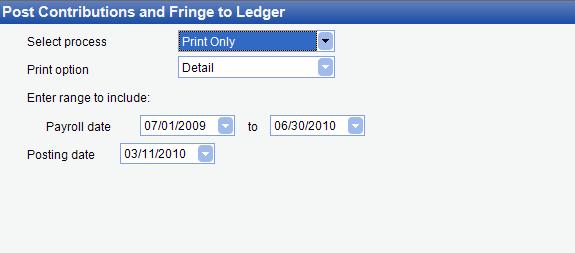
104 104
105 Employer Contributions/Fringe Posting Rollback This option allows the posting file that is created for employer contributions or fringe to be undone. Normally this option is needed if the fringe or employer contribution information needed to be corrected before the posting file was created. Note: This file creates posting records for void checks with the void date rather than the original check date. 105
106 Verify Fringe Setup Report This report is used to verify how the employee s fringe ratio is set up. This report pulls information from the employee s salary account tab and the deduction tab in the Enter/Edit Employee Master. The information from the employee s salary account tab is how the employee is being paid (the account numbers, the standard and current salary amount, FTE, and fringe ratio) and from the deduction tab, the employer s portion of health, dental and other fringe. If a deduction is flagged as one of the other types (2, 3, 4, or 5), it can be printed by selecting the include all other fringe costs checkbox and changing the printer to landscape mode. 106

107 Deductions (PR) The Deductions menu on the payroll menu bar provides access to menu options to print deduction reports and create electronic files to transmit deduction information for retirement, deferred compensation, insurance, savings bonds, etc. 107
108 Employee Deduction Report The employee deduction report can be very useful for producing a list of deduction amounts for specified time periods, deduction codes, and pay groups. If you are writing a check to remit employee withholdings, the deduction report is an excellent document to send along with your check to support the payment. Examples include wage garnishments, insurance payments, etc. A report can also be submitted to the SC Retirement System for those employees who are paying additional retirement. To print the report, choose the payroll Deductions menu option named Employees Deduction Reports. The following selection screen will be displayed. The Period to Report selections include: Current (enter a current payroll date), Month, Quarter (current quarter), Quarter 1, Quarter 2, Quarter 3, Quarter 4, Fiscal year, and Calendar year. A field is provided to Enter the Employer Code if Applicable. This is where you would enter your organization ID number that identifies your organization to the person receiving the report. You may also include wages on the report by checking the box Include Wages on Report. If you select the option to Include Note Field on Report, you will be able to select a note field that can be printed on the deduction report. For example, this can allow a case number that has been added to the note field section of the employee master to be included on the deduction report. 108
109 The report detail is sorted by employee name instead of by deduction so therefore all of the employee s deductions are printed for each employee. Sample Payroll Deduction report: Detail version 109
110 Insurance Cost Report The insurance cost report is designed to report the employee and employer share of health, dental, and other insurance cost. The report will include deductions with a fringe type code of H, D, or O. The fringe type codes are assigned in the deduction parameter file. The employer cost amounts will show up only if you have run the Create Employer Fringe Posting File first. This report can be a very useful tool to verify monthly invoices covering amounts that you owe for health insurance. To print the insurance cost report, choose the payroll Deductions menu option named Insurance Cost Report. You will be able to run the report for a specified date or range of dates. Also you can elect to include all or selected records for Classes, Departments, Pay Groups, Employees, or Locations. Employer fringe must be created and posted for the month prior to running this report. 110
111 Sample Insurance Cost Report: 111
 deductions that have employer costs associated with them.")
112 Deduction Verification Report The deduction verification report is designed to list deductions that have been assigned to employees. The report can be run to include all deductions or only the deductions that you select. You may also select to print (only) deductions that have employer costs associated with them. To print the deduction verification report, choose the payroll Deductions menu option named Deduction Verification Report. Sample Deduction Verification Report: 112
113 Electronic Submission of Payroll Deduction Information Several options on the payroll deductions menu are designed to print a report and/or create a file that can be submitted via modem or diskette: Retirement File/Report FBMC Money Plus File/Report Savings Bond File/Report Deferred Comp File/Report Deferred Comp Maximum Limit Report SLTD Report for OIS Benefits File for OIS Create State ORP Withholdings Report/File Create 401k Report/Disk for NC Update Payroll Deduction Amounts Global Delete Old Deductions Retirement Deduction Reporting - SC Retirement deduction information for the SC Retirement system or NC Retirement system can be generated in report form, or a file can be created so that the information can be transmitted via diskette or modem transfer. To produce the reports and create the file, choose the payroll Deductions menu option and then choose the option named Retirement File/Report. The following selection screen will be displayed. You can choose to print a report, create a file, or both. 113
114 Information for all deductions that have been flagged as retirement type R will be included in the reports or files created from this option. Go to the deduction parameter file to flag a deduction as a retirement deduction. The options under Select Process are to print the report and create the file, create the file only, and print the report only. The Report Sequence options are to print in sequence by name, class, department, location, and social security number. The Output Options are to print a detail report or a totals only report Period to Report selections include a wide variety of options. These are Current (enter a current payroll date), month, quarter (current quarter), quarter 1, quarter 2, quarter 3, quarter 4, fiscal year, and calendar year. If a file is being created, enter the path and file name in the Enter Filename field. The default path/filename can be stored on page 4 of Payroll System File. Sample SC State Retirement Report: 114

115 Including ORP participants on SC State Retirement You can code your ORP deductions with the correct provider codes to identify the retirement plan. The following items will need to be set in the Deduction parameter file before submitting your Retirement report and file at the end of September. 1. Retirement type will need to be set to O for other retirement. 2. Provider code will need to be set with the appropriate code. Note: You will continue to submit your ORP report and disk through the Create State ORP Withholdings Report and Disk as you normally have been submitting. 115
. TRS2 is a newer version for the TRS system.")
116 Retirement Report/File Georgia Teacher Retirement (TRS) The Public School Employees Retirement System (PSERS) was established to provide supplemental retirement benefits for public school employees who are not part of the Teachers Retirement System of Georgia (TRS). TRS2 is a newer version for the TRS system. If you select the TRS2 flag, the system will alert you of any exceptions prior to creating the file for TRS2. The file names will vary depending on the type of file that you are creating. Electronic contribution files must be named as follows: yyyymmaaaaaaaa.ttt where TTT is the file extension and must be the three-character report type, yyyymm is the report month, and AAAAAAAA is a four- to eight-character alphanumeric employer code. Please review each item below and make sure you have set your system parameters correctly. Pay Types - TRS Transaction Type o C=Regular Contribution, P=Prior Period Adjustment, R=Retro Pay This field was automatically set to C when it was initially set up by CSI. Edit to P or R for applicable pay types Reported to TRS field 002 o Posting Month If blank, CSI will report the payroll year/month Enter the first day of the month if we are to report this field typically, this field would be used for reporting Prior Period Adjustments and Retro Pay Remember that you will need to set up a separate pay type for each month/year that may need to be adjusted 116
117 o o Reported to TRS field 003 Payment Reason Select the appropriate payment reason. This field was automatically set to 00 Regular when the most recent update was installed Reported to TRS field 042 Summer Employment Pay Set this flag for applicable pay types Reported to TRS-field 066 Job Codes - Job Classification o These are set to 00 by default when they are initially set up by CSI. 00 = teaching faculty 01 = instructional aides 02 = paraprofessionals 03 = executive, administrative, managerial 04 = clerical, secretarial, administrative support 05= technology, technical, professional 06= lunchroom, maintenance, warehouse and transportation Pay Group - Make sure you have the Contract Length (months) defined correctly for employees who are not 12-month employees. We use this information to report Prorated Summer Pay for employees. Deduction - Effective July 2012, the employee contribution for a PSERS member increased from $4.00 to $ Make sure the deduction for the $10.00 contribution group has the retirement type "X". The deduction for the $4.00 contribution group should have the retirement type "P". Make sure that these deductions are assigned to the appropriate employees. Employee Master - TRS Eligible Flag o Set to true automatically for all employees participating in TRS. - TRS Eligibility Date o Set to match Leave Accrual date. o Needs to be edited or entered on employees whose TRS Eligibility Date is not the same as the Leave Accrual date. o Reported to TRS field
. Detail employee member data must be submitted electronically to RSD unless the employer has only a few employees to report. In this case, they can key the data into ORBIT.")
118 North Carolina Orbit Beginning in October 1, 2007, NC employers participating in the state retirement system began submitting retirement salaries and contributions in a new format to the Retirement Systems Division (RSD). Detail employee member data must be submitted electronically to RSD unless the employer has only a few employees to report. In this case, they can key the data into ORBIT. Summary contribution information (including employer costs) will be entered by the employer using the Employer Self Service (ESS) website. Totals must be summarized by retirement plan and must match the totals reported in the detail data. Paper reports will no longer be accepted. There are two documents that detail requirements by the NC Retirement Systems Division (RSD): The file layout NC ORBIT Employer Contribution Record Layout A Q&A document NC ORBIT Q&A A helpful website is: The following items in the SmartFusion application are affected by this change: 1. Deduction Parameter Screen a. On existing Retirement deductions you will need to select a Plan Code value in the new RSD Plan Code field on the Deduction Parameter Screen. Each retirement deduction should have the correct plan code assigned. See the Plan Codes appendix in the ORBIT Employer File Layout. b. Retirement Type values on these deductions will still remain the same. c. Employer Code will be keyed in field Organization ID Code. Previously, a separate employer code was assigned for General employees and one for Law Enforcement employees. Now employers will have one employer code assigned by RSD. Therefore, all retirement deductions will now have the Organization ID Code set to the new employer code. 2. Pay Type Parameter Screen 118
 -- If an employee is to receive a prior period adjustment or retro pay, a new pay type must be set up.")

119 a. A new field called RSD Pay Type on the pay type parameter screen has been added. You will need to select a reason code for every pay type. Retirement will now be reported by pay type and the retirement deduction amount will be split among the different pay types. b. RSD Transaction Code and Posting Month (North Carolina only) -- If an employee is to receive a prior period adjustment or retro pay, a new pay type must be set up. The appropriate RSD adjustment transaction code and posting month should be set. Use the first day of the month that the transaction will be adjusting. A separate pay type must be set up for each month to be adjusted. 3. Class Parameter Screen a. Under the new retirement reporting process, employers must assign a RSD Job Classification to each employee. These job classes should be set up using the Class Parameter screen and the Job Classification appendix in the ORBIT Employer File Layout. Each employee must be assigned the correct Class value on the PR employee master screen. 4. Employee Master a. Member ID s must be blank for first submission. For your test file the current member ID will be used. Prior to the first live submission, all member ID s must be blank. After the first file is processed, each member will be assigned a new ID. See page 8 of ORBIT Employer Reporting Q&A. You will need to manually key in those values in the note field you have been using in PR employee master screen. 119


120 b. Set Class value for each employee. Setup was done on #3. Each employee must be assigned a valid Class in order to report their job classification to RSD. c. Terminating Employees after Sept When an employee is terminated for any reason, the RSD termination reason must be reported. Select the reason code on the Inactive Employee screen under Employees option in payroll that corresponds with the termination reason. Valid codes are RETIRE, DEATH, VOL, INVOL. These codes must be entered or edited in the Reason parameter. d. Retirement Eligibility Date field for the employee will now display on the General tab of the PR Employee Master. 5. Payroll System File a. The default drive in the Payroll System file is where the ORBIT file will be created. CSI suggest setting the value to C. 120


121 6. ORBIT Menu option a. There is no special menu option for ORBIT. The changes have been made on the normal Retirement File/Report option. The name of the file will be yyyymmnnnnn.cnt where yyyymm represents the reporting year and month, NNNNN represents the employer code (Organization ID) from the Deduction Parameter File and CNT is the file extension. This is hard-coded by the system. 121
122 FBMC/Money Plus File/Report To print a report and/or create a file for the plan administrator, choose the payroll Deductions menu and select the option named FBMC Money Plus File/Report. All deductions with provider codes unique to FBMC (111, 211, 311, and 511) will be included. The filename can be stored in the Deduction parameter file. See the Deduction parameter section of this manual for more information. Sample FBMC Money Plus Report: 122

123 Savings Bond File/Report Use this screen to create the disk for submission to the Federal Reserve. It will print a report based on the disk and will allow employee savings bond information to be printed for review. Savings bond information must be set up for an employee on the Savings Bond and Deductions tabs in the Employee Master. Five Options: o o o o o Print Savings Bond Report by Employee Name Print Submission Report Print Submission Report, Create File, Update Create File & Update Recreate File If creating the file, verify the file name and purchase date. When the file is created, the system updates the employee s savings bond information recording the purchase denomination, purchase date and reducing the accumulated amount. 123

124 Deferred Comp File/Report Use this screen to print reports and create disks for deferred compensation and credit union reporting. 1. Select a state. Select a process: Create File Print & Create File Print Only 2. Select a Type of File to Create. 3. Enter a period to report. 4. Enter a filename. This field retains the last path that was used. 5. In the Report Selections section, indicate if the file/report will include all deduction codes or specific deduction codes. 6. Select deduction codes for the 401K Loan and 457 Loan. These fields are active if you selected Great-West Retirement Services for your file type. Indicate if the report will be grouped by deductions. 7. If you selected Fiserv for your file type, the Note Field for Member ID field becomes active. Select a Note Title. This allows member IDs to be written to the file instead of SSN s. 8. Enter values for the If creating the file, enter your payroll center code and payroll extension if needed fields. 9. Indicate if the report will include all pay groups or specific pay groups. 10. Click Print to run your report/file or Print Preview to view your results. 124
125 Sample Deferred Compensation Report: 125

126 Deferred Comp Maximum Limit Report (SC Clients Only) This report summarizes the deduction amounts for deductions with a W-2 code of D and G for the selected date range. If the employee is over the maximum limit for their age group, they will be displayed on the report. 126

127 SLTD Report for OIS This is the Supplemental Long Term Disability Report for Office of Insurance Services. It is designed to furnish the OIS with the salary information that it needs to assess premiums for SLT insurance. 127
128 Benefits File for OIS This is the Benefits Disk for Office of Insurance Services (OIS) screen. This option allows you to create a disk file to send to the Office of Insurance Services. OIS will use the file to sequence their files so that benefit statements can be sent to your organization sorted by location. The intent is to make it easier for you to distribute the benefit statements. To create the disk, choose the payroll Deductions menu option named Benefits Disk for OIS. Enter the employer code assigned to you by the Office of Insurance Services and enter the name of the file or accept the default file name. You can enter a range of contract days to process and you can choose to include all or selected locations and pay groups. 128

129 Create State ORP Withholdings Report/File South Carolina educational organizations may now offer Optional Retirement Plans (ORP) to their certified staff. If your organization participates in ORP, use this option to report the withholdings to the various insurance companies. Each of these companies will provide information on how to submit the file once it has been created. 129

130 Create 401K Report/File for NC This menu option generates the 401K report and file to be submitted to BB&T with each payroll. You must specify the Regular 401K, the Law Enforcement 401K, and the Loan deduction codes. 130

131 Update Payroll Deduction Amounts This option allows global updates to be made to employee deductions in the Enter/Edit Employee Master. This option will not update the Deduction parameter file. If default amounts or percents are set up in the Deduction parameter file, these will need to be edited manually. Specify which deductions to update. Select which fields to update: Standard Amount Replace old with new Current Amount Replace old with new Employer Cost Replace old with new Employer Cost based on Deduction amount Specify deduction amount and employer cost to set Zero Deduction amount. Select Standard and/or Current. You may select to include inactive employees. You may also specify particular pay groups or employee to update. 131
132 Global Delete Old Deductions This option will globally delete any old deductions from an employee s Deduction tab of the Enter/Edit Employee Master if an employee has zero standard/current amounts and zero for the employer cost. This will delete deductions from both active and inactive employees. 132

133 403B Remittance File/Report SmartFusion provides a way to interface with various 403b vendors to create files for submission. 1. Select a process: Create File Print & Create File Print Only 2. Select a Type of File to Create. Depending on what type of file you select, various fields on the screen may become active. Some selections also activate the Select the Items to be Reported pane. 3. If the Payroll name field is active, enter the name of the file here. When the 403B Remittance File Report screen opens, this field remembers the last value entered. 4. If the Client Code field is active, select a date. 5. Select a 403b Loan deduction code, if applicable. 6. Select a 457 Loan deduction code, if applicable. 7. Select a report sequence: Location Name Vendor 8. Enter data for a period to report. 9. Enter the filename for the payroll file. 10. If the Exclude non-participants from report checkbox is active, indicate whether or not you want to include non-participants in the report. 11. Click Print to run the report or Print Preview to view your results first. 133
 with payroll information to be submitted to Colonial. Enter the drive and directory only.")
134 Colonial Supplemental Insurance Interface This option creates two files (census.csv & empbene.csv) with payroll information to be submitted to Colonial. Enter the drive and directory only. 134

135 Taxes (PR) The Taxes menu on the payroll menu bar provides the options to generate reports or electronic files necessary for reporting taxes to federal and state governments. 135
136 Multiple Worksite Report The multiple work-site report is a quarterly report for the Employment Security Commission. It provides a count of the number of employees at each location that received a check during each month of the quarter. The report also includes total quarter-to-date wages for each location. To print this report, select Taxes Multiple Work-Site Report from the Payroll menu bar. The following report selection screen opens. The output options are Detail and Summary. The normal option is the summary report that shows totals for each location. The details option includes the name of the employees reported for each location and is helpful when it is necessary to verify who is being reported at each location. You may elect to include all locations, a single location, or randomly selected combinations of locations. 136

137 Quarterly Tax Reports Use this screen to view Quarterly Reports for Federal & State Payroll Taxes. To print quarterly federal and state payroll tax reports, select Taxes Quarterly Tax from the Payroll menu bar. The following selection screen opens. From this selection screen you may choose to print the federal 941 report, state income tax withholding reports and the state unemployment tax reports. 137
138 Federal Tax Withholding Reports The selection to print the federal tax withholding reports will generate a summary report of the information that can be transcribed on to the formal quarterly 941 form. Schedule B, which supports the form 941 will be printed in a final format that can be submitted along with the form
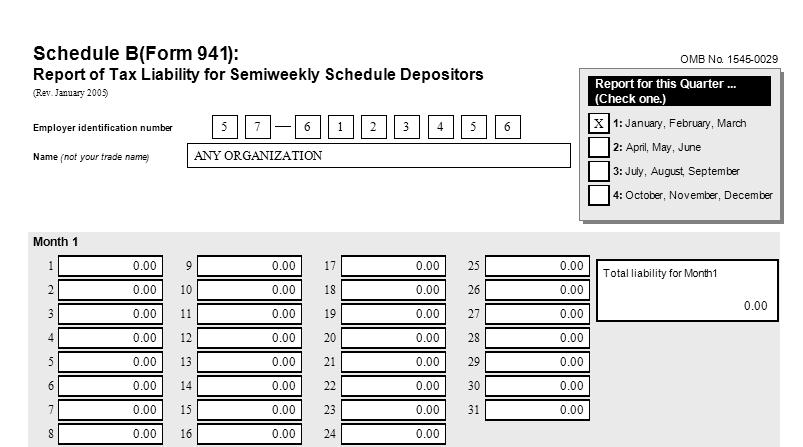
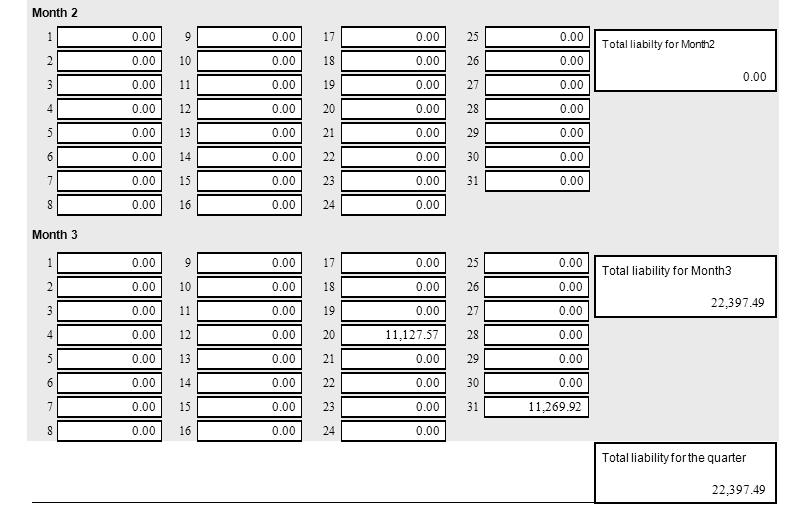
139 139
140 State Tax Withholding Reports The selection to print the State tax withholding reports generates a summary report showing the total state income tax withheld along with the federal liability for each month of the quarter. Transfer this information to the Appropriate State form WH The accompanying schedule B prints in a final format that can be submitted along with State form. 140
141 141
142 State Unemployment Reports The state unemployment option allows you to print a report as well as create a file that can be submitted to the Unemployment Security commission. When the selection box for state unemployment reports is checked, other fields on the selection screen will be made available to enter more choices. The choices available under report options are; Create File, Print Report, or Print Report and Create File. If the choice includes creating a file, you will be prompted to enter a path and file name for the file to be created. Input fields are also provided to enter the taxable wage limit as well as the contribution rate and the contingency assessment rate. These rates are typically shown on the quarterly forms supplied by the Employment Security Commission. The taxable wage limit is required but entering the rates is optional. If the contribution rates are entered, the program will compute the tax liability and include it on the report. Otherwise, the liability will need to be manually calculated. 142
143 143

144 Payroll Summary Report This report gives you the breakdown of the FICA & Medicare wages, and the Tax deposit information per pay period. You may select for the current pay period, the month, quarter, fiscal YTD. This also now reports the employee FICA and Medicare contributions, but when computing the Federal Tax Deposit, the system multiplies 12.4% x FICA wages and 2.90% x Medicare Wages. This report now shows voids separately, so that is it easier to tie back to the Payroll Register totals. NOTE: When you run a Payroll Check Register, you are running it for that moment in time, so the percentage is pulled from the system file. However, when you run the Payroll Summary Report, you need the FICA percentage as of the date of the check. If you're in 2013 and you run the Payroll Summary Report for 2012, it needs to know that the percentage in 2012 was 4.2. A table stores the percentage for each year. Sample Report: 144
145 W-2 Summarization Report The W-2 summarization report includes a summarization of the information on the employee s W-2 form. It provides a convenient way to preview and audit W-2 information to confirm that it is correct before the W-2 s are printed. It can also be used as a hard copy report to support the W-2 information. A common problem at year-end is that the information that has been reported on the quarterly 941 reports does not match the W-2 totals. To avoid this problem, CSI recommends that the W-2 summarization report (totals only) be printed each quarter and checked against the quarterly 941 totals before the 941 reports are filed. To print this report, select Taxes W-2 Summarization Report from the Payroll menu bar. The available selections under Select Report Sequence are Name, Class, Department, and Location. Output options are Detail and Totals Only. The Period to Report selections include: Current (enter a current payroll date), Month, Quarter (current quarter), Quarter 1, Quarter 2, Quarter 3, Quarter 4, Fiscal year, and Calendar year. The report displays ** s in the right margin of report to indicate an exception was found on the employee. The report can also be run to Print Exceptions Only. Use this option to highlight any negative amounts that will cause problems when reporting to the Internal Revenue Service. 145
146 Detail version: 146
147 Print W-2 s Use this screen to print W-2 s at the end of the Calendar year after all payroll checks have been printed and Special Compensation has been recorded. Before printing W-2 s, be sure to enter your organization s Federal and State Tax ID numbers in the Payroll System file. The W-2 summarization report should be printed to verify the W-2 information. We also recommend that you test print a small group of W-2 s to check alignment. Please contact CSI for information on ordering W-2 s. Select from the following report sequences: Department, Location or Name. If the W-2 print was interrupted, you may restart by specifying the restart number (a control number is printed on the W- 2 s for this purpose). Select Process: Create File, Print & Create File, or Print W-2. We recommend that you print W-2 s first and create the file later, since the file does not have to be submitted until February 28 th. Enter the period to report, be sure to specify the correct dates since you normally print W-2 s for the Calendar year. If you are creating the file for Magnetic Media reporting to SSA and the State, verify the file name and drive destination. (You must run the option twice in order to create a disk for SSA and the State). NOTE: An X prints in box 13 for employees who are flagged as Statutory employees. 147
148 NOTE: Various scenarios have come up where Box 13 for retirement gets checked on W2 s and it should not. These occasions are usually odd circumstances that do not fall within the normal rules for checking the box, but need to be handled properly. A new setup has been put in place to better handle these odd circumstances where Box 13 should not be checked. If your organization has an employee for whom this box should not be checked, set up a new note title for Payroll. Go to the Note Title parameter in Payroll and set up a new note title called W2NOBOX13. Once this new note title is set up, this note must be set up on each employee that does not need their Box 13 checked. Therefore any employee that has this note will no longer have their Box 13 Retirement Plan checked, no matter what. Select the W-2 type as follows: Standard Employee Copies Prints on special perforated forms. Standard Employer Copies Use these pre-printed forms if you are not creating a Magnetic Media disk. 3 rd Party Format Use this option if you are using Source4 (Dominion Solutions) or SoftDocs to print W-2 s. If you print W-2 s through a 3 rd party vendor (Source4 or SoftDocs), set up the filename for the 3 rd party vendor in the Payroll System File under the W-2 tab. CSI recommends the name of the file be W2.TXT. This applies only to clients who use a 3 rd party vendor to print W-2 s. You may also select to Include Totals and also to print totals only to verifications. You can also select departments, locations, or employee to be included. If you select to include totals and use a 3 rd party vendor to print W-2 s, the totals are included in the file created for the 3 rd party vendor. The totals report also continues to print on plain paper as well as being created in the file. Note: If an employee has ORP, the pension flag on the W-2 will be checked. **GA Clients Only If the Create second W2 file in state-specified format option on the W2 Settings tab of the Payroll System File is selected, a field appears on the Print W-2 s screen called Enter state filename. When Print & Create File is selected, a separate file from the Federal file will be created matching the State of Georgia s file layout. **GA Clients Only The Export totals option is enabled for GA clients only and provides a way for the state totals to be exported into a file format. 148

149 Reports (PR) The Reports menu on the payroll menu bar provides access to reports that are not related to options available under other menus. For example, reports such as employee master lists are included under the Employees menu, deduction reports are included under the Deductions menu, and quarterly tax reports are included under the Taxes menu. The Reports menu is used for all other miscellaneous reports. When a report is selected from the menus the selection screen that is displayed provides options for customizing your report with regard to the report sequence, level of detail to be reported, and the groups/individuals to be included. By default, the screen opens with all of the options checked, meaning that all individuals or groups of individuals will be included. If you uncheck any selection box, you will be provided with a list of options to choose from. From any of the lists, you can choose a single item, all items, or items selected at random. To choose all items, click on the first item and scroll to the bottom of the list, press the Shift key, and then click on the last item. To choose items at random (for example location 10 and location 12) click on location 10, press the control key and click on location

150 Labor History Reports Labor History reports are designed to report gross wages paid to employees for a specified date range. Two reports, labor history by employee and labor history by account, are available. Labor History by Employee To print a labor history report by employee, choose the payroll Reports menu option named Labor History by Employee. This report may be printed in sequence by employee name or by payroll date. Please note that references to the payroll date, refers to the payroll period ending date as opposed to check date. Output options include detail, summary, and totals only. The detail report shows the payment made to the employee for each payroll date along with the number of hours worked where applicable. Subtotals are reported for each account. The summary report shows only the account subtotals for each employee. The Totals Only report shows a single total for each employee. Several options regarding data to be included in the report are provided: 1) A payroll date range can be selected by entering a beginning and ending payroll date. 2) A selection to include accrued payrolls is provided. The default selection is Include Non Accruals. 3) By default, all pay groups (monthly, weekly, bi-weekly, etc.) will be included. Optionally, a single pay group or a combination of pay groups can be selected. 4) By default, all employees will be included but optionally, a single employee or a random selection of employees can be included. 150
151 Labor History by Account To print a labor history report by account, choose the payroll Reports menu option named Labor History by Account Number. This report is printed in sequence by account number and provides separate totals for each fund. By default, the report shows a single line total for each account, but optionally details can be included for each employee or each payroll date. Several options regarding data to be included in the report are provided: 1) A payroll date range can be selected by entering a beginning and ending payroll date. 2) A beginning and ending criteria number can be entered to select pre-defined report criteria or the report criteria tab can be used to define new selections on the fly. Considerable flexibility for reporting on ranges of account numbers or segments of the account number is provided through this option. 3) By default, subtotals will be included for accounts and funds. Optionally, subtotals can be included for functions and locations. 4) Options are provided to include accruals and to start a new page after each fund total. 151
152 Salary Allocation Report If your organization uses the Salary Allocation feature on the Salary/Accounts page in the Employee Master, this report shows you how the employees are set up for allocation (for example, 50% of pay from one account, 30% of pay from a second account, 20% of pay from a third account). 152
153 Earnings Report To print an Earnings Report, choose the payroll Reports menu option named Earnings Report. The Earnings Report is designed to report the following information for each employee for a specified time period. 1. The various types of employee wages such as Gross wages, Taxable wages, FICA wages, Medicare wages, and Retirement wages. 2. The amounts withheld for federal tax, FICA/Medicare tax, and state income tax. 3. Earned Income Credit (EIC) 4. Total other deductions (Optionally, detail deductions can be included) 5. Net Pay Time period options include: Current payroll date, Current quarter, Month, Fiscal year, Quarter 1, Quarter 2, Quarter 3, Quarter 4, and Year. The report sequence options include: Category, Class, Department, Location, and employee Name. Output options are summary and detail. The detail option reports details by employee followed by a totals page at the end of the report. The summary option prints only the totals page at the end of the report. Numerous selections are available to allow you to choose which employees will be included in the report. By default, all employees will be included but you can select to include a single employee or employees assigned to specified classes, departments, locations, and pay groups. 153
154 Employee Check Detail Report Use this screen to report check information by employee. The report may be printed by Class, Department, Location, or Name. Select whether to report detail or totals only for each employee. Employee deductions and/or pay type, accounts may be included on the report. Select the period to report. Optionally, a range of check numbers may be specified. By selecting the include void checks only option, a report can be run to print check detail for voided checks only. Numerous selections are available for selecting employees to include. 154

155 Leave Detail Report The leave detail report reflects every leave type that is assigned to each employee. The information reported for each leave type includes: a note indicating that leave is tracked in hours or days the accumulation rate leave balance at the beginning of the selected reporting period the amount of leave earned the amount of leave used the balance available. Select Reports Leave Detail Report from the menu bar. 155
156 Leave Summary Report The leave summary report is a single line report for each employee that shows the leave balance and the amount of leave used for up to four different types of leave. The Print/Display order on the Leave parameter must be set prior to running this report. The order value cannot be duplicated on leave codes. See Leave parameter for more details. 156
157 Leave History Report The leave history report provides a detail look at every leave record that was created for the employee for a specific period of time. To print the report, choose the payroll Reports menu and choose the option named Leave History Report. 157
158 Time Sheets Select Reports Time Sheets from the menu bar. The Time Sheets screen opens. Please note that you can define your own column titles. Once the titles have been entered, they will be retained until they are changed. The maximum length of the title is seven characters. You can choose to include only hourly employees and you may elect to print the pay rate on the time sheet. Numerous selections are available to allow you to choose which employees will be included in the report. By default, all employees will be included but you can select to include a single employee or employees assigned to specified classes, departments, locations, and pay groups. 158
159 A sample time sheet is as follows: Hourly Employees only with pay rate and employee ID number included: 159
160 Direct Deposit Master List The Direct Deposit Master List will report all or selected employees who are having all or part of their net earnings deposited directly to a savings or checking account. The information that is reported includes: Employee Name, Employee ID Number, Bank Routing Number, Bank Account Number, a column indicating whether or not the account is the primary deposit account, the type of deposit, and the amount of the deposit if an amount has been specified. Select Reports Direct Deposit Master List from the menu bar. Example of Direct Deposit Master List: 160
161 Employees Not Paid Report The Employees Not Paid Report prints a list of employees who did not receive a check for a specified pay group. The report will not include employees who are flagged as BP Only. If you think someone might have been accidentally omitted from a payroll, this report provides a quick way to confirm your suspicions. The information included on the report includes: Employee Name, Social Security Number, and Pay Group. 161

162 New Hire Report/File The Child Support Enforcement Division of the State Department of Social Services requires that employers submit a monthly report listing all new hires for the month. The information is used by the CSED to pursue persons with child support obligations. The employer s reporting obligation can be met by submitting a written report or a diskette. The payroll menu Reports option named New Hire/Disk Report allows you to print a report, create a file, or both. It also gives you the option to include inactive employees and reports the employee s status on the report. The report shows the employee s name, address, social security number, date of birth, and hire date. 162

163 Pay Type Report The pay type report provides a useful way to report the amount for different types of pay such as regular pay, overtime pay, bonus pay, or any other types of pay classifications that you use. In addition to the amount of pay, the report shows the number of days or hours worked under each classification. To print the report or preview the reporting options, select Reports Pay Type Report from the Payroll menu bar. The Fringe Benefit field on the report is updated from personal use pay that is included on a normal payroll run. 163
164 Labor Statistics Report The Labor Statistics Report will report the number of employees paid during a selected time period. The following sample report shows the type of information that will be reported when you choose to include wages and report the number of employees by both sex and race. To print this report, choose the payroll Reports menu option named Labor Statistics Report. Example: 164
165 EEOC-4 Labor Statistics Report The Equal Employment Information Report (EEO-4) is a report that is to be filed by state and local government entities. The report sets forth the sex and race/ethnic composition of the work force by job category and annual salary. The frequency for filing the report varies with the number of full time employees. The current reporting requirements are: Over 100 employees Annually 50 to 99 employees Every other year 25 to 49 employees Every four years 15 to 24 employees Every six years To print this report, select Reports EEOC-4 Labor Statistics Report from the Payroll menu bar. The report can be run by Category or EEOC code. These codes are used on the demographics tab of the Enter/Edit Employee Master. 165
166 166

167 Enumeration Verification System File To create a disk for the Social Security Administration, select Reports Enumeration Verification System File from the Payroll module s menu bar. This option creates a disk that can be sent to the SSA to verify the accuracy of your employee social security numbers. 167

168 Worker s Comp Report This report sorts by worker s comp codes that are set up on the Enter/Edit Employee Master. Wages are pulled from the employee s labor history file. 168

169 Compare Checks to Labor History Use this report to compare the check file to the labor history file to ensure that there are no discrepancies. If discrepancies are found, they will be displayed in bold and highlighted on the report. 169

170 Terminated Employee Report This report can be run for a specific terminated date range and employee type. The terminated employee will be shown along with their SSN, DOB, Hire Date, and Termination Date. Sample Terminated Employee Report: 170
171 Employees with Current Hours but No Pay Report This report can be run to create a list of employees who may have current hours, but who do not have a current amount set up. Note that this report can be run for a specific department or employee. Average Days Missed by Employee Category Run this report to view an average of days/hours missed by category. 171
172 Attendance Report by Employee Type and School Run this report to view a breakdown of averages by category and location. 172

173 Maintenance (PR) The Payroll module s Maintenance menu provides the options to edit or fix files. Maintenance options can be compared to options that fix problems. Most maintenance options are recommended to be used with caution. Payroll is made up of many different history files so if you are using a maintenance option especially to edit files just remember that you may need to also use other edit options. Contact our Support staff for guidance on which options you may need to use. 173
174 Rollback Payroll Check Update Each time a payroll is updated, it is assigned a unique update number. If something goes wrong with the update or if the payroll needs to be redone for any reason, the payroll rollback feature will allow you to completely reverse a payroll and start over. However, the system will not allow the update to be rolled back if any of the checks have been voided! To roll back a payroll, select Maintenance PR Check Update Rollback from the Payroll menu bar. Enter the update number for the payroll that you wish to roll back. NOTE: If you have deductions flagged to auto-create in AP, you will need to manually void those vouchers in the Accounts Payable screen. (The system alerts you that these vouchers need to be voided in AP.) NOTE: If Fringe has already been posted, you must rollback fringe before you rollback Payroll Check Update. 174
175 Void Check Rollback Each time a payroll check is voided, it is assigned a unique update number. If something goes wrong with the void check process or if the wrong check was voided, the Void Check Rollback feature allows you to completely reverse the voided check (basically undo the void check). To roll back a voided check, select Maintenance Void Check Rollback from the menu bar. Enter the update number for the void that you wish to roll back. 175

176 Edit Payroll Posting File To edit the payroll posting file, select Maintenance Edit Payroll Posting File from the menu bar. Enter the update number for the payroll you need to edit and click Search. If a payroll checks have already been printed and updated but not posted to ledger, corrections may be made to the payroll posting file with this option. If an employee was expensed to the incorrect salary account, be sure to edit the labor distribution for the employee as well as the payroll posting file. Employee information such as labor distribution may be edited using the Enter/Edit Earnings History option on the Special Maintenance menu. This option can also be used to fix an out of balance situation with the payroll posting. For example, if you print the Print Only version of the Post Payroll to Ledger option and notice that you have an out of balance situation like the example on the next page, you can edit the posting file and make the correction. 176
177 Example of an out-of-balance payroll posting register: Click on the New toolbar icon to add the missing account number if that is the situation that needs correcting. Then enter the payroll date paid. This will be the date on the checks. Then enter the record type (P = Payroll and M = Matching (employer contributions)). Finally, enter the posting amount. The total posting amount at the bottom of the screen in the list area should be $

178 Edit Quarterly Tax Record To edit the payroll quarterly tax record, select Maintenance Edit Quarterly Tax Record from the Payroll menu bar. Enter the update number for the payroll you need to edit and click Search. This option is normally used when your organization comes online with the SmartFusion system and needs to record quarterly payroll information for payrolls that were generated on your previous payroll system. This option can also be used to make adjustments to the quarterly tax file if needed. Any adjustments that are made will affect the Federal and State Quarterly Tax reports. 178

179 Edit Direct Deposit History File To edit the direct deposit history file, go to the payroll Maintenance menu and choose the option named Edit Direct Deposit History File. Enter the last name, first name or social security number of the person you need to edit and click on Search button to find the record. This feature enables you to make corrections to an employee s bank account or routing information in order to recreate the direct deposit. (It is not recommended to edit the Transaction Code) 179

180 Leave Maintenance Under the Leave Maintenance menu, you will find sub-menu options that pertain to editing individual employee leave, global editing and setup of leave and year end procedures for leave. To use a leave maintenance option, select Maintenance Leave Maintenance from the menu bar. Then select the option that is needed. 180

181 Enter/Edit Leave History This feature allows you to edit leave prior balances, earned, or used if corrections need to be made. Once the changes have been saved, it affects the balance immediately. To edit the Leave History file, select Maintenance Leave Maintenance Enter/Edit Leave History from the menu bar. Enter the last name, first name, or social security number of the person you need to edit and click Search. Select the leave code to be edited in the top portion of the screen and then edit or add to the history in the lower portion of the screen. A note may also be entered to record why the change was made. Once this record is saved, it immediately shows on the employee s leave balance. You can also correct a leave balance by keying the day/hours in the current earned field to give back a day/hours. For example: if you needed to give back a day of sick leave, you would type 1.00 in the Current Earned field. This will not reflect in the current balance until a payroll is updated or the Update Current Leave to History option is run. The Current Used field works the same way except it takes day/hours from the employee s leave balance. 181
182 Year End Leave Processing Select Maintenance Leave Maintenance Year End Leave Maintenance from the menu bar. This option allows you to reset leave balances at the end of the year if you have selected a reset level or if your organization allows you to carry balances forward it will calculate that information and carry over leave based on what your ceiling level is set at. This option normally is used either at Fiscal Year End or Calendar Year End depending on how your organization tracks leave. You can verify how you are tracking leave by going to the Leave Parameter File and checking the Accum Frequency field. The date used to record leave balances is very important when running this option. An incorrect date can cause the employee s leave balances to be incorrect. Other processes, such as Update Current Leave to History, may also need to be run prior to running this step. The calendar or fiscal year may also need to be closed in Payroll prior to running this step. 182

183 Rollback Leave Processing Use this screen to reverse a leave accrual if leave has accidentally been accumulated more than once. You will need to specify the Leave Accrual Update Number. This can be found by checking an employee s leave on the Enter/Edit Leave History screen. This option may also be used to reverse the year end leave processing if it needs to be rerun for some reason. Select Maintenance Leave Maintenance Rollback Leave Processing. 183
184 Update Current Leave to History The current used leave is updated as the payroll is being processed and is normally not updated to the history file until the payroll is updated. However, you may want the leave history to be updated sooner in order to print leave reports or due to Year End Leave processing. This option performs this function. Select Maintenance Leave Maintenance Update Current Leave to History from the menu bar. 184
185 Global Set Up of Employee Leave If your organization wishes to set up a leave code globally, you may use this option. The system will set up the leave code specified. The accumulation rate may also be set. This option sets the new leave to active when it is created. Select Maintenance Leave Maintenance Global Set Up of Employee Leave from the menu bar. You may also specify which employees should have the leave code. 185
186 Globally Set Accumulation Rate This feature allows you to globally add or edit the accumulation rate for a specific leave type. Select Maintenance Leave Maintenance Globally Set Accumulation rate from the menu bar. 186
187 Special Accumulate Leave based on Specified Rate This option allows leave to be accumulated based on the rate specified. You may also select to accumulate leave only if the employee s accumulation rate matches the rate entered. Select Maintenance Leave Maintenance Special Accumulate Leave Based on Specific Rate from the menu bar. 187
188 Compute Leave Reimbursement Select Maintenance Leave Maintenance Compute Leave Reimbursement from the menu bar. This option lets you automatically reimburse employees for excess leave at year end. When the Print & Update option is selected, the system writes the reimbursements to the temporary pay file. You can edit any of the pay records through Enter/Edit Temp Pay prior to updating Temp Pay to payroll. Make sure that in the leave parameter that the rate is set before you run this step. 188
189 Set/Reset Salaries To access the set/reset salaries option, select Maintenance Set/Reset Salaries from the menu bar. This option allows salary increases or decreases to be applied globally. To illustration below shows a 5% increase (entered as 1.05). Be sure to specify which employees should receive the pay increase. You may select employees by class, department, location, pay group, and employee status. The reset option is provided if you need to undo a salary increase. In the example illustrated here, you would also enter 1.05 when resetting the increase. You also have the option to round the pay rate. 189

190 Set Pay Rate To access the set pay rate option, select Maintenance Set Pay Rate from the Payroll menu bar. This option can be used to change an old pay rate in the employee master to a new pay rate globally. A common use of this option is when substitutes daily pay rates increase or decrease. 190
191 Globally Set Direct Deposit To access the globally set direct deposit option, select Maintenance Globally Set Direct Deposit from the Payroll menu bar. This option allows employees to be globally set up for or disabled from direct deposit. This program finds all employees who have the from criteria that is indicated and sets them to the to criteria that is indicated. This option is very helpful if you need to temporarily disable direct deposit. To take all employees off direct deposit for a single payroll, enter '3 - Participating' as the current setting and '4 Not Participating-Temp' as the replacement setting, or for pre-noted employees, enter '1 Pre-Notification' as the current setting and '5 Pre-Note/Temp Not Participating' as the replacement setting. After the employees' checks are printed, the system automatically resets the flag for all employees who received a check. *****Alert: Since employees not receiving a check are not automatically reset, you need to run the global update option again before the next payroll is run. The purpose is to reset the flag for these employees that did not receive a check. In this case, enter '4 Not Participating-Temp' as the current setting and '3 - Participating' as the replacement setting, or for pre-noted employees, enter '5 Pre- Note/Temp Not Participating' as the current setting and '1 Pre-Notification' as the replacement setting. 191
192 Global Update to Current Hours To access the Global Update to Current Hours screen, select Maintenance Global Update of Current Hours from the Payroll menu bar. This option can be used to globally set the current hours for a particular pay type for certain groups of employees in the employee master. This option updates the Curr Hrs column on the Salary Accounts tab in the employee master. Use this option with caution. Make sure you specify a particular group of employees either by class, department, location or pay group. 192
193 Update Years of Experience To access the update years of experience option, select Maintenance Update Years of Experience from the Payroll menu bar. This feature allows you to increment or decrement the years of experience for payroll. You can increment or decrement the BP years of experience, organization and total years of experience. This also prints an Exceptions report for employees hired since a user-specified date. These employees may need to have their experience manually adjusted. Select whether you are incrementing or decrementing the years of experience and then make the appropriate selections. Click on the printer or preview icon to begin process. The following screen indicates which fields get updated when you use the Update Years of Experience option. 193


194 Special Maintenance Contact CSI Support before running any of the following options for the first time to confirm that the option is suitable for your organization. Most of these options are designed for specific organizations and require certain setup procedures before the option will work properly. 194

195 Enter/Edit Earnings History To access the enter/edit earnings history option, select Maintenance Special Maintenance Enter/Edit Earnings History from the Payroll menu bar. This option allows an employee s check detail information to be edited. Please use this option carefully and contact CSI if you have any questions about what should be edited and if other files will need to be edited. First select the employee by last name, first name or by employee ID number and then click Search. You may select an employee s check to edit and may edit the employee s check information, deduction history, or labor history. You can also edit the employee s check number if needed by clicking on the edit button on the right side of the Net Amount field. This option does not affect the quarterly tax file or payroll posting file. You must edit these files through other maintenance options. This option will not display any records that were entered directly into the Enter Special Compensation screen. This information is now stored in a special compensation file behind the scenes and also in the quarterly tax file. 195

, the R can be removed")
196 Check Information The Retirement Status field is a drop-down list box with two options: R for Retiree, or blank. If the check is incorrectly flagged with an R status (causing the Retirement report to be incorrect), the R can be removed from the field. 196


197 Deduction History Labor History 197
198 Reset Standard Hours per Pay Period To access the reset standard hours per pay period option, select Maintenance Special Maintenance reset Standard Hours per Pay Period from the Payroll menu bar. This option is used by those organizations that pay semi-monthly and the number of hours in the pay periods varies. Even though the staff may be mostly salaried, they are expensed out to different projects they are working on, so you can record the time for the various jobs that they work on based on the hours worked on each job. Since the hours/pay period varies, the system must be able to reset the standard Hrs/Pay Period on the Salary Tax tab of the employee master and re-compute the hourly Pay Rate on the Salary Accounts tab. This will not reset the standard and current hours on the Salary Accounts tab unless the employee is paid from one account only. This program is designed for employees who are flagged as salaried. When this option is run, the user simply enters the prior number of hours and the new number of hours for the pay period (e.g., 75, 82.5, 90) and the system updates the Hrs/Pay Period field on the Salary Tax tab and hourly Pay Rate on the Salary Accounts tab. 198
199 Reset/Zero Fringe Ratio To access the reset/zero fringe ratio option, select Maintenance Special Maintenance Reset/Zero Fringe Ratio from the Payroll menu bar. This option is for organizations whose employees tend to work on a variety of projects that vary from month to month. For this reason, the payroll cost distribution is a moving target and it is not practical to enter a fringe distribution ratio for each employee on a manual basis. The fringe cost (health, dental, and other) needs to be allocated to the projects on the basis of actual payroll cost charged to the project during the monthly accounting period. When this option is run, the system computes a fringe ratio based on the actual payroll cost incurred within the date range specified by the operator. This option is normally run at the end of the month just prior to computing the fringe cost. The operator specifies the beginning and ending dates and the system computes the fringe. After resetting the fringe ratio, the Create Employer Fringe Posting file and Post Match & Fringe to Ledger must be run from the Fringe Menu. 199
200 Purge Salary Accounts This menu option is located under the Maintenance menu and under the Special Maintenance sub menu. This option can be run at any time to purge salary accounts from the Enter/Edit Employee Master Salary Account tab. This option purges only accounts that have no standard, current, FTE, fringe, fiscal year to date activity or budget amounts (from Budget Prep). 200
201 Time and Attendance Systems CSI currently supports Kronos and our standard time and attendance interface systems. Import and Export options are available with Kronos interface system. 201
202 Globally Include Employee in Time and Attendance Interface Use this screen to clear or set an employee s time and attendance flag on the employee master. 202
203 Change Salary Account This option allows for the original salary account to be changed. When the screen is pulled up, there is a place for the original salary account and a place for the new salary account, if the Update current salary account box is checked when this is run, then the new salary account will be written to the salary accounts tab for the employee and, if this is run with this unchecked, the new salary account will not be written to the salary accounts tab. Once the above information is entered, you can select the employee on whom you want to perform this change. Once the employee is selected, the checks associated with that employee and salary account appear. Then you will select the check and click OK and a Verify Fringe Amount screen will appear and once you have verified the information showing here, click OK and the new salary account will be in effect. When you go to Post Payroll to FL and Post Fringe and Contributions, you will see entries that will correct the ledger side from where the original account was used and show entries for the new account. This step also writes to the Labor History and corrects the salary account showing there. Select the Change accounts on monthly fringe checkbox to create entries for the monthly fringe. Checking this box results in a recalculation of monthly fringe amounts for the month the check occurred. If multiple checks in a single month are processed with this option checked, the monthly costs will be recalculated multiple times. This step should be used with caution. 203
204 Globally Add Deduction This maintenance option lets you add a furlough retirement deduction based on the regular retirement deduction. It also has a flag to calculate the dollar amount of what the employer needs to pay (both employer and employee portions) based on the furlough wages which have been updated to the payroll salary accounts screen. You will be prompted to enter the existing deduction code and the new deduction code to add, along with the default Std/Curr Amt (optional) and Default Employer Cost (optional). If you flag the Calculate employer cost for furloughs, you must select a furlough pay type. When it processes, the following happens: If the employee already has the furlough retirement deduction, it is skipped over and nothing is added or calculated. If the employee doesn t have the deduction already set up and does not choose to calculate, it will just add the deduction with the default amounts specified on the screen. If the employee doesn t have the deduction and chooses to calculate, the program: o First looks at the PR employee master for employer cost and standard employee amount for the existing deduction. If either of those are zero, it defaults to the employer and employee default amounts in the parameter. o It then adds the employer and employee percentages together, and multiplies that against the amount of furloughed wages to calculate the retirement portion on those wages. The result is then written to the employer cost field for the new furlough deduction in the PR master as a flat dollar amount (not a percentage). 204

205 Parameters (PR) The Parameters menu on the payroll menu bar provides options to set up parameters, which build your drop-down box selections in the payroll master, as well as to print Parameter reports. Access to the payroll system file is also provided on this menu. 205

206 Category If the Budget Prep module is not installed, the parameter file for category codes is limited to a Category Code, Description, Abbreviation, and Category Header. If Budget Prep is installed, however, additional fields are available to enter information that is used to build salary schedules in the Budget Prep module. If the Budget Prep module is installed, make sure that the category codes are compatible with the codes in the Budget Prep salary schedules. The category code can be tied to a substitute pay rate. This will allow pay rates in the Enter/Edit Employee Absence/Sub to be different based on who is subbing. For example, a certified category such as Teacher can be set up to have a standard substitute rate instead of the substitute employee s normal pay rate. If this feature is not utilized, the pay rate used when the sub is entered will be their normal pay rate from the payroll master file. Normally, when a substitute is keyed in the Absentee Sub module, the absent employee s salary account is used to pay the substitute but the object code is normally replaced with the code stored in the Absence Reporting System File. For example: Absent employee s primary salary account Substitute s salary account (notice object code is 120) The system automatically replaced the 112 object code with the 120 object code that is stored in the Absence Reporting System File. Below is an example of the absent employee s salary accounts. 206


207 In certain situations, the object code may not always be the same object code that is stored in the Absence Reporting System File. In that case, the Substitute Salary Object Number can be different based on the category code. 207

208 Class Use Class Codes to enter codes and descriptions that can be used without restriction. Normally, these codes identify employee groups for reporting purposes. 208
209 Deduction The following view is used to illustrate the type of information that can be entered for each deduction. Please note that deduction codes are not required for the non-voluntary deductions such as FICA & Medicare, federal income tax, and state income tax. If you wish to globally inactivate a deduction that is no longer being used by your organization, you can un-check the Active flag and it will set the deduction to an inactive status. In addition to normal deduction information, the deduction file is also used to store information about the employer cost share of deductions. For example, in the case of retirement, both the employee deduction amounts and the employer share of retirement cost are recorded in the same parameter record. In other cases, such as life insurance and long-term disability, where the total cost may be funded by the employer, only the employer cost information is reflected in the deduction record. 1 The deduction Code, description and abbreviation should be one that suits your organization s needs. If you have lots of deductions, and you have flexibility in assigning numbers, you might find it helpful to assign the numbers in such a way that deductions with common characteristics are grouped together. The abbreviation is printed on the check stub and other places where there is not enough room to print or display a full description. The Print/Display Order allows you to choose the order that the deduction is printed on the employee s check stub, displayed on screens, and printed on reports. If the employee s net check amount is not sufficient to cover all deductions, the Priority code determines which deductions get covered first. Priority 1 deductions will be covered before priority 2 deductions, and so on. The Account field identifies the fund ledger liability account number that should be credited for deduction amounts that are withheld from the employee s check. 209
210 The Deduction Schedule identifies the frequency in which the deduction should be withheld. For example, selecting all five schedule checkboxes indicates that deductions should be withheld every week, while selecting the checkboxes marked 2 and 4 indicates that deductions should be withheld only on the 2 nd and 4 th weeks. Valid Deduction Tax Statuses are: Annuity -- Subject to FICA & Medicare tax but not federal income tax. (An Annuity deduction is withheld before Federal & State Taxes are computed, but after FICA.) Non-Taxable -- Normally a section 125 deduction, and is not subject to any tax. Annuity Plus State Taxable -- should be assigned to all other deductions that receive no favored tax treatment. (A Taxable deduction is withheld after FICA, Federal & State taxes are computed.) The available Computation Methods are percent of gross and variable method. If the deduction is to be computed as a percent of the gross payroll, choose the percent of gross method, otherwise choose the variable method. The variable method means that an amount will be specified. The default amount or percent is automatically displayed when a new deduction is entered on the employee. The amount or percent entered here is only the default amount and it can be modified for each employee. Deduction Type codes are used to control certain behavior and application within the system. The available type codes are: Employer cost only - If a deduction is to be used only for employer cost, you will not be allowed to enter an employee deduction amount in the employee master. State life insurance and long term disability insurance are examples of deduction codes that might be entered as a type E. Normal deduction - The majority of deductions are of this type and no special treatment is needed. Retirement deduction - The deduction percentage applies only to wages that are identified as retirement wages. Savings bonds - Savings bond deductions require special handling in several areas. Term Life Employer Cost Selecting this type activates the Wage Limit entry field below. Workers Comp Employer Cost The deduction percentage applies only to wages that are subject to workers compensation. The Retirement Type code identifies the retirement plan. If the deduction type code is equal to anything except Retirement, this field is not accessible. The available Fringe Type codes are health, dental, and other. These fringe type codes are needed only with deduction codes that are set up to compute the employer cost for health, dental, and other insurance such as disability insurance, life insurance, etc. **If a default amount/percent is specified, it will be pulled in automatically when the deduction is added to the deduction screen. The organization ID code is used when reporting electronically to various agencies (e.g., Retirement System Deferred Comp, FBMC, etc.). If the ID is being entered for the Federal Reserve for Savings Bonds, enter the 6-digit code company ID number followed by the 3- digit FRB District Designator. Both are provided by the Federal Reserve. The W-2 code determines how deductions are taxed and reported on the employee s annual W-2. Code C - Dependent Care: Employee deductions for contributions to a dependent care flexible spending account that is part of a section 125 plan should have a W-2 code of C. These deduction amounts are reported in box 10 on the W-2. Deduction amounts that do not exceed $5,000 are exempt from income tax as well as FICA and Medicare, but deduction amounts in 210
211 excess of $5,000 are taxable and must be included in taxable wages, FICA wages, and Medicare wages. Code D Section 401k Retirement Plan: Contributions to a 401k plan are not subject to income tax but they are subject to FICA and Medicare tax and will therefore be included in FICA and Medicare wages on the employee s W-2. The contribution amount will also be reported in box 12 with a code D. Code E Section 403b Tax Sheltered Annuities: Deductions to purchase tax sheltered annuities are not subject to income tax but they are subject to FICA and Medicare tax and will therefore be included in FICA and Medicare wages on the employee s W-2. The contribution amount will also be reported in box 12 with a code E. Code G Section 457 Deferred Compensation: Contributions to a 457 plan are not subject to income tax but they are subject to FICA and Medicare tax and will therefore be included in FICA and Medicare wages on the employee s W-2. The contribution amount will also be reported in box 12 with a code G. Code H- Section 501c contributions for tax exempt organizations: The amounts deducted as a code H are added to taxable wages on the employee s W-2 and reported in box 12 with a code H. When the employee s personal income tax is filed, the amount coded with H should be reflected a credit adjustment to adjusted gross income. Code S- Simple IRA or 401k plan for employers with less than 100 employees: Contributions to a SIMPLE plan are not subject to income tax but they are subject to FICA and Medicare tax and will therefore be included in FICA and Medicare wages on the employee s W-2. The contribution amount will also be reported in box 12 with a code S. Provider Codes identify the deduction to plan administrators such as FBMC. This also identifies the SC State ORP deductions. If the Allow a Deduction Ceiling checkbox is selected, you can specify a ceiling amount for the deduction and the system will automatically stop withholding when the ceiling is reached. Examples of deductions that might have a ceiling include garnishments, tax levies, United Way deductions, etc. If you select the Associate an Employer Cost checkbox, you can specify: The default amount or percent to be used in calculating the cost is displayed on each employee s deduction screen and can be edited from there for that one employee. Flag whether the employer cost is a percent The Object code segment of the expenditure accounts where the cost will be charged The Accrual Account that will be credited for the employer s liability Retirement is a good example of a deduction with an associated employer cost. FICA and Medicare deductions also have employer-associated costs but this information is recorded in the Payroll System File instead of the Deduction parameter. Term Life Wage Limit Active only if you select a Deduction Type of Term Life Employer Cost. The system will withhold wages up to the specified amount, and then stop withholding. Select the checkbox if you want to Print the deduction report along with the payroll register. Failure to make this selection does not prevent printing the deduction report at a later time. To automatically create an AP voucher when the payroll is run, enter the vendor number for the vendor that will be paid. If a vendor number is entered, the system will create a voucher for the amount withheld in each payroll run. The payroll check date will be assigned as the accounts payable pay date for the voucher. The payroll program will only create a voucher in the Accounts Payable module. The actual printing of the vendor check will be handled as a part of the normal accounts payable check writing process. 211
212 The Filename field can be used for the FBMC file and ORP (SC Optional Retirement Plan) file that is created. For the FBMC filename, the name only needs to be identified on one of the deductions that have a provider code of 111. Note: only the filename is stored here, not the drive and directory (i.e., A:\). 212

213 Department Normally, Department codes identify the employee s primary department or function. Various reports are generated based on the department code and payroll checks can be printed by department code to simplify distribution of the payroll checks. The department codes may also be used in the Fixed Assets module to identify where an asset is located. If a department code is to be used in both the Payroll and the Fixed Assets modules, be sure to check both boxes in the Valid for System section. The Project start year and project years are used with the Project Report by Department report. See Fund Ledger documentation for more details. 213

214 EEOC EEOC codes may be established if your organization is required to report employees to EEOC using any special sort criteria. 214

215 Leave Use the Leave Code parameter to enter the rules regarding how each type of leave is accumulated and tracked. General leave information is recorded on the Setup tab. The Accumulation Schedules is provided to enter specific accumulation rates where the amount of leave depends on the number of years employed. Not all organizations will use Accumulation Schedules to track leave. Information recorded on the Leave screen is illustrated below. The Active flag lets you set a leave code to inactive, globally. If this box is unchecked, the leave code will no longer be displayed on the employee master Leave tab, but the system will maintain the leave history. Leave Code and Description define types of leave such as vacation, sick leave, etc. The Abbreviation prints on check stubs and reports where there isn t enough room to print a full description. Setup Tab Enter the following information, as needed: Print/Display Order This determines which leave code to print in which column on the Leave Summary report and also determines the order in which the leave will be displayed in the Employee Master. Up to seven columns of leave can be reported on the extended version of the leave report. You must set up a print/display order on leave codes before the Leave 215
216 Summary report will print. The print/display order cannot be duplicated on leave codes. For example, you cannot give more than one leave code the same print/display order. Order to print on stub -- Up to seven types of leave can be printed on the employee s check stub. This field controls the sequence in which the leave types will be reported on the check stub and payroll register. Active Track In -- Indicates if the leave will be tracked in hours or days. Carry balance forward The options under Carry Balance Forward are Y, N, and Other. If this is set to be carried forward to the new calendar or fiscal year to the same leave code, enter Y. If it is not to be carried forward, enter N. If the leave can be rolled over into another type of leave (for example, personal days converted to sick days) then enter O for other leave. When you choose O, you must then enter the other leave code in the Balance Forward Leave Code field. Accum Frequency -- Options include: Monthly/Calendar Year Monthly/Fiscal Year Annual/Calendar Year Annual/Fiscal Year Per Pay Period/Calendar Year Per Pay Period/Fiscal Year Anniversary Date Per Pay Period/Anniversary In the schedule above, the first part of the option indicates how frequently the leave is accumulated. The second part indicates whether the leave is tracked and reported on a fiscal or calendar year basis. When the Accumulate Leave option is selected from the Processing Menu, the system prompts for the Frequency (monthly, annual, or pay period) to accumulate and those leave types that match the selected frequency will be accrued. Balance Forward Ceiling -- The Balance Forward Ceiling field can be used in two different ways: Example 1 of Carry Balance Forward= O (other): Personal leave code has a remaining balance of 30. The Balance Forward Ceiling is set for will stay in Personal but 5 will roll forward to the Balance Forward Leave Code that is indicated. Example 2 of Carry Balance Forward=O (other): Personal leave code has a remaining balance of 30. The Balance Forward Ceiling is set for zero. The entire 30 rolls forward to the Balance Forward Leave Code that is indicated. Accum Ceiling -- Indicates the maximum accumulation allowed during the year. This ceiling is checked when the Accumulate Leave option is selected. If leave cannot be accumulated beyond a particular level, enter that level here. Some organizations allow leave to be accumulated beyond a certain level during the year but only allow a limited amount to be carried forward. When that is the case, enter in the Accum Ceiling field and enter the carry forward limit in the Balance Forward Ceiling field. The accumulation ceiling can also vary depending on the employee s years of experience. To record a variable ceiling based on years of experience, go to the Accumulation Schedules tab. Balance Forward Leave Code Select a leave code. This field is active only if you selected O for Other in the Carry Balance Forward? Field. 216
217 Reset Level -- Sometimes leave is not allowed to carry forward, but is simply reset at the beginning of the year. Personal leave is an example of this. When this is the case, enter the Reset Level and omit the accumulation rates. Carry balance forward during accumulate -- This should be checked only if your organization allows your balances to be carried at any time during the year, not just at Year End or Fiscal Year end. This will affect the employee's balance only if the Leave parameter is set to go to another leave code and the employee's leave balance goes over the ceiling. For Example: Employee's VACATION leave balance is 14. They are set to accumulate 2. Their ceiling is 15. The VACATION leave parameter is set to carry balance forward during accumulate, and to carry the balance over to PERSONAL. After accumulation, VACATION should have 15, and PERSONAL should have 1. The system checks the Carry balance forward during accumulate flag only if the (balance + accumulation) rate is over the ceiling. This should not affect new employees at all. Default Rate -- Indicates the most common accumulation rate for each type of leave. When the leave is being set up for the employee, the default rate entered here will be automatically displayed on the employee s leave record. However, the default rate can be changed to a rate specific to each employee. Be sure to enter the accumulation rate in hours or days, depending upon how the type of leave is tracked. If the leave type has no accumulation rate, leave the default rate blank. If the accumulation rate changes based on experience levels, they can be changed manually when the employee reaches the next level or the rates can be changed automatically based on rates established for different experience levels. To set the rate based on experience levels, go to the Accumulation Schedules tab. CPI Leave Code -- This is used with the CPI report for Georgia clients only. This determines which leave category to print on the report. Year End Reimbursement -- If, at year end, the employee is to be reimbursed for extra leave that is accumulated, check the Year End Reimbursement box and enter the reimbursement rate in the adjoining Rate field. If the Absentee Sub module is Being Used: The following items are applicable only if the Absentee Sub module is being used. Dock Pay -- If an employee is to be docked when his or her leave balance is exceeded, check the Dock Pay box and complete the remaining related fields. Dock -- Use the Dock field to dock pay at a daily, hourly, or set rate. If a daily rate is to be used, be sure the daily rate has been entered in the Employee Master file. If you select a set rate, enter the rate amount in the adjoining Rate field. Dock Other Leave -- If the system should check other leave balances before docking the employee s pay, you can enter up to 4 other leave types to be checked. For example, the system can be set up to reduce personal leave after sick pay has been exhausted, and then dock the pay if there is no personal leave available. The four boxes beside Dock Other Leave can be used to select a chain of up to 4 leave types to be checked before reducing the employee s pay. Dock Pay Type -- If the employee s pay is to be docked after all available leave balances have been exhausted, at least one pay type must set up and identified for this purpose. However, if you have added other types of leave, each type of leave can have its own pay type to dock. Use the Dock Pay Type field to select an available pay type to dock. If you want the system to report the amount of pay to be docked, but do not want the system to automatically dock the pay, leave the Dock Pay Type blank. Note: When the Employee Absence/Sub information is updated to payroll, the system automatically posts the docked pay to the Pay Account screen and it will add the docked pay 217

218 type record for the employee. The system will track the total docked pay through the pay type and it will also track the year-to-date amount associated with each leave type. Other leave to also be reduced, if applicable -- This field ties one type of leave to another. In some organizations, for example, when a day of personal leave is taken, sick leave is also reduced. If this is not applicable to your organization, leave this field blank. Leave accrual process date Leave code processing order Comp time Accumulation Schedules Tab Use the Accumulation Schedules tab to enter specific accumulation rates and accumulation schedules where the amount of leave depends on the number of years employed. 1. Click the button. 2. Enter the following information: Years of exp Accumulation rate Accumulation ceiling Balance forward ceiling 3. Repeat Steps 1 and 2 until all of your schedules are entered. 4. Click Save. 218

219 Location Location codes can be used in the Payroll, Purchase Order, Warehouse Requisition, and Fixed Assets modules. The codes can be made available to all or selected systems by making the appropriate selection in the Systems Used In section. In the Payroll module, the Location code normally identifies the employee s primary location. Various reports are printed based on location and payroll checks can be printed by location code to simplify distribution of the payroll checks. In the Purchase Order and Requisition modules, the location code identifies the location where goods are to be delivered (shipped to) as well as the location that should be billed. A location code must be entered for both the ship to and bill to locations and then a bill to location can be assigned to a ship to location. Because of this assignment, the bill to location will be automatically identified when the ship to location is entered in the purchase order entry screen. This also holds true when the ship to location is entered in a warehouse requisition entry screen. Please note that a location can be assigned a separate bill to location for both purchase orders and requisitions. In the Fixed Assets system, the location code identifies the location of the asset. 219

220 Note Title This screen is used for any other notes that you may need to make on a record that is not already covered anywhere else. 220

221 Pay Group The Pay Group Code is used to identify the employee s pay cycle as well as the Number of Checks received in a year. Examples of pay cycles and the number of checks per year are: Weekly 52 checks, Biweekly 26 checks, Semi Monthly 24 checks, Monthly 12 checks, etc. In addition to the number of checks received, a field has been provided to enter the Number of Insurance & Benefits checks. This is because benefits are not always distributed to all checks. For example, an employee may receive 26 checks but have benefits distributed based on 24 checks. When a payroll register that reflects a Pay Group Ending Date is printed for this pay type, a record will be written to this record. The Contract Length is the number of months that employees assigned to this pay group are under contract. This data is reported to the SC Retirement System and is used on other required reports. If leave is to be accumulated for employees assigned to this pay group, the check box beside Accrue leave to this pay group should be checked. If necessary, this feature can be shut off during periods when leave should not be accrued. For example, employees working during the summer months may not be accruing leave. If your organization wants the system to prorate leave for part-time employees or full-time employees, select the appropriate option and specify the full time equivalent hours. The system will automatically prorate the employee s accumulation rate based on the employee s hours/full time equivalent hours. The item called Post salaries to relieve a Payroll Accrual Account is used to flag payrolls that have been accrued and charged to expenditure accounts in prior accounting period. When the checks are actually written for the pay period, this checkbox should be checked to cause the gross salaries to be charged to the accrued payroll account that was credited when the payroll was accrued. The payroll accrual account is set up in the Payroll System File. 221

222 Pay Type Pay type codes can be used to define a wide variety of pay types. Examples include: regular pay, overtime pay, bonus pay, sick pay, etc. The following screen illustrates the type of criteria that can be applied to a pay type. The Print/Display Order determines the sequence that the pay type is printed on the employee s check stub and on selected reports. It also controls how the pay type is displayed on the employee s Salary Account screen. The options for Taxable? are: F (Federal Only) N (no tax) S (Set tax rate specified) -- If you select S for a specified rate, you will be able to enter the Federal % and State % in the adjoining fields. T (tax computed from tax tables). Is pay type subject to allows you to select if the particular pay type is subject to certain withholdings. There is also a check box that will flag if the pay type is considered overtime. The W2 Pay Type is assigned to pay type codes that are established for the purpose of recording taxable income items that need to be reported on the employee s W-2. Code C Group Term Life Insurance: Use code C to enter the value or cost of employer provided group-term life insurance coverage over $50,000. These amounts will be included in boxes 1, 3, and 5 of the employee s W-2. This amount will also be reported in box 12. Code J Non taxable Third Party Sick Pay-NT: Use code J to enter third party sick pay that is not subject to federal income tax because of the employee s after tax contributions to the sick pay plan. This amount will be reported in box 12 of the employee s W-2. Use code X to report taxable third party sick pay. 222
223 Code L Non tax Business Expense: Compensation for non-taxable travel (business) expenses will be reported in Box 12 on the W-2s. Code P Qualified Moving Expense: Use code P to enter moving expenses paid to employees that were not included in the employee s income because they were paid for qualified moving expenses. The amount will be reported in box 12 of the employee s W-2. Code S -- Supernumerary Code T Adoption Benefits: Adoption Benefits is reported in boxes, 3 & 5. Code U Personal Use Pay: Use code U to record the value of reportable fringe benefits such as the personal use of an employer provided vehicle. The amounts entered as a code U will be included in boxes 1, 3, and 5 of the employee s W-2. Code W Health Savings Account Code X Taxable Third Party Sick Pay: Use code X to record taxable sick pay benefits paid by a third party. The amounts entered as a code X will be included in boxes 1, 3, and 5 of the employee s W-2 The factor for computing the pay rate must be entered. Enter a 1.00 for regular pay, 1.50 for overtime pay, etc. If a pay rate is not associated with vacation pay, the factor for vacation pay would be entered as zero. Most pay types will be set to Enter the amount for shift differential, if applicable. To reduce leave: A pay type may be associated with a leave code. When the hours of pay are recorded for the pay type, the system will automatically record the hours of leave used in Current Used in the employee leave screen. To increase leave: A pay type may be set up to accumulate a type of leave. This feature could be used to update comp time earned automatically when hours are recorded. Prorating Leave Flag: Be sure to check each pay type that you prorate leave on. This is set immediately when the update is installed. If your organization prorates leave based on hours worked, you may now set this flag on pay types that should be included in the total hours worked. You will need to uncheck the flag for those pay types that should be excluded. The Include salary 4 (supplements) in budgeted salary or daily rate flag is to allow your organization the option to include supplements (salary 4) in the Budgeted Ann Sal and Daily Rate field in the employee master when transferring budget prep profiles to payroll. The flag called is special compensation type is used for pay (other than W-2 coded types) that needs to be recorded under the Enter Special Compensation menu. This would be for pay types to record earnings from other organizations such as Bailiffs that were paid through the court system. W-2 pay types that are coded with a W-2 pay type code such as Group Term Life, Personal Use, etc. should remain the same. It is not necessary for these types of pay to be flagged with the is special compensation type. Subject to furlough flag and Furlough pay type are used by the Re-compute Salaries function in Budget Prep. If a pay type is subject to furlough a furlough pay type is required in the Payroll Module. Setting the flag means that money associated with the pay type is subject to furlough and will be included in the process that computes furlough distribution. 223
224 If you are a Georgia client, four fields for the TRS (Teacher Retirement System) located at the bottom of your screen. Below, you will find the necessary information for the TRS Transaction Type, Payment Reason, Posting Month, and Summer Employment Pay. TRS Transaction Type C=Regular Contribution, P=Prior Period Adjustment, R=Retro Pay This field was automatically set to C when it was initially set up by CSI Edit to P or R for applicable pay types Reported to TRS field 002 Posting Month If blank, CSI will report the payroll year/month Enter the first day of the month if we are to report this field typically, this field would be used for reporting Prior Period Adjustments and Retro Pay Remember that you will need to set up a separate pay type for each month/year that may need to be adjusted Reported to TRS field 003 Payment Reason Select the appropriate payment reason. This field was automatically set to 00 Regular when the most recent update was installed Reported to TRS field 042 Summer Employment Pay Set this flag for applicable pay types Reported to TRS-field

225 Salary Class If the budget preparation system is installed, the salary class codes must be compatible with the salary class codes used to identify salary schedules in the BP system. In the BP system, the Category code and Salary class is used to identify a salary schedule. For example, a salary schedule for an executive salary may have a category code of S for secretary and a class code of S1 to identify the class of secretary. Additional class codes would be used to identify other classes of secretaries that are paid on a different pay scale. 225

226 WC This parameter tracks the workers' compensation rating classification that applies to the majority of an organization s employees. 226

227 Reason codes Reason codes are used in conjunction with the Inactivate and Activate Employee. This parameter is not required in order to inactivate or activate an employee but it allows you to track specific reasons for activation and inactivation. 227

228 Enter/Edit Templates Each module that utilizes capabilities through SmartFusion has an Enter/Edit Template option. This is the subject and body of the that will be sent to vendors, employees, etc. when s are generated. CSI has predefined these options but the user can edit the wording if needed. The subject and the body use tokens to insert information like amounts, dates, names, etc. An unlimited amount of verbiage can be added to the s to customize it for each organization. To add a token, click on the browse button and a token form will appear. Click in the Content box in the area in which you would like to insert a token. Then click on the token from the list and click on insert. 228

229 Tax Table Update This option must be run to install new tax tables. Specify the tax year to update. If errors occur when entering the tax year, you will need to load tax table from file. Access System Setup Data Entry CSI System File. Click on Technical Setup and select Update tax table from file. Once this flag is set, the Tax Table Update screen in payroll will now display the Load tax tables from file option. Click on the browse button or type in the location of the file. This is a file that is sent to your organization upon your request. 229
 will receive an update from CSI at the beginning of each payroll year.")
230 Federal Tax Tables Information from the federal tax Circular E can be used to easily update the federal tax tables. However, customers with a current service agreement (GSA) will receive an update from CSI at the beginning of each payroll year. This chart is based on an Annualized tax schedule. 230
 will receive an update from CSI at the beginning of each payroll")
231 State Tax Tables Information from tax tables provided by the state can be used to easily update the state tax tables. However, customers with a current service agreement (GSA) will receive an update from CSI at the beginning of each payroll year. 231

232 Payroll System File The payroll system file stores information that is unique to your organization and used to control certain payroll and personnel programs functions. Information stored in this file is displayed under six tabs that are labeled as page 1, page 2, page 3, page 4, Direct Deposit, and W2. Payroll System File Page 1 The account numbers reflected on page one (below) of the Payroll System File are used when the ledger posting files are created within the Payroll module. The Payroll Cash account entered here is the cash account that will be credited for the net amount of the payroll. The Withholding accounts will be credited with the amounts withheld from the employee pay for each of the respective accounts. The Payroll accrual account is the liability account for accrued payrolls and is used only when the accrued payroll option is run. The accounts for accrued FICA and unemployment are credited with the employer liability amounts generated from the options to compute employer contributions cost. The Liability accounts for other amounts withheld (insurance, retirement, etc.) from employee earnings and the liability accounts for employer share of cost related to these withholdings are stored in the Deduction parameter file. 232
233 Payroll System File Page 2 Page 2 of the Payroll System File identifies key dates and tax identification numbers. Dates entered on this screen define the beginning and ending dates for the various periods. When reports based on any of these periods are run, these dates are used to establish the date range. When the Payroll Quarter is closed, these dates are automatically updated. The federal and state identification numbers are used for various reports such as W2 s, and 1099 s. The Default Drive designation indicates which drive the system should use when files are being created for various agencies and taxing authorities. If you wish to process payroll accruals at fiscal year end, set the Track Accruals flag. If you wish to use the allocation feature on the Salary Account tab in Enter/Edit Employee Master, set the Track account allocations flag. 233

234 Payroll System File Page 3 The Employee Information section contains several check boxes (Track Direct Deposits, Track Leave, Track Savings Bonds, and Track Notes) that allow you customize the information that is shown on the Enter/Edit Employee Master screen. Check the checkboxes for the information you want to see on the Employee Master screen. If the Track Statutory Employees flag is checked, a new option appears on the Enter/Edit Employee Master Salary/Tax tab. This allows the information to print on W2 forms. When the Compute daily rate using current contract days instead of standard contract days option is checked, the Daily Rate on the employee master is computed based off of the current contract days; otherwise the daily rate is computed based on the standard contract days. The system automatically re-computes employees daily rates when you check or uncheck this option. The Check Type code identifies the check format the system uses to print payroll checks. This includes MICR checks. For more information on MICR check printing, see Appendix C: Printing Payroll Checks on Blank Check Stock at the end of this document. The Next Update Number is assigned to the next payroll check print/update. The number assigned to each update can be used to roll back the update and thus allow the payroll to be reprocessed if necessary. CSI strongly suggests you do not edit these fields as it may complicate your roll back process. When the Prevent Negative Checks check box is selected, the system excludes certain deductions (based on the deduction priority code) in an attempt to produce a positive net check amount. If the selection is not made, persons with negative pay are excluded from the payroll. Report leave on the check stub in days or hours. If reporting in days, enter the number of hours that make up the day. 234
235 When employees have signed up for direct deposit, a note can be printed on the employees check stubs letting them know that they are being pre-noted. If you want such a message to print on the check stub when the employee is being pre-noted, use this box to enter the message to print. When the employee s pay is pre-noted, this message prints regardless of any other notes that were entered. The Check/Notification Directory along with the Check Filename and Notification Filename is information that is needed when special is being used to print enhanced laser checks and notifications. If you selected 3 rd party Check Type, this information must be entered. The Print Organization Name on notification stub is used with our standard check types. If this flag is checked, the organization name stored in the CSI System File prints at the top of the stub. The default code to print on checks is used in conjunction with the Prelist, Payroll Register, and checks. If you prefer the payroll register, prelist, and checks to print in a particular order (such as by location or department), select the code here and the payroll register and prelist will default to that setting (e.g., Class, Department, or Location). If no code is specified in this field, the payroll register defaults to name order. The Print Loc/Dept subtotal with payroll register allows you to omit the subtotal pages if you print the payroll register by location or department. Group Allocated Sub slips Summarizes sub slip detail for stub information for third-party printing solutions. 235
236 Payroll System File Page 4 Page 4 of the system file establishes percentage rates, taxable limits, and accounting codes for the employer share of Federal and State unemployment, FICA, and Medicare taxes. The fields for percentage rates and taxable limits for the various types of employer payroll taxes are self-explanatory. If your organization elects to have the system expense unemployment as the payroll runs (as part of the Employer Contributions Reporting). Specify the unemployment object codes, unemployment percentages, and unemployment limits. The Employment Security Commission ID number, Tax Limit, Contingency/Adm. Rate, and Contribution Rate are used when printing the State unemployment reports. The Object Code required for federal unemployment and state unemployment can be separate codes or a single object code can be used for both. In the case of FICA & Medicare tax, only one object code is provided. These codes represent the object code portion of the fund ledger expenditure account where the employer cost will be charged. Use the Place 9 s to indicate where expenditure account changes for FICA/MEDI, Retirement, and Fringe field to define the object code segment of the account number. Therefore, if you use an account structure like???-???-999-????-??, the 999 identifies the object code portion of the account number. The question marks are matched against the employee s salary distribution accounts to identify the remaining segments of the account number 236
237 where unemployment, FICA/Medicare, retirement, and fringe cost will be charged. The object codes for retirement and fringe are identified in the Deduction parameter. If the modifier portion of the account number is used in the salary accounts and you do not want the employer contributions and fringe charged to that detail level, select the When creating match/fringe account, replace modifier with zeros checkbox. If you want these costs charged to a single location instead of to the locations where the salaries are charged, select the location code from the If distributing match to one location, select location drop-down. The FICA and Medicare percentages and limits are used to compute the employee and employer contributions. The FICA object must be specified if your organization plans to expense the employer contribution to the appropriate expense accounts. 237
238 Payroll System File Direct Deposit If employees in your organization participate in direct deposit, this screen identifies the information needed to affect the bank transfers. The Company Name is used to enter the name of your organization and the Company Bank is used to enter the bank routing number that identifies your bank. The Company ID is your organization s federal tax identification number and the Company Bank Account is used to enter your bank account number at the bank identified by the company bank routing number. Use direct deposit notifications only if your organization would like to utilize this feature. When this option is checked, a new address appears on the employee master for notifications. See section on Direct Deposit Notifications for more details on how this feature works. If the Mask SSN in direct deposit file option is checked, all but the last 4 digits of the SSN will be replaced with asterisks. Your organization may need to check with your bank before checking this new option to make sure that they will take your file if it includes asterisks. If this option is not checked, the SSN appears as it normally does. Enter a value of 200 for the Service Class Code. Under Discretionary Data enter any optional notes to include in the direct deposit records. The Entry Description is used to identify the transaction on the participating employee s bank statement. Normally this description is PAYROLL. The various codes for checking and savings deposits are: Checking: Pre-note 23, Debit 27, and Credit 22. Savings: Pre-note 33, Debit 37, and Credit
239 Under the Originating Financial Institution enter the routing number for your bank or for the Federal Reserve and under the Originating Financial Institution Name enter the name for your bank or the Federal Reserve. Check with your bank to find out which one this needs to be. Under the Immediate Destination enter the routing number and under Immediate Destination Name enter the name of the financial institution (e.g., Federal Reserve) that will receive the direct deposit from your bank. Check with your bank to find out what this needs to be. Some banks require a number instead of a space in Position 14 of the direct deposit file s header record. Use the Immediate Origin Prefix field to enter this number. Select the Carriage Return check box if a carriage return and line feed needs to be inserted after each record. Select the Header Record check box if a carriage return and line feed needs to be inserted after each header record. Select the Pad Nines check box if the file needs to be padded with 9 s. Select the Debit Record check box if the system should create the offsetting debit to the employee s credit transactions. Enter the ID Modifier if a file identification modifier is required. In the DD Directory/Filename field enter the location where the direct deposit file is to be written. This can be a floppy drive or a fixed drive on your workstation or network. If you use a fixed drive, be sure to add a slash ( \ ) at the end of the drive/directory statement. 239
240 Payroll System File W2 If your organization will submit the employer s copies of W-2 s via magnetic media, the W-2 s tab must be complete before doing so. Your organization must obtain a PIN (Personal Identification Number) in order to submit the EFW2 format for magnetic media files. You can do so by either calling or visiting the following website for more information: (click on Business Services Online). The bottom section of the W-2 s tab is for organizations that use a 3 rd party vendor such as SoftDocs or Source4 to print employee W-2 s. If your organization uses a 3 rd party vendor to print employee W-2 s you will need to find out what directory and filename they need the W-2 file created and enter it on this tab. We recommend the name of the file be W2.TXT. This only applies to clients who use a 3 rd party vendor to print W-2 s. **GA Clients Only - When the Create second W2 file in state-specified format is checked, a new filename field will show on the Print W-2 s screen called Enter state filename. When Print & Create File is selected, a separate file from the Federal file will be created matching the State of Georgia s file layout. 240
241 Payroll System File EEOC File 241
242 PR Parameter Reports This report allows you see what parameters have been set up for your organization. Example of a Pay Group Parameter Report: 242

243 Enter/Edit Custom Reports (PR) Use this option to set up basic information for custom checks, purchase orders, or receipts. Once the information is set up, you can then access it in the system file of the module you are using. To enter new a new custom report, select Parameters Enter/Edit Custom Reports from the menu bar. Then click the New toolbar icon. The Code field describes the type of custom report that is being created. The Description further identifies what is customized about the form. The Category often defaults to the module you are in. The Report Filename can be set up one of two ways: If the custom report is created and saved in a specific directory, you must specify the full directory path and filename. If the custom report is created and saved in the CSI Reports directory, enter only the filename. No path is needed. If the file is to be exported, select the Is File Export checkbox. Then enter the Export Path and Filename. When you access the module s system file, you will then see an option for your custom form. If your report will include an electronic signature, browse to the location of the Signature Image. 243
244 Appendix A Payroll Processing Checklist School District Version - Summary Pay Period Ending Date Current Pay Date Accumulate Leave (If leave is based on per pay period basis.) using the Accumulate Leave option located under the Process menu. Print a Pre-list located on the Print Payroll Register/Prelists option under the Process menu. ***Write any salary changes on prelist that need to be made (including adding new employees). Key employee master file changes using the Enter/Edit Employee Master option located on the Employees menu. Example of things that may need changing: direct deposit changes (Direct Deposit Tab) deduction changes (Deductions Tab) flag retirees (Salary and Deductions Tab) leave (Leave Tab) exemptions (Tax tab) permanent salary changes (Salary & Salary Acct tab) key hours/salaries (if not using temp pay file) add new employees Inactivate inactive employees (if needed) using the Inactivate Employee option located under the Employees menu. Key hours for hourly employees or additional pay in Temporary File using the Enter Hours/Pay Temporary File located under the Process menu. (Use this option if not using employee master to key hours/pay.) Update Temporary File to Payroll using the Print Reports/Update Temporary Pay to Payroll option located under the Process menu if hours/pay were keyed in temp pay file. Key Absentee/Subs using the Enter/Edit Employee Absence/Subs option under the Process menu in the Employee Absence/Sub module. Update Absences to payroll using the Update Absences to Payroll option located under the Process menu in the Employee Absence/Sub module. Update Subs to payroll using the Update Substitutes to Payroll option located under the Process menu in the Employee Absence/Sub module. Key Insurance & Benefits Changes (If using the Insurance & Benefits Module) using the Enter/Edit Insurance & Benefits Master located under the Process menu in the Insurance & Benefits module. Update Insurance & Benefits to Payroll (If using the Insurance & Benefits Module) using the Update/Compare Benefits to Payroll located under the Process menu in the Insurance & Benefits module Print a second Pre-list located on the Print Payroll Register/Prelists option under the Process menu. Compare totals with the original pre-list making. The difference should be temporary pay, sub pay and any dockage. 244
245 Print a Payroll Register & Negative Check Report and optionally deduction reports located on the Print Payroll Register/Prelists option under the Process menu. Verify that the totals are correct before printing checks. If errors are detected, make the corrections and reprint payroll register. The payroll register is a required report before printing checks. Print/Update payroll checks using the Print/Update Payroll Checks option located under the Process menu. Print the Payroll Check Register located under the Process menu. Create AP Vouchers from Payroll (if using this feature) located under the Process menu. Post Payroll to Ledger located under the Process menu. Record Employer Contributions (Employer s FICA/Medicare, Retirement, and Workers Comp) using the following options located under the Fringe menu. Employer Contributions Report Create Employer Contributions Posting File Post Contributions & Fringe to Ledger Create Disk if needed (such as FBMC & Deferred Comp) all are located under the Deductions menu. 245
246 Payroll Processing Check List Non-District Version - Summary Pay Period Ending Date Current Pay Date Accumulate Leave (if leave is based on per pay period basis.) using the Accumulate Leave option located under the Process menu Print a Detail Pre-list located on the Print Payroll Register/Prelists option under the Process menu. ***Write any changes on prelist that need to be made. Key employee master file changes using the Enter/Edit Employee Master option located on the Employees menu. Example of things that may need changing: direct deposit changes (Direct Deposit Tab) deduction changes (Deductions Tab) flag retirees (Salary and Deductions Tab) leave (Leave Tab) exemptions (Tax tab) permanent salary changes (Salary & Salary Acct tab) key hours/salaries (if not using temp pay file) add new employees Inactivate inactive employees (if needed) using the Inactivate Employee option located under the Employees menu. Key hours for hourly employees or additional pay in Temporary File using the Enter Hours/Pay Temporary File located under the Process menu. (Use this option if not using employee master to key hours/pay.) Update Temporary File to Payroll using the Print Reports/Update Temporary Pay to Payroll option located under the Process menu if hours/pay were keyed in temp pay file. Key Insurance & Benefits Changes (If using the Insurance & Benefits Module) using the Enter/Edit Insurance & Benefits Master located under the Process menu in the Insurance & Benefits module. Update Insurance & Benefits to Payroll (If using the Insurance & Benefits Module) using the Update/Compare Benefits to Payroll located under the Process menu in the Insurance & Benefits module Print a second Pre-list located on the Print Payroll Register/Prelists option under the Process menu. Compare totals with the original pre-list making. The difference should be temporary pay, sub pay, and any dockage. Print a Payroll Register & Negative Check Report and optionally deduction reports located on the Print Payroll Register/Prelists option under the Process menu. Verify that the totals are correct before printing checks. If errors are detected, make the corrections and reprint payroll register. The payroll register is a required report before printing checks. Print/Update payroll checks using the Print/Update Payroll Checks option located under the Process menu. 246
247 Print the Payroll Check Register located under the Process menu. Create AP Vouchers from Payroll (if using this feature) located under the Process menu. Post Payroll to Ledger located under the Process menu. Record Employer Contributions (Employer s FICA/Medicare, Retirement, and Workers Comp) using the following options located under the Fringe menu. Employer Contributions Report Create Employer Contributions Posting File Post Contributions & Fringe to Ledger Create Disk if needed (such as FBMC & Deferred Comp) all are located under the Deductions menu. 247
248
249 Appendix B Payroll Processing Check List School District Version - Detail Pay Period Ending Date Current Pay Date Accumulate Leave (if leave is based on per pay period basis.) using the Accumulate Leave option located under the Process menu Print a Pre-list Write any changes on prelist that need to be made. Click on Print Payroll Registers/Pre-list Click on Payroll Prelist check box Click on 2-Data Selections tab Type in Pay Period Ending Date & Current Pay Date Click in the Select Pay Group to Include box to specify certain pay groups (if paying all pay groups, do not click in this box) Click on Printer icon Key employee master file changes Click on Enter/Edit Employee Master Type in last name or type SS# & (or any of the other options) click on Search If more than one employee was found, click on Next icon on toolbar or use List area. Click on tab that needs changing (such as Salary, Tax, Deductions, etc.) Key changes and save Click on search area to pull up next person. Example of things that may need changing: direct deposit changes (Direct Deposit Tab) deduction changes (Deductions Tab) flag retirees (Salary and Deductions Tab) leave (Leave Tab) exemptions (Tax tab) permanent salary changes (Salary & Salary Acct tab) key hours/salaries (if not using temp pay file) add new employees Inactivate inactive employees (if needed) Click on Inactivate Employee Type in either SS# or press <Enter> over to last name and type last name Type in date inactivated Type in note (if needed) Select to Inactivate in Personnel/Budget Prep/emp benefits, if needed Click on OK button Key hours for hourly employees or additional pay in Temporary File (use this option if not using employee master to key hours/pay.) Click on Enter Hours/Pay Temporary File Click on New icon on toolbar 249
250 If finished with this employee and need to key new record, click on the Finish toolbar button. Click on X to close screen instead of finish after keying the last temp file record. Update Temporary File to Payroll if hours/pay were keyed in temp pay file Click on Print Reports/Update Temporary Pay to Payroll Print the Print Only version first Select to print either by Name, Department, Fund, Loc, Order Keyed or Pay Type Click on Printer icon and verify If report is correct, click on drop-down arrow on Select Process and click on Print & Update Click on Printer icon Key Absentee/Subs Click on Enter/Edit Employee Absentee/Subs Click on New icon on toolbar Account Number and dollar amount will automatically read in if following is indicated: System File is set up appropriately Absent employee has valid salary accounts set up If sub salary account is setup in fund ledger To edit account number that is automatically read in, <Tab> or click with the mouse to the account number & type correct number & click on Save icon on toolbar. When you are finished with entire record and ready to key another new absentee/sub sheet, click on the toolbar icon. Update Absences/Subs Click on Update Absences to Payroll Click on Printer icon to print the Print Only version first Click on Print & Update and click on Printer icon Click on Update Substitutes to Payroll Click on Printer icon to print the Print Only version first Click on Print & Update and click on Printer icon Key Insurance & Benefits Changes (If using the Insurance & Benefits Module) Click on Enter/Edit Insurance & Benefits Master Select employee either by Last Name, SS#, Class, Dept, Loc or Pay Group Click on Search or press <Enter> down to search. If more than one employee was found, click on Next icon on toolbar or use List tab. Highlight line that needs to be edited by clicking on it Click in field that needs editing on the edit line (white area) Key changes and key Payroll Change Date Click on Save or press <Enter> out of Payroll Change Date field to auto save. Click on search area to pull up next person. If needing to change Coverage, Plan, Dependents or Beneficiaries, click on button beside deduction number for detail screen. 250
251 If needing to add a new benefit, click on green plus key or press <Enter> on green plus key. Update Insurance & Benefits to Payroll (If using the Insurance & Benefits Module) Click on Update/Compare Benefits to Payroll Key in Change Dates range Unselect Update/Compare Employer Cost if this doesn t need to be updated to payroll Print the Print Only version first and verify Print the Print/Update version to update to payroll Print a second Pre-list compare totals with the original pre-list making the difference should be temporary pay, sub pay and any dockage. Click on Print Payroll Registers/Pre-list Click on Payroll Prelist check box Click on 2-Data Selections tab Type in Pay Period Ending Date & Current Pay Date Click in the Select Pay Group to Include box to specify certain pay groups (if paying all pay groups, do not click in this box) Click on Printer icon Print a Payroll Register & Negative Check Report and optionally deduction reports. Verify that the totals are correct before printing checks. If errors are detected, make the corrections and reprint payroll register. The payroll register is a required report before printing checks. Click on Print Payroll Registers/Pre-list Click on Payroll Register & Negative Check box Click on all include boxes such as W-4, deductions, leave, & hours/pay Click on Deduction Reports for Current Period if needed Click on 2-Data Selections tab Type in Pay Period Ending Date & Current Pay Date Select Pay Period for Deductions (1-5). Click in the Select Pay Group to Include box to specify certain pay groups (if paying all pay groups, do not click in this box) Click on Printer icon Print/Update payroll checks Click on Print/Update Payroll Checks Verify the gross amount, date and time displayed on message box and click on yes Click on Select Process drop-down box Click on Print/Update Verify beginning check number Verify beginning notification number Verify the leave balance date Load Checks into Printer Click on Printer icon If checks & notifications printed ok Update payroll by clicking on OK button **UPDATE ONLY IF CHECKS PRINTED SUCCESSFULLY!! Remove checks from Printer Print the Payroll Check Register 251
252 Click on Payroll Check Register Click on Printer icon Create AP Vouchers from Payroll (if using this feature) Post Payroll to Ledger Click on Post Payroll to Ledger Click on either Preview icon or Printer icon for the Print Only and verify totals Click on Select Process and select Print/Post Enter down to Posting Date and key in date Click on Printer icon Record Employer Contributions (Employer s FICA/Medicare, Retirement, and Workers Comp). Click on Employer Contributions Report Click on Printer icon Compare the wages to the payroll register. Click on Create the Employer Contributions Posting File Click on OK button Click on Post Contributions & Fringe to Ledger Click on Printer icon or Preview icon to do PRINT ONLY version should be run first to verify the totals compared to the Employer Contributions Report Click on Select Process and select Print/Post Create Disk if needed (such as FBMC & Deferred Comp) Click on menu option that is needed (FBMC, Deferred Comp, etc.) Insert disk and click on Printer ***Some options may require selections to be made. 252
253 Payroll Processing Check List Non-District Version - Detail Pay Period Ending Date Current Pay Date Accumulate Leave (if leave is based on per pay period basis.) using the Accumulate Leave option located under the Process menu Print a Pre-list Write any changes on prelist that need to be made. Click on Print Payroll Registers/Pre-list Click on Payroll Prelist check box Click on 2-Data Selections tab Type in Pay Period Ending Date & Current Pay Date Select Pay Period for Deductions (1-5). Click in the Select Pay Group to Include box to specify certain pay groups (if paying all pay groups, do not click in this box) Click on Printer icon Key employee master file changes Click on Enter/Edit Employee Master Type in last name or type SS# & (or any of the other options) click on Search If more than one employee was found, click Next toolbar icon or use List area. Click on tab that needs changing (such as Salary Tax, Deductions, etc.) Key changes and save Click on search area to pull up next person. Example of things that may need changing: direct deposit changes (Direct Deposit Tab) deduction changes (Deductions Tab) flag retirees (Salary and Deductions Tab) leave (Leave Tab) exemptions (Tax tab) permanent salary changes (Salary & Salary Acct tab) key hours/salaries (if not using temp pay file) add new employees Inactivate inactive employees (if needed) Click on Inactivate Employee Type in either SS# or press <Enter> over to last name and type last name Type in date inactivated Type in note (if needed) Select to Inactivate in Personnel/Budget Prep/emp benefits if needed Click OK button Key hours for hourly employees or additional pay in Temporary File (use this option if not using employee master to key hours/pay.) Click on Enter Hours/Pay Temporary File Click on New icon on toolbar 253
254 If finished with this employee and need to key new record, click on the Finish toolbar button. Click on X to close screen instead of finish after keying the last temp file record. Update Temporary File to Payroll if hours/pay were keyed in temp pay file Click on Print Reports/Update Temporary Pay to Payroll Print the Print Only version first Select to print either by Name, Department, Fund, Loc, Order Keyed or Pay Type Click on Printer icon and verify If report is correct, click Select Process and select Print & Update Click on Printer icon Key Insurance & Benefits Changes (If using the Insurance & Benefits Module) Click on Enter/Edit Insurance & Benefits Master Select employee either by Last Name, SS#, Class, Dept, Loc orpay Group Click on Search or press <Enter> down to search. If more than one employee was found, click on Next icon on toolbar or use List area. Highlight line that needs to be edited by clicking on it Click in field that needs editing on the edit line (white area) Key changes and key Payroll Change Date Click on Save or press <Enter> out of Payroll Change Date field to auto save. Click on search area to pull up next person. If needing to change Coverage, Plan, Dependents or Beneficiaries, click icon beside the deduction number for detail screen. If needing to add a new benefit, click on green plus key or press <Enter> on green plus key. Update Insurance & Benefits to Payroll (If using the Insurance & Benefits Module) Click on Update/Compare Benefits to Payroll Key in Change Dates range Unselect Update/Compare Employer Cost if this doesn t need to be updated to payroll Print the Print Only version first and verify Print the Print/Update version to update to payroll Print a second Pre-list. Compare totals with the original pre-list making. The difference should be temporary pay, sub pay and any dockage. Click on Print Payroll Registers/Pre-list Click on Payroll Prelist check box Click on 2-Data Selections tab Type in Pay Period Ending Date & Current Pay Date Click in the Select Pay Group to Include box to specify certain pay groups (if paying all pay groups, do not click in this box) Click on Printer icon Print a Payroll Register & Negative Check Report and optionally deduction reports. Verify that the totals are correct before printing checks. If errors are detected, make the corrections and reprint payroll register. The payroll register is a required report before printing checks. 254
255 Click on Print Payroll Registers/Pre-list Click on Payroll Register & Negative Check box Click on all include boxes such as W-4, deductions, leave, & hours/pay Click on Deduction Reports for Current Period if needed Click on 2-Data Selections tab Type in Pay Period Ending Date & Current Pay Date Select Pay Period for Deductions (1-5). Click in the Select Pay Group to Include box to specify certain pay groups (if paying all pay groups, do not click in this box) Click on Printer icon Print/Update payroll checks Click on Print/Update Payroll Checks Verify the gross amount, date/time displayed on message box and click on yes Click on Select Process drop-down box Click on Print/Update Verify beginning check number Verify beginning notification number Verify the leave balance date Load Checks into Printer Click on Printer icon If checks & notifications printed ok. Update payroll by clicking OK button. **UPDATE ONLY IF CHECKS PRINTED SUCCESSFULLY!! Remove checks from Printer Print the Payroll Check Register Click on Payroll Check Register Click on Printer icon Create AP Vouchers from Payroll (if using this feature) Post Payroll to Ledger Click on Post Payroll to Ledger Click on either Preview or Printer icon Print Only & verify totals Click on Select Process and select Print/Post Enter down to Posting Date and key in date Click on Printer icon Record Employer Contributions (Employer s FICA/Medicare, Retirement, and Workers Comp). Click on Employer Contributions Report Click on Printer icon Compare the wages to the payroll register. Click on Create the Employer Contributions Posting File Click on OK button Click on Post Contributions & Fringe to Ledger Click on Printer icon or Preview icon to do PRINT ONLY version should be run first to verify the totals compared to the Employer Contributions Report Click on Select Process and select Print/Post Create Disk if needed (such as FBMC & Deferred Comp) Click on menu option that is needed (FBMC, Deferred Comp, etc.) Insert disk and click on Printer ***Some options may require selections to be made. 255
 There are currently three new standard.")
256 Appendix C: Printing Payroll Checks on Blank Check Stock You have the option to print payroll checks, including the MICR line, on blank check stock. (We will refer to checks that print on blank stock as "MICR checks.") There are currently three new standard.rpt files/options for MICR checks: Top stub only, with MICR -- prints a pay stub on top, above the check, with the payee's name and address on the bottom Top and bottom stubs, with MICR -- prints a copy of the pay stub on the top and the bottom Pressure-seal form, with MICR -- formatted for pressure-sealed forms. To use MICR checks, most of the necessary setup is done in the Bank Reconciliation module, on the Enter/Edit Bank Accounts screen. The required fields for printing MICR checks are: Bank Name (which is already required in E/E Bank Accounts) -- The name of the bank as it would be printed on the check. City, state, and zip code for the bank -- As printed on the check. Bank Account Number -- Will be printed on the MICR line. Must be 15 or fewer digits. Bank Routing Number -- Will be printed on the MICR line. Must be 9 digits. Bank Transit Number -- Printed with the bank name at the top of the check. Must be in format x-y/z. x, y, and z may be more than one digit. (In the banking world, this may be called a Fractional Routing Number, or something similar. In SF, we put that value in the transit number field.) All of these fields will be printed on the check. The new field "Account memo for checks" is optional. 256


257 The following example shows how the fields are used on the check. When the user tries to print payroll checks, if a MICR check has been selected, all of the required fields will be checked for valid values. The user will receive a message and will not be able to continue with printing if any required fields are not present. The Bank Account record that must have these values is the record that has the same Fund Ledger Account Number as the Payroll Cash Account on Page 1 of the Payroll system file. 257

258 In Enter/Edit Bank Accounts, there is another new field: "PR check type override." It is a dropdown box to select the check type, just like on the Payroll system file. If this field is not blank, the value will override the value on the system file. This would allow the user to associate different check types with different FL account numbers. (The check type override does not have to point to a MICR check, and the customer might have multiple custom MICR checks.) However, the check that is used is determined by the Bank Account record associated with the Payroll Cash Account. If the Bank Account record for that account does not have an override, the check type on the system file will be used. 258