BIGROAD MOBILE APPLICATION
|
|
|
- Emory Taylor
- 5 years ago
- Views:
Transcription

1 BIGROAD MOBILE APPLICATION DOWNLOADING THE BIGROAD MOBILE APP To download the BigRoad Mobile application, search for BigRoad in the Apple itunes Store or Google Play Store, based on your device. Tap Get or Install on the application. LOGIN SCREEN Drivers are required to log in to the BigRoad mobile application with their address and the temporary password that was sent to their by the desktop application. Steps: Logging into the mobile application 1. On the Login screen in the field, type the driver s address 2. In the Password field, type the driver s password information 3. Tap Sign In

2 CONNECTING TO A TRUCK Once logged in to the app, the Pick A Truck screen will display. The truck the driver was last connected to will always appear at the top of the liar. Drivers can search for an existing truck by using the Find Truck field. If the truck is existing, matches will begin to appear based on the characters typed in. If a driver will not need a vehicle for their work, they can also select Unknown or No Truck. If a DashLink for this vehicle has been connected at least once, the Fleet Complete tracking device and BigRoad DashLink will connect via Bluetooth automatically once the ignition is turned ON. ELD-enabled trucks (e.g Log Type set to ELD) cannot be selected for drivers using BigRoad Mobile App versions older than v21.0. Only AOBRD and elog vehicles may be used by these older versions of the mobile app. Drivers need to upgrade to v21.0 or to the latest version of BigRoad in order to select and connect to an ELD-enabled truck. Steps: Connecting to a truck
3 1. Tap the truck description the driver would like to connect to from the list. OR 1. Search for a truck using a minimum of 1 character in the Find Truck field. NAVIGATING THE HOME SCREEN Once the driver is signed in and connected to a vehicle, they will be directed to the Home screen. In the upper left corner of the Home screen is the name of the driver and the vehicle they are connected to, as well as the Header Bar arrow which accesses Trailer & Shipping information. In the upper right corner is the DashLink symbol. If the selected vehicle has a successful DashLink connection, the symbol will be solid white. Should there be no connection to a DashLink device, there will be an orange i symbol and an orange band across the screen reminding the driver to connect to the DashLink device. To the right of the DashLink symbol is the 3-dot ellipses button, which gives access to Settings, Switch Truck, and Sign Out. Below this is the Duty Status Wheel. To the right are the options for Daily Logs, Messages, and the recorded Odometer Reading based either on the DashLink device, or a manual entry. Further below are the hot buttons for

4 Telephone, Google Maps, Calculator, and Clock. Lastly is the map view with the driver s current position based on GPS. CONNECTING TO A DASHLINK If a selected vehicle is not yet connected to a DashLink device, this will need to be done prior to the driver getting in and driving away. There will be an orange band across the top of the Home Screen advising the driver to connect to a DashLink. The phone or tablet the driver is using will need to have Bluetooth enabled and they need to be logged in to the BigRoad Mobile App prior to starting the connection process. Connecting to a DashLink can be done from the Home Screen.

5 If the DashLink is already connected, the DashLink symbol on the Home Screen will appear in solid white. Once the Bluetooth connection has been established for the first time, the phone/tablet and DashLink should find each other on their own as long as the truck ignition is ON, the mobile device has Bluetooth ON, and the BigRoad app is open. If for any reason a connection to a DashLink device cannot be found, a message will appear with some troubleshooting tips and the opportunity to search again or cancel. Steps: Connecting to a DashLink device 1. Tap the DashLink device symbol with the orange i in the upper right corner of the Home Screen 2. Tap Connect DashLink TRAILER & SHIPPING DROPDOWN ARROW You can quickly update the Trailer & Shipping information directly from the header on the Home screen via the dropdown arrow. This feature is also available from the HoS screen or the header section of the current day s log within the mobile app. Note: Trailer names must be less than 10 characters and Shipping documents must be less than 40 characters long.

6 Steps: Adding Trailer & Shipping information 1. Expand the header by tapping the dropdown arrow 2. Tap Update Trailer & Shipping Info 3. Type the updated information into the appropriate fields 4. Tap Done Note: The last item added will become the current trailer and shipping doc on the daily log CHANGING A DUTY STATUS The driver s duty status can be changed by tapping the Duty Status wheel. The options presented are: 1. Off Duty 2. Sleeper 3. Driving with remaining available drive time for the shift 4. On Duty with remaining available on duty time for the shift 5. Begin Personal Use if applicable based on the driver s profile settings 6. Start a Yard Move if connected to a DashLink device and if applicable based on the driver s profile settings, and

7 7. Duty Status with a note Once selected, the pop-up window disappears, and the driver s status is changed automatically and displays the amount of time remaining for that status. The green colour surrounding the duty status wheel will also recede as time runs down. Once there is 29 minutes remaining, the status wheel will be highlighted in Red to warn the driver that changing their duty status will be required in the next 29 minutes so as not to go into violation. If the mobile device s GPS settings are turned ON, the Location field in the Daily Log will be auto-populated. If the device is DashLink-connected, the starting odometer will also be auto-populated. Steps: Changing Duty Status 1. Tap the Duty Status Wheel 2. Select the required duty status COMPLETING A DRIVER VEHICLE INSPECTION REPORT (DVIR) As a good start-of-day practice, once in On Duty status for a minimum of 15 minutes, drivers should complete a driver vehicle inspection report, or DVIR prior to putting themselves into Driving status.

8 Steps: Completing a DVIR 1. Tap Daily Logs 2. Tap View Logs 3. Select the daily log for which you would like to add an inspection 4. Scroll to the bottom of the log 5. Tap New Inspection 6. Confirm the Carrier and Inspector names 7. Select a truck to inspect OR select Other Truck or Other Trailer to indicate an alternate unit to inspect 8. Specify the Time of the inspection 9. Confirm the Odometer reading at the time of inspection 10. Confirm the Location of inspection 11. If any Defects are found during the inspection, check the box for Found Defects 12. Enter remarks related to the defects found 13. If no defects are found, leave the checkbox blank 14. Tap Save

9 SIGNING A COMPLETED DVIR Once a DVIR has been completed, the driver can choose to sign it right away, or they can wait until the end of the day and sign the Daily Log and DVIR all at once; however, we do recommend that drivers get in the habit of signing the inspection as soon as they complete it. Steps: Signing a DVIR 1. Tap Sign Inspection Report at the bottom of the Daily Log 2. If no signature has been saved in the driver s settings, they will need to create one by tapping Create Signature and using their fingertip or a stylus pen 3. Tap Sign Inspection to declare that all information submitted is correct

10 DRIVING STATUS Drivers can put themselves into Driving duty status by simply starting to drive the vehicle. The app will detect movement and automatically switch the driver into Driving duty status. The Duty Status wheel will then begin counting down for available driving time. If the app no longer detects movement after 5 consecutive minutes, the app will put the driver back into On Duty Not Driving status. Steps: Switching to Driving status 1. Start driving the vehicle

11 TAKING A BREAK Depending on the rule under which the driver is operating, they will be required to take a 30-minute break within the first 8 hours of their work shift. It is important that the driver take all 30 minutes at once and not less. If a Driver s break is interrupted for any reason and they must move their vehicle prior to the end of their Break Time, they must use the Yard Move function if possible. Otherwise, the mobile app will record the movement as Driving time and they will be required to take another full 30-minute break again before the end of their 8-hours shift, and not just the remainder of the time they had left for the first break that was interrupted. When a driver is taking a break, the Duty Status wheel will count down 30 minutes automatically. At 0, the driver can return to On Duty and/or Driving status without going into violation. You do not need to be in On Duty status first before going to Off Duty. The truck must be stopped, so if driving the driver will not be able to change their status at all.
12 Steps: Taking a Break 1. Tap the Duty Status wheel 2. Select Off Duty 3. Confirm the location as indicated by the GPS, or enter it manually if not autopopulated 4. Tap Save YARD MOVE To access Yard Move, it must be enabled for the fleet and the driver must be connected to DashLink. If using an AOBRD, once the driver has started a Yard Move, the vehicle can be driven up to 5miles/8km, which the app will count down for them. A driver can perform multiple yard moves within a work shift; however, they must wait a total of 5 minutes between each instance. If they exceed 5 miles/8km, the DashLink will put them into Driving status and count all distance driven as drive time, not just the extra distance beyond the first 5mi/8km.

13 If using ELD, there is no distance limit and drivers are allowed to drive for the duration of the duty status that they are in. For example, if they have 14 hours of On Duty time remaining for their work shift, they can use all of it as Yard Move, but this would be at their discretion. An ELD Yard Move will also have its own line on the log graph for ELD, where as an AOBRD Yard Move does not. If the app detects a power cycle, meaning the engine was turned off and then on again, the app will prompt the driver to indicate if they want to continue in Yard Move, or switch to On Duty status instead. Steps: Using Yard Move 1. Tap the Duty Status wheel 2. Select Start a Yard Move 3. Enter a Note for the special driving mode 4. Tap Save 5. When finished, stop the vehicle and tap Yard Move Complete PERSONAL CONVEYANCE/PERSONAL USE To access Begin Personal Use, it must be enabled for the fleet and the truck must also be unladen, or bobtailed.

14 If the app detects a power cycle, meaning the engine was turned off and then on again, the app will prompt the driver to indicate if they want to continue in Personal Use, or switch to Off Duty status instead. Steps: Using Personal Conveyance 1. Tap the Duty Status wheel 2. Select Begin Personal Use 3. Enter a Note for the special driving mode 4. Tap Save COMPLETING A DOT INSPECTION Should a DOT inspector request a driver s logs, they can easily view them directly onscreen from the mobile device. Prior to handing the mobile device over to the inspector, the driver must ensure the inspector has been given the information card with important details about how to use the mobile app and how to view the necessary log and DVIR information. Inspectors will have the ability to view 7 or 14 days of logs plus the current day depending on the rule the driver is operating under.

15 As per the ELD mandate, the driver needs to also have a printed or electronic copy of the user manual for the ELD device. We have provided an electronic copy in the mobile app via the Inspect On-Screen option from the Instructions screen. Steps: Completing a DOT Inspection 1. Tap Daily Logs from the Home Screen 2. Select the number of days to inspect 3. Tap Inspect Logs 4. Tap Inspect On-Screen 5. Tap Show Inspection Logs at the bottom of the screen As per the ELD mandate, malfunction and diagnostic events also need to be recorded. These events can be viewed via the Show Inspection Logs screen. Steps: Completing a DOT Inspection cont d 6. The Inspector will select the listed dates to view the available logs 7. When done, the Inspector will hand the mobile device back to the driver 8. Tap the End Inspection button on the mobile device to return to standard operating mode

16 In general, if the driver is operating an AOBRD Truck, they will be inspected as AOBRD and if they are operating an ELD Truck, they will be inspected as an ELD. How will the Inspector know what type of Truck you are operating? At the time of inspection, the driver will provide the Inspector with the ELD or AOBRD Driver Card that tells them how to inspect the truck. Therefore, it is important that the Driver provides the Inspector with the appropriate driver card. DAILY LOGS SENDING TO FMCSA Inspectors have the ability to perform inspections by sending Driver Daily Logs directly to the FMCSA web site using a Web Service (XML) or an . The Inspector will inform the driver on the method to use (i.e. Web service / ). Note: a web service is any piece of software that makes itself available over the internet and uses a standardized XML messaging system. (As all communication is in XML, web services are not tied to any one OS or programming language). Note: the driver will need to have an app downloaded to their device to use the option. The Inspect Daily Logs screen has a Send to FMCSA button to make it easier to send logs directly to the FMCSA without delay.

17 Steps: Sending Logs to FMCSA 1. Navigate to the Inspect Daily Logs screen 2. Tap SEND TO FMCSA 3. Tap Via Web Service or Tap Via 4. Tap Send 5. On the Send Daily Logs to FMCSA screen in the Inspection Comment field, the driver will type the comment that the Inspector wants to capture 6. Tap Send 7. An Error or Success message will then display to the driver 8. In the case of an Error message displaying, it will prompt the driver to select a different Inspection Method EDITING LOGS FROM THE MOBILE APP There will come a time when a driver will need to edit a log to correct a warning or violation. This can be done directly from within the Mobile App and should be completed prior to the driver ending their shift and logging out. Log violations and warnings are identified with a yellow triangle icon with a white exclamation mark hovering over the Daily Logs button. Steps: Editing a Daily Log 1. Tap Daily Logs from the Home Screen 2. Tap Warnings at the bottom to view the log containing violations 3. Select the daily log for which the driver would like to make edits

18 The Daily Log screen displays the Log and Header information on separate tabs for ease of use. On the Log tab the driver will see the graph, event list, and more events recorded. With the ELD mandate, Location, Odometer, Engine Hrs, and Origin are recorded as well. On the Header tab, Certification History, Co-Driver details, and Carrier information are maintained. A driver may certify (i.e. sign) their log multiple times throughout the day and may edit their past signed logs at any time for the past 14 days. Steps: Editing a Daily Log, cont d 4. Scroll through the log to locate the yellow triangle where the violation has been marked 5. Tap the yellow triangle 6. Correct the violation 7. Tap the back button on the mobile device to return to the list of logs with violations Repeat steps 1-7 until all logs have been edited and amended EDITING LOGS - ADDING A LOG EVENT

19 Duty statuses can be added to the daily log to clarify a change in duty status that may have been missed or forgotten. For example, the driver logged in to the Mobile App at 9:30am, but they actually started their shift at 9:00am. Before the driver can make any changes such as Adding or Editing events, they must sign the log so they can make changes up until the time they signed. Drivers should also sign the log again once they ve made their edits so as to always have the most recent version of their log being sent to their Manager or Dispatcher. Steps: Adding a Log Event 1. From the Daily Log, tap Edit Daily Log 2. Tap Add Past Duty Status 3. Select the Duty Status 4. Indicate the time the duty status was to start 5. Confirm or specify the location where the duty status occurred 6. Enter a Note clarifying the reason for adding the new duty status 7. Tap Save

20 EDITING LOGS - EDITING AN EXISTING LOG EVENT Any events that have been auto-recorded by the DashLink device, such as Driving time will not be editable as per the ELD mandate. Those that have been manually entered will be editable and will require notes explaining why the edit is being made. For example, you went Off Duty at noon to take your break and forgot to mark yourself as Off Duty at the proper time. While adding notes is a process that drivers will need to get used to, the recordkeeping process will become much easier and clearer when reviewing past logs and determining why modifications have been made. Steps: Editing an Existing Log Event 1. From the Daily Log, tap Edit Daily Log 2. Locate the Event to be edited and tap Edit 3. Select the Duty Status as needed 4. Indicate the time the duty status was to start and/or end 5. Confirm or specify the location where the duty status occurred 6. Enter a Note clarifying the reason for editing the duty status 7. Tap Save

21 DAILY LOGS AUTO-RECORDED EVENTS There are also a number of different types of ELD events that must be recorded including but not limited to: Log In, Log Out, and Engine On/Off as per the ELD mandate. These types of events do not affect a driver s Hours of Service and are auto-recorded for them. For ease of use, they have been grouped together in a dropdown list and the driver can view the events by tapping the downward arrow or hide them by tapping the upward arrow. These auto-recorded events display in both the Admin Console for an Administrator and on the Log tab of a Driver s Daily Log.
22 UNIDENTIFIED DRIVING As of December 18, 2017, fleets use the feature of Unidentified Driving for increased accuracy of driver and truck drive time and distance, as well as for reporting on unidentified driving as part of the ELD mandate. If a truck is recorded driving while no driver is connected via the Mobile App, the next driver who connects to the vehicle will see a blue triangle with a question mark on their Daily Logs button. They will be required to claim the previously driven distance as their own, or to reject it should it belong to another driver. Unidentified driving time will also display in the BigRoad Admin Console / Dashboard tab / on the Roadside Inspection Risk screen via the View button Steps: Addressing Unidentified Driving 1. Tap the Daily Logs button 2. At the bottom, the driver can see how many driving events were unassigned and where they were recorded 3. Tap Unassigned Driving to access the information 4. Tap the corresponding log 5. Tap where it indicates the number of unassigned driving events for that day 6. Tap either Claim or Reject NOTE: If selecting Reject, the driver will no longer be prompted to claim the unidentified driving time in the future.

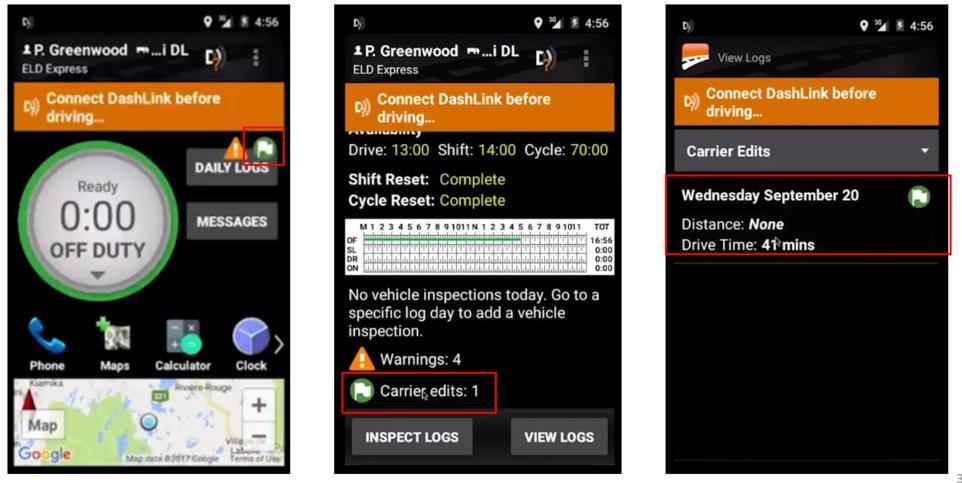
23 ACCEPTING OR REJECTING CARRIER EDITS Carrier Edits are also known as Suggested Edits and are available as of December 18, This feature is enabled automatically once ELD is enabled for the Fleet within the BigRoad Admin Console. It enables a Safety Manager to edit a Driver s log; however, it first requires the Driver s approval before any edits appear on the log. Edits can only be accepted or rejected on an All or None basis, meaning that all suggested edits must either be accepted or rejected at once by the Driver. Carrier, or Suggested Edits appear on the mobile app as a Green Flag icon on the Daily Logs button. Steps: Accepting or Rejecting Carrier Edits 1. Tap the Daily Logs button from the Home screen 2. Tap Carrier Edits 3. Tap the day for which the drivers want to review the Carrier Edits 4. Tap the Green Banner to review the edits 5. Tap either Accept or Reject for all changes as a group (All edits to review appear in white with the green flag icon as well as any Carrier Notes about why the changes were suggested) NOTE: If there is one change that is not correct, the Driver must reject the entire list and include a note to the Carrier about why the suggestions have been rejected. The Driver s log will remain unchanged. The Carrier can then re-submit a Suggested Edit if they wish. If edits are Accepted, they will be added immediately to the Driver s log.

24
25 SENDING A MESSAGE If activated on their profile, Drivers will have the ability to send messages to other drivers within their fleet and/or to Dispatchers. Sent and received messages are stored within the BigRoad Admin Console and cannot be deleted. Drivers cannot read or respond to messages while the vehicle is in motion, they must be stopped. Steps: Sending a Message 1. From the Home screen, tap Messages 2. To begin a new message, tap New Chat 3. Select a Contact from the list to send a message to 4. Enter the message in the Message field 5. Tap Send

26 RECEIVING & REPLYING TO A MESSAGE Drivers are also able to receive messages from other drivers and Dispatchers as well as reply to them. Newly received and unread messages will display with an orange circle with a white exclamation point on the Home screen at the top of the Messages button. Steps: Receiving & Replying to a Message 1. From the Home screen, tap Messages 2. New messages will be highlighted with an orange dot to the left of the message 3. Tap the new message to review 4. Enter a reply in the Message field 5. Tap Send
27 CHECKING IN Drivers have the option to Check in at a location and send an to a recipient containing their current location. The mobile device the driver is using must have an account activated in order to use this feature. This will be handy for those drivers who would like to provide Dispatchers or customers with an update as to their current location and progress. Steps: Checking In 1. From the Home Screen, tap Messages 2. Tap Check In 3. Enter any notes in the Notes field 4. Tap Add and select the recipient from the device s Contact list OR tap Add New to enter a new address if they do not exist in the list

28 DOCUMENTS Drivers have the option to upload documents either by taking a photo using the mobile device or choosing an existing photo from the mobile device s gallery. Steps: Uploading Documents 1. From the Home Screen, tap Messages 2. Tap Documents 3. Select an image from the Gallery, or tap Camera and use the mobile device s camera to take a picture of the document 4. Enter Notes about the type or nature of the document being sent 5. Tap Add and select the recipient from the device s Contact list (again, there must be an account active on the driver s mobile device) OR tap Add New to enter a new address if they do not exist in the list 6. To also send to the Dispatcher, tap Send to Dispatch

29 DRIVER SETTINGS Drivers have the opportunity to change and manage certain settings via the mobile app. Steps: Accessing Mobile App Settings 1. From the Home Screen, tap the 3-dot ellipses button 2. Tap Settings Automatic duty status: Will automatically adjust the driver s duty status should they be in On Duty or Driving status. Depending on the movement of the asset, the app will determine whether or not the driver is in motion or simply On Duty, not driving. This checkbox should be activated by default. Steps: Activating Automatic duty status 1. Tap the checkbox to either activate or deactivate this feature
30 Share BigRoad allows the driver to text a friend, a friend (if the driver has an account active on the mobile device), tweet about BigRoad (if the driver has a Twitter account), and like BigRoad on Facebook (if the driver has a Facebook account). Rate BigRoad allows the driver to access the mobile app information from the Google Play or Apple itunes store to rate the app on a 5-star scale and write a review if desired. DashLink allows the driver to view and/or repair a DashLink connection. Driving Lockout screen allows the driver to decide which screen is displayed when driving. The driver has a choice between the Main Dashboard, which is the Home Screen or Hours of Service. The Main Dashboard will be selected and displayed by default.

31 Data Collection: The checkbox for this feature is selected by default and it allows the mobile app to collect both application and contact data for sending s. Deactivating this checkbox stops the mobile app from collecting this information. FAQ provides the driver with a list of frequently asked questions. Support & Feedback allows the driver to directly send BigRoad an if support is required. About BigRoad provides version and copyright information as well as the ability to request support and send feedback. BigRoad Website opens a direct link to the BigRoad web site where the driver can access a copy of the Driver Information Card and training videos. Legal opens the BigRoad end user license agreement. Privacy accesses the BigRoad privacy policy.

32 SWITCHING TRUCKS Drivers may need to operate more than one vehicle throughout their shift. They are able to slip seats and connect to multiple vehicles via the BigRoad Mobile App using the Switch Truck feature. Steps: Switching Trucks 1. From the Home Screen, tap the 3-dot ellipses button 2. Tap Switch Truck 3. Select the new truck from the list, or search using the Find Truck field

33 SIGNING OUT OF THE MOBILE APP When a driver has completed their work shift they can then log out of the mobile app. Drivers should first correct all log warnings or violations, complete all necessary vehicle inspection reports, put themselves into Off Duty status, and sign their daily log prior to logging out of the mobile app. Steps: Signing Out of the Mobile App 1. From the Home Screen, tap the 3-dot ellipses button 2. Tap Sign Out

34 NEED MORE? Training Session Requests: ELD Resource Centre: