EB-300 / EB-310. Simple Counter with Detection. (Counting/Detecting) SERVICE MANUAL
|
|
|
- Gabriel Flynn
- 5 years ago
- Views:
Transcription
1 EB-300 / EB-310 Simple Counter with Detection (Counting/Detecting) SERVICE MANUAL E-Banking Tech Co., Ltd. #A-1104, Digital Empire 11F, Gwanyang, Dongan, Anyang, Gyeonggi, Korea TEL : ~83 FAX : Homepage : info@ebankingtech.com 1
2 Important Safety Information Always be careful when using the machine. To reduce the risk of fire, electrical shock, and other injuries, keep these safety considerations in mind when installing, using, and maintaining your machine: Stability. Place the machine on a secure, stable surface. The machine can be seriously damaged if it falls. Power Supply. Provide correct power to the machine, as listed on the back of the machine. If you are not sure of the type of power supplied to your office, call your electric company. Grounding. If the plug has three prongs, it must be plugged into a grounded (three holes) outlet. Grounded plugs and outlets are designed for your safety - do not try to make a three-prong plug fit into a two-prong outlet by modifying the plug or outlet in any way. If you cannot insert the plug into your wall outlet easily, then the outlet should be inspected by a qualified electrician. Overload. Do not plug too many electrical devices into a wall outlet or an extension cord. An overloaded outlet could be a reason of fire and electrical shock hazard. Cleaning. Before cleaning the machine, unplug it from the power outlet. Clean exposed parts with a soft cloth slightly dampened with water. Do not use aerosol cleaners. Gas Leaks. Never use any machine close to a gas leak. If you think gas is leaking, call the gas company immediately. A small electrical spark in the machine could cause a fire or explosion. Precaution When using the machine, these precautions should always be followed. 1. Never push objects of any kind into your machine through the case or cabinet openings. 2. Do not use your machine near water, in wet locations, or outdoors. 3. Do not allow anything to rest on the power cord, line cord, or PC interface cable. Do not locate your machine where the cords can be damaged by persons walking on them. 4. Do not allow pets to chew the power cord or PC interface cable. 5. Use supplies or cleaning materials only as directed. Keep all supplies and materials out of the way of children. 6. The power supply turns this machine on and off. Make sure that your machine is installed near an outlet and is easily accessible. 7. Never remove covers or guards that require a tool for removal. There are no operator serviceable areas inside your machine. Refer servicing to authorized service personnel. 8. Never defeat interlock switches. This machine is designed to restrict operator access to 2
3 unsafe areas. Covers, guards and interlock switches are provided to ensure that the machine will not operate with covers opened. 9. Avoid direct viewing of the image sensor lights. The lamps are bright and, while not harmful, they may cause an annoying afterimage. Always keep the rear cover closed during operation and storage. 10. Risk of explosion If battery is replaced by an incorrect type. Dispose of used batteries according to the instruction. Managing the performance of the machine This unit has many sophisticated sensors. Without proper maintenance, it cannot last its good performance. Please read the Daily Maintenance section of this manual carefully, and do it everyday. When the performance is deteriorated on a sudden, please clean all the sensors first before calling a service. Safety Notes Your machine and the supplies are designed and tested to meet strict safety requirements. Included are safety agency examination and approval and compliance to established environmental standards. Please read the following instructions carefully before operating your machine, and refer to them as needed to ensure the continued safe operation of your machine. 3
4 Table of Contents Part 1 Description of the Parts Part 2 Classification of models Part 3 Function of Control Panel ~12 Part 4 Overview of Display Part 5 Operating Placing Bills onto the Hopper Counting Selecting Add Function Selecting Batch Function Selecting Automatic/manual Part 6 User setting menu ~16 Part 7 General setting menu ~18 Part 8 Device setting menu ~21 Part 9 Software upgrade ~29 Part 10 Error messages & Troubleshooting Part 11 Specification Part 12 Daily care Part 13 Product warranty


5 1. Description of the Parts NO The name of the Parts note 1 Guide for counting Note Expansion Guide 2 Hopper 3 Thickness Adjustment Screw Gap Control screw 4 Stacker 5 Handle 6 Connector for external display 7 Power Switch 8 Power Plug 5
6 2. Classification of models Model \ Sensor IR UV MG Size 3D EB-300 O X X X EB-300UV O O X X EB-300MG O X O X EB-310 O O O X EB-310SU O O X O EB-310S O O O O 6

7 3. Function of Control Panel (EB-300UV, EB-300MG, EB-310, EB-310S, EB-310SU) 1 : UV DETECTION ON / OFF 2 : MG DETECTION ON / OFF 3 : DIFFERENT-DENOMINATION DETECTION ON / OFF 4 : ACCUMULATED NUMBER COUNT 5 : PRESET NUMBER OF NOTES 6 : ONLY FOR SETTING MENU 7 : CLEAR THE COUNTED NUMBER or MANUAL START KEY 8 : DOWN KEY OR NUMBER 9 9 : UP KEY OR NUMBER 0 7
8 2-1. This key can be used to detect counterfeit note by UV sensor. When counterfeit note or suspected notes were detected while counting, some of specific message or error messages are displayed on the screen This key can be used to detect counterfeit note by MG sensor. When counterfeit note or suspected notes were detected while counting, some of specific message or error messages are displayed on the screen This key can be used to detect different-denomination note by vertical-size. (Specially 310S, 310SU model detect by 3D size sensor.) 2-4 When press ADD key, the accumulated total of notes will be shown on the screen when they have been counted. By pressing CLEAR/BACK key user can clear the counted value. 2-5 When press BAT key, you can activate batch number, which is already registered (default: 100). Or if you want to select a special batch number, please use number key When the counted number reaches at the batch number, the machine will stop automatically. 2-6 By pressing MODE key, you can enter the setting menu. 8
9 2-7 After counting - By pressing RESET/START key, you can clear counted number. On the other condition - RESET/START key performs reset the machine or manual start on manual counting mode. 2-8 By pressing 9 (DOWN) key, you can input 9 or move to the next line in setting mode. 2-9 By pressing 0 (UP) key, you can input 0 or move to the previous line in setting mode. 9
10 (EB-300) 1 : DIFFERENT-DENOMINATION DETECTION ON / OFF 2 : AUTO COUNTING / MANUAL COUNTING 3 : COUNTING SPEED 4 : ACCUMULATED NUMBER COUNT 5 : PRESET NUMBER OF NOTES 6 : ONLY FOR SETTING MENU 7 : CLEAR THE COUNTED NUMBER or MANUAL START KEY 8 : DOWN OR NUMBER 9 9 : UP KEY OR NUMBER 0 10
11 2-1. This key can be used to detect different-denomination note by vertical-size sensor. 2-2 This key can be used to activate auto-counting or manual-counting. 2-3 It is the SPEED key which has 4 different speeds. Whenever you press this key, it will be forwarding as shown under : 1,000 notes/ minute 1200: 1,200 notes/ minute 1,300: 1,300 notes/ minute 1,500: 1,500 notes/ minute You can change the counting speed under DEN off mode only. 2-4 When press ADD key, the accumulated total of notes will be shown on the screen when they have been counted. By pressing CLEAR/BACK key user can clear the counted value. 2-5 When press BAT key, you can activate batch number, which is already registered (default: 100). Or if you want to select a special batch number, please use number key When the counted number reaches at the batch number, the machine will stop automatically. 2-6 By pressing MODE key, you can enter the setting menu. 2-7 After counting - By pressing RESET/START key, you can clear counted number. 11
12 On the other condition - RESET/START key performs reset the machine or manual start on manual counting mode. 2-8 By pressing 9 (DOWN) key, you can input 9 or move to the next line in setting mode. 2-9 By pressing 0 (UP) key, you can input 0 or move to the previous line in setting mode. 12
13 4. Overview of Display Counting number Batch number Counted number : number of notes (Max 4 digit) BATCH function : Display the batch number (Max 3 digit) 13
14 5. Operating Placing Bills onto the Hopper It is very important to place the bills onto the hopper correctly because recognition performance of the bills is highly affected by the arrangement of the bills. Please avoid counting bills in bad condition such as wet, excessively dirty, spoiled, folded, curled notes and with foreign material like clips, bands, etc. Sometimes it causes malfunction of the machine. Counting If ADD mode was set, the cumulative number will be displayed. If an error occurs during operation and the machine stops, then an error message will be displayed. To clear the error, press RESET / START key. The machine will try to solve the problem automatically, but if it fails to clear a jam or there are some other mechanical errors, remove jammed bills manually. Then press the start/stop key again to clear error message. Selecting Add Function ADD function provides a cumulative count, to the operator. For example, if someone tries to count up to 400, but the machine cannot count over 300, which is maximum capacity of the Stacker. But pressing ADD key, then try to count again. The machine counts and stops when the stacker is full. After removing those notes from the Stacker, you can begin counting again, and the total counted number will be increased from the previous total. The Add function is On/Off by pressing ADD key and clears counted value by RESET / START key. Selecting Batch Function BAT key is used to select preset batch number. In the batch count mode, the machine stops counting when the counted number reaches at the set number, even though the bills remain on the Hopper. User can edit batch number by pressing 0~9 number key. Selecting Automatic/Manual In AUTOMACTIC mode, when the hopper sensor detect banknote on the hopper, machine will automatically start to count the bill. In MANUAL mode, the machine will not count the bills automatically even though the bills are onto the hopper. When user presses RESET / START key manually, the machine will start to count. While counting, the machine will display the number of the bills on FND display and it stops working when it meets the conditions described as below; - No bills on the hopper - The number of the bills counted is the same as the batch number to be set in BATCH mode. - Errors have occurred. When the machine finishes counting without errors, the number of counted bills will be displayed on the screen. 14
15 6. User setting menu Way to enter the menu: Press MODE Key 5times No Title Description 1 SPd Counting speed setting : L-1 : 1,200 notes /minute (default) L-2 : 1,300 notes /minute L-3 : 1,500 notes /minute L-4 : 1,800 notes /minute 2 Ed-A Double level setting : L-A : auto(default) L-1 : level 1 L-2 : level 2 L-3 level 3 OFF 3 Bt-A Initial preset number setting : 100(default) Use or to select level Use or to select level Use ~ This menu is not work on EB At-n Counting mode setting : On : automatic-counting(default) Off : manual-counting 5 SS-A Different vertical size detection setting : L-0 L-3(default) L-4 ~ L9 to set The initial batch number. Use or to select mode Use or to select level This menu is not work on EB
16 No Title Description 6 Bu-A Buzzer level setting : On1: Beep sounds when error occurred On2: Beep sounds when error occurred and counting finished(default) Off: No beep 7 St-A Stacker warning time setting : Passed note remains on the stacker after 30(default) seconds, machine notify to user by beep sound until remove it. 30(default) 8 HP-t Hopper warning time set : If the banknote remained on the stacker over 10 seconds after the last count. At that condition, adding more banknote on the hopper is not available. ( E-ST error) 10(default) 9 BL-A Different horizontal size detection setting : L-0 L-3(default) L-4 ~ L9 Use or to select value Use or to select value Use or to select level This menu is only for EB-310S EB-310SU 16
17 7. General setting menu Way to enter the menu: Press No Title Description 1 MOTOR TEST Motor test mode 1 : Motor stop 2 : Motor run Use or to select MOTOR TEST mode and press 1 or 2 2 SIZE TEST Banknote size test mode Place the banknote on the hopper that to be tested. Use or This menu is only for to select SIZE EB-310S Vertical Horizontal Skew TEST mode EB-310SU size size value 3 Not in use 17


 300MG 310 310S 310SU 300")
18 No Title Description 4 IR SETTING IR sensor setting Place the white setting paper as below. Use or to select IR setting mode Set the value UV (Old type) 300MG S 310SU UV (New type) 18
19 5 FL SETTING FL setting mode No need setting paper. Normally the standard value bounds are 05~15 (Increasing value makes more sensitivity.) This menu is only for Use or to select FL setting mode EB-300UV, EB-310, EB-310S EB-310SU EB-300UV (New type) 19
20 8. Device setting menu Way to enter the menu: Press MODE key 5times Ex) setting menu 9 FUNCTION 1 FUNCTION 2 No Increase Decrease Increase Decrease Select Value Value Value Value Menu No FUNCTION1 DESCRIPTION1 FUNCTION2 DESCRIPTION2 S01 S02 S03 S04 S05 S06 S07 Not in use Not in use 20
21 No FUNCTION1 DESCRIPTION1 FUNCTION2 DESCRIPTION2 Double level setting 2 : S08 Not in use Double level setting 2 Specially two double setting values are needed. (Generally using for USD currency.) 20(default) S09 Skew Set Maximum Skew angle limit of banknote. (Generally using for local currency.) 30(default) Short/Chain Set Double limit of UV Set Banknote. (Only for 300UV S10 Double Set It can change by 310 local currency 310S condition. 310SU) S11 Not in use Not in use Minimum MG limit of local currency. S12 MG2 (Generally using for MG1 USD currency and specified currency.) Back feed setting. Increasing value S13 Motor make more Stack Speed backfeed. DP Output set Customer displayer S14 (This menu is not setting. Not in use work on EB-300) 1(default) Changing value can occurs unexpected problems. Strongly recommend the default values. Maximum Short/Chain limit of banknote. It can change by local currency condition. Maximum FL limit of genuine banknote. Increasing value makes more insensitivity. Minimum MG limit of genuine banknote. (Generally using for local currency.) Stacker Motor speed setting. 9(default) 21

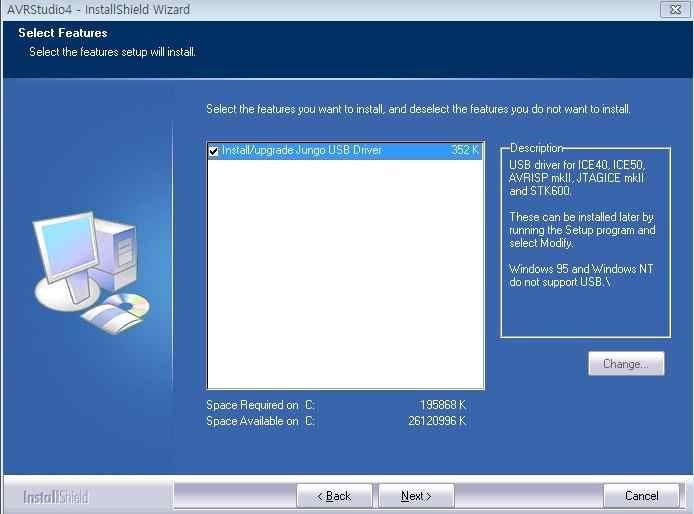
22 9. Software upgrade 1. Install the AVR Studio to the PC. 22
23 23

24 24


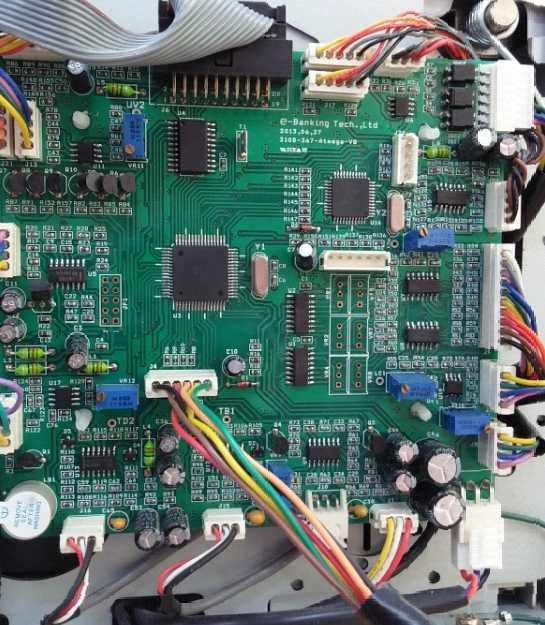
25 2. Connect PC to the machine 2-1. Turn off the machine and Remove the right-cover Connect PC to the AVR ISP Connect AVR ISP to the main B/D Turn on the machine. Customized cable for Main B/D S/W upgrade tool Connect to the PC Connect to the upgrade tool 25
26 26


27 3. S/W downloading. Execute AVR Studio 4 and click Cancel. Click AVR button. 27


28 Select ATmega64 on Main tab. 1 2 Click button and select firmware file on Program tab. Click Program button
29 When the downloading is successfully complete, the message will be displayed as above. After downloading, it is necessary to reset the machine. ( MODE key 10 times.) ** If some process is failed, reset the power or reconnect the AVR ISP from PC and then try again. 29
30 10. Error messages & Troubleshooting Error message Cause of error Solution E_DB A duplicated note has been passed. Make the gap narrow by adjusting the gap control screw. E_CH 2 or more notes have passed at the Make the gap narrow by adjusting same time. the gap control screw. E_HF Half note has been detected. Remove and check the note. E_JA Notes were jammed. Remove notes or check end sensor. E_HP Something detected on the hopper Check the hopper sensor or sensor while initial checking. remove banknote. E_ST Something detected on the stacker Check the stacker sensor or sensor while initial checking. remove banknote. E_EN Motor runs but no response of Check the encoder sensor and encoder. cable connections. E_PL Note passed with skewed left. Check the note and count again. E_PR Note passed with skewed right. Check the note and count again. E_TE Passed note was too short. Remove and check the note. E_FE Hopper sensor detects but didn't pass anything. Clean the sensor and count again. E_CF Passed banknote is suspected counterfeit by FL. Check the note and count again. E_FC Passed banknote is suspected counterfeit by MG. Check the note and count again. E_DD Different denomination detected by vertical size. E_D2 Different denomination detected horizontal size. 30
31 11. Specifications Item Specification Dimension (W x D x H) 270[W] x 260[D] x 255[H] mm Weight 6 kgs Hopper capacity 300 pcs(extension Max 500 pcs) Stacker capacity 300 pcs Display Type FND Banknote Size Range W: 90 ~ 180, H: 50 ~ 100 Banknote thickness range 0.05 ~ 0.2mm Counting Speed 1000,1200,1300,1500,1800 / Min Preset Batch Number Counterfeit Detection(option) MG, MT, UV, FL, IR Connectivity Serial (RS232C) Power Requirements VAC, 50~60Hz, 1.5A Notes: - This machine specification can be changed without any notice - The contents of this user's guide also can be changed. 13. Daily care We recommend you to clean the sensors with brush or dried cloth. When cleaning the sensors, please do not use any Chemicals and watery cloth. 31
32 13. Product warranty Thank you for purchasing our product. If a failure occurs due to defects, Contact your dealer or product manufacturer to repair or compensate the product. All process about warranty is in accordance with our terms of warranty. < Terms of warranty > Warranty coverage - A failure occurred under normal condition, 1-year warranty from date of purchased product. Warranty exclusion - A failure occurred by customer s negligence or incorrect operation. - A failure occurred by alternation of product or repair from non-certified service engineer. - A failure occurred by input power. - A failure occurred by non-official consumables. - A failure occurred by natural disasters. After the expiry of the warranty period - If repair is required, the customers have to pay for visit, repair or consumable cost. Securement of A/S parts - If the product is discontinued, warranty to supply A/S parts during 5-years. 32