10/13/2017. Jakarta Service Management
|
|
|
- Rosamund Summers
- 6 years ago
- Views:
Transcription
1 10/13/2017
2 Contents Contents...4 Activate...4 Activate other applications... 4 Service management states...6 State flow customization...6 State flow example Implications of disabling SM state flows Application Designer Generate an SM application with default settings...18 Configure an SM application prior to generation Request Management Request creation...41 Request states...46 Request approvals Agent assignment Collaborate on a request...54 Close a request Request task management...54 Content packs for Request Management...58 Core installation reference Installed with Core...59 Planned Maintenance Activate Planned Maintenance Maintenance plan management Maintenance plan examples...88 Facilities Facilities overview Field Field overview Field service process Activate Field Configure Field Field overview module Manage work orders Work order questionnaires Manage work order tasks Work order templates Part requirements Dispatching work order tasks Central dispatch Dispatch map Auto assignment Dynamic scheduling Field Service manager module Execute work order tasks Use the agent calendar Field service groups Field SLAs Service management states Territory management ii
3 Contents Performance Analytics reports Request Management Request task management Integration with Project Portfolio Management Integration with Customer Integration with Financial Management Time recording for Field Push notifications and mobile interface updates Planned maintenance enhancements Content packs for Field Components installed with Field Finance Get started with Finance Finance process Administer Finance Finance installation reference Legal Legal process Get started with Legal Legal installation reference Marketing Get started with Marketing Marketing process Marketing installation reference Index iii
4 (SM) refers to the service management applications you install, such as Facilities and Legal, but also the service management applications created using the Application Designer. Each of these applications allow you to manage business functions that require a request-type workflow where requests are approved, qualified, assigned, and completed. Activate The Core plugin is activated automatically when you activate any service management application. For information on subscribing to a service management application, see one of the following topics. Activate Facilities on page 91 Activate Finance on page 393 Activate Legal on page 409 Activate Marketing on page 426 The Core plugin also activates the following plugins if they are not already active. Automatic Assignment Asset Management Process Flow Formatter State Flows Knowledge Management V3 Skills Management Territory Management Managed documents Task Activities Geolocation Geolocation Mobile Encryption Support Workbench Checklist Activate other applications After the Core plugin has been activated, you can activate other SM applications, such as Field Service management and facilities service management. You can also activate CMS portals for each of these SM applications to add them to the Portal. 4
5 Table 1: Other SM plugins to activate Plugin ID Facilities com.snc.facilities.core Manages facilities requests and enables users to report and track requests by their location on a floor plan. Activation of this plugin on production instances may require a separate license. Contact for details Facilities CMS Portal com.snc.facilities.core.cms Displays the Facilities Service Automation SM application on the portal. Activation of this plugin on production instances may require a separate license. Contact for details. Field com.snc.work_management Provides support for scheduling and managing on location work. Field CMS Portal com.snc.work_management.cms Displays the Work Management SM application on the Service Management portal. Activation of this plugin on production instances may require a separate license. Contact for details. Finance com.snc.finance_service_automation Provides support for managing finance requests and enabling users to report and track those requests. Activation of this plugin on production instances may require a separate license. Contact for details. Finance CMS Portal com.snc.finance_service_automation.cms Displays the Finance Service Automation SM application on the portal. Activation of this plugin on production instances may require a separate license. Contact for details. HR Service Delivery: Core com.snc.hr.core Provides a basic data and security model for HR systems. HR Service Delivery: Core CMS com.snc.hr.core.cms Portal Displays the Human Resources Service Automation SM application on the Service Management portal. Activation of this plugin on production instances may require a separate license. Contact for details. 5
6 Plugin ID Legal com.snc.legal_service_automationprovides support for managing legal matters and enabling users to report and track matters. Activation of this plugin on production instances may require a separate license. Contact for details. Legal CMS Portal com.snc.legal_service_automation.cms Displays the Legal Service Automation SM application on the portal. Activation of this plugin on production instances may require a separate license. Contact for details. Marketing com.snc.marketing_service_automation Provides support for managing marketing requests and enabling users to report and track those requests. Activation of this plugin on production instances may require a separate license. Contact for details. Marketing com.snc.marketing_service_automation.cms Displays the Marketing Service CMS Portal Automation SM application on the portal. Activation of this plugin on production instances may require a separate license. Contact for details. Service management states From creation until closure, SM application requests for work (for example, work orders and facilities requests), and their respective tasks follow a life cycle tracked by the State field in Field Service Management and Facilities. The life cycle is controlled through business rules and UI actions that are updated by the system automatically. Note: The State field on the record is always read-only. State flow customization State flows control the sequence in which records transition between states in SM applications. An administrator can perform the following tasks: Add or delete states. Trigger events on particular state transitions. 6
7 Transition to another state automatically when data in a request or its task changes, or change states manually when the user clicks a button. Limit the choice list for the State field to those end states that are valid transitions from the given start state. Control the visibility and behavior of selected fields on a target table when records in that table change states. Create custom state flows. Turn off the State flows are enabled option on the configuration screen. Creating custom state flows requires scripting knowledge. Note: Users with the wm_admin role can create, read, update, and delete only work order flows and work task flows. Users with the facilities_admin role can create, read, update, and delete only facilities request flows and request task flows. Users with the wm_admin role cannot manipulate facilities records, and users with the facilities_admin role cannot manipulate work order records. How SM request and task state flows work State flows replace the standard process that controls how requests and their associated tasks move between states. The system creates business rules, client scripts, and UI actions that perform the transitions and field controls you specify. These programming elements remain in use while the state flow records that use them are present. When state flows on an SM application table are deleted, the system attempts to delete any unnecessary programming elements that were created on that table. You can limit the selections for the State field to valid states for the transition, based on the starting state. State flows provide the following controls: Manual transitions: A UI action, created automatically by the system when you provide a condition or a script, initiates a transition. Automatic transitions: A business rule, created automatically by the system when you provide a condition and a script, initiates a transition when changes are made to a request or task. Features available with state flows Custom transitions: Customize the order in which states can change for requests and task records. Field controls: Control the behavior and visibility of specific fields when a task changes states or reaches a specified end state. State choice list: Limit the values offered in a task record State field to valid states for that transition. This is the same client script that the system creates to manage field controls for state transitions. Events: Trigger events when a state transition occurs or when a record reaches a specific end state. Start and end states You can create a custom state flow for processing that must occur when a task record makes a specific transition from one state to another. These records require a starting state and an ending state, and processing occurs during the transition between states. To perform some processing when a task record reaches a particular end state, you only need to define the end state. In some cases a state flow can have a starting state only, such as when you need to perform some type of cleanup after a task is canceled. A state flow might have no starting or ending state if the processing in the record applies to more than one state transition. The solution is to store the business rule or client script in a state flow record and create a condition to trigger processing for any state change that requires it. An example of this in field service management is 7
8 the Roll Up Changes business rule on the Work Order Task [wm_task] table. This business rule rolls up state changes that occur in tasks to the parent work order. State flow dictionary overrides A dictionary override in a state flow defines the starting state for all new records in a specific table. You set an override in tables that extend a base table only, so that your customizations are applied only to the extended table In a state flow record, select an Ending state. This is the override value which becomes the starting state for all new records in the table named. Click Create Default Value. The system populates the Dictionary override field with a value of state, which is the field in the task table affected by the override. The Dictionary override field is read-only. After the override is created, the system hides the Create Default Value button on all subsequent state flow forms for that table. Work notes in state flows Work notes are an important part of the state flow process and are used to communicate information about state transitions. The state flow adds work notes into the Work notes field of any task making this transition. For example, you might include the note, Task rejected by agent, in the Reject state flow, which occurs when the task moves from Assigned to Pending Dispatch. If an agent rejects the task and fails to enter a work note, this note tells the dispatcher why the task reappeared in the dispatch queue. Work notes added by an agent rejecting the task are appended to the work notes that are inherited from the state flow. These rules apply to state flow work notes: For a state flow with no Starting state, the work note is added every time the task transitions to the Ending state. For a state flow with a Starting state and an Ending state, the work note is added only when the task transitions from that starting state to that ending state. If two state flows with work notes have the same Ending state, but only one has a Starting state, the system adds the work notes from the state flow with the starting state. This better matches the state flow work note to the more important transition between specific starting and ending states. In the example here, the work note information is more pertinent to a task moving from Assigned to Pending Dispatch than to a task that reaches the Pending Dispatch state from an undetermined beginning state. Field controls in state flows You can define controls for individual fields that are enforced when a record transitions between states. Settings in the Field Controls section of the State Flow form enable you to apply field controls when the system detects a specified state transition or when the end state is the current state when the form is opened. The control is applied only to existing fields on the form. State flows cannot add fields to the form. For example, you might want the Problem field to be visible when an incident moves to the Awaiting Problem state. If the incident state changes to Awaiting User Info, you hide the Problem field and make the Caller field mandatory. The best practice when creating field controls is to configure state flow records with an ending state only and to create the correct behavior for every ending state you want to control. This ensures that the field controls are set properly when the user selects a new state, and also when the user returns a record's State field to the original state. Only specify a full state transition, with both a starting and ending state, when you want a particular behavior for that precise state transition. 8
9 Note: State flows use client scripts to enforce field controls. It is possible that your settings can be changed by existing UI policies, which execute after client scripts. Trigger events on state changes You can configure a state flow to trigger a registered system event when a task transitions from a starting state to a specified end state. For example, you can use events to trigger notifications and create script actions. You can configure a state flow to trigger a registered system event when a task transitions from a starting state to a specified end state. For example, you can use events to trigger notifications and create script actions. When you attach an event to a state flow, the system creates a business rule called State Flow Events for <table name> for the table specified in the state flow. If you specify a start and end state, the business rule executes when the record transitions from the start state to the end state. If the state flow only specifies an end state, the business rule executes whenever that end state is reached. The system creates one business rule for all state flows containing events on a single table. When all events or all state flows on a table are deleted, the system deletes the business rule. To create an event that fires when a work order task moves from a starting state of Work in Progress to an end state of Closed Complete: Register a new event on the Work Order Task [wm_task] table called task.closed. Navigate to State FlowsWork Task Flows. Open the state flow record Close Complete. 4. Select task.closed in the Event field and save your changes. The system automatically creates a business rule called State Flow Events for wm_task. 9
10 10
11 Rebuild state flows You can rebuild state flows when a mismatch between existing and new sys_ids occurs. When you use an XML file to import a state flow record into an instance, the system attempts to match the incoming states with existing states by comparing sys_ids. Because the sys_ids of items in a choice list can vary between instances, the system can fail to match the states, even though they are otherwise identical. When matching fails, the start and end states of affected records are left blank or contain numeric values. To repair these records navigate to State Flows > Admin > Rebuild State Flows. This module runs a script that compares the numerical value of each item in the State field choice list until it finds a match in the imported state flow record. State flow cleanup The business rules, client scripts, and UI actions that the system creates automatically to perform custom transitions exist only while the state flow records that use them are present. When all the state flows on a table are deleted, the system attempts to delete any unnecessary programming elements that were created on that table, using these criteria: Table 2: State flow Cleanup Element Deleted When The state flow that created it is deleted. UI action Business rule Dictionary override Business rule that processes events triggered by All state flows for the table specified that have a state flow events configured are deleted. Client script (onload) All state flows for the table are deleted. Client script (onchange) All state flows with field controls are deleted. Work notes business rule All state flows with field controls or work notes are deleted State flow example Your business processes might require work order tasks to be accepted automatically when dispatched to an agent. Create a new state flow record that automates the transition from Pending Dispatch to Accepted and bypasses the Assigned state in which agents can reject tasks. This prevents the system from running the manual script associated with UI actions. The automatic script performs the jobs that the manual script performed, such as updating the date and time the task was dispatched, or to do additional work such as sending a notification Navigate to State Flows > > Service Order Flows. Open the Assigned record that defines a task transition from a starting state of Pending Dispatch to an ending state of Assigned. 11
12 This is an automatic state change that occurs when an agent's name is added to the Assigned to field and the task is updated. 12
13 13
14 3. Change the name of the state flow. 4. In this example, change the name to Skip Agent Acceptance. Change the value in the Ending state field to Accepted. 5. This transition allows you to bypass the Accept state flow record that enables agents to reject tasks. Do not change the settings in these fields: Automatic condition string: This condition ensures that the current state is at Pending Dispatch and the value in the Assigned to field changes: current.state == 10 && current.assigned_to.changes() Automatic condition: The condition [Assigned to] [is not empty] ensures that all dispatched tasks are accepted automatically. Note: The previous two condition statements have an [and] relationship. In this example, the business rule runs when a task in a state of Pending Dispatch is assigned to any agent. Automatic script: The automatic script sets the time the task was dispatched, using the method: current.dispatched_on = gs.nowdatetime();. 6. Copy the record using the Insert and Stay command. 7. This action increments the record number and clears the Business rule field. The system automatically creates a new business rule, using the name of the new state flow record. The Skip Agent Acceptance business rule moves the task from Pending Dispatch to Accepted automatically when a dispatcher enters a user name in the Assigned to field. Note that any changes you make to this state flow record in the future are executed by this business rule. Ensure that the Active check box is selected. 14
15 15
16 8. In the Work Task Flows list, locate the Accept state flow record and change the Active status to false. This action deactivates the transition that allows agents to accept tasks and moves the state flow directly from Pending Dispatch to Accepted. Implications of disabling SM state flows State flows are used by SM applications to control how a work order or request automatically transitions from one state to the next. When state flows are disabled, various aspects of the system are also changed, as described here. Review the following implications before setting the Enable state flows configuration option to Off. After the configuration is saved, state flows cannot be re-enabled from the user interface. When state flows are disabled, the state transition-related behavior of the following business rules, UI actions, and security rules are affected. Business rules on requests: Business rules on tasks: When the Spam button on the request form is clicked, the state is not changed, but the work notes indicate that the request was closed as spam. UI actions on tasks: The part of Build scratchpad and display info messages that shows an error message if a task is pending dispatch and auto-assignment fails is disabled. For the Validate changes business rule, the only part that runs is when the system checks for work notes and rolls them up. UI actions on requests: Apply dispatch method Populate schedule Populate schedule - new SOT (service order task) Transitions Unassigned The following business rules run partially: Group change validation Move tasks to pending assignment Request-driven dispatch Unassigned Verify work notes Assign to me View task on map New Security rules: State-based aspects of security rules no longer apply. For example, when state flows are enabled, the Short description field is not editable when a request or task is closed complete, incomplete, or canceled. When state flows are disabled, the Short description is always editable. Role-based aspects of security rules continue to apply when state flows are disabled. 16
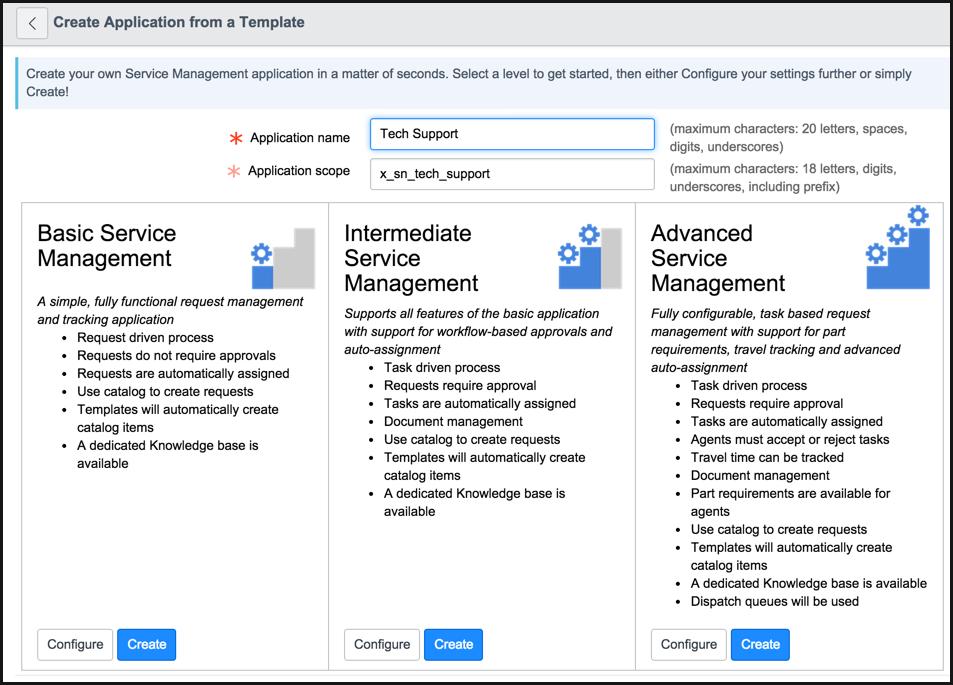
17 Additional changes when state flows are disabled: The process flow formatter is removed from request and task forms. The State field can be edited on request and task forms. The following configuration fields are changed: Process lifecycle is set to request-driven. Assignment method for requests is set to manual. Assignment method for tasks is set to manual. Approval for new request required is disabled. Qualification is required for new requests is disabled. Agent must accept or reject the assigned task is disabled. Use dispatch queue is disabled. Re-enable state flows When service management state flows have been disabled, they cannot be re-enabled from the user interface. State flows can, however, be re-enabled by running a script for each service management application. For each service management application, run the following script: var gr = new GlideRecord( sm_config ); gr.get( name, {YOUR_APP_NAME} ); //this can be looked up by navigating to the sm_config list gr.use_sf = true; gr.update(); Application Designer The Application Designer allows you to create custom applications that use a similar service management workflow. There are three options for creating SM applications: basic intermediate advanced Each option contains a different set of capabilities and allow you to create the application with the click of a button. You can also configure the SM application specific to your organization's needs. This video demonstrates how to get started with the Application Designer. Note: The Application Designer is not supported for the Internet Explorer 8 and 9 browsers. To create custom applications, you must upgrade to at least IE10. 17
18 Generate an SM application with default settings Generating an SM application with the default settings is a very simple process Navigate to System Applications > Applications. In the Develop tab, click New. 3. Next to Start from a template, click Create. 18
19 19
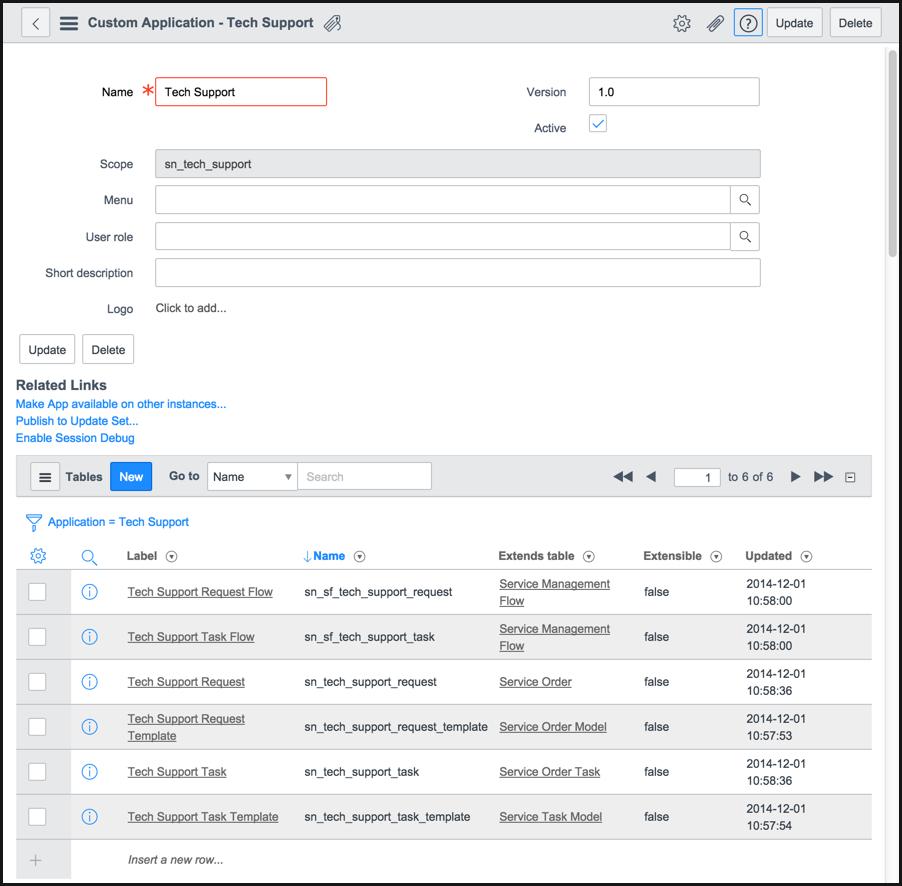
20 Enter a unique Application name for this application. The application name can be a maximum of 20 characters. Only letters, digits, spaces, and underscores (_) are valid. If you enter the name of an existing application, you will be asked to select a different name. The Application scope field defaults to an x prefix that identifies this as a custom application, an optional instance vendor prefix that identifies your company, followed by the application name. You can accept the default or change it, if needed. If you enter the application scope of an existing application, you will be asked to select a different name after you click Create. Click Create in the section that identifies the type of application you want to create. A confirmation box opens and displays the default configuration settings that the new application will inherit. Click OK. A confirmation box appears. Click View App. All of the files you need to run the application, including tables, roles, properties, ACLs, and navigation menus are created, and the new application appears. 20
21 21
 in the header to view on-screen descriptions of each Elements in a generated SM application Standard elements are created when you generate an application using the SM application designer.")
22 Note: Click the annotation icon ( of the fields. ) in the header to view on-screen descriptions of each Elements in a generated SM application Standard elements are created when you generate an application using the SM application designer. Table 3: Service management elements Element Tables and form layouts Request and supporting task tables Requests and supporting tasks are given auto-generated number prefixes and use default form layouts. Request tables are extended from the service order, and tasks are extended from the service task. Note: Auditing is turned on for both the request and supporting task tables. 22

23 Element State flow tables State process flows provide a visual subway bar to identify the request's or task's current state. Completed tasks appear in green. State flows are associated with UI actions and business rules. The states that display depend on your settings on the application's Configuration screen. For example, if you set the Approval slider to OFF, the states relating to approval are not displayed in the process flow formatter, and the request moves to the next state. Note: The workflow identified in the subway bar represents the default approval workflow. If needed, administrators can create and use their own approval workflows. Request and task template tables Templates for common requests and tasks, including model categories. Template tables are extended from the product model. 23
24 Element Roles The following roles are copied from service management and prefixed with the name of the service management application. admin basic initiator qualifier dispatcher agent approver Request and supporting task model categories Sets cmdb_model_category field default in all request and supporting task templates. Properties Properties categories are copied from facilities management and facilities management geolocation, and prefixed with the name of the service management application. For a list of property categories, see XXXX. Properties categories are copied from facilities management and facilities management geolocation, and prefixed with the name of the service management application. For a list of properties categories, see XXXX. Properties categories Access control lists Access control lists are copied from service management and prefixed with the name of the service management application. Service catalog If Catalog item on is set to true, any new request template will automatically be associated with a new service catalog item in the default category. The service catalog contains default categories. If no name is provided, this field defaults to a variation of the name of the service management application. Knowledge base The knowledge base is prefixed with the name of the service management application. Templates Templates are created within the product catalog menu. Navigation menus 24
25 Element CMS application An icon and text description is added to the CMS site. Additional Modules for SM Applications Depending on the logged-in user's role and configuration settings in the application designer, certain other modules may be displayed in SM applications. If the logged-in user has the approver role, and the Approval is required for new requests option is set, the SM application menu will contain My Approvals. If the logged-in user has the qualifier role, and the Qualification is required for new requests option is set, the SM application menu will contain Awaiting Qualification. If the logged-in user has the dispatcher role, and the Tasks are dispatched via auto-assignment option is set, the SM application menu will contain My Dispatch Queue. Properties in a generated SM application When you generate an application using the SM application designer, a set of properties are created. Table 4: Generated SM application properties Property {property_prefix}.autodispatch.skills Indicates whether skills should be used for autodispatch. {property_prefix}.allow.toll.roads Indicates whether toll roads should be allowed when routing. {property_prefix}.rush.travel.buffer Percentage to add to all rush hour travel. {property_prefix}.limit.location Limits the dispatch groups available based on the location of the task. {property_prefix}.evening.rush.hours Indicates the evening rush hour span. {property_prefix}.autodispatch.location Indicates whether location should be used for auto-dispatch. {property_prefix}.morning.rush.hours Indicates the morning rush hour span. {property_prefix}.default.start.time Identifies the default start time for agents when no schedule is provided. {property_prefix}.autodispatch.geolocation Indicates whether geolocation should be used to update the estimated travel time for a task. {property_prefix}.work.spacing Identifies the amount of time (in minutes) to add between tasks. {property_prefix}.default.end.time Identifies the default end time for agents when no schedule is provided. {property_prefix}.travel.buffer Identifies the percentage to add to all travel times. 25
26 Property {property_prefix}.max.agents.processed Identifies the maximum number of agents to be processed at a time using auto-dispatch. Property categories in a generated SM application When you generate an application using the SM Application Designer, a set of property categories are created. Table 5: Generated SM application property categories Property category Included properties Main category The name of this category is the same as the application label (for example, Legal). {property_prefix}.default.end.time {property_prefix}.default.start.time Dispatch category The name of this category will be a variation of the name of the service management application (for example, Legal Dispatch). {property_prefix}.max.agents.processed {property_prefix}.work.spacing {property_prefix}.autodispatch.location {property_prefix}.autodispatch.skills {property_prefix}.limit.location Geolocation category The name of this category will be a variation of the name of the service management application (for example, Legal Geolocation). {property_prefix}.rush.travel.buffer {property_prefix}.travel.buffer {property_prefix}.allow.toll.roads {property_prefix}.morning.rush.hours {property_prefix}.evening.rush.hours Configure an SM application prior to generation Configure an application to your organization's needs before it's generated Navigate to System Applications > Applications. Click New. Next to Start from a template, click Create. 26
27 27
28 Enter a unique Application name for this application. The application name can be a maximum of 20 characters. Only letters, digits, spaces, and underscores (_) are valid. If you enter the name of an existing application, you will be asked to select a different name. The Application scope field determines where an application runs and what resources from other applications it can access. It defaults to an x prefix that identifies this as a custom application, an optional instance vendor prefix that identifies your company, followed by the application name. You can accept the default or change it, if needed. Click Configure in the section that identifies the type of application you want to create. The default configuration settings for the specified application type appear. Fill in the Application Settings fields. Table 6: Application settings fields Field Configuration Defaults by Type Request number prefix The prefix applied to all All types request numbers created using your application. This field defaults to a prefix based on the application name, followed by an R for request. For example, if your application name is Legal Matters, the request number prefix will be LMR. If you have another application that already uses this prefix, you must change it. This prefix will be applied to all request numbers created using your application. Task number prefix The prefix applied to all All types task numbers created using your application. This field defaults to a prefix based on the application name, followed by a T for task. For example, if your application name is Legal Matters, the request number prefix will be LMT. If you have another application that already uses this prefix for tasks, you must change it. This prefix will be applied to all task numbers created using your application. 28
29 Field User role prefix The prefix applied to all All types user roles defined for the application. This field defaults to the application name. If you have another application that already uses this prefix for user roles, you must change it. Create CMS pages Creates an icon for your application to be added to the Shared Service CMS Portal. This switch appears only if you have first activated the CMS User Interface - Service Management Core plugin. If you do not activate the plugin, the switch will not be displayed and the icon for your application will not appear on the CMS portal. Configuration Defaults by Type All types The remaining options on the configuration screen are arranged in a multiple-tabbed layout, as follows: 8. The Business process tab contains options for setting up the request lifecycle, creating catalogs and requests, and configuring notifications. The Assignment tab contains options for setting up manual and auto-assignment. The Add-ons tab contains options for enabling the knowledge base, managed documents, and task activities. Fill in the fields on the Business process tab. Note: The Configuration screen contains many configuration options. An option is enabled when the switch appears green and is toggled to the right. All configuration options listed in the Dependency must be enabled in order for the option to be displayed. 29
30 Table 7: Configuration screen - Business Process Field Dependency Lifecycle Enable state flows Enable state flows consistent with all service management applications. If you prefer to create your own state flows using business rules, client scripts, and UI actions, disable the option. A confirmation box displays and includes a link to a help article that describes the implications of disabling state flows. It is highly recommended that you read the article before proceeding. If you disable state flows and save, this configuration option is removed from the screen and state flows cannot be re-enabled from the user interface. Process life cycle Select request driven (subtasks are optional) if you do not want to require tasks to fulfill requests. When the request life cycle is request driven, requests can be directly assigned to users in an assignment group. Users can still add tasks to requests. However, closing all tasks does not automatically close the request. Enable state flows is turned on. Note: If the Enable state flows option is not selected, the process life cycle becomes requestdriven and this field is not displayed. 30
31 Field Dependency Select the method for assigning requests: Lifecycle Assignment method for requests using auto-assignment: Requests are automatically assigned. using a workflow: User is prompted to select the workflow for assignment. manually: Manually assign requests. Note: If the Enable state flows option is not selected, the assignment method defaults to manually and this field is not displayed. Use this workflow to assign requests Select the workflow for dispatching requests. Enable state flows is turned on. Process life cycle: request driven (subtasks are optional) Note: The Process life cycle option is not available in all service management applications. Enable state flows is turned on. Process life cycle: request driven (subtasks are optional) Assignment method for requests Note: The Process life cycle option is not available in all service management applications. Approval for new request required When disabled, all requests in the Awaiting Approval state are automatically approved. Enable state flows is turned on. 31
32 Field Dependency Lifecycle Use this workflow for approvals Select the approval workflow for requests. An approver must provide one of the following approval responses before requests can move to the next state: Enable state flows is turned on. Approval is required for new requests Approved Rejected More information required Duplicate Note: If you do not select a workflow, the default workflow, Approval Workflow for SM, is used. This workflow requests an approval from all users with the wm_approver_user role. Assignment method for tasks Select the method for assigning tasks: Enable state flows is turned on. Enable state flows is turned on. Assignment method for tasks using auto-assignment: Tasks are automatically assigned. using a workflow: User is prompted to select the workflow for assignment. manually: Manually assign tasks. Note: If the Enable state flows option is not selected, the assignment method defaults to manually and this field is not displayed. Use this workflow to assign tasks Select the workflow for assigning tasks. 32
33 Field Dependency Agent must accept or reject the assigned task Enable to require the assigned agent to accept or reject the task. Enable state flows is turned on. Copy task work notes to request Enable to synchronize task work notes with the work notes on the order or request. When work notes are added in the task, the same work notes appear in the order or request. Enable state flows is turned on. Lifecycle Catalog and Request Creation Create or update requests by inbound . Enable this option to allow inbound messages to create or update requests. This option must be enabled to allow requests to be marked as spam. Requests are created using Select catalog or regular form to install the catalog and enable automatic publishing of request templates to the catalog. Select regular form only to uninstall the catalog and disable automatic publishing of request templates to the catalog. Templates create a dedicated catalog item Enable this option to allow automatic publishing of catalog items for the application. Notification 33
34 Field Dependency Lifecycle Send a notification when a field changes for a task or request. Configure notifications to be sent to specific recipients when selected fields in requests and/or tasks change. 1. From Table, select Request or Task. 2. From Field, select the field to use for generating notifications. When a change is made to the selected field, a notification is sent to the recipients identified. 3. From Recipients, select one or more recipients 4. If a specific user or a specific group, is selected, the user is prompted to select a user or group. 5. To define more notifications using other fields or recipients, repeat the steps on the next line. 6. To remove a notification, click the symbol to the right of the notification. 9. Click the Assignment tab and fill in the fields. Table 8: Configuration screen - Assignment tab Field Dependency Manual Assignment Assign requests or tasks based on assignment group coverage areas Enable this option to limit the selection of groups from the Dispatch group and Assignment group fields to groups that cover the location of the task. 34
35 Field Dependency Use dispatch queue Enable this option to use the dispatch group for manual assignment. Enable state flows is turned on. Process life cycle: Life cycle is task driven Auto-Assignment - Scheduling Auto-selection of agents will consider agent or task schedules Enable this option to allow auto-assignment to use the schedules of the agents or tasks to determine who can be assigned to each task. Also, the Estimated work duration field is not mandatory when this configuration option is disabled. Enable state flows is turned on. Process life cycle: Life cycle is task driven Note: The Process life cycle option is not available in all service management applications. Auto-selection of agents will consider time zone for tasks Enable this option to consider the time zone of the agent when assigning a task. Enable state flows is turned on. Enable priority assignment Enable this option to use priority assignment for autoassigning agents. Enable state flows is turned on. Process life cycle: Life cycle is task driven Auto-selection of agents will consider agent or task schedules Note: The Process life cycle option is not available in all service management applications. 35
36 Field Dependency Use this priority list for priority assignment Select priorities for assignment. Enable state flows is turned on. Process life cycle: Life cycle is task driven Auto-selection of agents will consider agent or task schedules Auto-selection of agents will follow the sun for tasks Note: The Process life cycle option is not available in all service management applications. Auto-Assignment - Additional Factors Auto-selection of agents will consider location of agents Enable this option to use the agent and location when determining who to assign the task to. Agents closer to the task location receive preference. Enable state flows is turned on. If using Process life cycle: Life cycle is task driven, then If using Process life cycle: Life cycle is request driven, then Assignment method for tasks: using auto-assignment Assignment method for requests: using auto-assignment 36
37 Field Dependency Auto-selection of agents for tasks requires them to have skills This option determines the degree to which skills must be matched to a task when determining autoassignment. Select all to require that an assigned agent has all the skills to perform the task. An agent who lacks one skill is eliminated. Select some if you want agents who have most of the skills to perform the task. Select none if you want to auto-assign agents without considering skills. Auto-selection will attempt to Enable this option to auto assign the same agent to all assign all tasks for a request tasks in a request to the same agent. Enable state flows is turned on. If using Process life cycle: Life cycle is task driven, then Assignment method for tasks: using auto-assignment If using Process life cycle: Life cycle is request driven, then Assignment method for requests: using auto-assignment Enable state flows is turned on. If using Process life cycle: Life cycle is task driven, then Assignment method for tasks: using auto-assignment If using Process life cycle: Life cycle is request driven, then Assignment method for requests: using auto-assignment 10. Click the Assignment tab and fill in the fields. Table 9: Configuration screen - Add-ons tab Field Dependency Documentation Enable a dedicated knowledge base Enable this option to install the knowledge base for the application. Enable managed documents Enable this option to add a related list to managed documents. 37
38 Field Dependency Documentation Enable task activities Enable this option to log the task interactions and communications, such as phone calls and messages. Maps Enable maps Enable this option to use maps. 11. When you are done configuring the application, click Create. A confirmation box opens and displays your settings. 12. Click OK. 13. Click View App. 38
39 39
40 application types Use the SM Application Designer to create basic, intermediate, or advanced applications, each with a different set of capabilities and default configurations. Table 10: SM application types Type Default Configuration Basic Basic applications use a request-driven process. This process allows parent records, such as work orders, facilities requests, and HR cases, that contain a single task to streamline the request process by displaying information from the parent and task records on the same form. Intermediate applications use a task-driven process that is useful for requests that contain multiple tasks. Intermediate Requests are assigned via auto-assignment. Requests are created using a dedicated catalog. Templates automatically create catalog items. A dedicated knowledge base is available Approvals are required for new requests, and the Approval Workflow for SM is used. Tasks are assigned via autoassignment. Requests are created using a dedicated catalog. Templates automatically create catalog items. A dedicated knowledge base is available. Managed documents are used. 40
41 Type Default Configuration Advanced Advanced applications use a task-driven process that is useful for requests that contain multiple tasks. Approvals are required for new requests, and the Approval Workflow for SM is used. Tasks are assigned via autoassignment. After tasks are assigned, they must be accepted or rejected by agents. Part requirements are needed by agents. Requests are created using a dedicated catalog. Templates automatically create catalog items. A dedicated knowledge base is available. Managed documents are used. Time tracking is used. The new application uses dispatch queue. Note: You can modify the configuration prior to the application generation process or after. You can even convert a basic application to an intermediate or advanced application, or create a hybrid application. Request Management Agents regularly access request records as they resolve requests and correspond with the submitters. They can also access built-in reports to see information like the number of active or unassigned requests for an SM application. Request creation Requests are created differently based on the role that has been granted to the user. Department administrators can create requests differently than an employee can. Create a request through the catalog The catalog provides several different categories so users can choose the one that closely relates to their request Navigate to Self-Service > [SM application] Catalog. Choose from the displayed categories. Select a subcategory, if necessary. Fill in the fields on the form. 41
42 Note: Each service management application displays different fields. Table 11: Catalog fields 5. Field Opened for The name of the person submitting this request. Select a new name if you are opening this request on behalf of another user. Location The location for this request. Priority The priority that describes the importance of this request. Short A brief summary of the request. Detailed A detailed description of the request. Click Submit. Note: If the catalog fields do not appear on the request form, you can configure the form and add the SM Variable Editor related list. Create a request using the request form The request form allows you to associate a request with a configuration item that is affected by the request in an SM application. Associating a CI to a request helps your configuration management team understand which services could be negatively impacted by the request issue. You can also use this form when you want to include additional comments and work notes for the request Navigate to [SM application] > Requests > Create New. Fill in the fields on the form, as appropriate. Table 12: Request form fields Field Number An auto-generated number that identifies the request record. Company The name of the company from which the request initiated. Caller The name of the requester. Affected CI A CI affected by this request. Location The location associated with this request. Verify that the location is correct. If it is not, you can select another location record. 42
43 Field Template The template for creating this request (optional). Click the reference lookup icon and select a template. The request is populated with all fields in the selected template including all subtasks and part requirements (if applicable). Opened Auto-filled with the date and time the request was opened. Priority The priority that describes the importance of this request. By default, all requests are set to 4-Low. State The state that describes what work stage this request is in. By default, all requests are set to Open. Assignment group Select the group from which an agent is assigned to the request. You can select only assignment groups associated with the service management application you are using. Note: If you selected the [SM application name] will use the dispatch queue option on the Configuration screen, only users with the Dispatcher role can edit this field. If you selected the [SM application name] will not use the dispatch queue option, all users except those users with the Basic and Initiator roles can edit this field. 43
44 Field Assigned to Select the agent to assign the request to. If you already selected an assignment group, you can only select agents who belong to that group. If notifications are enabled on your instance, a built-in notification automatically sends an to this user when you save the request record. Notes: If you selected the [SM application name] will use the dispatch queue option on the Configuration screen, only users with the Dispatcher and Agent roles can edit this field. If you selected the [SM application name] will not use the dispatch queue option, all users except those users with the Basic and Initiator roles can edit this field. If you selected an assignment group and want to assign the work to a new user, click the reference lookup icon next to Assigned to, click New, and create a new user. Be aware, however, that you must navigate to User Administration > Groups and add the user to the assignment group before the request can be assigned. Initiated from Specify the incident or task from which this request was created. Billable Select this check box if the request is billable. Short description [Required] A brief summary of the request. Optionally, you can click the search knowledge icon to view articles in the knowledge base relating to this product model, plan, or CI. Doing so could provide a solution related to the reason you are submitting this request. A detailed description of the request. The description is always visible to the submitter. Therefore, if you add or modify the description for a request that another user submitted, the user is able to see the changes. Work notes Additional notes that you want to share between users who can access the request form. A user who submits the request through the service catalog cannot see the work notes. 44
45 Note: If you specify an Assignment group and you want to assign the work to a user who is not already in your user table, click the magnifying glass icon in the Assigned to field. Then click New and create the user record. Be aware, however, that the new user is not recognized. 3. Click Submit Request creation using inbound actions Requests can be automatically created or updated from the information in inbound s as long as the functionality has been enabled on the configuration screen of SM application. The s are also to be sent to a mailbox defined by criteria in the appropriate inbound action. After the functionality has been enabled by selecting the Requests can be created and updated by inbound option on the application configuration screen, three inbound actions are available for the SM applications available in the base system. These inbound actions are also available for new applications created using the SM application creator. Create a request from an inbound Requests can be automatically created from the information in inbound s as long the functionality has been enabled on the configuration screen of SM application. The s are also to be sent to a mailbox defined by criteria in the appropriate inbound action Navigate to System Policy > > Inbound Actions. Select the inbound action called Create [application name] Request. The inbound action record opens and displays the default conditions that trigger the inbound action. When an is sent to the mail list defined by the criteria in Actions, a request is created with the following information: 3. The Contact type is set to . The sender (if found) populates the opened_by and Caller fields for a newly created sm_order based item. The subject populates the Short description field. The body populates the field. The senders company (Sender->Company) populates the Company field. The senders location (Sender->Location) populates the Location field. The entire is copied into the Work notes field. You can use the action as it is or modify it to meet the needs of your organization. Create a request from a forwarded inbound Requests can be automatically created from the information in forwarded inbound s as long the functionality has been enabled on the configuration screen of SM application. The s are also to be sent to a mailbox defined by criteria in the appropriate inbound action Navigate to System Policy > > Inbound Actions. Select the inbound action called Create [application name] Request (Forwarded). The forwarded inbound action record opens and displays the default conditions that trigger the inbound action. When an is forwarded to the mail list defined by the criteria in Action, a request is created with the following information: 45
46 3. The Contact type is set to . The sender (if found) populates the opened_by and Caller fields for a newly created sm_order based item. The subject populates the Short description field. The body populates the field. The senders company (Sender->Company) populates the Company field. The senders location (Sender->Location) populates the Location field. The entire is copied into the Work notes field. You can use the action as it is or modify it to meet the needs of your organization. Update a request from an inbound Requests can be automatically updated from the information in inbound replies as long the functionality has been enabled on the SM application's configuration screen. The s must also be sent to a mailbox defined by criteria in the appropriate inbound action Navigate to System Policy > > Inbound Actions. Navigate to the inbound action called Update [application name] Request and click its Name. The update inbound action record opens and displays the default conditions that trigger the inbound action. When an reply is received in the mail list defined by the criteria in the action, the associated request is opened and update information is added to the Work notes field. You can use the action as is or modify it to meet the needs of your organization. Request states SM requests follow a specific life cycle. The State field on the record is always read-only. The request states displayed depend on the SM application, as indicated in the table. Table 13: Service management request states State Draft Request initiator adds information about the work to be done. Awaiting Qualification Initiator fully describes the request, and qualifier can process the request. This state is valid only for the following SM applications: Qualified Field Request is fully qualified, meaning that all technical information to complete the request tasks has been added, but work has not started. This state is valid only for the following SM applications: Field 46
47 State Awaiting Approval When the information is complete enough for review by an approver, the request is marked ready for approval. This state is valid only for the following SM applications: Approved Facilities Finance Legal Marketing The appropriate approver approves the request. This state is valid only for the following SM applications: Facilities Finance Legal Marketing Work In Progress Work has started. Closed Complete Request was completed to specification. Closed Incomplete Request could not be completed as specified. Canceled Request was canceled. In addition to the State field, the different request task states are also shown visually at the top of each task record with the process flow formatter. Figure 2: Process flow formatter Note: If the State flows are enabled option in the configuration screen is not selected, the process flow formatter is removed. If you added states to the request and task tables, those states are visible on the request form. Request approvals Approving a request in an SM application means that the request is ready for task creation and assignment. When a request is sent to a user with the [SM application]_approver_user role, the approver has several choices. If you select Approval is required for new requests in the applications Configuration screen, a newly created request automatically moves to the Awaiting Approval state. Otherwise, the request moves to the next configured state. 47
48 Table 14: Request approval states Approval Choice Approved The request is approved. Rejected The request is not qualified and it is moved to the canceled state. Also, the following work note is added to the request: The [SM application] request is rejected. More information required The request does not contain enough information. It reverts to the Draft state and the following work note is added to the request: The [SM application] request needs more information for further approval. Duplicate The request is no longer required, because another request has already performed the work. The request is moved to the Cancelled state and the following work note is added to the request: This is a duplicate [SM application] request. Agent assignment Depending on your settings in the SM application's configuration screen, you can assign agents manually or using auto-assignment. Manually assign agents to active requests Use this procedure to assign agents to active requests in service management (SM) applications. 1. Navigate to one of the following modules: SM application] > Open - Unassigned for a list of requests that no one is assigned to. [SM application] > All [SM application] Requests for a list of all open requests, regardless of their current assignment. Open the request you want to assign. In the Assignment group field, enter the group that handles this kind of request. If no groups are available, leave this field blank. To look up the assignment group, click the reference lookup icon ( field. ) beside the Assignment group Note: You do not have to select an assignment group, but doing so limits the users you can assign the request to. 4. In the Assigned to field, enter the agent to handle this request. To look up an agent, click the reference lookup icon ( ) beside the Assigned to field. 48
49 Note: If one was selected, the users in the search results are limited to the users in the Assignment group. 5. Click Update. An notification is automatically sent to the assigned agent when notifications are set up for the instance. Agent auto assignment When auto assignment is enabled and a task is qualified or marked as Ready for Work, an appropriate agent is automatically assigned to the task and it is moved to the Assigned state. If the task cannot be auto-assigned, a user with the dispatcher role must adjust the values in the request or task form and then save the record. The Auto-Assignment feature can be enabled for requests or tasks, depending on the configuration settings of (SM) application: If the Requests are assigned via auto-assignment option is enabled, requests are automatically assigned. If the Tasks are assigned via auto-assignment option is enabled, the tasks in a request are automatically assigned. Agent auto assignment using rating-based criteria Rating-based methods, such as location, skills, and time zones, help to auto assign agents based on configuration settings and optional properties. The calculated ratings are used to determine the best agent to perform the task. Any combination of rating-based methods can be enabled in configuration screen of the application. When a task is created, a rating for each type of enabled selection criteria is calculated for each available agent. The agent whose average rating is highest is considered for auto-assignment. The settings for the auto-assignment weighting properties, found in [SM application] > Administration > Properties, are included in the rating calculations. These values help you prioritize which auto-assignment selection criteria is more important to your organization. The priority values should be [1, 10] and they are factored between 1 and 0. That is, 10 is a factor of 1, 5 is a factor of 0.5, and so on. For an example of how the weighting properties affect agent ratings, see Agent auto assignment using multiple selection criteria on page 52. Agent auto assignment using location Agents can be auto assigned based on the location defined in their user record and the location of the tasks. Auto assignment by location can be performed in a task- or request-driven processing environment when the Auto-selection of agents will consider location of agents configuration is enabled. When a task is created, agent locations are compared to the following ranges to determine a location rating for each agent. Table 15: Location rating calculation Distance (mi.) from agent to task Rating
50 Distance (mi.) from agent to task Rating >100 0 When a task is qualified or marked as Ready for Work, the agent closest to the task location is considered for the task. If the application is configured so that only location is considered, the closest agent is autoassigned to the task. If the application is configured to use other selection criteria such as skills, time zone, or schedule the ratings of all selection criteria are averaged, and the agent with the highest overall rating is auto-assigned for the task. See Agent auto assignment using multiple selection criteria on page 52 for details. Agent auto assignment using skills Agents can be auto assigned based on the skills of an agent, and the skills required to perform the task. Assign skills to an agent user records using Skills > Users. Auto assignment by skills can be performed in either a task- or request-driven processing environment when the Auto-selection of agents for tasks requires them to have skills configuration option must be set to all or some for the application. When a task that includes skills is qualified or marked as Ready for Work, skills of each agent are compared with the skills required to perform the task, and a rating is calculated based on the skills configuration option. If the option is set to some, the agent with the closest skills match is auto-assigned the task. If the option is set to all, only agents who possess all the required skills are considered. If no agents possess all the skills required to perform the task, none are auto-assigned. Skills rating of an agent is calculated as: Skills_agent/Skills_task When: Skills_agent is the number of skills possessed by the agent that match the skills required for the task. Skills_task is the total number of skills required for the task. For example, if a task requires four skills, and Agent A possesses three of them and Agent B possesses two of them: Skill rating of Agent A = 3/4 or 0.75 Skill rating of Agent B = 2/4 or 0.5 If the application is configured to use other selection criteria, such as location or time zone, the ratings of all selection criteria are averaged, and the agent with the highest overall rating is auto-selected for the task. See Agent auto assignment using multiple selection criteria on page 52 for details. Agent auto assignment using time zones Agents can be auto assigned based on the time zone defined in their user records and the time zone of the tasks. 50
51 Auto assignment by time zone can be performed in either a task- or request-driven processing environment when the Auto-selection of agents will consider time zone for the task configuration option must be enabled for the application. When a task is qualified or marked as Ready for Work, agents in the time zone closest to the task time zone are considered for the task. If the application is configured so that only time zone is considered, an agent in the same time zone is auto-assigned the task. Note: It is important that the time zones for the agent and the task are set correctly. When a task is created, agents are rated based on the time zones of both task and agent using the following formula: 1 - [abs(task_tz Agent_tz) 12] Where: abs is the mathematical function to compute the absolute value. Task_tz is the offset between the time zone of the task and GMT. Agent_tz is the offset between the time zone of the agent and GMT. For example, a task is created in New York City (GMT-4), and two agents are available to perform the task, one in Los Angeles (GMT-7) and one in Paris, France (GMT+1). The rating of the agent in Los Angeles is calculated as: 1 - abs((-4) - (-7)) 12 or 0.75 The rating of the agent in Paris is calculated as: 1 - abs((-4) - (+1)) 12 or 0.58 So if the auto assignment of the task is based on the time zone alone, it is assigned to the agent from Los Angeles. If the application is configured to use other selection criteria, such as skills or location, the ratings of all selection criteria are averaged, and the agent with the highest overall rating is auto-selected for the task. See Agent auto assignment using multiple selection criteria on page 52 for details. Agent auto assignment using time-based criteria Time-based methods, such as schedules and priority assignment, help you auto assign agents based on configuration settings and optional properties. The calculated ratings are used to determine the best agent to perform the task. Any combination of time-based methods can be enabled in the application configuration screen. When a task is created, the schedule of the agent and the task to be performed are combined with ratingbased criteria to auto-assign an agent. Agent auto assignment using schedules Agents can be auto assigned based on the agent or the task schedule. Auto assignment by schedule can be performed only in a task-driven processing environment, and the Auto-selection of agents will consider agent or task schedules configuration option must be enabled for the application. If this option is turned off, only the agent ratings are used for auto-assignment. When a task is qualified or marked as Ready for Work, agents ratings are evaluated, and the schedules of qualified agents are compared against the schedule of the task to determine the agent with the best matching schedule. Note: If the task includes specific time entries in the Window start and Window end fields, and no schedule of an agent falls within that task window, no agents are assigned. Also if the customer 51
52 wants a task to be performed at or near a specific time, the Window start time should be set as close to that time as possible. For example, the Window start and Window end fields are set to 1:00 pm and 8:00 pm respectively. The customer prefers the job to be started at 4:00 pm. It is possible that an agent is dispatched at 13:00. So, setting the Window start closer to 4:00 can help ensure that the work is performed when the customer prefers it to be done. If the application is configured to use other selection criteria, such as skills or time zone, the ratings of all selection criteria are averaged, and the agent with the highest overall rating is auto-selected for the task. See Agent auto assignment using multiple selection criteria on page 52 for details. Agent auto assignment using priority assignment The priority assignment feature enables you to configure auto assignment so that agents can be assigned to perform tasks or provide services on a continual, 24x7x365 basis. Priority assignment is triggered when the priority of a task matches the priority set in the application configuration page. Priority assignment can be used with location and skills settings. However, it can also operate independently. To use priority assignment, you must set the following configuration options for the application. Table 16: Priority auto-assignment configuration options Field Process life cycle Set to task driven (subtasks are required). Assignment method for tasks Set to auto-assignment. Auto-selection of agents considers agent or task schedules Enabled. Enable priority assignment Enabled. Select priorities for assignment Select one or more priorities. Only tasks of the selected priority or priorities trigger auto-assignment based on priority assignment. When a task is qualified or marked as Ready for Work, and the priority of the task matches a priority selected for the application, the agent that best matches the schedule of the task is auto-assigned. If the location and skills options are enabled, agents are first evaluated on their physical proximity to the location of the task, and then on how their skills match the skills required to perform the task. The agent whose location, availability, and skills best match the requirements of the task is auto-assigned. When a task has a priority that matches a priority in the priority assignment list, the Location Rating and Timezone Rating are ignored, even if they have been enabled. If the priority of a task matches a priority selected in the Select priorities for assignment option, and no agents in the assignment group are available to be auto-assigned, the task is assigned to the group manager, regardless of whether the manager is available. It is the responsibility of the manager to locate an agent to perform the task. Note: If no agent is located in the same time zone as the task, priority assignment fails. Agent auto assignment using multiple selection criteria At its simplest, auto assignment involves identifying a set of selection criteria and automatically assigning the task to the agent who most closely meets the criteria. You can, however, select multiple sets of criteria, including both rating-based and time-based criteria. When a task is qualified or marked as Ready for Work, the following evaluations are performed: 52
53 1. The ratings of an agent are calculated. If the Auto-selection of agents will consider agent or task schedules configuration option is disabled for the application, the ratings of an agent are used exclusively for auto-assigning an agent. For more information on how the ratings are calculated, see: 2. Agent auto assignment using location on page 49 Agent auto assignment using skills on page 50 Agent auto assignment using time zones on page 50 If the Auto-selection of agents will consider agent or task schedules configuration option is enabled, the schedules of the agents whose ratings are acceptable for auto-assignment are compared to the schedule for the task, and the agent with the best match is auto-assigned. For more information on time-based methods for auto-assigning agents, see: Agent auto assignment using schedules on page 51 Agent auto assignment using priority assignment on page 52 Auto assignment is based on the following calculation: (Criteria_1 rating x Criteria_1 weight) + (Criteria_2 rating x Criteria_2 weight) + (Criteria_3 rating x Criteria_3 weight) / Number of criteria types used Where: Number of criteria types used = 1, 2, or 3 depending on the location, skill, and time zone settings used. This example calculates agent auto-assignment based on location and skills. The example is based on the following assumptions. The Auto-selection of agents will consider location of agents configuration option is enabled for the application. The Auto-selection of agents requires them to have some of the required skills for the task configuration option is enabled for the application. The Skills Weight property is set to 10 for the application. The Location Weight property is set to 5 for the application. Agents A and B are available to perform a task, and the task requires four specific skills. The location of Agent A is 5 miles from the site of the task. Agent A possesses three of the four required skills. The location of Agent B is one-quarter mile from the site. Agent B possesses two of the required skills. Auto assignment for the agents uses this calculation: [(Location rating x Location weight) + (Skills rating x Skills weight)]/ 2 The auto assignment calculation for Agent A is: [(0.7 x 0.5) + (0.75 x 1)]/ 2 = 0.55 The auto assignment calculation for Agent B is: [(0.9 x 0.5) + (0.5 x 1)]/ 2 = In this example, Agent A is auto assigned the task. 53
54 Collaborate on a request Within a request, you can enter comments that are visible to the submitter, allowing for collaboration between the two of you. For collaboration with other agents, you can enter comments that are not visible to the submitter Navigate to [SM application] > All [SM application] Requests. Open the request you want to collaborate on. In the Additional comments (Customer visible) field, enter the comments that you want the person who submitted the request to see. The submitter can see the comments in this field and add more comments as necessary. Update this field as many times as necessary to correspond with the submitter. To correspond with other agents, enter content that you do not want the submitter to see in the Work notes field. Close a request When you close a request, you can add details that you want the submitter to be aware of Navigate to [SM application] > Assigned to me. Click the request number. In the Additional comments field, enter any final notes or comments. Change the State field to the appropriate closed state. Click Update. Closed and completed requests When the Request lifecycle option is set to request-driven, the assigned agent can complete and close the request once all the tasks in the request are complete. A Close Complete button is visible to the agent assigned to the request. The agent enters work notes before clicking Close Complete. When the button is clicked, the open task is automatically completed (if applicable) and the request transitions to the Complete state. Request task management A request contains one or more tasks. These tasks allow qualifiers to define activities that must be done to complete a request. Administrators can create multiple tasks under a single request. Splitting a request into separate tasks, when necessary, enables qualifiers to: Assign different aspects of a request to different staff members. Assign tasks to staff members who have different set of skills or are in different locations. Schedule tasks so they are either done one after another, or at the same time by different staff members. Schedule additional tasks, if necessary, to complete the request. 54
55 Note: If you have the Request life cycle is request driven configuration option activated, you can manually add tasks as needed. If you have Request life cycle is task driven activated, an initial task is automatically created when the request record is created. Create request tasks Tasks are created in support of requests. Role required: [SM application]_admin or [SM application]_qualifier Navigate to [SM Application] > Requests > All [SM Application] Requests. Open the request for which you want to create tasks. Click the Add Task related link. 4. The Task screen for the SM application opens. Fill in the fields on the form. Note: Not all fields display for all SM applications. Table 17: Request task fields Field Number Auto-generated identification number for the task. Parent Request that this task is associated with. Cloned from Record number of the task this task was cloned from, if any. Location Geographical area where the work must be done. The location is critical for determining the staff member who is assigned to the task. Template Template for creating this request (optional). Click the lookup icon and select a template. The description of the selected template populates the field. Skills Abilities necessary to execute the task. This field is automatically completed based on the selection in the Affected CI field on the associated request. If you change the affected CI on the request, the system adds any skills required by the new CI to the skills already listed here. State Current state of the task, such as Accepted or Closed Complete. The advances the state automatically as users complete the work for each successive state. 55
56 Field Assignment group Group from which an individual legal staff member is selected to complete the task. The lookup list shows only the assignment groups associated with the selected Location. If the Assignment Group field is empty, the system searches for the group covering the territory that includes the location of the task. Assigned to Individual staff members who should complete the task, selected from the Assignment group. If you defined skills and assigned them to staff members, the Assigned to field lookup list shows only those staff members in the assignment group who have all the Skills required. If no exact match of skills is found, the lookup list shows all assignment group members. Note: If state flows are disabled, this field is not mandatory. Short description Brief explanation of the task. Exact technical description of the unit of work to be performed. Qualifiers should provide as much detail about the problem as possible to avoid extra communication with the caller in later stages of the request. Work notes Information about the task as it progresses through each state. Work notes are not visible to customers. Scheduling - These fields display for Finance and Marketing Service Management. Scheduled start Date and time when the earliest task is scheduled to start. Note: If state flows are disabled, this field is not mandatory. Estimated end Estimated work end date. The estimated date when the latest task is completed. Actual work start Date and time when the earliest task actually started. Actual work end Date and time when the latest task ended. Requested due by Estimated date when the latest task is completed. 56
57 Note: The workflow appears at the top of the form, with the completed states shown in green. Request task states Like service management requests, their associated tasks follow a specific life cycle. The State field on the request task record is always read-only. The request task states displayed depend on the SM application, as indicated in the table. Table 18: Service management request task states State Draft Qualifier is not done describing the work. Pending Dispatch Request task is ready to be assigned. The parent request state changes to Qualified if all associated tasks are in Pending Dispatch or a later state. Assigned Request task is pending acceptance from the assigned agent. Accepted Agent accepts the request task and is ready to be done. This state is valid only for Marketing. Work In Progress Work on the request task has started. The parent request state changes to Work In Progress if no associated tasks are in Draft state. Closed Complete Request task was completed to specification. Closed Incomplete Request task could not be completed as specified. Canceled Request task was canceled. In addition to the State field, the different request task states are also shown visually at the top of each task record with the process flow formatter. Note: If the State flows are enabled option in the configuration screen is not selected, the process flow formatter is removed. Task windows A task window is the time period, bordered by start and end times, in which a task is performed. Task windows can be flexible or fixed and are used by the auto-routing and auto-dispatch features when determining the daily schedule of staff members. A flexible window has start and end times that the application attempts to respect when dispatching or routing a task automatically. The system can reschedule a flexible task window if necessary, to make it fit into the schedule of a staff member. A fixed task window cannot be rescheduled. If the auto-router or auto-dispatcher cannot schedule the task for the 57
58 fixed window time period, that task is not scheduled at all. The time interval configured for a window cannot be less than the time required to perform the task. Use a task template for multiple request templates If you have tasks that are often repeated across multiple jobs, you can create a task template and reuse it in multiple request templates. 1. Create a request template and an associated task template that contains the information you want to reuse. 2. When you create subsequent request templates, you can select the task template from the Task Template field and save the file. Clone a request task Existing tasks can be cloned to create tasks with the same populated fields. Role required: admin, ITIL, creator, or catalog admin In the cloning process, the following information is copied from the source task: Parent request reference Short description Assignment group Location Required skills Open the request task and select Clone Task under Related Links. The application creates a task in Draft state. The Work Notes field contains the original task number and text stating that the task is a clone. Content packs for Request Management Content packs contain preconfigured best practice dashboards. These dashboards contain actionable data visualizations that help you improve your business processes and practices. Note: You can activate Performance Analytics content packs and in-form analytics on instances that have not licensed Performance Analytics Premium to evaluate the functionality. However, to start collecting data you must license Performance Analytics Premium. Content packs The Performance Analytics widgets on the dashboard visualize data over time, which allows you to analyze your business processes and identify areas of improvement. With content packs, you can get value from Performance Analytics for your application with minimal setup. Note: Content packs include some dashboards that are inactive by default. You can activate these dashboards to make them visible to end users according to your business needs. 58
59 To enable the content pack for Request Management, an admin can navigate to Performance Analytics > Guided Setup. Click Get Started then scroll to the section for Request Management. The guided setup takes you through the entire setup and configuration process. Core installation reference Core includes several feature plugins. Each of these plugins installs several types of components in support of the service management process. Installed with Core Several types of components are installed with the Core plugin. Demo data is available with Core. Tables installed with Core There are several tables that are installed with Core. Core adds the following tables. Table Part Requirement Defines a relationship between a service order task an an asset (part) required to complete this task. [cmdb_model_part_requirement] Service Order Model Stores service order templates. [cmdb_serviceorder_product_model] Service Task Model Stores service task templates. [cmdb_servicetask_product_model] Flow State flows for. [sf_state_flow] Service Order Flow State flows for service orders. [sf_sm_order] Service Task Flow State flows for service order tasks. [sf_sm_task] Asset Usage [sm_asset_usage] SM Category [sm_category] SM Config Module [sm_config_module] Defines relationship between a service order task and the assets used to complete this task. Links a single service order template to a service order category value. Links a configuration to a set of navigation modules that are shown or hidden based on configuration settings. 59
60 Table SM Config Service management application configuration. [sm_config] Incidentals [sm_incidentals] Service Order Groups Dependency [sm_m2m_group_dependency] SM Model Application [sm_m2m_model_application] SM Model Knowledge Incidental items used to complete a service order task. Dispatch groups that handle scheduling for assignment groups. Links SM applications to hardware and consumable models often used in part sourcing. Relates any knowledge page to any model. [sm_m2m_model_knowledge] Affected CI Configuration items related to a service order. [sm_m2m_order_affected_ci] Service Order Task Models [sm_m2m_somodel_stmodel] Task Affected CI [sm_m2m_task_affected_ci] Service Order Task Contract [sm_m2m_task_contract] Service Order Task Dependency [sm_m2m_task_dependency] Service Order Task Template Dependency [sm_m2m_task_template_dependency] SM Notification Rule Links service task models to service order models. Configuration items related to a service order task. Defines a relationship between a task and contract. Defines a dependency between two service order tasks: downstream task cannot be started before upstream task gets completed. Defines a dependency between two service order task templates: downstream task cannot be started before upstream task gets completed. Service management notification rules. [sm_notification_rule] Service Order [sm_order] Part Requirement [sm_part_requirement] Service Task [sm_task] SM Template Definition [sm_template_definition] Defines and manages work that needs to be performed. Defines a relationship between a service order task and an asset (part) required to complete this task. Unit of work performed by one person in one session (one location, one time). Defines a field and value that will be included in a service order template. 60
61 Table Task Asset Assets related to a task. [task_asset] Properties installed with Core Core adds the following properties. Property Properties for service management core sm.template.minute.step Default minute step for date time or time fields on service order template page. Can be overridden for a specific application by replacing "sm.template" with the appropriate property prefix. See application configuration record. sm.template.hour.step Default hour step for date time or time fields on service order template page. Can be overridden for a specific application by replacing "sm.template" with the appropriate property prefix. See application configuration record. glide.autodispatch.debug Whether auto dispatch engine should output logs when assigning tasks. Roles installed with Core Core adds the following roles. Role title [name] personalize_read_dictionary Role allowing service management application admins the ability to see fields when modifying field controls (for example, mandatory fields, read-only fields) on the state flow form. sm_qualifier Qualifier role used when creating SM applications. This role is a template only and it does not provide actual access to any navigation modules or records. sm_agent Agent role used when creating SM applications. Performs work on a task. This role is a template only and it does not provide actual access to any navigation modules or records. sm_approver_user Approver user role used when creating SM application. Approves requests. This role is a template only and it does not provide actual access to any navigation modules or records 61
62 Role title [name] sm_initiator Initiator user role used when creating SM application. Grants UI access, as well as performing the same functions as Basic. This role is a template only and it does not provide actual access to any navigation modules or records. service_fulfiller Role allowing service management users the ability to see the Service Desk modules. sm_admin Admin user role used when creating SM application. Controls all data. This role is a template only and it does not provide actual access to any navigation modules or records sm_basic Basic user role used when creating SM application. Reads and creates requests, and follows up on those requests. This role is a template only and it does not provide actual access to any navigation modules or records. sm_dispatcher Dispatcher user role used when creating SM application. Schedules and assigns tasks to agents. This role is a template only and it does not provide actual access to any navigation modules or record. sm_read Read-only user role used when creating SM application. This role is a template only and it does not provide actual access to any navigation modules or records. template_admin Grants the ability to create and administer templates. Script includes installed with Core Core adds the following script includes. Script includes PartRequirementStateHandler Marks a part requirement Sourced or Delivered based on the transfer orders. SMTemplates Builds a service order and related tasks from an SM Template. SMAutoAssignment Javascript wrapper around SNC.SMAutoassignment that automatically determines property prefix needed. SMStockRooms Retrieves and creates personal stockrooms. 62
63 Script includes BaseSMControls Provides functions used to control access to service management records like the configuration and notification rules. Modify the SMControls Script Include to make changes rather than modifying this Script Include. SMConfigProcessor Handles changes that are made to the configuration page. Also handles sending notifications set up on the configuration page. SMTemplateHelper Backend-code for the SM Template page. Should not be customized. AppCreatorCMSCreation Creates CMS pages for apps created by Service Management template. SMDateRollup Rolls up the dates from service order tasks to service orders. SMI18nUtils Utilities for internationalizing the Service Management and Configuration Pages. SMAJAX Handles Service management AJAX calls. AJAXMileageCalculator Calculates mileage costs for incidentals. SMCIControls CI controls for adding and removing CI's from Orders and Tasks. SharedServiceUtils Shared Service Utilities SMSourcingDispatch Contains methods supporting the Agent Schedule section in the lower portion of the Source popup. SMStateFlowCreator Methods for creating state flows for ESM-based applications. SMAgentStatusAJAX AJAX wrapper around the updatestatus function available in SMScheduleStatus. SMDateValidation Verifies that dates in service order tasks are valid and consistent with one another in terms of scheduling. SMTask Task utility functions. AppCreatorKnowledgeCreation Methods for "app creator" engine to create knowledgebase pages. SMAgentStatus Code for updating the "on schedule" and status of an agent. SMAppCreator Methods for creating Service management applications. SMScheduleGrapper Schedule APIs. Gets schedule times from a work order task in milliseconds. Actual times are given priority, if those are not available, return scheduled times. 63
64 Script includes SMTableCreator Methods for creating tables for Service management applications SMControls Extension of BaseSMControls. Modify this script for controlling access to service management records like the configuration and notification rules AssetUsageFilters Reference qualifier filters for AssetUsage. SMTaskDependency Collection of methods that control the data integrity of the Service Order Tasks Dependency [sm_m2m_task_dependency] table. AppCreatorCatalogCreation Creates an SM application catalog. SMAssetUsage Asset Usage APIs SMConstants List of constants used in the State field of the (SM) flows (sm_order and sm_task) and extended tables (for example, wm_order, wm_task). SMNotifRuleTables Restricts tables that are displayed on the SM Notification Rule form to the request and task table of the application. SMTransferOrders Collection of methods that create or update service management-related transfer order lines. SMPortalCreator Methods for creating a portal and reports for SMbased applications. WMSourcingAjax AJAX calls used in the "Source" popup available from Work Orders and Work Order Tasks. Contains methods for displaying work order tasks and part requirements in the tree-section (left-hand side), deleting and copying part requirements using the tree, and retrieving task information and agent information for the lower section. SMFilters Filters for service management. SMUpgradeManager Handles finding SM application items that need upgrades, storing information, upgrading. SMTemplateMigration Handles migrating SM templates from previous version of Geneva. Client script includes installed with Core Core adds the following client script includes. 64
65 Client script includes Table Hide blacklisted fields SM Config Hide sm_config fields based on blacklist. [sm_config] Start work read-only (exp. travel Service order task chg) [sm_task] Start work read-only when travel is required and not started. Start work read-only when travel is required and not started Displays an error after a location change when no dispatch group or assignment group covers the location of the work order task. Service order task [sm_task] Show or hide/clear contract field Incidentals If type is Vendor cost, then show the contract field. Otherwise, clear and hide the contract field. [sm_incidentals] check order of start date and end date Service order task Update Assigned to (Assign Group change) Service order Ci update Service order Verify that the start date happens before the end date. [sm_task] Update Assigned to when Assignment group changes: clear the Assigned to field. [sm_order] Updates the associated asset and location based on changes to the affected CI. [sm_order] Populate CI Location Service order Populates work order location based on CI location. [sm_order] check_work_duration Service order task Verify that the work duration is not 0 or empty. [sm_task] Calculate total amount quantity Incidentals Calculates the total mileage costs when the quantity changes. [sm_incidentals] Validate Estimated Travel Duration Service order task Ensure that the estimated travel duration does not carry into the expected start time. [sm_task] Validate Scheduled Travel Start Service order task Ensure that the scheduled travel start (with its duration) is before scheduled work start. [sm_task] Template selected Service order Populates form based on template values. [sm_order] Populate Caller Location Service order Sets the location field when the caller is changed. [sm_order] 65
66 Client script includes Table Check for group errors Service order Displays an error on load if no qualification group covers the location of the work order. [sm_order] Hide unused related lists/fields Service order Hides related lists that are not relevant based on application configuration [sm_order] Ci update Service order task Updates the associated asset and location based on changes to the affected CI. [sm_task] New fields type control SM Template Definition Displays the appropriate field type based on selection of field on template definition page. [sm_template_definition] Asset update Service order [sm_order] Updates the associated configuration item and location based on changes to the affected asset. [sm_order] Field onload helper SM Template Definition Displays the appropriate field type based on selection of field on template definition page (onload). [sm_template_definition] Read only task templates dependencies Service Order Task Template Dependency Makes the dependent field read only when creating task template dependencies in [sm_m2m_task_template_dependency] sm_m2m_task_template_dependencies table. Make Location not mandatory Stockroom Makes Location not mandatory for stockroom type field_agent [alm_stockroom] Calculate End Time (Duration change) Service order task Calculates Estimated End Time in a Work Order Task based on a change of estimated work duration. [sm_task] Show error when no application Service Order Model Show error when no application installed installed. [cmdb_serviceorder_product_model] Calculate total amount - cost per mile Incidentals Calculates the total mileage costs when the quantity changes. [sm_incidentals] Priority assignment SM Config Set scheduling to true and hide consistent assignment of priority assignment is turned on. [sm_config] Asset update Service order task Updates the associated configuration item and location based on changes to the affected asset. [sm_task] 66
67 Client script includes Table Read only group dependencies Service Order Group Dependency Once set, fields are read-only. [sm_m2m_group_dependency] Add sourcing UI Listeners Service order task Sets up event listeners for changes to travel duration, work duration, or expected work start so that they are automatically updated in the sourcing UI (if the task is opened via the sourcing UI). [sm_task] check window_start Service order task Verify that window start is before window end. [sm_task] Set required quantity read-only Part Requirement Sets the Required quantity field to read-only when the required number of assets are sourced for the part requirement [sm_part_requirement] Show messages Service order task Shows messages if the expected due date for the task is after the requested due date of the request, or if autoassignment does not work. [sm_task] Calculate total amount - type Incidentals Calculates the total mileage costs when the type changes. [sm_incidentals] Update Assigned to (Assign Group change) Service order task Hide group field Service Task Model Hide state flow field SM Config Update Assigned to when Assignment group changes: clear the Assigned to field. [sm_task] Hides the dispatch group field when dispatch queue is off [cmdb_servicetask_product_model] When state flow is turned off, hide the field from the form. [sm_config] Check TOs before reassigning Service order task When reassigning or unassigning a work order task, prompt user to cancel all transfer orders to personal stock rooms for a task if the task only has cancelable transfer orders. [sm_task] Verify Group Post Dispatch Group Change Service order task Displays an error on load if no assignment group covers the location of the work order task. [sm_task] 67
68 Client script includes Table Set Tables SM Notification Rule Limit the tables to the two possible tables, if none is chosen, set the first one as the default. [sm_notification_rule] Calculate End Time (Start time change) Service order task Update Model and Quantity based on Asset Asset Usage Read Only Order Affected Cis Affected CI Calculate the Estimated End Time based on Expected Start Time changing. Also checks for inconsistencies that may have been created with estimated travel start. [sm_task] Synchronizes model and quantity information of an asset usage record based on the asset it references. [sm_asset_usage] Makes a field read only once a value is selected for that field. [sm_m2m_order_affected_ci] Reset quantity Incidentals When the type changes back to car rental, the Qty is set back to 1. [sm_incidentals] Read Only Task Affected CIs Task Affected CI Makes a field read only once a value is selected for that field. [sm_m2m_task_affected_ci] Hide group field Service Order Model Hide the assignment group field if application is not request [cmdb_serviceorder_product_model] driven, hide the qualification group field if qualification is off. Check TOs before reassigning Service order task When reassigning or unassigning a work order task, prompt user to cancel all transfer orders to personal stock rooms for a task if the task only has cancelable transfer orders. [sm_task] Notify parent on submit Part Requirement Updates the Source tree whenever a new part requirement is created inside the Source popup window. [sm_part_requirement] Show warning msg of templates SM Config upgrade [sm_config] Show warning message when the templates must be migrated. Verify Group Fields Displays an error on load if no dispatch group or assignment group covers the location of the work order task. Service order task [sm_task] Ensure no negative and decimal quantity Part Requirement Ensures the quantity required for a part is valid. [sm_part_requirement] 68
69 Client script includes Table Read only task dependencies Service Order Task Dependency Making the dependent field read only on creating task dependencies in sm_m2m_task_order table. [sm_m2m_task_dependency] Start work read-only (actual travel chg) Service order task Show warning message of disable SF SM Config Populate from stockroom for drop off Transfer Order Set value before submit SM Template Definition Start work read-only when travel is required and not started. 'Schedule travel start' and 'Schedule start' are mandatory when 'Agent Track Time' is on. [sm_task] Shows a warning message when state flows are disabled. [sm_config] Sets the from stock room to the logged in user's personal stockroom when creating a drop off transfer order. [alm_transfer_order] Sets the value from the various widgets to the appropriate value before submitting the template definition form. [sm_template_definition] Template selected Service order task Populates form based on template values. [sm_task] Personal Stockroom Name by Type Stockroom Update agent status Service order task Sets the name of a stockroom based on its manager when it becomes a personal stockroom. [alm_stockroom] Update the status of assigned agent. [sm_task] Update UI on load and model change Asset Usage Personal Stockroom Name by Manager Stockroom Hide unused related lists/fields Service order task Update UI on load and model change [sm_asset_usage] Updates the name of a personal stockroom when its manager changes. [alm_stockroom] Hides related lists that are not relevant based on application configuration. [sm_task] use schedule SM Config Turn off priority assignment and show consistent assignment if scheduling is turned off. [sm_config] Verify Group Post Location Change Service order [sm_order] Displays an error after a location change when no qualification group covers the location of the work order. [alm_stockroom] 69
70 Business rules installed with Core Core adds the following business rules. Business rule Table Build scratchpad & display info messages Service order task Build scratchpad variables that are used to display initial info messages on page. Affected CI changed or removed Service Order Verify Work Notes Service Order Set default values [sm_task] Synchronizes the primary CI field and the Affected CIs related list on the Service Order form. [sm_order] [sm_order] Ensures that the Work notes field is populated in work orders that transition to the Cancel state. SM Template Definition Sets the table field by default. [sm_template_definition] Set Personal Stockroom Transfer Order Automatically sets the stockroom to the personal stockroom of the logged in user for drop-off transfer orders. [alm_transfer_order] Export to update set Part Requirement Exports part requirement templates to the current [cmdb_model_part_requirement] update set and creates a sys_metadata_link record to associate template with current application. Export to update set Service Order Task Models [sm_m2m_somodel_stmodell] Export to update set Service Order Task Template Export to update set Service Order Template Sync update of associated variables SM Template Definition Exports link between service order template and service task template to the current update set and creates a sys_metadata_link record to associate template with current application. Exports service task templates to the current update set and [cmdb_servicetask_product_model] creates a sys_metadata_link record to associate template with current application. Exports service order templates to the current update set and [cmdb_serviceorder_product_model] creates a sys_metadata_link record to associate template with current application. Synchronizes template definition with associated catalog variable. [sm_template_definition] 70
71 Business rule Table Date Checks Service Order Task Validates the window, estimated, and actual start and end dates. [sm_task] Populate Location - New SOT Service Order Task Populates the location, if possible, based on parent work order location. [sm_task] add_model_filter Reset qty to 1 Global [global] Filter for SM Model Application slush bucket, limits available models to hardware and consumable models. Incidentals Sets the quantity field to 1 when the type is Car Rental. [sm_incidentals] Validate notification SM Notification Rule Validates that a user or group is selected when inserting or updating a notification rule. [sm_notification_rule] Validate Field Agent Type Stockroom Prevents duplicate personal stockrooms. [alm_stockroom] Calculate cost Incidentals Helps to calculate the Costwhen the Type is Mileage (starting with the Eureka release). [sm_incidentals] Check asset and CI Service order task Synchronizes affected Cis and affected assets. [sm_task] Assign the previous agent on task Service order task Populate Service Order from Template Service Order Validate quantity requested Transfer Order Line Sets the previous agent whenever the task assigned to changes. [sm_task] Populates a new work order from the work order model selected as a template. [sm_order] Checks that the quantity requested on a transfer order line with a part requirement does not exceed the quantity that is required to fulfill the part requirement (starting with the Eureka release). [alm_transfer_order_line] Close service order on workflow Workflow contexts complete [wf_context] Prevents rollup of task closures when there are active workflows on service orders. Create Sub Tasks When service order leaves draft state, creates tasks from template if service order built from template, or creates default task if task-driven. Service Order [sm_order] 71
72 Business rule Table Validate Field Agent Name Stockroom Validates that a personal stockroom has a valid, associated agent. [alm_stockroom] Create expense line Incidentals Creates or updates an expense line based on the incidental's cost when the incidental is saved and all of the following are true: [sm_incidentals] Validation Service Order Groups Dependency The state is Incurred The type is not None The cost is not zero Validates that the dependency is valid. [sm_m2m_group_dependency] Verify CI on SM Task Cis Affected Verifies that the affected CI for a task is also an affected CI for the order. [task_ci] Vendor type requires manager User Group Vendor is required for vendor groups. [sys_user_group] Part Requirements Service Order Task Creates part requirements for a service order task from the part requirements configured for a service order task model used as a template. Free up assets when unassigned or reassigned. Update asset usages when tasks are closed. [sm_task] Apply dispatch method Service Order Task Automatically assigns a task once it is marked as ready for assignment when assignment method of the application is workflow or auto. [sm_task] Group change validation Service Order Task Validates changes to assignment and dispatch groups in work order tasks. [sm_task] Assign the previous agent on order Service Order ValidateChanges Service Order Task Sets the previous agent whenever the order assigned to changes. [sm_order] Validates dispatch group and assignment group types match and that worknotes are provided if required. [sm_task] 72
73 Business rule Table Transitions Service Order Task Sets a task into work in progress when the task is accepted and work start is populated. [sm_task] Sync catalog SM Config Synchronizes the application catalog when the service management configuration changes. [sm_config] Set required by date on display Part Requirement Sets part requirement required by to the expected travel start of the associate service order task. [sm_part_requirement] Request driven dispatch Service Order Responsible for dispatching service orders based on application configuration. [sm_order] Build scratchpad & display info messages Service Order Build scratchpad variables that are used to display initial info messages on page. Prevent Loop In TaskTemplateDependencies Service Order Task Template Dependency [sm_order] Prevents loops in task template dependencies [sm_m2m_task_template_dependency] getmainsmmodels Global Slush bucket filter when linking service order task templates to service order templates. [global] Task contract m2m Incidentals Synchronizes contracts, expense lines, and incidentals [sm_incidentals] Notification for task Service Order Task Sends notifications when task changes if values change for fields specified in the configuration page. [sm_task] Build scratchpad tables SM Notification Rule Sets the tables that should be displayed on notification rule page. [sm_notification_rule] Update PR based on TOL Transfer Order Line Updates the part requirement when the associated transfer order line changes stage. [alm_transfer_order_line] Add removed asset Asset Usage Determines validity of asset removal and updates the removed asset accordingly. [sm_asset_usage] Add/remove manager to/from vendor group Group When group manager changes for a vendor group, add the new manager as a group member and remove the previous manager as a group member. [sys_user_group] 73
74 Business rule Table Group Types Group Ensures data integrity for dispatch group coverage information. Deletion of Affected CI Cis Affected [sys_user_group] Part of the synchronization mechanism between the primary CI field and the Affected CIs related list on the Service Order form. [task_ci] Prevent Loop In Tasks Dependencies Service Order Task Dependency Prevents circular work order task dependencies. [sm_m2m_task_dependency] Cascade SO deletion Service Order Delete service order tasks and checklists when service order is deleted. [sm_order] Create Personal Stockroom User Role Creates a personal stockroom for users (if they do not have one already) when they are assigned an agent role. [sys_user_has_role] Delete Personal Stockroom User Role Deletes a user's personal stockroom when all agent roles are removed from the user. [sys_user_has_role] Validate Part Requirement Part Requirement Validates the part requirement and checks for availability of the part. Validates sourcing information. [sm_part_requirement] Invoke template workflow & move task Service Order Populate Group - Qualification Service Order Start workflow for service order and move subtasks to pending dispatch. [sm_order] Populates the qualification group, if possible, based on location. [sm_order] Create catalog Service Order Template Create a corresponding record producer if automatic publishing [cmdb_serviceorder_product_model] is on. Populate schedule Service Order Task Populates scheduling fields if they are not already set. They are set, only if the state changes to Pending Dispatch. [sm_task] Notification for request Service Order Sends notifications when task changes if values change for fields specified in the configuration page. [sm_order] Cascade delete checklist Service Order Task Delete checklists when service order task is deleted. [sm_task] 74
75 Business rule Table Scratchpad SM Config Builds scratchpad for SM config form. [sm_config] Validate TOL and check availability Transfer Order Line Delete all expense lines SM Incidentals Validates transfer order line state changes and ensures that the asset is available in the stockroom. [alm_transfer_order_line] Delete expense lines when incidentals are deleted. [sm_incidentals] Populate Schedule - New SOT Service Order Task Populates scheduling fields if they are not already set. They are set only if the state changes to Pending Dispatch. [sm_task] Populate Location Service Order Populates the location, if possible, based on the affected CI identified by the caller. [sm_order] Add as Primary if none set Cis Affected Add configuration item as primary affected CI if no primary CI exists. [task_ci] Roll Up Changes Service Order Task Rollup state changes and estimated work times to service order. [sm_task] Build scratchpad Service Order Template Sets scratchpad for service order template form. [cmdb_serviceorder_product_model] Check asset and CI Service order Synchronizes affected Cis and affected assets. [sm_order] Unassigned Service order Sets state of service order back to ready when it becomes unassigned. [sm_order] Propagate priority Service order Propagates priority from service order to service order tasks. [sm_order] Apply configuration settings SM Config Handles changes to SM Config record. [sm_config] Update agent status Service Order Task Updates the status of an agent assigned to a task. [sm_task] Build scratchpad Service Order Task Template Sets scratchpad for service order task template form. [cmdb_servicetask_product_model] Check TOs before reassigning Service Order Task Sets scratchpad to prevent reassigning a task when there are transfer orders in transit. [sm_task] 75
76 Business rule Table Prevent Duplicate Order Affected CIs Cis Affected Prevent duplicated affected Cis Unassigned Service Order Task [task_ci] Prevent reassigning a task if there are transfer orders in transit. [sm_task] SNC - Run parent workflows (Approval) Approval gettasksmmodels Global Handles order workflows when approval set to "More info required" or "Duplicate". [sysapproval_approver] Slush bucket filter when linking service order templates to service task templates. [global] Prevent model change after sourced Part Requirement Create AssetUsage when TOL delivered Transfer Order Line Release Asset on AssetUsage delete Asset Usage Redirect TOL to existing TO under WOT Transfer Order Line Populate Group - Dispatch/ Work Service Order Task Prevent changing the model after the part requirement is sourced. [sm_part_requirement] Create asset usage once a transfer order line is delivered. [alm_transfer_order_line] Make asset available when asset usage is deleted. [sm_asset_usage] Attempts to group transfer order lines under the same transfer order for a service order if the transfer order lines have the same "from" and "to" locations. [alm_transfer_order_line] Populates the dispatch group and assignment groups when only one dispatch group covers the location of a task, and only one assignment group is covered by the dispatch group. [sm_task] notifications installed with Core Core adds the following notifications. Notification Table ${Request_Label} created from Service Order Template that is used to build notifications for new applications created from a template. This notification should remain inactive and not be used. [sm_order] 76
77 Notification Table ${Request_Label} changed Service Order Template that is used to build notifications for new applications created from a template. This notification should remain inactive and not be used. [sm_order] ${Task_Label} changed Service Order Template that is used to build notifications for new applications created from a template. This notification should remain inactive and not be used. [sm_order] Planned Maintenance Although not a service management (SM) application itself, the planned maintenance application works with SM applications to help organizations manage regular, preventive maintenance of their assets. The application uses maintenance plans to trigger the automatic creation of work orders or facilities requests. These work orders and facilities requests define how to perform maintenance on devices and vehicles, or just about any type of asset that requires maintenance. Work orders and requests can be based on a specific time interval, such as after a specified number of months since the previous maintenance was performed, or they can be based on meters or usage. For example, after a specified number of pages are printed or a specified number of miles are driven. Activate Planned Maintenance The SM Planned Maintenance plugin is available as a separate subscription. Role required: admin Navigate to System Definition > Plugins. Find and click the plugin name. On the System Plugin form, review the plugin details and then click the Activate/Upgrade related link. If the plugin depends on other plugins, these plugins are listed along with their activation status. 4. If the plugin has optional features that depend on other plugins, those plugins are listed under Some files will not be loaded because these plugins are inactive. The optional features are not installed until the listed plugins are installed (before or after the installation of the current plugin). Optional: If available, select the Load demo data check box. Some plugins include demo data Sample records that are designed to illustrate plugin features for common use cases. Loading demo data is a good practice when you first activate the plugin on a development or test instance. 5. You can also load demo data after the plugin is activated by clicking the Load Demo Data Only related link on the System Plugin form. Click Activate. 77
78 Installed with SM Planned Maintenance Several types of components are installed with the SM Planned Maintenance core plugin. Demo data is available with SM Planned Maintenance. Tables installed with SM Planned Maintenance SM Planned Maintenance adds the following tables. Table Maintenance Plan Record Relates a maintenance schedule to a record in the system (from a document ID). Also contains information about the last time or value the schedule was run for the record and the next time or value when the schedule will run. [sm_m2m_maint_plan_to_record] Schedule Template [sm_m2m_schedule_template] Maintenance Plan [sm_maint_plan] Maintenance Schedule [sm_schedule] Relates a maintenance schedule to service management templates. Defines a maintenance plan, including which table and records the plan applies to. Defines a schedule that is part of a maintenance plan. A schedule can be duration, meter, condition, or script based. Roles installed with SM Planned Maintenance SM Planned Maintenance adds the following roles. Role title [name] plan_maint_admin Administrator for planned maintenance. Script includes installed with SM Planned Maintenance SM Planned Maintenance adds the following script includes. Script include PlannedMaintenanceUtils Utilities for planned maintenance. PlannedMaintenanceAjax AJAX entry points into PlannedMaintenanceUtils. Client scripts installed with SM Planned Maintenance SM Planned Maintenance adds the following client scripts. 78
79 Client script Table Update field display - trigger type chg Maintenance schedule Updates the fields displayed on the maintenance schedule form based on the trigger type selected. Update field display - repetition chg Maintenance schedule Update table when type changes Maintenance plan Validate the every field Maintenance schedule [sm_schedule] Updates the fields displayed on the maintenance schedule form based on the repetition selected. [sm_schedule] Updates the table field based on the selected models (for model-based plans). [sm_maint_plan] Verifies that the every field is a positive number; else it defaults to 1. [sm_schedule] Update table when models change Maintenance plan Updates the table field based on the selected models (for model-based plans). [sm_maint_plan] Business rules installed with SM Planned Maintenance SM Planned Maintenance adds the following business rules. Business rule Table Update maintenance plan record Service Order Updates the maintenance records [sm_m2m_maint_plan_to_record] once a service order is closed. Update m2m schedule records Maintenance schedule [sm_order] Recalculates the next value or next run time when meter or duration fields change. [sm_schedule] Active changes Maintenance Plan Record Handles changes to the active flag for a maintenance plan [sm_m2m_maint_plan_to_record] record. Active insert Maintenance Plan Record Active changes Maintenance schedule Handles changes to the active flag for a maintenance plan [sm_m2m_maint_plan_to_record] record. Handles changes to the active flag for a maintenance schedule. [sm_schedule] Active changes Maintenance plan Handles changes to the active flag for a maintenance plan. [sm_maint_plan] Active Insert Maintenance schedule Handles changes to the active flag for a maintenance schedule. [sm_schedule] 79
80 Business rule Table Apply plan to new records Maintenance plan Updates the business rule for applying a plan to new records whenever the Apply to new records field changes. [sm_maint_plan] Scheduled jobs installed with SM Planned Maintenance SM Planned Maintenance adds the following scheduled jobs. Scheduled jobs Planned Maintenance Nightly Run Builds maintenance requests based on active maintenance plans. Maintenance plan management Planned maintenance allows you to create, maintain, and schedule maintenance for any equipment in your business that requires regular maintenance. The maintenance plan specifies the CI class, product model, or other criteria, such as location, and defines what maintenance is to be performed. The maintenance schedule defines the timing, by specifying how often and when to perform the maintenance. For example, one maintenance plan can be defined to inspect and clean all air conditioners within a product model. The maintenance schedule specifies that the inspection is performed every six months. Maintenance plans and schedules also take into consideration service management work orders and facilities requests opened against that equipment. Timing the first maintenance By default, the first planned maintenance is scheduled based on the timing entered in the schedule. For example, if you create a schedule to inspect the air conditioners every six months, the first one occurs six months from schedule creation. To schedule the date of the first maintenance: 1. Navigate to the Maintenance Schedule form. 2. Click the Run on demand related link. 3. De-select the Run now field. 4. In the Select next run date field, use the calendar to select the desired date. 5. Save the date. 6. Click Schedule. This updates the next run time for the maintenance plan records. You can update this field for any maintenance schedule as needed. For example, if the regular interval is due next month, you can select a date earlier or later in this field to change when the maintenance occurs. 80
81 Create a maintenance plan When creating a maintenance plan, options on the form help to determine how and when maintenance should be performed. Role required: SM admin Navigate to Planned Maintenance > Maintenance Plans. Click New. Fill in the fields on the form. Table 19: Maintenance plan Field Number Auto-generated identification number for the maintenance plan. Name Enter a name for the maintenance plan. Short description Enter a description for the maintenance plan. Conditions Type Select the type of trigger that determines when maintenance should be performed. Model based: Select this to base the maintenance plan on a specified model of a CI, such as a product model. General: Select this to base the maintenance plan on a table and filter. Note: Model-based plans apply only to hardware models, specifically ones that have at least one model category defined. 81
82 Field Model Select one or more product models to identify the CIs that require preventive maintenance. When you select a model, the associated table appears in the Table field. For example, if you select a specific model of PC, the Table field displays Computer [cmdb_ci_computer]. This field appears if you selected the Model based type. If you select more than one model in the same category, the table does not change. But if you select a CI from a different category, the Table field displays the lowest level table that contains all the selected CIs. For example, if you select two PCs and one laser printer, the Table field changes to Hardware [cmdb_ci_hardware], because that table includes computers and printers. If you then add a computer rack, the Table field changes to Configuration Item [cmdb_ci], which contains all CIs. Table If you selected the General type, select the table you want to associate with the maintenance plan. If you selected the Model based type, this field displays the lowest level table that contains all the selected CIs. Filter condition Enter the filter conditions to locate the specific assets you want to maintain. Only records in the selected table that match the filtering criteria require maintenance. Apply to new matching records Select this check box to ensure that the schedules defined for this maintenance plan are applied to all records that have been added to the specified table since the last time the plan was executed, and that meet the conditions entered in the Filter condition. For more information, see Associate a maintenance plan to filtered records on page
83 Field Task creation policy Specify what to do when a maintenance plan runs on a record that is already under maintenance. 4. Leave alone: Do not allow the creation of new tasks or the deletion of existing ones. Cancel existing: Allow tasks currently associated with the plan to be deleted. Add to existing: Allow new tasks, along with existing active tasks, to be added to maintenance plans. Click Submit. The maintenance plan is now ready for you to Define a maintenance schedule on page 83. Note: You can configure the form to add Asset, CI, and User reference fields. These fields are appropriately pre-filled in the associated table and can be useful for generating reports. When a configuration item is selected for the maintenance plan and it is associated with an asset, the Asset field is automatically pre-populated with that CI. Note: After defining a maintenance plan and creating maintenance schedules for the plan, you cannot change the Type, Model, and Table fields, or the Filter conditions defined in the maintenance plan, because the changes could potentially cause conflicts. If you need to make changes to those fields, first delete the maintenance schedules, then recreate them with the desired criteria. Define a maintenance schedule After creating a maintenance plan, define specific criteria for determining when the plan should be executed. Role required: sm_admin Depending on the asset or CI for which you are setting up maintenance plans, you can create a single plan or multiple plans. For example, you can set up plans for a class of computer to be rebooted on the first and fifteenth of every month. Note: Plan carefully when defining multiple maintenance schedules for the same plan. For example, you set up one schedule to replace a printer cartridge every three months. You set up another schedule to replace the cartridge after every 10,000 pages is printed. This conflict could cause the cartridge to be replaced twice in the same week. Ensure that your schedules do not conflict with one another. Based on the templates associated with the plan, one or more service management work orders and facilities requests are automatically generated Navigate to Planned Maintenance > Maintenance Plans. Click the number of the maintenance plans you want to associate to a maintenance schedule. In the Maintenance Schedules related list, click New. Enter a name and short description. 83
84 5. Complete the form. Table 20: Maintenance schedule Field Plan Auto-generated identification description for the maintenance plan. Trigger Select the timing condition that triggers the execution of the plan. Duration: Select for the maintenance to be performed based on time. Depending on your selection, additional fields appear to define the duration. Meter: Select for the maintenance to be performed based on count. The Every and Field fields appear. Condition: Select for the maintenance to be performed when a certain condition is met. The Filter condition field appears Script: Select to apply advanced criteria for running a maintenance plan. The Script field appears. Duration or Meter: Select for the maintenance to be performed based on both time and count, whichever comes first. Then define the duration and meter details. Trigger type Enter the duration category for the maintenance schedule. For example, if you select Monthly, the Due day of month field appears where you select which day of each month you want the maintenance to run. Different fields appear depending on the trigger type selected. This field appears when Duration is selected in the Trigger field. Repeat Enter the frequency of the repetition. This field appears when Interval is selected in the Trigger type field. Due day of week Select the day of week. This field appears when Weekly is selected in the Trigger type field. Due day of month Enter the day of the month. This field appears when Monthly or Annuallyis selected in the Trigger type field. Due month Enter the month. This field appears when Annually is selected in the Trigger type field. 84
85 Field Due time Enter the time of day in hours, minutes, and seconds. This field appears for all trigger types, except Interval. Every Enter the number of occurrences, such as miles or pages, that must be recorded before the maintenance plan is executed. Your entry in this field must be greater than zero (0). This field appears when Meter is selected in the Trigger field. Field Enter the field used to define what the occurrences in the Every field apply to. For example, if the pages field is entered, the Every field can contain the number of pages that are printed before the action defined in the plan is performed. This field appears when Meter is selected in the Trigger field. Table Lists the table associated with the assets or CIs selected for maintenance. This field appears when Meter or Condition is selected in the Trigger field. Lead Time Enter the number of days prior to the Requested Due by date to determine the date on which work should begin. That date is pre-filled in the Scheduled start field for the task. This field appears when Duration is selected in the Trigger field. Condition Enter the condition that determines if the maintenance schedule should run. This field appears when Condition is selected in the Trigger field. Script Enter the script that determines if the maintenance schedule should run. This field appears when Script is selected in the Trigger field. Maintenance runs if the script returns true. The "current" variable is available and represents the record that is undergoing maintenance, for example, a CI. Note: If the form is configured to show the Next action field, you can select the date and time for the first maintenance to be performed. 6. Click Submit. Changes to maintenance schedules If you make and save changes to an existing maintenance schedule, any previously associated records are updated accordingly. The following examples explain the types of behavior you can expect after making changes: 85
86 If you change a schedule from a duration-based to a meter-based schedule, the next run time is cleared and the associated records are automatically populated with a next run value instead. If the Every field is changed on a meter-based schedule, the next run value is updated based on the existing Last Run Value, or from the asset's current value if no last run value exists. If you change the Field value for a meter-based schedule, the records associated with the schedule have their next run values recalculated based on the new Field value selected. For Interval-based schedules, changing from one Trigger type to another updates the next run time based on the existing Last Run Time value, or from Now if no last run time exists. Associate a maintenance plan to filtered records Maintenance plans can be defined with filtering criteria. For example, you can apply a maintenance plan to all records containing computers that start with "apple". Role required: SM admin Create a maintenance plan on page 81. Set up a Filter condition to capture the records to which you want to apply the maintenance plan. Note: You may want to click the refresh ( ) icon to display the number of matching records. Click Submit. Define a maintenance schedule on page 83. In the Related Links for the maintenance plan, click Apply schedules to filtered records. The schedule is applied to the records defined by the filter conditions you entered. Note: If you have multiple schedules defined, they all take effect on the matching records when you click Apply schedules to filtered records. See Define a maintenance schedule on page 83 for details. This same functionality exists for maintenance schedules. The Related Links for the schedule also contains an Apply schedule to filtered records link. If you click this link in the maintenance schedule, only this specific schedule is applied to the records defined by the filter conditions within the associated maintenance plan. Associate a schedule template to matching records Templates are added to a maintenance schedule so the appropriate requests and tasks, such as work orders and facilities requests, can be automatically generated when a maintenance schedule runs. Role required: SM admin A maintenance schedule runs and the requests or orders are generated, when a scheduled job called Planned Maintenance Nightly Run evaluates the schedule and determines that the meter or interval criteria in the schedule is met or exceeded. You can run a scheduled job to execute a maintenance schedule that runs at a day or time convenient for your business. Each automatically generated service order is linked to the record under maintenance in a few ways: 1. Each service order Record table and Record ID field is always populated with the table name and ID of the record under maintenance. If the record under maintenance is a configuration item, the service orders Affected CI field is populated. Create a maintenance plan on page
87 ) icon to display the number of matching records. Click Submit. Define or select a maintenance schedule. In the Maintenance Schedules related list, click the name of the schedule. In the Maintenance Schedule form, a Schedule Templates related list appears. In the Schedule Templates related list, click Edit. The Edit Members slushbucket displays all the service order, work management, and facilities request templates defined using any of the following applications: 7. Add a Filter condition to identify those records for which you want to apply the maintenance plan. Note: You may want to click the refresh ( Product Catalog > Templates > Work Order Templates Product Catalog > Product Model > Facilities Request Templates Move the templates you want to apply to the matching record from the Collection bucket to the Model List bucket, and click Save. In the Maintenance Schedule header, click the Back icon. Work orders or facilities requests created by the scheduled jobs running on the associated records contain the selected template. Run a scheduled job to execute a maintenance schedule Maintenance schedules are executed whenever the meter, duration, script, or condition criteria is met. You can also run a maintenance schedule manually, by using the Schedule ad-hoc feature. Role required: SM admin Maintenance schedules are run regularly using the Planned Maintenance Nightly Run Scheduled Job. When the Scheduled Job is run, the appropriate Service Orders are created for all records that meet their schedules' criteria. To configure the nightly planned maintenance scheduled job: Navigate to System Definition > Scheduled Jobs. Open Planned Maintenance Nightly Run. To specify a different schedule for running the job, change the Run and Time fields. Click Update. At any time, you can run the scheduled job by clicking Execute Now. The scheduled job evaluates all previously defined schedules and executes the ones that are scheduled to run. Note: If one or more records in the table associated with the maintenance plan are deleted after the matching records were associated with the maintenance plan, the next nightly run removes all the records associated with those removed assets. Run a maintenance schedule on demand Maintenance schedules are typically run using the Planned Maintenance Nightly Run schedule job. However, an admin may want to run the schedule immediately, or change the date when a schedule runs. Role required: admin 87
88 When you run a maintenance schedule on demand, all of the next run dates for the relevant maintenance plan records are updated to the user-defined time, now or in the future. All the appropriate service orders are created. If the schedule is meter, condition, or script-based, service orders are created for maintenance plan records that meet the schedule s criteria Navigate to Planned Maintenance > Maintenance Plans. Open the Maintenance Plan containing the schedule you want to run. In the Maintenance Schedules related list, select the maintenance schedule you want to run. Click the Run on demand related link. Fill in the fields on the form. Table 21: On demand schedule Field Run now Select this checkbox to run the maintenance for this schedule immediately. Deselect it to schedule a date for the schedule to run. Select date Select a date for maintenance to run. Note: This field is shown only when the Run Now checkbox is not selected. The scheduled date must be in the future. View a maintenance log Administrators can view all maintenance performed on a particular CI, the next scheduled maintenance, and the last time maintenance was performed. Role required: SM admin After the Planned Maintenance Nightly Run has been executed for a maintenance plan, navigate to the location of the CI for which you ran the plan. For example, Configuration > Servers > Linux. Right-click in the record header and select View > Maintenance. Select the CI for which you want to view logs. You can see related lists that show maintenance plans, maintenance plan records for the CI, and service orders. Maintenance plan examples Maintenance plans can be defined using model-based, meter-based, or duration-based selection criteria. Define a maintenance schedule for a computer reboot If you wanted to schedule a reboot for certain computer models after a predefined number of keystrokes, define a model-based plan with a meter-based maintenance schedule. In this example, a field called keystrokes is added to the Computer [cmdb_ci_computer] table. 1. Navigate to Planned Maintenance > Maintenance Plans. 88
89 2. Type: Model-based Model: Click the lock icon and select Apple imac 27 and Apple MacBook Pro 17. Click Submit. Navigate to Planned Maintenance > Maintenance Plans. Click the number of the maintenance plan you just created. In the Maintenance Schedules related list, click New. Enter the following: 8. Click New and create a maintenance plan called Reboot Apple Computers with the following definitions: Name: Reboot Apple Computers Short description: Scheduled reboot for Apple computers Repetition: Meter Every: Field: keystrokes Click Submit. The Reboot Apple Computer maintenance plan schedules all Apple imac 27 and Apple MacBook Pro 17 computers to automatically reboot after 500,000 keystrokes. Define a maintenance schedule for an ink cartridge replacement If you wanted to schedule a printer ink cartridge replacement after printing a pre-defined number of pages, define a general plan with a meter-based maintenance schedule. In this example, a simple table called Printer is added with string fields for printer, model, pages, and the like Navigate to Planned Maintenance > Maintenance Plans. Click New and create a maintenance plan called Epson Laser Cartridge Replacement with the following definitions: Click Submit. Navigate to Planned Maintenance > Maintenance Plans. Click the number of the maintenance plan you just created. In the Maintenance Schedules related list, click New. Enter the following: 8. Type: General Table: Printer Filter condition: Model is Epson Name: Epson Laser Cartridge Replacement Short description: Scheduled cartridge replacement for Epson laser printers Repetition: Meter Every: 7500 Field: Pages Click Submit. The Epson Laser Cartridge Replacement maintenance plan schedules all Epson laser printers to replace ink cartridges after printing 7,500 pages. 89
90 Define a maintenance schedule to run antivirus software If you wanted to schedule an antivirus software scan on certain computers after a pre-defined number of days, define a model-based plan with a duration-based maintenance schedule. In this example, a field called trigger type is added to the Computer [cmdb_ci_computer] table Navigate to Planned Maintenance > Maintenance Plans. Click New and create a maintenance plan called Update Antivirus with the following definitions: Click Submit. Navigate to Planned Maintenance > Maintenance Plans. Click the number of the maintenance plan you just created. In the Maintenance Schedules related list, click New. Enter the following: 8. Type: Model-based Model: Click the lock icon and select Apple imac 27 and Apple MacBook Pro 17. Name: Antivirus Update Short description: Scheduled antivirus update for Apple computers Repetition: Duration Trigger Type: Interval Days: 30 Click Submit. The Update Antivirus maintenance plan schedules all Apple imac 27 and Apple MacBook Pro 17 computers to automatically run the antivirus software every 30 days. Facilities With the Facilities application, you can request changes to the operation and maintenance of your facilities, track these requests, and make the necessary changes. Explore Set up../../../release-notes/service management/facilitiesrn.dita#facilities-rn.dita../../../release-notes/upgrades/ reference/r-upgrade-tojakarta.dita#r-upgrade-tojakarta Facilities overview on page 91 Administer Activate Facilities Visualization Workbench on page 115 Facilities service management process on page 125 Configure Facilities Service Management on page 92 Configure Enterprise Move on page 108 Properties installed with Facilities on page 100 Properties installed with Facilities Move Management on page 110 Use Develop Troubleshoot and get help Facilities requests on page 125 Developer training Developer documentation Ask or answer questions in the community 90
91 Facilities request tasks on page 130 Space management on page 133 Facilities move management on page 152 Installed with Facilities Service Management on page 98 Search the HI knowledge base for known error articles Contact Support Facilities overview The Facilities application lets users request changes to the operation and maintenance of your facilities. The facilities staff can then track these requests and make the necessary changes. The Facilities application offers the following benefits: Indicates the location of a facility request so the facilities team knows exactly where users encountered the issue. Identifies configuration items (CIs) for each facility request so you know which items in your infrastructure are also impacted. Allows any user in the system to view all open facilities requests. Users can see the facilities issues that have already been reported before they submit a new request. Activate Facilities The Facilities plugin (com.snc.facilities_service_automation) is available as a separate subscription. There are other facilities plugins that are provided with the subscription. Role required: admin This plugin includes demo data and activates related plugins if they are not already active Navigate to System Definition > Plugins. Find and click the plugin name. On the System Plugin form, review the plugin details and then click the Activate/Upgrade related link. If the plugin depends on other plugins, these plugins are listed along with their activation status. 4. If the plugin has optional features that depend on other plugins, those plugins are listed under Some files will not be loaded because these plugins are inactive. The optional features are not installed until the listed plugins are installed (before or after the installation of the current plugin). Optional: If available, select the Load demo data check box. Some plugins include demo data Sample records that are designed to illustrate plugin features for common use cases. Loading demo data is a good practice when you first activate the plugin on a development or test instance. 5. You can also load demo data after the plugin is activated by clicking the Load Demo Data Only related link on the System Plugin form. Click Activate. Create a group Set up groups and assign the necessary roles and users. The users in the group inherit the roles of the group, so you do not have to assign roles to each user separately. Role required: admin 91
92 There are a few good practices when creating groups: Create one group for administrators and assign the admin role to this group only. Create as many groups as needed in your organization. For example, create a staff group for each geographic location or function, such as building maintenance or building security. Assign the necessary users to those groups, and then assign the staff role to those groups. Navigate to User Administration > Groups. Click New. Fill in the fields on the form, as appropriate. See Creating Groups for an explanation of each field. Click the lock icon beside the Type field. If the field is not visible, configure the form to add it. The Type field expands Click the reference lookup ( ) icon and select the [application] type. Right-click the form header and select Save. Add the [application]_admin or [application]_staff role to the Roles related list. Add users to the Group Members related list. Click Update. Configure Facilities Facilities administrators can set facilities configurations to determine how the system handles daily operations. Role required: facilities_admin Facilities defaults to the request-driven processing method for handling tasks. For information about both processing methods, see Task vs request driven processing on page Navigate to Facilities > Administration > Configuration. Note: Administrators in domains lower than the global domain can view the Configurations screen, but cannot modify the settings. The options on the configuration screen are arranged in a multiple-tabbed layout, as follows: 2. The Business Process tab contains options for setting up the request life cycle, creating catalogs and requests, and configuring notifications. The Assignment tab contains options for setting up manual and auto-assignment. The Add-ons tab contains options for enabling the knowledge base, managed documents, and task activities. Fill in the fields on the Business process tab. Note: The Configuration screen contains many configuration options. An option is enabled when the switch appears green and is toggled to the right. All configuration options listed in the Dependency must be enabled in order for the option to be displayed. 92
93 Table 22: Configuration screen - Business Process Field Dependency Lifecycle Enable state flows Enable state flows consistent with all service management applications. If you prefer to create your own state flows using business rules, client scripts, and UI actions, disable the option. A confirmation box displays and includes a link to a help article that describes the implications of disabling state flows. It is highly recommended that you read the article before proceeding. If you disable state flows and save, this configuration option is removed from the screen and state flows cannot be re-enabled from the user interface. Process life cycle Select request driven (subtasks are optional) if you do not want to require tasks to fulfill requests. When the request life cycle is request driven, requests can be directly assigned to users in an assignment group. Users can still add tasks to requests. However, closing all tasks does not automatically close the request. Enable state flows is turned on. Enable state flows is turned on. Note: If the Enable state flows option is not selected, the process life cycle becomes requestdriven and this field is not displayed. Agent must accept or reject the assigned task Enable to require the assigned agent to accept or reject the task. 93
94 Field Dependency Lifecycle Work notes are required to close or cancel a request or task Enable if work notes are required when closing, completing, or canceling requests and tasks. If it is disabled, work notes are not needed when closing, completing, or canceling. Copy task work notes to request Enable to synchronize task work notes with the work notes on the order or request. When work notes are added in the task, the same work notes appear in the order or request. Enable state flows is turned on. Catalog and Request Creation Create or update requests by inbound . Enable this option to allow inbound messages to create or update requests. This option must be enabled to allow requests to be marked as spam. Requests are created using Select catalog or regular form to install the catalog and enable automatic publishing of request templates to the catalog. Select regular form only to uninstall the catalog and disable automatic publishing of request templates to the catalog. Templates create a dedicated catalog item Enable this option to allow automatic publishing of catalog items for the application. Notifications 94
95 Field Dependency Lifecycle Send a notification when a field changes for a task or request. Configure notifications to be sent to specific recipients when selected fields in requests and/or tasks change. 1. From Table, select Request or Task. 2. From Field, select the field to use for generating notifications. When a change is made to the selected field, a notification is sent to the recipients identified. 3. From Recipients, select one or more recipients 4. If a specific user or a specific group, is selected, the user is prompted to select a user or group. 5. To define more notifications using other fields or recipients, repeat the steps on the next line. 6. To remove a notification, click the symbol to the right of the notification. 3. Click the Assignment tab and fill in the fields. Table 23: Configuration screen - Assignment tab Field Dependency Assignment method for tasks: Manually Assign requests or tasks based on assignment group coverage areas Enable this option to limit the selection of groups from the Dispatch group and Assignment group fields to groups that cover the location of the task. 95
96 Field Dependency Use dispatch queue Enable this option to use the dispatch group for manual assignment. Enable state flows is turned on. Process life cycle: Life cycle is task driven Scheduling Use agent or task scheduling Enable this option to allow agent auto-assignment and agent auto-selection. Assignment method for tasks is set to using a workflow. Auto-selection of agents will consider time zone for tasks Enable this option to consider the time zone of the agent when assigning a task. Enable state flows is turned on. Enable priority assignment Enable this option to use priority assignment for autoassigning agents. Enable state flows is turned on. Process life cycle: Life cycle is task driven Auto-selection of agents will consider agent or task schedules Note: The Process life cycle option is not available in all service management applications. Select priorities for priority assignment Select priorities for assignment. Use agent or task scheduling is turned on. Enable priority assignment is turned on. Additional Factors 96
97 Field Dependency Auto-selection of agents will consider location of agents Enable this option to use the agent and location when determining who to assign the task to. Agents closer to the task location receive preference. Enable state flows is turned on. If using Process life cycle: Life cycle is task driven, then This option determines the degree to which skills must be matched to a task when determining autoassignment. 4. Select all to require that an assigned agent has all the skills to perform the task. An agent who lacks one skill is eliminated. Select some if you want agents who have most of the skills to perform the task. Select none if you want to auto-assign agents without considering skills. Assignment method for tasks: using auto-assignment If using Process life cycle: Life cycle is request driven, then Auto-selection of agents for tasks requires them to have skills Assignment method for requests: using auto-assignment Enable state flows is turned on. If using Process life cycle: Life cycle is task driven, then Assignment method for tasks: using auto-assignment If using Process life cycle: Life cycle is request driven, then Assignment method for requests: using auto-assignment Click the Add-ons tab and fill in the fields. Table 24: Configuration screen - Add-ons tab Field Dependency Part Requirements Part requirements are needed by agents Enable this option to require agents to specify parts for the task. Select models Click add and select the part Part requirements are model to be used for this needed by agents task. Click more to select more part models. 97
98 Field Dependency Part Requirements Documentation Enable a dedicated knowledge base Enable this option to install the knowledge base for the application. Enable managed documents Enable this option to add a related list to managed documents. Enable task activities Enable this option to log the task interactions and communications, such as phone calls and messages. Associated Task Tables Select associated tables Click Add to select more tables. Maps Enable maps 5. Enable this option to use maps. Click Save. Warning: When the Enable state flows option is disabled, a confirmation box with a link to documentation appears, explaining the consequences of disabling state flows. It is highly recommended that you read the documentation before making this change, as the action of disabling service management state flows cannot be reversed. Task vs request driven processing All SM applications use either task-driven or request-driven processes for handling tasks. Each application defaults to one or the other of these processing types, but you can switch between them as needed. Task-driven processing means that the work order or request simply contains a list of tasks necessary for completing the overall work. When a work order record is created, an associated task record is automatically created. A request must have at least one task, and more tasks can be defined to handle all aspects of the request. As tasks are performed and completed, the request transitions through a series of states. After the last task is closed, the request automatically transitions to closed. Request-driven processing means that tasks are assigned to a request, but closing all the tasks does not automatically close the request. A request does not require any tasks and can be opened and closed independently. Any tasks can be transitioned and assigned independently and to different agents than specified on the request. Even if all tasks are closed, the request can remain open and continue to be worked on. However, the request cannot be closed until all tasks are also closed. In request-driven processing, state transitions are based solely on the request. Installed with Facilities Several types of components are installed with the Facilities plugin. Demo data is available with Facilities. 98
99 Tables installed with Facilities Facilities adds the following tables. Table Building Stores building records [alm_building] Equipment Item Stores equipment item records [cmdb_equipment_item] Facilities Request Stores facilities request records [facilities_request] Facilities Request Task Stores facilities request task records [facilities_request_task] Bathroom Stores bathroom records [fm_bathroom] Campus Stores campus records [fm_campus] Conference Room Stores conference room records [fm_conference_room] Cubicle Stores cubicle records [fm_cubicle] Elevator Stores elevator records [fm_elevator] Hallway Stores hallway records [fm_hallway] Level Stores level records [fm_level] Spaces to Zones Stores space assignment to zone records [fm_m2m_space_to_zone] Associated User Stores associated user records [fm_m2m_user_to_space] Associated Department Stores associated department records [fm_m2m_department_to_space] Office Stores office records [fm_office] 99
100 Table Point Stores point records [fm_point] Facility Space Stores facility space records [fm_space] Stairs Stores stairs records [fm_stairs] Facility Zone Stores zones records [fm_zone] Facilities Data [imp_facilities_data] Facilities Floor Data [imp_facilities_level_data] Facilities Request Flow Import set table used as the source for transforming facilities space records Import set table used as the source for transforming facilities floors Stores request state flow records [sf_facilities_request] Facilities Request Task Flow Stores request task state flow records [sf_facilities_request_task] Facilities Request Model Stores request models [cmdb_facreq_product_model] Facilities Request Task Model Stores request task models [cmdb_factask_product_model] Properties installed with Facilities Facilities Properties controls the behavior of the Facilities application. Facilities adds the following properties. Property facilities.management.autoclose.request.time Number of days (integer) after which Resolved requests are automatically closed. Zero (0) disables this feature. Type: integer Default value: 1 Location: Facilities > Administration > Properties 100
101 Property facilities.management.workflow.state Select the state at which the template workflow starts. facilities.management.default.end.time Default end time for all work agents when no schedule is set, formatted as 17:00. facilities.management.fvw.area.unit Type: integer Default value: 10 Location: Facilities > Administration > Properties Select the state that the request goes into after work in progress. facilities.management.work.spacing Type: true false Default value: false Location: Facilities > Administration > Properties Time zone weight. facilities.management.state.value Type: string Default value: 17:00 Location: Facilities > Administration > Properties The system base area unit for facilities space tables. Set to true to use meters squared, or false to use feet squared. facilities.management.timezone.weight Type: string Default value: 5 Location: Facilities > Administration > Properties Type: integer Default value: 6 Location: Facilities > Administration > Properties Amount of time (in minutes) to add between the end of a task and the travel start of the next. Type: integer Default value: 0 Location: Facilities > Administration > Properties 101
102 Property facilities.management.skills.weight Skills weight. facilities.management.location.weight Type: integer Default value: 10 Location: Facilities > Administration > Properties Type: string Default value: 08:00 Location: Facilities > Administration > Properties Overwrite the user location with the primary location set in the fm_m2m_user_to_space table. glide.ui.facilities_request_task_activity.fields Type: integer Default value: 10 Location: Facilities > Administration > Properties Default start time for all agents when no schedule is set. If there is no scheduled task or if the task is continued from the previous day, the start time is set for a day other than the current day. This property uses a 24-hour clock. facilities.management.overwrite.user.location Location weight. facilities.management.default.start.time Type: true false Default value: true Location: Facilities > Administration > Properties Facilities Request Task activity formatter fields Type: string Default value: assigned_to,cmdb_ci,state,impact,priority,opened_by,work_ Location: Facilities > Administration > Properties facilities_management.map.merge.task.agent.markers Merge the task and agent markers on the geolocation maps with a purple marker. Type: true false Default value: false Location: Facilities > Administration > Properties 102
103 Property facilities.management.max.agents.processed Sets the maximum number of agents processed by auto-dispatch at a time. The system has an absolute limit of 300 agents. The system cannot auto-dispatch a task for a dispatch group that contains more agents than the value configured. Type: integer Default value: 100 Location: Facilities > Administration > Properties Roles installed with Facilities Roles control access to features and capabilities in Facilities. Facilities adds the following roles. Role title [name] Contains Roles facilities_read Can read facilities requests. none facilities_admin Can create and modify all facilities requests, modify floor plans, and configure buildings, floors, and rooms. Administrators can also create tasks using the Clone Task feature. knowledge_manager facilities_staff facilities_dispatcher catalog_admin territory_admin skill_admin facilities_approver_user template_admin skill_model_admin facilities_asset_admin Can create and modify all facilities assets. asset facilities_approver_user Can approve whether a facilities request can move forward. approver_user facilities_dispatcher Can schedule and assign tasks to the facilities staff. They can be searched (filtered by) the group they manage. skill_model_user facilities_staff territory_user inventory_user facilities_staff Provides full access to the Facilities application and all modules. Can create and modify facilities requests and access facilities reports. Facilities staff are typically the users who are assigned to facilities requests and update the request record accordingly. inventory_user skill_user document_management_user fc_request_reader territory_user service fulfiller fc_request_writer facilities_read 103
104 Role title [name] Contains Roles The facilities_staff and facilities_admin roles automatically inherit the following roles: fc_request_reader Can read facilities request records. none fc_request_writer Can create, read, write, and delete facilities request records. fc_request_reader fpv_floorplan_writer Can create, read, write, and delete facilities floor plans. fpv_floorplan_reader fpv_element_reader Can read room records. none fpv_element_writer Can create, read, write, and delete room records. none Script includes installed with Facilities Script includes are used to store JavaScript that runs on the server. Facilities adds the following script includes. Script include fc_abstractwrapper Abstract wrapper used to wrap GlideRecord objects related to the Facilities Management application. Customers do not modify this class. fpv_elementsecuritymanager Wrapper class for Floor Plan Viewer security. Customers do not modify this class. fpv_factory Customizable class providing the correct Facilities Management wrapper type. Customers modify this class when adding their own wrapper implementations. fc_abstractsecuritymanager Abstract security manager providing default denied access. All security managers extend this class. Customers do not modify this class. fpv_floorplan Wrapper class for Floor Plan Viewer floorplan record. Customers do not modify this class. fc_constants Facilities Constants Customers do not modify this class. fc_basefactory Base class providing wrappers for Facilities Request objects. Customers do not modify this class. 104
105 Script include fc_requestsecuritymanager Wrapper class for Facilities Management Request security. Customers do not modify this class. fpv_basefactory Base class providing wrappers for FloorPlanViewer objects. Customers do not modify this class. fpv_abstractsecuritymanager Abstract security manager providing default denied access. All security managers extend this class. Customers do not modify this class. fc_facilitiesrequest Facilities Request functions. Customers do not modify this class. fpv_abstractwrapper Abstract wrapper used to wrap GlideRecord objects related to the Floor Plan Viewer plugin. Customers do not modify this class. fpv_element Wrapper class for Floor Plan Viewer element records. Customers do not modify this class. fc_facilitiesrequestajax Facilities Request AJAX. Customers do not modify this class. FacilitiesUtils Contains utility methods for space management, including rollup calculations from spaces to levels and levels to building. fc_factory Customizable class providing the correct Facilities Management wrapper type. Customers modify this class when adding their own wrapper implementations. FacilitiesUtilsAJAX Contains utility methods for facilities, including scheduling and blackouts. fpv_constants Floor Plan Viewer Constants. Customers do not modify this class. fpv_floorplansecuritymanager Wrapper class for Facilities Management Case security. Customers do not modify this class. FacilitiesViewerUtils Contains utility methods for the floor plan viewer. Business rules installed with Facilities A business rule is a server-side script that runs when a record is displayed, inserted, updated, deleted, or when a table is queried. 105
106 Facilities adds the following business rules. Business rule Table Building Utilization Building Ensures that utilization thresholds are set to numbers from 0 through 100. [alm_building] Update User Primary Location Associated User Updates the sys user records location to the current primary location for the user in the fm_m2m_user_to_space table. [fm_m2m_user_to_space] Reference Area Facility Space Calculates the area in common units for the space. [fm_space] Prevent ancestry loop Facility Space Prevents circular space definitions where a space is both a parent and child at the same time. [fm_space] Rollup Facility Space Rolls up the space information to level as info is changed on the space. [fm_space] Rollup Level Rolls up level information to the building. [fm_level] Floor Utilization Level Ensures that utilization thresholds are set to numbers from 0 through 100. [fm_level] Rollup Associated User Updates the space utilization on a space as users are added and removed from spaces. [fm_m2m_user_to_space] Reference area Campus Calculates the area in common units for the space. [fm_campus] update space display name Building Generates the full display name for the space. [alm_building] Max Occupancy Building Max occupancy cannot be less than 0. [alm_building] Rollup Building Rolls up building data to the campus. [alm_building] Request Autoclose Facilities Request Automatically closes requests that are resolved and have not been updated in the 1 day. This number is a property in System Properties. [facilities_request] 106
107 Business rule Table Facilities Primary Location Change User Updates the fm_m2m_user_to_space table when the location on the sys_user records changes. Max Occupancy Facility Space [sys_user] Max occupancy cannot be less than 0. [fm_space] Prevent duplicates Facility Zone Do not allow the same space to be added to a single zone more than once. [fm_zone] Prevent duplicates Associated User Do not allow the same user to be added to the same space more than once. [fm_m2m_user_to_space] Prevent multiple main level for building Level Update primary location Associated User Do not allow there to be more than one main level set for levels in a building. [fm_level] Helps keep the sys user and fm_m2m_users_to_space tables in synchronization when primary location changes. [fm_m2m_user_to_space] Facilities area unit option changed Facility Space update space display name Level Converts` square feet to square meters [fm_space] Updates display name as building and level name changes [fm_level] Reference Area Facility Space Calculates the area in common units for the spaces. [fm_space] Max Occupancy Facility Space Max occupancy cannot be less than 0. [fm_space] Reference Area Facility Space Calculates the area in common units for the space. [fm_space] Space - generate full name Facility Space Generates the full display name for the space. [fm_space] notifications installed with Facilities notifications are a way to send selected users or SMS notifications about specific activities in Facilities. Facilities adds the following notifications. Notification Facilities Request is assigned Sends an message to the facilities staff member who is assigned to the facilities request. 107
108 Catalogs installed with Facilities Catalogs provide customers with self-service opportunities within Facilities. Facilities adds the following catalogs. Table Facilities Catalog Contains facilities catalog items Table transform maps installed with Facilities Table transform maps allows you to add spaces or details about spaces from other sources. Facilities adds the following table transform maps. Table transform maps Facilities level transform map Helps the user quickly populate floor (level) data. Facilities transform map Helps the user quickly populate space data, including associated users. Activate Facilities Move Management A license for Facilities is required to activate the Facilities Move Management plugin (com.snc.facilities_service_automation.move). Role required: admin This plugin includes demo data and activates related plugins if they are not already active Navigate to System Definition > Plugins. Find and click the plugin name. On the System Plugin form, review the plugin details and then click the Activate/Upgrade related link. If the plugin depends on other plugins, these plugins are listed along with their activation status. 4. If the plugin has optional features that depend on other plugins, those plugins are listed under Some files will not be loaded because these plugins are inactive. The optional features are not installed until the listed plugins are installed (before or after the installation of the current plugin). Optional: If available, select the Load demo data check box. Some plugins include demo data Sample records that are designed to illustrate plugin features for common use cases. Loading demo data is a good practice when you first activate the plugin on a development or test instance. 5. You can also load demo data after the plugin is activated by clicking the Load Demo Data Only related link on the System Plugin form. Click Activate. Configure Enterprise Move Facilities or Move administrators can set configurations to determine how the system displays colors on the move planning tool. Role required: facilities_admin or move_admin Navigate to Enterprise Move > Configuration > Enterprise Move Properties. Fill in the fields on the form, as appropriate. 108
109 Table 25: Enterprise Move Properties Option Selection The colors for segments on the move planning tool Hex values, RGB values, or HTML colors The color to use for highlighting seats on the Hex values, RGB values, or HTML colors move planning tool after the list of segment colors has been exhausted 3. The color to use for non-selected segments Hex values, RGB values, or HTML colors The color to use for highlighting open seats on the move planning tool Hex values, RGB values, or HTML colors Click Save. Installed with Facilities Move Management Several types of components are installed with the Facilities Move Management plugin. Demo data is available with Facilities Move Management. Tables installed with Facilities Move Management Facilities Move Management adds the following tables. Table Enterprise Move Scenario Holds all scenarios [enterprise_move_scenario] Enterprise Move Request Holds actual move requests [enterprise_move_request] Enterprise Move Request Task Contains tasks for enterprise move request [enterprise_move_request_task] Enterprise Move Delegator Stores delegator to scenario correlations [move_delegator] Enterprise Move Detail [move_detail] Move Task Template [move_task_template] Move Task Flow Contains users moved in enterprise move scenario Contains sm_core template for single user move tasks Stateflow for single user move task [move_sf_task] Move Request Contains single user move requests [move_request] 109
110 Table Move Request Flow Stateflow for single user move request [move_sf_request] Move Request Template Contains sm_core template for single user move requests [move_request_template] Move Task Holds single user move tasks [move_task] Properties installed with Facilities Move Management Properties control the behavior of the Facilities Move Management application. Facilities Move Management adds the following properties. Property The colors for segments on the move planning tool [facilities.enterprise.move.mpt.segment.colors] The colors for segments on the move planning tool The color to use for highlighting seats The color to use for highlighting seats on the on the move planning tool after the list move planning tool after the list of segment of segment colors has been exhausted colors has been exhausted [facilities.enterprise.move.mpt.overflow.seats.color] The color to use for non-selected segments [facilities.enterprise.move.mpt.other.color] The color to use for non-selected segments The color to use for highlighting open seats on the move planning tool [facilities.enterprise.move.mpt.open.seats.color] The color to use for highlighting open seats on the move planning tool Roles installed with Facilities Move Management Roles control access to features and capabilities in Facilities Move Management. Facilities Move Management adds the following roles. Role title [name] Contains Roles Move Basic Can read and create service orders and follow up on the orders they created. [move_basic] document_management_user move_read service_fulfiller task_activity_writer skill_user territory_user inventory_user 110
111 Role title [name] Contains Roles Move administrator Has full control over all Service Management data. Also administers Territories and Skills, as needed. territory_admin skill_model_admin move_approver_user skill_admin catalog admin knowledge_manager move_agent template_admin move_dispatcher Schedules and assigns the tasks to agents. They can be searched (filtered by) the group they manage. skill_model_user inventory_user territory_user move_basic [move_admin] Move dispatcher [move_dispatcher] Move agent [move_agent] Move initiator [move_initiator] Move approver Can accept or reject a task. It is the one who performs the work on the site. move_basic Similar to sm_basic (can read and create service orders and follow up on the orders they created), but can also grant UI access. move_basic Approve orders and requests. approver_user [move_approver_user] Move read [move_read] Can only read and create service orders and follow up on the orders they created. templates installed with Facilities Move Management templates allow you to create reusable content for the subject line and message body of notifications. Facilities Move Management adds the following templates. templates move.del Notifies delegators to assign seats for an enterprise move. Script includes installed with Facilities Move Management Script includes are used to store JavaScript that runs on the server. Facilities Move Management adds the following script includes. Script include FacilitiesMoveUtils Utilities used by move management 111
112 Client scripts installed with Facilities Move Management Client scripts define custom behaviors that run when events occur like when a form is loaded or submitted, or a cell changes value. Facilities Move Management adds the following client scripts. Client script Table Remove bad date Move Request Remove default date [move_request] Autopopulate from_location Move Request Auto-populate the from_location based on the selected User to be moved. [move_request] Autopopulate From on embedded list Enterprise Move Detail State is read only Move Request Populate from location when a user is added [move_detail] Set state to read only when state is Draft or Submitted [move_request] Warn to_location not a Facility Space Enterprise Move Detail Asset update Enterprise Move Detail Warn the user that the to location is not a facility space (fm_space) [move_detail] Update assets for the user in a move [move_detail] Close Complete Check Enterprise Move Request Check that all tasks are closed complete before setting request state [enterprise_move_request] Autopopulate from location Enterprise Move Detail Populate from location when a user is added [move_detail] hide submit Move Request Hide submit button when needed [move_request] Lock down form when request approved Enterprise Move Detail Info message Move Request Prevent changes to the request after tasks are created [move_detail] Add an info message when state is Ready [move_request] Remove extra buttons on Workbench Enterprise Move Scenario Warn from_location not a Facility Space Enterprise Move Detail Remove the extra buttons (various icons, and so on) while in a modal [enterprise_move_scenario] Warn the user when the selected from location is a cmn_location and not a facility space (fm_space) [move_detail] 112
113 Client script Table Warn from_location not a Facility Space Move Request [move_request] Warn the user when the selected from location is a cmn_location and not a facility space (fm_space) Remove bad date2 Move Request Remove default date [move_request] Set Building and Floor Enterprise Move Detail Automatically sets the destination building and floor when the to location is selected [move_detail] Warn to_location not a Facility Space Move Request Warn the user that the selected from location is a (cmn_location) [move_request] Notification scripts installed with Facilities Move Management notifications are a way to send selected users or SMS notifications about specific activities in Facilities Move Management. Facilities Move Management adds the following notifications. Notification script move_delegator_link Generates the link that is provided in the sent to move delegators Business rules installed with Facilities Move Management A business rule is a server-side script that runs when a record is displayed, inserted, updated, deleted, or when a table is queried. Facilities Move Management adds the following business rules. Business rule Table Force Workflow Update Enterprise Move Request Task Forces workflow to trigger on close [enterprise_move_request_task] Move to/from Facility Spaces only Enterprise Move Detail Only allows facility space (fm_space) as to or from location Pending Assignment - Update Task State Move Task Set request to WIP Enterprise Move Request Task [move_detail] Sets state to pending assignment [move_task] [enterprise_move_request_task] Keep request scenario reference in synch Enterprise Move Scenario Set request to work in progress when a task is started Update scenario on enterprise move request [enterprise_move_scenario] 113
114 Business rule Table Move Catalog out of draft Move Request If the request was created through the facilities catalog, set the state to Ready [move_request] Move users and assets Enterprise Move Request Task Update user and asset location [enterprise_move_request_task] Set Requested by user Move Request Set caller and requested by user [move_request] Enforce Building when floor is populated Enterprise Move Detail Set Building when floor is populated Enterprise Move Detail Do not remove scenario from move request Enterprise Move Request Trigger workflow on update Move Task Prevent the selection of a building that does not contain a floor [move_detail] Set the building when one of its floors are selected [move_detail] Maintain the scenario with the move request [enterprise_move_request] Force workflow to start [move_task] Prevent non-space to_location Enterprise Move Detail Ensure the to location is a facilities space (fm_space) [move_detail] Prevent Duplicates Enterprise Move Detail Do not allow the same move detail record to be added more than once [move_detail] Set Move Request Enterprise Move Request Task Set the parent request [enterprise_move_request_task] Check for open tasks Enterprise Move Request Prevent a request from being closed when tasks are still open [enterprise_move_request] Autopopulate Move Delegator Enterprise Move Delegator Set the delegator [move_delegator] Add messaging Enterprise Move Request Add help messaging on the move request [enterprise_move_request] Uncheck task options Enterprise Move Request [enterprise_move_request] Set Assigned Enterprise Move Request Task Set the state to Assigned when Assigned to is not empty and [enterprise_move_request_task] State is Pending Assignment Workflows installed with Facilities Move Management Workflows provide a drag-and-drop interface for automating multi-step processes. 114
115 Facilities Move Management adds the following workflows. Workflow Single User Move Handles single user move requests Enterprise Move Handles enterprise move requests Activate Facilities Visualization Workbench A license for Facilities is required to activate the Facilities Visualization Workbench plugin (com.snc.facilities_service_automation.fvw). Role required: admin This plugin includes demo data and activates related plugins if they are not already active Navigate to System Definition > Plugins. Find and click the plugin name. On the System Plugin form, review the plugin details and then click the Activate/Upgrade related link. If the plugin depends on other plugins, these plugins are listed along with their activation status. 4. If the plugin has optional features that depend on other plugins, those plugins are listed under Some files will not be loaded because these plugins are inactive. The optional features are not installed until the listed plugins are installed (before or after the installation of the current plugin). Optional: If available, select the Load demo data check box. Some plugins include demo data Sample records that are designed to illustrate plugin features for common use cases. Loading demo data is a good practice when you first activate the plugin on a development or test instance. 5. You can also load demo data after the plugin is activated by clicking the Load Demo Data Only related link on the System Plugin form. Click Activate. Workbench configuration Space administrators can configure properties on the workbench. In the application navigator, Facilities > Workbench Configuration contains the configuration settings divided into sections. Map Properties Map properties allow some customization on the floor plan. For a full description of each property, see r_syspropinstallwfacvisworkbench.dita#r_syspropinstallwfacvisworkbench. Parsing Configuration Map features [fm_facility_feature] define how to handle features during processing map set files and running transforms. A basic set of Map Features are pre-loaded for your use under Space Mangement > Map Configuration > Feature Definitions. To create spaces for a feature type during parsing: Set Create spaces to true. Set the default space type to specify the class of space that is created. 115
116 Icon Definition A set of Map Icons [fm_icon] is pre-loaded for your use. These icon definitions affect both parsing and runtime configuration. If the geojson property of type "point" type is found during parsing and its name matches the Parsing name field, then an icon is added to the map. Set Active to true to show the icons on the map. Set Show by default to true so the icons display on the initial map load. Map Colors A set of Feature Colors [fm_map_color] is preloaded for your use. The Color and Outline color fields support hex values, RGB values, and HTML colors. The Opacity field supports decimal values from 0 to 1 to set the opacity of the feature on the map. The Outline thickness field supports whole numbers to set the outline thickness of a feature on the map. Map Labels Specify which space types have labels shown by default on the interactive map. The settings section of the map lets you change the currently selected values. For each facilities space type, set show label to true for its label to be visible on the map by default. Map Tasks Specify which Tasks to show and search on the workbench. For each facilities map task, set show task to true for its pin to be visible on the map by default. Showing tasks can be limited to specified roles (not specifying a role shows tasks to all who can see them based on security settings). Map Filters Specify filters to apply to the map, coloring spaces based on conditions specified. Limit showing map filters to Roles or specific users with the Owner, Public, and Roles fields. Example filters are provided as a default. Map Menu Items Specify which catalog items are displayed in the pop-up menu on the workbench. Note: You can display catalog items from any catalog (Facilities, IT, HR, and others). 116
117 To view catalog items from Workbench, right-click on a space and the catalog items display. Or, click a space and the catalog items display under Related Links. For each facility map menu item, select the Roles for which this catalog item is visible. No defined roles means that the catalog item is available to all users. For each facility map menu item, select the Order in which this entry appears. For each facility map menu item, select the Campuses for which this catalog item is visible. No defined campuses means that the catalog item is available on all campuses. URL Parameters Workbench supports URL parameters. URL parameters provide configuration information for a form or list. Note: The URL parameters are listed in order of dependency. For example, syspar_drawingid requires sysparm_campussysid in the URL parameter. The URL parameters supported are: sysparm_campussysid: Loads the map to a Campus [fm_campus] identified by its sys_id. sysparm_drawingid: Loads the map to a Building [alm_building] identified by its external_building_id (requires sysparm_campussysid). sysparm_levelid: Loads the map to a Level [fm_level] identified by its external_level_id (requires sysparm_drawingid). sysparm_spacegid: Loads the map to a space [fm_space] identified by its external_space_id (requires sysparm_levelid). sysparm_scenariosysid: Loads the map to a Scenario [enterprise_move_scenario] identified by its sys_id (requires Facilities Move Management plugin). sysparm_zonesysid: Loads the map to a zone [fm_zone] identified by its sys_id. Multiple spaces make up a zone. sysparm_filtersysid: Applies a filter [fm_map_filter] for a loaded map. Filters highlight spaces based on conditions. sysparm_refreshinterval: Enter a whole number value to specify a rate in minutes to automatically refresh applied filters. sysparm_labeldisplay: Specify the label to display for a map (can be changed under settings on the map). sysparm_move: Loads a move query for a map. sysparm_tab: Specify the number of the tab to default to on the map. sysparm_fromwidget: Triggers event "space.clicked" on a space click, which returns {'sys_id': SPACESYSID, 'displayname': SPACEDISPLAYNAME}, or hiding space which returns {'sys_id':", 'displayname':"}; Migrate facilities data to new space definition tables To continue using the image-based floor plans with the new space definition, migrate your data from the old tables to the new space definition tables. Role required: facilities_admin The migration process only migrates complete data. A space that is not in a level or a level not in a building is not migrated. This behavior can be changed by updating the migration script include. Floors that are not connected to a building are not migrated, nor are spaces that are not part of a floor or building. As part of the migration process, the legacy spaces, floors, and buildings are marked as migrated. The migration path for the old tables to the new are: [cmn_building] migrates to [alm_building] 117
118 1. 2. [fpv_floor] migrates to [fm_level] [fpv_element] migrates to [fm_space] Navigate to Facilities > Administration > Migrate. Click Migrate. The following results can be expected: Data is migrated to the new facilities management tables for buildings, floors, and spaces. After a building, floor, or space is migrated, it is marked as migrated, and is not able to be migrated again. Note: Any object that is marked as migrated does not get migrated again, so you can safely run through the migration process multiple times without creating duplicated objects in the space tables. This behavior can be modified in the migration script include or by resetting the migration flag on the original objects. Installed with Facilities Visualization Workbench Several types of components are installed with the Facilities Visualization Workbench plugin. Demo data is available with Facilities Visualization Workbench. Tables installed with Facilities Visualization Workbench Facilities visualization workbench adds the following tables. Table Facility Map Option Specify what space types show labels by default [fm_map_option] Facility Map Task Option Specify what task types can be seen on a map [fm_map_task] Facility Feature Specify what features are parsed [fm_facility_feature] Space Icon Mapping Associate an icon with a space [fm_m2m_space_icon] Facilities Map Menu Item [fm_map_menu_item] Fm Map Filter Specify what catalog items are available on a map Create a custom filter for a map [fm_map_filter] Facilities Map Set Transformed [fm_map_set_transformed] Facility Icon Holds transformed GeoJSON as attachments, with the transformation showing the map in a "straight up" manner Specify icons that can be added to the map [fm_icon] 118
119 Table Facilities Map Set Holds GeoJSON files as attachments [fm_map_set] Facility Map Color Specifies map colors [fm_map_color] Space Management Properties Space Management Properties controls the behavior of Space Management. Space Management organizes properties into three sections: Floor Plan Parsing Space Management Floor Plan The logo to use for the header of the interactive floor plan [facilities.management.fvw.workbench.logo] Click to select a logo that appears in the top, left corner of an interactive floor plan. The title to show on the workbench [facilities.management.fvw.workbench.title] The title to show on the workbench. Use user's location as the default campus when available [facilities.management.fvw.default.campus] The location of the user is used as the default campus when available. Allow copying a URL link when available on the workbench [facilities.management.fvw.allow.copy.url] Allow copying a URL link when available on the workbench. Type: string Default value: Workbench Location: Facilities > Workbench Configuration > Map Properties Type: true or false Default value: true Location: Facilities > Workbench Configuration > Map Properties Type: true or false Default value: true Location: Facilities > Workbench Configuration > Map Properties Default to showing the compass on the floor plan Determines if a compass appears in the top, [facilities.management.fvw.show.compass] right corner of a floor plan to provide directional orientation. 119
120 Floor Plan The maximum length allowed for a label before using ellipses [facilities.management.fvw.max.label.length] The maximum length allowed for a label before using ellipses. The color to use for highlighting the selected space on the floor plan map [facilities.management.fvw.highlight.color] The color to use for highlighting the selected space on the floor plan map. The colors for applying filters to the workbench [facilities.management.fvw.filter.colors] The colors for applying filters to the workbench. The colors for availability filtering on the workbench [facilities.management.fvw.availability.colors] Type: integer Default value: 30 Location: Facilities > Workbench Configuration > Map Properties Type: color Default value: #F5F500 Location: Facilities > Workbench Configuration > Map Properties Type: string Default value: #278ECF; #4BD762; #FFCA1F; #FF9416; #D42AE8; #535AD7; #FF402C; #83BFFF; #6EDB8F; #FFE366; #FFC266; #D284BD; #8784DB; #FF7B65; #CAEEFC; #9ADBAD; #FFF1B2; #FFE0B2; #FFBEB2; #B1AFDB Location: Facilities > Workbench Configuration > Map Properties The colors for availability filtering on the workbench. Type: string Default value: #71e279; #fcc742; #278efc; #f95050; #00A0A6; #fc8a3d; #00FFFF; #b1afdb Location: Facilities > Workbench Configuration > Map Properties Maximum number of search results to Maximum number of search results to return per return per level on spaces tab in workbench level on spaces tab in workbench. [facilities.management.fvw.max.results.per.level] Type: integer Default value: 20 Location: Facilities > Workbench Configuration > Map Properties 120
121 Floor Plan Maximum number of search results to return Maximum number of search results to return for per campuses on spaces tab in workbench other campuses on spaces tab in workbench. [facilities.management.fvw.max.results.per.campus] Type: integer Default value: 20 Location: Facilities > Workbench Configuration > Map Properties Maximum number of search results to return Maximum number of search results to return for for other campus on spaces tab in workbench other campuses on spaces tab in workbench. [facilities.management.fvw.max.results.per.other.campus] Type: integer Default value: 20 Location: Facilities > Workbench Configuration > Map Properties Maximum number of search results to return Maximum number of search results to return when searching for tasks in workbench when searching for facilities/move requests tabs [facilities.management.fvw.max.requests.per.search] in workbench. Type: integer Default value: 200 Location: Facilities > Workbench Configuration > Map Properties Maximum number of spaces per Maximum number of spaces per zone to render zone to render for the zone edit tab for the zone edit tab. [facilities.management.fvw.max.spaces.per.zone] Type: integer Default value: 50 Location: Facilities > Workbench Configuration > Map Properties Maximum number of tasks to Maximum number of tasks to return per level on return per level on workbench workbench. [facilities.management.fvw.max.requests.per.level] Type: integer Default value: 20 Location: Facilities > Workbench Configuration > Map Properties Parsing Specifies whether we should preserve Determines how to save the field values of the field values of records when parsing existing records when parsing geojson files or geojson files if the record already exists to delete them. [facilities.management.fvw.geojson.parsing.preserve.fields] Preserve Existing Area Overwrite Area Ignore Area Files 121
122 Parsing Specifies whether we should preserve the If the space exists, specifies whether the sys_class_name of a space when parsing sys_class_name of a space is preserved when geojson files if the space already exists parsing geojson files. [facilities.management.fvw.geojson.parsing.preserve.sys_class_name] Type: true or false Default value: true Location: Facilities > Workbench Configuration > Map Properties Specifies how to handle area parsing. Preserve Specifies how to handle area parsing. If a nonexisting Area will not update a space's area zero value exists, Preserve Existing Area does if a non-zero value exists. Overwrite Area not update the area of a space. Overwrite Area will always update a space's area from an always updates the area of a space from an area file. Ignore Area Files will not parse area file. Ignore Area Files does not parse any any existing area files within the map set existing area files within the map set. [facilities.management.fvw.geojson.space.area.parsing] Type: choice list Default value: overwrite_false Location: Facilities > Workbench Configuration > Map Properties Space Management The system base area unit for facilities space tables. Set to true to use meters squared, or false to use feet squared [facilities.management.fvw.area.unit] The system base area unit for facilities space tables. Set to true to use meters squared, or false to use feet squared. Type: true false Default value: false Location: Facilities > Administration > Properties System property categories installed with Facilities Visualization Workbench Facilities visualization workbench adds the following system property categories. System property category Floor Plan Properties Grouping for interactive floor map properties Script includes installed with Facilities Visualization Workbench Script includes are used to store JavaScript that runs on the server. Facilities visualization workbench adds the following script includes. Script include FacilitiesViewerUtils Utility methods FacilitiesViewerAJAX Utilities used by the UI macros and the map set parsing FacilitiesGeoJsonParser Configurable parsing support for feature properties 122
123 Script include FacilitiesCampusMapFileParser Contains functions that take file attachments and process them to extract facilities spaces for the Facilities Viewer Workbench FacilitiesMapFilterUtils Utility for map filtering capabilities FacilitiesConstants List of constants used in Facilities Management and Facilities Visualization Workbench Client scripts installed with Facilities Visualization Workbench Client scripts define custom behaviors that run when events occur like when a form is loaded or submitted, or a cell changes value. Facilities visualization workbench adds the following client scripts. Client script Reload form on attachment window Reload the external map data form every time the attachment window closes to hide or display the process map file UI action. Hide field for space tables Show or hide the "field" field when the "table" field value is an extension of "cmn_location" or not. Business rules installed with Facilities Visualization Workbench A business rule is a server-side script that runs when a record is displayed, inserted, updated, deleted, or when a table is queried. Facilities visualization workbench adds the following business rules. Business rule Table Update default campus Campus Ensures one default campus [fm_campus] Prevent duplicates Facility Map Option Prevents duplicate map options [fm_map_option] Max search results per campus < 50 System Property Max spaces per zone < 1000 System Property Limits the maximum search results to less than 50 [sys_properties] Limits the number of spaces per zone to 1000 [sys_properties] Build Scratchpad Prevent duplicates Facilities Map Filter [fm_map_filter] Provides a list of tables that are extended from fm_spaces. Used by the Hide field for space tables client script. Facility Map Color Prevents duplicate map colors [fm_map_color] 123
124 Business rule Table Prevent duplicates Facility Map Task Option Prevents duplicate map task options [fm_map_task] Facility map highlight color validation System Property Validates the highlight colors on the floor plan map Facility map color validation Facility Map Color [sys_properties] Validates the colors on the floor plan map [fm_map_color] Max facilities/move search results< 5000 System Property Prevent duplicate Facility Feature Limits the maximum facilities move search results to less than 5000 [sys_properties] Prevents duplicate facility features [fm_facility_feature] Create spaces requires default class Facility Feature Facility map outline color validation System Property Max requests per level should be < 5000 System Property Prevent duplicate Facility Icon Prevents empty class by default on a space [fm_facility_feature] Validates the outline colors on the floor plan map [sys_properties] Limits the number of requests per level to 5000 [sys_properties] Prevents duplicate facility icons [fm_icon] Max search results for other campuses System Property Max search results per level < 50 System Property Limits the maximum search results for other campuses [sys_properties] Limits the maximum search results per level to less than 50 [sys_properties] Macros installed with Facilities Visualization Workbench Facilities visualization workbench adds the following macros. Macro floor_plan_show_space If the location is on a map, it adds a map icon next to the location field floor_plan_show_affected_ci If the location of the CI is on a map, it adds a map icon next to the CI field floor_plan_show_user If the location of the user is on a map, it adds a map icon next to the user field 124
125 Facilities service management process The facilities administrator creates the campus and configures the application with workflow, agent assignment, and other considerations. Employees make facilities and move requests that are tracked to specific locations anywhere on the campus. The Facilities process is as follows: 1. A administrator activates and configures the Facilities application according to the needs and requirements for your organization. 2. A facilities administrator creates the campus and configures the spaces and assets contained within. 3. Users submit facilities requests. 4. Facilities staff qualify facilities requests. Which is the process of checking that the information in the request is complete, so facilities tasks can be assigned. 5. Administrators organize requests into tasks and dispatch those tasks. 6. Facilities staff members perform the tasks necessary to fulfill the request. 7. The assigned facilities staff members close their tasks, allowing the request to be closed. Be sure to identify people within your organization that can be assigned the following facilities roles: facilities administrator Creates and modifies all campuses, building, floors, rooms, and floor plans. They can also qualify and dispatch requests. facilities staff Performs the work necessary to answer facilities requests. facilities dispatcher Schedules and assigns the tasks to facilities staff. Facilities requests A facilities request is a record in the system that tracks a proposed change to the physical facility of the organization. Typical facilities requests include the reporting of something bring broken or an issue like a beeping smoke alarm. Facilities request creation Facilities service management uses the common service management request management process. Any user can submit a facilities request through the Facilities catalog. Users with the facilities_staff role can also create and update facilities requests from the Facilities Request form. Create a request through the facilities catalog Employees use the Facilities catalog to submit requests. The catalog provides several different categories so users can choose the one that closely relates to their request. Role required: none Navigate to Self-Service > Facilities Catalog. Select a category. If necessary, select a subcategory. Fill in the fields on the form, as appropriate. Note: Some request forms do not contain every field described here. See../../../use/usingforms/concept/c_UsingForms.dita#c_UsingForms. 125
126 Table 26: Facilities catalog request form 5. Field Opened for The name of the person submitting this request. Select a new name if you are opening this request on behalf of another user. Location The location for this request. Short A brief summary of the request. Detailed A detailed description of the request. Priority The priority that describes the importance of this request. Click Submit. Create a request with the facilities request form Facilities staff members create requests using the Facilities Request form, allowing them to associate the request with a configuration item (CI), like printers or projectors. Role required: facilities_admin Associating a CI to a request helps your facilities team understand which services are negatively impacted by a facilities issue Navigate to Facilities > Requests > Create New. Fill in the fields on the form, as appropriate. Table 27: Request form fields Field Number An auto-generated number that identifies the request record. Opened Auto-filled with the date and time the request was opened. Caller The name of the requester. Priority The priority that describes the importance of this request. By default, all requests are set to 4-Low. Affected CI A CI affected by this request. State The state that describes what work stage this request is in. By default, all requests are set to Open. Location The location associated with this request. Verify that the location is correct. If it is not, you can select another location record. Category 126
. Initiated from Indicates an ITIL task that needs to be performed.")
127 Field Template The template for creating this request (optional). Click the reference lookup icon and select a template. The request is populated with all fields in the selected template including all subtasks and part requirements (if applicable). Initiated from Indicates an ITIL task that needs to be performed. Short description [Required] A brief summary of the request. Optionally, you can click the search knowledge icon to view articles in the knowledge base relating to this product model, plan, or CI. Doing so could provide a solution related to the reason you are submitting this request. A detailed description of the request. The description is always visible to the submitter. Therefore, if you add or modify the description for a request that another user submitted, the user is able to see the changes. Work notes Extra notes that you want to share between staff members assessing the request form. Note: A user who submits the request through the service catalog cannot see the work notes. 3. Click Save from the Form Context Menu icon to save the request and remain on the Facilities Request form. The Related Links section displays. When an Affected CI has a warranty date in the future, the Facilities Request Task tab appears as a task to check the warranty information. 127
128 Facilities request approvals Approving a facilities request means that the request has been reviewed and is ready to be qualified for facilities task creation and assignment. When a request is sent to a user with the facilities_approver_user role, the approver has several choices. If a facilities request is created from a template with a workflow in Draft state, and the Ready to Work button is clicked, the request goes to a Submitted state. The template workflow turns the Submitted state to Ready state. Users can include approvals in that workflow, if desired. Facilities agent assignment Depending on your settings in the facilities configuration screen, you can assign agents manually or using auto-assignment. If you have a limited number of agents for completing requests or you simply do not want to auto-assign agents, you can use manual assignment. Auto-assignment allows you to define criteria by which agents can be automatically selected to satisfy requests entered in service management applications. Based on the needs of your organization, you can configure the criteria for agent auto-assignment in the following ways. When auto-assignment is enabled and a task is qualified or marked as Ready for Work, the following actions occur: Available agents are evaluated based on the criteria defined in the configuration. An appropriate agent is automatically assigned to the task. The task is moved to the Assigned state. If more than one set of criteria is considered, such as location and skills, the agents are evaluated on the weighting property settings and other criteria. If the task cannot be auto-assigned, a user with the dispatcher role adjusts the values in the request or task form and saves the record. Schedule blackout periods A blackout period prevents work from being performed in a defined area for a scheduled time period. Blackout periods can be defined for spaces, levels, buildings, campuses, and zones. Blackout business rules check the Schedules field of the Location field on a request or task to assess if there are any schedule conflicts with the time span of current.expected_start to current.estimated_end. Table 28: Blackout period business rules Business rule Action Display Space Schedule Conflicts (facilities_request business rule) If the current.expected_start and current.estimated_end are populated and the location is a facilities space, informs the user of any possible schedule conflicts. Display Space Schedule Conflicts (facilities_request_task business rule) If the current.expected_start and current.estimated_end are populated and the location is a facilities space, informs the user of any possible schedule conflicts. Prevent Space Schedule Conflicts (facilities_request_task business rule) If there are any possible schedule conflicts between now and now + estimated_work_duration, prevent the user from starting work. To override, a facilities_admin can use a field override_schedule_conflict 128
129 Create a facilities schedule blackout Blackout periods can be defined for spaces, levels, buildings, campuses, and zones. The Facilities_admin can override blackout period requests. Role required: Facilities_admin (create), Facilities_staff (view) Navigate to the list of spaces, levels, buildings, campuses, or zones within the Space Management application. For example, Space Management > Floor Select a record for the space you want to add the blackout period. In the Related Links, click View Facilities Schedule. Fill in the fields on the form, as appropriate. Table 29: Create a facilities schedule blackout 5. Field Schedule The new or existing cmn_schedule Schedule name The name of the cmn_schedule Blackout name The name of the blackout Start Date to start the blackout schedule End Date to end the blackout schedule Blackout spans for Display blackout spans for selected time frame Click Add. Collaborate on a request Within a request, you can enter comments that are visible to the submitter, allowing for collaboration between the two of you. For collaboration with other agents, you can enter comments that are not visible to the submitter Navigate to [SM application] > All [SM application] Requests. Open the request you want to collaborate on. In the Additional comments (Customer visible) field, enter the comments that you want the person who submitted the request to see. The submitter can see the comments in this field and add more comments as necessary. Update this field as many times as necessary to correspond with the submitter. To correspond with other agents, enter content that you do not want the submitter to see in the Work notes field. Change the location of a request After opening a request, you can modify the details and update it. 1. Perform one of the following actions: Facilities > Open and open the request you want to modify. Facilities > View Floor Plans, click the request icon ( list that appears. 2. ), and click the request number on the On the Facilities Request form, click the reference lookup icon beside Room. 129
130 3. A list of locations defined for your organization appears. A location could be a room or any point on a floor plan. Select the correct location. If you do not see it, contact the facilities administrator to add the location to the floor plan. Close a request When you close a request, you can add details that you want the submitter to be aware of Navigate to [SM application] > Assigned to me. Click the request number. In the Additional comments field, enter any final notes or comments. Change the State field to the appropriate closed state. Click Update. Closed and completed requests When the Request lifecycle option is set to request-driven, the assigned agent can complete and close the request once all the tasks in the request are complete. A Close Complete button is visible to the agent assigned to the request. The agent enters work notes before clicking Close Complete. When the button is clicked, the open task is automatically completed (if applicable) and the request transitions to the Complete state. Facilities request tasks A facilities request contains one or more tasks. These tasks allow qualifiers to define separate activities that must be done to complete a facilities request. Administrators can create multiple tasks under a single request. Splitting a request into separate tasks, when necessary, enables qualifiers to: Assign different aspects of a request to different staff members. Assign tasks to staff members with different skill sets. Assign tasks to staff members in different locations. Schedule parts of the work at different times. Schedule tasks so they are done one after another. Schedule tasks so they are done at the same time by different staff members. Schedule more tasks, if necessary, to complete the request. Users with these roles can edit schedule times, including windows and planned durations. The Estimated end time is calculated from the expected start time and the work duration and is read-only. <sm application>_qualifier: Tasks in the Draft state. <sm application>_dispatcher: Tasks in the Pending Dispatch state. <sm application>_admin: Tasks in Draft or Pending Dispatch state. Create a facilities request task Facilities request tasks are created from facilities requests. Role required: facilities_admin or facilities_qualifier Navigate to Facilities > Requests > All Facility Requests. Open the desired request. Click the Add Task related link. Fill in the fields on the form. 130
131 Table 30: Facilities request task Field Number Auto-generated identification number for the task. State Current state of the task, such as Accepted or Closed Complete. States progress automatically as users complete the work for each successive state and appears on the subway map at the top of the form. Parent Facilities request that this task is associated with. Assignment group Group from which an individual facilities staff member is selected to complete the task. The lookup list shows only the assignment groups associated with the selected Location. If the Assignment Group field is empty, the system searches for the group covering the territory that includes the location of the task. Cloned from Record number of the task this task was cloned from, if any. Assigned to The individual staff member to complete the task, selected from the Assignment group. The Assigned to field lookup list shows only those staff members in the assignment group who have all the Skills required. If no exact match of skills is found, the lookup list shows all assignment group members. Override schedule conflict Location The geographical area of the request. The location is critical for determining which staff member is assigned to the task. Template Skills Abilities necessary to execute the task. The system automatically completes the Skills field based on the selection in the Affected CI field on the associated request. If you change the affected CI on the request, the system adds any skills required by the new CI to the skills already listed here. Short description Brief explanation of the task. Exact technical description of the unit of work to be performed. Provide as much detail about the problem as possible to avoid extra communication with the caller in later stages of the request. 131
132 Field Work notes Information about the task as it progresses through each state. Work notes are not visible to customers. Schedule Scheduled start Date and time that work on the task is expected to begin. The scheduled start time is set automatically to one hour after the scheduled travel start time. For example, if Scheduled travel start is 10:00 AM, the Scheduled start time is set to 11:00 AM. When the task reaches the Pending Dispatch stage, the default value can be edited. A staff member cannot be scheduled for two tasks at the same time. If a specified time is already allocated to another task, an error message is displayed. This field is required when the task is assigned or when the state is Assigned, Accepted, Pending Dispatch, or Work In Progress. 5. Estimated end [Read-only] Date on which work on the task ends. The date is automatically calculated based on the Scheduled start and Estimated work duration. Estimated work duration Estimated amount of work time. One hour is set by default. The default value can be edited during the Draft or Pending Dispatch stage. When defining the estimated work duration, it cannot exceed the total time of the window. Actual work start Time when work began. This field is not available until Actual travel start time is added manually or the Start Travel button is clicked. Actual work end Time when work on the task was completed. Actual duration [Read-only] Total amount of time spent traveling to the site and completing the task. This value is automatically calculated based on the Actual travel start and Actual work end times. Click Submit. Task windows A task window is the time period, bordered by start and end times, in which a task is performed. Task windows can be flexible or fixed and are used by the auto-routing and auto-dispatch features when determining the daily schedule of staff members. A flexible window has start and end times that the application attempts to respect when dispatching or routing a task automatically. The system can 132
133 reschedule a flexible task window if necessary, to make it fit into the schedule of a staff member. A fixed task window cannot be rescheduled. If the auto-router or auto-dispatcher cannot schedule the task for the fixed window time period, that task is not scheduled at all. The time interval configured for a window cannot be less than the time required to perform the task. Clone a request task Existing tasks can be cloned to create tasks with the same populated fields. Role required: admin, ITIL, creator, or catalog admin In the cloning process, the following information is copied from the source task: Parent request reference Short description Assignment group Location Required skills Open the request task and select Clone Task under Related Links. The application creates a task in Draft state. The Work Notes field contains the original task number and text stating that the task is a clone. Use a task template for multiple request templates If you have tasks that are often repeated across multiple jobs, you can create a task template and reuse it in multiple request templates Create a request template and an associated task template that contains the information you want to reuse. When you create subsequent request templates, you can select the task template from the Task Template field and save the file. Auto-dispatch a task When a task is auto-dispatched, the application matches the task with a nearby agent having the necessary skills and schedule that can accommodate the task. To dispatch a task from a task record automatically, click Auto-Dispatch. If the system cannot find an appropriate agent, it displays a failure message and leaves the task in the Pending Dispatch state. Space management The concept of space has been added to the Facilities application. Spaces are defined at all levels with the same unit measure, providing metrics that are readily available for analysis. These metrics include occupancy percentage, total space available, and so on. The additional benefits of space management include: ability to forecast future space requirements simplification of the charge back process space analysis for actual and planned use cases addition of zones for creating different collections of spaces 133
, and space. Administrators create types of spaces as needed. New space definition tables are extended from the [fm_space] table.")
134 Space hierarchy A natural hierarchy models all the spaces of your organization. Facilities staff uses this information to determine how effectively space is being utilized. The hierarchy from top to bottom is campus, building, level (floor), and space. Administrators create types of spaces as needed. New space definition tables are extended from the [fm_space] table. Be sure the proper ACLs are set. The following graphic depicts how tables are related to one another. Figure 3: Space table hierarchy 134

135 Space roll up calculations The Facilities application can roll up occupancy, area, and usage information from lower to higher levels in the space hierarchy. Roll ups apply to spaces that are designated as 'occupiable'. The occupancy values from that space are rolled up to the level above them. An occupiable space is designated by selecting the check box on the facility space record. The Current occupancy and Percent occupied fields rely on the Occupiable option. Roll up calculations are modified in a script include. Figure 4: Occupiable selected and dependent fields The values that roll up are: occupancy max occupancy assignable area The percent occupied calculation takes place based on the current and max occupancy values. Associated users Each space includes an Associated Users related list. Users can be assigned to more than one location, and can be assigned a primary location. Employees are assigned a primary location. A business rule ensures that only one record per user can be made the primary location. Employees that travel between campuses can have an assigned space on each campus. These records are stored in the [fm_m2m_user_to_space] table. Adding a user automatically updates the current occupancy and availability status of the space and performs the percent occupied calculation. Note: When a user becomes inactive, they are automatically unassigned from their space. Associated departments Each space includes an Associated Departments related list. Spaces can be assigned to more than one department for cost allocation and reporting purposes. The Associated Department [fm_m2m_department_to_space] table was added to fm_space, containing the relationship of departments and percentage ownership. Space managers set the weight for each 135
136 department and the percentage is automatically calculated. A business rule sets the percentages based on weight so that the sum of percentages equals 100%. GeoJSON map files The floor plan visualization feature uses files in the GeoJSON format, an open standard for representing geographical features. Due to the complexity of each file, work with Micello, Inc. or some other vendor to create the floor plan for your organization. Note: However, creating a floor plan requires GeoJSON knowledge. Ensure that you are familiar with geospatial data and/or GeoJSON data before attempting this task. For information about the GeoJSON standard, see Note: Object properties in the GeoJSON files are used to create buildings, floors, and spaces. Community file The community file contains information about the campus, including the number of buildings and the number of floors for each building. The file naming standard is: Must begin with map Must contain -geojson-com-map- For example, map mv-1-ev-1-geojson-com-map-fv-2.json Campus information Sample code for campus and map set properties. "entity_version": 1, "id": 23641, "languages": [ "en" ], "location": { "coordinates": [ , ], "type": "Point" }, "map_version": 1, "obj_type": "CommunityMap", "properties": { "city": "San Diego", "com_type": "Business Campus", "country": "US", "default_lang": "en", "name": " - San Diego Campus", "postal code": "92121", "state": "CA", "street address": "4810 Eastgate Mall" } The id is a unique id for this campus and is mapped to the database as the external campus id field in the campus table. 136
137 The entity_version and map_version are the versions of the map sets, helpful when a campus has multiple map sets. The location contains WGS 84 coordinates providing the overall latitude and longitude of the campus. Other data provides the name and address of the campus and is used to create a location in the location table for the campus. Building information Each drawing in the campus map file represents a building or campus overview. The campus overview is a map that shows the entire campus, and is included for multi-building campuses only. { "id": 28500, "levels": [ <See level section>> }, ], "obj_type": "Drawing", "properties": { "display_name": "SD Campus Building 1", "map_type": "Shopping Mall", "name": "San Diego Campus Building 1" }, "ref_frame": { "angle_deg": , "height": , "local2m": , "transform": [ e-07, e-07, e-07, e-07, , ], "width": } This information is used to create a building in alm_building. The id is mapped to the external building id in alm_building. The display_name is used to name the building. The ref frame is used to align the building horizontally and vertically. The GeoJSON data, contains WGS 84 information used to rotate the image so it displays at a natural horizontal orientation. Level information Each building (drawing) has a list of levels. Each level is a map and represents one floor, though that is not a rule. { "id": 46475, "obj_type": "Level", "properties": { "main": true, "name": "1", "parent_level": 46465, "root_geom": , "zlevel": 0 } 137
138 }, { }, { } "id": 46477, "obj_type": "Level", "properties": { "name": "2", "type": "indoor", "zlevel": 1 } "id": 46478, "obj_type": "Level", "properties": { "name": "3", "type": "indoor", "zlevel": 2 } Each level creates an fm_level record. The id is mapped to the external level id in fm_level. The name is mapped to the name field in fm_level. The zlevel orders the levels (0 is ground level). The main property assigns the main level of the building and is used as the default map when a building is selected. The id is used to find the correct level geometry file. Level geometry file The level geometry file contains all the geometry for a given level. Each file is one map that can be rendered in the platform. The file naming standard is: Name with the id of the level found in the community map file Must contain -geojson-geojson-level-geom- For example, level is found in a file named map mv-1-ev-1-geojson-geojson-levelgeom fv-2.json The main component of the level file is an array of features, and looks like: { "geometry": { "coordinates": [ [ [ , ], [ , ], [ , ], [ ,
139 ], [ ] ] , ], "type": "Polygon" }, }, "id": , "label_area": [ , , , , ], "location": { "coordinates": [ , ], "type": "Point" }, "obj_type": "Geometry", "properties": { "display_name": "Reef Shark", "entities": [ ], "facility": "room", "int_address": "Room B1-132" }, "type": "Feature" The geometry object is the geojson representation of points that make up the object. For more information about the GeoJSON standard, see Geometries can be turned into fm_space records. The id is mapped to the external space id on the fm_space record. The display_name is the name of the space. The type is the most important property. In the example, the class is a facility and the type for that class is a room. When parsing, these values determine: If an fm_space record is created for the geometry If the fm_space has a subtype If any default icons are assigned to a space If any default colors are assigned to the map Valid classes There are certain classes and class types that are valid for the level geometry file. Facility Bathroom Gender Female Male 139
140 Elevator Escalator Stairs Room Door Wall Hallway Inaccessible space Wall Window Defibrillator Fire extinguisher First aid Atm Power Changing station Wifi Area Family Service Safety Smoke Rest area Furnishing Chair Table Shelf Bin Process GeoJSON map files Processing GeoJSON map files includes parsing data from a map and importing that information to the campus space management tables. Use this process to set up your spaces or update bulk changes to your campus without having to enter each change manually. Role required: facilities_admin To process the files properly: Include the area file in the map set and follow the proper naming convention (-area-geom-) Set the facilities.management.fvw.geojson.space.area.parsing property to true Navigate to Space Management > Campus. Click the name of the campus. 140
141 Click the Facilities Map Sets related list to see all the maps sets associated with this campus. Click the name of the map set you want to parse. All files associated with that map set are shown as attachments. Click Process the Map Files related link. All the files that will be read and parsed (processed) are shown. Click Preview. A summary of all the spaces that will be created are shown. Table 31: Process map files summary Field Summary The total for each space that will be added or retired: buildings, levels, spaces Facility space creation Feature type All the types of spaces that will be created Class name Creating The total amount of each space type that will be created. Existing The existing amount of each space type. Ignoring The amount of each space type that not is created. Icon Creation Icon The names of all icons that will be included within this campus. Parsing label The parsing label of all icons that will be included within this campus. Creating The total number of that icon type that will be created for this campus. Existing The total number of that icon type that already exists within this campus. Review the process map set summary carefully, to be sure if the space adds and ignores make sense. If the summary does not make sense, refer to the [fm_facility_feature] table. Click Process. A summary of all spaces created is displayed when the map file has been processed. Customer-created maps Creating a map begins with the addition of the campus, then the buildings, floors, and other spaces. Add or edit a campus A campus represents the top level in the organization space, and contains buildings and map sets. Details include its location, manager, gross area, and usable area. Occupancy and utilization metrics are calculated using these details. Role required: admin 1. Navigate to Facilities > Space Management > Campus. 141
142 2. 3. Continue with one of the following options. Option Action To add a campus manually Click New. To add a campus using a map set Process GeoJSON map files on page 140 To edit the details of the campus Click the name of the campus you want to edit. Fill in the fields on the form, as appropriate. Table 32: Campus form 4. Field Name Enter a descriptive name for the campus. Managed by Select the employee who manages the campus. Location Select from the location hierarchy. Gross area The total floor space of a campus. Includes unusable space or excluded areas. Usable area The total useable area of a campus. Excludes unusable space or excluded areas. Assignable area Indicates a space roll-up calculation. See Space roll up calculations on page 135. Area unit Select the unit used for defining the space size: square feet or square meters. Current occupancy Displays the number of users currently associated with the space. The calculation is generated using business rules on the Associated User [m2m_fm_user_to_space] table. Max occupancy Enter the maximum capacity of users for this space. This value is intended for reporting purposes. Percent occupied The percentage of the total floor space that is occupied. Default campus Check to indicate that this campus is the primary location for the company. Notes Notes or comments about this campus. Continue with one of the following options. Option Action To add the campus Click Submit. 142
143 Option Action To update the campus details Click Update. Add or edit a building Buildings are assigned to campuses with a unique name, and contain floors or levels, a location, and utilization thresholds. Role required: admin Navigate to Facilities > Space Management > Building. Continue with one of the following options. Option Action To add a building Click New. To edit the details of the building Click the name of the building you want to edit. Fill in the fields on the form, as appropriate. Table 33: Building form Field Name Provide a descriptive name for this building. Campus Select the campus where this building is located. Floors Enter the number of floors the building has. Location Select the location for this building. Define the locations in Organization Management. A good practice is to select a location that is defined at the address, not at the floor level. Floors are defined separately in Facilities. Assignable area Displays only the area of the building that is assignable to users. Usable area Enter only the area of the building that is available for the creation of spaces. Gross area Enter the total area of the building, including non-usable and non-assignable spaces. Area unit Select the unit used for defining the space size: square feet or square meters. Note: The Area unit assigned to all spaces must be consistent for the roll-up calculations to work properly. See Space roll up calculations on page
144 Field Current occupancy Displays the number of users currently associated with the space. Calculation is generated using business rules on the Associated User [m2m_fm_user_to_space] table. Note: This field depends on the Occupiable option being selected. Max occupancy Displays max occupancy of the building based on rollup calculations from the spaces below it. Note: This field depends on the Occupiable option being selected. Percent occupied Displays the percentage of total space occupied based on rollup calculations from the spaces below it. Note: This field depends on the Occupiable option being selected. 4. Utilization Max Enter a number to define the maximum level of utilization for the building. Show Floor Plan: Click to display a floor plan of the selected floor. View Facilities Schedule: Click to create a facilities schedule blackout and prevent work from being performed in a defined area for a scheduled time period. Three tabs appear: 6. Enter a number to define the minimum level of utilization for the building. Click Save and the Related Links section displays. 5. Utilization Min Levels: List of levels for the building. Click New to create a level or on an existing level to edit. Assets: List of assets associated with the building. Click New to create an asset or on an existing asset to edit. Expense Lines: List of expense lines for the building. Click New to create an expense line or on an existing expense line to edit. Continue with one of the following options. Option Action To add the building Click Submit. To update the building details Click Update. 144
145 Add or edit a floor or level A floor is a level in a structure that contains spaces. It can be a floor of a building, the basement, levels in a parking lot, or outdoor areas. Role required: admin Navigate to Facilities > Space Management > Floor. Continue with one of the following options. Option Action To add a floor or level Click New. To edit the details of a floor or level Click the name of the floor or level you want to edit. Fill in the fields on the form, as appropriate. Table 34: Level form Field Name Provide a descriptive name for this floor or level. Building Select the building that the floor is in. Main level Select this check box if this floor is the main level of the building. Abbreviation Enter an alphanumeric string to identify the level the floor is on. For example, enter G for garage or 3 for the third floor. Assignable area Displays only the area of the floor that is assignable to users. Usable area Enter only the area of the floor that is available for the creation of spaces. Gross area Enter the total area of the floor, including non-usable and non-assignable spaces. Area unit Select the unit used for defining the space size: square feet or square meters. Note: The Area unit assigned to all spaces must be consistent for the rollup calculations to work properly. See Space roll up calculations on page
146 Field Current occupancy Displays the number of users currently associated with the space. Calculation is generated using business rules on the Associated User [m2m_fm_user_to_space] table. Note: This field depends on the Occupiable option being selected. Max occupancy Displays max occupancy of the floor based on rollup calculations from the spaces below it. Note: This field depends on the Occupiable option being selected. Percent occupied Displays the percentage of total space occupied on this floor based on rollup calculations from the spaces below it. Note: This field depends on the Occupiable option being selected Enter a number to define the minimum level of utilization for the floor or level. Utilization max Enter a number to define the maximum level of utilization for the floor or level. Click Save and the Related Links section displays. 5. Utilization min Show Floor Plan: Click to display a floor plan of the selected floor. View Facilities Schedule: Click to create a facilities schedule blackout and prevent work from being performed in a defined area for a scheduled time period. The Facility Spaces section displays with a list of spaces that are part of the floor or level. Click New to add a facility space or click a facility space to edit. Continue with one of the following options. Option Action To add the floor Click Submit. To update the floor details Click Update. Add or edit a space Spaces are assigned to floors or levels, and can be cubicles, conference rooms, restrooms, gymnasiums, elevators, parking spaces, and so on. Spaces are assigned users and assets, and have the most data defined. Role required: admin 146

147 1. 2. Navigate to Facilities > Space Management > Space. Continue with one of the following options. Option Action To add a space Click New. The Facility Space interceptor page displays. Select the type of space you are creating. To edit the details of a space 3. Click the name of the floor or level you want to edit. Fill in the fields on the form, as appropriate. Table 35: Facility Space form Field Display name An auto-generated label based on the Name, Building, and Floor entries. For example, if the Name is 1002, the Building is Santa Clara Building 1, and the Floor is Floor 1, the Display name is Santa Clara Building 1 - Floor Name Enter a descriptive name for the space. Building Select the building for which you are defining the space. Floor Select the floor for which you are defining the space. Area Enter the value associated with the space size and the Area unit field: square feet or square meters. 147
148 Field Area unit Select the unit used for defining the space size: square feet or square meters. Note: The Area unit assigned to all spaces must be consistent for the rollup calculations to work properly. See Space roll up calculations on page 135. Cost center Select the cost center for the space. Cost centers are defined in IT Cost Management and require the../../cost-management/task/ t_activatingcostmanagement.dita#t_activatingcostmanag This field is a reference to [cmn_cost_center] table for charge backs reasons. Department Select the department for the space. Departments are defined in User Administration. This field is a reference to the [cmn_department] table. Status Select the status of the space (active, planned, maintenance, retired). Availability Select the availability of the space (vacant, partially occupied, at capacity, over capacity or reserved). Note: This field depends on the Occupiable option being selected. Current occupancy Displays the number of users currently associated with the space. Calculation is generated using business rules on the Associated User [m2m_fm_user_to_space] table. Note: This field depends on the Occupiable option being selected. Max occupancy Enter the maximum capacity of users for this space. Note: This field depends on the Occupiable option being selected. Percent occupied Displays the percentage of total space occupied. Note: This field depends on the Occupiable option being selected. 148
149 Field Occupiable Select this check box if the space can be occupied. See Space roll up calculations on page 135. Use the Associated Users and Assets related lists to view or add users and assets to the space. Use the Associated Departments related list to view or add which departments are associated with this space. Continue with one of the following options. Option Action To add the space Click Submit. To update the space details Click Update. Add or edit a zone Zones are a logical collection of spaces that can be shared across campuses, floors, or buildings. Examples of zones are: Chiller 4 Zone, Guest Wi-Fi Zone, AC 1 Zone, Power Circuit 3 Zone, and so on. Role required: admin There are no restrictions on zones. They can cross campuses and buildings. In addition, spaces can belong to one or more zones Navigate to Facilities > Space Management > Zone. Continue with one of the following options. Option Action To add a zone Click New. To edit the details of a zone Click the name of the zone you want to edit. Fill in the fields on the form, as appropriate. Table 36: Facilities zone form 4. Field Name Provide a descriptive name for this zone. Short description Provide a more descriptive name for this zone. Continue with one of the following options. Option Action To add the zone Click Submit. To update the zone details Click Update. Delete a campus Delete all buildings assigned to a campus, before deleting the campus itself. Role required: admin 1. Navigate to Facilities > Space Management > Campus. 149
150 2. 3. Click the name of the campus you want to delete. Click Delete. Note: If the campus has any buildings defined for it, a warning box appears identifying those buildings. Delete the buildings before deleting the campus. Delete a building Before deleting a building, delete any floors or levels defined for it. You must delete all the floors in a building before deleting the building itself. Role required: admin Navigate to Facilities > Space Management > Building. Click the name of the building you want to delete. Click Delete. If the building has any floors defined for it, a warning box opens and identifies the floors. Delete the floors before deleting the building. Delete a floor or level Before you can delete a floor, you must first delete any spaces defined for it Navigate to Facilities > Space Management > Floor. Click the name of the floor you want to delete. Click Delete. If the building has any assets associated with it, a warning box opens. If you click Delete, the associated asset is deleted. Delete a space Spaces can be deleted from any floor or from another space as long as the space you want to remove does not have other spaces associated with it. For example, if you want to delete a space that contains several offices, those spaces must be deleted before the parent space can be deleted Navigate to Facilities > Space Management > Space. Click the name of the space you want to delete. Click Delete. If the space has any assets associated with it, or if the space is associated with another space, a warning box opens. If you click Delete, the associated asset or space is deleted. Delete a zone When deleting a zone, any associated assets or spaces is also deleted. Role required: admin Navigate to Facilities > Space Management > Zone. Click the name of the zone you want to delete. Click Delete. Note: If the space has any assets associated with it, or if the space is associated with another space, a warning box opens. If you click Delete, the associated asset or space is deleted. Run transform to update data Running a transform exports information from your records into an.xls file. That data can be imported into the space management application. 150
151 Role required: admin An example transform map is included with the demo data. Load the demo data on a pre-production instance, go to campuses, and select the Westfield Valley Fair campus. Open the Westfield Valley Fair V map set. Use the westfield_transform_example.xls file as an example. Process the campus, then run the transform Navigate to System Import Sets > Run Transform. Click Create and load an import set first. Fill in the fields on the form, as appropriate. Table 37: Create or add to an existing import set table Option Import set table Selections are create table or existing table. Label Enter a label for the new table. Note: This field depends on the Create table option being selected. Name The name is automatically generated from the Label you enter. Note: This field depends on the Create table option being selected. Import set table All saved import set tables are listed in a list. Note: This field depends on the Existing table option being selected. Source of the import Selections are file or data source. File Browse to the location of the file. Note: This field depends on the File option being selected. Sheet number Identifies the sheet number used for the transform. Note: This field depends on the File option being selected. Header row Identifies the row number used as the header row in the transform file. Note: This field depends on the File option being selected. Data source All data sources are listed in a list. 151
152 Click Submit. Click Run transform. Click Transform. All the spaces are populated in space management from the space details in the transform map. Navigate to Space Management > Spaces Review all space details to be certain all extra details were imported. Transform map A transform map is an.xls file that allows you to add spaces or details about spaces from other sources into the space management application. Transform maps must be run separately for floors and spaces. Unique spaces are identified based on a combination of the building name, floor, and space name and must be included in the transform map. For your convenience, provides two transform maps for your use: imp_facilities_data imp_facilities_level_data For instructions, see Run transform to update data on page 150. Facilities move management Employees and managers can request single user moves. Members of the facilities staff can use the enterprise move tool to plan and execute large move scenarios involving multiple people, assets/cis, and departments. The Facilities Move Management application benefits your organization in the following ways: Streamlines the move process from request through execution Reduces costs by avoiding unnecessary moves Simplifies move planning through increased visibility of space resources Provides reporting and insight into in-progress moves Improves service delivery through better communication and coordination throughout a move process Facilities move requests Both employees and managers can request a move, which initiates the workflow of tasks to complete that move. Any user can submit a move request through the Facilities catalog. Users with the Facilities staff role can also create and update facilities requests using the move request form directly. Facilities move management works in the following manner: 1. A administrator activates and configures the Facilities Move Management application according to your organization's needs and requirements. 2. A facilities administrator creates your organization's campus and configures the spaces and assets contained within. 3. Users submit facilities move requests, including the name of user to be moved, the move from location, and the move to location. 4. The move workflow creates tasks and updates the state of the move request. 5. Facilities staff members perform the tasks necessary to fulfill the move request. 6. The end of workflow script runs to update the user location and the location of all the asserts that were requested to be moved. 152
153 Create a move request through the facilities catalog Users can submit move requests by selecting from the categories of the Facilities catalog. Role required: none Navigate to Self-Service > Facilities Catalog. Select the Space Management category. Select the subcategory for your move request. Fill in the fields on the form, as appropriate. Note: Some request forms do not contain every field described here. See../../../use/usingforms/concept/c_UsingForms.dita#c_UsingForms. Table 38: Facilities catalog move request form Field Requested by The name of the person submitting this request. User to be moved Select a name if you are opening this request on behalf of another user. From location The current location of the user. To location The new location for the user. Requested move date Select a date for the move request to be performed. Additional comments Enter additional information about the move that you feel is important for the facilities staff to know. Options Security badge update Select this check box if the user being moved requires changes in location access. Boxes Select this check box if the user requires that boxes be delivered before their move. Move assets Select this check box if the user being moved requires assets to be moved along with them. Assets to be moved Provides filtering and condition statements to help narrow your search for assets. Move assets to the Selected assets list. Note: This field depends on the Move assets check box being selected. 5. Click Submit. Create a move request with the move request form Facilities staff members can create move requests using the move request form. 153
154 Role required: facilities_read Associating a CI to a move request helps your facilities team understand which services or assets are affected in a move. You can also use this form to include extra comments and work notes for the move request Navigate to Facilities Move > Requests > Create New. Fill in the fields on the form, as appropriate. Table 39: Move request form fields Field Number An auto-generated number that identifies the move request record. Priority The priority that describes the importance of this request. By default, all requests are set to 4-Low. Move date Select a date for the move request to be performed. State The state that describes what work stage this request is in. By default, all requests are set to Open. Opened Auto-filled with the date and time the request was opened. Assignment group Select the group from which an agent is assigned to the request. You can select only assignment groups associated with the service management application you are using. Note: If you selected the Use the dispatch queue option on the Facilities Management Configuration screen, only users with the Dispatcher role can edit this field. If you did not select the Use the dispatch queue option, all users except those users with the Basic and Initiator roles can edit this field. Requested by The name of the requester. 154
155 Field Assigned to Select the agent to assign the request to. If you already selected an assignment group, you can only select agents who belong to that group. If notifications are enabled on your instance, a built-in notification automatically sends an to this user when you save the request record. Note: If you selected the Use the dispatch queue option on the Facilities Management Configuration screen, only users with the Dispatcher and Agent roles can edit this field. If you did not select the Use the dispatch queue option, all users except those users with the Basic and Initiator roles can edit this field. If you selected an assignment group and want to assign the work to a new user, click the reference lookup icon next to Assigned to, click New, and create a user. Be aware, however, that you must navigate to User Administration > Groups and add the user to the assignment group before the request can be assigned. Template [Required] The workflow template to be used for the fulfillment of this request. Short description [Required] A brief summary of the request. Optionally, you can click the search knowledge icon to view articles in the knowledge base relating to this product model, plan, or CI. Doing so could provide a solution related to the reason you are submitting this request. Move Details User to be moved Select a name if you are opening this request on behalf of another user. From location The location from which the user is moved. To location The location to which the user is moved. Requested move date Select a date for the move request to be performed. 155
156 Field Boxes Select this check box if the user requires that boxes be delivered before their move. Security badge update Select this check box if the user being moved requires changes in location access. Move assets Select this check box if the user being moved requires assets to be moved along with them. Work Notes A detailed description of the request. The description is always visible to the submitter. Therefore, if you add or modify the description for a request that another user submitted, the user is able to see the changes. Work notes Extra notes that you want to share between users who can access the request form. A user who submits the request through the service catalog cannot see the work notes. Note: To specify an Assignment group, and assign the work to a user not in your user table, click the magnifying glass icon in the Assigned to field. Then click New, and create the user record. Be aware, however, that the new user is not recognized. 3. Continue with one of the following options. Option Action To assign the move request to yourself Click Assign to me. To initiate the workflow Click Ready for Work. To save the form without initiating workflow Click Save. Facilities move request templates The facilities staff adds templates to the facilities catalog, so users can select from subcategories for their request type. Enterprise move Facility teams use Enterprise Move to plan and execute move scenarios in support of large or complex employee move requests. The Facilities enterprise move process is as follows: 1. A facilities administrator uses the Move Planning Tool to create scenarios of potential moves. A facilities administrator assigns delegators and move groups to each scenario. A facilities administrator reviews the scenarios and chooses the one to execute. 2. Delegators access their assigned move scenarios and assign users to seats. 3. Facilities staff members execute and facilitate the move through the Enterprise Move workflow. 156
157 State changes are handled by UI actions and a workflow, which contains a required approval from facilities_admin or move_admin. Note: The Service management workflow can be edited to meet customer-specific processes. Move planning tool The Move Planning tool displays occupancy totals by campus and floor. Facilities and move administrators can add or remove users to and from scenarios while planning a move. Groups of people are selected and moved by department (department on sys_user record) or by direct manager (manager on sys_user record). The move planning tool also contains three tabs to help in enterprise move planning. Table 40: Move planning tool tabs Tab Scenarios Create or change scenarios Change the campus you are viewing See current seating capacity Planning Choose how you want to select groups to move: by department or manager Select a group and color that group on the map Display Select how segments are displayed Hide buildings and floors 157

158 Figure 5: Move Planning Tool 158
159 Enterprise move scenarios Move scenarios are used by the Facilities team to see the implications of a move in relation to other moves. Multiple scenarios can be created. Predictive availability considers planned seating changes for the selected scenario (on or off current level). Plan a move scenario Facilities administrators create move scenarios when planning and executing large-scale moves. When people are added to the scenario, move_detail records are created. These records contain all the information about the potential move for a specific person, such as the reference to the sys_user, destination floor, and destination building. Role required: move_agent or facilities_staff Navigate to Enterprise Move > Move Planning Tool. Click Create New Scenario. Fill in the fields on the form, as appropriate. Table 41: Enterprise Move Scenario Field Name Provide a name for the scenario. Notes Enter additional information about the move that you feel is important for the facilities staff to know. Click Submit. On the right-side pane, on the Scenarios tab, select the campus this move applies to. Occupancy totals for the campus you selected are displayed per floor in bar charts, showing how many seats are assigned to a department or manager. The total number of open seats are shown also. Click the Planning tab, and select the User Manager or User Department view. Note: User Department refers to the department of the user (sys_user) that is sitting there. It is not showing the department that is assigned the space Select the manager or department on the floor bar chart. Click a highlighted segment on one of the floors. Fill in the fields on the form, as appropriate. Table 42: Add Users to Scenario form Field Destination building The building you are moving employees to. Note: If no building or floor is specified, the user is moved to the Lounge. Destination level The floor you are moving employees to. 159
160 Field Move group Enter a name for the group you are planning to move. Note: Use a unique name to identify a group. After clicking Submit, the group name is saved and can be used again. Move delegator The person responsible for assigning users to open spaces in a scenario. Refer to Activate a delegator on page To add or delete users in this scenario, click the arrow to expand the Users tab. 11. Select users and click Add Users to Scenario. Users added to the scenario are shown in the pending assignments in the floor details. 160

161 Figure 6: Pending assignment 161

162 Lounge When a facilities administrator sets up a move scenario without specifying the destination building or floor, the users are moved to the lounge. Figure 7: Move Planning Tool Lounge Activate a delegator Delegators assign users to seats in a scenario. Activating the delegator sends an notification request that they assign seats using Move Details. 162
163 Role required: facilities_staff or move_basic Navigate to Enterprise Move > Enterprise Move Scenarios. Select the move scenario. Click the Enterprise Move Delegators tab to review the list of delegators. Add or delete delegators, as necessary. Click Activate Delegators. Move delegators Facilities administrators assign move delegators to assign users to locations. Move delegators are usually managers or someone assigned by the manager, to determine which locations users are moving into. Delegators assign locations on the floor plan, which are added to the move scenario and carried over to the move request and subsequent move tasks. Assign users to seats Delegators receive an notification requesting that they assign seats using Move Details. Role required: admin Navigate to Self-Service > Floor Plan. On the right-side pane, on the Moves tab, select the scenario. 3. Click the destination link for which there are pending assignments. The users with pending destinations are listed. 163
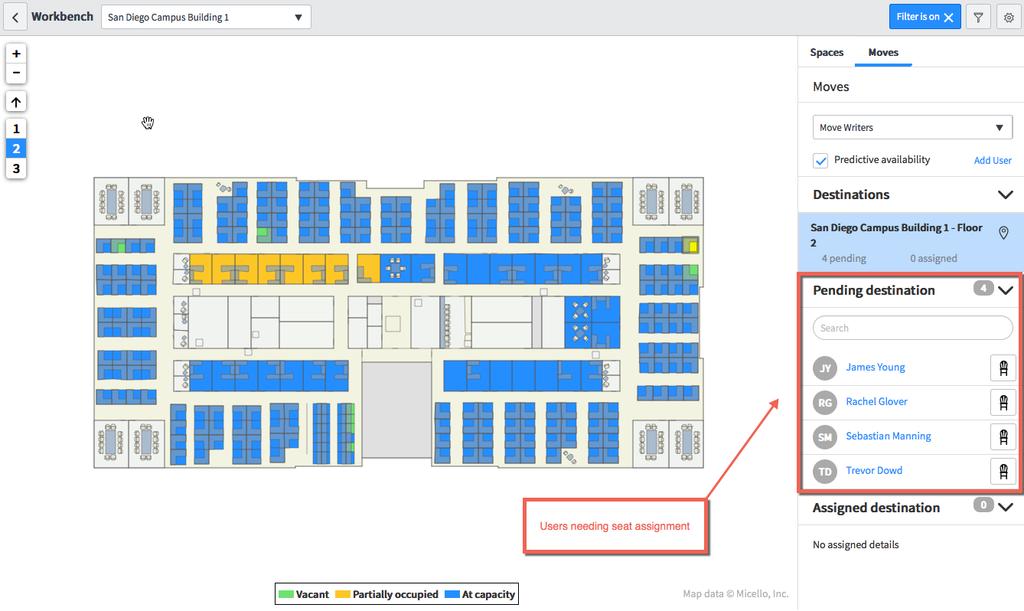
164 164
165 4. 5. Click the icon beside a name and click a destination space on the map. The user and location are added to the Assigned destination link. Continue assigning spaces in this manner. You are finished assigning spaces when all users in the Pending destination list have been moved into the Assigned destination list. 165
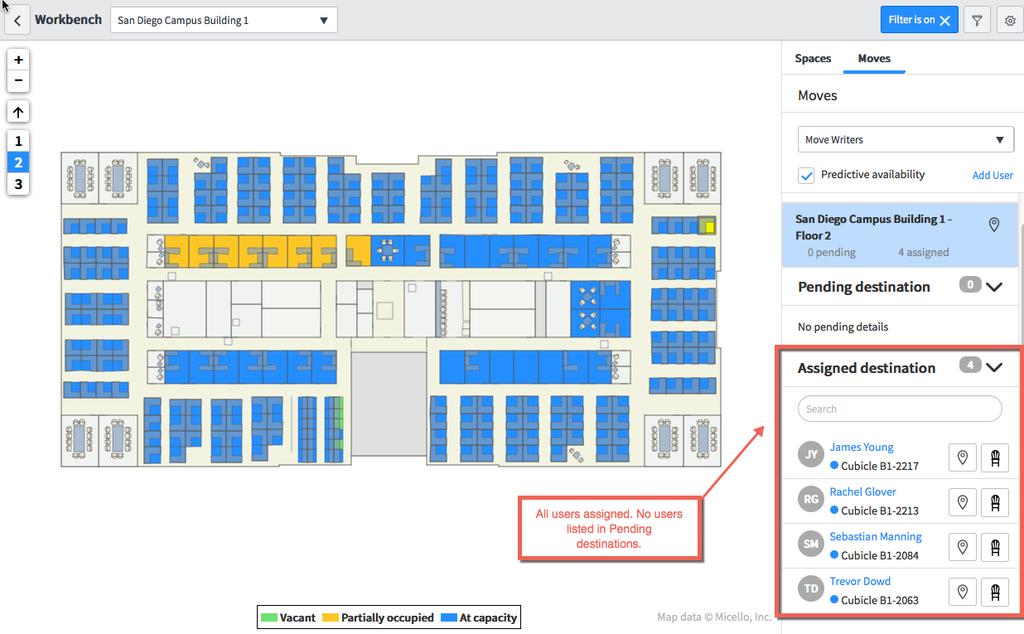
166 166
167 Enterprise move details Enterprise move details are created when people are added to the scenario. Move details contain information about the move for a specific person, such the destination floor, destination building, need for moving boxes, or a security badge update. Duplicate details are not allowed (same user, scenario, and from_location). The same move detail can be in multiple scenarios. Updates can be made to move details from the list or form view. 167
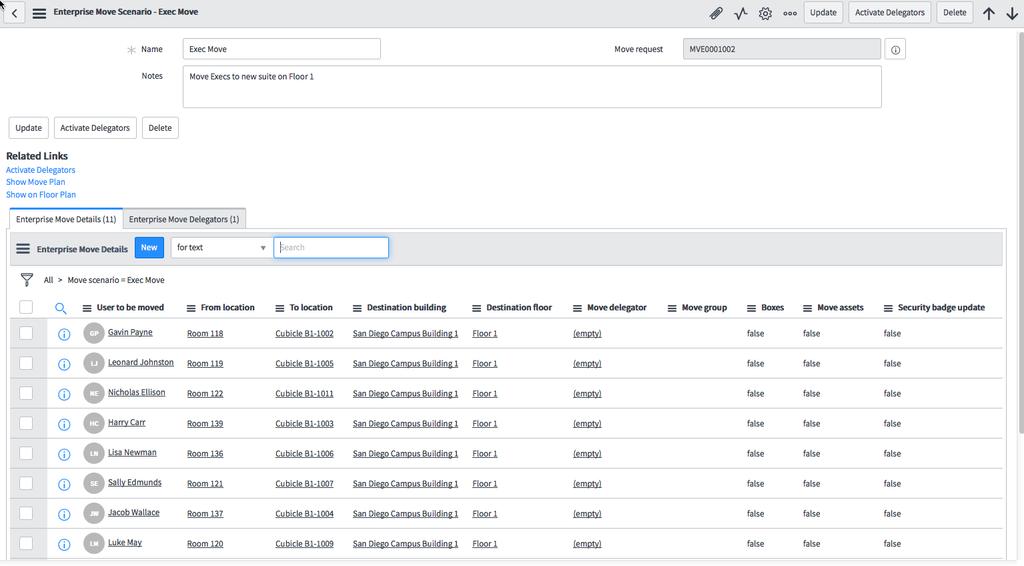
168 168
169 Enterprise move requests Enterprise move requests are managed by a workflow, which contains required approvals from facilities_admin or move_admin. State changes are handled by UI actions. Enterprise move tasks Before a move can be executed, destination locations for all users must be complete. Move tasks are based on check boxes on the request form. One task per type: Move users and assets Update security badge Groups or waves of users can be moved at a time. Useful if the move will be executed over a period of time with different groups moving at different times. One per user moving. Useful for tracking actual users moves in detail. When the user move task is closed, the location of the users and their assets are updated. Interactive facility maps The interactive facility maps, including the Workbench and the Floor Plan, provide a campus-level hierarchy, improving your facilities request tracking and space management. Decision makers in your organization can track, manage, and analyze spaces in support of organizational needs and users can find other users and assets. The interactive facility maps offer the following benefits: The workbench provides the exact location of a facilities request on a campus map, so the facilities team knows exactly where users encountered the issue. Maps are available to anyone in the organization, so users can search for people or spaces on the map. Configuration items (CIs) can be identified on each request identifying which items in your infrastructure are also impacted. Zone creation allows you to see what spaces will be affected by particular actions, like construction or maintenance of equipment that services those zones. Define spaces with capacity metrics (gross space, usable space, assignable space, occupiable space) for reporting and financials. Map filters Users can filter the map to determine how various spaces are colored. There are two types of map filters: Simple filter: Allows you to quickly highlight spaces based on conditions. Saved filter: Allows advanced filtering when you want to highlight spaces, based on conditions not supported by a simple filter. Simple filters Simple filters are available for the Workbench and the floor plan. Simple filters allow you to quickly highlight spaces based on conditions. 1. From Workbench, click the icon. 169
170 Table 43: Simple filter selections Category Options Show Spaces Deselect All Lists spaces queried from the tables that extend or include [fm_spaces] Show color by None Department Availability Departments Lists departments queried from the tables that extend or include [fm_m2m_department_to_space] Zones Lists zones queried from the tables that extend or include [fm_m2m_space_to_zone] Availability Saved filters A saved filter allows advanced filtering when you want to highlight spaces, based on conditions not supported by a simple filter. You can set a filter showing all the printers on a map and share that filter with other users. Private filters can be saved without sharing those filters with others. 170
171 Figure 11: Facilities map filter Create a map filter Filters can be created against any mappable space (fm_space), asset, associated user, CI, or task with a location defined. Role required: admin Navigate to Space Management > Map Configuration > Filters. Click New or an existing map filter. 171
172 3. Complete or edit the form. Option Name Enter or edit the name of the map filter. Table Select or edit the table the map filter is accessing information from. Location field Only shows when the table selected is not associated with a location. Note: The table selected determines which fields show. You can dot-walk to any field from the selected table. Group by Group by a selected field from the table selected. You can color each matching space based on this group. For example, you can group by availability status from the Facility Space [fm_space] table. Note: The table selected determines which fields show. You can dot-walk to any field from the selected table. Condition Select or edit the conditions that define the map filter. The table selected determines what conditions are available. 172
173 4. Option Public Check to make the filter available to others. Roles Select or edit the roles that are required to view this filter on the workbench. Enter or edit a description of the map filter. Click Save and the Related Links section shows. 5. Show on Floor Plan: Click to show a floor plan with the map filter applied. Click Submit for a new map filter or Update for an existing map filter. Enhanced labels Enhanced labels allow the end user to show any information on any mappable space (fm_space), as the space label. Users choose to display the occupant name, the department name, or other custom field as the default label. 173

174 Figure 12: Enhanced Labels The label selector on the interactive map gives the user all fields on fm_space including custom, userdefined fields, allowing any piece of information to be a label. In addition to fm_space two special pieces of information are shown: Sys_users assigned to space based on the fm_m2m_user_to_space table 174
175 Departments assigned to the space based on the fm_m2m_department_to_space table Map settings Map settings allow the facilities staff or users to choose the appearance of their floor plan. Find a space or user on a mobile interface Quickly find a conference room, office, cubicle, or another employee in your organization on a mobile interface. Role required: none Tap the icon to expand the side tab. In the User/Space search field on the Spaces tab, enter the search criteria and tap return. Matching users and spaces are listed by current level, campus, and other campuses. 175

176 3. Perform one of the following options. 176
177 Result Action To see the space or user details Tap the link for the space or user. To see the location of the space or user on the floor plan Tap the pin user or space. icon, beside the link for the Find a space or user All users in your organization, regardless of their role, can search for other users and spaces. The results are ordered by current level or floor, current campus, and other campuses. Role required: none Perform one of the following options. Type of user Action User Navigate to Self-Service > Floor Pan. Facility role Navigate to Facilities > Workbench. Select User/Space in the search criteria box. To help narrow your search results, you can select the campus, building, and floor number for your search. Note: The facilities administrator configures the number of search results returned. See Workbench configuration on page
178 4. 5. On the Spaces tab, enter the user's name or space name in the search field. Press the Enter key to submit your search criteria. Search results are returned in the following order: 6. Current Level Other in Campus Other Campuses Perform one of the following options. 178
179 Result Action To see the space or user details Click the link for the space or user. The details for that user or space open in a separate form. Note: If the location is a space, users and facilities staff can create facilities requests from the room information. See Create a facility request from the floor plan on page 183. To see the location of the space or user on the floor plan Click the pin user or space. icon, beside the link for the Find an asset or CI All users in your organization, regardless of their role, can search for assets and CIs. The results are ordered by current level or floor, current campus, and other campuses. Role required: none Perform one of the following options. Type of user Action User Navigate to Self-Service > Floor Pan. Facility role Navigate to Facilities > Workbench. Select Asset/CI in the search criteria box. To help narrow your search results, you can select the campus, building, and floor number for your search. Note: The facilities administrator configures the number of search results returned. See Workbench configuration on page
180 4. 5. On the Spaces tab, enter the asset or CI in the search field. Press the Enter key to submit your search criteria. Search results are returned in the following order: 6. Current Level Other in Campus Other Campuses Perform one of the following options. Result Action To see the asset or CI details Click the link for the asset or CI. The details for that asset or CI open in a separate form. 180
181 Result To see the location of the asset or CI on the floor plan Action Click the pin asset or CI. icon, beside the link for the Show any task on a map Custom tables that are extended from task can be created, shown, and managed on the interactive map. The location field on the task, must be a mappable space (fm_space). There are some location fields on task that may have a reference qualifier that does not allow fm_space be used. Role required: facilities_admin to edit, create, delete records Check that the location of the task is mappable (fm_space). Check that the reference qualifier on the location field allows fm_space. Navigate to Facilities > Workbench Configuration > Map Tasks Click New. All the items that extend the task are available. Do one of the following actions: Option To show the task on the map Set Show task to true To hide the task from the map Set Show task to false These tasks display on the Task tab on the map. 181

182 Figure 13: Tasks Tab 182
183 Facilities Floor Plan Users use the floor plan find other users, spaces, and assets. Users can also create facilities requests from any space on the floor plan. Use the floor plan as follows: 1. A administrator activates and configures the Facilities Floor Plan according to your organization's needs and requirements. 2. A facilities administrator creates your organization's campus and configures the spaces and assets contained within. 3. Users submit facilities and move requests and those request locations are tagged on the floor plan. 4. Users can set filters to see particular spaces, users, and assets. 5. From the workbench, administrators qualify facilities requests. This is the process of checking that the information in the request is complete, so facilities tasks can be assigned. 6. Administrators organize requests into tasks that must be done before the request is complete, and dispatch those tasks. 7. Facilities staff members perform the tasks necessary to fulfill the request. 8. The assigned facilities staff members close their tasks, allowing the request to be closed. Create a facility request from the floor plan All users in your organization can create any facility requests that your facilities admin [facilities_admin] has enabled on the floor plan view. Role required: none Perform one of the following options. Choice Action To search for a space location Find a space on the floor plan. If you know the space location Click the space on the floor plan. On the Spaces tab, under the room information details and Related Links section, click Create Facilities Request. Note: You can also right-click the space link and select Create Facilities Request. 183
184 Table 44: Facilities request form 3. Field Location The specific location from the floor plan. Short Enter a short description summarizing the facilities request. You can overwrite the default description. Detailed Enter a detailed description of the facilities request. Requested buy The user name of the person making the request displays. Additional comments Add additional comments if necessary. Click Submit and the Floor Plan form displays. Facilities Workbench Members of the facilities staff use the workbench to interact dynamically with the floor plan. Users have access to the floor plan (but not the workbench), from which they can find other users and spaces. Use the workbench as follows: 1. A administrator activates and configures the Facilities Visualization Workbench application according to your needs and requirements. 2. A facilities administrator creates your campus and configures the spaces and assets contained within. 184
185 3. Users submit facilities and move requests and those request locations are tagged on the workbench. 4. From the workbench, administrators qualify facilities requests. This process checks that the information in the request is complete, so facilities tasks can be assigned. 5. Administrators organize requests into tasks that must be done before the request is complete, and dispatch those tasks. 6. Facilities staff members perform the tasks necessary to fulfill the request. 7. The assigned facilities staff members close their tasks, allowing the request to be closed. Note: Facilities Workbench is available on a mobile device, but with limited capabilities. Find a move request Facilities and move staff can locate and manage move requests from the Moves tab within the workbench. Role required: move_basic The Move tab is only visible when the Facilities Move Management plugin (com.snc.facilities_service_automation.move) has been activated Navigate to Facilities > Workbench. To help narrow your search results, you can select the campus, building, and floor number for your search. Note: The facilities administrator configures the number of search results returned. See Workbench configuration on page
186 By default, facilities administrators can see all move requests for the selected level displayed in the 3. right side pane. Yellow pins ( ) depict those request locations on the floor plan. Continue with one of the following options. Option Action To see all move requests assigned to you Select Assigned to me check box. To search for a move request 1. On the Moves tab, enter the move request number, the name of the user to be moved, or the name of the user who made the request. 2. Press the Enter key to submit your search criteria. 186
187 Search results are returned in the following order: 4. Current Level Other in Campus Other Campuses Continue with one of the following options. Option Action To see move request details Click the move request number. To edit the From or To space 1. Click the edit ( To: field. 2. ) icon beside the From: or Click a space on the floor plan to change its location. 3. Click the save ( ) icon. To see the location on the floor plan Click the pin ( ) icon. Find a facilities request Facilities administrators can locate and manage requests from the Requests tab within the workbench. Role required: facilities admin Navigate to Facilities > Workbench. To help narrow your search results, you can select the campus, building, and floor number for your search. Note: The facilities administrator configures the number of search results returned. See Workbench configuration on page
188 By default, facilities administrators can see all requests for the selected level displayed in the right side 3. pane. Red pins ( ) depict those requests on the floor plan. Continue with one of the following options. Option Action To see all requests assigned to you Select Assigned to me check box. To search for a request 1. On the Requests tab, enter the request number or the name of the user who made the request. 2. Press the Enter key to submit your search criteria. 188
189 Search results are returned in the following order: 4. Current Level Other in Campus Other Campuses Continue with one of the following options. Option Action To see request details Click the request number. To see tasks associated with a request Click the task number under the request. To see the location on the floor plan Click the pin ( ) icon. Edit a zone Facilities administrators and staff can edit existing zones from the Zones tab within the workbench. Role required: facilities_staff Navigate to Facilities > Workbench. On the Zones tab, click Edit. Select a zone from the choice list. The spaces belonging to that zone are shown on the floor plan, highlighted in blue. Continue with one of the following options. Option Action To remove a space from the zone Click a space within the zone. Note: The space turns red indicating that it will be removed when the update is applied. To add a space to the zone Click a space outside the zone. Note: The space turns green indicating that it will be added when the update is applied. 5. You can select other floors, buildings, and campuses while making edits to a zone. 189

190 6. When finished making edits, click Apply edits. Field The Field application helps organizations manage work tasks of any kind that need to be performed on location. Use Field to match tasks to agents based on agent skills, geographic territory assignments, and available inventory. Agents complete assigned tasks and then record the details, including travel and work time. Explore Set up Administer Field release notes Field overview Activate Field Service Management Activate additional plugins for Field Administer central dispatch Create work order templates Create and edit work order SLAs Create field service groups 190
191 Field service process Task vs request driven processing on page 98 Configure Field Service Management Configure central dispatch Create a work order on page 208 Approve a work order on page 219 Create a work order task on page 230 Qualify a work order task on page 219 Assign a work order task on page 276 Dispatch a task from the queue Automatically dispatch a task at qualification on page 221 Create request tasks on page 55 Use Develop Troubleshoot and get help Accept or reject a work order task on page 293 Pick up an unassigned task on page 301 Record asset usage on page 305 Close a work order task as complete on page 309 Close a work order task as incomplete on page 309 Use the agent calendar Work order questionnaires Dynamic scheduling Components installed with Field on page 380 Additional plugins for Field on page 196 Customize state flows Create a knowledge article for a work order template on page 240 Content packs for Field on page 379 Ask or answer questions in the community Search the HI knowledge base for known error articles Contact Support Field overview Use the Field application to manage work requests that are performed on location by field service agents. Use Field to record details such as necessary skills and required parts in work orders and work order tasks and then match tasks to agents based on skill, location, and inventory. Field service agents perform the assigned tasks and track their travel and work time, part requirements, and asset usage. Integration with Field is integrated with the (SM) application. This integration helps you manage settings for all of the -based applications such as Facilities Service Management and Finance. 191
192 Field user roles Several different roles are used to manage the field service process. The following list provides a brief description of the key roles and what they do. User role Administrator Manages data and performs setup and configuration tasks. Users with this role can also create, approve, qualify, and dispatch work orders and tasks. [wm_admin] Initiator [wm_initiator] Approver user [wm_approver_user] Qualifier [wm_qualifier] Dispatcher [wm_dispatcher] Agent [wm_agent] Creates work orders and assigns qualification groups. Approves work orders before they are qualified or assigned to field service agents. Qualifies work orders by assigning dispatch groups, creating work order tasks, and adding part requirements. Schedules tasks, adds necessary parts, and assigns tasks to field service agents. Users with this role can also create tasks and add and source parts as needed. Performs work at customer locations and records details in the work order form, including parts used and incidental expenses. Two combination roles can also be used: wm_initiator_qualifier wm_initiator_qualifier_dispatcher For a more detailed description, see User roles installed with Field. Work orders and work order tasks Work orders are records that store information about requested work, including customer names and addresses, locations where work is to be performed, and any associated configuration items (CIs). Work orders can include one or more tasks that contain specific details about the work to be performed, such as required agent skills and part requirements. Work order and work order task states Work orders and work order tasks move through several states from creation to completion. Different user roles are required to move work orders from one state to the next, with each role providing an important part of the process. These roles work together to define work orders, add the necessary technical information, break the work down into specific tasks, and assign tasks to dispatch groups and field service agents. After accepting assigned tasks, agents order and pick up parts, perform the work, and record the details. 192
193 The state of a work order is displayed on the work order and task forms in the process flow formatter and also in the State field. Table 45: Work order states Work order state Draft The initiator (wm_initiator) creates a work order and adds information to the work order form about the work to be done. Awaiting Qualification The work order is ready to be reviewed by the qualifier (wm_qualifier). Qualified The qualifier (wm_qualifier) has added any necessary technical information to the work order, created tasks, added part requirements, and assigned a dispatch group. Assigned The dispatcher (wm_dispatcher) assigns one or more of the work order tasks to a field service agent. Work in Progress The agent (wm_agent) accepts the assigned work order task and begins work. Closed Complete The agent completes the work in the assigned task. Once all of the tasks for a work order are complete, the state of the work order is set to complete. Closed Incomplete The agent does not complete the work in the assigned task. If one or more tasks for a work order are closed incomplete, the state of the work order is closed incomplete. Cancelled The work is no longer necessary or the work order is a duplicate. A reason for cancelling the work order must be added to the Work notes field. Table 46: Work order task states Work order task state Draft The qualifier (wm_qualifier) creates a task for a work order. Pending Dispatch The qualifier (wm_qualifier) assigns a dispatch group to the work order task. Assigned The dispatcher (wm_dispatcher) assigns the work order tasks to a field service agent. Accepted The field service agent (wm_agent) accepts the assigned task. The agent can also reject a task. If rejected, the task state returns to Pending Dispatch. 193
194 Work order task state Work in Progress The field service agent (wm_agent) clicks Start Travel on the Work Order Task form, followed by Start Work, and begins the work described in the task. Closed Complete The field service agent (wm_agent) completes the work for the assigned task, adds a description in the Work notes field, and clicks Close Complete on the Work Order Task form. The agent can also click Close Incomplete and add a reason for the incomplete closure. Closed Incomplete The field service agent (wm_agent) cannot complete the work for the assigned task, adds a reason for the incomplete closure in the Work notes field, and clicks Close Incomplete. Cancelled The work order task is no longer necessary or is a duplicate of another task. The field service agent (wm_agent) adds a reason for the cancellation in the Work notes field and clicks Cancel. Work locations Field relies on defined locations for qualifying work orders and tasks and assigning dispatchers and agents. As part of setting up the application, you can define your locations and then create qualification, dispatch, and assignment groups based on those locations. Section 508 compliance features Users can view and interact with the following Field features using Section 508 compliance features: Central Dispatch Manager Calendar Agent Calendar See Set up Section 508 compliance features for more information. Field service process The Field application streamlines the way that tasks are qualified and dispatched and how parts are sourced. Additional automated features enable dispatchers to route and dispatch tasks quickly, using precise geolocation to create schedules. These features are explained where they occur in the following flow: Create qualification, dispatch, and assignment groups. These groups are sets of users or agents, filtered by location, who can perform specific field service tasks. Establish service level agreement (SLAs). 194
195 Activate the Field Geolocation Demo Data plugin (com.snc.work_management_geolocation.demo). Geolocation allows dispatchers to track agents with greater accuracy. Only users with the admin role can activate this plugin. Create and qualify work orders. Qualifying a work order is the process of checking that work order information is complete so work order tasks can be assigned. Organize work into tasks that must be done to complete the work order. Source parts and dispatch work order tasks to agents based on criteria such as skills and location. Have agents execute the work order tasks assigned to them and track the task completion. Access and perform work order tasks from a mobile device. Agents can accept and reject tasks, track travel and work time, and access all the information they need about the work to perform and assets to pick up. Activate Field The Field (com.snc.work_management) plugin is available as a separate subscription. This plugin activates related plugins if they are not already active. After Field Service Management is activated, you can also activate additional plugins that provide demo data and enable a variety of features. Role required: admin The Field plugin activates these related plugins if they are not already active. Table 47: Plugins for Field Plugin Core Installs the core items used to allow other service-related plugins to work, such as Field and Facilities. [com.snc.service_management.core] Central Dispatch [com.snc.central_dispatch] Special Handling Notes [com.sn_shn] Assignment Workbench [com.snc.assignment_workbench] Field Service Signature Pad [com.snc.wo_signature_pad] Agent Schedule [com.snc.agent_schedule] Provides dispatchers with drag-and-drop capabilities to assign and dispatch tasks. It also provides search and filter capabilities, which enable dispatchers to focus on specific tasks and agents. Enables users to quickly view important information about records. Workbench to assign work to individual agents easily so that work gets done efficiently and effectively Captures a customer signature for closed work orders. Creates a PDF of the work order that includes a summary of the completed work and the name and signature of the customer. Enables customer service agents and field service technicians to see work schedules and assignments and also add personal events such as meetings or appointments. 195
196 Plugin Field Service Questionnaire () Enables the system administrator to create questionnaires for work orders and work order tasks. [com.snc.wm_questionnaire] You can add Field to the Content Management System (CMS) portal by activating the following plugins: CMS User Interface - Core [com.snc.service_management.core.cms] Field CMS Portal [com.snc.work_management.cms] Navigate to System Definition > Plugins. Find and click the plugin name. On the System Plugin form, review the plugin details and then click the Activate/Upgrade related link. If the plugin depends on other plugins, these plugins are listed along with their activation status. If the plugin has optional features that depend on other plugins, those plugins are listed under Some files will not be loaded because these plugins are inactive. The optional features are not installed until the listed plugins are installed (before or after the installation of the current plugin). 4. Optional: If available, select the Load demo data check box. Some plugins include demo data Sample records that are designed to illustrate plugin features for common use cases. Loading demo data is a good practice when you first activate the plugin on a development or test instance. 5. You can also load demo data after the plugin is activated by clicking the Load Demo Data Only related link on the System Plugin form. Click Activate. Additional plugins for Field After Field is activated, you can activate additional plugins that provide demo data and enable a variety of features. You must have the admin role to activate these additional plugins. For details, see Activate a plugin. Plugin Field Geolocation Demo Data Enables the Field application to use Google Maps travel times when auto-dispatching work order tasks. [com.snc.work_management_geolocation.demo] Activating the Field Service Automation Geolocation plugin automatically activates the Field plugin. Field Demo Data [com.snc.work_management.demo] Adds demonstration data for the Field Service Management application covering the medical and telecommunication domains. Note: Installing this plugin adds new Configuration Item tables and relationships to the database. 196
197 Plugin Field Mobile Adds the Field menu to the mobile user interface. Activating this plugin automatically activates or upgrades thefield and Mobile UI plugins. [com.snc.work_management_m] Customer Service with Field Service Management (com.snc.csm_fsm_integration) Performance Analytics - Content Pack - Field [com.snc.work_management_pa] This plugin provides an integration between the Customer and Field applications. Customers and consumers can view caserelated work orders from the Customer Service and Consumer Service Portals. In the Field application, users can view account and contact information on work orders and work order tasks. Enables Performance Analytics for Field Service Management. Activation of this plugin on production instances may require a separate license. Contact for details. Note: If you have Performance Analytics installed, the Field Service Management Performance Analytics plugin (com.snc.work_management_pa) is automatically activated as part of the Field plugin. Field Service with Project Management [com.snc.wm_ppm] Field Services Integration with Project Management. This plugin activates the Project Management application and may require additional licenses. Field Service with Project Management Demo Data Demo plugin for the Field Services Integration with Project Management. [com.snc.wm_ppm_demo] Field Service - Questionnaire [com.snc.wm_questionnaire] Enables the work order questionnaire feature, which enables users with the system administrator role to create questionnaire records and associate those records with work orders or work order tasks. Configure Field Field defaults to the request-driven method for handling work order tasks. Administrators in the global domain can set configurations to determine how Field handles daily operations. Administrators in the global domain can set Field configurations to: Include or exclude portions of the request process. For example, you can require a work order to be approved before continuing to the next stage. Automatically assign tasks using SM Auto-Assignment, a custom-defined workflow, or leave it up to dispatchers to manually assign tasks. 197
198 1. Track agent travel time. Navigate to Field Service > Administration > Configuration. Note: Administrators in domains lower than the global domain can view the Field Service Configuration screen but cannot modify the settings. The options on the Field Service Configuration screen are arranged in a multiple-tabbed layout, as follows: 2. The Business Process tab contains options for setting up the request life cycle, creating catalogs and requests, and configuring notifications. The Assignment tab contains options for setting up manual and auto-assignment. The Add-ons tab contains options for enabling the knowledge base, managed documents, and task activities. Fill in the fields on the Business Process tab. Note: The Field Service Configuration screen contains many configuration options. An option is enabled when the switch appears green and is toggled to the right. All configuration options listed in the Dependency must be enabled in order for the option to be displayed. Table 48: Field Service Configuration screen - Business Process tab Field Dependency Select request driven (subtasks are optional) if you do not want to require tasks to fulfill requests. When the request life cycle is request driven, requests can be directly assigned to users in an assignment group. Users can still add tasks to requests. However, closing all tasks does not automatically close the request. Enable state flows is turned on. Enable state flows is turned on. Lifecycle Process life cycle Note: If the Enable state flows option is not selected, the process life cycle becomes requestdriven and this field is not displayed. Approval for new request required When disabled, all requests in the Awaiting Approval state are automatically approved. 198
199 Field Dependency Enable to require work orders to be qualified before moving to the next state. Lifecycle Qualification is required for new requests If this option is not enabled, any work orders in the Awaiting Qualification state are automatically qualified. Agent must accept or reject the assigned task Enable to require the assigned agent to accept or reject the task. Track agent travel time Enable to use time cards for agent travel for a task. Work notes are required to close or cancel a request or task Enable if work notes are required when closing, completing, or canceling requests and tasks. If it is disabled, work notes are not needed when closing, completing, or canceling. Copy task work notes to request Enable to synchronize task work notes with the work notes on the order or request. When work notes are added in the task, the same work notes appear in the order or request. Enable state flows is turned on. Process life cycle: task driven (subtasks are optional) Enable state flows is turned on. Enable state flows is turned on. Catalog and Request Creation Create or update requests by inbound . Enable this option to allow inbound messages to create or update requests. This option must be enabled to allow requests to be marked as spam. Requests are created using Select catalog or regular form to install the catalog and enable automatic publishing of request templates to the catalog. Select regular form only to uninstall the catalog and disable automatic publishing of request templates to the catalog. 199
200 Field Dependency Lifecycle Templates create a dedicated catalog item Enable this option to allow automatic publishing of catalog items for the application. Notification Send a notification when a field changes for a task or request. Configure notifications to be sent to specific recipients when selected fields in requests and/or tasks change. 1. From Table, select Request or Task. 2. From Field, select the field to use for generating notifications. When a change is made to the selected field, a notification is sent to the recipients identified. 3. From Recipients, select one or more recipients 4. If a specific user or a specific group, is selected, the user is prompted to select a user or group. 5. To define more notifications using other fields or recipients, repeat the steps on the next line. 6. To remove a notification, click the symbol to the right of the notification. 3. Click the Assignment tab and fill in the fields. 200
201 Table 49: Field Service Configuration screen - Assignment tab Field Dependency Assignment method for tasks Select one of the following task assignment options: Select using autoassignment to automatically assign work order tasks to field service agents. Select using a workflow to assign work order tasks using a customdesigned workflow. Select manually to allow dispatchers to manually assign work order tasks. Select using dynamic scheduling to use the dynamic scheduling feature. Assign requests or tasks based on assignment group coverage areas Enable this option to limit the selection of groups from the Dispatch group and Assignment group fields to groups that cover the location of the task. Use dispatch queue Enable this option to use the dispatch group for manual assignment. Enable state flows is turned on. Process life cycle: Life cycle is task driven Scheduling Use agent or task scheduling Enable this option to allow agent auto-assignment and agent auto-selection. Auto-selection of agents will consider time zone for tasks Enable this option to consider the time zone of the agent when assigning a task. Assignment method for tasks is set to using a workflow. Enable state flows is turned on. 201
202 Field Dependency Enable priority assignment Enable this option to use priority assignment for autoassigning agents. Enable state flows is turned on. Process life cycle: Life cycle is task driven Auto-selection of agents will consider agent or task schedules Note: The Process life cycle option is not available in all service management applications. Additional Factors Auto-selection of agents will consider location of agents Enable this option to use the agent and location when determining who to assign the task to. Agents closer to the task location receive preference. Enable state flows is turned on. If using Process life cycle: Life cycle is task driven, then If using Process life cycle: Life cycle is request driven, then Assignment method for tasks: using auto-assignment Assignment method for requests: using auto-assignment 202
203 Field Dependency Auto-selection of agents for tasks requires them to have skills This option determines the degree to which skills must be matched to a task when determining autoassignment. 4. Select all to require that an assigned agent has all the skills to perform the task. An agent who lacks one skill is eliminated. Select some if you want agents who have most of the skills to perform the task. Select none if you want to auto-assign agents without considering skills. Enable state flows is turned on. If using Process life cycle: Life cycle is task driven, then Assignment method for tasks: using auto-assignment If using Process life cycle: Life cycle is request driven, then Assignment method for requests: using auto-assignment Click the Add-ons tab and fill in the fields. Table 50: Field Service Configuration screen - Add-ons tab Field Dependency Part Requirements Part requirements are needed by agents Enable this option to require agents to specify parts for the task. Select models Click add and select the part Part requirements are model to be used for this needed by agents task. Click more to select more part models. Documentation Enable a dedicated knowledge base Enable this option to install the knowledge base for the application. Enable managed documents Enable this option to add a related list to managed documents. Enable task activities Enable this option to log the task interactions and communications, such as phone calls and messages. Associated Task Tables Select associated tables Click Add to select more tables. 203
204 Field Dependency Part Requirements Maps Enable maps Enable this option to use maps. Signature Capture and PDF Order Summary 5. Signature Capture Enable this option to include the name and electronic signature of the customer in the PDF work order summary. PDF Order Summary Enable this option to create a PDF summary for a work order that includes completed tasks, parts used and returned, incidental expenses, and the time required to complete the work. Click Save. Warning: If you clicked the Enable state flows option to disable it, a confirmation box appears, along with a link to documentation that explains the consequences of disabling state flows. It is highly recommended that you read the documentation before proceeding. The action of disabling service management state flows cannot be reversed. Task vs request driven processing All SM applications use either task-driven or request-driven processes for handling tasks. Each application defaults to one or the other of these processing types, but you can switch between them as needed. Task-driven processing means that the work order or request simply contains a list of tasks necessary for completing the overall work. When a work order record is created, an associated task record is automatically created. A request must have at least one task, and more tasks can be defined to handle all aspects of the request. As tasks are performed and completed, the request transitions through a series of states. After the last task is closed, the request automatically transitions to closed. Request-driven processing means that tasks are assigned to a request, but closing all the tasks does not automatically close the request. A request does not require any tasks and can be opened and closed independently. Any tasks can be transitioned and assigned independently and to different agents than specified on the request. Even if all tasks are closed, the request can remain open and continue to be worked on. However, the request cannot be closed until all tasks are also closed. In request-driven processing, state transitions are based solely on the request. Field overview module The Field overview module is a homepage that displays various field service reports. 204
205 The widgets on this page help field service users track and manage aspects of the Field Service Management processes, such as work orders, work order tasks, and dispatch locations. Note: If you have tasks defined with assignment groups of the type Vendor, additional reports display useful information for tracking vendor tasks and performance. Field overview module roles Access to the Field overview module is granted to a specific set of user roles. The different levels of access include: View: the user can view the overview page and refresh reports. Customize: the user can refresh, add, delete, and rearrange reports and other widgets. Access is limited for users with non-administrative roles. Table 51: Field overview module roles Role Access admin View, customize sm_admin View, customize sm_agent View wm_basic View wm_dispatcher View wm_initiator View wm_qualifier View wm_initiator_qualifier View wm_initiator_qualifier_dispatcher View Use the Field overview module The Field overview module provides a dispatch map that displays tasks and links to the related task records. Navigate to Field Service > Overview. The map view depends on whether or not the Field Geolocation Demo Data plugin (com.snc.work_management_geolocation.demo)is activated. The dispatch map view with geolocation enabled groups tasks and agents by proximity and displays related records in pop-up windows on the map. 205
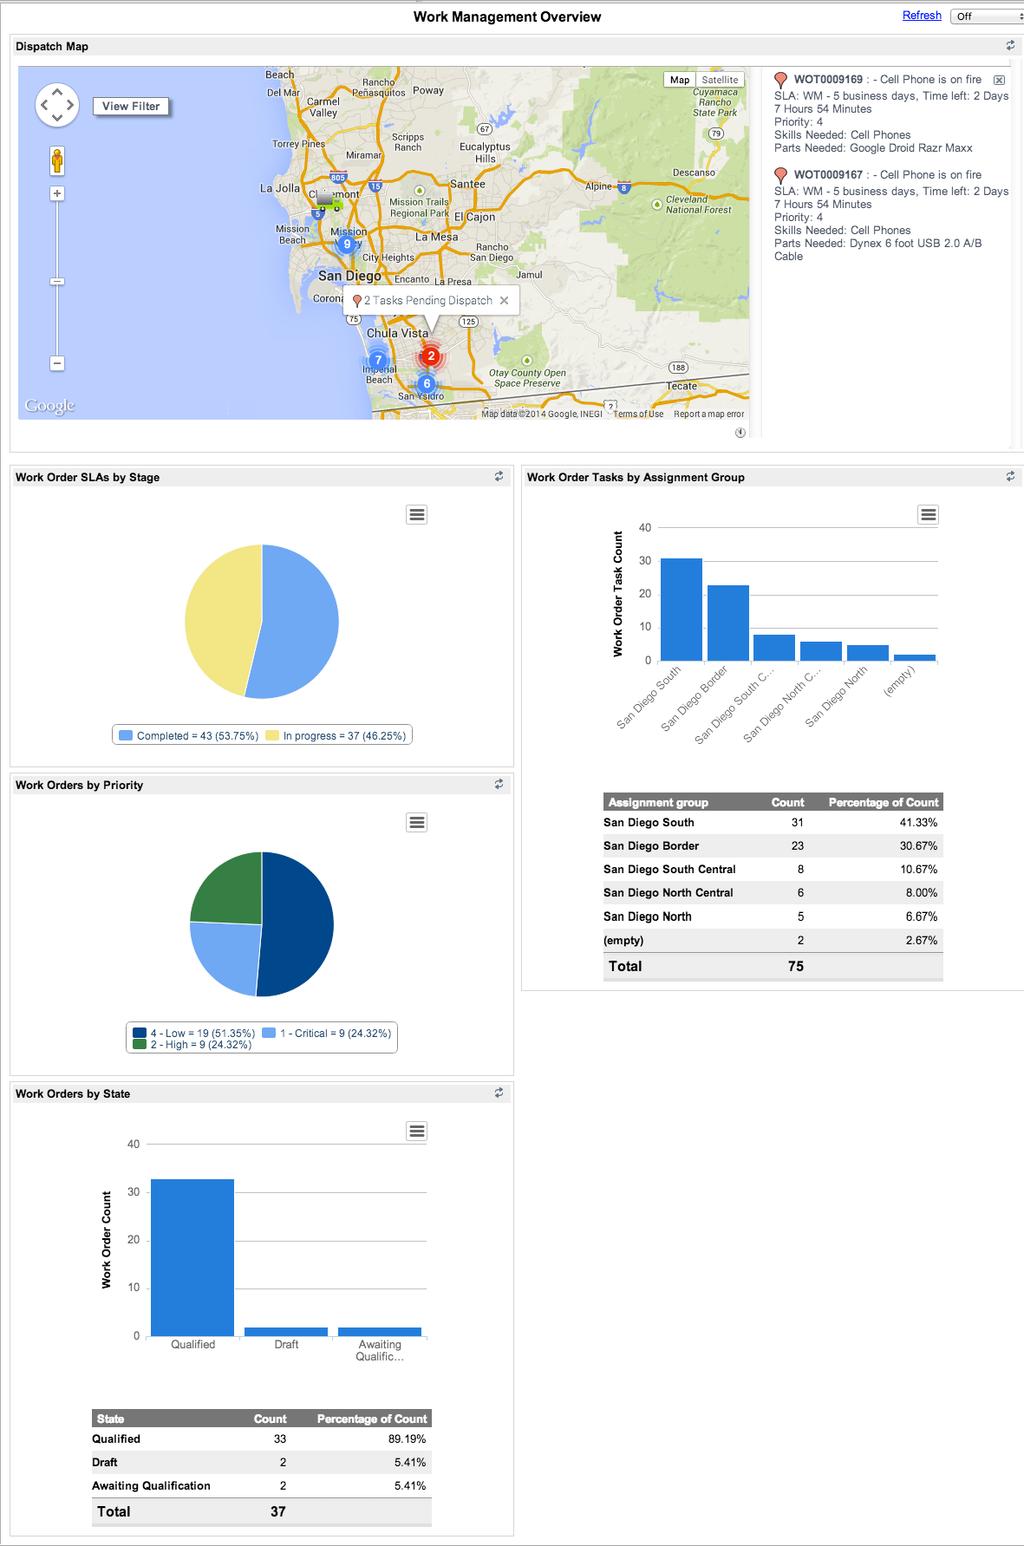
206 206

207 The dispatch map view without geolocation enabled shows individual tasks by state and displays related records in a separate window. Figure 15: Dispatch map without geolocation You can click elements within the reports to obtain more information without leaving the overview page. 207
208 Manage work orders The Field process involves creating, qualifying, dispatching, and executing requests for off-site work, called work orders. The steps and functions of the work order life cycle ensure that off-site issues are resolved efficiently. Users with the appropriate roles create the work orders and provide the necessary information needed for the work order tasks. Other users qualify those work orders and create the tasks necessary to complete the work order. For instructions on how to dispatch tasks using geolocation with Google Maps, see Using the dispatch map. Create a work order Creating a work order involves gathering the initial information about the work that needs to be done. Role required: wm_initiator, wm_initiator_qualifier, or admin Users with the initiator and initiator-qualifier roles can create work orders. In the Draft stage, the initiator or initiator-qualifier determines the nature of the problem and identifies the configuration items affected. To create work orders for common tasks such as the on-boarding of new employees, you can use work order model templates to create all the necessary records automatically Navigate to Field Service > Work Order > Create New. Enter a Short description. 3. Optionally, you can click the search knowledge icon ( ) to view articles in the knowledge base relating to this product model, plan, or CI. Doing so could provide a solution related to the reason you are submitting a work order. Fill in the fields on the Work Order form, as appropriate. Table 52: Work Order form fields Field Number Auto-generated identification number for the work order. Company Company for which the work order was opened. The lookup list shows only those companies designated as Customers in their company record. Caller Person for whom the work needs to be performed. The lookup list shows only users associated with the selected Company. Affected CI Primary item that requires work, such as a broken laptop or a printer that needs ink. Configuration Item lookup lists are based on the selected Company. If more than one item requires work, refer to the Affected CIs related list. 208
209 Field Location Geographical area where the work needs to be done. If not entered manually, the field is filled automatically based first on the Affected CI field and then, if no affected CI or location is provided, on the Caller. Template Template for creating this work order (optional). Click the lookup icon and select a template. The description of the selected template will populate the field. If you selected Tasks will be dispatched manually in the Field Service Configuration screen, work order tasks that were created for orders that use templates are automatically transitioned to Pending dispatch. For more information on templates, see Creating Service Order Templates. Note: If defined in advance, the template may contain task dependencies, which the tasks in your work order will inherit. Opened Date and time the work order was opened. Priority Precedence of the work order, based on severity of the impact, number of users affected, or other factors. The SLA applied to this work order is determined by the priority selected in this field. State Current stage of the work order in the work order life cycle. Qualification group Group that can specify the technical details of the work order. The lookup list shows only the qualification groups associated with the selected Location. If no qualification groups exist for the location, all qualifications groups are listed and any can be selected. This field is hidden when Field Service Management is configured for Automatic qualification on page 220. Initiated from Record number of the original problem, incident, change request, or other work order from which the work order was created. Billable Option for issuing a statement of fees or charges for the work order. This is useful for running reports on billable work orders. Short description Brief explanation of the work order. 209
210 Field Detailed information describing the work to be performed. Initiators create work orders, but qualifiers should add as much detail about the work to be performed as possible to avoid extra communication with the caller. Work Notes Information about the work order and how it was completed. This field is not visible to customers. Work notes are added throughout the work order life cycle to help users who work on it to communicate useful information. Scheduling 4. Scheduled start Date and time when the earliest task is scheduled to start. Estimated end Estimated date when all tasks will be completed. Actual work start Date and time when the earliest task actually started. Actual work end Date and time when the last task actually ended. Requested due by Estimated date when the latest task will be completed. The Lead Time for the maintenance schedule is subtracted from the Required Due by date for the work order to determine this date. Click one of the following buttons. Option Submit Saves the work order in Draft state so more information can be added. Work orders submitted by a user with the wm_qualifier role are automatically set to Ready for Qualification. Ready for Approval Advances the work order to the Awaiting Approval state. This button appears only if you selected the Approval is required for new requests option in Field Service Configuration. 210
211 Option Ready for Dispatch Advances the work order to the Pending Dispatch state. Tasks cannot be advanced until this button has been clicked. This button will be displayed only if the following two options in Field Service Configuration are selected: Ready for Qualification Approval is not required for new requests Tasks are dispatched manually Creates an initial work order task automatically if one does not exist. The work order Short description,, and Location are copied into the work order task. This button is not available if automatic qualification is configured. The following fields are visible only if you activated the SM Planned Maintenance plugin. Table 53: Additional fields Field Maintenance plan Displays the maintenance plan used to generate the order, if any. Maintenance schedule Displays the maintenance schedule used to generate the order, if any. Record table The table associated with the order. For example, the Server [cmdb_ci_server] table. Record ID The sys_id of the record in the specified table that represents the item under maintenance, if any. Create a work order from an incident, problem, or change You can create a work order directly from an incident, problem, or change record. Role required: wm_initiator, wm_initiator_qualifier, or admin This ability is useful if one of these tasks needs to be assigned to an off-site agent and tracked. Some information from the original record is copied automatically into the new work order. 211
212 Table 54: Auto-filled fields from incident, problem, or change records Record type Auto-filled fields Incident Problem Change Incident record reference (in the Initiated from field) Caller Location Priority Short description Problem record reference (in the Initiated from field) Affected CI Priority Short description Change record reference (in the Initiated from field) Affected CI Priority Short description Navigate to the incident, problem, or change record. Right-click the form header and select Create Work Order. A new work order is created in Draft stage. The incident short description is copied as the short description of the work order. Fill in the fields on the Work Order form, as appropriate. Table 55: Work Order form fields Field Number Auto-generated identification number for the work order. Company Company for which the work order was opened. The lookup list shows only those companies designated as Customers in their company record. Caller Person for whom the work needs to be performed. The lookup list shows only users associated with the selected Company. 212
213 Field Affected CI Primary item that requires work, such as a broken laptop or a printer that needs ink. Configuration Item lookup lists are based on the selected Company. If more than one item requires work, refer to the Affected CIs related list. Location Geographical area where the work needs to be done. If not entered manually, the field is filled automatically based first on the Affected CI field and then, if no affected CI or location is provided, on the Caller. Template Template for creating this work order (optional). Click the lookup icon and select a template. The description of the selected template will populate the field. If you selected Tasks will be dispatched manually in the Field Service Configuration screen, work order tasks that were created for orders that use templates are automatically transitioned to Pending dispatch. For more information on templates, see Creating Service Order Templates. Note: If defined in advance, the template may contain task dependencies, which the tasks in your work order will inherit. Opened Date and time the work order was opened. Priority Precedence of the work order, based on severity of the impact, number of users affected, or other factors. The SLA applied to this work order is determined by the priority selected in this field. State Current stage of the work order in the work order life cycle. Qualification group Group that can specify the technical details of the work order. The lookup list shows only the qualification groups associated with the selected Location. If no qualification groups exist for the location, all qualifications groups are listed and any can be selected. This field is hidden when Field Service Management is configured for Automatic qualification on page 220. Initiated from Record number of the original problem, incident, change request, or other work order from which the work order was created. 213
214 Field Billable Option for issuing a statement of fees or charges for the work order. This is useful for running reports on billable work orders. Short description Brief explanation of the work order. Detailed information describing the work to be performed. Initiators create work orders, but qualifiers should add as much detail about the work to be performed as possible to avoid extra communication with the caller. Work Notes Information about the work order and how it was completed. This field is not visible to customers. Work notes are added throughout the work order life cycle to help users who work on it to communicate useful information. Scheduling Scheduled start Date and time when the earliest task is scheduled to start. Estimated end Estimated date when all tasks will be completed. Actual work start Date and time when the earliest task actually started. Actual work end Date and time when the last task actually ended. Requested due by Estimated date when the latest task will be completed. The Lead Time for the maintenance schedule is subtracted from the Required Due by date for the work order to determine this date. Select a template if your organization created one for commonly performed tasks. A task is automatically created from the work task model and any part requirements specified in the template. Click Update. The following fields are visible only if you activated the SM Planned Maintenance plugin. Table 56: Additional fields Field Maintenance plan Displays the maintenance plan used to generate the order, if any. Maintenance schedule Displays the maintenance schedule used to generate the order, if any. 214
215 Field Record table The table associated with the order. For example, the Server [cmdb_ci_server] table. Record ID The sys_id of the record in the specified table that represents the item under maintenance, if any. Create a work order from an existing work order You can create a new work order from an existing work order. Role required: wm_initiator, wm_initiator_qualifier, or admin This ability is useful if the scope of a work order changes during the execution phase and it becomes necessary to create another work order. Analyze whether the scope change can be managed by adding additional tasks instead of creating another work order. Also, because some information is copied from the original record, an existing work order can be used as a template to create new work orders. The following information is copied from the original record: Work order record reference (in the Initiated from field) Affected CI Caller Location Priority Short description Navigate to the original work order. Right-click the header and select Create Work Order. A new work order in Draft stage is created. Enter a Short description if one was not added automatically. Fill in the fields on the Work Order form, as appropriate. Table 57: Work Order form fields Field Number Auto-generated identification number for the work order. Company Company for which the work order was opened. The lookup list shows only those companies designated as Customers in their company record. Caller Person for whom the work needs to be performed. The lookup list shows only users associated with the selected Company. 215
216 Field Affected CI Primary item that requires work, such as a broken laptop or a printer that needs ink. Configuration Item lookup lists are based on the selected Company. If more than one item requires work, refer to the Affected CIs related list. Location Geographical area where the work needs to be done. If not entered manually, the field is filled automatically based first on the Affected CI field and then, if no affected CI or location is provided, on the Caller. Template Template for creating this work order (optional). Click the lookup icon and select a template. The description of the selected template will populate the field. If you selected Tasks will be dispatched manually in the Field Service Configuration screen, work order tasks that were created for orders that use templates are automatically transitioned to Pending dispatch. For more information on templates, see Creating Service Order Templates. Note: If defined in advance, the template may contain task dependencies, which the tasks in your work order will inherit. Opened Date and time the work order was opened. Priority Precedence of the work order, based on severity of the impact, number of users affected, or other factors. The SLA applied to this work order is determined by the priority selected in this field. State Current stage of the work order in the work order life cycle. Qualification group Group that can specify the technical details of the work order. The lookup list shows only the qualification groups associated with the selected Location. If no qualification groups exist for the location, all qualifications groups are listed and any can be selected. This field is hidden when Field Service Management is configured for Automatic qualification on page 220. Initiated from Record number of the original problem, incident, change request, or other work order from which the work order was created. 216
217 Field Billable Option for issuing a statement of fees or charges for the work order. This is useful for running reports on billable work orders. Short description Brief explanation of the work order. Detailed information describing the work to be performed. Initiators create work orders, but qualifiers should add as much detail about the work to be performed as possible to avoid extra communication with the caller. Work Notes Information about the work order and how it was completed. This field is not visible to customers. Work notes are added throughout the work order life cycle to help users who work on it to communicate useful information. Scheduling 5. Scheduled start Date and time when the earliest task is scheduled to start. Estimated end Estimated date when all tasks will be completed. Actual work start Date and time when the earliest task actually started. Actual work end Date and time when the last task actually ended. Requested due by Estimated date when the latest task will be completed. The Lead Time for the maintenance schedule is subtracted from the Required Due by date for the work order to determine this date. Click Update. The following fields are visible only if you activated the SM Planned Maintenance plugin. Table 58: Additional fields Field Maintenance plan Displays the maintenance plan used to generate the order, if any. Maintenance schedule Displays the maintenance schedule used to generate the order, if any. Record table The table associated with the order. For example, the Server [cmdb_ci_server] table. 217

218 Field Record ID The sys_id of the record in the specified table that represents the item under maintenance, if any. Associate CIs to work orders and work order tasks The initiator of a work order usually specifies the configuration items for the work order and work order tasks. CIs on the work order: Give qualifiers an overview of all the work that needs to be done. Provide important information for the agents completing the individual tasks. When assigning CIs to individual tasks, the qualifier and dispatcher can choose only from the CIs in the Work Order Affected CIs related list. The same CI in a work order can be applied to multiple work order tasks. Figure 16: Affected CIs on a work order 218
219 Approve a work order Approving a work order means that it has been reviewed and is ready to be qualified for task creation and assignment. Role required: wm_approver_user or admin When a work order is sent to a user with the wm_approver_user role, the approver can approve or reject the order, request more information, or mark it as a duplicate order To activate the approval phase of the work order workflow, navigate to Field Service > Administration > Configuration. Select the Approval is required for new requests option. Table 59: Approval choice Approval choice Approved The order is approved. Rejected The order has been rejected by the approver. More information required The order does not contain enough information. It reverts back to the Draft state and the following work note is added to the order: The order needs more information for further approval. Duplicate The order is no longer required, because the work was already performed by another order. The order is moved to the Cancelled state and the following work note is added to the order: The order already exists. Qualify work orders Work orders are qualified to create and assign the work order tasks. In the Field application, a user with the wm_qualifier role selects the dispatch group, adds work order tasks, and defines part requirements. The work.management.limit.location property controls whether the choice list of available dispatch groups is filtered by proximity to the task location. The qualifier can add the Affected CI, Short description, and to a work order if the initiator did not provide complete information. Qualification can be manual or automatic. You can configure the Field application to promote the work order from Draft directly to Qualified without the qualification stage. When you are using manual qualification, a work order cannot advance to the Qualified state until all of its tasks are qualified. Note: To activate the qualifying phase of the Field workflow, you must enable the Qualification is required for new requests configuration option in Field Service > Administration > Configuration. Qualify a work order task Qualify a single task or qualify multiple tasks at the same time. 219
220 Role required: wm_qualifier To qualify a task, open it from the Work Order Tasks related list, select a Dispatch group, and then click Qualified. To qualify multiple tasks at the same time, select the check boxes next to the desired tasks in the Work Order Tasks related list, and then select Qualified from the Actions choice list. Note: If the Approval for new request required configuration option in Field Service > Administration > Configuration is enabled, the New button in the Work Order Request Tasks related list does not appear until the work order has been approved. Also, if you are attempting to create a work order task using a template, the task will not be created until the work order has been approved. View and qualify a sibling task A sibling task is a different task that is related to the same request or order. Role required: wm_qualifier To view sibling tasks, open a work order task from the Work Order Tasks related list and click the Sibling Tasks related list. Sibling tasks can be qualified in the same manner as parent tasks. To qualify a sibling task, select a Dispatch group and then click Qualified. To qualify multiple sibling tasks, select the check boxes next to the desired tasks iand then select Qualified from the Actions choice list. Automatic qualification Users with the admin or wm_admin role can configure the application to skip the Awaiting Qualification state for work orders and automatically advance them to Qualified. Role required: wm_admin or admin Navigate to Field Service > Administration > Configuration. Disable the Qualification is required for new requests configuration option. Click Save. This configuration option eliminates the qualification stage. When a work order is qualified automatically, the system automatically creates a work order task in the Draft state. No qualification group is required for work orders configured in this manner, so the Qualification group field is hidden in the Work Order form. In the application navigator, the Awaiting Qualification module is replaced by the My Work Order Tasks module. This module is accessible to users with the wm_initiator_qualifier role and shows only those tasks created by the current user. Promote draft work order tasks When a work order is automatically qualified, the system creates a task in the Draft state, which must be promoted. Role required: wm_initiator_qualifier, wm_admin, or admin When you create a work order that is qualified automatically, the work order state progresses from Draft to Qualified and the system automatically creates a task in the Draft state. You can then promote the draft tasks to a state of Pending Dispatch. 1. Navigate to Field Service > Work Order > My Work Order Tasks. The list displays tasks in the Draft state created by the current user. 220
221 Open a task. Make sure the task has a Dispatch group. Click Ready for Dispatch. The task is promoted to the Pending Dispatch state. You can promote multiple tasks at the same time from a related list or a task list. Select the check boxes next to the tasks to be promoted and then select Ready for Dispatch from the Actions choice list. Automatically dispatch a task at qualification Dispatch a task automatically at qualification by assigning the task to a dispatch group that has autoassignment enabled. Role required: wm_qualifier, wm_initiator_qualifier, or wm_admin To activate the auto-dispatch phase of the work order workflow, navigate to Field Service > Administration > Configuration, select the Assignment tab, and select using auto-assignment for the Assignment method for tasks configuration option. 1. Open a work order that is in the Awaiting Qualification state or one that has been qualified automatically Open a task in the Draft state. Select a Dispatch group that has auto-dispatch defined. 4. The choice list is not filtered. You must know which of your groups are configured for auto-dispatch. Ensure that the task has a location defined. 5. Auto-dispatch will fail unless the task contains a valid location. In the Planned section, create a schedule for this task or let the system determine the times. 6. By default, the current date and time appear in the Window start field. If you do not create a schedule or a fixed window, the Window start value is used to look for an agent who has that time slot open. Click Qualified. The view returns to the previous page, and a success message appears. The system assigns an agent to the task, enters the agent's assignment group in the task record, and moves the state to Assigned. 7. If auto-dispatch fails, the message indicates either that no agent was available or that the task did not specify a location. The system moves tasks that fail auto-dispatch to the Pending Dispatch state. To auto-dispatch a task that failed previously, enter any missing information or change the schedule, and then click Auto-Dispatch. Auto-assign a vendor Assign a vendor automatically to a work order task after the appropriate group and template have been created. Role required: wm_qualifier, wm_initiator_qualifier, or wm_admin 1. Navigate to User Administration > Groups and set up a group for your approved vendors If not done already, set up a group type called wm_vendor. In the Type field, select wm_vendor. In the Vendors field, select at least one vendor. Save the group. Navigate to Field Service > Catalog & Knowledge > Work Order Templates. 221
222 Create a work order template with at least one task In the Dispatch group field for the task, select a dispatch group. In the Assignment group field, select the group you created earlier. Save the template. Navigate to Field Service > Work Order > Create New. Create a new work order. In the Template field on the Work Order form, select the template that you created in step 4. When you are ready, click Ready for Qualification. Scroll down to the Work Order Tasks related list. Open the work order task that was just created. The Assigned to field automatically defaults to the manager of the vendor group. Note: If the vendor group does not have a manager, the Assigned to field is left blank. 10. The manager can re-assign the task to anyone else in the group. Close a work order The Field application closes work orders automatically depending on the states of the associated work order tasks. There are two types of closure available for work orders: The work order state changes to Closed Complete if all work order tasks are marked Closed Complete. The work order state changes to Closed Incomplete if at least one work order task is marked Closed Incomplete. When a work order is closed, the following takes place: Time and effort are calculated automatically. The work order becomes inactive and is removed from the list of work orders. After an order has been assigned to an agent, that agent can complete and close the order under two conditions: When the Request lifecycle is task driven configuration option is enabled, all states of the work order are driven by the task. The agent can click the Close Complete button on the Work Order Task form to close any tasks that need to be closed manually. After all of the work order's tasks are closed, the work order is closed automatically. When the Request lifecycle is request driven configuration option is set and all of the work order's tasks are closed, the agent can click the Close Complete button on the Request form to close and complete the order. Cancel a work order Cancel a work order if the work is no longer necessary or if it is a duplicate of another work order. Role required: Work orders can be canceled by users with different roles during specific states in the work order life cycle. When you cancel a work order, all associated work order tasks are also canceled Navigate to Field Service > All Work Orders. Open a work order. 222
223 3. 4. In Work notes, enter a reason for canceling the work order. Click Cancel. An error message appears if text is not entered into the Work notes field. Delete a work order You should only delete a work order if you are cleaning up errors, such as deleting duplicate work orders. Role required: wm_admin For tracking purposes, the correct method for managing a work order that is no longer in use is to change the work order state to Closed Complete, Closed Incomplete, or Canceled. Closed and canceled work orders are inactive and do not appear on work order lists. Delete a work order only to clean up errors, such as duplicate work orders. Deleting a work order automatically deletes all associated work order tasks. This ensures that agents are not assigned work order tasks that are part of a deleted work order Navigate to Field Service > All Work Orders. Open a work order. Click Delete. Confirm the action when prompted. PDF summary for work orders Create a PDF for a work order that includes a summary of the completed work and the name and signature of the customer. This feature is available for work orders that are Closed Complete or Closed Incomplete. The summary includes the completed tasks, parts used and returned, incidental expenses, and the time required to complete the work. The PDF also includes the name and signature of the customer. After a work order has been closed, the system generates a message with a link to the work order form, which displays both the Sign & Confirm button in the form header and the Sign & Confirm related link. Use either the button or link to open the Signature Pad popup window. After the customer enters a name and electronic signature, the information is confirmed and a PDF is generated and attached to the work order. Plugins This feature requires the Field Service Signature Pad plugin (com.snc.wo_signature_pad). To use this feature, activate the plugin and enable the related configuration options. Tables The Field Service Signature Pad plugin adds the following tables. Table Signature Images Stores images of customer signatures for work orders. [signature_image] 223
224 Script Includes The Field Service Signature Pad plugin adds the following script includes. Script include GeneralWOForm Creates a PDF of the work order form. Enable PDF summary for work order configuration options Enable these configuration options to create a PDF summary for a completed work order and capture a customer signature. Role required: admin Navigate to Field Service > Configuration. Click the Add-ons tab. Scroll down to Signature Capture and PDF Order Summary. Enable these options: 5. Signature Capture PDF Order Summary Click Save. Create a PDF summary for a work order Users with the field service agent role can generate a PDF that includes a summary of the completed work. Role required: wm_agent When a work order is closed, the system generates a message with a link to the work order form, which displays the Sign & Confirm button and related link. Use this link to open the Signature Pad popup window. After the customer enters a name and electronic signature, the information is confirmed and a PDF is generated and attached to the work order After completing a work order, click the link in the message to open the work order form. You can also navigate to a work order with a state of Closed Complete or Closed Incomplete. Click the Sign & Confirm button or related link to open the Signature Pad popup window. Enter a Name and Signature. Click Accept. The system displays a message stating that the signature has been accepted. The signature is captured and included in the generated PDF, which is attached to the Work Order form. Work order questionnaires Create questionnaires and associate them with work orders and work order tasks. As part of completing some work orders and tasks, field service agents fill out questionnaires or complete checklists. For example, an agent might need to complete a safety checklist before starting work on a task or fill out an inspection questionnaire before completing a work order. The work order questionnaire feature enables users with the system administrator role to create questionnaire records and associate those records with work orders or work order tasks. Questionnaire records include some configuration information, such as the condition or event that triggers the 224
225 questionnaire, as well as the list of questions included in the questionnaire. The Survey Designer tool is used to create the questionnaires. When a work order or task has an associated questionnaire, the Questionnaires button appears at the top of the form. Clicking this button displays the Questionnaires page, where the agent can complete the questionnaire or checklist. Enable the work order questionnaire feature by activating the Field Service - Questionnaire plugin (com.snc.wm_questionnaire). This plugin requires the following plugins: Customer Service (com.sn_customerservice) Customer Demo Data (com.snc.customerservice.demo) Field (com.snc.work_management) The Field Service - Questionnaire plugin adds the Questionnaire module to the Field Service menu (Field Service > Administration > Questionnaire). Demo questionnaire One demo questionnaire record, Inspection Questionnaire, is included with the Field Service Questionnaire plugin. This questionnaire record has a trigger condition that adds a questionnaire to a work order task when the task state changes to Work in Progress. 225
226 226
227 This demo questionnaire works as follows: 1. The dispatcher assigns a work order task to an agent. 2. The agent accepts the task and clicks Start Work on the task form. 3. The task state changes to Work in Progress and the Questionnaires button appears in the task form header. 4. The agent clicks Questionnaires to display one or more available questionnaires for the task. 5. The agent clicks Start on the desired questionnaire. 6. The agent completes the questionnaire and clicks Submit Save 7. The agent returns to the work order task, completes the work, and closes the task. Note: Questionnaires are not editable after the associated work order or task is closed. Troubleshooting the questionnaire feature If a trigger condition is defined for the task state as Work in progress rather than when the task state changes to Work in progress, every update of the work order task creates a questionnaire. When a task gets reassigned to another agent, the existing questionnaires do not get reassigned. Configure the form layout and add the Assigned to field to ensure that a questionnaire does not get created without an assigned agent. Create a questionnaire for a work order or task Create a questionnaire record and then associate it with a table such as the Work Order or Work Order Task tables. Role required: admin The system administrator can view questionnaire records from the Questionnaire list and questionnaires by navigating to Surveys > View Surveys Navigate to Field Service > Administration > Questionnaire. Click New. Fill in the fields on the Questionnaire form to create a new questionnaire record. This record stores the basic information for the questionnaire. Table 60: Questionnaire form fields (new record) Field Name The name of the questionnaire. Active Enable this check box to make the questionnaire record active. The system administrator can attach active questionnaires to work orders and work order tasks. A brief description of the questionnaire record. 227
228 Field Introduction Text that appears at the beginning of the questionnaire. End note Text that appears at the end of the questionnaire. Table The table with which this questionnaire record is associated. Trigger condition The trigger condition determines when the questionnaire is applicable. Use the condition builder to create a trigger condition that adds the questionnaire to the work order or work order task. Mandatory Enable this check box to make the questionnaire mandatory. When enabled, the agent must complete the questionnaire before closing the work order or work order task. If you enable the Mandatory check box, you must also select a state in the Close before field. Close before If the questionnaire record is mandatory, select one or more states by which the questionnaire must be completed. The questionnaire must be completed before the agent can set the work order or work order task to the selected states. Click Submit. The system creates the record, displays the Questionnaire form, and adds the Questionnaire Designer button. If desired, make changes to the fields on the Questionnaire form and click Update. Click Questionnaire Designer to create the text of the questionnaire. The Survey Designer tool opens in a new window. Use the Survey Designer tool to create the questions or checklist items that appear on the questionnaire. Click Save. Close the Survey Designer window and return to the Questionnaire form. Complete a questionnaire for a work order or task Field service agents can access and complete questionnaires from the Work Order or Work Order Task forms. Role required: wm_agent If one or more questionnaires are available for a work order or work order task, the Questionnaires button appears at the top of the form. Clicking this button displays the questionnaires. Agents can also navigate to Self-Service > My Assessments & Surveys to see questionnaires for work orders and work order tasks. 228
229 Note: Users who can view a work order or task can also view associated questionnaires. Users who are assigned to a work order or task can complete associated questionnaires Open a work order or work order task. Click Questionnaires. The Questionnaires page opens and displays the questionnaires associated with the task record. Each questionnaire is listed as an individual tile and displays the associated work order or task number. Click Start on the questionnaire tile. The questionnaire opens in the window. A message at the top displays the related work order or task number. Complete the questionnaire. Click Submit or Save. Option Submit Submits the questionnaire and returns to the work order or task form. Once submitted, an agent cannot make changes to the questionnaire. Upon returning to the questionnaire list, an agent can only view the responses. (Tile displays View.) Save Saves the questionnaire and returns to the work order or task form. Once saved, an agent can return to the questionnaire and make changes or add information. (Tile displays Start.) Complete any remaining work and then close the task. Note: If mandatory, you must complete the questionnaire before closing the task. Manage work order tasks Use work order tasks to define separate activities that must be done to complete a work order. A work order contains one or more work order tasks. These tasks allow qualifiers to define separate activities that must be done to complete a work order. When a user with the wm_qualifier role or a qualifier combination role moves a work order from Draft to Awaiting Qualification, a work order task is automatically created and populated with information from the work order. This user can edit existing tasks or create new tasks at any time. A key feature in Field is the ability to create multiple work order tasks under a single work order. Splitting a work order into separate tasks, when necessary, enables qualifiers to: Assign different aspects of a single work order to different agents. Assign work to agents with different skill sets. Assign work to agents in different locations. Schedule parts of the work at different times. Schedule tasks so they are done one after another. Schedule tasks so they are done at the same time by different agents. Schedule additional tasks, if necessary, to complete the work order. Coordinate the arrival and usage of the parts required to complete a work order. 229
230 Create a work order task Create a work order task from a work order. Role required: wm_qualifier or qualifier combination role A task window is the time period, bordered by start and end times, in which a task should be performed. It can be flexible or fixed and is used by the auto-routing and auto-assignment features to determine an agent's daily schedule. A flexible window has start and end times that the Field application attempts to respect when dispatching or routing a task automatically. The system can reschedule a flexible task window if necessary to make it fit into an agent's schedule. A fixed task window cannot be rescheduled. If the auto-router or auto-dispatcher cannot schedule the task for the fixed window time period, that task is not scheduled at all. The time interval configured for a window cannot be less than the time required to perform the task. These users can edit schedule times, including task windows and planned durations. The Estimated end time is calculated from the expected start time and the work duration and is read-only. Table 61: Schedule task roles Role Edit capabilities wm_qualifier Tasks in the Draft state. wm_dispatcher Tasks in the Pending Dispatch state. wm_admin Tasks in Draft or Pending Dispatch state. Open a work order. Click the Work Order Tasks related list and then click New. Note: If the Approval for new request required configuration option is enabled, the New button in the Work Order Tasks related list does not appear until the work order has been approved. Also, if you are attempting to create a work order task using a template, the task is not be created until the work order has been approved. 3. Fill in the fields on the Work Order Task form, as appropriate. Table 62: Work Order Task form fields Field Number Auto-generated identification number for the task. Parent Work order this task is assigned to. Cloned from Record number of the work order task this task was cloned from, if any. Priority Priority of this task. Location Geographical area where the work needs to be done. The location is critical for determining the agent assigned to the task. 230
231 Field Skills Abilities necessary to execute the task. automatically completes the Skills field based on the selection in the Affected CI field on the associated work order. If you change the affected CI on the work order, the system adds any skills required by the new CI to the skills already listed here. Under warranty Indicator of an existing warranty for one or more configuration items associated with the task. Qualifiers can select and clear this option. State Current state of the task, such as Accepted or Closed Complete. advances the state automatically as users complete the work for each successive state. Dispatch Group Group that can select an agent to complete the task. By default, a Field Service Management property is enabled to limit the dispatch groups that you can select to those groups that belong to the location that you selected. If no dispatch groups exist for the location, all dispatch groups are listed for assignment of the tasks. Assignment group Group from which an individual agent or vendor should be selected to complete the task. The lookup list shows only the assignment groups associated with the selected Location. If the Assignment Group field is empty, the system searches for the group covering the territory that includes the location of the task. Assigned to Individual agent or vendor who should complete the task, selected from the Assignment group. If you have defined skills and assigned them to agents, the Assigned to field lookup list shows only those agents in the assignment group who have all the Skills required. If no exact match of skills is found, the lookup list shows all assignment group members. If an assignment group of type Vendor is selected, this field defaults to the vendor manager assigned to the selected vendor group. If the vendor group does not have a manager, the Assigned to field is left blank. 231
232 Field Assigned vendor Individual vendor who should complete the task, selected from the Assignment group. This field displays only when an assignment group of type Vendor is selected. Vendor reference A reference number for tracking the selected vendor's work activities. This field displays only when an assignment group of type Vendor is selected. Short Brief explanation of the task. Exact technical description of the unit of work to be performed. Qualifiers should provide as much detail about the problem as possible to avoid extra communication with the caller in later stages of the work order life cycle. Work notes Information about the task as it progresses through each state. Work notes are not visible to customers. Planned Window start Start of the time window established for this task. Auto-routing and auto-dispatch use this time when calculating the agent's daily schedule. Window end End of the time window established for this task. The elapsed time of the window cannot exceed the value in the Estimated work duration field. Auto-routing and autodispatch use this time when calculating the agent's daily schedule. Scheduled travel start Date and time when the agent expects to travel to the site. In versions at Eureka or later, the travel start time is automatically set to one hour from the current time. In versions prior to Eureka, the travel start time is set to the beginning of the next hour. For example, if you save the Work Order Task record at 9:35 am, the scheduled travel start is automatically set to 10:00am. When the task reaches the Pending Dispatch stage, the default value can be edited. An agent cannot be scheduled for two tasks at the same time. If a specified time is already allocated to another task, an error message is displayed. This field is required when the task is assigned or when the state is Assigned, Accepted, Pending Dispatch, or Work In Progress. 232
233 Field Scheduled start Date and time that work on the task is expected to begin. The scheduled start date is pre-filled with the date calculated by subtracting the number of days entered in the Lead Time field for the maintenance schedule from the Required Due by date for the work order. This field is required when the task is assigned or when the state is Assigned, Accepted, Pending Dispatch, or Work In Progress. Estimated end [Read-only] Date on which work on the task will end. The date is automatically calculated based on the Scheduled start and Estimated work duration. Is fixed window Indicator of a fixed service window that cannot be shortened or extended to accommodate other tasks in an agent's daily schedule. If this checkbox is not selected, the service window is considered flexible. A flexible task window can be rescheduled by auto-routing and auto-assignment, but a fixed window cannot. If a fixed window task does not fit into the agent's schedule, the task is not routed or dispatched. Estimated travel duration Estimated amount of time to be spent traveling to the site. A time of one hour is set by default. When the task reaches the Pending Dispatch stage, the default value can be edited. Estimated work duration Estimated amount of work time. One hour is set by default. The default value can be edited during the Draft or Pending Dispatch stage. The estimated work duration cannot exceed the total time of the window, if one is defined for this task. Actual Actual travel start Date and time agent traveled to the site. Actual work start Time when work began. This field is not available until Actual travel start time is added manually or the Start Travel button is clicked. Actual work end Time when work on the task was completed. Actual travel duration Amount of time spent traveling to the site. 233
234 Field Actual duration [Read-only] Total amount of time spent traveling to the site and completing the task. This value is automatically calculated based on the Actual work start and Actual work end times. Related Lists Task SLA SLAs associated with the parent work order. Work Order Task Affected CIs Configuration items (CIs) associated with the task. Part Requirements Part requirements associated with the task. Transfer Orders Orders for transferring the necessary parts between stockrooms for this task. Asset Usages Records indicating if the parts requested for this task were used, not used, or removed because they were defective. Depends on Upstream dependencies associated with the task. Dependents Downstream dependencies associated with the task. Incidentals Incidental expenses associated with this task. Clone a work order task Clone existing tasks to quickly create new tasks. Role required: wm_qualifier or qualifier combination role In the cloning process, the following information is copied from the source task: Parent work order reference Short description Dispatch group Assignment group Location Planned information (scheduled and estimated, no actuals) Required skills Open the task from the related list in a work order. Select the Clone Task related link. This creates a new task in Draft state. An entry in the Work Notes field contains the original task number and text stating that the task is a clone. 234
235 Delete a work order task Work order tasks can be deleted by users with the wm_admin role. Role required: wm_admin A task cannot be deleted if it has a part requirement with a transfer order. To delete the task in this case, you must first delete the transfer order Navigate to a work order. In the Work Order Tasks related list, select the check box beside the task Number. 3. Select Delete from the Actions choice list. Create dependencies between work order tasks If a work order contains multiple tasks, you can create dependencies between the tasks that determine the order in which tasks are performed. Role required: wm_qualifier or qualifier combination role These dependencies set and enforce the order in which a single agent or multiple agents perform the tasks. For example, on a work order for a new server, one agent might install the server, the upstream task, and a different agent might configure the server after installation is complete, the downstream task. You can specify multiple dependencies, both upstream and downstream, for a single task. The system prevents circular relationships where two tasks are dependent on each other by considering all upstream dependencies when deciding if a task can be auto-assigned. Setting a work order task as an upstream task means that this task must be completed before any downstream tasks can be started. Setting a work order task as a downstream task means that this task cannot be started until any upstream tasks have been completed. Note: Dependencies can only be set for work order tasks in the Draft state Navigate to a work order. Open a work order task in the Draft state. In the Depends on related list, click New. Select either Upstream task or Downstream task. Only tasks for the same work order are listed. Click Submit. Create a work order task dependency using a work order template In addition to creating work order task dependencies that are inherited from the associated work orders, you can also create work order templates that contain task dependencies. Role required: wm_qualifier or qualifier combination role Like work order tasks created from work orders, the dependencies inherited from the template enforce the order in which a single agent or multiple agents perform the tasks Navigate to Product Catalog > Templates > Work Order Template. Create a new work order template. Create the work order tasks. 235
236 4. Open one of the tasks If other tasks are dependent on this task; that is, this task must be completed before other tasks can be completed, click Dependents > New and select the dependent tasks. If this task is dependent on other tasks; that is, other tasks must be completed before this task can be completed, click Depends on > New and select the tasks to which this task is dependent. Repeat this process for the remaining tasks. When you have defined the dependencies for all tasks, click Update. After the work order task dependencies are defined, you can select the template when creating a new work order, and the tasks, along with the defined dependencies, will be inherited by the work order. Work order templates Work order templates allow you to quickly create well-defined work orders. These templates automatically create tasks and part requirements on work orders for common activities, such as password reset or memory upgrades. Work order templates and work order task templates are added to the product catalog when the Field plugin is activated. Users with the wm_admin or model_manager role can create, edit, and delete work order templates and work order task templates. Create a work order template Field uses the work order template as a source of information for populating fields in a work order. Role required: wm_admin or model_manager Some of the predefined fields specific to the Work Order Templates table (cmdb_workorder_product_model) have been removed from the template form. This change enables the template form to be used with other tables, such as the table selected in the Task Type field. Add fields to the template form as needed, such as the Assignment group field, as part of template creation process. 1. Navigate to one of the following: 2. Product Catalog > Templates > Work Order Templates Field Service > Catalog & Knowledge > Work Order Templates Click New. 236
237 237
238 3. Fill out the fields on the Work Order Template form, as appropriate. For fields in the Task Information section of the form, you can click Copy Task Template and add the information from a task template if desired. Table 63: Work Order Template form fields Field Request information Name [Required] Unique and descriptive name for this template. Short description [Required] Content that is copied into the Short description field of a work order when this work order template is used. The exception to this is a work order created from an incident, problem, or change request, which always uses the short description of the source task, even when a template is applied. More in-depth description of the purpose of the template. Checklist template Select a checklist template to add a checklist to the work orders created from this work order template. Workflow The workflow for work orders created from this template. Qualification group The qualification group for work orders created from this template. Task information Task type The type of task to create. The default is Work Order Task. Name Unique and descriptive name for this task. As you start to type the description of the task, fields for your next task appear. A description of this task. Parts and quantities Parts requirements and quantities, as needed. If you selected Part requirements are not needed by agents on the Field Service Configuration screen, the Parts and quantities fields are not displayed. 238
239 Field Dispatch group The dispatch group used to select the individuals who will fulfill the task. By default, filters the list of available dispatch groups by their proximity to the work order task location. When the work.management.limit.location property is set to false, the system displays all dispatch groups for selection, without any consideration of location. If only one dispatch group is available for a work order task in any location, automatically enters that group in this field. If the Field Service will not use the dispatch queue option is selected in the Field Service Configuration screen, this field is not displayed. Depends on Identifies the task of tasks that must be completed before this task can be performed. You cannot make an entry in the first task until you have created subsequent tasks. Checklist template Select a checklist template to add a checklist to the tasks created from this work order template. If desired, add a field to the Request Information section of the template: a) Click Edit fields and select the field from the choice list. b) Add a value to the field. c) Click the gear icon next to the field and enable the Show option if you want this field to be displayed when this template is selected from the Field Service Catalog. If desired, enable the Mandatory option to make this a mandatory field. If desired, add one or more fields to the Task Information section of the template from the table selected in the Task type field. a) Click Edit fields and select the field from the choice list. b) 6. Add a value to the field. As you work with tasks, you can click the min and max buttons to expand and collapse task information. If needed, you can also change the order of tasks using drag-and-drop. If you set the Templates will not create a dedicated catalog item option on the Field Service Configuration screen, the template screen includes a Publish button. You can click this button if you want to manually publish a template as an item in the catalog. If the option is set to Templates will create a dedicated catalog item, the Publish button will not be displayed and the template will be automatically added to the catalog. When you have completed your entries, click Submit. 239
240 Create a knowledge article for a work order template You can add knowledge articles and guides (such as installation guides, maintenance procedures, and checklists) to the default knowledge base for hardware, software, and consumable templates. Role required: wm_admin or model_manager 1. Navigate to one of the following: Product Catalog > Templates > Work Order Templates Field Service > Catalog & Knowledge > Work Order Templates Click New. Fill in the fields on the Work Order Template form, as appropriate. Table 64: Work Order Template form fields Field Request information Name [Required] Unique and descriptive name for this template. Short description [Required] Content that is copied into the Short description field of a work order when this work order template is used. The exception to this is a work order created from an incident, problem, or change request, which always uses the short description of the source task, even when a template is applied. More in-depth description of the purpose of the template. Checklist template Select a checklist template to add a checklist to the work orders created from this work order template. Workflow The workflow for work orders created from this template. Qualification group The qualification group for work orders created from this template. Task information Task type The type of task to create. The default is Work Order Task. Name Unique and descriptive name for this task. As you start to type the description of the task, fields for your next task appear. A description of this task. 240
241 Field Parts and quantities Parts requirements and quantities, as needed. If you selected Part requirements are not needed by agents on the Field Service Configuration screen, the Parts and quantities fields are not displayed. Dispatch group The dispatch group used to select the individuals who will fulfill the task. By default, filters the list of available dispatch groups by their proximity to the work order task location. When the work.management.limit.location property is set to false, the system displays all dispatch groups for selection, without any consideration of location. If only one dispatch group is available for a work order task in any location, automatically enters that group in this field. If the Field Service will not use the dispatch queue option is selected in the Field Service Configuration screen, this field is not displayed. Depends on Identifies the task of tasks that must be completed before this task can be performed. You cannot make an entry in the first task until you have created subsequent tasks. Checklist template Select a checklist template to add a checklist to the tasks created from this work order template. Any hardware, software, and consumable assets you create and assign to the new template are displayed in the Knowledge related list on the template record. Use the work order template Work order templates enable users with the proper roles to automatically create work orders, tasks, and part requirements. Role required: wm_admin or model_manager Navigate to Field Service > Work Order > Create New. Select the desired work order template from the Template field and save the form. The template information is used to: Copy the short description, priority, and billable status to the work order. The system also copies the qualification group to the work order form if this field is present. Qualification groups are not required when automatic qualification is configured. Work orders created from an incident, problem, or change request display the short description from the source task, even when a template is selected. Tasks for work orders created from templates always display the short description from the task template. Create any tasks, using the information from the work task templates. 241
242 Create the parts requirements. If a part specified is out of stock, the system displays a message naming the part. Part requirements After all work order tasks are qualified and the parent work order state automatically changes to Qualified, you can request more information from the qualifier, if necessary, and source any parts required for the tasks. If a work order was created from a work order template, the part requirements are automatically added to the work order task. The examples included in this topic illustrate the use of part requirements with work orders; however, part requirements can be used with any application. To create part requirements and source parts, the Part requirements are needed by agents configuration option must be enabled on the Field Service Configuration screen. Request additional information Transfer orders move necessary parts to the location where the agent can receive them. If there is not enough information to create a transfer order, the dispatcher can request more details from the qualifier. Role required: wm_dispatcher or wm_admin Navigate to Field Service > Dispatching > Dispatch Queue. Open a work order task in Pending Dispatch state. In the Work Notes field, enter a reason for returning the work order. Click Request more information. The task state changes to Draft and the work order state changes to Awaiting Qualification. If Field is configured for automatic qualification, the work order state remains at Qualified. Source parts Sourcing a part is the process of reserving and obtaining an asset described in a part requirement record, either by ordering it from a vendor or transferring it from one stockroom to another. Users who can create work orders can create part requirements by using work order templates or by manually using the procedures on this page. Agents, qualifiers, and dispatchers, including users with the combination roles, can create and source a part requirement. A qualifier determines if parts are necessary to execute work order tasks. A dispatcher sources the part requirements and creates transfer order lines. A dispatcher or agent moves the parts through the transfer process. An agent accepts delivery of the parts and records part usage. Part requirements must be associated with a work order task. After parts are identified, a transfer order is created to move the parts from the stockroom where they are located to a different stockroom or directly to an agent. Agents can be selected based on skills and the availability of parts in their personal stockrooms. One work order task can have multiple part requirements and multiple transfer orders. 242
243 In one work order task, multiple part requirements may require different items that can all be found in one stockroom. One transfer order can satisfy the part requirements. The transfer order will have multiple transfer order lines, each specifying a different item based on the part requirements. When one stockroom has all required items, a single transfer order line can fulfill the order when moving consumable assets. One or more transfer order lines may need to be created when moving non-consumable assets. (For more information about consumable and non-consumable assets, see Managing Assets.) If a single stockroom does not contain all the items needed for the part requirement, create an additional transfer order line to a different stockroom. Because the new transfer order line specifies a different stockroom, a separate transfer order is automatically created. One part requirement is then fulfilled by two separate transfer orders to two different stockrooms. When a technician/agent is working on a task, and requires a part, she should be able to use the part from her personal stock room, when available, without going through the sourcing process. With simplified part sourcing, an agent can create a part requirement and use a part from their personal stockroom without going through the sourcing process. This is helpful for agents who are already working on tasks and have access to the necessary parts. The Use Asset and Remove Asset buttons are available on the Asset Usages related list on the Work Order Task form. Simplified part sourcing With simplified part sourcing, an agent can create a part requirement and use a part from their personal stockroom without going through the sourcing process. This is helpful for agents who are already working on tasks and have access to the necessary parts. To use simplified part sourcing, click the Use Asset button on the Asset Usages related list on the Work Order Task form. Manage part requirements Create, copy, and delete part requirements as required for work order tasks. If the agent assigned to the task does not have the skills or parts required, the dispatcher can select an agent who is better equipped to complete the task. Create a part requirement Create a part requirement for a work order task. Role required: wm_agent, wm_qualifier, wm_dispatcher, wm_admin, or qualifier combination role Navigate to Field Service > Work Order > All Work Orders. Open a work order. Open a work order task that is not in the Closed or Cancelled state. Do one of the following: Option Click Source. All tasks and part requirements are listed on the left. Point to any task or part requirement icon to obtain more information. Right-click a work order task and select Create Part Requirement. This method is useful if you are sourcing multiple parts for a work order task. In the Part Requirements related list, click New. This method is useful if you are sourcing a single part for a work order task. Fill in the fields, as appropriate. 243
244 Table 65: Part Requirement form fields Field Number Auto-generated number for the part requirement. Work order task Number assigned to the work order task. Model of the part model needed to complete the work order task. Required by date Date by which all parts should be delivered. The date is filled in automatically based on the task's expected travel start time. If necessary, change the date manually. Required quantity Total quantity necessary to complete the part requirement. This field becomes readonly when the full number of required parts has been sourced. Reserved quantity Total quantity that has been sourced already. Sourced Indicator for whether the required quantity for this part requirement has been reserved and transfer requested from one stockroom to another. Delivered Indicator for whether the transfer order lines under this part requirement have been delivered or not. Short description Contents of the Short description field from the parent work order. If the work order was created from an incident, problem, or change request, the short description of the part requirement is inherited from that record. If the work order was created automatically from a work order model, the short description is from model template. This field is not visible by default. Click Submit. If the part is out of stock, a message appears at the top of the form naming the part. If someone other than the qualifier will source the part requirement, create transfer order lines, move the part from a stockroom to an agent, and click Qualified. Note: Part requirement record numbers start with an SOPR prefix and the records are stored in the [sm_part_requirement] table in the Service Order Management application. Part requirements created in prior releases start with an WOPR prefix. Copy a part requirement Copy a part requirement to quickly create another, similar part requirement. 244
245 Role required: wm_agent, wm_qualifier, wm_dispatcher, wm_admin, or qualifier combination role Navigate to Field Service > Work Order > All Work Orders. Open a work order. Open a work order task that is not in Closed or Cancelled state. Click Source. In the Source Work Order list, right-click on a work order part number and select Copy Part Requirement. This action copies the part requirement information to the clipboard. In the Source Work Order list, right-click on a work order task number and select Paste Part Requirement. Delete a part requirement Delete a part requirement from a work order task. Role required: wm_qualifier or qualifier combination role 1. Navigate to Field Service > Work Order > All Work Orders Open a work order. Open a work order task that is not in Closed or Cancelled state. Click Source. 5. The Source Work Order list appears, showing the part requirement records in a tree structure. Right-click on a part requirement number and select Delete Part Requirement from the context menu. The system deletes the part requirement without displaying a confirmation message. Source a part and assign an agent The work order sourcing option is useful when you want to assign a work order task to agents who already have the required parts in their stockroom or to a specific agent who needs you to obtain the parts for them. Role required: wm_agent, wm_qualifier, wm_dispatcher, wm_admin, or qualifier combination role The sourcing option shows the full list of tasks and part requirements to source for a work order or task. For each task, the agents and stockrooms that have the required parts are listed. Also, the skills and parts required for each task are displayed. Select an agent to see if the agent has the skills and parts required for the task. The time slots during which the agent is available within the work order window are shown to help you schedule task work efficiently Navigate to Field Service > Work Order > All Work Orders. Open a work order. Open a work order task that is not in Closed or Cancelled state. Click Source. In the Source Work Order list, click a work order task. 245
. Only agents that meet the criteria in the work order task are available for selection.")
246 Figure 19: Work Order Task Sourcing screen The Agent field under Agent info is populated automatically based on information provided in the work order task. 6. To specify a different agent, click the reference lookup icon ( ). Only agents that meet the criteria in the work order task are available for selection. The system populates the Skills and Parts fields automatically, based on the agent specified. If a not available icon ( ) appears next to a part, the specified agent either does not have the part or does not have enough units of the part to complete the task. Point to the icon to obtain information about how many units of the part are needed and how many units the agent has in their stockroom. To filter agents and reserve parts, click the arrow next to Agent info to expand the section. 246


247 Figure 20: Expanded sourcing screen Select the skills and parts options to filter the agents. Select Reserve parts in agent stockroom to reserve parts located in the specified agent's stockroom. This automatically sources the parts already present. Figure 21: Filter agents 9. In the Date field, select the date on which the work should take place. If the agent is available on the date specified, the Assign button appears in the Schedule field. 10. If necessary, you can update the Scheduled start and Scheduled end fields in the Task info section. If you change the Scheduled start and Scheduled end fields in the Part Requirements section at the top of the screen, the corresponding fields in Task info are also changed. If you make changes to the fields in the Task info section, the corresponding fields in the Part Requirements section are not changed. Any edits to the Estimated travel duration, Estimated work duration, or Scheduled start time fields on the Task form appear automatically in Task info. 11. Click Assign. 247

248 12. To revert your changes to Agent Info, click Refresh. You cannot use Refresh after you have saved the record. 13. Click Save. The agent is not assigned until you save the record. 14. Source any parts the specified agent does not yet have reserved. In the left pane, select a part from the list of part requirements under the task. Figure 22: Source part 15. Click Source Part and complete the transfer order. Transfer orders Use a transfer order to move necessary parts between company stockrooms or to a location where an agent can recieve them. The transfer order defines delivery dates, the stockrooms involved in the transfer, and the general status of the order. A transfer order contains one or more transfer order lines which allow the transfer of multiple parts or assets on one transfer order. A transfer order line describes the part, the quantity required, and the status of the part in the transfer process. The system creates a transfer order automatically when you create a transfer order line. You can add additional transfer order lines to a transfer order as long as the transfer order is in the Draft stage. When any of the transfer order lines advance to the next stage, the transfer order stage also advances, and can no longer accept additional transfer order lines. 248
249 Consumable and non-consumable models The transfer process is slightly different for consumables than it is for non-consumables. Consumable assets, such as computer keyboards, are not tracked individually in transfer orders. Nonconsumable assets, such as network routers, are configuration items that are tracked individually in transfer orders. Consumable models If the model being transferred is a consumable, the system can order all the items at once if you specify a Requested quantity on a single transfer order line. After the quantity is specified, the system determines whether the selected stockroom has enough quantity to fulfill the part requirement. If the stockroom cannot fill the entire part requirement, the system enters the quantity available in the stockroom automatically. For example, if the requirement is for 25 keyboards and the selected stockroom only contains 10, the available quantity of 10 is added. The user must create another transfer order line manually to order the remaining 15 keyboards from another stockroom. Non-consumable models If the model being transferred is a non-consumable asset, create one transfer order line per asset. The system creates as many transfer order lines as the required quantity. This approach is used so that each configuration item can change its status and stockroom location independently. For example, if the part requirement specifies two Canon i960 Photo printers, and printers are managed as configuration items, then the system generates two transfer orders lines - one per configuration item. After the agent receives the part (item state changes to In Stock and substate changes to Reserved) and uses it, the asset is listed as In Use by the caller who originated the work order. Create a transfer order Create a transfer order that moves the necessary parts or assets to the correct stockroom or agent location. Role required: wm_agent, wm_qualifier, wm_dispatcher, wm_admin, or qualifier combination role Navigate to Field Service > Work Order > All Work Orders. Open a work order. Open a work order task. In the Part Requirements related list, click a Number. Click Source Part. A new Transfer Order Line form appears. The system completes the Model field automatically with information from the part requirement. You can select a different model, but it must be a substitute 6. for the requested model. If you click the reference lookup icon ( ) beside the Model field, only the selected model and any substitute models that are in stock are listed. Select a From stockroom. 249
250 7. Only stockrooms that have the model specified are included in the list. If no stockrooms are listed, the part is considered out of stock. Select a To stockroom. To deliver the items to an agent directly and skip the Received stage, select a personal stockroom as the destination. If no agent is assigned to the work order task, the transfer order line waits in the Received stage until an agent has been assigned. To use a part without transferring it, select the same non-personal stockroom for both the source and destination stockroom. This action moves the transfer order directly to the Received stage and sets the asset state and substate to In stock - Pending transfer. Note: An error occurs if the same personal stockroom is selected for both the source and destination stockroom. In this case, the transfer order line automatically moves to the Delivered stage even if no agent is assigned to the work order task. 8. Specify the Quantity requested. 9. If the first stockroom you select does not contain sufficient quantity, then repeat steps 2-5 until the entire quantity required is ordered. As you order from stockrooms, the number in the Reserved quantity field is updated automatically. When the numbers in the Reserved quantity and Requested quantity fields on the Part Requirement form match, the system selects the Sourced check box. After one transfer order line is requested from the part requirement, you cannot change the part requirement. Select a Delivery method. Qualifiers, dispatchers, agents and users with combined roles can specify a delivery method for parts while a transfer order is in the Draft stage. The possible delivery options are: Standard Overnight Courier Agent Pickup 10. Click Submit. Merge transfer orders After you submit a new transfer order, the system examines all existing transfer orders attached to the current work order task to determine if the new transfer order can be merged with any of the existing orders. The system uses these criteria to merge transfer orders: Created from the Field application. (Configure the transfer order record to add the Type field.) In the Draft stage. Same From Stockroom. Same Destination Stockroom. If an existing transfer order matches these criteria, the new transfer order line is placed under the existing transfer order. If no existing transfer order matches these criteria, a new transfer order is created and the transfer order line is added. It is good practice to view the transfer order and ensure that all information is correct. For example, check that the Delivery by date on the transfer order is appropriate for the Required by date on the part requirement. Transfer orders created in the Field application are not merged or combined with transfer orders created from any other application, such as Procurement. 250
251 When all the transfer order lines under a part requirement are delivered to the assigned agent's personal stockroom, the part requirement is marked Delivered. When both the consumable and non-consumable assets are delivered, the system changes their State to In stock and their Substate to Reserved (in Asset Management). Transfer parts Agents, dispatchers, and users with combined roles can transfer parts. Open a work order task in the Pending Dispatch state, and then open a transfer order from the Transfer Orders related list. Transfer the parts using the procedure in Move an asset through the transfer process. Move an asset through the transfer process The transfer order itself and each individual transfer order line have a separate stage. The overall stage of the transfer order is calculated cumulatively based on the stages of the individual transfer order lines. For example, after all transfer order lines are changed to Received, the transfer order is marked Received. The transfer order line stages are visible in the Transfer Order Lines related list. 1. Click the plus icon to expand the stage information. After creating transfer order lines, the transfer order and all of the transfer order lines are in Draft stage. Transfer orders and transfer order lines always start in Draft. While a transfer order or a transfer order line is in Draft stage, it can be deleted. Note: When an asset is part of a transfer order set to Draft, the asset record updates to show the asset as reserved. No one else can request or transfer the asset while it is reserved. 2. After all information has been added to the transfer order and the transfer order lines, click Ready for Fulfillment on the transfer order. 251

252 Figure 23: Transfer order ready for fulfillment 3. This moves the transfer order and all transfer order lines to the Requested stage. At this point in the process, the transfer order can continue to move forward as a unit or the transfer order lines can be moved forward separately. To move the transfer order, ready all assets for shipment and click Prepare for shipment on the transfer order. The transfer order and all transfer order lines move to the Shipment Preparation stage. You can also click Prepare for shipment on a transfer order line to move only that transfer order line to the Shipment Preparation stage. The transfer order stage is set to Shipment Preparation as soon as the first transfer order line is set to Shipment preparation. While an asset is in the Shipment Preparation (or earlier) stage, the transfer order line can be cancelled by opening the transfer order line record and clicking Cancel. The stage changes to Cancelled (Closed Complete). 4. When all transfer order lines reach the Shipment preparation stage, the Ship button is available on the transfer order. Click Ship on the transfer order to move all transfer order lines to the In Transit stage. 252
253 5. In the case that assets ship at different times, transfer order lines can move individually. For example, assume a transfer order is comprised of three assets: a laptop, a printer, and a keyboard. All three assets have been prepared for shipment and the laptop is ready to ship. Click the transfer order line Number next to the laptop. Now, on the transfer order line record for the laptop, click Ship. Figure 24: Ship Transfer Order The laptop moves to the In Transit stage, but the printer and keyboard remain in the Shipment Preparation stage. Because at least one of the transfer order lines is now in transit, the overall transfer order is moved to the Partially Shipped stage. Once all transfer order lines are shipped, the transfer order moves to the Fully Shipped stage. 253
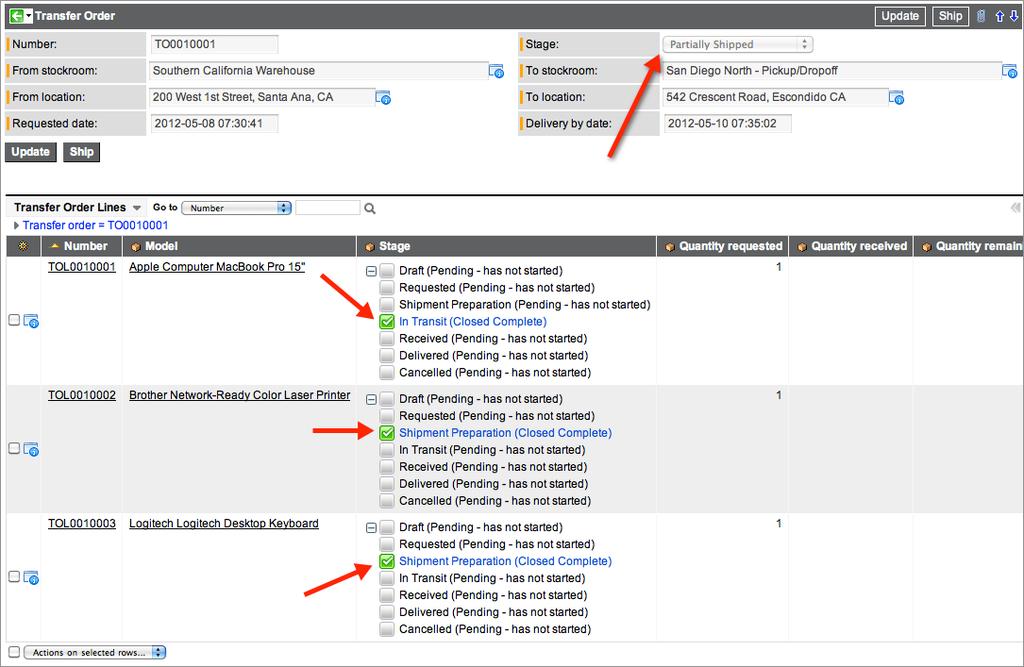
254 254

255 6. 7. After all transfer order lines are shipped, the next step is to receive the assets. Assets are always received at the transfer order line level. Click the transfer order line Number next to the asset. On the asset record, click Receive. Figure 26: Receive Transfer Order After all transfer order lines are received, the transfer order moves to the Received stage. Note: It may be necessary to return items, such as when they are defective. To return items, receive the items, then follow the return process. Dispatching work order tasks When all of the work order tasks associated with a work order are qualified, you can dispatch the work order tasks from the task form or task map, or by using central dispatch When all of the associated tasks are qualified, the state of the parent work order changes to Qualified. If you have already sourced parts and created transfer order lines, you are ready to begin dispatching the work order tasks to agents. Users with the following roles can dispatch work order tasks: wm_dispatcher, wm_initiator_qualifier_dispatcher, or wm_admin. You can dispatch work order tasks to qualified work agents from these locations: Dispatch queue: Dispatch tasks to agents from task records. Task map: Dispatch tasks to agents using a Google map with geolocation. Central Dispatch: Dispatch tasks to agents using the Central Dispatch board, which provides drag-anddrop capabilities to assign and dispatch tasks. Note: Central Dispatch replaces Visual Dispatch in the Helsinki release. Dispatch a work order task from the dispatch queue You can dispatch a work order task from the dispatch queue. 255
256 Role required: wm_dispatcher, wm_initiator_qualifier_dispatcher, or wm_admin Navigate to Field Service > Dispatching > My Dispatch Queue. Open a work order task. Select an Assignment group. Select an individual agent in the Assigned to field. The lookup list displays all of the agents in the selected assignment group. Click Update. Dispatch a work order task from the task map You can dispatch a work order task from the task map. Role required: wm_dispatcher, wm_initiator_qualifier_dispatcher, or wm_admin In some cases, you might need to dispatch an urgent task or reassign a task to an alternate agent if the assigned agent is delayed or otherwise unable to perform the task. Only users with the wm_dispatcher or wm_initiator_qualifier_dispatcher role can display their tasks on the dispatch map directly from a task record and see the available agents nearby who have the skills to perform the task. Note: A task cannot be displayed on the dispatch map without a location that has latitude and longitude defined Navigate to Field Service > Dispatching > My Dispatch Queue. Open the work order task that that you want to dispatch or reassign. Click View Task on Map This button is only visible if the task contains a location with a defined latitude and longitude. The map that appears displays a red task icon with a black spot for the task, and shows icons for all nearby agents. Click View Filter. Select a skill level for the agents to display in the map. Match all needed skills Match some needed skills Match none of skills 6. Click Apply Filter The resulting list shows the agents on the map who match the skills selection. Click an agent icon to show the agent's name, skills, and schedule. Click the icon beside the agent's name to assign the task to that agent. Figure 27: Assign single task 256
257 If the task can fit within the agent's schedule, the task is assigned to the agent and a confirmation message is displayed. If the agent's schedule cannot accommodate the task, the system displays a failure message and allows you to select a different agent. Auto-dispatch a work order task Automatically match a task to a nearby agent who has the necessary skills and a schedule that can accommodate the task. Role required: wm_dispatcher, wm_initiator_qualifier_dispatcher, or wm_admin Auto-dispatch evaluates an agent's dispatch group, assignment group, location, or skills before assigning a task Open a task. Click Auto-Dispatch. The system assigns the work order task to the selected agent. If the system cannot find an appropriate agent, it displays a failure message and leaves the task in the Pending Dispatch state. Request additional work order task information If there is not enough information in the task record to dispatch a work order task, you can request more details from the qualifier. Role required: wm_dispatcher, wm_initiator_qualifier_dispatcher, or wm_admin Navigate to Field Service > Dispatching > Dispatch Queue. Open a work order task in Pending Dispatch state. In the Work Notes field, enter a reason for returning the work order task. Click Request more information. The work order task state changes to Draft and the work order state changes to Awaiting Qualification. If Field is configured for automatic qualification, the work order state remains at Qualified. Central dispatch With the wm_dispatcher role, you can use Central Dispatch to view and assign scheduled work order tasks to available field service agents. The central dispatch board provides drag-and-drop capabilities to assign and dispatch tasks. It also provides search and filter capabilities, which enable dispatchers to focus on specific tasks and agents. Dispatchers can use the central dispatch board to evaluate task details, such as locations and required skills, and then match tasks to available agents. The location of the unassigned tasks and the assignment groups displayed on the central dispatch board are based on the dispatcher s dispatch group. Note: The central dispatch feature is supported on the following browsers: The latest public release of Firefox The latest public release of Chrome Safari version 6 and up Internet Explorer version 10 and up 257
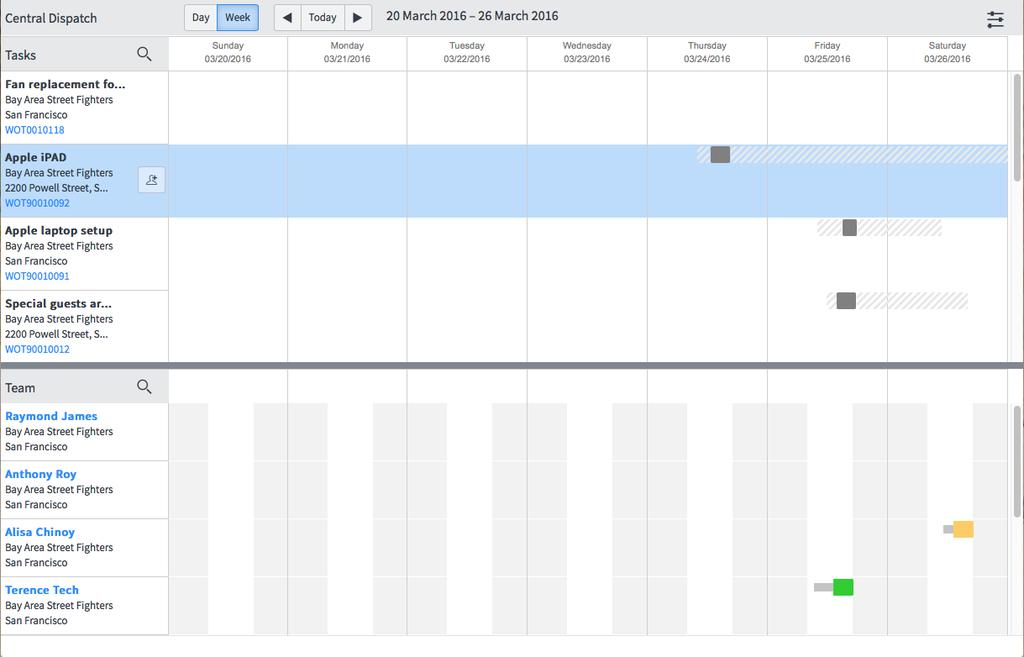
258 258
259 The top section of the central dispatch board displays unassigned work order tasks, with a Tasks list on one side and the tasks represented in a calendar view on the other side. The bottom section of the central dispatch board displays field service agents and calendars, with a Team list on one side and the assigned work order tasks in a calendar view on the other side. A gray bar between the two sections can be used for resizing the task and team areas. Note: Assigning tasks in Central Dispatch considers the settings on the Field Service Configuration page even if the Assignment method for tasks configuration option is set to manually. Notifications appear at the top of the central dispatch board, including informational and error messages about configuration changes, task assignment issues, and other usage tips. Central dispatch calendar The central dispatch board displays scheduled work order tasks in a calendar view. The calendar displays scheduled tasks for a single day or for a week. Change the view by clicking the corresponding button in the header: Day Displays 24 hours starting at midnight. Week Displays seven days starting with Sunday. The date or range of dates for the view is then displayed accordingly above the central dispatch board. View different dates by clicking arrows in the header. Click the left arrow to display earlier dates and the right arrow to display later dates. Click Today to display the current date. A blue vertical line in the calendar denotes the current date and time. The upper section of the calendar displays unassigned tasks, which are represented with these types of bars: A solid bar that extends from the task's scheduled start time to the estimated end time. A dashed bar that indicates the window of time in which the task can be completed. This bar is displayed if the task's scheduled start and estimated end fall within the task window. The lower section of the calendar displays assigned tasks. The tasks are represented by colored bars that indicate the estimated work duration. The color of the bar represents the current task status: Blue: accepted Yellow: assigned Gray: pending dispatch Green: work in progress Black: other states The colored task bars are preceded by a thinner gray bar that represents estimated travel time. Point to a task in either section to display a tooltip that provides information about the task, including the task number and short description. For assigned tasks, the initials of the assigned agent are also displayed. Additional information, such as estimated travel and work durations, expected start time, and location is also displayed. The information included in the task tooltips can be configured by the system administrator. Double-clicking a task in either section opens a task form from the side of the screen. This allows the dispatcher to view and update tasks without leaving the central dispatch board. 259
260 Central dispatch calendar keyboard shortcuts Action Keyboard Shortcut Go to the next event E Go to the previous event Shift + E Central dispatch tasks The upper section of the central dispatch board displays scheduled work order tasks in both a list and a calendar view. The Tasks list shows the unassigned tasks that meet the conditions set in the Central Dispatch [central_dispatch_config] table. The dispatcher can set these conditions from the Configuration Settings menu. The Tasks list displays the Short description and Number for each task. The dispatcher can configure this list to display additional task fields, such as the location and assignment group. The system administrator can configure the task fields that are available for selection by the dispatcher. When you navigate to the central dispatch board, the first task in the Tasks list is selected by default. When you select a task in the Tasks list: An auto assign icon appears, which can be used to assign the task to an available agent. The Team list also updates to show all of the agents available for this task. You can scroll through the Tasks list to display additional tasks. If not automatically displayed, click the Show more tasks link at the bottom of the list. Unassigned work order tasks are represented in the calendar using these types of bars: A solid bar that extends from the task's scheduled start time to the estimated end time. A dashed bar that indicates the window of time in which the task can be completed. This bar is displayed if the task's scheduled start and estimated end fall within the task window. Assigned tasks in the lower section are represented by colored bars that indicate the estimated work duration. These colored task bars are preceded by a thinner gray bar that represents estimated travel time. To see more details about a task, point to the task in the calendar to display a tooltip. You can also click the task number in the Tasks list or double-click the task in the calendar to open the task form on top of the central dispatch board. To assign a task to a field service agent: Click a task bar in the calendar and drag it to an agent in the Team list. Select a task in the Tasks list and click the auto assign icon ( ). After assigning a task, confirm the assignment information in the work order task window, including the agent in the Assigned to field. Central dispatch agents The lower section of the central dispatch board displays the field service agents in the dispatcher's group and the tasks assigned to each agent. 260
261 The Team list on the left displays the names of the agents in the dispatcher's group. The dispatcher can configure this list to display additional information for each agent, such as the agent's location, matching skills, and parts required. The system administrator can configure the fields that are available for selection by the dispatcher. After a task is selected from the Tasks list, the Team list updates to show all of the agents available for this task. To show all team members, click the Show all Team members link at the bottom of the Team list. You can also scroll through this list to display additional agents. As you scroll, more agents are displayed at the bottom. Assigned tasks are represented on the calendar by colored bars, with the color of the bar indicating the task state. The default colors for the task states are: Blue: accepted Yellow: assigned Gray: pending dispatch Green: work in progress Black: other states Assigned tasks in the lower section are represented by colored bars that indicate the estimated work duration. These colored task bars are preceded by a thinner gray bar that represents estimated travel time. To see more details about an agent, click the agent name in the Team list to open the user form on top of the central dispatch board. To see more details about an assigned task, you can point to the task in the calendar to display a tooltip or double-click the task in the calendar to open the task form on top of the central dispatch board. Configure central dispatch Each dispatcher can create their own configuration for the central dispatch board. Role required: wm_dispatcher or admin A dispatcher can configure the following on the central dispatch board: Select the fields that are displayed for each task in the Tasks list. Select the fields that are displayed for each agent in the Team list. Select conditions to filter the tasks that are displayed in the Tasks list. These configuration settings are saved for each dispatcher and are available the next time the dispatcher logs in. If the system administrator makes changes to the central dispatch advanced configuration settings, the dispatcher sees a message about the changes the next time they log in Navigate to Field Service > Dispatching > Central Dispatch. Click the configuration settings icon ( window. Configure the following information. ) in the upper corner to display the Configuration Settings 261
262 Option Select the fields that are displayed for each task in the Tasks list on the central dispatch board. Click the Tasks button at the top of the window. In the Task Display Fields section, enable the fields that you want to display and disable the fields that you want to hide. The Number and Short description fields are displayed by default. The remaining fields available for selection are configured by the system administrator. Select the fields that are displayed for each agent in the Team list on the central dispatch board. Click the Team button at the top of the window. In the Team Display Fields section, enable the fields that you want to display and disable the fields that you want to hide. The Name field is displayed by default. The fields available for selection are configured by the system administrator. Select one or more conditions to filter the tasks that are displayed in the Tasks list on the central dispatch board. 4. Click the Advanced Configuration link to display the Personalize Central Dispatch window. In the Task condition field, use the condition builder to construct one or more condition statements to filter the tasks in the Tasks list. Click the configuration icon again to close the Configuration Settings window. Administer central dispatch The system administrator can configure several settings that control the information displayed on the central dispatch board. Role required: admin The system administrator can set the following advanced configuration settings: The task fields displayed in the Tasks section on the central dispatch board The task fields displayed in task tooltips in the central dispatch calendar The user fields displayed in the Team section on the central dispatch board The colors assigned to the different task states These configuration settings are saved for each dispatcher and are available the next time the dispatcher logs in. If the system administrator makes changes to the central dispatch advanced configuration settings, the dispatcher sees a message about the changes the next time they log in. The configuration settings can be accessed in two different ways: From the Central Dispatch window by clicking the configuration settings icon. From the Field Service menu by navigating to Field Service > Administration > Central Dispatch Configuration. Navigate to Field Service > Dispatching > Central Dispatch. Click the configuration settings icon ( ) in the upper corner to display the Configuration Settings window. Click the Advanced Configuration link to display the Personalize Central Dispatch window. 262
263 4. Configure the following information. Option Select the task fields that can be displayed in the Tasks list. The selected fields appear on the Tasks tab of the Configuration Settings window and the dispatcher can enable or disable these fields as desired. In the Task Fields section, select the desired fields and move them to the Selected list. Select the fields displayed in the task tooltips. In the Task Tooltip Fields section, select the fields and move them to the Selected list. Select the user fields that can be displayed in the Team section. The selected fields appear on the Team tab of the Configuration Settings window. The dispatcher can enable or disable these fields as desired. In the Team Display Fields section, select the fields and move them to the Selected list. Select the colors that represent the different task states. 5. Click the Visuals tab. For each task state, enter the name or HTML hex number for the desired color. Click Update. Display a task form Display a task form from the central dispatch board. Role required: wm_dispatcher or admin Navigate to Field Service > Dispatching > Central Dispatch. Click a task number in the Tasks list or double-click a task bar in the calendar view. The task form opens on top of the central dispatch board. If necessary, make any changes to the task form. Click Update. Display a user form Display user information for a field service agent from the central dispatch board. Role required: wm_dispatcher or admin Navigate to Field Service > Dispatching > Central Dispatch. Click an agent name in the Team list. The User form opens on top of the central dispatch board. This form includes information about the agent, including current schedule status. If necessary, make any changes to the task form. Click Update. Assign a work order task to an agent Assign a work order task to a field service agent from the central dispatch board. 263
264 Role required: wm_dispatcher or admin You can assign tasks that have a state of Pending Dispatch. You can also reassign tasks. When assigning and dispatching work order tasks, consider the following: The length of time required to complete a task The window of time in which a task must be completed The schedule and availability of the agents with the necessary skill sets The availability of required parts The impact on other tasks Navigate to Field Service > Dispatching > Central Dispatch. Do one of the following: Click a task bar in the calendar and drag it to an agent in the Team list. Select a task in the Tasks list and click the auto assign icon ( ). Confirm the assignment information in the work order task window, including the agent in the Assigned to field. Click Update. The task is displayed on the calendar next to the agent's name and the task bar color indicates that the task has been assigned. Search work order tasks Search the tasks in the Tasks list on the central dispatch board. Role required: wm_dispatcher or admin You can search on the following fields: Task number Short description Assignment group Dispatch group Assigned agent Location Navigate to Field Service > Dispatching > Central Dispatch. Click the search icon in the Tasks list header to expand the search field. 3. Type the search term in the search field and press the Enter key. The tasks that meet the search requirements are displayed in the Tasks list. To clear the search and display all of the tasks, delete the search term and press the Enter key. 4. Search field service agents Search the agents in the Team list on the central dispatch board. Role required: wm_dispatcher or admin You can search on the following fields: Agent name Assignment group 264
265 Assignment group manager Location Navigate to Field Service > Dispatching > Central Dispatch. Click the search icon in the Team list header to expand the search field. Type the search term in the search field and press the Enter key. The agents that meet the search requirements are displayed. To clear the search and display all of the agents, delete the search term and press the Enter key. Dispatch map The Field dispatch map uses geolocation data to show tasks and agents in the field. Users with the wm_dispatcher role or the dispatcher combination role can use the dispatch map to schedule and assign work order tasks. When the dispatch map opens, the view centers on the logged in user's location, as defined on the user record. Icons for tasks and agents provide access to scheduling information and links to related records. An administrator must activate the Field Geolocation Demo Data plugin (com.snc.work_management_geolocation.demo) to enable the dispatch map. Agent starting position and time You can set the starting position and time for each agent on the dispatch map. Agent starting position The starting position for each agent is determined by the geographic coordinates returned from the agent's mobile device, assuming geolocation is enabled. If geolocation is not enabled, the starting position defaults to the agent's home office The Field application uses these criteria to locate work agents at the beginning of the day: If the agent is routed for a future date, the system calculates the route from the home office. If current geolocation data for the agent is available at the start of the day, the system uses those geographical coordinates instead of the home office as the starting point for the agent's routing. If current geolocation data for the agent is not available for an agent at the start of the day or if geolocation tracking is disabled, the system uses the home office as the starting point. If the agent has a task that is still Work in Progress at the start of the current day, the system starts the agent's route for that day at the location of the unfinished task. The start time is set to the time of the scheduled completion of the unfinished task or the current time, whichever is later. To enable geolocation tracking: In the default view of the User form, select the Geolocation tracked check box to enable agent location tracking. Note: The system can update geographic coordinates only for users who have location services enabled in their browsers. Even users who have the Geolocation tracked check box selected may be prompted by their browsers to share or withhold their location. When the system tracks an agent, it updates the geographic coordinates whenever the agent loads a record on the Task [task] table or on a table that extends Task. After the initial update, the system 265
266 continues to update the agent's geographic coordinates at recurring intervals if the agent does not close or reload the record. Administrators can set the length of this interval by editing the Minimum amount of time between updating the user's location (in seconds) system property. The default geolocation update interval value is 300 seconds, or 5 minutes. To change the default geolocation update interval, navigate to Geolocation > Administration > Geolocation Properties. Agent starting time The starting time for each agent is determined by the Default start time for all work agents when no schedule is set, formatted as 08:00 property, unless the agent has another schedule or task continued from the previous day. The default starting time value is 8:00. To change the default starting time, navigate to Field Service > Administration > Properties. Agent work and schedule status View an agent's work status and schedule status as they complete their tasks. Work status To evaluate the agent's work status, the system checks the action that the agent takes when updating a task and interprets it as a status. An agent's work status can be one of the following: On route On site On break Off work For example, when the agent starts travel to a task, the system considers the agent's status as On route. When the agent starts to work on a task, the agent's status is updated to On site. When an agent closes or cancels a task, the agent's status is updated to None in preparation for travel to the next task. You can view an agent's work status in the information box that opens when you click the agent's icon in the dispatch map or in an agent's user record. To display agent work status in the user record, navigate to User Administration > Users and configure the User form to show the Work agent status field. This action puts the status field on all user records. Schedule status View an agent's schedule status in the information box that opens when you click the agent's icon in the dispatch map or in an agent's user record. A green icon indicates that the agent is ahead of schedule. If the agent is behind schedule, the icon in the map appears in red. Possible statuses are: Ahead of schedule On time Behind schedule, less than 30 minutes Behind schedule, between 30 to 60 minutes 266
267 Behind schedule, more that an hour To display the agent schedule status in the user lists and records, navigate to User Administration > Users and configure the User list and form to show the On schedule field. This action puts the schedule status field on all user records. Tasks that are behind schedule appear highlighted in lists and forms. Red: Tasks that are more than one hour behind. Orange: Tasks that are between 30 and 60 minutes behind. Yellow: Tasks that are only 30 minutes behind. Dispatcher view The icons in the dispatch map mark the location of tasks and agents in the dispatcher's area and serve as access points to various records. Users with the wm_dispatcher, wm_admin, or wm_initiator_qualifier_dispatcher roles can manage tasks and routing from the map, filter the view, and determine at a glance what agents are on time or behind schedule. To access the dispatch map, navigate to Field Service > Dispatching > My Dispatch Map. The dispatch map opens in the geographical area containing the agents from any assignment group that is part of your dispatch group. These icons indicate the location of agents and tasks: Table 66: Dispatch map symbols Image Title Agent on schedule Current location of an agent selected in the filter. Agents with this icon are on time or ahead of schedule. Agent behind less than 30 minutes Current location of an agent who is less than 30 minutes behind schedule. Agent behind less than 60 minutes Current location of an agent who is between 30 and 60 minutes behind schedule. Agent behind more than 60 minutes Current location of an agent who is at least one hour behind schedule. Figure 29: Green truck Figure 30: Blue truck Figure 31: Yellow truck Figure 32: Red truck 267
268 Image Title Agent off the schedule Last known location of an agent who is not currently on the schedule or working on any tasks. Unassigned Unassigned tasks that are awaiting dispatch. Assigned Assigned tasks that have not yet been accepted. Accepted Tasks that have been accepted or tasks that are in progress. Multiple tasks Multiple active tasks clustered by proximity. Multiple agents Multiple agents clustered by proximity. Agent/Tasks Combination of agents and tasks clustered by proximity. Figure 33: Gray truck Figure 34: Red marker Figure 35: Blue marker Figure 36: Green marker Figure 37: Multi task Figure 38: Multi agent Figure 39: Agent-task combo 268

269 Figure 40: Dispatch map Clusters Tasks and agents are gathered together by proximity into clusters as you increase the altitude of the dispatch map view. Tasks are gathered into red clusters and agents are gathered into blue clusters. Counters in each cluster icon indicate the number of agents or tasks rolled up as the perspective changes. When multiple agents and tasks are in one location, they can be gathered into purple clusters. This icon is created by a system property called Merge the task and agent markers on the geolocation maps with a purple marker. This property is found in Field Service > Administration > Properties and is disabled by default. 269

270 Figure 41: Dispatch map cluster Figure 42: Task cluster View task information View task information by clicking the task icon on the dispatch map. A pop-up window shows the task number, the name of the agent if one is assigned to the task, and the task description. By default, the system closes one pop-up window before opening another. To allow multiple pop-up windows to remain open, navigate to System Properties > Google Maps and edit the If true, automatically closes a dispatch map information window before opening a new one property. The following information is included in a task pop-up window: SLA: Time remaining on an SLA, if one is affected by this task. Priority: Task priority by number, 1 being the highest and 5 the lowest. Skills Needed: Skills needed to perform the work. Parts Needed: Parts needed to perform the work. 270


271 Figure 43: Dispatch map task pop-up window If multiple tasks exist in the same location, click the cluster icon to display the list of tasks by status. Click any entry to display summaries for all the tasks in a pane beside the map. You can access individual task records from this list. Figure 44: Dispatch map task pane Click the task number link to display the record in a pop-up window. You can reassign a task to another agent using these fields: Dispatch group Assignment group 271
272 Assigned to Note: If a task has transfer orders that have shipped and are in transit, the system displays a warning and blocks any attempt to reassign the task or to clear the Assigned to field. If the transfer orders have been received or delivered, reassignment is permitted, and the assets are moved to a state of In Stock / Available. For an unassigned task, click the Auto-Dispatch related link to let the system dispatch the task automatically. You can edit the task schedule in this record or create a task window. 272

273 Figure 45: Dispatch map task detail View agent information View details about an agent at a particular location by clicking the agent icon on the dispatch map. A pop-up window shows the agent's schedule and these additional details: Status: Possible values are On route, On site, On break, Off work. 273

274 Last login: Time the agent last logged in to the instance. This field is updated automatically each time a user with geolocation tracking enabled views a task. On schedule: Possible values are On time, Behind schedule, and Ahead. The icon for an agent who is behind schedule appears in red on the map. The system highlights in red the name of the agent who is behind schedule in the Map View of all user records and lists. Assignment groups: All assignment groups this agent belongs to. Click the agent's name to open the user record. Only the Location field can be edited in this record. Click a task number in the schedule list to display the task record. Tasks that are behind schedule are marked in red. If more than one agent is in a location, the map gathers them together in a blue cluster icon. Click the cluster to display a summary pop-up window showing the agents at that location by dispatch group. Click any link in this list to display a detailed list of agents in a panel beside the map. You can open user records and tasks using the links in this list. Figure 46: Dispatch map agent detail 274

275 Filter the dispatch map Filter the items that are visible on the dispatch map. To change the items visible in the map, click View Filter. These filters are available: Table 67: Dispatch map filters Title Show unassigned tasks All unassigned tasks are displayed by default. Clear the check box to hide unassigned tasks. Show assigned tasks All assigned tasks are displayed by default. Clear the check box to hide assigned tasks. On The current date is selected by default. You can change the date to view tasks for that day. Show my agent's work group All assignment groups are selected by default. You can select any assignment group in your dispatch group. Show agent All agents are displayed by default. When you select a specific assignment group, the choice list for agents shows only the agents in that assignment group. Figure 47: Dispatch map filter Click Apply Filter to apply your changes to the map. The view displays all tasks assigned to the agent selected in the filter. The icons are all numbered to show the sequence of the agent's route. Click Apply auto-routing to let decide the most efficient route to the agent's tasks. Auto-routing Auto-routing reorders agent tasks for the day as efficiently as possible using either geolocation or straight line estimation. Properties are used to configure system estimates by adjusting: Travel time between tasks. Task windows that are either fixed or flexible. Task dependencies that require the completion of a prerequisite task. Toll road routing that is either enabled or disabled. 275
276 Rush hour and other specified time buffers. If a task cannot be auto-routed because of an impractical or missing location or because the task window cannot be scheduled, the system displays a message advising that the unroutable task was not included in the new sequence. Dependent tasks cannot be auto-routed if the routing would produces a circular relationship. The system returns any unroutable task to the Pending Dispatch state. Google Maps API for Business Geolocation uses Google Maps API for Business to calculate the most efficient route between tasks, using real-time positioning. To use geolocation, you must provide a Google Key and client ID. For more information, go to Google Maps API for Business. Straight line estimates If you do not have Google Maps API for Business, the system uses built-in time and distance estimates based on latitude and longitude to determine the best route for the agent. Routing restrictions Certain general restrictions apply to auto-routing. If you attempt to auto-route more than 200 tasks, routing fails and the system displays a message describing the error. If a task cannot be auto-routed because of an impractical or missing location, or because the task window cannot be scheduled, a message is displayed advising that the unroutable task was not included in the new sequence. Dependent tasks cannot be auto-routed if the routing would produce a circular relationship. Note: The system returns any unroutable task to the Pending Dispatch state. Assign a work order task Assign agents to unassigned work order tasks using the dispatch map. Role required: wm_dispatcher, wm_initiator_qualifier_dispatcher Navigate to Field Service > Dispatching > My Dispatch Map. Select a filter view for the day and the assignment group you want to see. Click an unassigned task in the map, marked by a red icon. 4. A pop-up window shows the unassigned task and a description. Click the icons of nearby agents and examine their schedules An agent's schedule shows each assigned task and its work duration. The tasks appear in the sequence defined manually by the dispatcher or by the agent using the auto-routing feature. Locate an appropriate agent with available time to perform the unassigned task. Click the number of the unassigned task to display the record in a pop-up on the map. Select the available agent in the Assigned to field. Only agents from the current assignment group are available for selection. 276

277 8. Click Update. The red icon on the map turns blue, indicating that the task is assigned but not yet accepted by the agent. The icon turns green when the agent accepts the task. Assign a single task In some cases, you might need to dispatch an urgent task or reassign one to an alternate agent if the assigned agent is delayed or otherwise unable to perform the task. Role required: wm_dispatcher, wm_initiator_qualifier_dispatcher Only users with the wm_dispatcher or wm_initiator_qualifier_dispatcher role can display their tasks on the dispatch map directly from a task record and see the available agents nearby who have the skills to perform the task. A task cannot be displayed on the dispatch map without a location that has latitude and longitude defined. A task assigned in this manner can be accepted or rejected by the agent Navigate to Field Service > Dispatching > My Dispatch Queue. Open the task you want to dispatch or reassign. Click the View Task on Map The task is not visible in the Draft, Closed Complete, Closed Incomplete, or Cancelled state. The map that appears displays a red task icon with a black spot for the task, and shows icons for all nearby agents. Click View Filter. Select a skill level for the agents to display in the map. The default filter selects all agents in the vicinity. The icons in the map indicate agents with these skill combinations: Match all needed skills Match some needed skills Match none of skills Figure 48: Single task filter 6. Click Apply Filter The system displays the agents on the map who match the skills selection. Click an agent icon to show the agent's name, skills, and schedule. Click the icon beside the agent's name to assign the task to that agent. If the task can fit within the agent's schedule, the system assigns the task and displays a confirmation message. If the agent's schedule cannot accommodate the task, the system displays a failure message and allows you to select a different agent. 277
278 Auto assignment The auto assignment feature can be enabled for requests or tasks, depending on the (SM) application's configuration settings. If the Requests are assigned via auto-assignment option is enabled, requests are automatically assigned. If the Tasks are assigned via auto-assignment option is enabled, the tasks in a request are automatically assigned. When auto assignment is enabled and a task is qualified or marked as Ready for Work, an appropriate agent is automatically assigned to the task and it is moved to the Assigned state. If the task cannot be auto-assigned, a user with the dispatcher role must adjust the values in the request or task form and then save the record. The system uses these criteria to assign agents automatically. Table 68: Auto assignment criteria Option Geolocation The system uses geolocation to find available agents when auto-assigning a task. Skills You can configure whether an agent's skills should be considered when auto-assigning a task. Availability Auto-assignment considers an agent's existing schedule when auto-assigning additional tasks. Task windows Auto-assignment attempts to schedule within any configured task windows. If a window cannot be scheduled for any available agents, autoassignment fails. Task dependencies Auto-assignment considers any upstream task dependencies when auto-assigning a task. Auto assignment of a request and a task Automatically assign a task to a dispatch group when the Requests are assigned using autoassignment option is set in the SM application's configuration. Role required: wm_qualifier, wm_initiator 1. In any SM application, do one of the following: Open a request in the Awaiting Qualification state or one that has been qualified automatically, and then open a task in the Draft state. Open a task in the Ready for Work state. Select an Assignment group. If the Tasks are assigned via auto-assignment and Auto-selection of agents will consider location of agents configuration options are set, enter a location. Auto-dispatch will fail unless the task contains a valid location. 278
279 4. 5. If the Tasks are assigned via auto-assignment option is enabled, create a schedule for this task in the Planned section, or let the system determine the times. For instructions, see Creating Work Order Tasks. By default, enters the current date and time in the Window start field. If you do not create a schedule or a fixed window, uses the start value to look for an agent who has that time slot open. Click Qualified or Ready for Work. The view returns to the previous page, and a success message appears. The system assigns an agent to the task, enters the agent's assignment group in the task record, and moves the state to Assigned. 6. If auto-assignment fails, the message indicates either that no agent was available or that the task did not specify a location. The system moves tasks that fail auto-assignment to the Remain in the Pending Dispatch state. To auto-assign a task that failed previously, enter any missing information or change the schedule, and save the record. Dynamic scheduling Use dynamic scheduling to assign tasks to field service agents. Select and prioritize a list of tasks, provide assignment recommendations based on selected criteria, and auto assign tasks. Dynamic scheduling provides schedule optimization, allowing dispatchers to auto assign tasks and adapt to changing conditions, as well as to focus only on exception cases. Using this advanced tool for task assignment, you can: Select a set of tasks for scheduling. Prioritize the tasks in the set based on ordering rules (for example, assign P1 tasks first). Use ordering rules and unassignment constraints to unassign previously assigned tasks in order to allow the assignment of higher priority tasks. Use selection criteria, such as agent skills and travel time, to select agents. Re-assign tasks for agent time off System administrators can configure task filters and ordering rules to specify how and when tasks are assigned and unassigned. Dispatchers can use dynamic scheduing to automatically assign tasks as they are created and unassign tasks as needed to accommodate higher priority tasks. Dispatchers can also select multiple tasks and use dynamic scheduling to optimize the task assignment. Dynamic scheduling can run in one of two modes: manually or automatically. For manual operation, dispatchers select a set of tasks and then click Auto Assign to prioritize and assign the tasks. For automatic operation, dispatchers can choose to run dynamic scheduling immediately upon task creation or at a specified interval. Using task filters you can identify some tasks to be assigned manually while others can be set up for auto assignment. Agent schedules When an agent creates a time-off event in the agent calendar, the tasks assigned to the agent during the time-off event are reassigned to other agents based on availability. Configure dynamic scheduling Follow these steps to configure the dynamic scheduling feature. 279
280 1. Configure the Field application to use dynamic scheduling. 2. Create or modify a dynamic scheduling configuration. a. Select the task table on which to run dynamic scheduling and enable or disable the task unassignment option. b. Create a task filter on page 282. c. Create one or more task ordering rules. d. If needed, define any task unassignment constraints. Activate dynamic scheduling Activate the dynamic scheduling feature by activating the Field plugin (com.snc.work_management). Role required: admin The Field plugin activates the Dynamic Scheduling plugin (com.snc.dynamic_scheduling) and adds the following module to the Field Service menu in the application navigator: Field Service > Administration > Dynamic Scheduling Configuration. The following tables are installed with dynamic scheduling: Table Constraint Stores the unassignment constraints for the dynamic scheduling feature. [scheduling_constraint] Dynamic Scheduling Configuration [dynamic_scheduling_config] Task Filter [dynamic_schedule_task_filter] Task Ordering Rule [task_ordering_rule] Un-Assignment Constraint [unassignment_rule] Stores the configurations for the dynamic scheduling feature. Configurations include the selected task table, task filters, task ordering rules, and task unassignment constraints. Stores the task filters for a dynamic scheduing configuration. Filters identify a list of tasks to be assigned using dynamic scheduling. Stores the task ordering rules for a dynamic scheduling configuration. Ordering rules prioritize the list of tasks identified by the task filters. Stores the task unassignment constraints for a dynamic scheduling configuration. Constraints prevent a task from being unassigned even if it is of lower importance based on the task ordering rules. Dynamic scheduling system properties Dynamic scheduling uses the following system properties. Property Definition com.snc.dynamic.scheduling.showlogs Controls the display of logs on the Confirm Assignment pop-up window. 280
281 Property Definition com.snc.dynamic.scheduling.maxtasks Controls the maximum number of tasks that can be selected when manually running dynamic scheduling. The default value for this property is 50 tasks. Dynamic scheduling task dependencies Dynamic scheduling uses task ordering rules to prioritize the list of tasks to be assigned. Where applicable, task dependencies override the task ordering rules. A task with one or more downstream tasks cannot be unassigned. If a downstream task is assigned and the upstream task gets reassigned, dynamic scheduling attempts assign the upstream task before the start of the downstream task. If a task has an upstream task that is unassigned, the downstream task does not get assigned. If a task has an upstream task that is assigned, the downstream task does not start until the upstream task is completed. If a task has an upstream task that is assigned a lower priority, the downstream task is not assigned until the upstream task is assigned. Configure Field to use dynamic scheduling Configure the Field application to use dynamic scheduling as the task assignment method. Role required: admin For more information, see Field Service Configuration Navigate to Field Service > Administration > Configuration. Click the Assignment tab. In the Assignment method for tasks field, select using dynamic scheduling. Click Save. Create a dynamic scheduling configuration Create a new dynamic scheduling configuration or modify the configuration provided with the Field Service Management application. Role required: admin Dynamic scheduling works with one selected task table, such as the Work Order Task [wm_task] table, which you select on the Dynamic Scheduling Configuration form. Then create task filters to identify specific lists of tasks, create task ordering rules, and define any task unassignment constraints. Note: To use dynamic scheduling, select this task assignment method on the Field Service Configuration screen. The Dynamic Scheduling Config for Work Order configuration is provided with the Dynamic Scheduling plugin. Modify this configuration to meet your needs or use it as an example for creating your own configuration. 1. Navigate to Field Service > Administration > Dynamic Scheduling Configuration. The Dynamic Scheduling Config For Work Order form is displayed. 281
282 2. Select a table in the Task Table field. By default, this configuration uses the Work Order Task [wm_task] table. For Field Service Management, you can also select the Work Order [wm_order] table. Note: Dynamic scheduling can have only one configuration for each task table. 3. If desired, disable the Un-assignment check box. When the unassignment option is enabled, dynamic scheduling can unassign a previously assigned task in order to complete the assignment of a more important task. Task importance is determined by task ordering rules. This field is enabled by default. Note: If you disable the Un-assignment check box, the Un-Assignment Constraints related list is removed from the form. 4. Click Update. Create a task filter Create one or more task filters to identify a list of tasks to be assigned using dynamic scheduling. Role required: admin For example, create a task filter to identify tasks of a specific priority or tasks with expiring SLAs. Also define criteria to evaluate and identify suitable agents for each task. If desired, enable auto assignment and select the frequency for assigning tasks. You can create multiple task filters. The filter with the lowest Execution Order value defines the initial task list. Filters with higher values further filter the initial task list. The All Work Order tasks filter is provided with the Dynamic Scheduling plugin. This filter identifies all active work order tasks. If desired, you can also enable auto assignment and select the frequency for assigning tasks. Dynamic scheduling can run on the tasks returned from a task filter automatically as soon as the tasks are ready to be assigned or at a specified interval. Dynamic scheduling can also be run manually by a dispatcher Navigate to Field Service > Administration > Dynamic Scheduling Configuration. In the Task Filters related list, click New. Fill in the fields on the Task Filter form, as necessary. Table 69: Task Filter form Field Name The task filter name. Active Denotes this filter as active. Execution Order The order in which this filter is evaluated. The filter with the lowest Execution Order value defines the initial task list. Table The task table selected for this dynamic scheduling configuration. Conditions Define the conditions that identify the specific list of tasks. 282
283 Field Auto Assign Enable this check box to auto assign tasks. Enabling Auto Assign displays the Auto Assignment Frequency field. Auto Assignment Frequency The frequency with which tasks are auto assigned. Immediate: tasks are assigned as soon as they are ready to be assigned. Interval: tasks which are ready to be assigned are selected at the defined interval and assigned. Selecting Interval displays the Auto Assignment Interval field. Auto Assignment Interval The interval, in minutes, at which tasks are selected for auto assignment. Note: A task filter with a higher Execution Order value must have an interval that is greater than the interval for a task filter with a lower Execution Order value In the Select Criteria related list, select the criteria used to evaluate and identify suitable agents for each task. Select criteria from the Matching Criteria list. For more information, see Matching criteria for case assignment. If necessary, adjust the Weight for the selected criteria. By default, each matching criterion has an assigned weight of 10. You can assign a higher weight to the criteria that are more important. If necessary, select a different Ranking Method for the selected criteria. Option More is better A higher value is preferred. For example, more availability is better when determining the agent ranking. Less is better A lower value is preferred. For example, fewer assigned cases are better when determining agent ranking. Click Save. Create a task ordering rule Create one or more task ordering rules to prioritize the list of tasks identified by the task filters. Role required: admin Dynamic scheduling evaluates the task ordering rules based on the values in the Execution Order field. The ordering rule with the lowest value determines the initial task order. For example, you can create a task ordering rule that sorts tasks based on the assigned Priority and orders the P1 tasks first followed by P2 tasks, P3 tasks, and so on. The ordering rule with the next lowest value determines an additional order 283
284 for a subset of tasks within the initial task list. For example, sort all P1 tasks by SLA due date. Create any number of task ordering rules to determine how tasks are ordered for dynamic scheduling. Rules are evaluated in the execution order. Dynamic scheduling goes to the rule with the next highest execution order only when task values are equal for the current rule. You can create two types of task ordering rules: simple and advanced. A simple rule sorts tasks based on one selected field from the task table and either an ascending or descending sort order An advanced rule sorts tasks based on selections from two different tables, the task table and any other table that contains the desired information. Connecting Task Field? The Priority Based Ordering rule is provided with the Dynamic Scheduling plugin. This rule uses the Priority field and the a to z sort order to determine the order of the tasks to be scheduled. You can modify this task and create additional tasks as needed Navigate to Field Service > Administration > Dynamic Scheduling Configuration. In the Task Ordering Rules related list, click New. Fill in the fields on the Task Ordering Rule form, as necessary. Table 70: Task Ordering Rule form Field Name The task ordering rule name. Execution Order The order in which this rule is evaluated. Dynamic Scheduling Config The dynamic scheduling configuration to which this ordering rule applies. Advanced Enable this check box to create an advanced task ordering rule. When enabled, the Task Field, Task Table, Connecting Task Field, and Aggregate Function fields are displayed. Sort Table The table that contains the tasks to be sorted. Sort Field The field on which the tasks are sorted. Sort Order The order in which the tasks are sorted, either ascending (a to z) or descending (z to a). Task Field The field on which the tasks are sorted. Task Table For an advanced ordering rule, this field displays the table that contains the tasks to be sorted. Connecting Task Field 284
285 Field Aggregate Function The aggregate function to apply when there are multiple rows for a task. 4. MIN MAX COUNT SUM Click Submit. Create a task unassignment constraint Define the constraints that prevent a task from being unassigned even if it is of lower importance based on the task ordering rules. Role required: admin Three task unassignment constraints are provided with the Dynamic Scheduling plugin. Task with downstream: prevents a task from being unassigned if it has a downstream task. Would breach SLA in the next 5 hours: prevents a task from being unassigned if the task SLA is due to expire within five hours. Part sourced: prevents a task from being unassigned if one or more parts required for the task have already been sourced. When the unassignment option is enabled, dynamic scheduling can unassign a previously assigned task in order to complete the assignment of a more important task. Task importance is determined by task ordering rules. If an unassigned task has downstream tasks, the downstream tasks are also unassigned and added to the queue. The system will take care of assignments correctly, as long as ordering rules are not defined in a way that conflicts with the task dependencies Navigate to Field Service > Administration > Dynamic Scheduling Configuration. In the Un-Assignment Constraints related list, click New. Click the lookup icon next to the Constraint field. In the Constraints list, click New. Fill in the fields on the Constraint form, as necessary. Table 71: Constraint form Field Name The constraint name. Task Table The task table to which this constraint applies. Type The type of constraint. Simple: define a simple constraint by selecting a table, a task field, and one or more filter conditions. Advanced: define an advanced constraint by creating a script. 285
286 6. 7. Field Constraint Table The table used to define a constraint on a task. Task Field The task field to which this constraint applies Constraint Condition When true, the selected condition prevents a task from being reassigned or unassigned. Constraint Script For an advanced constraint, create a script to define the constraint details. Click Submit. Returns you to the Un-Assignment Constraint form. Click Submit. Returns you to the configuration form and adds the constraint to the Un-Assignment Constraints related list. Validate the dynamic scheduling configuration After creating a dynamic scheduling configuration, validate the configuration to ensure that works as intended. Role required: admin After creating or modifying a dynamic scheduling configuration, click the Validate config related link to validate the settings. If the configuration is valid, an informational message appears at the top of the Dynamic Scheduling Configuration form. Select and assign multiple tasks Dispatchers can manually select multiple tasks on which to run dynamic scheduling. Role required: wm_dispatcher or wm_admin Users with the dispatcher role can select multiple tasks for assignment. Clicking Auto Assign creates assignment recommendations for the selected tasks which the dispatcher can view in the Confirm Assignment pop-up window. The dispatcher can then cancel or confirm the task assignments. If there has been an update to any of the selected tasks, an informational message notifies the dispatcher to run the recommendations again Navigate to a list of work order tasks. Select the desired tasks for assignment. Tasks must be in the Pending Dispatch state. From the Actions menu at the bottom of the list, select Auto Assign. The Confirm Assignment pop-up window displays a list of the selected tasks in the following categories: Assigned, Not Assigned, Reassigned, and Unassigned. Note: If there has been an update to any of the selected tasks, an informational message notifies the dispatcher to run the recommendations again. Note: If more tasks are selected than dynamic scheduling can handle, the pop-up window displays a message to reduce the number of tasks. 4. Click Confirm to approve the recommendations on the Confirm Assignment pop-up window. 286
287 Confirm Assignment pop-up window When using the dynamic scheduling feature, the Confirm Assignment pop-up window displays the task assignment recommendations. When a dispatcher selects multiple tasks for assignment and clicks Auto Assign, the results of the task assignment process are displayed in the Confirm Assignment pop-up window. Information about the selected tasks, including the Short, Scheduled Start, and Estimated End, is displayed in the following categories. Category Definition Assigned Dynamic scheduling is able to find a suitable agent and recommends the task for assignment. Unassigned Dynamic scheduling is not able to find a suitable agent and the task remains unassigned. Reassigned Tasks that were previously assigned and have been reassigned to a different agent or time slot to allow for the assignment of the selected tasks. Not Assigned Tasks that were previously assigned, have been unassigned to allow for the assignment of the selected tasks, and have not yet been reassigned. Selected tasks that do not match the task filter also appear in the Not Assigned category. The information icon next to each task displays additional information about the task in a tool tip, such as required skills and parts. For unassigned and reassigned tasks, this information also includes the previous agent and schedule start time. If more tasks are selected than dynamic scheduling can handle, the pop-up window displays a message to reduce the number of tasks. If there has been an update to any of the selected tasks, an informational message notifies the dispatcher to run the recommendations again. Clicking Save confirms the task assignment recommendations listed in the Confirm Assignment pop-up window. Task assignment debug log System administrators can also view task assignment debug logs in the Confirm Assignment pop-up window by enabling the com.snc.dynamic.scheduling.showlogs system property. This information is displayed below each task in the pop-up window. Collapse or expand the debug log by clicking on the task. Display the task assignment debug log Display information from the task assignment debug log in the Confirm Assignment pop-up window. Role required: admin System administrators can enable the com.snc.dynamic.scheduling.showlogs system property to display debug logs in the Confirm Assignment pop-up window. This information is displayed below each task. Collapse or expand the debug log by clicking on the task. 287
288 The task assignment debug log information is stored in the Log [syslog] table Navigate to System Properties > All Properties. Go to the com.snc.dynamic.scheduling.showlogs property. Set the Value to true. Click Update. The Confirm Assignment pop-up window displays the debug logs for each of the selected tasks. Click the task to collapse or expand this information. View an agent's status in Central Dispatch Use Central Dispatch to see if an agent is ahead of schedule, behind schedule, or on time. Agents are responsible for updating their schedule status. An agent can update this information from the mobile UI by navigating to the Field Service menu and selecting the Schedule Status option, then selecting the desired status in the On schedule field. After updating, there are two ways for a dispatcher to view an agent's status: Adding the status to the display fields in the Team list. Viewing the status on the User form for a selected agent. In Central Dispatch, the Team list displays the agents in a dispatch group. The dispatcher can configure the information displayed for each agent in this list, including the agent's status. See Configure central dispatch for more information about displaying the Schedule Status field in the Team list. Click an agent name in the Team list to display the agent's User form. The On schedule field displays the agent's current status: On time Behind schedule, less than 30 minutes Behind schedule, between minutes Behind schedule, more than an hour Ahead of schedule Set agent status from the mobile UI Field service agents can indicate their status from the mobile UI and let dispatchers know if they are ahead of schedule, behind schedule, or on time. Role required: wm_agent 1. In the mobile UI, navigate to Field Service > Schedule Status. 2. Select the desired status in the On schedule field. 3. On time Behind schedule, less than 30 minutes Behind schedule, between 30 to 60 minutes Behind schedule, more than an hour Ahead of schedule Click Save. The status is updated on the agent's User form. The dispatcher can see this status update in Central Dispatch. 288
289 Set agent status from the desktop Field service agents can indicate their status from the desktop and let dispatchers know if they are ahead of schedule, behind schedule, or on time. Role required: wm_agent The system administrator must enable the FSM Profile view before field service agents can update their schedule status from the desktop. 1. Click your user name in the banner frame and then click Profile. 2. Select the desired status in the On schedule field. 3. On time Behind schedule, less than 30 minutes Behind schedule, between 30 to 60 minutes Behind schedule, more than an hour Ahead of schedule Click Update. The status is updated on the agent's User form. The dispatcher can see this status update in Central Dispatch. Work order task start and end dates Dynamic scheduling uses work order task Window start and Window end dates to schedule tasks. If both the Window start and Window end dates are present in the work order tasks, dynamic scheduling uses these dates. If the task has a Window start date but the date has passed, dynamic scheduling uses the current date and time for this value. If the task has a Window start date but no Window end date, dynamic scheduling uses the com.snc.wm.wo.task_window_day property to determine this value. If the task has no Window start date but has a Window end date, dynamic scheduling uses the current time for this value. If the task has neither a Window start nor a Window end date, dynamic scheduling uses the current time and date for the Window start and the com.snc.wm.wo.task_window_day property for the Window end. Field Service manager module The Field Service Manager module provides enhanced management capabilities for Field Service managers. The Field Service > Manager module provides the following capabilities for users with the wm_manager role. My team Provides a list of agents in the manager's assignment groups. Team Calendar Provides a calendar view of the agents in the manager's assignment groups and their assigned work order tasks and events. 289
290 Manage Skills Provides a list of the current skills and the agents in the manager's assignment groups. Managers can create or edit skills, assign skills to agents, and view agents with a specific skill. Note: In the Customer Service Management application, users with the sn_customerservice_manager role can access the Manage Skills module. Manager Map Provides a map view of the agents in the manager's assignment groups and their locations. Work Order Task Open work order tasks assigned to the manager's agents and groups. Recent Work Order Tasks Work order tasks created for the manager's agents and groups within the last 30 days. This list includes open and closed work order tasks. Time Sheets - Pending Approval Time sheets for the agents in the manager's assignment group that are pending manager approval. Field service manager map The Field Service manager map shows the locations of the agents in the manager's assignment groups as well as nearby tasks. Users with the wm_manager role can use the manager map to view agents and tasks and assign agents to task. The manager map is available for both the desktop interface and the mobile interface. For the mobile manager map, users can also open the map legend. The manager map uses icons to display: Accepted, assigned, and unassigned tasks Agent status, including on schedule, off schedule, and delayed Multiple tasks Multiple agents 290
291 Figure 49: Field Service Manager Map mobile interface legend To filter the information displayed on the manager map, click the filter icon in the map header and select the desired work group or agent and assigned or unassigned tasks. From the manager map, managers can: Assign or reassign a work order task by opening the task and selecting a user in the Assigned to field. View task information by clicking a task icon. View details about an agent at a particular location by clicking the agent icon. 291
292 Field service manager team calendar Field service managers can use the team calendar to view a list of agents in the manager's assignment groups and their assigned work order tasks and events. Navigate to Field Service > Manager > Team Calendar to view the calendar. The calendar displays information for a single day or a week. In the week view, the current day is highlighted in blue. Use buttons in the calendar header to switch views as well as go backward or forward in time. Use the calendar icon to select a specific date or date range or click Today to select the current date. The team calendar displays work order tasks assigned to each agent and other events, such as cases, incidents, and personal time-off. Each type of event is displayed on the calendar using a different color. To use the team calendar: Click the schedule configuration icon in the calendar header to select the types of events displayed in the calendar. Click an event in the calendar to display overview information in a pop-up window. Double-click an event in the calendar to open the event record or click Open in the pop-up window. Update an event from the event record. Manager team calendar keyboard shortcuts Action Keyboard Shortcut Switch to Day view Alt + 1 Switch to Week view Alt + 2 Switch to Month view Alt + 3 Go to the previous day/week Ctrl + 1 Go to the current day/week Ctrl + 2 Go to the next day/week Ctrl + 3 Go to the next event E Go to the previous event Shift + E Manage Field Service and Customer Service skills Field Service and Customer Service managers can create or edit skills, assign skills to agents, and view agents with a specific skill. Users with the wm_manager role (Field ) or sn_customerservice_manager (Customer ) can manage agent skills. Navigate to Field Service > Manager > Manage Skills or Customer Service > Manage Skills to access the Manage Skills form. This form displays a list of the available skills and the agents in the manager's assignment groups. Each skill in the All Skills list on the left side of the screen includes the skill name and the number of users who are assigned that skill. Each user in the user section on the right side of the screen is represented by a tile that includes the user's name, assignment group, address, and a list of the skills currently assigned. From this form, managers can: 292
293 Create new skills by clicking New Skill and adding the skill name and description. Edit existing skills by clicking the pencil icon to the left of the skill name. View all agents by clicking All Users. View the agents who are assigned a specific skill by clicking the skill name. Assign a skill to an agent using the following methods: Click a skill in the skills list and then click Assign/Remove Users. To add a skill, click the desired user. The tile for the selected user turns blue. To remove a skill, click a user who has the skill already assigned. If the skill is assigned, the user's tile is blue. In the user's tile, click the down arrow on the Skills button. Assign multiple skills to a single user by checking the boxes for the desired skills. There are two default skills: Field Service Skill and Customer Service Skill. These are parent skills; other skills created by the manager are stored under these parent skills. Execute work order tasks After the dispatcher dispatches work order tasks, the system automatically sends the tasks to the assigned agent's queue. The agent has the option to accept or reject the work order task. If the agent accepts the task, the task state automatically changes to Accepted. If the agent who accepts assignment of a work order task does not yet have a personal stockroom, the system creates a personal stockroom automatically with the name Personal stockroom - <first and last name of agent>. If the wm_agent role is ever removed from the user, the personal stockroom is deleted. The examples in this page illustrate the use of tasks with work orders; however, tasks can be used with any application. The system provides an agent with these methods for managing work order tasks: Agent task map: The agent task map displays an agent's location and the location of that agent's tasks for the day in a familiar Google Map. The agent map is available when the Geolocation plugin (com.snc.service_management.geolocation) is active. This map allows for the general scheduling of tasks and provides estimates of an agent's location. Precise agent locations and some automatic features are available when your organization purchases a Google Maps API for Business key and enters it into the system. Task queue: It the task map is not available, an agent can manage assigned tasks and their schedule directly from a queue accessed from the application navigator. Accept or reject a work order task How to accept or reject a work order task Navigate to Field Service Automation > Work Order > My Work Order Tasks. Open a work order task. Click Accept or Reject. Note: You can also accept multiple tasks from the list by selecting the appropriate check boxes and then selecting Accept from the Actions choice list. Reasons for rejecting tasks An agent can reject a work order task for reasons such as being unavailable at the appropriate time or not having the skills required for the task. 293
294 A work order task can only be rejected if the agent has not started travel or work for the task. If you reject the task, you must include a reason in the Work Notes field. A rejected work order task returns to the Pending Dispatch state so the dispatcher can assign the task to a different agent. Task dependencies When an agent accepts a downstream task that is dependent on another task, the downstream task can be started before the upstream task is complete. When the agent clicks Start Work, a message states that open task dependencies exist and asks if the agent wants to start work. If the agent clicks OK, the task state changes to Work in Progress. If the agent clicks Cancel, no change occurs and the task remains in the Accepted state. Execute a task from the agent map As an agent, you can accept or reject tasks assigned to you using features in the agent task map, or take on unassigned tasks near you if your schedule permits. You can use the auto-routing feature in the map to have the system determine the most efficient route. Initial routing shows the sequence established when the dispatcher assigned the tasks. Auto-routing locates you using your mobile device and creates an ideal schedule based on variables such as location, task duration, travel time, or any task windows. The agent map, which displays color-coded icons for the tasks and your current location, is updated as you complete each task. To access the map, users with the wm_agent role navigate to Field Service > Agent > My Map. Tasks that are in one of these states are visible on the map: Assigned Accepted Pending Dispatch Work in Progress Note: These procedures assume that the Geolocation plugin (com.snc.service_management.geolocation) is active, and the Google Maps API for Business key has been entered into the appropriate Google Maps property Agent map symbols The agent map shows your location, the tasks assigned to you for the current day, tasks that have been accepted, and other tasks that have not yet been assigned. Task icons are color coded and display automatic sequence numbers indicating the order in which the dispatcher has scheduled the tasks initially. Table 72: Task icons Icon Title Agent Your current location on the map. Assigned Assigned tasks that have not yet been accepted. Accepted Tasks that have been accepted or tasks that are in progress. 294

295 Icon Title Unassigned Unassigned tasks that are awaiting dispatch. These tasks are available for an agent to accept to fill gaps in a schedule. Multiple tasks Multiple tasks clustered by proximity. the system gathers tasks together by proximity into a cluster as you increase the altitude of the map view. Counters in the cluster icon indicate the number of tasks rolled up as the perspective changes. Figure 50: Agent map 295

296 Agent location The Field application calculates your location from a set of geographical coordinates. These coordinates are updated at a predefined interval based on geolocation data returned by your mobile device. Your position at the beginning of the day might be calculated from mobile device coordinates or from the location of the home office, whichever is more current. If you are starting the day completing a task that carried over from the previous day, the system uses the location of that task as your starting position. The system uses your precise location throughout the day to calculate accurate travel times, route your tasks automatically, and schedule fixed time windows. Manage tasks on the map The icons in the task map mark the location of tasks assigned to you and any unassigned tasks in your area. You can manage your tasks and routing from the map, filter the view, and accept unassigned tasks. View work order task information Click the task icon on the agent map to view task details. A summary pop-up window shows the task number and description, the name of the agent if one is assigned to the task, and other important information. Click a cluster icon to display a summary pop-up listing the number of tasks at that location by State. Click any entry to display detailed summaries for all the tasks in a pane beside the map. You can access individual task records from this list. The following information is included in a summary pop-up window for a single task and in the summary pane for a task cluster: SLA: the time remaining on an SLA, if one is affected by this task. Priority: the task priority by number, with 1 being the highest priority and 5 being the lowest. Skills needed: the agent skills needed to perform the work. Parts needed: the parts needed to perform the work. Figure 51: Agent map with task popup 296

297 Click the task number link in the summary pop-up or in the summary pane to display the task in a record pop-up. Use the controls under Related Links to accept or reject a task and to update your work status by starting or completing a task. Figure 52: Agent map with task details Use the filter Use the filter to change the items visible on the agent map. To change the items visible in the map, click View Filter. Use the filter to show and hide tasks, the routing sequence numbers, or your location, and to change the date to view another day's tasks. You can also let the system choose your route for you. 297

298 Table 73: Filters Filter Show unassigned tasks All unassigned tasks are displayed by default. Clear the check box to hide unassigned tasks. Show assigned tasks All assigned tasks are displayed by default. Clear the check box to hide assigned tasks. Show my location Your current position. If the system cannot locate you automatically by mobile device, the location is the site of a continuing task or the home office. Show routing numbers Show or hide routing numbers on tasks dispatched for that day. On The current date is selected by default. You can change the date to view tasks for that day. Figure 53: Agent map filter Click Apply Filter to apply your changes to the map. Click Apply auto-routing to let the system decide the most efficient route for your tasks. Auto-routing Auto-routing reorders agent tasks for the day as efficiently as possible using either geolocation or straight line estimation. Properties are used to configure system estimates by adjusting: Travel time between tasks. Task windows that are either fixed or flexible. Task dependencies that require the completion of a prerequisite task. Toll road routing that is either enabled or disabled. Rush hour and other specified time buffers. If a task cannot be auto-routed because of an impractical or missing location or because the task window cannot be scheduled, the system displays a message advising that the unroutable task was not included 298
299 in the new sequence. Dependent tasks cannot be auto-routed if the routing would produces a circular relationship. The system returns any unroutable task to the Pending Dispatch state. Google Maps API for Business Geolocation uses Google Maps API for Business to calculate the most efficient route between tasks, using real-time positioning. To use geolocation, you must provide a Google Key and client ID. For more information, go to Google Maps API for Business. Straight line estimates If you do not have Google Maps API for Business, the system uses built-in time and distance estimates based on latitude and longitude to determine the best route for the agent. Routing restrictions Certain general restrictions apply to auto-routing. If you attempt to auto-route more than 200 tasks, routing fails and the system displays a message describing the error. If a task cannot be auto-routed because of an impractical or missing location, or because the task window cannot be scheduled, a message is displayed advising that the unroutable task was not included in the new sequence. Dependent tasks cannot be auto-routed if the routing would produce a circular relationship. Note: The system returns any unroutable task to the Pending Dispatch state. Start work What to do when you are ready to begin travelling to the first task. 1. Open the task record from the map, and click Start Travel under Related Links. 2. The system enters the time in the Actual travel start field. When you arrive at the job site and begin the task, open the task record, and click Start Work under Related Links The system enters the time in the Actual work start field. When the work is done, open the task record and add a work note describing what you did to complete the task. Click Close Complete under Related Links. The system redraws the map and removes the icon for the completed task. The next accepted task in the route is relabeled as number 1. The agent icon appears at the site of the last location update. 299

300 Figure 54: Agent map with next task View task information on the mobile UI map The agent map on the mobile interface displays the agent's location, tasks assigned to the agent for the current day, accepted tasks, and unassigned tasks. Role required: wm_agent Use the filter to change the items visible on the agent map. Show and hide tasks or routing sequence numbers, change the location, or change the date to view the tasks for a different day In the mobile interface, navigate to Field Service > My Map. Click the gear icon in the map header to display the filter settings. Change the filter settings as needed. Option On Displays the current date. Click the arrow to display the calendar and select a different date. Show Assigned Tasks All assigned tasks are displayed by default. Disable the switch to hide assigned tasks. Show My Location Displays your current position on the map with the agent location icon. Disable the switch to remove this icon from the map. If the system cannot locate you automatically by mobile device, it uses the location of a continuing task or the home office. 300
301 4. Option Show Routing Numbers Displays the routing numbers on tasks dispatched for the date selected in the calendar. Disable the switch to hide the routing numbers. Show Unassigned Tasks All unassigned tasks are displayed by default. Disable the switch to hide unassigned tasks. Click Save and then click the left arrow to return to the map. Pick up an unassigned task Agents can assign themselves nearby unassigned tasks directly from the agent task map. Agents can assign themselves nearby unassigned tasks directly from the agent task map. This might be necessary to complete a schedule when a another task is cancelled or a fixed task window cannot be met. Make sure the task's scheduled start time and duration fit into your route and that the travel time is realistic. If the task does not fit into the available time slot in your schedule, the system blocks the assignment and displays a warning. 1. To pick up an unassigned task, click a red icon near you and open the task record. 2. Under Related Links, click Assign to me. If the task can be assigned to you, one of the following occurs: 3. If you belong to more than one assignment group, you are asked to select a group. Only the assignment groups that belong to the dispatch group of the task are displayed. If you belong to only one assignment group, the system assigns the task to you and enters your assignment group in the Work Order Task form. If the assignment is allowed, the task state changes to Accepted, and the icon on the map turns green. In the task form, the Start Travel and Start Work links appear under Related Links. Execute a task from the queue If the agent task map is not used in your organization, you can manage assigned tasks from the task queue Navigate to Field Service > Agent > Assigned to me. Open a work order task. When parts are delivered or picked up from a stockroom, acknowledge the delivery. a) In the Transfer Orders related list, open the transfer order. b) In the Transfer Order form, open a record from the Transfer Order Lines related list. c) Click Receive to acknowledge delivery from an external stockroom, or click Deliver if the part is located in your personal stockroom. 301

302 Figure 55: Transfer order lines form 4. Click Start Travel when you begin travel to the remote site This is mandatory if the Scheduled travel start field is completed. Click Start Work when you begin working on the task. When work is complete, record any asset usage. Add a description of the work you did to the Work notes field. 8. This is required to close the task. Close the task. Note: The Start Work and Start Travel buttons appear together on the form. When you click Start Travel, that button disappears. If no travel is scheduled, and you click Start Work, both buttons disappear. Pick up an asset Agents can view a consolidated list, grouped by stockroom, of all their assets that are waiting to be picked up. The agents can physically pick up the assets and then record them as delivered. The list contains transfer order lines in the Received or In Transit stage with a work order task that meets the following criteria: 302


303 1. Assigned to the agent In the Accepted or Work in Progress state Navigate to Field Service > Pick Up/Drop Off > My Pick Up List. The Transfer Order Lines list is displayed in PickUpList view. Figure 56: Pickup list Optional: Click text in any column to obtain more information about, for example, the transfer order, the transfer order line, or the asset. After physically picking up the items, select a check box next to the transfer order column, then go to the Actions choice list and select Deliver. Figure 57: Pickup list marked as delivered Use drop off lists Agents use drop off lists to return items that are in their personal stockroom. An item may need to be returned because it is defective or not needed to complete a work order task. Agents can create a drop off list of items to send the items to a different stockroom using a transfer order. 303
304 Agents also have the option to physically drop items off at a stockroom and note the drop off in the Field application. Agents using the mobile interface can also ship drop off lists to a remote location using the Prepare for shipment and Ship buttons. An asset must meet the following criteria to be added to an agent's drop off list: Located in the agent's personal stockroom Drop Off check box selected on the transfer order record One of the following: Substate is Defective Asset was not used and the work order task is in Closed Complete state Create a drop off list Agents can create a drop off list of assets at any time. As an example, the agent might have several assets that were removed when completing a work order task and all of the assets need to be returned to a different stockroom. After creating a drop-off list, there are two ways to add items to the list. Use the Add Defective button to add items that are in their personal stockroom with a substate of Defective. For more information about defective items, see Recording Asset Usage. Create a transfer order line for an item in the personal stockroom. The item cannot have a substate of Reserved or Defective, and cannot already be included on another drop off list Navigate to Field Service > Pick Up/Drop Off > Create Drop Off List. Select a To stockroom. Click Submit. Do one or both of the following: Click Add Defective to add all defective items in your personal stockroom to the drop off list. In the Transfer Order Lines related list, click New, select a Model, and click Submit. Only items in an agent's personal stockroom that are not reserved, not defective, and not included on another drop off list are available for selection. View a drop off list Agents can view a consolidated list, grouped by stockroom, of all items that have been added to drop off lists by all agents Navigate to Field Service > Pick Up/Drop Off > All Drop Off Lists. Expand a group by clicking the arrow beside the group name. Drop off an asset Agents can physically drop assets off at a stockroom. If a dropped-off item was not used, it is automatically placed in In Stock - Available state. If a dropped off item is defective, it is automatically placed in In Stock - Defective state. 1. Navigate to Field Service > Pick Up/Drop Off > My Drop Off List. 304
305 2. 3. The Transfer Order Lines list is displayed in DropOffList view. Optional: Click text in any column to obtain more information about, for example, the transfer order or stockrooms. After physically dropping off the items, select the check box beside the item, then go to the Actions choice list and select Drop Off. Figure 58: Drop off an asset Record asset usage The Field application tracks the consumable and non-consumable parts that are used or changed during the execution of work order tasks. The Asset Usages related list on the Work Order Task form displays the assets that are used during the execution of a task and also any existing assets that are removed from the task location. The field service agent adds records to the Asset Usages related list by clicking the Remove Asset and Use Asset buttons and filling in the details on the Asset Usage form. The status of an asset can be one of the following: Table 74: Asset status settings Setting Used When an agent records the use of an asset, the asset is added to the Asset Usages related list with a status of Used. If the asset is a non-consumable, it is marked as being In Use and assigned to the caller identified on the work order. If the asset is a consumable, it is marked as Consumed. 305
306 Setting Not used When a transfer order line is delivered to an agent, the system creates a new asset usage record with a status of Not Used. If the agent does not use the asset and the work order task is closed, the asset usage record remains Not Used. The asset is marked as In Stock Available in the agent's personal stockroom. Removed When an agent records the removal of an asset, the asset is added to the Asset Usages related list with a status of Removed. Assets are most often removed because they are not working. These assets are marked as Defective. Remove an asset If you remove an existing asset from a task location during the execution of a task, record the asset on the Asset Usages related list on the Work Order Task form. Role required: wm_agent Navigate to Field Service > Agent > Assigned to me. Open a work order task. View the Asset Usages related list. Click Remove Asset to display the Asset Usage form. The Service order task field displays the work order task number and the Status of the asset is set to Removed. Select a Model. The Quantity and Asset fields are enabled or disabled depending on the selection in the Model field. Do one of the following: 7. If the selected model is consumable, enter the Quantity removed. If the selected model is non-consumable, select the specific Asset. Click Submit. The removed asset is added to the Asset Usages related list. Use an asset If you use an asset during the execution of a task, record the asset on the Asset Usages related list on the Work Order Task form. Role required: wm_agent Navigate to Field Service > Agent > Assigned to me. Open a work order task. View the Asset Usages related list. Click Use Asset to display the Asset Usage form. The Service order task field displays the work order task number and the Status of the asset is set to Used. 306
307 Select the model of the asset in the Model field. If the selected model is a consumable, the Asset field becomes read-only. Select the asset in the Asset field. If the asset is a consumable, enter the Quantity used. Click Submit. The used asset is added to the Asset Usages related list. Record an incidental expense Agents can track incidental expenses required to complete a work order task. Agents can track incidental expenses required to complete a work order task. Incidental expenses, or incidentals, are distinct from other expenses related to work orders, such as part requirements. Incidentals represent expenses that arise during the execution of a task or that are otherwise related to the task. Incidentals are classified by type. Field provides incidental types to track the costs of car rentals and miles traveled. An organization can create additional types to meet their needs. You can generate incidentals for a task at any point during the task life cycle. For example, field service administrators might create an incidental in the Pending state before an agent begins work, based on an anticipated expense. Agents might create incidentals in the Incurred state as expenses arise during work. Field service administrators and agents can view all incidentals by navigating to Field Service > Agent > Incidentals. When an incidental record is created, the system generates an expense line if the following conditions are met: The state is Incurred. The type is not None. The cost is greater than zero. The expense line is deleted if any of these conditions change. Role required: wm_admin or wm_agent role Open a work order task. In the Incidentals related list, click New. Fill in the fields as appropriate (see table). 307
![Figure 59: Incidental expense form Table 75: Incidental expense form fields Field Work order task [Read-only] Task from which the incidental was created.](/docs-images/71/66071391/images/308-0.jpg "Type Kind of incidental: Mileage and Car Rental. Cost Total cost of the incidental.")
308 Figure 59: Incidental expense form Table 75: Incidental expense form fields Field Work order task [Read-only] Task from which the incidental was created. Type Kind of incidental: Mileage and Car Rental. Cost Total cost of the incidental. If the type is Mileage, the cost is read-only and is automatically calculated by multiplying Quantity and Cost per mile. If the type is Car Rental, enter the total cost of rental expenses. Quantity Number of units for the incidental. This field is required if the type is Mileage; enter the number of miles traveled. This field is hidden if the type is Car Rental. State Status of the expense: Pending or Incurred. Cost per mile Average cost of transportation per mile. This field is visible only if the type is Mileage. Helpful information about the incidental expense. 308
309 Close a work order task as complete Only agents can close work order tasks assigned to them. If the caller's problem was fixed or resolved, use the Close Complete option Navigate to Field Service > Agent > Assigned to me. Open a work order task. Add information to the Work notes field. The notes should include a description of the work done and any other helpful information. 4. Optional: Enter a date and time earlier than the current date and time in the Actual Work End field. You cannot add a date and time later than the current date and time. 5. If you do not enter a date and time, the system adds the current date and time automatically when you click Closed Complete. Click Close Complete. The status of all unused parts automatically changes to In-Stock. The state of the parent work order automatically changes to Closed - Complete if all work order tasks on the work order have a state of Closed - Complete or Canceled. Close a work order task as incomplete Only agents can close work order tasks assigned to them. If the problem was only partially fixed or resolved, use the Close Incomplete option Navigate to Field Service > Agent > Assigned to me. Open a work order task. Click Close Incomplete. In the Create a follow on task field, do one of the following: 5. Select Yes to have a new work order task cloned and, if this task is the last remaining task to complete, prevent the work order from closing. After the follow on task is done and marked Closed Complete, the status of the work order changes to Closed Complete even though the task that generated the follow on task was marked Closed Incomplete. Select No to close the work order task. In the Reason for the incomplete closure field, enter information about why the task could not be completed. The information entered is added to the Work Notes field on the work order task form. The status of all unused parts automatically changes to In-Stock. The state of the parent work order automatically changes to Closed - Incomplete if all work order tasks have a state of Closed - Complete or Canceled and at least one task has a state of Closed - Incomplete. Cancel a work order task The Cancel Task option is appropriate if a work order task is no longer necessary or is a duplicate of another work order task. Work orders and work order tasks cannot be canceled while in Closed Complete or Closed Incomplete state. When you cancel a work order task, the system automatically: 309
310 Cancels all associated transfer orders if the items have not already shipped. If the items have shipped, the system blocks the cancellation of the task until the parts are delivered. Removes all upstream and downstream dependencies. Changes the state of the parent work order to Canceled if all associated work order tasks are Canceled. Removes all part requirements without a transfer order line. Retains all asset usage information. Work order tasks can be canceled by users with these roles: Table 76: User roles Role Initiator Can cancel a work order, which automatically cancels all associated work order tasks. Qualifier Can cancel work orders and work order tasks. Dispatcher Can cancel work orders and work order tasks. Agent Can cancel work order tasks assigned to them. Field Administrator Can cancel any active work order or work order task at any time. Navigate to Field Service > Work Order > All Work Orders. Open a work order. Open a work order task. In Work notes, enter a cancellation reason. Click Cancel Task. An error message appears if text is not entered into the Work Notes field. For traceability, auditing, and possible deletion, field service administrators need to know the reason why a work order or work order task was canceled. Use the agent calendar Customer service agents and field service technicians can use the agent calendar to see work schedules and assignments and also add personal events such as meetings or appointments. The agent calendar provides a tool for maintaining different work schedules or shifts and assigning agents and technicians to shifts for specific time periods. The calendar has the flexibility to accommodate work schedules that are fixed or varied and shifts that rotate by week, month, or other patterns. The agent calendar administrator creates the calendar configuration, including a schedule configuration for each calendar user and the types of tasks to display on the calendar. The schedule information stored in the agent calendar is used by other applications and features, such as the assignment workbench, central dispatch, and auto assignment. The assignment workbench uses agent availability, based on upcoming work schedules and personal time off, when evaluating predefined criteria and recommending agents for case assignment. Auto assignment in Service Management core applications, such as Field and Facilities, evaluate agent work schedules before assigning tasks. The agent calendar administrator has access to the Agent Schedule menu in the application navigator. This menu includes the following modules: 310
311 Event Configuration: create a configuration for each type of task displayed on the agent calendar. Work Schedule: create one or more work schedules for each calendar user. Agent Personal Events: create personal schedules for each agent and add events to those schedules. Schedule: create or modify schedules. Viewing the calendar Customer service agents and field service technicians with the agent_schedule_user role can access their personal calendars in the following ways: Customer Service > My Schedule Field Service > Agent > My Schedule 311

312 312
313 The calendar can display a single day, a week, or a month. Buttons in the calendar header allow you to switch views as well as go backward or forward in time. An agent's scheduled work hours are highlighted in gray and the current day is highlighted in blue. The agent calendar displays work or tasks assigned to the agent as well as personal events. Each type of event is displayed on the calendar using a different color. Agents can add events to their calendars by double-clicking a specific time slot and entering the details in the New Event popup window or by clicking and dragging. Agents can also move events by dragging and dropping. Click an event to display a popup with event details and double-click an event to open the event record. Plugins The Agent Schedule plugin (com.snc.agent_schedule) is activated as part of the Customer Service Management and Field plugins. Tables The Agent Schedule plugin adds the following tables. Table Agent Work Schedule Stores one or more work schedules for each agent, including the date range for the schedule and the schedule type. [agent_work_schedule] Agent Personal Schedule [agent_events] Event Configuration [agent_schedule_task_config] Agent Schedule User Config [agent_schedule_user_pref] Agent Schedule Relationship [agent_schedule_task_config_rel_user_pref] Agent Schedule Definition Theme [agent_schedule_definition_theme] Stores personal calendar events for each agent, such as training, personal time off, or meetings. Stores a configuration for each type of task displayed on the agent calendar, such as case tasks or work order tasks. Stores the agent s personalization data for the calendar. A user configuration is created automatically when a user with the agent_schedule_user role accesses their personal calendar. Stores the relationships between agent configurations and event configurations. Relationship entries are created automatically based on a user's read access to the task tables selected in the event configurations. Stores the colors used to display different types of tasks on the agent calendar. User Roles The Agent Schedule plugin adds the following user roles. 313
314 Role Agent schedule administrator Sets up the Agent Calendar configuration. Contains roles: [agent_schedule_admin] Agent schedule user [agent_schedule_user] agent_schedule_user schedule_admin Allows customer service agents and field service technicians to access and update their personal calendars. Configure the agent calendar Users with the agent calendar administrator role can perform several calendar configuration tasks. These tasks include: Creating one or more schedule configurations for each calender user. Creating an event configuration for each type of task to display on the calendar. Creating a work schedule to assign to an agent. If necessary, agent calendar administrators can create personal events for a calendar user although the users themselves typically perform these tasks. Create an event configuration for the agent calendar Users with the agent schedule administrator role can create a configuration for each type of task displayed on the agent calendar, such as case tasks or work order tasks. Role required: agent_schedule_admin Event configuration records are included for case tasks, work order tasks, and appointments Navigate to Agent Schedule > Event Configuration. Click New. Fill in the fields on the Event Configuration form, as necessary. Field Name A descriptive name for this configuration. Task Table The table where the tasks for this type of configuration are stored. Task Filter Use the condition builder to create the desired conditions for the selected task type. For example, the event configuration for Case Tasks includes a filter on the task State field to display only those tasks that are open. 314
315 Field Task User Field Select a field from the Task Table that provides the user assigned to the task. For example, the event configuration for Case Tasks uses the Assigned To field from the Task table [sn_customerservice_task]. When a case task is assigned, it appears on the agent calendar for the user selected in this field. Display Field Select a field from the Task Table that provides the information to be displayed for this event type on the agent calendar. For example, the event configuration for Case Tasks uses the Subject field from the Task table [sn_customerservice_task]. When a case task is assigned, the subject of the task appears on the agent calendar. Start Date Field Select a field from the Task Table that provides the start date for the task. For example, the event configuration for Case Tasks uses the Expected start field from the Task table [sn_customerservice_task]. When a case task is assigned, it appears on the agent calendar starting on the date and time specified in this field. End Date Field Select a field from the Task Table that provides the start date for the task. For example, the event configuration for Case Tasks uses the Due date field from the Task table [sn_customerservice_task]. When a case task is assigned, it appears on the agent calender it appears on the agent calendar ending on the date and time specified in this field. Note: Because the agent schedule administrator can select any fields from the Task Table for the Start Date Field and the End Date Field, it is possible that the end date may be earlier than the start date. In this event, the task is displayed on the agent calendar between the two points in time. Color theme Select the color used to display this type of task on the agent calendar. 315
316 4. Click Submit. Create a work schedule for an agent or technician Users with the agent schedule administrator role can create one or more work schedules for a customer service agent or a field service technician. Role required: agent_schedule_admin A work schedule includes a date range and a schedule type, such as day shift or evening shift. Agents and technicians can have multiple work schedules Navigate to Agent Schedule > Work Schedule. Click New. Fill in the fields on the Agent Work Schedule form, as necessary. Table 77: Agent Work Schedule form Field From Date The first day of the work schedule. To Date The last day of the work schedule. User The selected agent or technician. Work Schedule The selected schedule from the Schedules list. Type The type of work that the agent or technician is performing during this schedule: Primary work Other An agent can have only one primary schedule for a specific range of dates. Primary schedules cannot overlap. 4. Click Submit. Create a personal event for an agent or technician Users with the agent schedule administrator role can create personal events that appear on an agent's personal calendar. Role required: agent_schedule_admin Agents and technicians typically add personal events to their own calendars Navigate to Agent Schedule > Agent Personal Events. Select the personal schedule for the desired agent. In the Schedule Entries related list, click New. Fill in the fields on the Schedule Entry form, as necessary. 316
317 Table 78: Schedule Entry form Field Name The name of the event. Type The type of event: Show as Time off Appointment Meeting Phone call Excluded On call Time off - in approval Time off - rejected Show this event on the agent's personal calendar as one of the following: Busy Free Tentative On call Select Busy to exclude the block of time from agent availability calculations for the auto assignment and the case assignment workbench. When The start date and time of the personal event. To The end date and time of the personal event. All day Enable this check box if the event lasts all day. Repeats Create a repeating event by selecting the frequency. Depending on the selection, other fields are required to complete the frequency information. Does not repeat Daily Every Weekday (Mon-Fri) Every Weekend (Sat, Sun) Every Mon, Wed, Fri Every Tue, Thu Weekly Monthly Yearly 317
318 Field Repeat every Enter a number for the frequency of the repeated event. Repeat on For weekly events, select a day of the week. Monthly type For monthly events, select one of the following. These selections use the day and date in the When field as the basis for repetition. Yearly type Day of the month Day of the week Last day of the month Last week of the month For monthly events, select one of the following: 5. Day of the year: this selection uses the day and date in the When field as the basis for repetition. Floating: for this selection, complete the Float week, Float day, and Float month fields. Repeat until Select a date for the end of the repeated event. Float week For a floating yearly repeating event, select the week. Float day For a floating yearly repeating event, select the day. Float month For a floating yearly repeating event, select the month. Click Submit. Create a schedule to use with the agent calendar Users with the agent calendar administrator role can create a schedule to use with the agent calendar. Role required: agent_schedule_admin Creating a schedule for the agent calendar uses the schedule feature. For more information, see Schedules. Schedules are configured with two types of records Schedule records specify a time zone and a type of schedule and use one or more schedule entries. Schedule records are saved in the Schedule [cmn_schedule] table. Schedule entry records specify the time periods that are included or excluded from a schedule. Schedule entries are saved in the Schedule Entry [cmn_schedule_span] table. Navigate to Agent Schedule > Schedule. Click New. 318
319 3. Complete the fields on the Schedule form. Field Name Enter a unique name for the schedule. Time Zone Select the time zone for the schedule. If you select Floating, the time zone will be relative to whatever is accessing the item at any given time. Parent Select a parent schedule to constrain the new schedule. Type Enter a label that describes the purpose of the schedule. You can also use one of these system terms to determine how to process certain schedules: excluded: excludes time periods from SLA counts. maintenance: specifies time periods where change management activities are allowed. A schedule containing maintenance schedule entries cannot also contain blackout schedule entries. blackout: excludes time periods from change management schedules. A schedule containing blackout schedule entries cannot also contain maintenance schedule entries. [Optional] Describe the schedule. Note: The Schedule form displays a warning message if there are no active entries defined for the current schedule. If your schedule is a child schedule that only contains exclusions, ignore the message because exclusions are non-active entries. 4. Right-click the header bar and click Save. Note: If you create a schedule of type maintenance and save the record, a UI policy hides the Type field from the form. To view or change the value for the Type field, view the list of schedules rather than the schedule form and add the Type column if necessary. You can double-click the cell for the value in the Type column and modify from the list view Configure one or more schedule entries. Click Submit. Use the agent calendar Users with the agent calendar user role can add events to their personal calendar and configure the calendar to show or hide different types of events. 319
320 Agent calendar keyboard shortcuts Action Keyboard Shortcut Move the cell focus up I Move the cell focus down K Move the cell focus to the left J Move the cell focus to the right L Create an event Shift + W Open an event Ctrl + Enter Go to the next event E Go to the previous event Shift + E Switch to Day view Alt + 1 Switch to Week view Alt + 2 Switch to Month view Alt + 3 Go to the previous day/week Ctrl + 1 Go to the current day/week Ctrl + 2 Go to the next day/week Ctrl + 3 Add an event to the agent calendar Users with the agent schedule user role can add events to their personal calendar. Role required: agent_schedule_user 1. Navigate to your calendar Customer Service > My Schedule Field Service > Agent > My Schedule Double-click a timeslot or click and drag over a timeslot on the calendar to open the New Event form. Fill in the fields on the New Event form, as necessary. Field Name The name of the event. Type The type of event: Time off Appointment Meeting Phone call Excluded On call Time off - in approval Time off - rejected 320
321 Field Show as Show this event on the agent's personal calendar as one of the following: Busy Free Tentative On call Select Busy to exclude the block of time from agent availability calculations for the auto assignment and the case assignment workbench. When The start date and time of the personal event. To The end date and time of the personal event. All day Enable this check box if the event lasts all day. Time zone [Read only] If an agent has selected a specific time zone in their user profile, that time zone is displayed here and is used as the time zone for this event. Subsequent changes to the Time zone field in the user profile do not change the time zone designation for this event. Repeats Create a repeating event by selecting the frequency. Depending on the selection, other fields are required to complete the frequency information. Does not repeat Daily Every Weekday (Mon-Fri) Every Weekend (Sat, Sun) Every Mon, Wed, Fri Every Tue, Thu Weekly Monthly Yearly Repeat every Enter a number for the frequency of the repeated event. Repeat on For weekly events, select a day of the week. 321
322 Field Monthly type For monthly events, select one of the following. These selections use the day and date in the When field as the basis for repetition. Yearly type Day of the month Day of the week Last day of the month Last week of the month For monthly events, select one of the following: 4. Day of the year: this selection uses the day and date in the When field as the basis for repetition. Floating: for this selection, complete the Float week, Float day, and Float month fields. Repeat until Select a date for the end of the repeated event. Float week For a floating yearly repeating event, select the week. Float day For a floating yearly repeating event, select the day. Float month For a floating yearly repeating event, select the month. Click Submit. The new event appears on the agent calendar and also in the Schedule Entries related list on the Agent Personal Schedule form. Move an event on the agent calendar Users with the agent schedule user role can move events on their personal calendar. Role required: agent_schedule_user 1. Navigate to your calendar. 2. Customer Service > My Schedule Field Service > Agent > My Schedule Use one of the following methods to move an event. Option Click an event and drag it to a new day or time The When and To fields in the event record are updated with the new information. Double-click an event to open the event record Change the date and time information in the When and To fields and click Submit. The event appears on the calendar in the new location. 322
323 Show or hide event types on the agent calendar Users with the agent schedule user role can personalize their calendar and show or hide different types of events. Role required: agent_schedule_user 1. Navigate to your calendar Customer Service > My Schedule Field Service > Agent > My Schedule Click the configuration icon in the calendar header to display the Schedule Configuration menu. Enable or disable the switches for the different types of events. An option is enabled when the switch is moved to the right and appears with a green background. Click the configuration icon again to hide the Schedule Configuration menu. The calendar displays the enabled task types. Field service groups Field service groups are sets of users or agents, filtered by location, who can perform specific field service tasks. Work orders and work order tasks use several different types of groups, including qualification, dispatch, and assignment groups. Administrators should set up an administrator group and one or more Administrators should set up an administrator group and one or more of each type of field service group, then assign the appropriate roles and users to those groups. Before using the Field application in a production environment, create at least one group of each type to cover all locations. Field service group information can be found in User Administration > Groups and Field Service > Group Management. Qualification groups A qualification group is a set of users who can provide technical information regarding the work to be performed to fulfill a work order or work order task. If one qualification group covers the location specified on the work order, the group name is automatically added to the Qualification group field on the work order when the work order state changes to Awaiting Qualification. If no qualification group or more than one qualification group covers the specified location, the Qualification group field is not automatically populated; information can be added manually. If no qualification group is assigned, the work order can remain without a qualification group and proceed through the work order life cycle. However, it is good practice to set up location coverage and qualification groups. Note: The Qualification group field is hidden in the Work Order form when Field Service Management is configured for automatic qualification. Dispatch groups A dispatch group is a set of users who can select an agent to complete a work order task. 323
324 Dispatch groups are filtered based on location coverage. If only one dispatch group covers the location specified on a work order task, that group is added to the Dispatch Group field on the work order task record automatically. If multiple dispatch groups cover the specified location, use the lookup list to select a dispatch group. If no dispatch group is assigned, the work order task cannot progress to the Pending Dispatch state. Assignment groups and vendor groups An assignment group is a set of agents or vendors, filtered by location, from which an individual agent or vendor should be selected to complete a work order task. If a dispatch group has been identified and the dispatch group only covers one assignment group, that assignment group is added to the Assignment Group field on the work order task record automatically. If the identified dispatch group covers multiple assignment groups, use the Assignment Group field lookup list to select an assignment group. If the Assignment Group field is empty, the system searches for assignment groups covering the territory that includes the work order task's location. Note: When an assignment group of type Vendor is created, be sure to assign a manager to the group who has the vendor manager role for assigning and controlling vendor tasks. Also be sure to add vendors to the group. Create a group Set up groups and assign the necessary roles and users. The users in the group inherit the roles of the group, so you do not have to assign roles to each user separately. Role required: admin There are a few good practices when creating groups: Create one group for administrators and assign the admin role to this group only. Create as many groups as needed in your organization. For example, create a staff group for each geographic location or function, such as building maintenance or building security. Assign the necessary users to those groups, and then assign the staff role to those groups. Navigate to User Administration > Groups. Click New. Fill in the fields on the form, as appropriate. See Creating Groups for an explanation of each field. Click the lock icon beside the Type field. If the field is not visible, configure the form to add it. The Type field expands Click the reference lookup ( ) icon and select the [application] type. Right-click the form header and select Save. Add the [application]_admin or [application]_staff role to the Roles related list. Add users to the Group Members related list. Click Update. Groups in Field example An example of how locations, qualification groups, dispatch groups, and assignment groups can be created and used together for Field. The best approach is to create locations first, then create the different types of groups and associate locations to the groups. 324

325 Company ZYX has a group of field service automation agents that cover four locations: San Diego Los Angeles San Jose San Francisco Figure 61: Group locations There are two qualification groups that qualify work orders and work order tasks: Southern California Northern California The Southern California qualification group covers the San Diego and Los Angeles locations. The Northern California qualification group covers the San Jose and San Francisco locations. 325

326 Figure 62: Qualification group There are four dispatch groups that select agents to complete work order tasks: San Diego Los Angeles San Jose San Francisco Each dispatch group covers their corresponding location. 326

327 Figure 63: Dispatch group There are four assignment groups of agents that complete work order tasks: San Diego Los Angeles San Jose San Francisco Each assignment group covers their corresponding location. 327
328 Figure 64: Assignment group Using the four locations and the different groups, field service tasks can follow a logical flow based on location. The work is qualified, dispatched, and then performed by people who are as close to the work site as possible for maximum efficiency. For example, a work order with San Francisco specified in the Location field is created. A member of the Northern California qualification group qualifies the work order by adding detailed information. A member of the San Francisco dispatch group selects an agent from the San Francisco assignment group to perform the tasks. 328
329 Field SLAs SLAs track the service level provided by groups and individuals. When you create a work order, the system automatically assigns it a default service level agreement (SLA) based on priority level. If you change the priority of the work order, the system cancels the current SLA and applies the SLA appropriate for the new priority. The SLA timer continues to run even if the priority is changed. The three default SLAs used for work orders are: Table 79: Default SLAs SLA WM - 5 business days Assigned to work orders with a priority level of 4 (Low) WM - Next business day Assigned to work orders with a priority level of 3 (Moderate) WM - Same business day Assigned to work orders with a priority level of 2 (High) or 1 (Critical) Users with the wm_admin role can create and edit SLAs or delete them from work orders. Changes to an SLA are used in new work orders, but they do not affect existing work orders that use the SLA. Note: The SLA applies to the work order. All associated work order tasks must be completed within the SLA time period to meet the SLA. Manage a work order SLA View and manage work order SLAs from the Work Order form or the Work Order Task form. Role required: wm_admin, wm_dispatcher Activities include suspending and resuming SLAs and deleting SLAs from a work order. To view the list of work orders with SLAs, navigate to Field Service > Work Order > Work Order SLAs. 329

330 Figure 65: Work order SLA form View a task with a SLA View all work order tasks associated with work orders that have SLAs. Role required: wm_admin, wm_dispatcher 1. Navigate to Field Service > Work Order > Work Order Tasks With SLAs. 2. Tasks that are behind schedule are highlighted according to how delinquent they are. To view SLAs for a work order, select the Task SLAs related list in the Work Order form. The information in this list includes: Table 80: Work order form Information Actual elapsed time Total running time of the SLA since it started, including any time that has passed since a breach. 330
331 Information Actual elapsed percentage Total percentage of the SLA time period that has elapsed. This value can rise above 100% after a breach and increases until the task is completed. Actual time left Total time remaining until this SLA breaches. When the Actual elapsed percentage reaches 100%, this value is set to 0 seconds. Business elapsed time Amount of time that has elapsed for this SLA within the business calendar. For example, if the business calendar for this SLA is from 8am to 5pm on weekdays, then the running time for the SLA is computed between these hours only and not on weekends. If no business calendar is in effect, the business elapsed time is the same as the actual elapsed time. Business elapsed percentage Percentage of the SLA time period that has elapsed on the business calendar for this SLA. If no business calendar is in effect, the business elapsed percentage is the same as the actual elapsed percentage. Business time left Time remaining on the business calendar until this SLA is breached. If no business calendar is in effect, the business time left is the same as the actual time left. When the Business elapsed percentage reaches 100%, this value is set to 0 seconds. Suspend and resume SLA timing from a work order Pause and resume the timing on a work order SLA from the work order. Role required: wm_admin, wm_initiator, wm_qualifier, wm_dispatcher, or a combination role This is useful if a qualifier or dispatcher is waiting for information from the caller or for other actions to take place before continuing the work order. Note: Initiators cannot view the SLAs attached to the work orders they suspend or resume. 1. Navigate to a work order with an SLA using the path visible to your role: Field Service > Work Order > Work Order SLAs Field Service > Work Order > Awaiting Qualification Field Service > Work Order > Draft Work Orders Select an active work order. On the work order record, add a work note explaining why the work order is suspended. Click Suspend. 5. The system sets the Stage of the SLA to Paused. Click Resume to restart the SLA. 331
332 The system resets the SLA to its previous stage. Suspend and resume SLA timing from a work order task Pause and resume the timing on a work order SLA from a work order task. Role required: wm_admin, wm_qualifier, wm_dispatcher, wm_agent, or a combination role This is particularly useful for agents because it enables them to suspend the timing on the parent work order if they are waiting for information or for others to perform actions. 1. Navigate to a work order task with an SLA using the path visible to your role: Field Service > Work Order > Work Order Tasks with SLAs Field Service > Work Order > My Work Order Tasks Field Service > Work Order > Assigned to me Select an active work order task. Add a work note explaining why you are suspending the work order. Under Related Links, click Suspend Work Order. 5. The system sets the Stage of the SLA to Paused. Click Resume Work Order to restart the SLA. The system resets the SLA to its previous stage. Delete an SLA from a work order Remove an SLA from a work order but leave it available for use with other work orders. Role required: wm_admin Navigate to Field Service > Work Order > Work Order SLAs. Open a work order. In the Task SLAs related list, select the check box beside the SLA name. In the Actions choice list, select Delete. Use the SLA map View open work order tasks and their SLA status. The SLA map view allows users with the wm_admin, wm_dispatcher, or dispatcher combination role to quickly see open work order tasks that are in danger of breaching their SLAs. When the SLA map appears, the view is centered on the logged in user's location, from the Location field on the user record. Each task's icon color indicates the level of the SLA's Business elapsed percentage. This is the percentage of the SLA duration that has expired on the applicable business calendar, if one exists. For example, a work order with an SLA of 5 business days starts on a Friday. On Tuesday the actual elapsed percentage for the SLA reaches 100%. However, the business elapsed percentage does not reach 100% until Thursday, because the business calendar shows that a business day runs from 8am to 5pm on weekdays. If the SLA breaches on Thursday, the business elapsed percentage continues upward from 100% until the task is completed. If no business calendar is in use, the business elapsed percentage equals the actual elapsed percentage. 332
333 Access the map How to access the SLA map. Role required: wm_admin, wm_dispatcher, or dispatcher combination role To access the SLA map, navigate to Field Service > Dispatching > My SLA Map. The map opens in the geographical area containing work orders with SLAs that are assigned to your dispatch group. SLA map symbols Icons in the SLA map and what they represent. Table 81: SLA map symbols Icon Title Agent on schedule Current location of an agent selected in the filter. Agents with this icon are on time or ahead of schedule. Agent behind less than 30 minutes Current location of an agent who is less than 30 minutes behind schedule. Agent behind less than 60 minutes Current location of an agent who is between 30 and 60 minutes behind schedule. Agent behind more than 60 minutes Current location of an agent who is at least one hour behind schedule. Agent off the schedule Last known location of an agent who is not currently on the schedule or working on any tasks. Green Tasks with a business elapsed percentage from 0 to less than 25. Yellow Tasks with a business elapsed percentage from 25 to less than 50. Orange Tasks with a business elapsed percentage from 50 to less than 75. Red Tasks with a business elapsed percentage over 100. Multiple tasks Multiple active tasks with SLAs, clustered by proximity. 333
334 Icon Title Multiple agents Multiple agents, clustered by proximity. Agent/Tasks Combination of agents and tasks with SLAs, clustered by proximity. Filter the SLA map How to filter the SLA map. Role required: wm_admin, wm_dispatcher, or dispatcher combination role 1. Click View Filter. These filters are available: Date: Select the date you want to search. Show agents current location: Show or hide agent locations on the map. By default, all agents are shown. Select the desired filters. Click Apply Filter to apply your changes to the map. Figure 66: SLA map filter Manage a task with an SLA How to access and manage tasks with SLAs. Role required: wm_admin, wm_dispatcher, or dispatcher combination role 1. Click the task icon to display a pop-up window with these SLA details: Table 82: SLA details Title SLA Name of the SLA. Time left Business elapsed time remaining on the SLA. Priority Task priority by number, where 1 is the highest and 5 the lowest. Skills Needed Skills needed to perform the work. Parts Needed Parts needed to perform the work. 334

335 Figure 67: SLA map detail Click the task number link to display the record in a pop-up window in the map. Select the Task SLAs related list to view the SLA details. The list shows the following SLA values: Table 83: SLA values Title SLA Name of the SLA. Click this link to view the SLA definition and its schedule. Start time Time the SLA started. Stage Status of this SLA, such as In progress, Completed, or Breached. Business elapsed percentage Percentage of time that has elapsed for this SLA on the business calendar. If no business calendar exists, then this value is the same as the actual elapsed percentage. Business time left Amount of time remaining for this SLA on the business calendar. If no business calendar exists, then this value is the same as the actual time remaining. 335
336 Service management states From creation until closure, SM application requests for work (for example, work orders and facilities requests), and their respective tasks follow a life cycle tracked by the State field in Field Service Management and Facilities. The life cycle is controlled through business rules and UI actions that are updated by the system automatically. Note: The State field on the record is always read-only. Request states SM requests follow a specific life cycle. The State field on the record is always read-only. The request states displayed depend on the SM application, as indicated in the table. Table 84: Service management request states State Draft Request initiator adds information about the work to be done. Awaiting Qualification Initiator fully describes the request, and qualifier can process the request. This state is valid only for the following SM applications: Qualified Request is fully qualified, meaning that all technical information to complete the request tasks has been added, but work has not started. This state is valid only for the following SM applications: Awaiting Approval Field Field When the information is complete enough for review by an approver, the request is marked ready for approval. This state is valid only for the following SM applications: Facilities Finance Legal Marketing 336
337 State Approved The appropriate approver approves the request. This state is valid only for the following SM applications: Facilities Finance Legal Marketing Work In Progress Work has started. Closed Complete Request was completed to specification. Closed Incomplete Request could not be completed as specified. Canceled Request was canceled. In addition to the State field, the different request task states are also shown visually at the top of each task record with the process flow formatter. Figure 68: Process flow formatter Note: If the State flows are enabled option in the configuration screen is not selected, the process flow formatter is removed. If you added states to the request and task tables, those states are visible on the request form. Request task states Like service management requests, their associated tasks follow a specific life cycle. The State field on the request task record is always read-only. The request task states displayed depend on the SM application, as indicated in the table. Table 85: Service management request task states State Draft Qualifier is not done describing the work. Pending Dispatch Request task is ready to be assigned. The parent request state changes to Qualified if all associated tasks are in Pending Dispatch or a later state. Assigned Request task is pending acceptance from the assigned agent. Accepted Agent accepts the request task and is ready to be done. This state is valid only for Marketing. 337
338 State Work In Progress Work on the request task has started. The parent request state changes to Work In Progress if no associated tasks are in Draft state. Closed Complete Request task was completed to specification. Closed Incomplete Request task could not be completed as specified. Canceled Request task was canceled. In addition to the State field, the different request task states are also shown visually at the top of each task record with the process flow formatter. Note: If the State flows are enabled option in the configuration screen is not selected, the process flow formatter is removed. State flow customization State flows control the sequence in which records transition between states in SM applications. An administrator can perform the following tasks: Add or delete states. Trigger events on particular state transitions. Transition to another state automatically when data in a request or its task changes, or change states manually when the user clicks a button. Limit the choice list for the State field to those end states that are valid transitions from the given start state. Control the visibility and behavior of selected fields on a target table when records in that table change states. Create custom state flows. Turn off the State flows are enabled option on the configuration screen. Creating custom state flows requires scripting knowledge. Note: Users with the wm_admin role can create, read, update, and delete only work order flows and work task flows. Users with the facilities_admin role can create, read, update, and delete only facilities request flows and request task flows. Users with the wm_admin role cannot manipulate facilities records, and users with the facilities_admin role cannot manipulate work order records. How SM request and task state flows work State flows replace the standard process that controls how requests and their associated tasks move between states. The system creates business rules, client scripts, and UI actions that perform the transitions and field controls you specify. These programming elements remain in use while the state flow records that use them are present. When state flows on an SM application table are deleted, the system attempts to delete any unnecessary programming elements that were created on that table. You can limit the selections for the State field to valid states for the transition, based on the starting state. State flows provide the following controls: Manual transitions: A UI action, created automatically by the system when you provide a condition or a script, initiates a transition. 338
339 Automatic transitions: A business rule, created automatically by the system when you provide a condition and a script, initiates a transition when changes are made to a request or task. Features available with state flows Custom transitions: Customize the order in which states can change for requests and task records. Field controls: Control the behavior and visibility of specific fields when a task changes states or reaches a specified end state. State choice list: Limit the values offered in a task record State field to valid states for that transition. This is the same client script that the system creates to manage field controls for state transitions. Events: Trigger events when a state transition occurs or when a record reaches a specific end state. Start and end states You can create a custom state flow for processing that must occur when a task record makes a specific transition from one state to another. These records require a starting state and an ending state, and processing occurs during the transition between states. To perform some processing when a task record reaches a particular end state, you only need to define the end state. In some cases a state flow can have a starting state only, such as when you need to perform some type of cleanup after a task is canceled. A state flow might have no starting or ending state if the processing in the record applies to more than one state transition. The solution is to store the business rule or client script in a state flow record and create a condition to trigger processing for any state change that requires it. An example of this in field service management is the Roll Up Changes business rule on the Work Order Task [wm_task] table. This business rule rolls up state changes that occur in tasks to the parent work order. Customize a state flow You can customize state flows to control the sequence in which records transition between states in SM applications. Customizing state flows requires scripting knowledge Before customizing a state flow, make a copy of the state flow record for the transition you want to change and do all your customizations in the copied record. This allows the system to update the default state flow record automatically during an upgrade and enables you to revert to the default record if necessary. Make sure to deactivate the original record so the system cannot use it. Navigate to the class of state flows you want to customize State Flows > Work Order Flows State Flows > Work Task Flows Open the record for the transition you want to customize. Right-click the form header and select Insert and Stay. The system clears any values from the Business rule and UI action fields. A notification appears at the top of the form describing the action taken. Ensure that the Active check box is selected. In the appropriate section, configure a transition method: 339
340 Manual: Click Create UI Action to create a button on the form that enables users to execute the transition manually. The system uses the value in the Name field as the label for the UI action. The UI action executes the script in the Manual Script field when the conditions are true Automatic: Click Create Business Rule to create the business rule. The business rule executes the script in the Automatic Script field when the conditions are true Click Create Client Script to create the script that limits the values available a record's State field choice list to valid states for that transition Complete the Field Controls section to control how specific fields appear when a record changes states. The system enforces the field controls with the same client script you created to filter the choice list for the State field. Click Update Reopen the source record you copied and clear the Active check box Deactivating the original record allows the system to upgrade it normally when the instance is upgraded and prevents the system from using the record rather than your custom state flow. Open the copied state flow record you want to customize. Fill in the fields, as needed. 340

341 Figure 69: Work task flow 341
342 Table 86: Work task flow Field Number Record number automatically generated by the system. [Required] Table Table on which the state flow record runs. The possible tables are: Work Order Task [wm_task] Work Order [wm_order] Starting state Name of the state at the beginning of the transition. Ending state Name of the state at the end of the transition. Client script Client script to run for this transition. The client script controls the available starting and ending states you can select by limiting the contents of the State choice list to valid states. Event Name of an existing event to trigger when this transition occurs. Name [Required] State name as it appears in the choice list. Roles Roles required to configure the State field that uses the custom transition. Active Switch for enabling or disabling this state flow record. Class Available state flow classes: State Flow: Records created for state flows in all task-based tables except those in Field. Work Order Flow: Records created for state flows in the Work Order [wm_order] table. Work Task Flow: Records created for state flows in the Work Order Task [wm_task] table. This field is required for users with the admin role. Users with the wm_admin role can only create state flow records in the Work Order Flow and Work Task Flow classes and cannot edit this field in the record. Override Default starting value for the State field on all new records for the table named in the state flow record. 342
343 Field Work notes Comments about this state flow transition. Comment Details about the customized record. Manual (Runs scripts from a UI action that requires the user to click a button or related link.) Manual condition string Conditions for enabling a UI action that cannot be defined with the condition builder. For example, you can use this string to define UI actions for mobile devices. This condition has an [and] relationship with the condition in the Manual condition field. Manual condition Condition builder for enabling a UI action that can be defined for fields in the target table. This condition has an [and] relationship with the condition in the Manual condition string field. Manual script Script that defines what the UI action does when the conditions are true. This script runs when the user clicks a button or a related link. UI action [Read-only] Names the UI action to enable for this transition. By default, this UI action creates a button on the task form. Click Create UI Action to create the button. The button inherits the name of the state flow record in which it was created. Automatic (Runs a business rule automatically when a task record is changed and updated.) Automatic condition string Conditions for running the business rule that cannot be defined with the condition builder. For example, use this condition to evaluate if the proposed transition is a valid flow. This condition has an [and] relationship with the condition in the Automatic condition field. Automatic condition Conditions for running the business rule that can be defined for fields in the target table. This condition has an [and] relationship with the condition in the Automatic condition string field. Automatic script Script that performs additional work when the condition is true. This script can do tasks such as update the date and time the transition occurred or notify someone of a milestone. 343
344 Field Business rule Name of the business rule created for this transition. The business rule has a condition to ensure the validity of the flow. If that condition is true, the business rule performs the transition requested, using the starting and ending states from the Work Order Flow or Work Task Flow form. Field Controls (Determines field properties when a record transitions between states.) Mandatory fields Fields required when this transition occurs or when the Ending state is the current state of a work order or work order task. Read only fields Fields set as read-only when this transition occurs or when the Ending state is the current state of a work order or work order task. Visible fields Fields made visible when this transition occurs or when the Ending state is the current state of a work order or work order task. Not mandatory Fields set as optional when this transition occurs or when the Ending state is the current state of a work order or work order task. Not read only Fields that can be edited when this transition occurs or when the Ending state is the current state of a work order or work order task. Not visible Fields hidden when this transition occurs or when the Ending state is the current state of a work order or work order task. State flow dictionary overrides A dictionary override in a state flow defines the starting state for all new records in a specific table. You set an override in tables that extend a base table only, so that your customizations are applied only to the extended table In a state flow record, select an Ending state. This is the override value which becomes the starting state for all new records in the table named. Click Create Default Value. The system populates the Dictionary override field with a value of state, which is the field in the task table affected by the override. The Dictionary override field is read-only. After the override is created, the system hides the Create Default Value button on all subsequent state flow forms for that table. Work notes in state flows Work notes are an important part of the state flow process and are used to communicate information about state transitions. 344
345 The state flow adds work notes into the Work notes field of any task making this transition. For example, you might include the note, Task rejected by agent, in the Reject state flow, which occurs when the task moves from Assigned to Pending Dispatch. If an agent rejects the task and fails to enter a work note, this note tells the dispatcher why the task reappeared in the dispatch queue. Work notes added by an agent rejecting the task are appended to the work notes that are inherited from the state flow. These rules apply to state flow work notes: For a state flow with no Starting state, the work note is added every time the task transitions to the Ending state. For a state flow with a Starting state and an Ending state, the work note is added only when the task transitions from that starting state to that ending state. If two state flows with work notes have the same Ending state, but only one has a Starting state, the system adds the work notes from the state flow with the starting state. This better matches the state flow work note to the more important transition between specific starting and ending states. In the example here, the work note information is more pertinent to a task moving from Assigned to Pending Dispatch than to a task that reaches the Pending Dispatch state from an undetermined beginning state. Field controls in state flows You can define controls for individual fields that are enforced when a record transitions between states. Settings in the Field Controls section of the State Flow form enable you to apply field controls when the system detects a specified state transition or when the end state is the current state when the form is opened. The control is applied only to existing fields on the form. State flows cannot add fields to the form. For example, you might want the Problem field to be visible when an incident moves to the Awaiting Problem state. If the incident state changes to Awaiting User Info, you hide the Problem field and make the Caller field mandatory. The best practice when creating field controls is to configure state flow records with an ending state only and to create the correct behavior for every ending state you want to control. This ensures that the field controls are set properly when the user selects a new state, and also when the user returns a record's State field to the original state. Only specify a full state transition, with both a starting and ending state, when you want a particular behavior for that precise state transition. Note: State flows use client scripts to enforce field controls. It is possible that your settings can be changed by existing UI policies, which execute after client scripts. Trigger events on state changes You can configure a state flow to trigger a registered system event when a task transitions from a starting state to a specified end state. For example, you can use events to trigger notifications and create script actions. You can configure a state flow to trigger a registered system event when a task transitions from a starting state to a specified end state. For example, you can use events to trigger notifications and create script actions. When you attach an event to a state flow, the system creates a business rule called State Flow Events for <table name> for the table specified in the state flow. If you specify a start and end state, the business rule executes when the record transitions from the start state to the end state. If the state flow only specifies an end state, the business rule executes whenever that end state is reached. The system creates one business rule for all state flows containing events on a single table. When all events or all state flows on a table are deleted, the system deletes the business rule. To create an event that fires when a work order task moves from a starting state of Work in Progress to an end state of Closed Complete: Register a new event on the Work Order Task [wm_task] table called task.closed. Navigate to State FlowsWork Task Flows. 345

346 3. Open the state flow record Close Complete. 4. Select task.closed in the Event field and save your changes. The system automatically creates a business rule called State Flow Events for wm_task. 346
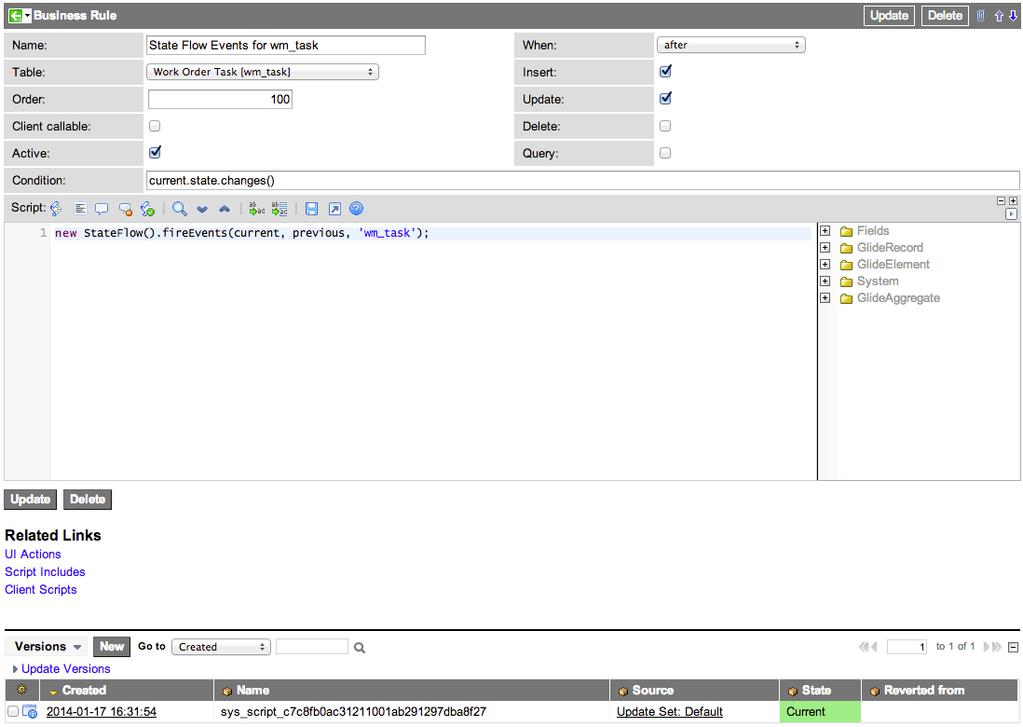
347 347
348 Rebuild state flows You can rebuild state flows when a mismatch between existing and new sys_ids occurs. When you use an XML file to import a state flow record into an instance, the system attempts to match the incoming states with existing states by comparing sys_ids. Because the sys_ids of items in a choice list can vary between instances, the system can fail to match the states, even though they are otherwise identical. When matching fails, the start and end states of affected records are left blank or contain numeric values. To repair these records navigate to State Flows > Admin > Rebuild State Flows. This module runs a script that compares the numerical value of each item in the State field choice list until it finds a match in the imported state flow record. State flow cleanup The business rules, client scripts, and UI actions that the system creates automatically to perform custom transitions exist only while the state flow records that use them are present. When all the state flows on a table are deleted, the system attempts to delete any unnecessary programming elements that were created on that table, using these criteria: Table 87: State Flow Elements Deleted in Cleanup Element Deleted When UI action The state flow that created it is deleted. Business rule Dictionary override Business rule that processes events triggered by All state flows for the table specified that have a state flow events configured are deleted. Client script (onload) All state flows for the table are deleted. Client script (onchange) All state flows with field controls are deleted. Work notes business rule All state flows with field controls or work notes are deleted. State flow example Your business processes might require work order tasks to be accepted automatically when dispatched to an agent. Create a new state flow record that automates the transition from Pending Dispatch to Accepted and bypasses the Assigned state in which agents can reject tasks. This prevents the system from running the manual script associated with UI actions. The automatic script performs the jobs that the manual script performed, such as updating the date and time the task was dispatched, or to do additional work such as sending a notification Navigate to State Flows > > Service Order Flows. Open the Assigned record that defines a task transition from a starting state of Pending Dispatch to an ending state of Assigned. This is an automatic state change that occurs when an agent's name is added to the Assigned to field and the task is updated. 348
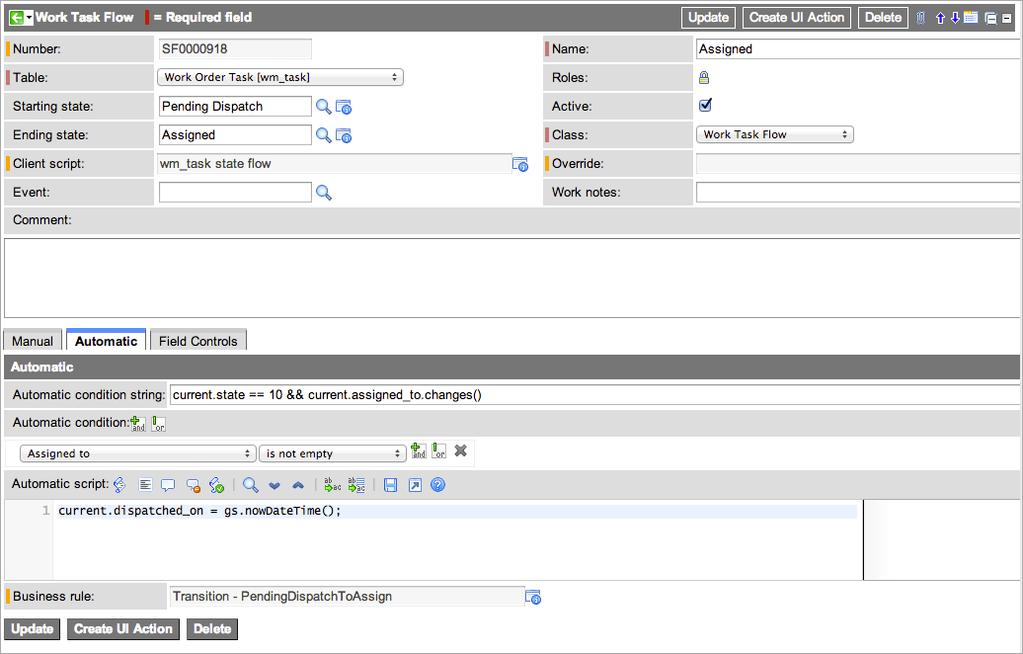
349 349
350 3. Change the name of the state flow. 4. In this example, change the name to Skip Agent Acceptance. Change the value in the Ending state field to Accepted. 5. This transition allows you to bypass the Accept state flow record that enables agents to reject tasks. Do not change the settings in these fields: Automatic condition string: This condition ensures that the current state is at Pending Dispatch and the value in the Assigned to field changes: current.state == 10 && current.assigned_to.changes() Automatic condition: The condition [Assigned to] [is not empty] ensures that all dispatched tasks are accepted automatically. Note: The previous two condition statements have an [and] relationship. In this example, the business rule runs when a task in a state of Pending Dispatch is assigned to any agent. Automatic script: The automatic script sets the time the task was dispatched, using the method: current.dispatched_on = gs.nowdatetime();. 6. Copy the record using the Insert and Stay command. 7. This action increments the record number and clears the Business rule field. The system automatically creates a new business rule, using the name of the new state flow record. The Skip Agent Acceptance business rule moves the task from Pending Dispatch to Accepted automatically when a dispatcher enters a user name in the Assigned to field. Note that any changes you make to this state flow record in the future are executed by this business rule. Ensure that the Active check box is selected. 350
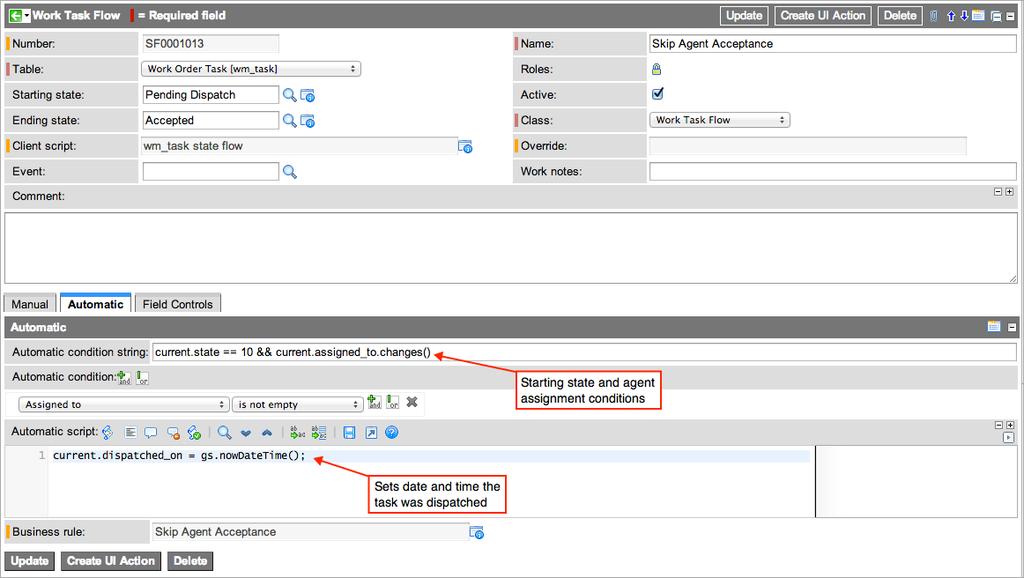
351 351
352 8. In the Work Task Flows list, locate the Accept state flow record and change the Active status to false. This action deactivates the transition that allows agents to accept tasks and moves the state flow directly from Pending Dispatch to Accepted. Territory management Territory management determines, by geographical location, the individual or group best positioned to execute a service call. Territory management allows the assignment of a set of geographical locations to an individual or group. This assignment creates a territory. Territory management is based on a hierarchy where all locations are attached to a parent location. Top-level locations do not have a parent location. Territory Management is activated automatically with Field. Assign a location to a user Territory management allows field service management administrators to assign locations to users. This creates a territory, or set of locations covered by a given user. The association helps the system to determine which users can fix problems in particular locations Navigate to Territories > Users. Open a user record. In the Locations Covered related list: Click Edit to add an existing location to the user. Click New to create a new location to associate to the user. Territory management at the user level is not used for automations. Assign a location to a group Territory management allows field service management administrators to assign locations to groups of users. This creates a territory, or set of locations covered by a given group. The association helps the system to determine which groups can fix problems in particular locations Navigate to Territories > Groups. Open a group record. In the Locations Covered related list: Click Edit to add an existing location to the group. Click New to create a new location to associate to the group. Note: To determine which group covers a given location, the system checks the location hierarchy to see if there are any groups assigned to the location. If not, the system checks the upper level of hierarchy. 352
353 Performance Analytics reports Performance Analytics reports are available for the Field application with the activation of the Performance Analytics - Content Pack - Field plugin (com.snc.work_management_pa). Activating this plugin adds the Performance Analytics option to the Field Service menu. Click this option to view the Field Service Performance Analytics homepage, which includes the following reports: Percent productive agent time for work order tasks Percent utilization of agents for work order task Percent actual duration to planned duration for work order tasks Average closing time for work orders Number of new work orders Number of open work orders Number of closed work orders Note: If you have Performance Analytics installed, the Field Performance Analytics plugin (com.snc.work_management_pa) is automatically activated as part of the Field plugin. Request Management Agents regularly access request records as they resolve requests and correspond with the submitters. They can also access built-in reports to see information like the number of active or unassigned requests for an SM application. Request creation Requests are created differently based on the role that has been granted to the user. Department administrators can create requests differently than an employee can. Create a request through the catalog The catalog provides several different categories so users can choose the one that closely relates to their request Navigate to Self-Service > [SM application] Catalog. Choose from the displayed categories. Select a subcategory, if necessary. Fill in the fields on the form. Note: Each service management application displays different fields. Table 88: Catalog fields Field Opened for The name of the person submitting this request. Select a new name if you are opening this request on behalf of another user. 353
354 5. Field Location The location for this request. Priority The priority that describes the importance of this request. Short A brief summary of the request. Detailed A detailed description of the request. Click Submit. Note: If the catalog fields do not appear on the request form, you can configure the form and add the SM Variable Editor related list. Create a request using the request form The request form allows you to associate a request with a configuration item that is affected by the request in an SM application. Associating a CI to a request helps your configuration management team understand which services could be negatively impacted by the request issue. You can also use this form when you want to include additional comments and work notes for the request Navigate to [SM application] > Requests > Create New. Fill in the fields on the form, as appropriate. Table 89: Request form fields Field Number An auto-generated number that identifies the request record. Company The name of the company from which the request initiated. Caller The name of the requester. Affected CI A CI affected by this request. Location The location associated with this request. Verify that the location is correct. If it is not, you can select another location record. Template The template for creating this request (optional). Click the reference lookup icon and select a template. The request is populated with all fields in the selected template including all subtasks and part requirements (if applicable). Opened Auto-filled with the date and time the request was opened. Priority The priority that describes the importance of this request. By default, all requests are set to 4-Low. 354
355 Field State The state that describes what work stage this request is in. By default, all requests are set to Open. Assignment group Select the group from which an agent is assigned to the request. You can select only assignment groups associated with the service management application you are using. Note: If you selected the [SM application name] will use the dispatch queue option on the Configuration screen, only users with the Dispatcher role can edit this field. If you selected the [SM application name] will not use the dispatch queue option, all users except those users with the Basic and Initiator roles can edit this field. Assigned to Select the agent to assign the request to. If you already selected an assignment group, you can only select agents who belong to that group. If notifications are enabled on your instance, a built-in notification automatically sends an to this user when you save the request record. Notes: If you selected the [SM application name] will use the dispatch queue option on the Configuration screen, only users with the Dispatcher and Agent roles can edit this field. If you selected the [SM application name] will not use the dispatch queue option, all users except those users with the Basic and Initiator roles can edit this field. If you selected an assignment group and want to assign the work to a new user, click the reference lookup icon next to Assigned to, click New, and create a new user. Be aware, however, that you must navigate to User Administration > Groups and add the user to the assignment group before the request can be assigned. Initiated from Specify the incident or task from which this request was created. Billable Select this check box if the request is billable. 355
356 Field Short description [Required] A brief summary of the request. Optionally, you can click the search knowledge icon to view articles in the knowledge base relating to this product model, plan, or CI. Doing so could provide a solution related to the reason you are submitting this request. A detailed description of the request. The description is always visible to the submitter. Therefore, if you add or modify the description for a request that another user submitted, the user is able to see the changes. Work notes Additional notes that you want to share between users who can access the request form. A user who submits the request through the service catalog cannot see the work notes. Note: If you specify an Assignment group and you want to assign the work to a user who is not already in your user table, click the magnifying glass icon in the Assigned to field. Then click New and create the user record. Be aware, however, that the new user is not recognized. 3. Click Submit Clone a request To save time, an existing request can be cloned to create a new request. In the cloning process, the following information is copied from the source task: Parent request reference Short description Dispatch group Assignment group Location Planned information (scheduled and estimated, not actuals) Required skills Open the task and select Clone Task under Related Links. New tasks are created in Draft state. The Work Notes field contains the original task number and text stating that the task is a clone. Request creation using inbound actions Requests can be automatically created or updated from the information in inbound s as long as the functionality has been enabled on the configuration screen of SM application. The s are also to be sent to a mailbox defined by criteria in the appropriate inbound action. After the functionality has been enabled by selecting the Requests can be created and updated by inbound option on the application configuration screen, three inbound actions are available for 356
357 the SM applications available in the base system. These inbound actions are also available for new applications created using the SM application creator. Create a request from an inbound Requests can be automatically created from the information in inbound s as long the functionality has been enabled on the configuration screen of SM application. The s are also to be sent to a mailbox defined by criteria in the appropriate inbound action Navigate to System Policy > > Inbound Actions. Select the inbound action called Create [application name] Request. The inbound action record opens and displays the default conditions that trigger the inbound action. When an is sent to the mail list defined by the criteria in Actions, a request is created with the following information: 3. The Contact type is set to . The sender (if found) populates the opened_by and Caller fields for a newly created sm_order based item. The subject populates the Short description field. The body populates the field. The senders company (Sender->Company) populates the Company field. The senders location (Sender->Location) populates the Location field. The entire is copied into the Work notes field. You can use the action as it is or modify it to meet the needs of your organization. Create a request from a forwarded inbound Requests can be automatically created from the information in forwarded inbound s as long the functionality has been enabled on the configuration screen of SM application. The s are also to be sent to a mailbox defined by criteria in the appropriate inbound action Navigate to System Policy > > Inbound Actions. Select the inbound action called Create [application name] Request (Forwarded). The forwarded inbound action record opens and displays the default conditions that trigger the inbound action. When an is forwarded to the mail list defined by the criteria in Action, a request is created with the following information: 3. The Contact type is set to . The sender (if found) populates the opened_by and Caller fields for a newly created sm_order based item. The subject populates the Short description field. The body populates the field. The senders company (Sender->Company) populates the Company field. The senders location (Sender->Location) populates the Location field. The entire is copied into the Work notes field. You can use the action as it is or modify it to meet the needs of your organization. Update a request from an inbound Requests can be automatically updated from the information in inbound replies as long the functionality has been enabled on the SM application's configuration screen. The s must also be sent to a mailbox defined by criteria in the appropriate inbound action. 1. Navigate to System Policy > > Inbound Actions. 357
358 2. 3. Navigate to the inbound action called Update [application name] Request and click its Name. The update inbound action record opens and displays the default conditions that trigger the inbound action. When an reply is received in the mail list defined by the criteria in the action, the associated request is opened and update information is added to the Work notes field. You can use the action as is or modify it to meet the needs of your organization. Request approvals Approving a request in an SM application means that the request is ready for task creation and assignment. When a request is sent to a user with the [SM application]_approver_user role, the approver has several choices. If you select Approval is required for new requests in the applications Configuration screen, a newly created request automatically moves to the Awaiting Approval state. Otherwise, the request moves to the next configured state. Table 90: Request approval states Approval Choice Approved The request is approved. Rejected The request is not qualified and it is moved to the canceled state. Also, the following work note is added to the request: The [SM application] request is rejected. More information required The request does not contain enough information. It reverts to the Draft state and the following work note is added to the request: The [SM application] request needs more information for further approval. Duplicate The request is no longer required, because another request has already performed the work. The request is moved to the Cancelled state and the following work note is added to the request: This is a duplicate [SM application] request. Agent assignment Depending on your settings in the SM application configuration screen, you can assign agents manually or using auto-assignment. If you have a limited number of agents for completing requests or you simply do not want to auto-assign agents, you can use manual assignment. Auto-assignment enables you to define criteria by which agents can be automatically selected to satisfy requests entered in service management applications. Based on the needs of your organization, you can configure the criteria for agent auto-assignment in the following ways. 358
359 When auto-assignment is enabled and a task is qualified or marked as Ready for Work, the following actions occur: Available agents are evaluated based on the criteria defined in the configuration. An appropriate agent is automatically assigned to the task. The task is moved to the Assigned state. If the configuration is set up to consider more than one set of criteria, such as location and skills, the agents are evaluated based on the weighting property settings in addition to other criteria. If the task cannot be auto-assigned, a user with the dispatcher role must adjust the values in the request or task form and then save the record. Manually assign agents to active requests Use this procedure to assign agents to active requests in service management (SM) applications. 1. Navigate to one of the following modules: SM application] > Open - Unassigned for a list of requests that no one is assigned to. [SM application] > All [SM application] Requests for a list of all open requests, regardless of their current assignment. Open the request you want to assign. In the Assignment group field, enter the group that handles this kind of request. If no groups are available, leave this field blank. To look up the assignment group, click the reference lookup icon ( field. ) beside the Assignment group Note: You do not have to select an assignment group, but doing so limits the users you can assign the request to. 4. In the Assigned to field, enter the agent to handle this request. To look up an agent, click the reference lookup icon ( ) beside the Assigned to field. Note: If one was selected, the users in the search results are limited to the users in the Assignment group. 5. Click Update. An notification is automatically sent to the assigned agent when notifications are set up for the instance. Agent auto assignment using rating-based criteria Rating-based methods, such as location, skills, and time zones, help to auto assign agents based on configuration settings and optional properties. The calculated ratings are used to determine the best agent to perform the task. Any combination of rating-based methods can be enabled in configuration screen of the application. When a task is created, a rating for each type of enabled selection criteria is calculated for each available agent. The agent whose average rating is highest is considered for auto-assignment. The settings for the auto-assignment weighting properties, found in [SM application] > Administration > Properties, are included in the rating calculations. These values help you prioritize which auto-assignment selection criteria is more important to your organization. The priority values should be [1, 10] and they are factored between 1 and 0. That is, 10 is 359
360 a factor of 1, 5 is a factor of 0.5, and so on. For an example of how the weighting properties affect agent ratings, see Agent auto assignment using multiple selection criteria on page 52. Agent auto assignment using location Agents can be auto assigned based on the location defined in their user record and the location of the tasks. Auto assignment by location can be performed in a task- or request-driven processing environment when the Auto-selection of agents will consider location of agents configuration is enabled. When a task is created, agent locations are compared to the following ranges to determine a location rating for each agent. Table 91: Location rating calculation Distance (mi.) from agent to task Rating >100 0 When a task is qualified or marked as Ready for Work, the agent closest to the task location is considered for the task. If the application is configured so that only location is considered, the closest agent is autoassigned to the task. If the application is configured to use other selection criteria such as skills, time zone, or schedule the ratings of all selection criteria are averaged, and the agent with the highest overall rating is auto-assigned for the task. See Agent auto assignment using multiple selection criteria on page 52 for details. Agent auto assignment using skills Agents can be auto assigned based on the skills of an agent, and the skills required to perform the task. Assign skills to an agent user records using Skills > Users. Auto assignment by skills can be performed in either a task- or request-driven processing environment when the Auto-selection of agents for tasks requires them to have skills configuration option must be set to all or some for the application. When a task that includes skills is qualified or marked as Ready for Work, skills of each agent are compared with the skills required to perform the task, and a rating is calculated based on the skills configuration option. If the option is set to some, the agent with the closest skills match is auto-assigned the task. If the option is set to all, only agents who possess all the required skills are considered. If no agents possess all the skills required to perform the task, none are auto-assigned. Skills rating of an agent is calculated as: Skills_agent/Skills_task When: 360
361 Skills_agent is the number of skills possessed by the agent that match the skills required for the task. Skills_task is the total number of skills required for the task. For example, if a task requires four skills, and Agent A possesses three of them and Agent B possesses two of them: Skill rating of Agent A = 3/4 or 0.75 Skill rating of Agent B = 2/4 or 0.5 If the application is configured to use other selection criteria, such as location or time zone, the ratings of all selection criteria are averaged, and the agent with the highest overall rating is auto-selected for the task. See Agent auto assignment using multiple selection criteria on page 52 for details. Agent auto assignment using time zones Agents can be auto assigned based on the time zone defined in their user records and the time zone of the tasks. Auto assignment by time zone can be performed in either a task- or request-driven processing environment when the Auto-selection of agents will consider time zone for the task configuration option must be enabled for the application. When a task is qualified or marked as Ready for Work, agents in the time zone closest to the task time zone are considered for the task. If the application is configured so that only time zone is considered, an agent in the same time zone is auto-assigned the task. Note: It is important that the time zones for the agent and the task are set correctly. When a task is created, agents are rated based on the time zones of both task and agent using the following formula: 1 - [abs(task_tz Agent_tz) 12] Where: abs is the mathematical function to compute the absolute value. Task_tz is the offset between the time zone of the task and GMT. Agent_tz is the offset between the time zone of the agent and GMT. For example, a task is created in New York City (GMT-4), and two agents are available to perform the task, one in Los Angeles (GMT-7) and one in Paris, France (GMT+1). The rating of the agent in Los Angeles is calculated as: 1 - abs((-4) - (-7)) 12 or 0.75 The rating of the agent in Paris is calculated as: 1 - abs((-4) - (+1)) 12 or 0.58 So if the auto assignment of the task is based on the time zone alone, it is assigned to the agent from Los Angeles. If the application is configured to use other selection criteria, such as skills or location, the ratings of all selection criteria are averaged, and the agent with the highest overall rating is auto-selected for the task. See Agent auto assignment using multiple selection criteria on page 52 for details. Agent auto assignment using time-based criteria Time-based methods, such as schedules and priority assignment, help you auto assign agents based on configuration settings and optional properties. The calculated ratings are used to determine the best agent to perform the task. 361
362 Any combination of time-based methods can be enabled in the application configuration screen. When a task is created, the schedule of the agent and the task to be performed are combined with ratingbased criteria to auto-assign an agent. Agent auto assignment using schedules Agents can be auto assigned based on the agent or the task schedule. Auto assignment by schedule can be performed only in a task-driven processing environment, and the Auto-selection of agents will consider agent or task schedules configuration option must be enabled for the application. If this option is turned off, only the agent ratings are used for auto-assignment. When a task is qualified or marked as Ready for Work, agents ratings are evaluated, and the schedules of qualified agents are compared against the schedule of the task to determine the agent with the best matching schedule. Note: If the task includes specific time entries in the Window start and Window end fields, and no schedule of an agent falls within that task window, no agents are assigned. Also if the customer wants a task to be performed at or near a specific time, the Window start time should be set as close to that time as possible. For example, the Window start and Window end fields are set to 1:00 pm and 8:00 pm respectively. The customer prefers the job to be started at 4:00 pm. It is possible that an agent is dispatched at 13:00. So, setting the Window start closer to 4:00 can help ensure that the work is performed when the customer prefers it to be done. If the application is configured to use other selection criteria, such as skills or time zone, the ratings of all selection criteria are averaged, and the agent with the highest overall rating is auto-selected for the task. See Agent auto assignment using multiple selection criteria on page 52 for details. Agent auto assignment using priority assignment The priority assignment feature enables you to configure auto assignment so that agents can be assigned to perform tasks or provide services on a continual, 24x7x365 basis. Priority assignment is triggered when the priority of a task matches the priority set in the application configuration page. Priority assignment can be used with location and skills settings. However, it can also operate independently. To use priority assignment, you must set the following configuration options for the application. Table 92: Priority auto-assignment configuration options Field Process life cycle Set to task driven (subtasks are required). Assignment method for tasks Set to auto-assignment. Auto-selection of agents considers agent or task schedules Enabled. Enable priority assignment Enabled. Select priorities for assignment Select one or more priorities. Only tasks of the selected priority or priorities trigger auto-assignment based on priority assignment. When a task is qualified or marked as Ready for Work, and the priority of the task matches a priority selected for the application, the agent that best matches the schedule of the task is auto-assigned. If the location and skills options are enabled, agents are first evaluated on their physical proximity to the location of the task, and then on how their skills match the skills required to perform the task. The agent whose location, availability, and skills best match the requirements of the task is auto-assigned. 362
363 When a task has a priority that matches a priority in the priority assignment list, the Location Rating and Timezone Rating are ignored, even if they have been enabled. If the priority of a task matches a priority selected in the Select priorities for assignment option, and no agents in the assignment group are available to be auto-assigned, the task is assigned to the group manager, regardless of whether the manager is available. It is the responsibility of the manager to locate an agent to perform the task. Note: If no agent is located in the same time zone as the task, priority assignment fails. Agent auto assignment using multiple selection criteria At its simplest, auto assignment involves identifying a set of selection criteria and automatically assigning the task to the agent who most closely meets the criteria. You can, however, select multiple sets of criteria, including both rating-based and time-based criteria. When a task is qualified or marked as Ready for Work, the following evaluations are performed: 1. The ratings of an agent are calculated. If the Auto-selection of agents will consider agent or task schedules configuration option is disabled for the application, the ratings of an agent are used exclusively for auto-assigning an agent. For more information on how the ratings are calculated, see: 2. Agent auto assignment using location on page 49 Agent auto assignment using skills on page 50 Agent auto assignment using time zones on page 50 If the Auto-selection of agents will consider agent or task schedules configuration option is enabled, the schedules of the agents whose ratings are acceptable for auto-assignment are compared to the schedule for the task, and the agent with the best match is auto-assigned. For more information on time-based methods for auto-assigning agents, see: Agent auto assignment using schedules on page 51 Agent auto assignment using priority assignment on page 52 Auto assignment is based on the following calculation: (Criteria_1 rating x Criteria_1 weight) + (Criteria_2 rating x Criteria_2 weight) + (Criteria_3 rating x Criteria_3 weight) / Number of criteria types used Where: Number of criteria types used = 1, 2, or 3 depending on the location, skill, and time zone settings used. This example calculates agent auto-assignment based on location and skills. The example is based on the following assumptions. The Auto-selection of agents will consider location of agents configuration option is enabled for the application. The Auto-selection of agents requires them to have some of the required skills for the task configuration option is enabled for the application. The Skills Weight property is set to 10 for the application. The Location Weight property is set to 5 for the application. Agents A and B are available to perform a task, and the task requires four specific skills. The location of Agent A is 5 miles from the site of the task. Agent A possesses three of the four required skills. 363
364 The location of Agent B is one-quarter mile from the site. Agent B possesses two of the required skills. Auto assignment for the agents uses this calculation: [(Location rating x Location weight) + (Skills rating x Skills weight)]/ 2 The auto assignment calculation for Agent A is: [(0.7 x 0.5) + (0.75 x 1)]/ 2 = 0.55 The auto assignment calculation for Agent B is: [(0.9 x 0.5) + (0.5 x 1)]/ 2 = In this example, Agent A is auto assigned the task. Collaborate on a request Within a request, you can enter comments that are visible to the submitter, allowing for collaboration between the two of you. For collaboration with other agents, you can enter comments that are not visible to the submitter Navigate to [SM application] > All [SM application] Requests. Open the request you want to collaborate on. In the Additional comments (Customer visible) field, enter the comments that you want the person who submitted the request to see. The submitter can see the comments in this field and add more comments as necessary. Update this field as many times as necessary to correspond with the submitter. To correspond with other agents, enter content that you do not want the submitter to see in the Work notes field. Close a request When you close a request, you can add details that you want the submitter to be aware of Navigate to [SM application] > Assigned to me. Click the request number. In the Additional comments field, enter any final notes or comments. Change the State field to the appropriate closed state. Click Update. Closed and completed requests When the Request lifecycle option is set to request-driven, the assigned agent can complete and close the request once all the tasks in the request are complete. A Close Complete button is visible to the agent assigned to the request. The agent enters work notes before clicking Close Complete. When the button is clicked, the open task is automatically completed (if applicable) and the request transitions to the Complete state. Close an SM request as spam Mark any open request as spam; that is, the request has no value and should be closed. Role required: admin In the SM application, open the request you want to mark as spam. In the header bar, click Spam. The state of the request is changed to Closed and the Work notes indicate that the request was closed as spam. 364
365 If the State flows are enabled option on the configuration screen is not selected, the state is not changed, but the Work notes indicate that the request was closed as spam. Request task management A request contains one or more tasks. These tasks allow qualifiers to define activities that must be done to complete a request. Administrators can create multiple tasks under a single request. Splitting a request into separate tasks, when necessary, enables qualifiers to: Assign different aspects of a request to different staff members. Assign tasks to staff members who have different set of skills or are in different locations. Schedule tasks so they are either done one after another, or at the same time by different staff members. Schedule additional tasks, if necessary, to complete the request. Note: If you have the Request life cycle is request driven configuration option activated, you can manually add tasks as needed. If you have Request life cycle is task driven activated, an initial task is automatically created when the request record is created. Create request tasks Tasks are created in support of requests. Role required: [SM application]_admin or [SM application]_qualifier Navigate to [SM Application] > Requests > All [SM Application] Requests. Open the request for which you want to create tasks. Click the Add Task related link. 4. The Task screen for the SM application opens. Fill in the fields on the form. Note: Not all fields display for all SM applications. Table 93: Request task fields Field Number Auto-generated identification number for the task. Parent Request that this task is associated with. Cloned from Record number of the task this task was cloned from, if any. Location Geographical area where the work must be done. The location is critical for determining the staff member who is assigned to the task. 365
366 Field Template Template for creating this request (optional). Click the lookup icon and select a template. The description of the selected template populates the field. Skills Abilities necessary to execute the task. This field is automatically completed based on the selection in the Affected CI field on the associated request. If you change the affected CI on the request, the system adds any skills required by the new CI to the skills already listed here. State Current state of the task, such as Accepted or Closed Complete. The advances the state automatically as users complete the work for each successive state. Assignment group Group from which an individual legal staff member is selected to complete the task. The lookup list shows only the assignment groups associated with the selected Location. If the Assignment Group field is empty, the system searches for the group covering the territory that includes the location of the task. Assigned to Individual staff members who should complete the task, selected from the Assignment group. If you defined skills and assigned them to staff members, the Assigned to field lookup list shows only those staff members in the assignment group who have all the Skills required. If no exact match of skills is found, the lookup list shows all assignment group members. Note: If state flows are disabled, this field is not mandatory. Short description Brief explanation of the task. Exact technical description of the unit of work to be performed. Qualifiers should provide as much detail about the problem as possible to avoid extra communication with the caller in later stages of the request. Work notes Information about the task as it progresses through each state. Work notes are not visible to customers. Scheduling - These fields display for Finance and Marketing Service Management. 366
367 Field Scheduled start Date and time when the earliest task is scheduled to start. Note: If state flows are disabled, this field is not mandatory. Estimated end Estimated work end date. The estimated date when the latest task is completed. Actual work start Date and time when the earliest task actually started. Actual work end Date and time when the latest task ended. Requested due by Estimated date when the latest task is completed. Note: The workflow appears at the top of the form, with the completed states shown in green. Task windows A task window is the time period, bordered by start and end times, in which a task is performed. Task windows can be flexible or fixed and are used by the auto-routing and auto-dispatch features when determining the daily schedule of staff members. A flexible window has start and end times that the application attempts to respect when dispatching or routing a task automatically. The system can reschedule a flexible task window if necessary, to make it fit into the schedule of a staff member. A fixed task window cannot be rescheduled. If the auto-router or auto-dispatcher cannot schedule the task for the fixed window time period, that task is not scheduled at all. The time interval configured for a window cannot be less than the time required to perform the task. Use a task template for multiple request templates If you have tasks that are often repeated across multiple jobs, you can create a task template and reuse it in multiple request templates Create a request template and an associated task template that contains the information you want to reuse. When you create subsequent request templates, you can select the task template from the Task Template field and save the file. Clone a request task Existing tasks can be cloned to create tasks with the same populated fields. Role required: admin, ITIL, creator, or catalog admin In the cloning process, the following information is copied from the source task: Parent request reference Short description 367
368 Assignment group Location Required skills Open the request task and select Clone Task under Related Links. The application creates a task in Draft state. The Work Notes field contains the original task number and text stating that the task is a clone. Integration with Project Portfolio Management Link project tasks to work orders to assist with managing installation or deployment projects in the field. A project can have multiple tasks that are assigned to field service agents. Using the Field Service Management integration with Project Portfolio Management, you can create work orders directly from project tasks. Linking project tasks to work orders in this way: Synchronizes the planned and actual dates between the project task and the work order. Synchronizes the states between the project task and the work order. To create a work order from a project task, click the Create Work Order related link on the Project Task form. To view an active linked work order, click the View Work Order related link on the Project Task form. Project tasks can have more than one linked work order, but only one work order can be active at a time. Dates Dates are synchronized in one direction, from the project task to the linked work order and to any work order tasks. Work order tasks created for a linked work order have fixed Window start and Window end dates that are based on the planned start and end dates of the project task. Updates to project task dates are also updated in the linked work order tasks for tasks that are not in the Work In Progress or Closed states. Note: Changes to the dates on a work order task do not change the dates on the linked project task. States State changes are synchronized in one direction, from the work order to the project task. Updating the work order state also updates the state of the linked project task. Updating the state of a project task add a note to the Work Notes field on the linked work order. Closing a work order also closes the project tasks. If an update to the state of a project task fails, a note is added to the project task Work notes field about the corresponding work order update. Updates can fail with project tasks that have dependencies. Work order and project task states are updated as follows. Work Order State Project Task State Work In Progress Work In Progress 368
369 Work Order State Project Task State Close Complete Close Complete Close Incomplete Close Incomplete Canceled Close Skipped Plugins Activate the Field Service with Project Management plugin (com.snc.wm_ppm) to use this feature. This plugin requires the Field plugin (com.snc.work_management) and the Project Portfolio Suite with Financials plugin (com.snc.financial_planning_pmo). Create a work order from a project task Link a work order to a project task by creating the work order and any related tasks directly from the Project Task form. Role required: wm_initiator, wm_initiator_qualifier, or admin Navigate to the desired Project Task form. Click the Create Work Order related link. Note: Only one active work order can be linked to a project task. If an active work order has already been linked, the related link changes to View Work Order The work order is created and some of the fields on the Work Order form are updated with information from the project task, including the Short and the Location. The Planned start date and Planned end date for the project task become the Scheduled start and Estimated end dates for the work order. Fill in the fields on the Work Order form. See Create a work order for more information. Create a work order task by clicking New in the Work Order Tasks related list. The work order task is created and some of the fields on the Work Order Task form are updated with information from the project task, including the Location and the Window start and Window end dates. Fill in the fields on the Work Order Task form. See Create a work order task for more information. Customize the work order state transition map Users with the system administrator role can customize the work order state transition map, which maps work order states to project task states. Updating the state of a work order also updates the state of the linked project task. The FieldServicesProjectTaskStateHandler script maps the work order states to the project task states. Users with the system administrator role can customize this state transition map as needed based on the following examples. 369
370 Examples Setting the status of a work order to Close complete should not close the project task. To make this change, remove the following line in the initialize() function: this.workorderprojecttaskstatemap[fieldserviceprojecttaskstatehandler.work_order_state_c = FieldServiceProjectTaskStateHandler.PROJECT_TASK_STATE_CLOSE_COMPLETE; To map the work order Pending dispatch state to the project task Open state, add the following line to the initialize() function: this.workorderprojecttaskstatemap[fieldserviceprojecttaskstatehandler.work_order_state_ = FieldServiceProjectTaskStateHandler.PROJECT_TASK_STATE_OPEN; To qualify a task automatically once the project task is changed to Open, change the FieldServiceProjectUpdateHandler process function that listens on project task updates and change the linked work order to Qualified. Add the following line after this section: if(taskjson.change_map && taskjson.change_map.state){ If(taskJSON.change_map.state == FieldServiceProjectTaskStateHandler.PROJECT_TASK_STATE_OPEN workorder.state = FieldServiceProjectTaskStateHandler. WORK_ORDER_STATE_PENDING_DISPATCH workorder.update(); Integration with Customer Provides an integration between the Customer and Field applications. Users can view account and contact information on work orders and work order tasks in the Field application. Customers and consumers can view case-related work orders from the Customer Service and Consumer Service Portals. When an agent creates a work order from a customer service case, the work order and task forms include case-related information such as the account and contact. When a customer or a consumer views a case from either the Customer or Consumer Service Portals, they can view the details of any work orders and tasks related to the case. Customer Service with Field plugin The Customer Service with Field plugin (com.snc.csm_fsm_integration) integrates the Field and Customer applications. This plugin requires: Field Customer Customer Service Portal 370
371 Changes to the Field application In the Field application, this integration adds the following fields to the Work Order form. These fields are visible in the Case view. To display these fields, right-click the Work Order form header and select View > Case. Account Consumer Contact Asset Partner Partner Contact Updating the Account field on the Work Order form also updates the Company field. Updating the Contact field on the Work Order form updates the Caller field. Changes to the Customer application In the Customer application, this integration adds the Work Orders link to the Customer Service Portal and Consumer Service Portal headers. Click this link to view a list of work orders, including the work order number, priority, state, and short description. The work orders displayed in this list on the Customer Service Portal depend on the customer role: customer, customer admin, partner, or partner admin. Click a work order in this list to display the work order details. Known limitations There is no synchronization between the Work Order form and the associated Case form. If information changes on the Case form, it does not get updated on the Work Order form. Integration with Financial Management Plugins for Customer and Field provide integration with the Financial Management application as well as dashboards and reports. The Financial Management application enables you to allocate, track, and report on expenses in your organization. When the Financial Management application allocates an expense, it breaks down the expense into detailed amounts of money called allocations. These allocations can be associated with specific segments and accounts for a specific cost model. The integration with Financial Management provides cost allocations for Customer and Field. Use these cost allocations on the Financial Management workbench, which provides financial administrators with a graphical interface to allocate expenses. Access the workbench through the Cost Transparency > Workbench module. Plugins Two different plugins, one for Customer and one for Field, enable the integration with Financial Management. These plugins also add dashboards based on cost allocations. 371
372 Performance Analytics - Content Pack - Financial Management for Customer Service plugin (com.snc.pa.fm.csm). Performance Analytics - Content Pack - Financial Management for Field plugin (com.snc.pa.fm.fsm) Note: The Performance Analytics - Content Pack - Financial Management for Customer Service plugin includes demo data for FY16: Q1 through FY17: Q2. The Performance Analytics - Content Pack - Financial Management for Field plugin does not include demo data. Cost models A cost model is a set of rules, methods, and metrics that determines the allocation of expenses. Select cost models on the Data Definitions tab of the Financial Management workbench. For Customer, the integration with Financial Management provides these cost models: CSM Allocation Model for Cust Account: allocates expenses for individual B2B customer accounts. CSM Allocation Model for Channels: allocates expenses for communication channels. For Field, the integration with Financial Management provides this cost model: FSM Allocation Model for Company: allocates expenses for companies. Segment hierarchy All accounts in the chart of accounts belong to segments which are structured in a hierarchy. This hierarchy enables the roll-up of expenses from lower-level accounts and segments to higher-level accounts and segments. CSM Allocation Model for Cust Account uses this segment hierarchy: Assignment Group > Product > Customer Account. CSM Allocation Model for Channels uses this segment hierarchy: Assignment Group > Product > Channels. FSM Allocation Model for Company uses this segment hierarchy: Assignment Group > Product > Company. Account buckets Use account buckets to categorize cleansed expenses before assigning them to accounts and segments. Account buckets can be organized in parent-child relationships so that several child buckets can refer to a single parent bucket. The Customer Support and Field Service Support account buckets include: Facilities IT Chargeback Payroll and Labor Expenses Professional Fees & Services Supplies Training 372
373 Other expenses Allocation metrics Allocation metrics are rules that you can create and use to split an allocation based on dimensions such as: Number of Customer Service cases: allocate expenses to a product based on the number of cases closed in a fiscal period. Total Customer Service case resolution time: allocate expenses to a product based on the total hours worked on cases closed in a fiscal period. Number of Field Service work order tasks: allocates expenses to a product based on the number of work order tasks completed in a fiscal period. Total work order completion time: allocates expenses to a product based on the total hours worked on tasks completed in a fiscal period. For Customer, the integration with Financial Management provides these allocation metrics: CSM Allocate to Assignment Groups by Headcount CSM Allocate to Product by # Cases CSM Allocate to Product by Case Time Worked Duration CSM Rollup from AssgGrp to Product by # Cases CSM Rollup from AssgGrp to Product by Case Time Worked Duration CSM Rollup from Product to Account by # Cases CSM Rollup from Product to Account by Case Time Worked Duration For Field, the integration with Financial Management provides these allocation metrics: FSM Allocate to Assignment Groups by Headcount FSM Allocate to Product by # Work Orders FSM Rollup from Product to Company by # Work Orders User roles These roles can access the Financial Management workbench (Cost Transparency > Workbench): cost_transparency_analyst cost_transparency_admin financial_mgmt_user financial_mgmt_admin Dashboards and reports The Performance Analytics - Content Pack - Financial Management for Customer Service and Performance Analytics - Content Pack - Financial Management for Field plugins provide the following dashboards: CSM Financials Dashboard 373
374 FSM Financials Dashboard Navigate to Performance Analytics > Dashboards and select the desired dashboard from the Dashboard menu. Time recording for Field Agents record time worked on tasks and activities. Time recorded entries automatically generate time cards and time sheets for approval by managers. The time recording feature extends the functionality of the Time Card Management application to Field. Field service agents can record time worked on tasks directly from the Work Order Task form and time spent on other activities, such as meetings or training, from the Time Worked form. Time worked entries automatically create time cards for each selected work category. Time cards are automatically included in a weekly time sheet. The time recording feature also extends the functionality of the Cost Management application to Field. Managers can view and create labor rate cards and also view expense lines. Time sheets use labor rate cards to determine costs. Two labor rate cards are provided for users with the Field Service agent role (wm_agent): FSM - Task category (100$/hour) FSM - Default (50$/hour) Agents can modify the hours recorded on time cards. Once a time sheet is approved and a time card is processed, the agent can still go back and modify the time worked. The time sheet reverts to the Pending state and new time cards are created. If an agent adds more time worked records to an approved time sheet for the same week, a new time sheet record is created for the current week. Managers can view time worked records, time cards, and time sheets for agents in their assignment groups, as well as approve and reject time sheets. After a time sheet is approved, the system processes the time cards and uses rate cards based on the time card category to create expense lines. Time recording plugin The time recording feature requires the Field plugin and the Time Recording for Field Service (com.snc.wm_time_recording) plugin. The Time Recording for Field Service plugin activates the Time card management (com.snc.time_card) plugin and the Cost Management (com.snc.cost_management) plugin. User roles Users with the wm_agent role inherit the timecard_user role. This role restricts access to the time sheets, time cards, and time worked records created by the agent. Users with the wm_manager role inherit the timecard_admin role. This role restricts access to the time sheets, time cards, and time worked records created by the agents in a manager's assigned groups. Time sheet policy For users with the wm_agent role, creating time worked records automatically creates or modifies time cards regardless of the setting for the com.snc.time_card.time_worked system property. The Time Sheet 374
375 policy controls this functionality. The system administrator can disable the auto creation of time cards for a specific user with the wm_agent role by creating a separate Time Sheet policy for that user. Field Service view The Time Card form and the Time Sheet form have a Field Service view. This view does the following for users with the wm_agent and wm_manger roles: Removes the Generate Time Cards UI action. Displays the Time Worked related list on the Time Card form. Record time worked for a task or activity Agents can record time worked on a work order task as well as time spent on other activities. Role required: wm_agent An agent can record time worked directly from a work order task by clicking Record Time on the work order task form. Time can be recorded regardless of the work order task state. An agent can also record time spent on other activities from the Time Worked list by creating a new time worked record, recording the time, and selecting a category. A time card is created for each category type and work order task. The total hours recorded on each time card are then recorded on the current time sheet in the Time Cards related list. 1. To record time worked for a task or an activity: Navigate to a work order task and click Record Time. This opens a Time Worked form with the Task and User field already populated. Navigate to Time Sheets > My Time Worked and click New. This opens a Time Worked form with the User field already populated. If necessary, select the work order task in the Task field. If necessary, select the Work Date. This field defaults to the current date. Select a Category for the time being recorded. Fill in the Time worked. Provide any additional information in the Comments field and click Submit. The Time Worked form is saved and added to the Time Worked list. If this is the first time worked entry for the selected category, a time card is created for that category and the time worked record is added to the card. If a time card for the category already exists, the time worked record is added to that card. Review time recorded for a task Agents can review the time recorded for work order tasks. Role required: wm_agent The Time Worked related list on the Work Order Task form displays the Time Worked records that have been created for the work order task. From this related list, field service agents can review their recorded time and also delete records Navigate to the desired work order task. Go to the Time Worked related list. This list displays the Time Worked records that have been created for this work order task. 375
376 3. To view a record, click the Category. Modify or delete time worked entries Agents can modify and delete existing time worked entries and create new entries after a time sheet has been approved. Role required: wm_agent An agent can add, modify, or delete time worked entries for an approved time sheet. Adding, modifying, or deleting these entries creates new time cards or updates existing time cards and generates an updated time sheet. Note: Do not manually edit time cards. Instead, edit the original time worked entries, which generates updated time cards and time sheets. 1. To modify or delete a time worked entry: Navigate to the desired work order task, click the Time Worked related list, and click the desired entry. Navigate to Time Sheets > My Time Worked and click the desired entry. To modify the entry, make changes to the desired fields and click Update. To delete the entry, click Delete. Review and submit a time sheet Agents can review and submit time sheets to managers for review and approval. Role required: wm_agent The total hours worked for each category are recorded on the time card and on the time sheet. From the time sheet, you can see total hours by day and by category Navigate to Time Sheets > My Time Sheets > Current Time Sheet. If desired, review the time cards associated with the time sheet in the Time Cards list. Click Submit Time Sheet. The time sheet is submitted to the manager for approval. The state of the time sheet changes from Pending to Submitted and the form becomes read-only. Review and approve time sheets Managers can review time cards and time sheets for agents in their assignment groups. Role required: wm_manager Navigate to Field Service > Manager > Time Sheets - Pending Approval. Select a time sheet. If necessary, review the time cards associated with this time sheet in the Time Cards related list. Click one of the following: 376
377 Option Approve The state of the time sheet and the associated time cards changes to Approved and becomes read-only. Time cards for any work order tasks that are in the Work in process state are marked as Processed. Once the work order task is Complete, the time cards are marked as Approved. Reject The state of the time sheet and the associated time cards changes to Rejected. The field service agent can make changes to the time sheet and submit again for approval. Push notifications and mobile interface updates Assign tasks and send reminders to customer service agents and field technicians using push notifications. Use the enhanced agent map and dispatcher map on the mobile user interface. Agents and technicians can receive push notifications about tasks on their mobile devices. Dispatchers and managers can use push notifications to assign tasks to groups or to individual agents and to send reminders. Agents and technicians can accept or reject tasks from their mobile devices depending on the configuration. Push notifications for work order tasks use the Mobile Application push application. Use this application to send notifications to both individual users and assignment groups. Users with the system administrator role can enable and configure push notifications. See Push notifications for more information. Push notifications for task assignment When a dispatcher or manager assigns a task to an individual user: The user receives a notification with an Approve or Reject action. Approving the notification assigns the task to the user. Rejecting the notification unassigns the task and returns it to the Pending Dispatch state. With auto assignment enabled, the user receives a notification about the assigned task and no further action is required. Note: This behavior depends on the setting for the Agent must accept or reject the assigned task configuration option. If disabled, the agent does not have the option to reject a task. When a dispatcher or manager assigns a task to an assignment group, all users in the group receive a notification with an Approve or Reject action. Agents receive the notification and can accept or reject the task. When an agent clicks Assign to me, the state of the task changes to Assigned. Push notifications as reminders Notifications can be sent as reminders about upcoming tasks and about SLAs coming due. These notifications are sent to the agent assigned to the task. 377
378 Send notifications as upcoming task reminders. Reminders can be set at 15-minute intervals up to one hour. These reminders require the wm_notification.upcoming.task.reminder.minutes.before system property to be set. The default setting is 45 minutes before the task start time. If the value for this property is not defined, the agent does not receive reminders. Send notifications to the assigned agents and agent managers for the following SLAs: SLA warning SLA breached SLA repair complete Mobile interface enhancements Several enhancements improve the Field experience with the mobile user interface. In addition to push notifications for task assignment, enhancements include upgrades to the agent map, the dispatch map, and the agent and manager calendars. For the dispatch map, users access My Dispatch Map in the desktop interface and Dispatcher Map in the mobile interface. The functionality of these two modules is the same. The map centers on the position defined in the user profile Users can turn on and off the Dispatcher Map legend. The system stores map filter preferences in the wm_dispatcher_map_filter table. The Apply button replaces the Search button. If there are more than 99 agents or tasks, 99+ appears in the icon labels. For the agent map: The Assigned to me module replaces the WO tasks assigned to me module. The Apply button replaces the Search button. The Search button replaces the Save button. Manager calendar and agent calendar functionality is also available with the mobile user interface. Agents can create and edit personal events and view tasks. Managers can query for team events such as cases, tasks, and personal time-off. Managers can also create and update time-off events for team members. Push notifications, actions, and messages Push notifications, actions, and messages for work order task assignments and reminders. Push notifications Adds the following notifications to System Notification > Push > Push Notifications: WorkOrderTaskUpcomingReminder: sends a notification to the assigned agent as a reminder about an upcoming task. WorkOrderTaskAcceptanceNotification: sends a notification when a task needs to be accepted by an agent. WorkOrderTaskGrpAssignmentNotification: sends a notification when a dispatcher assigns a task to an assignment group. WorkOrderTaskAutoAcceptanceNotification: when auto assignment is enabled, sends a notification when a task is auto accepted by an agent. 378
379 Push notification actions Adds the following actions to System Notification > Push > Push Action: WO Task-Accept Action WO Task-Reject Action WO Task-Running Late Action Push notification messages Adds the following messages to System Notification > Push > Push Messages: WO Task Acceptance Message WO Task Auto Acceptance Message WO Task Group Assignment Message WO Task Upcoming Reminder Message Turn on notification preferences Field service agents need to turn on the following notification preferences: 1. Navigate to Self Service > My Notifications. 2. Turn on the work order task notifications: 3. WO Task Acceptance Notification WO Task Auto Acceptance Notification WO Task Group Assignment Notification WO Task Upcoming Reminder Ensure that notifications are set to ON on the user profile. Planned maintenance enhancements Maintenance schedules can be based on either duration or meter and can be triggered by the first occurring related condition. For example, on the Maintenance Schedule form, select Duration or Meter as the trigger for an automobile maintenance schedule and then define the duration as three months and the meter as 5,000 miles. The schedule is triggered by whichever comes first. With the Duration or Meter trigger selected, the Next run time and Next run value fields are populated in the Maintenance Plan Records related list on the Maintenance Plan form. See Define a maintenance schedule for more information. Content packs for Field Content packs contain preconfigured best practice dashboards. These dashboards contain actionable data visualizations that help you improve your business processes and practices. 379
380 Note: You can activate Performance Analytics content packs and in-form analytics on instances that have not licensed Performance Analytics Premium to evaluate the functionality. However, to start collecting data you must license Performance Analytics Premium. Content packs The Performance Analytics widgets on the dashboard visualize data over time, which allows you to analyze your business processes and identify areas of improvement. With content packs, you can get value from Performance Analytics for your application with minimal setup. Note: Content packs include some dashboards that are inactive by default. You can activate these dashboards to make them visible to end users according to your business needs. To enable the content pack plugin for Field, an admin can navigate to System Definitions > Plugins and activate the Performance Analytics - Content Pack - Field plugin. Components installed with Field Several types of components are installed with Field. Demo data for the Field application is a separate plugin. The Field Service Management Demo Data plugin (com.snc.work_management.demo) provides sample qualifiers, dispatchers, agents, work orders, work order tasks, stockrooms, and asset information. Tables installed with Field Tables Field adds the following tables. Table 94: Tables for Field Table Work Order Stores work order records. [wm_order] Work Order Flow Stores the work order state flow records. [sf_work_order] Work Order Model [cmdb_workorder_product_model] Work Order Task [wm_task] Stores the Product Catalog work order model records. This table was modified by the Field plugin. This table is renamed and part of Service Order Management. Unit of work performed by one person, in one session (one location and one time). 380
381 Table Work Task Flow Stores the work task state flow records. [sf_work_task] Work Task Model [cmdb_servicetask_product_model] WM Map Filters Config [wm_map_filters_config] Questionnaire Stores the Product Catalog work task model records. This table was modified by the Field plugin. This table is renamed and part of Service Order Management. Stores filter configurations for the agent map on the mobile UI. Stores questionnaires created for work orders and work order tasks. [wm_questionnaire] Properties installed with Field Properties Field adds the following properties. Table 95: Properties for Field Property glide.ui.wm_order_activity.fields Determines which fields are tracked in the activities list for work orders. The system automatically synchronizes the values in this property and the selections made by personalizing activities. glide.ui.wm_task_activity.fields Type: String Default value: opened_by,work_notes Location: System Properties [sys_properties] table Determines which fields are tracked in the activities list for work order tasks. The system automatically synchronizes the values in this property and the selections made by personalizing activities. Type: String Default value: work_notes,assigned_to Location: System Properties [sys_properties] table 381
382 Property work.management.default.end.time Default end time for all work agents when no schedule is set, formatted in a 24 hour clock. work.management.default.start.time Default start time for all work agents when no schedule is set. This value sets the start time for a day other than the current day, when no scheduled task exists or is continued from the previous day. This property uses a 24 hour clock. work.management.limit.location Type: String Default value: 08:00 Location: Field Service > Administration > Properties Field should limit the dispatch groups available to choose by the location of the task. By default, the list of available dispatch groups is filtered by their proximity to the work order task location. When this property is set to false, the system displays all dispatch groups for selection, without any consideration of location. If only one dispatch group is available for a work order task in any location, that group is automatically entered in the Dispatch group field. work.management.max.agents.processed Type: String Default value: 17:00 Location: Field Service > Administration > Properties Type: true/false Default value: true Location: Field Service > Administration > Properties > Dispatch Properties for Field Service Sets the maximum number of agents that will be processed by auto-dispatch at a time. The system has an absolute limit of 300 agents and sets the value at that level if you specify more than 300. The system cannot auto-dispatch a task for a dispatch group that contains more agents than the value configured. Type: Integer Default value: 100 Location: Field Service > Administration > Properties 382
383 Property work.management.work.spacing Amount of time (in minutes) to add between the end of a task and the travel start of the next. An example of a valid time value is 10. com.snc.wm.wo.task_window_days Type: Integer Default value: 0 Location: Field Service > Administration > Properties Default days for a window of a task. Type: Integer Default value: 14 Location: Field Service > Administration > Properties Geolocation properties Field adds the following geolocation properties. Table 96: Geolocation properties for Field Property glide.geolocation.map.merge.task.agent.markers Merge the task and agent markers on the geolocation maps with a new purple marker. When this property is true, agent and task markers that are close together are merged into a purple cluster that displays the count of both marker types. The pop-up information window for the purple marker displays the items for all agents and tasks. If this property is false, agents and tasks will only be gathered into their own clusters and not into the single, purple cluster. work.management.allow.toll.roads Type: true/false Default value: false Location: Field Service > Administration > Properties Allow toll roads to be used. Allows the system to use toll roads when auto-routing an agent's tasks. Type: True/false Default value: True Location: Field Service > Administration > Properties 383
384 Property work.management.autodispatch.geolocation Geolocation should be used to update estimated travel time via Google Maps API. work.management.evening.rush.hours Evening rush hour span, formatted as 14:30-16:00. This property uses a 24 hour clock. All times are expressed as a range, separated by a dash with no spaces. Times not using this format are ignored. This property must be used with the work.management.morning.rush.hours and work.management.rush.travel.buffer properties. work.management.morning.rush.hours Type: String Default: 0 Location: Field Service > Administration > Properties Morning rush hour span, formatted as 06:30-08:00. This property uses a 24 hour clock. All times are expressed as a range, separated by a dash with no spaces. Times not using this format are ignored. This property must be used with the work.management.evening.rush.hours and work.management.rush.travel.buffer properties. work.management.rush.travel.buffer Type: true/false Default value: true Location: Field Service > Administration > Properties > Dispatch Properties for Field Type: String Default: 0 Location: Field Service > Administration > Properties Percentage to add to all rush hour travel times. The system uses this percentage to calculate schedules when auto-routing an agent. Use this property when both morning and evening rush hour times are defined. An example of a valid time buffer percentage is 15. Type: Integer Default value: 0 Location: Field Service > Administration > Properties 384
385 Property work.management.travel.buffer Percentage to add to all travel times. An example of a valid percentage value is 15. Type: Integer Default value: 0 Location: Field Service > Administration > Properties User roles installed with Field Roles Field adds the following roles. Table 97: Roles for Field Role title [name] Contains Roles Field Administrator Manages data related to field service management. Field service management administrators also can: [wm_admin] Control and override all information in the Field application. Delete work orders and tasks. Create tasks using the Clone Task feature. Create, edit, and delete work order models and work task models. Create, edit, and delete incidentals. View expense lines. View certain fields in non-subscription-based contracts. catalog_admin knowledge_manager skill_admin skill_model_admin template_admin territory_admin wm_agent wm_approver_user wm_dispatcher wm_qualifier 385
386 Role title [name] Contains Roles Field Agent Manages actual task time and performs work on site. Agents also can: [wm_agent] Accept or reject tasks assigned to them. Add parts requirements. Source parts. Create tasks using the Clone Task feature. Add work notes to work orders and work order tasks. Create, edit, and delete incidentals. View expense lines. View certain fields in non-subscription-based contracts. document_management_user inventory_user skill_user territory_user wm_basic Agents cannot update schedule or task window times or toggle the window control. Field Approver User [wm_approver_user] Field Basic Responsible for approving work orders before they are qualified or assigned. approver_user Common data access shared by all field service roles. wm_read [wm_basic] 386
387 Role title [name] Contains Roles Field Dispatcher Schedules tasks, adds parts, and assigns tasks to work agents. Dispatchers also can: document_management_user inventory_user skill_model_user territory_user wm_basic wm_basic wm_initiator wm_qualifier [wm_dispatcher] Field Initiator [wm_initiator] Creates work orders and assigns qualification group. Initiators also can: Field Initiator Qualifier [wm_initiator_qualifier] Create tasks. Add part requirements. Source parts. Edit all work order task fields and manage tasks from Draft to Assigned status. Edit the Assigned to field until work starts. Create tasks using the Clone Task feature. Set actual travel time and work start and end times if needed. Add work notes to any field service record. Create, edit, and delete incidentals. View expense lines. View certain fields in non-subscription-based contracts. Edit work orders they create that are in the Draft state. Add work notes to any field service record. View work order tasks and part requirements. Initiator-qualifiers can: Create work orders. Create tasks. Add part requirements. Source parts. Assign skills to agents. View incidentals. 387
388 Role title [name] Contains Roles Field Initiator Qualifier Dispatcher Initiator-qualifier-dispatchers can: wm_initiator wm_qualifier wm_dispatcher document_management_user inventory_user skill_model_user territory_user wm_basic [wm_initiator_qualifier_dispatcher] Field Qualifier [wm_qualifier] Qualifies work orders and creates work order tasks. Qualifiers also can: Field Read Create work orders. Create tasks. Add parts requirements. Source parts. Assign skills to agents. Assign work to agents. Manage agent tasks. View incidentals. Edit work orders in the Qualified state. Edit work orders in the Awaiting Qualification state. Edit tasks that are in the Draft state to provide technical details, such as information about CIs involved or parts needed. Create tasks using the Clone Task feature. Change the qualification group. Set the dispatch group. Add part requirements. Source parts Add work notes to any field service record. View incidentals. Capable of reading work orders and work order tasks. None [wm_read] Script includes installed with Field Script includes Field adds the following script includes. 388
389 Table 98: Script includes for Field Script include WMTimelineGroupSchedulePage Schedules page script include for the field service resource chart. WorkManagementInitiation Links to a newly created work order and transfers any relevant information. FSMQuestionnaireHelper Geolocation script includes Field adds the following geolocation script includes. Table 99: Script includes for Field geolocation Script include WMGeolocationAJAX Automatically routes tasks from the Field Service Management mobile dispatch map. WMGeolocationUtils Provides utilities for Field geolocation maps. WorkTaskRouting Routing functionality for work order tasks. Client scripts installed with Field Client scripts Field adds the following client scripts. Table 100: Client scripts for Field Client script Table Populate Short Expense Line Automatically populates the short description of expense lines with the work order short description when expense lines are manually created from work orders. Cost Management must be activated. [fm_expense_line] Hide End Date Fields Work Order Hide estimated_end when the request-driven process is used and hide expected_end when task-driven is used. [wm_order] 389
390 Client script Table Update UI on load and model change Asset Usage Show/Hide Task Map section Work Order Task [sm_asset_usage] This section of the map displays the location of the task and also shows the agents in the vicinity. This section needs to be visible only when the task is in the Pending Dispatch state. Work Order Hides part requirements on the Work Order form if part requirements are not activated in Field Service Configuration. [wm_order] Update Model and Quantity based on Asset [wm_task] Part requirement activation Asset Usage [sm_asset_usage] Business rules installed with Field Business rules Field adds the following business rules. Table 101: Business rules for Field Business rule Table Accept Work Order Task Automatically moves a task from the Assigned state to Accepted if the Accept/Reject option is selected in Field Service Configuration. [wm_task] Assigned Work Order Task Sets a task in the Draft state to the Assigned state if the Assigned to field is populated. This business rule is associated with the "Assigned (Draft to Assigned)" State flow. [wm_task] Assigned(state flow business rule) Work Order Cancel Work Task Work Order Task Automatically moves an order to the Assigned state if the Assignment group or Assigned to are populated. recommends not editing this business rule. [wm_order] Cancels any transfer orders for a work order task, via State Flows, when the task is cancelled. [wm_task] 390
391 Business rule Table Create First Work Order Task Work Order Creates the first task for a newly qualified work order. [wm_order] Field Service Automation Group Group Types [sys_user_group] Ensures data integrity for dispatch group coverage information. Field Service Automation Qualification System Property Turns off the qualification stage whenever the work.management.qualification system property is set to No. This business rule turns on the qualification stage when the property is set to Yes. Populate Skills - Update Child Tasks Work Order Populate Work Order from Template Work Order Ready for Qualification (approval off qu) Work Order Reassign Work Order Task [sys_properties] When the CI is changed, updates the skills required in tasks for the order to contain those skills. [wm_order] Populates a new work order from the work order model selected as a template. [wm_order] Automatically moves a work order from the Draft state to Ready for Qualification when the Template field is populated. [wm_order] Prevents task reassignment if the task has part requirements that are in a state of In transit. [wm_task] RFD (approval qual both off) Work Order Automatically moves a work order from the Draft state to Ready when the Assigned to or Template field is populated. [wm_order] Roll Up Changes Work Order Task Updates the work order status based on changes to the work order task. [wm_task] Start Work Work Order Automatically moves a work order from the Ready state to Work In Progress. [wm_order] Start Work(state flow business rule) Work Order Task Automatically moves a task to the Work in process state if the Actual Start Work field is populated. [wm_task] 391
392 Business rule Table State Change - After Deprecated Work Order Task Ensures that the field service life cycle is followed. recommends not editing this business rule. This business rule is deprecated and is marked inactive for instances that are upgraded. This business rule is not installed for new instances. State Change - Before Work Order Task [wm_task] Ensures that the field service life cycle is followed. recommends not editing this business rule. This business rule is deprecated and is marked inactive for instances that are upgraded. This business rule is not installed for new instances. [wm_task] Transition - Cancel Work Order Ensures that the field service life cycle is followed. recommends not editing this business rule. [wm_order] Transition PendingDispatchToAssign Work Order Task Transition - StateChange Deprecated Work Order Update questionnaires state to complete business rule Work Order Task check active questionnaires Work Order Ensures that the field service life cycle is followed. [wm_task] Ensures that the field service life cycle is followed. recommends not editing this business rule. This business rule is deprecated and is marked inactive for instances that are upgraded. This business rule is not installed for new instances. [wm_order] [wm_task] [wm_order] Check active questionnaires Work Order Task [wm_task] Finance The Finance application lets you request changes to the operation and maintenance of your finance-related requests. The finance staff can then track these requests and make the necessary changes. 392
393 Any user in the system can view all open finance requests. This gives your users a chance to see the finance issues that have already been reported before they submit a new request. Request templates are linked to service catalog items - specifically, to record producers. When you make a request from the catalog, it uses the template associated to catalog item to create the actual finance request. Finance is one in a suite of applications known as (SM) applications. SM applications, such as field service management and facilities service management allow you to manage business functions that require a request-type workflow where requests are approved, qualified, assigned, and completed. When is activated, SM applications can be activated, as well as other features such as the Application Designer and the Portal. Get started with Finance Activate Finance and configure it for use. Activate Finance The Finance plugin is available as a separate subscription. Activating it automatically activates the Core plugin. Role required: admin To purchase a subscription, contact your account manager. After purchasing the subscription, activate the plugin within the production instance. You can evaluate the feature on a sub-production instance without charge by activating it within the instance. You can add Finance to the CMS portal by activating the following plugins: [com.snc.enterprise_service_management.cms] Finance CMS Portal [com.snc.facilities.core.cms] Navigate to System Definition > Plugins. Find and click the plugin name. On the System Plugin form, review the plugin details and then click the Activate/Upgrade related link. If the plugin depends on other plugins, these plugins are listed along with their activation status. 4. If the plugin has optional features that depend on other plugins, those plugins are listed under Some files will not be loaded because these plugins are inactive. The optional features are not installed until the listed plugins are installed (before or after the installation of the current plugin). Optional: If available, select the Load demo data check box. Some plugins include demo data Sample records that are designed to illustrate plugin features for common use cases. Loading demo data is a good practice when you first activate the plugin on a development or test instance. 5. You can also load demo data after the plugin is activated by clicking the Load Demo Data Only related link on the System Plugin form. Click Activate. 393
394 Configure Finance Administrators in the global domain can set finance configurations to determine how the system handles daily operations. Finance defaults to the request-driven method for handling tasks. 1. Navigate to [SM application] > Administration > Configuration. Note: Administrators in domains lower than the global domain can view the Configurations screen, but cannot modify the settings. The options on the configuration screen are arranged in a multiple-tabbed layout, as follows: 2. The Business Process tab contains options for setting up the request life cycle, creating catalogs and requests, and configuring notifications. The Assignment tab contains options for setting up manual and auto-assignment. The Add-ons tab contains options for enabling the knowledge base, managed documents, and task activities. Fill in the fields on the Business process tab. Note: The Configuration screen contains many configuration options. An option is enabled when the switch appears green and is toggled to the right. All configuration options listed in the Dependency must be enabled in order for the option to be displayed. Table 102: Configuration screen - Business Process Field Dependency Lifecycle Enable state flows Enable state flows consistent with all service management applications. If you prefer to create your own state flows using business rules, client scripts, and UI actions, disable the option. A confirmation box displays and includes a link to a help article that describes the implications of disabling state flows. It is highly recommended that you read the article before proceeding. If you disable state flows and save, this configuration option is removed from the screen and state flows cannot be re-enabled from the user interface. 394
395 Field Dependency Select request driven (subtasks are optional) if you do not want to require tasks to fulfill requests. When the request life cycle is request driven, requests can be directly assigned to users in an assignment group. Users can still add tasks to requests. However, closing all tasks does not automatically close the request. Enable state flows is turned on. Enable state flows is turned on. Process life cycle: request driven (subtasks are optional) Lifecycle Process life cycle Note: If the Enable state flows option is not selected, the process life cycle becomes requestdriven and this field is not displayed. Assignment method for requests Select the method for assigning requests: using auto-assignment: Requests are automatically assigned. using a workflow: User is prompted to select the workflow for assignment. manually: Manually assign requests. Note: If the Enable state flows option is not selected, the assignment method defaults to manually and this field is not displayed. Note: The Process life cycle option is not available in all service management applications. 395
396 Field Dependency Select the workflow for dispatching requests. Lifecycle Use this workflow to assign requests Enable state flows is turned on. Process life cycle: request driven (subtasks are optional) Assignment method for requests Note: The Process life cycle option is not available in all service management applications. Approval for new request required When disabled, all requests in the Awaiting Approval state are automatically approved. Use this workflow for approvals Select the approval workflow for requests. An approver must provide one of the following approval responses before requests can move to the next state: Enable state flows is turned on. Enable state flows is turned on. Approval is required for new requests Approved Rejected More information required Duplicate Note: If you do not select a workflow, the default workflow, Approval Workflow for SM, is used. This workflow requests an approval from all users with the wm_approver_user role. 396
397 Field Dependency Lifecycle Assignment method for tasks Select the method for assigning tasks: Enable state flows is turned on. Enable state flows is turned on. Assignment method for tasks using auto-assignment: Tasks are automatically assigned. using a workflow: User is prompted to select the workflow for assignment. manually: Manually assign tasks. Note: If the Enable state flows option is not selected, the assignment method defaults to manually and this field is not displayed. Use this workflow to assign tasks Select the workflow for assigning tasks. Agent must accept or reject the assigned task Enable to require the assigned agent to accept or reject the task. Enable state flows is turned on. Copy task work notes to request Enable to synchronize task work notes with the work notes on the order or request. When work notes are added in the task, the same work notes appear in the order or request. Enable state flows is turned on. Catalog and Request Creation Create or update requests by inbound . Enable this option to allow inbound messages to create or update requests. This option must be enabled to allow requests to be marked as spam. 397
398 Field Dependency Lifecycle Requests are created using Select catalog or regular form to install the catalog and enable automatic publishing of request templates to the catalog. Select regular form only to uninstall the catalog and disable automatic publishing of request templates to the catalog. Templates create a dedicated catalog item Enable this option to allow automatic publishing of catalog items for the application. Notification 398
399 Field Dependency Lifecycle Send a notification when a field changes for a task or request. Configure notifications to be sent to specific recipients when selected fields in requests and/or tasks change. 1. From Table, select Request or Task. 2. From Field, select the field to use for generating notifications. When a change is made to the selected field, a notification is sent to the recipients identified. 3. From Recipients, select one or more recipients 4. If a specific user or a specific group, is selected, the user is prompted to select a user or group. 5. To define more notifications using other fields or recipients, repeat the steps on the next line. 6. To remove a notification, click the symbol to the right of the notification. 3. Click the Assignment tab and fill in the fields. Table 103: Configuration screen - Assignment tab Field Dependency Manual Assignment Assign requests or tasks based on assignment group coverage areas Enable this option to limit the selection of groups from the Dispatch group and Assignment group fields to groups that cover the location of the task. Auto-Assignment - Scheduling 399
400 Field Auto-selection of agents will consider time zone for tasks Enable this option to consider the time zone of the agent when assigning a task. Dependency Enable state flows is turned on. Auto-Assignment - Additional Factors Auto-selection of agents will consider location of agents Enable this option to use the agent and location when determining who to assign the task to. Agents closer to the task location receive preference. Enable state flows is turned on. If using Process life cycle: Life cycle is task driven, then If using Process life cycle: Life cycle is request driven, then Auto-selection of agents for tasks requires them to have skills This option determines the degree to which skills must be matched to a task when determining autoassignment. Select all to require that an assigned agent has all the skills to perform the task. An agent who lacks one skill is eliminated. Select some if you want agents who have most of the skills to perform the task. Select none if you want to auto-assign agents without considering skills. Assignment method for tasks: using auto-assignment Assignment method for requests: using auto-assignment Enable state flows is turned on. If using Process life cycle: Life cycle is task driven, then Assignment method for tasks: using auto-assignment If using Process life cycle: Life cycle is request driven, then Assignment method for requests: using auto-assignment 400
401 Field Dependency Auto-selection will attempt to Enable this option to auto assign the same agent to all assign all tasks for a request tasks in a request to the same agent. Enable state flows is turned on. If using Process life cycle: Life cycle is task driven, then Assignment method for tasks: using auto-assignment If using Process life cycle: Life cycle is request driven, then 4. Assignment method for requests: using auto-assignment Click the Add-ons tab and fill in the fields. Table 104: Configuration screen - Add-ons tab Field Dependency Documentation Enable a dedicated knowledge base Enable this option to install the knowledge base for the application. Enable managed documents Enable this option to add a related list to managed documents. Enable task activities Enable this option to log the task interactions and communications, such as phone calls and messages. Work notes are mandatory Enable this option if work notes are mandatory when closing, completing, or cancelling requests and tasks. If it is disabled, work notes are not needed when closing, completing, or cancelling. Maps Enable maps 5. Enable this option to use maps. Click Save. 401
402 Warning: If you clicked the Enable state flows option to disable it, a confirmation box appears, along with a link to documentation that explains the consequences of disabling state flows. It is highly recommended that you read the documentation before proceeding. The action of disabling service management state flows cannot be reversed. Task vs request driven processing All SM applications use either task-driven or request-driven processes for handling tasks. Each application defaults to one or the other of these processing types, but you can switch between them as needed. Task-driven processing means that the work order or request simply contains a list of tasks necessary for completing the overall work. When a work order record is created, an associated task record is automatically created. A request must have at least one task, and more tasks can be defined to handle all aspects of the request. As tasks are performed and completed, the request transitions through a series of states. After the last task is closed, the request automatically transitions to closed. Request-driven processing means that tasks are assigned to a request, but closing all the tasks does not automatically close the request. A request does not require any tasks and can be opened and closed independently. Any tasks can be transitioned and assigned independently and to different agents than specified on the request. Even if all tasks are closed, the request can remain open and continue to be worked on. However, the request cannot be closed until all tasks are also closed. In request-driven processing, state transitions are based solely on the request. Finance process Finance defaults to the request-driven process, where tasks can be assigned to a request. Closing all tasks will not automatically close the request. You can switch to the task-driven process if you require multiple tasks to be performed before the request can be considered complete. The Finance process is as follows: 1. Users submit finance requests through the service catalog. 2. Based on settings in the Finance Configuration, the request transitions through states based on actions performed on the request. 3. When the request has been fulfilled by the finance team, the request is closed. Administer Finance Administrators should set up an administrator group and one or more finance groups, and assign the appropriate roles and users to those groups. Create a group Set up groups and assign the necessary roles and users. The users in the group inherit the roles of the group, so you do not have to assign roles to each user separately. Role required: admin There are a few good practices when creating groups: Create one group for administrators and assign the admin role to this group only. 402
403 Create as many groups as needed in your organization. For example, create a staff group for each geographic location or function, such as building maintenance or building security. Assign the necessary users to those groups, and then assign the staff role to those groups. Navigate to User Administration > Groups. Click New. Fill in the fields on the form, as appropriate. See Creating Groups for an explanation of each field. Click the lock icon beside the Type field. If the field is not visible, configure the form to add it. The Type field expands Click the reference lookup ( ) icon and select the [application] type. Right-click the form header and select Save. Add the [application]_admin or [application]_staff role to the Roles related list. Add users to the Group Members related list. Click Update. Create a report Users with a reporting role can create and customize reports. Role required: admin Note: Roles do not inherit any of the reporting roles. To grant facilities administrators or staff the rights to create and customize reports, assign the appropriate reporting role Navigate to Reports > View / Run. Scroll down to the [SM application] Request section. Click a report to open it, or click Edit to modify it. To create your own report, click New beside Global reports at the top of the page and use any of the tables installed with service management application to create the report. View a report The Overview module is a type of homepage which displays various request reports, which help administrators and staff members track and manage aspects of the request fulfillment processes. Role required: admin Note: If you have tasks defined with assignment groups of the type Vendor, additional reports display information for tracking vendor tasks and performance Navigate to [SM application] > Overview. A list of active requests appears at the top, and several built-in charts appear at the bottom. Click a request number to open that request. Click elements within the reports to obtain more information. For example, in the Active Facilities Requests by Building bar chart, click the building name. All the active requests for that building appear in a list. 403
404 404
405 Finance installation reference The Finance plugin installs several types of components in support of the Finance process. Installed with Finance Several types of components are installed with the Finance plugin. Demo data is available with Finance. Tables installed with Finance Finance adds the following tables. Table sn_sm_finance_request Stores finance requests. sn_sm_finance_task Stores finance tasks. sn_sm_finance_request_template Stores finance request templates to create new requests. sn_sm_finance_task_template Stores finance task templates to create new tasks. sn_sm_finance_sf_request Stores finance request state flows. sn_sm_finance_sf_task Stores finance task state flows. Properties installed with Finance Finance adds the following properties. Property Type (true/false, string, etc.) finance.allow.toll.roads true/false Allow toll roads to be used. finance.autodispatch.geolocation true/false Geolocation should be used to update estimated travel time via Google Maps API. finance.default.end.time string Default end time for all agents when no schedule is set, formatted as 17:00. finance.default.start.time string Default start time for all agents when no schedule is set, formatted as 08:00. finance.evening.rush.hours string Evening rush hour span, formatted as 14:30-16:00. finance.location.weight integer Location Weight. finance.map.merge.task.agent.markers true/false Merge the task and agent markers on the geolocation maps with a purple marker. 405
406 Property Type (true/false, string, etc.) finance.max.agents.processed integer Sets the maximum number of agents that will be processed by auto-dispatch at a time. finance.morning.rush.hours string Morning rush hour span, formatted as 06:30-08:00. finance.rush.travel.buffer integer Percentage to add to all rush hour travel times. finance.skills.weight integer Skills Weight. finance.timezone.weight integer Time Zone Weight. finance.travel.buffer integer Percentage to add to all travel times. finance.work.spacing integer Amount of time (in minutes) to add between the end of a task and the travel start of the next. Roles installed with Finance Finance adds the following roles. Role sn_sm_finance_admin Finance Administrator role has full control over all data. Also administers Territories and Skills, as needed. sn_sm_finance_agent Finance Agent role can accept or reject a task. It is the one who performs the work on the site. sn_sm_finance_approver_user Finance Approver role allows users to approve orders/requests. sn_sm_finance_basic Finance Basic role can read and create service orders and follow up on those they created. sn_sm_finance_dispatcher Finance Dispatcher role schedules and assigns the tasks to agents. They can be searched (filtered by) the group they manage. sn_sm_finance_initiator Finance Initiator is similar to sm_basic but is also used to grant UI access. sn_sm_finance_read Finance Read role can only read and create service orders and follow up on those they created. Script includes installed with Finance Finance adds the following script includes. 406
407 Script include FacilitiesUtils Business rules installed with Finance Finance adds the following business rules. Business rule Table Ready for work (approval off) sn_sm_finance_request Request state flow from draft to ready. Assigned sn_sm_finance_request Request state flow from ready to assigned. Cancellation sn_sm_finance_request Request state flow from any state to cancel. Start Work sn_sm_finance_request Request state flow from assigned to work in progress. Ready for work (approval on) sn_sm_finance_request Request state flow from approved to ready. Assigned sn_sm_finance_task Task state flow from draft to assigned. Start Work sn_sm_finance_task Task state flow from accepted to work in progress. Accept sn_sm_finance_task Task state flow from assigned to accepted. Ready for work sn_sm_finance_task Task state flow from draft to pending assignment. Cancel Cleanup sn_sm_finance_task Task state flow from any state to cancel. Reassign sn_sm_finance_task Task state flow from any state to assigned. Assigned sn_sm_finance_task Task state flow from pending assignment to assigned. notifications installed with Finance Finance adds the following notifications. Notification Table Finance Request created from sn_sm_finance_request Finance Request created from . Finance Request changed sn_sm_finance_request Finance Request changed. Finance Task changed sn_sm_finance_task Finance Task changed. 407
408 Events installed with Finance Finance adds the following events. Event Table fr.request.changed sn_sm_finance_request When the state, assignee, assignment group and work notes are changed. fr.request. .creation sn_sm_finance_request When a request is created via fr.task.changed sn_sm_finance_task When the state, assignee, assignment group and work notes are changed. Legal The Legal application lets you request changes to the operation and maintenance of your legal-related cases. The legal staff can then track these requests and make the necessary changes. Any user in the system can view all open legal requests, giving your users a chance to see the legal issues that have already been reported before they submit a new request. Request templates are linked to service catalog items, specifically to record producers. When you make a request from the catalog, it uses the template associated with the catalog item to create the actual legal request. Legal is one in a suite of applications known as (SM) applications. SM applications, such as Field and Facilities allow you to manage business functions that require a request-type workflow where requests are approved, qualified, assigned, and completed. When is activated, SM applications can be activated, as well as other features such as the Application Designer and the Portal. Legal process Legal defaults to the request-driven process, where tasks can be assigned to a request. However, closing all tasks does not automatically close the request. You can switch to the task-driven process if you require multiple tasks to be performed before the request can be considered complete. The legal service management process is as follows: 1. Users submit legal requests through the service catalog. 2. Based on settings in the Legal Configuration, the request transitions through states based on actions performed through the request. 3. When the request has been fulfilled by the legal team, the request is closed. 408
409 Get started with Legal The topics in this section describe how to activate Legal and configure it for use. Activate Legal The Legal plugin is available as a separate subscription. Activating it, automatically activates the Core plugin. Role required: admin You can add legal service management to the Content Management System (CMS) portal by activating the following plugins: [com.snc.enterprise_service_management.cms] Legal Service Automation CMS Portal [com.snc.work_management.cms] Navigate to System Definition > Plugins. Find and click the plugin name. On the System Plugin form, review the plugin details and then click the Activate/Upgrade related link. If the plugin depends on other plugins, these plugins are listed along with their activation status. 4. If the plugin has optional features that depend on other plugins, those plugins are listed under Some files will not be loaded because these plugins are inactive. The optional features are not installed until the listed plugins are installed (before or after the installation of the current plugin). Optional: If available, select the Load demo data check box. Some plugins include demo data Sample records that are designed to illustrate plugin features for common use cases. Loading demo data is a good practice when you first activate the plugin on a development or test instance. 5. You can also load demo data after the plugin is activated by clicking the Load Demo Data Only related link on the System Plugin form. Click Activate. Administer Legal Administrators should set up an administrator group and one or more legal groups, and assign the appropriate roles and users to those groups. Create a group Set up groups and assign the necessary roles and users. The users in the group inherit the roles of the group, so you do not have to assign roles to each user separately. Role required: admin There are a few good practices when creating groups: Create one group for administrators and assign the admin role to this group only. Create as many groups as needed in your organization. For example, create a staff group for each geographic location or function, such as building maintenance or building security. Assign the necessary users to those groups, and then assign the staff role to those groups. Navigate to User Administration > Groups. Click New. 409
410 3. 4. Fill in the fields on the form, as appropriate. See Creating Groups for an explanation of each field. Click the lock icon beside the Type field. If the field is not visible, configure the form to add it. The Type field expands Click the reference lookup ( ) icon and select the [application] type. Right-click the form header and select Save. Add the [application]_admin or [application]_staff role to the Roles related list. Add users to the Group Members related list. Click Update. Create a report Users with a reporting role can create and customize reports. Role required: admin Note: Roles do not inherit any of the reporting roles. To grant facilities administrators or staff the rights to create and customize reports, assign the appropriate reporting role Navigate to Reports > View / Run. Scroll down to the [SM application] Request section. Click a report to open it, or click Edit to modify it. To create your own report, click New beside Global reports at the top of the page and use any of the tables installed with service management application to create the report. View a report The Overview module is a type of homepage which displays various request reports, which help administrators and staff members track and manage aspects of the request fulfillment processes. Role required: admin Note: If you have tasks defined with assignment groups of the type Vendor, additional reports display information for tracking vendor tasks and performance Navigate to [SM application] > Overview. A list of active requests appears at the top, and several built-in charts appear at the bottom. Click a request number to open that request. Click elements within the reports to obtain more information. For example, in the Active Facilities Requests by Building bar chart, click the building name. All the active requests for that building appear in a list. 410
411 411
412 Configure Legal Legal defaults to the request-driven method for handling tasks. Administrators in the global domain can set legal configurations to determine how the system handles daily operations. 1. Navigate to Legal > Administration > Configuration. Note: Administrators in domains lower than the global domain can view the Configurations screen, but cannot modify the settings. The options on the configuration screen are arranged in a multiple-tabbed layout, as follows: 2. The Business Process tab contains options for setting up the request life cycle, creating catalogs and requests, and configuring notifications. The Assignment tab contains options for setting up manual and auto-assignment. The Add-ons tab contains options for enabling the knowledge base, managed documents, and task activities. Fill in the fields on the Business process tab. Note: The Configuration screen contains many configuration options. An option is enabled when the switch appears green and is toggled to the right. All configuration options listed in the Dependency must be enabled in order for the option to be displayed. Table 105: Configuration screen - Business Process Field Dependency Lifecycle Enable state flows Enable state flows consistent with all service management applications. If you prefer to create your own state flows using business rules, client scripts, and UI actions, disable the option. A confirmation box displays and includes a link to a help article that describes the implications of disabling state flows. It is highly recommended that you read the article before proceeding. If you disable state flows and save, this configuration option is removed from the screen and state flows cannot be re-enabled from the user interface. 412
413 Field Dependency Select request driven (subtasks are optional) if you do not want to require tasks to fulfill requests. When the request life cycle is request driven, requests can be directly assigned to users in an assignment group. Users can still add tasks to requests. However, closing all tasks does not automatically close the request. Enable state flows is turned on. Enable state flows is turned on. Process life cycle: request driven (subtasks are optional) Lifecycle Process life cycle Note: If the Enable state flows option is not selected, the process life cycle becomes requestdriven and this field is not displayed. Assignment method for requests Select the method for assigning requests: using auto-assignment: Requests are automatically assigned. using a workflow: User is prompted to select the workflow for assignment. manually: Manually assign requests. Note: If the Enable state flows option is not selected, the assignment method defaults to manually and this field is not displayed. Note: The Process life cycle option is not available in all service management applications. 413
414 Field Dependency Select the workflow for dispatching requests. Lifecycle Use this workflow to assign requests Enable state flows is turned on. Process life cycle: request driven (subtasks are optional) Assignment method for requests Note: The Process life cycle option is not available in all service management applications. Approval for new request required When disabled, all requests in the Awaiting Approval state are automatically approved. Use this workflow for approvals Select the approval workflow for requests. An approver must provide one of the following approval responses before requests can move to the next state: Enable state flows is turned on. Enable state flows is turned on. Approval is required for new requests Approved Rejected More information required Duplicate Note: If you do not select a workflow, the default workflow, Approval Workflow for SM, is used. This workflow requests an approval from all users with the wm_approver_user role. 414
415 Field Dependency Lifecycle Assignment method for tasks Select the method for assigning tasks: Enable state flows is turned on. Enable state flows is turned on. Assignment method for tasks using auto-assignment: Tasks are automatically assigned. using a workflow: User is prompted to select the workflow for assignment. manually: Manually assign tasks. Note: If the Enable state flows option is not selected, the assignment method defaults to manually and this field is not displayed. Use this workflow to assign tasks Select the workflow for assigning tasks. Agent must accept or reject the assigned task Enable to require the assigned agent to accept or reject the task. Enable state flows is turned on. Copy task work notes to request Enable to synchronize task work notes with the work notes on the order or request. When work notes are added in the task, the same work notes appear in the order or request. Enable state flows is turned on. Catalog and Request Creation Create or update requests by inbound . Enable this option to allow inbound messages to create or update requests. This option must be enabled to allow requests to be marked as spam. 415
416 Field Dependency Lifecycle Requests are created using Select catalog or regular form to install the catalog and enable automatic publishing of request templates to the catalog. Select regular form only to uninstall the catalog and disable automatic publishing of request templates to the catalog. Templates create a dedicated catalog item Enable this option to allow automatic publishing of catalog items for the application. Notification 416
417 Field Dependency Lifecycle Send a notification when a field changes for a task or request. Configure notifications to be sent to specific recipients when selected fields in requests and/or tasks change. 1. From Table, select Request or Task. 2. From Field, select the field to use for generating notifications. When a change is made to the selected field, a notification is sent to the recipients identified. 3. From Recipients, select one or more recipients 4. If a specific user or a specific group, is selected, the user is prompted to select a user or group. 5. To define more notifications using other fields or recipients, repeat the steps on the next line. 6. To remove a notification, click the symbol to the right of the notification. 3. Click the Assignment tab and fill in the fields. Table 106: Configuration screen - Assignment tab Field Dependency Manual Assignment Assign requests or tasks based on assignment group coverage areas Enable this option to limit the selection of groups from the Dispatch group and Assignment group fields to groups that cover the location of the task. 417
418 Field Dependency Use dispatch queue Enable this option to use the dispatch group for manual assignment. Enable state flows is turned on. Process life cycle: Life cycle is task driven Auto-Assignment - Scheduling Auto-selection of agents will consider agent or task schedules Enable this option to allow auto-assignment to use the schedules of the agents or tasks to determine who can be assigned to each task. Also, the Estimated work duration field is not mandatory when this configuration option is disabled. Enable state flows is turned on. Process life cycle: Life cycle is task driven Note: The Process life cycle option is not available in all service management applications. Auto-selection of agents will consider time zone for tasks Enable this option to consider the time zone of the agent when assigning a task. Enable state flows is turned on. Enable priority assignment Enable this option to use priority assignment for autoassigning agents. Enable state flows is turned on. Process life cycle: Life cycle is task driven Auto-selection of agents will consider agent or task schedules Note: The Process life cycle option is not available in all service management applications. 418
419 Field Dependency Use this priority list for priority assignment Select priorities for assignment. Enable state flows is turned on. Process life cycle: Life cycle is task driven Auto-selection of agents will consider agent or task schedules Auto-selection of agents will follow the sun for tasks Note: The Process life cycle option is not available in all service management applications. Auto-Assignment - Additional Factors Auto-selection of agents will consider location of agents Enable this option to use the agent and location when determining who to assign the task to. Agents closer to the task location receive preference. Enable state flows is turned on. If using Process life cycle: Life cycle is task driven, then If using Process life cycle: Life cycle is request driven, then Assignment method for tasks: using auto-assignment Assignment method for requests: using auto-assignment 419
420 Field Dependency Auto-selection of agents for tasks requires them to have skills This option determines the degree to which skills must be matched to a task when determining autoassignment. Select all to require that an assigned agent has all the skills to perform the task. An agent who lacks one skill is eliminated. Select some if you want agents who have most of the skills to perform the task. Select none if you want to auto-assign agents without considering skills. Auto-selection will attempt to Enable this option to auto assign the same agent to all assign all tasks for a request tasks in a request to the same agent. Enable state flows is turned on. If using Process life cycle: Life cycle is task driven, then Assignment method for requests: using auto-assignment Enable state flows is turned on. If using Process life cycle: Life cycle is task driven, then Assignment method for tasks: using auto-assignment If using Process life cycle: Life cycle is request driven, then 4. Assignment method for tasks: using auto-assignment If using Process life cycle: Life cycle is request driven, then Assignment method for requests: using auto-assignment Click the Assignment tab and fill in the fields. Table 107: Configuration screen - Add-ons tab Field Dependency Documentation Enable a dedicated knowledge base Enable this option to install the knowledge base for the application. Enable managed documents Enable this option to add a related list to managed documents. 420
421 Field Dependency Documentation Enable task activities Enable this option to log the task interactions and communications, such as phone calls and messages. Work notes are required to close or cancel a request or task Enable this option to require the user to enter work notes before a task or request can be closed or canceled. Associated Task Tables Select associated tables Click Add to select more tables. Maps Enable maps 5. Enable this option to use maps. Click Save. Warning: If you clicked the Enable state flows option to disable it, a confirmation box appears, along with a link to documentation that explains the consequences of disabling state flows. It is highly recommended that you read the documentation before proceeding. The action of disabling service management state flows cannot be reversed. Task vs request driven processing All SM applications use either task-driven or request-driven processes for handling tasks. Each application defaults to one or the other of these processing types, but you can switch between them as needed. Task-driven processing means that the work order or request simply contains a list of tasks necessary for completing the overall work. When a work order record is created, an associated task record is automatically created. A request must have at least one task, and more tasks can be defined to handle all aspects of the request. As tasks are performed and completed, the request transitions through a series of states. After the last task is closed, the request automatically transitions to closed. Request-driven processing means that tasks are assigned to a request, but closing all the tasks does not automatically close the request. A request does not require any tasks and can be opened and closed independently. Any tasks can be transitioned and assigned independently and to different agents than specified on the request. Even if all tasks are closed, the request can remain open and continue to be worked on. However, the request cannot be closed until all tasks are also closed. In request-driven processing, state transitions are based solely on the request. Legal installation reference The Legal plugin installs several types of components in support of the Legal Service Management process. 421
422 Installed with Legal Several types of components are installed with the Legal plugin. Demo data is available with Legal. Tables installed with Legal Legal adds the following tables. Table Legal Request Stores legal request records (sn_sm_legal_request) Legal Task Stores legal task records (sn_sm_legal_task) Legal Request Template Stores the legal request catalog records (sn_sm_legal_request_template) Legal Task Template Stores the legal task catalog records (sn_sm_legal_task_template) Legal Request Flow Stores the legal requests state flow records (sn_sm_legal_sf_request) Legal Request Task Flow Stores the legal tasks state flow records (sn_sm_legal_sf_task) Properties installed with Legal Legal adds the following properties. Property Type legal.allow.toll.roads true or false Allow toll roads to be used legal.autodispatch.geolocation true or false Geolocation should be used to update estimated travel time via Google Maps API legal.default.end.time string Default end time for all agents when no schedule is set; formatted as 17:00 legal.default.start.time string Default start time for all agents when no schedule is set; formatted as 08:00 legal.evening.rush.hours string Evening rush hour span; formatted as 14:30-16:00 legal.location.weight integer Location weight 422
423 Property Type legal.max.agents.processed integer Sets the maximum number of agents that will be processed by auto-dispatch at a time legal.morning.rush.hours integer Morning rush hour span, formatted as 06:30-08:00 legal.rush.travel.buffer integer Percentage to add to all rush hour travel times legal.skills.weight integer Skills weight legal.timezone.weight integer Time zone weight legal.travel.buffer integer Merge the task and agent markers on the geolocation maps with a purple marker legal.work.spacing integer Amount of time (in minutes) to add between the end of a task and the travel start of the next legal_management.map.merge.task.agent.markers true or false Merge the task and agent markers on the geolocation maps with a purple marker Roles installed with Legal Legal adds the following roles. Role title [name] sn_sm_legal_admin Legal administrator role has full control over all service management data. Also administers territories and skills, as needed. sn_sm_legal_agent Legal agent role can accept or reject a task. It is the one who performs the work on the site. sn_sm_legal_approver_user Legal approver role allows users to approve orders/requests. sn_sm_legal_basic Legal basic role can read and create service orders and follow up on those they created. sn_sm_legal_dispatcher Legal dispatcher role schedules and assigns the tasks to agents. They can be filtered by the group they manage. sn_sm_legal_initiator Legal initiator is similar to sm_basic but is also used to grant UI access. sn_sm_legal_read Legal read role can only read service orders. Business rules installed with Legal Legal adds the following business rules. 423
424 Name Table Condition Assigned Legal Request Request is assigned Automatically moves a Legal request from Ready to Assigned state [sn_sm_legal_request] Cancellation Legal Request Automatically executes when a Legal request is cancelled [sn_sm_legal_request] Ready for work (approval off) Legal Request approval is off and assigned_to field is not [sn_sm_legal_request] empty Automatically moves a Legal request from Draft to Ready state Ready for work (approval on) Legal Request approval is on and either a template [sn_sm_legal_request] is selected or assigned_to field is not empty Automatically moves a Legal request from Approved to Ready state Start Work Legal Request Automatically moves a Legal request from Assigned to Work in Progress state [sn_sm_legal_request] Accept Legal Task Automatically moves a Legal task from Assigned to Accepted state [sn_sm_legal_task] Assigned Legal Task [sn_sm_legal_task] Assigned Legal Task [sn_sm_legal_task] Cancel Cleanup Legal Task Assigned_to changed and is not empty Automatically moves a Legal task from Draft to Assigned state Assigned_to is not empty Automatically moves a Legal task from Pending Assignment to Assigned state State changes Executes when a Legal task is cancelled Legal task has a template and a task is created for its parent request Automatically moves a Legal task from Draft to Pending Assignment Assigned_to field changes and is not null and state is not assigned, accepted or work in progress Automatically moves a Legal task to Assigned state [sn_sm_legal_task] Ready for Work Legal Task [sn_sm_legal_task] Reassign Legal Task [sn_sm_legal_task] Start Work Legal Task Automatically moves a Legal task from Accepted to Work in Progress state [sn_sm_legal_task] 424
425 notifications installed with Legal Legal adds the following notifications. Notification Table Event Legal Request created from Legal Request Legal Request changed Legal Request Legal Task changed Legal Task mr.request. .creationinbound should turned on in [sn_sm_legal_request] configuration mr.request.changed Create a notification rule in configuration on Request table mr.task.changed Create a notification rule in configuration on Task table [sn_sm_legal_request] [sn_sm_legal_task] Events installed with Legal Legal adds the following events. Event Table lr.request.changed Legal Request When the state, assignee, assignment group, or work notes on a legal request are changed [sn_sm_legal_request] lr.request. .creation Legal Request When a legal request is created via [sn_sm_legal_request] lr.task.changed Legal Task When the state, assignee, assignment group, and work notes on a legal task are changed [sn_sm_legal_task] Marketing The Marketing application lets you request changes to the operation and maintenance of your marketing-related cases. The marketing staff can then track these requests and make the necessary changes. Any user in the system can view all open marketing cases, giving your users a chance to see the marketing issues that have already been reported before they submit a new request. Request templates are linked to service catalog items, specifically to record producers. When you make a request from the catalog, it uses the template associated with the catalog item to create the actual marketing request. Marketing is one in a suite of applications known as (SM) applications. SM applications, such as Field and Facilities allow you to manage business functions that require a request-type workflow where requests are approved, qualified, assigned, and completed. 425
426 When is activated, SM applications can be activated, as well as other features such as the Application Designer and the Portal. Get started with Marketing Activate the Marketing plugin and configure it for use. Activate Marketing Marketing is available as a separate subscription. To purchase a subscription, contact your account manager. Role required: admin You can add Marketing to the Content Management System (CMS) portal by activating the following plugins: [com.snc.enterprise_service_management.cms] Marketing Service Automation CMS Portal [com.snc.work_management.cms] 1. Navigate to System Definition > Plugins Find and click the plugin name. On the System Plugin form, review the plugin details and then click the Activate/Upgrade related link. If the plugin depends on other plugins, these plugins are listed along with their activation status. 4. If the plugin has optional features that depend on other plugins, those plugins are listed under Some files will not be loaded because these plugins are inactive. The optional features are not installed until the listed plugins are installed (before or after the installation of the current plugin). Optional: If available, select the Load demo data check box. Some plugins include demo data Sample records that are designed to illustrate plugin features for common use cases. Loading demo data is a good practice when you first activate the plugin on a development or test instance. 5. You can also load demo data after the plugin is activated by clicking the Load Demo Data Only related link on the System Plugin form. Click Activate. Administer Marketing Administrators can set up an administrator group and one or more marketing groups, and assign the appropriate roles and users to those groups. View a report The Overview module is a type of homepage which displays various request reports, which help administrators and staff members track and manage aspects of the request fulfillment processes. Role required: admin Note: If you have tasks defined with assignment groups of the type Vendor, additional reports display information for tracking vendor tasks and performance. 1. Navigate to [SM application] > Overview. A list of active requests appears at the top, and several built-in charts appear at the bottom. 426
427 2. 3. Click a request number to open that request. Click elements within the reports to obtain more information. For example, in the Active Facilities Requests by Building bar chart, click the building name. All the active requests for that building appear in a list. 427
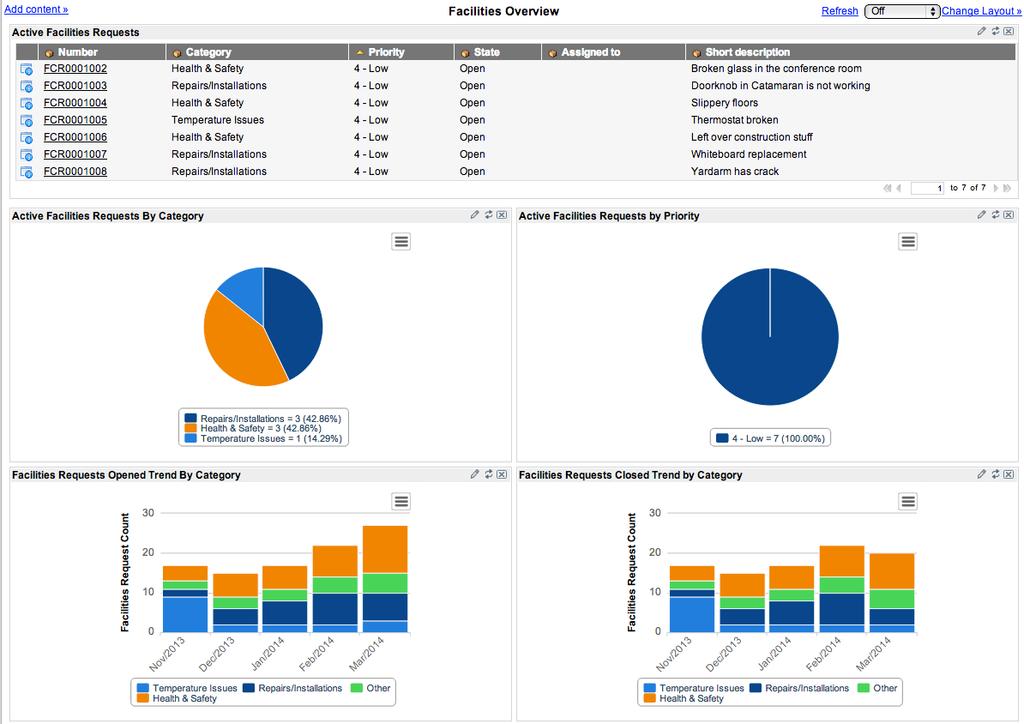
428 428
12/05/2017. Geneva Service Management
 12/05/2017 Contents Contents...4 Activate...4 Activate other applications... 4 Service management states...6 State flow customization...6 State flow example... 11 Implications of disabling SM state flows...
Invoice Manager Admin Guide Basware P2P 17.3
 Invoice Manager Admin Guide Basware P2P 17.3 Copyright 1999-2017 Basware Corporation. All rights reserved.. 1 Invoice Management Overview The Invoicing tab is a centralized location to manage all types
Human Resources application 10/13/2017
 Human Resources application 10/13/2017 Helsinki ServiceNow Contents Contents HR Service Management... 4 Understanding HR Service Management...5 Human Resources getting started... 7 HR implementation guide...8
10/16/2018. Kingston Governance, Risk, and Compliance
 10/16/2018 Kingston Governance, Risk, and Compliance Contents Contents... 4 Domain separation in... 8 Policy and Compliance Management...9 Understanding Policy and Compliance Management... 10 Risk Management...87
Jakarta ServiceNow Governance Risk Compliance. Last updated: February 13, 2019
 Jakarta Governance Risk Compliance Last updated: February 13, 2019 Jakarta Table of Contents Table of Contents Governance, Risk, and Compliance (GRC)... 4 Policy and Compliance Management... 7 Understanding
10/18/2018. London Governance, Risk, and Compliance
 10/18/2018 Governance, Risk, and Compliance Contents Contents... 4 Applications and integrations supporting GRC workflow... 6 GRC terminology... 7 Domain separation in... 9 Policy and Compliance Management...11
Solutions Implementation Guide
 Solutions Implementation Guide Salesforce, Winter 18 @salesforcedocs Last updated: November 30, 2017 Copyright 2000 2017 salesforce.com, inc. All rights reserved. Salesforce is a registered trademark of
Maintenance and Service Management User Guide
 IBM TRIRIGA Version 10.3.1 Maintenance and Service Management User Guide Copyright IBM Corp. 2011 i Note Before using this information and the product it supports, read the information in Notices on page
Copyright Basware Corporation. All rights reserved.. Vendor Portal User Guide Basware P2P 17.3
 Copyright 1999-2017 Basware Corporation. All rights reserved.. Vendor Portal User Guide Basware P2P 17.3 Table of Contents 1 Vendor Portal Registration... 4 1.1 Register for Vendor Portal...4 2 Vendor
TrackITSystem. Facility Manager Documentation Installation and User Guide
 TrackITSystem Facility Manager Documentation Installation and User Guide Pages 1 to 7 apply to the install and configuration for admins. The user guide begins on page 8 In a browser, go to the installation
Field Service Lightning Managed Packaged Guide
 Field Service Lightning Managed Packaged Guide Salesforce, Winter 18 @salesforcedocs Last updated: November 2, 2017 Copyright 2000 2017 salesforce.com, inc. All rights reserved. Salesforce is a registered
Change Management. ServiceNow User Guide. Version 2.0 Novmeber, November 2015
 1 Change Management ServiceNow User Guide November 2015 Contact: ITSM@harvard.edu Version 2.0 Novmeber, 2015 Document Change Control VERSION DATE AUTHOR(S) BRIEF DESCRIPTION 1.0 9/30/13 ITSM Team & Third
CENTRE Workflow Script
 CENTRE Workflow Script Workflow Module From the Administrative tab in CENTRE, select Main Tables and from the ensuing screen select Workflow to view the Edit Workflow Module screen as illustrated below.
Oracle Talent Management Cloud. What s New in Release 9
 Oracle Talent Management Cloud What s New in Release 9 30 April 2015 TABLE OF CONTENTS REVISION HISTORY... 4 OVERVIEW... 5 Give Us Feedback... 5 RELEASE FEATURE SUMMARY... 6 HCM COMMON FEATURES... 8 HCM
Deltek Touch Time & Expense for Vision. User Guide
 Deltek Touch Time & Expense for Vision User Guide September 2017 While Deltek has attempted to verify that the information in this document is accurate and complete, some typographical or technical errors
Index. Sarah Critchley 2018 S. Critchley, Dynamics 365 CE Essentials,
 A Accounts and contacts activities activities tab, 37 advantage of, 32 business, 29 capabilities, 35 case resolution form, 33 configuration, 36 definition, 28 feature, 29 filter, 38 form component, 34
04/02/2018. Jakarta Human Resources application
 04/02/2018 Human Resources application Contents Contents... 4 Scoped...4 Case and Knowledge Management... 5 Employee Service Center...152 Enterprise Onboarding and Transitions...170 HR Performance Analytics
Complete Guide to Field Service
 Complete Guide to Field Service Salesforce, Winter 19 @salesforcedocs Last updated: October 10, 2018 Copyright 2000 2018 salesforce.com, inc. All rights reserved. Salesforce is a registered trademark of
Demand Management User Guide. Release
 Demand Management User Guide Release 14.2.00 This Documentation, which includes embedded help systems and electronically distributed materials (hereinafter referred to as the Documentation ), is for your
Introductions. Rachel Manongdo, Communications Specialist, UIT. Vesna Siracevska, Business Analyst, UIT. Kiran Joshi, AS Tools Manager, UIT
 ServiceNow Training P HASE 1: AUGUST R ELEASE August 2016 Introductions Rachel Manongdo, Communications Specialist, UIT Vesna Siracevska, Business Analyst, UIT Kiran Joshi, AS Tools Manager, UIT Key Dates
Field Service Lightning Mobile User Guide
 Mobile User Guide Salesforce, Summer 18 @salesforcedocs Last updated: July 5, 2018 Copyright 2000 2018 salesforce.com, inc. All rights reserved. Salesforce is a registered trademark of salesforce.com,
V9 Jobs and Workflow Administrators Guide DOCUMENTATION. Phone: Fax:
 V9 Jobs and Workflow Administrators Guide DOCUMENTATION Phone: 01981 590410 Fax: 01981 590411 E-mail: information@praceng.com CHANGE HISTORY ORIGINAL DOCUMENT AUTHOR: MICHELLE HARRIS DATE: APRIL 2010 AUTHOR
PeopleSoft Financials epro Process Guide
 epro Process Guide General Stores Requisitions Information Management Client Support Services DCATS 210 567 7777 / Option 5 epro Process Guide Version 2 May 2011 Introduction to the PeopleSoft Financials
Teamcenter Service Scheduler Guide. Publication Number PLM00173 C
 Teamcenter 10.1 Service Scheduler Guide Publication Number PLM00173 C Proprietary and restricted rights notice This software and related documentation are proprietary to Siemens Product Lifecycle Management
Deltek Touch Time & Expense for GovCon 1.2. User Guide
 Deltek Touch Time & Expense for GovCon 1.2 User Guide May 19, 2014 While Deltek has attempted to verify that the information in this document is accurate and complete, some typographical or technical errors
Chapter Contents. Manage Employers Option Screen
 16: Manage Employers Chapter Contents Create an Employer Account (Registration)... 16-2 Add Employer Locations... 16-6 Assign a Case Manager... 16-8 Add Contacts... 16-9 Assist an Employer... 16-13 Search
Dynamics 365 for Field Service - User's Guide
 Dynamics 365 for Field Service - User's Guide 1 Contents Manage your field service operations with Microsoft Dynamics 365 for Field Service...8 Install Microsoft Dynamics 365 for Field Service...9 Install
Financial Services Cloud Installation Guide
 Financial Services Cloud Installation Guide Salesforce, Spring 18 @salesforcedocs Last updated: April 18, 2018 Copyright 2000 2018 salesforce.com, inc. All rights reserved. Salesforce is a registered trademark
Financial Services Cloud Installation Guide
 Financial Services Cloud Installation Guide Salesforce, Spring 18 @salesforcedocs Last updated: April 26, 2018 Copyright 2000 2018 salesforce.com, inc. All rights reserved. Salesforce is a registered trademark
A Comprehensive Handbook On Designing A Blueprint
 A Comprehensive Handbook On Designing A Blueprint TABLE OF CONTENTS Blueprint - An Overview 4 Designing a Blueprint 6 Part I Defining the Process Flow 6 Part I - Exercise 8 Part II - Configuring Transition
Oracle Risk Management Cloud. Release 13 (updates 18A 18C) What s New
 What s New") Oracle Risk Management Cloud Release 13 (updates 18A 18C) What s New TABLE OF CONTENTS DOCUMENT HISTORY 4 UPDATE 18C 4 Revision History 4 Overview 4 Feature Summary 5 Risk Management 8 Common 8 Monitor
Oracle Risk Management Cloud Release 13 (updates 18A 18C) What s New TABLE OF CONTENTS DOCUMENT HISTORY 4 UPDATE 18C 4 Revision History 4 Overview 4 Feature Summary 5 Risk Management 8 Common 8 Monitor
HR Recruiting Solutions
 HR Recruiting Solutions Automated Request to Advertise User Guide Contact Us: web www.csus.edu/irt/acs/services/cms/training/reference.stm phone (916) 278-7337 Service Desk Last updated 4/29/2015 Overview
Talent Acquisition: Guide for Recruiters
 Talent Acquisition: Guide for Recruiters Version 22 SP-R-XXX-UG-201803--R022.00 Sage 2018. All rights reserved. This document contains information proprietary to Sage and may not be reproduced, disclosed,
Supply Chain Tracking
 Supply Chain Tracking User Manual Version 2.0 Ananda Kumary 2/10/2016 This document defines the user manual for Supply Chain Tracking portal, which enables system based acceptance/rejection of Purchase
TABLE OF CONTENTS DOCUMENT HISTORY
 TABLE OF CONTENTS DOCUMENT HISTORY 5 UPDATE 17D 5 Revision History 5 Overview 5 Optional Uptake of New Features (Opt In) 5 Update Tasks 6 Feature Summary 7 Purchasing 8 Send Purchasing Document Attachments
Online Payment Requests
 Table of Contents Requesting a Payment... 2 Additional Features... 5 Modifying a Saved or Denied Request... 6 Payment Request Notifications and Approvals... 7 Stopping a Payment Request... 8 Approving
ARC System Upgrade. What s New with 9.2. Presentations: January & February 2017
 ARC System Upgrade What s New with 9.2 Presentations: January & February 2017 Welcome and Introductions Presenters: Kate Sheeran, Executive Director, Finance HR, Training & Change Management Paul Reedy,
Vendor Center. Page. Table of Contents: About the Vendor Center Purpose: Configuration and Setup Company Maintenance...
 Vendor Center Table of Contents: About the Vendor Center... 2 Purpose:... 2 Configuration and Setup... 2 Company Maintenance... 2 Security... 3 Vendor Maintenance... 3 Edit Follow Up Codes... 4 Vendor
City National Book2Bank User Guide MARCH 2018
 City National Book2Bank User Guide MARCH 2018 Copyright 2018 City National Bank City National Bank is a subsidiary of Royal Bank of Canada Page 2 Contents BOOK2BANK OVERVIEW... 4 What is Book2Bank? 4 What
Utilizing the Employee Training Module and ESS Munis: Human Resources
 [MU-HR-7-A] [MU-HR-14-A] Utilizing the Employee Training Module and ESS Munis: Human Resources CLASS DESCRIPTION This session will be an exploration of how Employee Self Service can be used in conjunction
Customer Interaction. Systems User Guide V1.4
 Systems User Guide 1 V1.4 Document Contents Contents Page Number Introduction 3 ETA Generation / configuration 4-5 Consolidated Deliveries 6 Vehicle Overview 7 Driver Performance 8 ETA Planner 9 Notifications
Version Ticketing Guide for Business Users. Oracle ATG One Main Street Cambridge, MA USA
 Version 10.0.2 Ticketing Guide for Business Users Oracle ATG One Main Street Cambridge, MA 02142 USA ATG Ticketing Guide for Business Users Document Version Service10.0.2 TICKETINGBUSINESSv1 04/15/2011
User Guide. ShipTrack Client Portal Release v4.1. Client Portal - User Guide
 User Guide ShipTrack Client Portal Release v. www.shiptrackapp.com info@shiptrackapp.com T:.0. F:..9 Page Revision History Version Date Description Author Comments V.0 0-0- Auto-Client Client V. 0-0-9
TRAINING DOCUMENT Internet Expenses Administrator
 TRAINING DOCUMENT Internet Expenses Author: William Arthur Green, Jr. Creation Date: March 26, 2007 Last Updated: September 28, 20 Control Number: Version: 1 Approvals: William Green Document Control Change
MULTI-DAY JOBS. User Guide. Version 1.0
 MULTI-DAY JOBS User Guide Version 1.0 Table of Contents Overview... 2 Getting Started... 2 Global Multi-Day Settings... 2 Creating Multi-Day Jobs... 4 One-Time Jobs... 4 Package Jobs... 7 Waiting List
Version Countries: US, CA. Setup and User Manual (include user demo scenarios in red) For Microsoft Dynamics 365 Business Central
 For Microsoft Dynamics 365 Business Central") Version 1.0.0.0 Countries: US, CA Setup and User Manual (include user demo scenarios in red) For Microsoft Dynamics 365 Business Central Last Update: January 11, 2019 Contents App Description... 3 Demo
Version 1.0.0.0 Countries: US, CA Setup and User Manual (include user demo scenarios in red) For Microsoft Dynamics 365 Business Central Last Update: January 11, 2019 Contents App Description... 3 Demo
Job Aid. Enter a Rate Based Contract
 Job Aid Enter a Rate Based Contract Note: This job aid does not contain agency specific procedures. Before proceeding, please check with your individual agency procedures for specific set up of Customer
FAMIS Training Manual
 FAMIS Training Manual 0 TABLE OF CONTENTS Overview of Service Request Work Order Workflow in FAMIS... 4 Logging into FAMIS... 5 Logging into FAMIS... 5 Select a Tab... 7 FAMIS Home Screen:... 8 Role Selection:...
Workforce One Time & Labor Management
 Workforce One Time & Labor Management Web Based Time & Labor Management is a web-based time and attendance system used for a variety of labor tracking needs such as: attendance management, project tracking,
ExpressMaintenance Release Notes
 ExpressMaintenance Release Notes ExpressMaintenance Release 9 introduces a wealth exciting features. It includes many enhancements to the overall interface as well as powerful new features and options
Complete Guide to Field Service
 Complete Guide to Field Service Salesforce, Winter 18 @salesforcedocs Last updated: November 9, 2017 Copyright 2000 2017 salesforce.com, inc. All rights reserved. Salesforce is a registered trademark of
1. A Sales Manager would like to get a report of opportunities grouped by sales stage. What kind of report meet this requirement:
 1. A Sales Manager would like to get a report of opportunities grouped by sales stage. What kind of report meet this requirement: A) Summary A) Summary B) All Salesforce Reports C) Tabular D) Matrix 2.
AiM User Guide Work Management Module
 AiM User Guide 2010 AssetWorks Inc. 1777 NE Loop 410, Suite 1250 San Antonio, Texas 78217 (800) 268-0325 Table of Contents AiM User Guide INTRODUCTION... 6 CHAPTER 1: WORK ORDER SCREEN... 7 CHAPTER 1 PART
DETAILED COURSE AGENDA
 DETAILED COURSE AGENDA Dynamics 365 University: Boot Camp Detailed Agenda Course Level: 100 This instructor-led course provides a key step for Microsoft Dynamics 365 administrators and customizers who
User Guide. Version 4.0.6
 Vorex User Guide Version 4.0.6 September 15, 2017 Copyright Agreement The purchase and use of all Software and Services is subject to the Agreement as defined in Kaseya s Click-Accept EULATOS as updated
UNITY CRM INTEGRATION AGILE CRM
 UNITY CRM INTEGRATION AGILE CRM CONTENTS 1 Overview... 1 2 Configuring Agile CRM Integration... 3 3 Unity CRM Functionality... 5 3.1 Contact Pop... 5 3.2 Contact Search... 7 3.3 Call Log Entry... 8 3.3.1
Ten Things You May Not Know About Sales & Service Contracts
 Ten Things You May Not Know About Sales & Service Contracts Mohan Dutt Oracle Corporation The following is intended to outline our general product direction. It is intended for information
Zebra s Repair Order Portal for Partners COURSE CODE: RPE01
 Zebra s Repair Order Portal for Partners COURSE CODE: RPE01 April 2017 Introduction Welcome to the Zebra s Repair Order Portal for Partners course. This course explains how to navigate the Repair Order
Multi Vendor Marketplace
 Multi Vendor Marketplace webkul.com /blog/magento2-multi-vendor-marketplace/ Published On - December 24, Multi Vendor Marketplace Extension converts your Store into a complete online 2015 marketplace shop.
Online Ordering System. Order and Inventory Management Training Manual v4.2
 Online Ordering System Order and Inventory Management Training Manual v4.2 Online Ordering System Logging In to BloodHub: Production/Live environment oneblood.bloodhub.com Validation/Training environment
Angus AnyWhere. Reports User Guide AUGUST 2012
 Angus AnyWhere Reports User Guide AUGUST 2012 Table of Contents About Reports... 1 Generating a Report... 2 Exporting Reports... 4 Printing Reports... 5 Tenant Request... 6 Labor Utilization... 6 Lists...
Select2Perform InterView User s Guide
 Select2Perform InterView User s Guide Table of Contents INTRODUCTION 1 Licensing 1 Competencies and Custom Questions 1 Interview Guides 1 MANAGING COMPETENCIES 2 Adding a Competency 2 Viewing a Competency
Eclipse Palm RDC. Release (Eterm)
") Eclipse Palm RDC Release 8.6.2 (Eterm) Legal Notices 2007 Activant Solutions Inc. All rights reserved. Unauthorized reproduction is a violation of applicable laws. Activant and the Activant logo are registered
Eclipse Palm RDC Release 8.6.2 (Eterm) Legal Notices 2007 Activant Solutions Inc. All rights reserved. Unauthorized reproduction is a violation of applicable laws. Activant and the Activant logo are registered
TABLE OF CONTENTS DOCUMENT HISTORY
 TABLE OF CONTENTS DOCUMENT HISTORY 4 UPDATE 17D 4 Revision History 4 Overview 4 Optional Uptake of New Features (Opt In) 5 Update Tasks 5 Feature Summary 6 Supply Chain Collaboration 7 Streamline Collaboration
The number of licences available for the company to assign is indicated at the bottom of this page.
 Admin: Organisation Company Details Admin > Organisations > Company Displays the Company Details. Click Tools > Edit to edit the details. Click Tools > Request Hot Folder. This will send a request email
Your Guide to Using Contribution Manager. WealthCare Administration System
 Your Guide to Using Contribution Manager WealthCare Administration System Your Guide to Using Contribution Manager Overview Contribution manager is a powerful tool for assisting administrators and employer
User Guide. Version 4.0.9
 Kaseya BMS User Guide Version 4.0.9 February 12, 2018 Copyright Agreement The purchase and use of all Software and Services is subject to the Agreement as defined in Kaseya s Click-Accept EULATOS as updated
Deltek Touch for Maconomy. Touch 2.2 User Guide
 Deltek Touch for Maconomy Touch 2.2 User Guide July 2017 While Deltek has attempted to verify that the information in this document is accurate and complete, some typographical or technical errors may
Field Service Lightning Managed Package Guide
 Field Service Lightning Managed Package Guide Salesforce, Spring 18 @salesforcedocs Last updated: April 24, 2018 Copyright 2000 2018 salesforce.com, inc. All rights reserved. Salesforce is a registered
This guide which is primarily intended for administrators and supervisors includes the following sections:
 Micro Focus Service Desk - Getting Started May 2017 The Micro Focus Service Desk Getting Started guide gives information about the basic steps that are required to quickly configure Micro Focus Service
IBM. Buyer Guide. IBM Emptoris Sourcing SaaS
 IBM Emptoris Sourcing IBM Buyer Guide 10.1.2 SaaS IBM Emptoris Sourcing IBM Buyer Guide 10.1.2 SaaS ii IBM Emptoris Sourcing: Buyer Guide Copyright Note: Before using this information and the product
Multi Vendor Marketplace
 Multi Vendor Marketplace webkul.com/blog/magento2-multi-vendor-marketplace/ December 24, 2015 Multi Vendor Marketplace Extension converts your Magento Store into a complete online marketplace shop. Using
IBM Maximo Mobile Suite Version 7 Release 5.1. User Guide
 IBM Maximo Mobile Suite Version 7 Release 5.1 User Guide Note Before using this information and the product it supports, read the information in Notices on page 39. This edition applies to version 7, release
User Manual. Acumatica - Magento Connector
 User Manual Acumatica - Magento Connector Connector Version: 2.2 Supported Acumatica Version: 6.0 Supported Magento Versions: CE 2.1.X and EE 2.1.X Kensium Solutions PHONE 877 KENSIUM (536 7486) FAX 312
Resource Management User Guide. Release
 Resource Management User Guide Release 13.3.00 This Documentation, which includes embedded help systems and electronically distributed materials, (hereinafter referred to as the Documentation ) is for
INTRODUCTION to NAFWerX. AFMAN and AFI are still applicable when using the NAFWerX application.
 (20 May 2015) - 1 - INTRODUCTION to NAFWerX NAFWerX has been developed as tool for use by all Air Force Nonappropriated Fund Instrumentalities (NAFI). This system will allow procurement of supplies and
Manager Training Package. Goal: To accurately and efficiently manage employees time
 Goal: To accurately and efficiently manage employees time Manager Training Package Table of Contents Pre-Payroll Processing Checklist... 2 Reviewing Time:...3 Viewing Employee Time:... 3 ManagingTime:...
Human Resources User Guide. isolved. Human Resources Guide
 isolved Human Resources Guide Table of Contents HR Data Screens... 2 Getting Started... 2 Certifications... 2 Email Alerts... 3 Employee Certifications... 4 Awards, Education, Skills, Disciplinary Offenses
Oracle Policy Automation The modern enterprise advice platform
 Oracle Policy Automation The modern enterprise advice platform Features and benefits August 2017 Program agenda 1 2 3 Overview of Oracle Policy Automation New features in August 2017 release For more information
UNIVERSITY OF MISSOURI
 UMSYS HR 9.1 Recruiting - Hiring Managers MU UNIVERSITY OF MISSOURI PeopleSoft End User Training R E C R U I T I N G HIRING M A N A GERS TRAIN IN G PARTICIPANT GUIDE P E O P L E S O F T H R M S 9.1 R E
Ariba Network Online Invoice Guide
 Ariba Network Online Invoice Guide Introduction Regions Financial Corporation Specifications Your Ariba Network Account Invoices Accessing Your Account Account Navigation Account Configuration Settlement/Remit-To
AppExchange Packaging Guide
 Salesforce.com: Salesforce Summer '09 AppExchange Packaging Guide Last updated: July 6, 2009 Copyright 2000-2009 salesforce.com, inc. All rights reserved. Salesforce.com is a registered trademark of salesforce.com,
Create New Project Delegation
 Create New Project Delegation As a Project Budget Owner you have the ability to delegate your approval authority for your projects online. The Manage Delegation page will allow you to assign and manage
15/01/2014 Panasonic Parts Ordering User Guide
 15/01/2014 Panasonic Parts Ordering User Guide Panasonic UK, a branch of Panasonic Marketing Europe GmbH 1 15/01/14 Table of Contents Welcome to the Spare Parts Ordering System Bulk Orders 3 Parts Deliveries
Business Portal for Microsoft Dynamics GP. Requisition Management Administrator s Guide Release 10.0
 Business Portal for Microsoft Dynamics GP Requisition Management Administrator s Guide Release 10.0 Copyright Copyright 2007 Microsoft Corporation. All rights reserved. Complying with all applicable copyright
Requisition line View New Change Cancel... 60
 User Manual erequisitions - Table of Contents How to use this manual... 4 Overview... 4 to erequisitions... 5 Overview... 5 Navigation... 6 How to access and exit erequisitions... 7 How to change password
mydpd Customer manual (English)
") mydpd Customer manual (English) CIT mydpd manual (En) Page 1 / 15 Content 1 Login to mydpd portal... 3 2 Landing Page... 4 3 Create shipment... 4 3.1 Create new shipment order... 4 3.2 Printing shipment
mydpd Customer manual (English) CIT mydpd manual (En) Page 1 / 15 Content 1 Login to mydpd portal... 3 2 Landing Page... 4 3 Create shipment... 4 3.1 Create new shipment order... 4 3.2 Printing shipment
Request Fulfillment Management. ITG s CENTRE Service Record Screen
 MANDATORY CRITERIA 1. Does the tool facilitate the creation, modification, fulfillment and closure of Service Request records? Comments: Yes. The tool facilitates; the creation of a fulfillment with a
Ariba Network Invoice Guide
 Ariba Network Invoice Guide Content Introduction Invoice Practices Before you Begin Invoicing Viewing Customer Invoice Rules Electronic Invoice Routing and notifications Account Configuration and Invoice
topshelf2.0 QUICK REFERENCE DEVICE MANUAL
 topshelf2.0 QUICK REFERENCE DEVICE MANUAL Scout topshelf2.0 Quick Reference Device Manual January 2007 2007 Scout Inc. Table of Contents 1) Introduction...6 System Requirements Initial Setup Common to
Vendor Management v4.3 For Passageways Portal Framework
 Vendor Management v4.3 For Passageways Portal Framework Vendor management module allows your organization to take a comprehensive view of your vendor relationships and organize that information for easy
Analytics Cloud Service Administration Guide
 Analytics Cloud Service Administration Guide Version 17 November 2017 Contents About This Guide... 5 About Primavera Analytics... 5 About Primavera Data Warehouse... 6 Overview of Oracle Business Intelligence...
PREVIEW. Complete Guide to Field Service. Salesforce, Winter
 Complete Guide to Field Service Salesforce, Winter 18 PREVIEW Note: This release is in preview. Features described in this document don t become generally available until the latest general availability
WorldTrack Logistics QUICKGUIDE. WORLDTRACK Ejby industrivej 2, 2600 Glostrup
 2017 WorldTrack Logistics QUICKGUIDE WORLDTRACK Ejby industrivej 2, 2600 Glostrup Indhold Logistics... 2 Orders... 2 Import Orders... 4 Planning... 6 Table... 6 Map... 6 Information Block... 7 Filters
Web TimeSheet Release Notes Version 8.10
 Web TimeSheet Release Notes Version 8.10 Welcome to Version 8.10 of Web TimeSheet. These release notes provide information on: Features and enhancements new to this version How Web TimeSheet data will
IBM TRIRIGA Version 10 Release 4.2. Reservation Management User Guide IBM
 IBM TRIRIGA Version 10 Release 4.2 Reservation Management User Guide IBM Note Before using this information and the product it supports, read the information in Notices on page 39. This edition applies
CCC Wallboard Manager User Manual
 CCC Wallboard Manager User Manual 40DHB0002USBF Issue 2 (17/07/2001) Contents Contents Introduction... 3 General... 3 Wallboard Manager... 4 Wallboard Server... 6 Starting the Wallboard Server... 6 Administering
ENTERPRISE CONTENT MANAGEMENT
 ENTERPRISE CONTENT MANAGEMENT For Small-to-Midsize Businesses Instantly access, automatically capture, and workflow process documents, emails, content and data DocRecord, an all-inclusive ECM, enables
New Client Training. Paychex Time and Labor Online Paychex, Inc. All rights reserved. TLO
 New Client Training Paychex Time and Labor Online 2013 Paychex, Inc. All rights reserved. TLO-4016-130617 Table of Contents WELCOME TO TIME AND LABOR ONLINE SUMMARY............................ 33 NEW CLIENT
NetSuite OpenAir/NetSuite Connector Guide April
 NetSuite OpenAir/NetSuite Connector Guide April 16 2016 General Notices Attributions NetSuite OpenAir includes functionality provided by HighCharts JS software, which is owned by and licensed through Highsoft