SunFounder. Preface. About SunFounder. About Quadcopter Learning Starter Kit for MWC
|
|
|
- Theodore Bates
- 6 years ago
- Views:
Transcription
1 Preface About is a technology company focused on Raspberry Pi and Arduino open source community development. Committed to the promotion of open source culture, we strive to bring the fun of electronics making to people all around the world and enable everyone to be a maker. Our products include learning kits, development boards, robots, sensor modules and development tools. In addition to high quality products, also offers video tutorials to help you build your own project. If you have interest in open source or making something cool, welcome to join us! Visit for more! About Quadcopter Learning Starter Kit for MWC This learning kit is a basic but functional study tutorial for quadcopters based on the open source platform MWC. Different from other toy aircrafts on the market, 6D-Box quadcopter is not only a toy through its application, you can not only learn much basic knowledge about quadcopter and radio transmitter control, but also, which is more important, assemble your own copter. It can the stepping stone on your path towards more advanced command of flying and copters. The assembly of this quadcopter is quite simple and we provide thorough hardware and software materials. This starter kit is a best choice for you if you are interested in quadcopter and want to start learning. As for the name 6D-Box: we call it 6D because it adopts a 6 degrees of freedom (DOF) attitude sensor, and the box comes from its shape after assembled, which is very vivid. An ATMega328P microprocessor is used for its flight control. The related sketch is compiled in Arduino IDE with Arduino Pro Mini as the board model and applies the software MultiWii V2.2 after our modification. The quadcopter uses a 720 coreless DC motor and its frame diagonal is only 11cm long, making it ultra-small in size and flexible in flight with premium lightweight propellers.
2 Notes: The figures of 3D model are included in this manual, so there may be difference between the model and physical product in color and shape. Please note that you need to be clear of your throttle on the left or right before applying the product. PLEASE follow instructions in this manual in case of parts damage. Some parts may be comparatively fragile. Please DO NOT try any operations that may harm the components. We provide free technical support, excluding any man-made damages. When you fly the quadcopter for the first time, please go to an open environment and avoid crashing into hard objects in case of quadcopter especially propeller damages. Free Support If you have any TECHNICAL questions, add a topic under FORUM section on our website and we'll reply as soon as possible. For NON-TECH questions like order and shipment issues, please send an to service@sunfounder.com. You're also welcomed to share your projects on FORUM. Copyright Notice All contents including but not limited to texts, images, and code in this manual are owned by the Company. You should only use it for personal study, investigation, enjoyment, or other non-commercial or nonprofit purposes, under the related regulations and copyrights laws, without infringing the legal rights of the author and relevant right holders. For any individual or organization that uses these for commercial profit without permission, the Company reserves the right to take legal action.
3 Contents 1. Introduction Overview Specifications Components List Software Debugging Preparations Battery & Charger Flight Control Board LED Board Program Configure Flight Parameters in GUI Radio Transmitter Control Radio Transmitter Control Radio Transmitter Control + Receiver Gyroscope and Accelerator Calibration Copter Lock & Unlock by Radio Transmitter Control Assembly Try Flying Fine Tuning Precautions During Flight First Fly! Reducing the Weight of Your Craft Stunt Flying Troubleshooting Precautions... 40

4 1. Introduction 1.1 Overview - MWC 6D-Box is a mini quadcopter based on MWC. Multiwii Copter, or MWC, is an open source firmware aiming to provide the brain of a RC controlled multi rotor flying platform. It was developed by French Alexander Dubus, a model airplane hobbyist, to control his DIY tricopter. Having been improved by many hobbyists around the world, Multiwii now can not only support multicopters like tricopter, quadcopter, and hexacopter, but also model aircrafts like fixed wing plane and helicopter. It is powerful but easy to use at the same time. It supports various types of sensor and a wide range of external devices and flight modes, which makes it one type of the most popular firmware in the world these years. However, for a beginner along the road, the mass information and the huge size of its code stops quite a lot of hobbyists from getting their feet wet. To help solve this issue, we developed this 6D-Box quadcopter based on MWC for Arduino. Though small, it contains most of the knowledges about MWC. By learning this aircraft, you can try making your own aircraft with the knowledge gained about multicopter as well as operation skills, using it as a quick start! - 6D-Box The 6D-Box quadcopter is ultrasmall and lightweight only weighing 45.8g (no protective bumpers), with a distance of 11.8cm between diagonal motors. The battery supports a non-stop flight of up to 8min. With a frame made of 3mm carbon fiber, the plane features light weight, high strength and strong anti-bump capability. As for flight control, Pro Mini board (compatible with Arduino Pro Mini) is 1
5 used as the core processor, with MPU6050, an attitude sensor that incorporates accelerometer and gyroscope. Four 720 coreless DC motors can realize the highest efficiency together with proper propellers. With the LED board underneath, the quadcopter can have "eyes" at night and also show fascinating effects. As to communication, a 4-channel RadioLink radio transmitter control and receiver are used. They can also be applied in other aircrafts - when you get enough knowledge about airplane model and are sufficiently familiar with the operations, you may even make your own plane using them for control! That'll save you a lot of money and you'll not need to adapt to another control again. To fit our 6D-Box better, some adjustments are made to the original MWC code. With the altered code, new hands may skip the difficulties in the PID adjustment and start learning MWC more easily. Besides, since it is lightweight and portable, and also quite safe to fly, our 6D-Box boasts itself the best choice for you to enter the model aircraft field! 1.2 Specifications Size: 4.6'' (distance between diagonal motors) Weight (without bumpers): 1.6oz (45g); (with bumpers) 1.75oz (49.6g) Motor model: 720 coreless motor; working voltage: 3.7V Blade/Propeller: 55mm long, high efficient Receiver: RadioLink; radio transmitter control : T4EU Battery: 3.7V, 380mAh, sizing 38x20x8 mm 2


6 2. Components List 2.1 Structural Fasteners Parts Name Qty. M1.2*10 Self-tapping Screw 6 M2*5 Nylon Screw Mechanical Components M2*20 Nylon Screw M2*8 Nylon Standoff M2*15 Nylon Standoff Parts Name Qty Frame 1 3


 2")

7 6D-Box Cover 2 6D-Box LED Board Motor Protective Seat 1 2 (Black) 2 (Red) Propeller Bumper 2 (Red) 2 (Black) 4
 2 2.")

")
")

8 Red Propeller Reverse (clockwise) Electronic Components Red Propeller Positive (counterclockwise) Black Propeller Reverse (clockwise) Black Propeller Positive (counterclockwise) Parts Name Qty. Flight Control Board 1 5
")

9 Li-Po Battery (3.7V, 380mAH) 1 Mini USB Cable (1m) 1 3.7V USB Charger for Li-Po Battery 720CW Motor (red & black wire) (M1, M2) 720CCW Motor (black & white wire) (M3, M4) USB To Serial for 6D-Box 1 2-Pin Connector Cable (1.27mm pin space, 3cm) 1 6
 1 4mm Heat-shrink")


10 6-Pin Connector Cable (1.27mm pin space, 10cm) 1 4mm Heat-shrink Tubing (8cm) Tools 2.5 Self-provided Parts Parts Name Qty. 2mm Cross Screwdriver 1 Propeller Removal Wrench 1 Parts Name Qty. AA Battery for radio 8 transmitter control 7

11 3. Software Debugging 3.1 Preparations Mini USB cable PL2303 (USB-to-Serial Tool) Flight control board The driver for PL2303 needs to be installed. If your PC is running Windows and the Update is open with access to the Internet, the driver will be installed automatically. But if Windows Update is not opened or your PC is not connected to the Internet but you've downloaded the package from our website on LEARN -> Get tutorials -> 6D-Box (no transmitter control), then open the folder extracted, go to Drivers -> PL2303_Prolific_DriverInstaller_v1160.zip and install. If your PC is running MAC OS X, refer to the 6D-Box (no transmitter control)\drivers\ PL2303_MacOSX_1_6_1_ folder. 3.2 Battery & Charger The 6D-Box quadcopter uses a 3.7V high energy density Li-Po battery, weighing 10.8g with a dimension of 38x20x8mm. It has a rated capacity of 380mAH a charging/discharging of 400mAH in real use. The high energy density and capacity empowers the battery to support a better endurance capability for the quadcopter. As shown in the figure above, the red wire is the anode and black, cathode. The connector is designed for anti-reverse purpose. 8

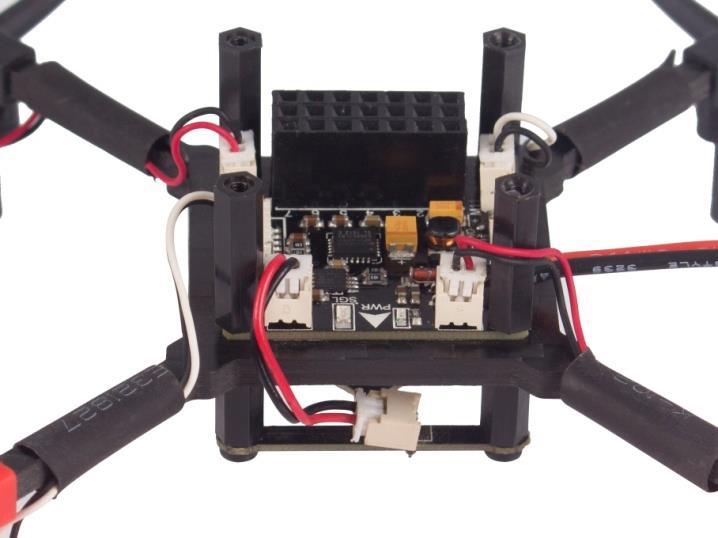
12 For the 6D-Box quadcopter, a Mini USB charger for a single battery is used. You may charge the battery with it by USB charger devices such as PC and power banks. During charging, first connect the battery with the charger. You can see the LED on the charger light up, which means the connecting works. Then connect the charger to a USB charger device like your PC. And the LED will go out. When you see the LED lights up again, the recharging is done. It should take about 60 minutes. Please note that the USB charger device should provide a voltage of 5V and a maximum current of 3A. Precautious items for battery usage:. DO NOT connect the anode and cathode of the battery to avoid a short circuit.. DO NOT throw batteries into fire or water. Do not dispose of batteries in the trash directly. Please place them in the appropriate collection container for recycle.. DO NOT overcharge or charge the battery to save life.. Store batteries in a cool, dry place at normal room temperature. The recommended voltage for restoring is 3.9V.. Remove the batteries in time in case of overcharging. 3.3 Flight Control Board Ports on the 6D-Box Flight Control Board: Get the flight control and the battery. Place the board flat, connect with the battery and then switch on the flight control. Check whether the red indicator LED on the board lights up or not. The blue indicator will blink for a while and then go out, or keep blinking. If the above situation happens, it means everything goes well. Remove the battery and continue the following steps. 9
, with the port at the top, as shown in the figure above, the three LEDs on the top frame are white, right ones red, bottom ones green and left")

13 3.4 LED Board The 6D-Box LED board makes the quadcopter more dazzling! With the shining LEDs, you can keep it in sight in the darkness. Taking the top view of the LED board (with the logo on), with the port at the top, as shown in the figure above, the three LEDs on the top frame are white, right ones red, bottom ones green and left three ones blue. These LEDs flash in a certain order with a specific frequency. You can not only locate the aircraft by their light, but also tell its flight direction by their colors. To connect the LED board to the flight control board, plug a 1.27mm 2-pin cable into the LED board port as shown in the above figure, and then connect to the flight control. Repeat the steps for flight control test. Then you'll see the LEDs on LED Board and flight control board blinking or dim synchronously, which indicates the LED board works. 3.5 Program Note: This section is not a must-do. If you did not re-burn any sketch to your board, skip this part and directly go to Configure Flight Parameters in GUI Program Download & Configuration First you need to download the related materials on the page of the quadcopter in LEARN>Get Tutorials on our website Then unzip the downloaded package. Go to 6D-Box (no transmitter control)\code\mutltiwii_2_2_se_2_0\ and click to open the MutltiWii_2_2_SE_2_0.ino file with Arduino 1.0 or higher. Then the code is as folllows: 10

14 Click the tab config.h and start configuring the parameters. In the part The type of multicopter, activate the line #define QUADX, while the other lines should be commented out. Then configure the radio transmitter control and choose the proper I2C communication rate. Just apply the default settings. Then the flight control. Activate the line #define SUNFOUNDER_SE_V1_0 and comment 11
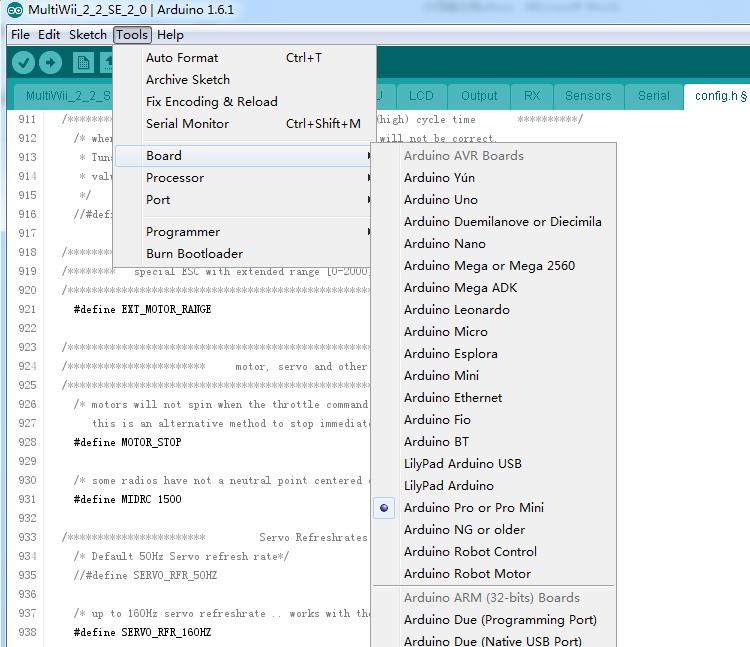
15 out the rest lines. If your sketch is downloaded on MWC website, there is no such line you need to find the line #define HK_MultiWii_SE_V2 and activate it. In Gyro filters, use a low-pass filter based on your situation, but the frequency should be no lower than 10Hz. You're suggested to activate the line #define MPU6050_LPF_188HZ. Note: It is very IMPORTANT to select the proper filter here! Finally, in the ESC part, activate #define EXT_MOTOR_RANGE Upload & Compile After the configurations are done, select the board: click Tools>Board>Arduino Pro or Pro Mini. 12
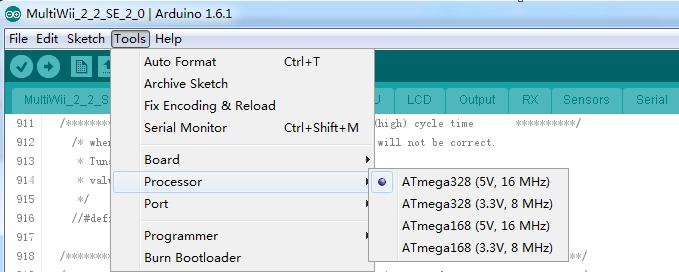
16 Then click Tools>Processor>ATMega328 (5V,16MHz). 13
 are rather")

\code\multiwiiconf, and start setting based on your upper computer.")
17 Connect the USB-to-Serial for 6D-Box with the flight control and select the correct serial port. Note: Since the sockets on the flight control board and USB-To-Serial for 6D-Box (or PL2303) are rather small, when plugging in the 6-pin connector cable, you may need to press the socket in case of damages to the pins. Click Upload and wait till it's done. 3.6 Configure Flight Parameters in GUI Connect the USB-to-Serial with the flight control, go to 6D-Box (no transmitter control)\code\multiwiiconf, and start setting based on your upper computer. Take 32-bit Windows. Go to application.windows32 and open the MultiWiiConf.exe file 14
. Then select the proper serial port. Click START and READ. Activate the LOW, MID and HIGH for ANGLE.")
18 (if you cannot open the file, you may need to install Java. Open a web browser, at the address bar enter and press Enter. On the page, click Free Java Download and then install, click the execution file again). Then select the proper serial port. Click START and READ. Activate the LOW, MID and HIGH for ANGLE. Click Write. Observe whether the ACC, GYRO and MAG curves get normal. They should be all level as shown above. If they are not, please put the flight control board flat and click CALIB_ACC for calibration. 15
.")
19 4. Radio Transmitter Control 4.1 Radio Transmitter Control To better meet the requirements of the customers, we've upgraded the 6D-Box quadcopter. This upgraded kit works with any radio transmitter control and the receiver with PWM signal (4-7 channels). If you have a radio transmitter control in hand, then you just need to buy this upgraded 6D-Box quadcopter, which can save a significant cost for you and doesn t lay your radio transmitter control aside. Talking of radio transmitter control, here a term is involved: "channel", meaning how many types of movement the copter can make by the radio transmitter control. For example, up and down can be counted one channel. If the radio transmitter control can only control the copter to fly up and down, it's called one channel. er For a quadcopter, at least four channels are needed, namely, up-down, right-left, forward-backward, and clockwise-counterclockwise rotation. The corresponding un d channels are throttle (up-down), roll (right-left), pitch (front-back) and yaw (clockwisecounterclockwise rotation). If you want more functions, more channels are required. Before installing the receiver, you need to make some adjustments about the flight Su nf o controller and the code. Step 1. Please check the quantity of the channels and their positions on the receiver. From the perspective of the direction of the receiver as shown in the right figure below, check whether the CH1 is the leftmost or the rightmost and how many channels it has. Step 2. On the flight controller upgraded, by default the leftmost header is the CH1, as shown in the left figure below. 16

, then you need to make")
20 So if the CH1 of your receiver is the leftmost and there are 4 to 7 channels, just insert the CH1 pin on the receiver into the No.7 pin header on the flight controller, CH2 to No.6, CH3 to No.5, Ch4 to No.4, CH5 to No.3, Ch6 to No.2 and CH7 to No.1 as shown below. If the CH1 on your receiver is the rightmost as shown below (here there are 4 channels on the receiver), then you need to make some adjustments on the flight controller. There are three soldering pads on the flight controller as shown below. 17

.")
21 The default setting is that the middle pad is connected with the CH1 pad. Here you need to disconnect them and solder the middle one to the CH7 pad instead with the soldering iron, making it like as shown below. Thus, the previous No.1 pin header is changed to No.7 and the rest are also swapped. Then insert the CH4 pin into the No. 7 pin socket, CH3 to No.6, CH2 to No.4 and CH 4 to No.4 as shown below. Step 3. If the CH1 on your receiver is the leftmost, there is no need for you to modify the code (MultiWii_2_2_SE_2_0). However, if the CH1 is the rightmost, you need to modify the code for the CH4, CH5, CH6 and CH7 on the receiver. Open the code file and go to the subprogram def.h to configure the parameters. Find the parameter configuration in the program atmega328p (Promini) and change the previous code into the following: After modifying the code (MultiWii_2_2_SE_2_0_modified), upload the code to the fight controller. For this 6-D Box quadcopter, a 4-channel radio transmitter control is used. Before 18
 and right. The throttle controls the motor speed.")
.")
22 applying the radio transmitter control, you need to know there are two different types of radio transmitter control. They are different in the position of throttle left (what we provided in this kit) and right. The throttle controls the motor speed. The higher you push it, the motor rotates faster, and the quadcopter flies higher, and vice versa. It is quite easy to tell the throttle. Try to pull the two rocker arms. The one that will not restore to the middle is the throttle rocker. Below is the physical picture of a radio transmitter control (throttle at the left hand). Since the focus of the remote is on the rocker arms, hereafter only virtual figures for them (instead of the whole remote) will be shown for better demonstration and easier understanding. See the figure below for the throttle type. Mode 1 (Throttle Left) 19
 4.2")


23 Mode 1 (Throttle left) Mode 2 (Throttle right) 4.2 Radio Transmitter Control + Receiver Matching Radio Transmitter Control with Receiver After the configuration of flight parameters is done, do not close GUI at once and connect the receiver to the flight control board. Switch on the radio transmitter control. Press and hold the button at the edge of the receiver (as shown below), and release it when you see the indicator light blinks. Wait for 5 seconds or so and the light may stop blinking and turn into a steady red, which means the receiver and radio transmitter control are successfully matched. See the figure below for the button and LED on the receiver: Phase Configuration for Radio Transmitter Control Generally the phase is normal when it's manufactured. But to ensure there will be no such case as opposite channel phase, you'd better test the remote. After the radio transmitter control and receiver are matched, take the following steps to check whether the phase of each channel is correct: 1. Push the throttle rocker arm up from lowest to highest. At the same time check whether the value of THROT increases on the GUI. If yes, it means the throttle channel works. But if the value decreases, it indicates that you need to invert the phase of throttle: use the small screwdriver or a tweezer to move the switch of THR from NOR to REV in the radio transmitter control, or vice versa. 20


24 2. Similarly, check the phase of PITCH, ROLL, and YAW and invert the phase it necessary. PITCH: The value should increase when you push the rocker arm up. ROLL: Push the rocker arm left to right and the value should increase accordingly. YAW: Same with ROLL, push the rocker arm left to right and the value should increase. If any of the four channels goes wrong, just invert its phase. 4.3 Gyroscope and Accelerator Calibration Calibrating Gyroscope Place the flight control board as flat as possible. Pull the throttle and elevator to lowest and rudder to the leftmost. The blue LED on the flight control board will blink for about 2 seconds and then stop. So the calibration is done. For throttle at the right hand, pull the rocker arms as below: Kind reminder: When pulling the throttle to lowest, you may first pull the elevator to the lowest and then the rudder to left. For throttle at the left hand, pull the rocker arms like the following: 21


25 4.3.2 Calibrating Accelerometer Place the flight control as flat as possible. Push the throttle to highest, pull the elevator to lowest and rudder the leftmost. The blue LED on the flight control board will blink for about 2 seconds and then stop. So the calibration is done. For throttle at the right hand, pull/push the rocker arms as below: For throttle at the left hand, pull/push the rocker arms like this: 4.4 Copter Lock & Unlock by Radio Transmitter Control Unlocking Copter When the quadcopter is not unlocked yet, it cannot fly and you can only calibrate it. The radio transmitter control still works on the plane, but for safety reason it is locked, in case of its going out of control caused by maloperation on the transmitter control. How to unlock: Pull the throttle rocker arm to lowest, leave elevator in the middle, and push the rudder to highest. You can see the LED on the flight control board lights up and glows a steady blue. It is unlocked now! You can push the throttle and the copter will take off. About unlocking: For throttle at the right hand, push the rocker arm as below: 22


, keep the elevator in the middle, and pull the rudder to the leftmost.")
26 For throttle at the left hand, pull the rocker arm like this: After the unlocking succeeds, pull the throttle and you can see the control data of the four motors on the GUI Locking Copter Suppose your copter just finished a flight and it landed successfully. Now you may need to lock the plane, for calibration maybe. How to lock: Pull the throttle to lowest (of course your copter should not be flying in the air now), keep the elevator in the middle, and pull the rudder to the leftmost. You can see the blue LED on the flight control goes out, which means it is locked smoothly! 23

27 About locking: For throttle at the right hand, pull the rocker arm as below: For throttle at the left hand, pull the rocker arm like this: 24

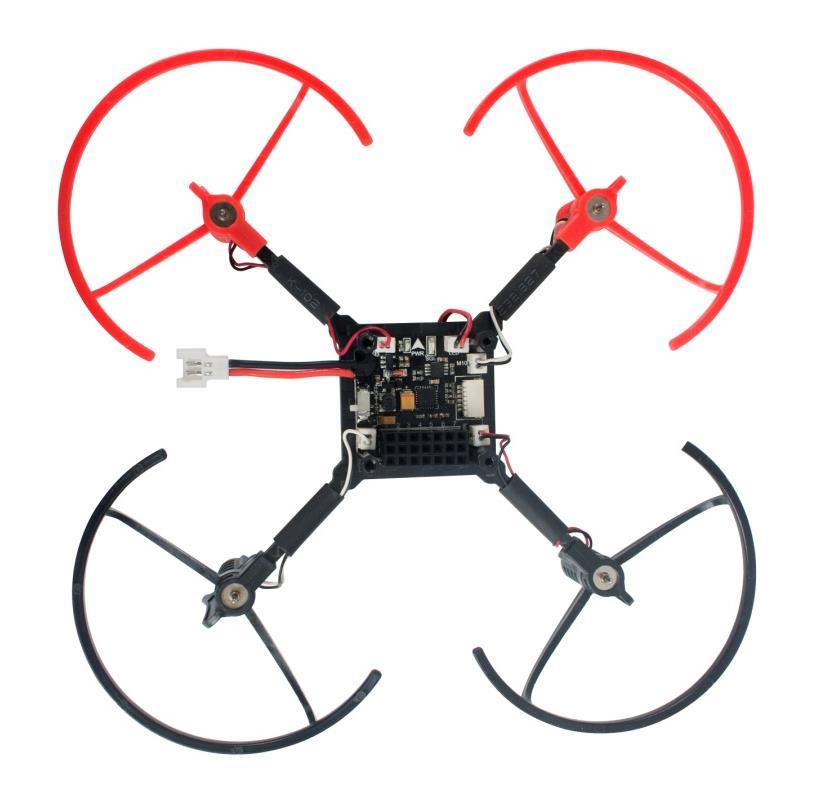
28 5. Assembly Having configured the flight control board and the phase of the radio transmitter control, as well as learned how to calibrate the gyroscope and accelerometer and lock/unlock, you may assemble the 6D-Box aircraft following the steps below. First let's take a look at the assembled copter and its exploded view drawing so you can see what it'll be like after assembly and how to assemble. Su nf o un d er The assembled 6D-Box: The exploded view drawing: Now you may have a basic idea of what the copter is like and how to make it. Now let's start the assembly! 25
.")
 Step 2. Wrap the motor wire with a heat-shrink tubing. Then a motor is assembled. Step 3. Similarly assemble the other three motors.")
29 5.1 Motor + Motor Seat Cut the heat-shrink tubing into 4, cm for each part. Then start to assemble. Step 1. Take a motor, a pair of motor protective seats, and a propeller bumper of the same color (note that two motors with the same color wire should be assembled to two different color motor seats). Assembly them as shown below. Note: When installing the motor seat, pull the wire up from motor bottom till through the slot at the seat rim, in case of its being pressed in later steps (Insert an M1.2*10 self-tapping screw, Page 27) Step 2. Wrap the motor wire with a heat-shrink tubing. Then a motor is assembled. Step 3. Similarly assemble the other three motors. Now all the four motors are finished. Black & white wire motor (M3) Red & black wire motor (M1) Black & white wire motor (M4) Red & black wire motor (M2) 26
30 5.2 Motor + Frame Before the assembly, first you need to know the direction of motor rotation and the frame. See the last figure above: the motor with red & black wires rotates clockwise, and that with black & white wires counterclockwise. For the direction of the frame, an X-shape model is used in this quadcopter. The two red motor seats are at the front while the black ones at the back. Step 1. Make clear the direction of the four motors and the X-shape frame. Note: Pay attention to the color of each motor wire. Check according to the figure on last page. Step 2. Take a motor that is assembled before. Wrap one arm of the frame with the tubing on the motor wire. 27


31 Step 3. Insert the arm into the socket of the motor seat. So the motor and the frame are connected. Step 4. Similarly, mount the other three motors onto the frame. Pay attention to the sequence: the two motors with the same color seat should be next to each other. Step 5. Insert an M1.2*10 self-tapping screw into the hole of the motor seat and tighten it with the screwdriver. Complete the plugging in the other three motor seats. Pay attention not to overtight the screw in case of breakage. 5.3 Battery Compartment + Flight Control Board 28

.")
 and insert four M2*15 nylon standoffs into the four screws that come out of")
32 Step 1. Take out the LED board, an M2*20 nylon screw and an M2*8 nylon standoff. Assemble them as shown below. Step 2. Complete the assembly of the other three props similarly. Then place the 6D-Box Cover. Step 3. Insert the screws assembled to the LED board into the threaded holes of the frame bottom (Note: the LED port should be in the same direction with the port on the flight control board). Place the flight control board on the frame (pay attention to the direction: the arrow on the flight control board should be pointed at the middle of the red motor seats) and insert four M2*15 nylon standoffs into the four screws that come out of the board. Connect the motor and LED board to the corresponding ports of the flight control board. 29

33 5.4 Final Receiver + Cover + Propellers 30


34 Step 1. Connect the receiver to the flight control board as shown below. Pay attention to the direction and the pin plugging. Step 2. Place the cover over the receiver and fasten them with 4 M2*5 nylon screws. 31
35 Step 3. Assemble the propellers. Special attention should be paid to rotational direction of each blade follow the instructions in the figure below. Warning: DO NOT install the motors and propellers inversely! 32

36 Step 4. Install the battery. Step 5. All assembly is completed now! 33

37 Note: After the assembly, you are not ready to go yet. Please follow the subsequent flying instructions carefully in case of unknown troubles! 34

38 6. Try Flying After all is assembled, you may need to adjust the copter a bit. It is necessary if you are new to or not so familiar with flight control. So please follow the instructions carefully. 6.1 Fine Tuning Place the copter flat on a level surface in an open environment. Now you may calibrate the gyroscope and accelerometer and unlock your plane. First push the throttle up slowly and stop pushing when the copter is about to take off (but not yet). Observe whether it tilts forward/backward or right/left, or spins. If any of these happens, try the following steps: Solution 1: Fine adjust the radio transmitter control rudder 1. If the copter tilts to the left, push the aileron trim switch to the right. 2. If it tilts to the right, pull the aileron trim switch to the left. 3. If it tilts forward, pull the elevator trim switch down. 4. If it tilts backward, push the elevator trim switch up. 5. If it spins clockwise (top view), pull the rudder trim switch to the left. 6. If it spins counterclockwise (top view), push the rudder trim switch to the right. As for how much to push/pull the switch, it depends on the tilt. Repeat the steps above until the copter does not tilt or spin any more when you push the throttle only. See the figure below for the fine tuning switches: Solution 2: Fine adjust the accelerometer (note: spinning cannot be adjusted). If the copter tilts to the left, lock it first. Push the throttle rocker arm to highest, aileron to the rightmost and back to the middle. Then you can see the blue LED on the flight control blinks fast for 1 second and then go out. It means you just completed a successful calibration. But whether the adjustment is precisely what it needs, you need to observe the tilting of the copter. If it tilts a lot, you may need to repeat the operation for many times until no tilting appears. 1. Similarly, if the copter tilts to the right, lock it first. Push the throttle to highest, aileron to the leftmost and back to the middle. Then you can see the blue LED on the flight control blinks and then go out. Then you complete a single round of 35


39 fine tuning. 2. If the copter tilts forward, lock it first. Push the throttle to highest, elevator backward and then back to middle. Then you can see the blue LED on the flight control blinks and then go out. Then a single round of fine tuning is done. 3. If the copter tilts backward, lock it first. Push the throttle to highest, elevator forward and then back to middle. Then you can see the blue LED on the flight control blinks and then go out. Then a single round of fine tuning is done. Repeat these steps until the copter does not tilt any more when you push the throttle only. How to fine adjust the accelerometer: For throttle at the right hand, pull/push the rocker arm as below: - Fine tuning forward and backward movement (PITCH): - Fine tuning right and left movement (ROLL): 36

40 For throttle at the left hand, pull/push the rocker arm like this: 6.2 Precautions During Flight. Please fly your copter in an open environment where there are few people.. To avoid the interference by magnetic field and airflow of Earth surface as possible, please fly the quadcopter to 1m or higher.. Please avoid quadcopter crashing into other objects in case of possible propeller damages.. At the beginning of flying, you may find it difficult to control the plane and it happens that the quadcopter hits something hard. CHILLAX! And pull the throttle to lowest AT ONCE! Or the motors may got clogged, which can generate huge heat and burn the motors. 6.3 First Fly! Having performed the operations above and learned the precautions, you can fly your copter now! So just hold your radio transmitter control, push the throttle and the aircraft takes off. Try to fly it in each directions, forward or backward, right or left, and spin clockwise or counterclockwise. Enjoy the flying! But for your first flights, please have your trial somewhere few people tread in case of danger. Read and bear the above-mentioned safety precautions in mind. Fly the quadcopter properly and deal with accidents if any happens. 6.4 Reducing the Weight of Your Craft When you're skilled enough at flying the plane "I can be sure these situations won't happen to my lovely copter: deviating from its route, hitting obstacles, losing control, or any blowing up" and can handle the operations in quite a familiar way, you may uninstall the four propeller protective bumpers. Thus your craft can be even more lightweight, and you may get a more flexible control and feel "weightless". But of course safety comes first! Even when you believe you're totally capable of any situations that may happen, you'll still need to keep in mind the safety of other people 37

41 as well as your plane. With the bumpers taken off, the aircraft may be 4g or so lighter. When flying it, you may feel this little but obvious difference and find it's much sensitive to your control. So just take minutes to get used to the new weight before flying it high. How to Remove Protection Bumpers? It would be pretty easy for you now to take away the bumpers, for you'd have a plenty time together with the plane and known it well: unscrew, remove the bumpers, and then screw the seats again. Quite easy! Then we get this even more lightweight quadcopter: 38

42 7. Stunt Flying The stunt flying with a quadcopter is advanced playing with the plane and requires very high skills. You are not recommended to try this type before getting proficient in performing the basic operations. Under this flight mode, the aircraft flies extremely fast and each aspect of flying becomes quite acute. Therefore, you need to pay more attention to safety issues in this occasion. If you've flied much before, and are fairly skilled at flying and confident enough, you may try the stunt flight operations! For stunt flying, you need to set the flight parameters in MultiWii Conf. Adjust the RATE values as shown in the figure below. The higher you set them, the more agile the quadcopter can be. The upper RATE value is to adjust the agility of the plane in the pitch and roll directions, when the lower is to do that in yaw. Both values range from 0.00~1.00. You may try to increase them slowly, get familiar with the changes in flying your quadcopter and eventually make them fit your flying operations most. Kindly reminder again: PLEASE safely fly the quadcopter! Keep our safety use instructions in mind. 39

43 8. Troubleshooting If the radio transmitter control fails to control the quadcopter, refer to Matching radio transmitter control with Receiver. Switch on the quadcopter and the blue LED indicator keep blinking, and the copter cannot be unlocked. --- Calibrate the gyroscope and accelerometer referring to Gyroscope and Accelerator Calibration. The quadcopter cannot fly steadily after taking off. --- First make sure you've opened the self-stabilization mode on the GUI. After a long time, my quadcopter flies less steadily than it does at the beginning. --- The propellers and motors are consumables and their lifetime may reduce with each usage. 9. Precautions Ensure the safety of yourself and others during the flying. The assembly of the quadcopter should comply with the instructions above. Please conform to the local aviation regulations and do not fly in the no-fly zone. Observe laws and regulations. Do not perform illegal actions with copter. Properly use the battery and other craft components. 40
About SunFounder
 About SunFounder www.sunfounder.com SunFounder is a technology company focused on Raspberry Pi and Arduino open source community development. Committed to the promotion of open source culture, we strive
U846. headless flying quad PRODUCT PARTS. 1. Quadcopter. Clockwise Blade A. Counter-clockwise Blade B. Counter-clockwise Blade B
 PRODUCT PARTS U846 headless flying quad 1. Quadcopter Clockwise Blade A Counter-clockwise Blade B Counter-clockwise Blade B Clockwise Blade A Clockwise Blade A Counter-clockwise Blade B USB Power 1 Power
PICTURE & VIDEO CAMERA 2.4GHz 4.5CH RC QUADCOPTER
 PICTURE & VIDEO CAMERA 2.4GHz 4.5CH RC QUADCOPTER 14+ ITEM NO. 33834 33835 INTRODUCTION Thank you for purchasing this amazing World Tech Toys product. This drone is suitable for indoor and outdoor flight.
MR210 RACING QUAD USER MANUAL
 MR210 RACING QUAD USER MANUAL Highlights - True X frame, agile and swift - High performance MindRacer flight controller with 168MHz floating point processor, super fast and accurate - 10:1 maximum thrust-to-weight
USER GUIDE AND MANUAL
 Specifications: Item No.: X5SC Function: up/down, forward/backward, turn left / Right,With GYRO /Flash lights 360-degree 3D special function. Battery: 3.7V 500mAh Li-poly Charging time: About 100 minutes
Instruction Manual ODY-1765
 INSPIRING IMAGINATION Instruction Manual ODY-1765 We hope you enjoy your purchase of the Stealth NX-2 Drone and use this Instruction Manual to get your drone to take off! Included Contents 1. Stealth NX-2
USER MANUAL FOR MORE INFORMATION
 USER MANUAL FOR MORE INFORMATION Visit us online at force1rc.com for product information, replacement parts and flight tutorials. ATTENTION: BEFORE FLYING YOUR DRONE, PLEASE WATCH THIS FLIGHT INSTRUCTION
LIVE FEED PICTURE / VIDEO CAMERA 2.4GHz 4.5CH RC DRONE INSTRUCTION MANUAL
 LIVE FEED PICTURE / VIDEO CAMERA 2.4GHz 4.5CH RC DRONE INSTRUCTION MANUAL INTRODUCTION Thank you for purchasing this amazing World Tech Toys product. This drone is suitable for indoor and outdoor flight.
INSTRUCTION & REFERENCE MANUAL Model no. ODY-1720NX
 INSTRUCTION & REFERENCE MANUAL Model no. ODY-1720NX FOR AGES 14 + We hope you enjoy your purchase of the StarBlade and that this user manual helps you get your drone off the ground and light up the sky!
INSTRUCTION MANUAL ITEM NO
 INSTRUCTION MANUAL ITEM NO. 33777 TABLE OF CONTENTS INTRODUCTION SAFETY & PRECAUTIONS DRONE DIAGRAM TRANSMITTER DIAGRAM INSTALLING THE TRANSMITTER BATTERY INSTALLING THE DRONE BATTERY CHARGING THE DRONE
U29. Operations Guide
 U29 Operations Guide Catalog www.udirc.com Important Statement 3 Safety Precautions 3 Safe Notice for Drone Battery 4 Charging Instruction for Drone Battery 5 Check List Before Flight 5 Instruction for
Drone Overview. Quick Start Guide. BACK 10 - Drone Status Indicator FRONT. 1 - Drone Overview. 4 - Disclaimers, Warnings & Guidelines
 1 Drone Overview FRONT Quick Start Guide Drone Body ROTORS 1 - Drone Overview Orange LED Indicator 2 - Transmitter Overview Landing Skids Rotor Nut 4 - Disclaimers, Warnings & Guidelines Rotor 6 - Charging
dronium TWO AP DRONE with camera
 dronium TWO AP TM DRONE with camera INSTRUCTION MANUAL WWW.PROTOCOLNY.COM THANK YOU. Thank you for your purchase of Protocol s Dronium Two AP With Camera. You are about to experience the best of what remote
Content. 1. Introduction. 2. Kit Contents Kit S250 SPEDIX Extra Propellers Black 5x4.5 (CW / CCW)
") Content 1. Introduction 2. Kit Contents 2.1. Kit S250 SPEDIX 2.2. Extra Propellers Black 5x4.5 (CW / CCW) 2.3. Turnigy 9X 9Ch & 8ch Receiver Module 2.4. Battery Turnigy 2.2 Amps 11.1V (3S) 1.5C 2.5. MultiStart
Content 1. Introduction 2. Kit Contents 2.1. Kit S250 SPEDIX 2.2. Extra Propellers Black 5x4.5 (CW / CCW) 2.3. Turnigy 9X 9Ch & 8ch Receiver Module 2.4. Battery Turnigy 2.2 Amps 11.1V (3S) 1.5C 2.5. MultiStart
DRONIUM ZERO DRONE WITH LIVE STREAMING CAMERA
 DRONIUM ZERO DRONE WITH LIVE STREAMING CAMERA THANK YOU. Thank you for your purchase of Protocol s Dronium Zero With Live Streaming Camera. You are about to experience the best of what remote control
VENTO WIFI DRONE WITH LIVE STREAMING CAMERA
 VENTO WIFI DRONE WITH LIVE STREAMING CAMERA INSTRUCTION MANUAL THANK YOU. Thank you for your purchase of Protocol s Vento Wifi Drone with Live Streaming Camera. You are about to experience the best of
DOT VR FOLDING DRONE WITH CAMERA
 DOT VR FOLDING DRONE WITH CAMERA INSTRUCTION MANUAL THANK YOU. Thank you for your purchase of Protocol s Dot VR Folding Drone with Camera. You are about to experience the best of what remote control flight
U51. Operations Guide
 U51 Operations Guide Catalog Instruction for Drone and Transmitter 3 Installing & Removing Spare Parts 7 Pre-Flight Checklist 8 Pre-Flight Operation Instructions 8 Functions 14 Spare Parts 18 Troubleshooting
Microduino-Quadcopter Tutorial USER GUIDE
 Microduino-Quadcopter Tutorial USER GUIDE Content Outline... 2 Principle... 2 Bildup and Debugging... 6 Program Download... 9 Operating Instruction... 10 Conrrection Guide of Qaudcopter... 10 Joypad Remote
14+ FOR AGES 14 AND UP ITEM NO
 14+ FOR AGES 14 AND UP ITEM NO. 33743 INTRODUCTION Thank you for purchasing this amazing World Tech Toys product. This drone is suitable for indoor and outdoor flight. Please carefully read the entire
FOREWORD PRODUCT SPECIFICATIONS MAIN CHARACTER MAIN ACCESSORIES SAFETY PROCEDURES BEFORE FLIGHT LIMITATIONS OF FLYING AREA ASSEMBLING THE AIRCRAFT
 FOREWORD PRODUCT SPECIFICATIONS MAIN CHARACTER MAIN ACCESSORIES SAFETY PROCEDURES BEFORE FLIGHT LIMITATIONS OF FLYING AREA ASSEMBLING THE AIRCRAFT SETUP OF THE TRANSMITTER THE USAGE OF THE CHARGER VALUABLE
Instructional Manual
 Instructional Manual 1. Parts 1. The vice-blade steering engine can be divided into levels of 25%, 50%, 75%, and 100% rudder power. The user can select any one of these levels according to their flying
FuriBee F90 Wasp Mini RC Racing Quadcopter
 FuriBee F90 Wasp Mini RC Racing Quadcopter User Manual V1.0 Warnings and Safety Notes Thanks for purchasing F90 WasMiniquadcopter.Please regularly visit F90 web page at www.gearbest.com which is updated
Instruction Manual ODY-1012
 Ages 8+ Instruction Manual ODY-1012 INCLUDED CONTENTS: 1 Fuselage Cover 2 Main Frame / Cage 3 Replacement Blades (x 4) 4 3.7 Rechargeable Lithium Battery 5 USB Charging Cable 6 Radio Transmitter 1 RADIO
GT p HD FPV 4 Channel RC Quadcopter. Quadcopter Overview Remote Control Overview
 GT-4160 720p HD FPV 4 Channel RC Quadcopter 1 2 3 4 5 6 7 8 9 10 11 12 13 Quadcopter Overview Remote Control Overview Headless Mode Explained Remote Control Battery & Pairing Remote Control Mode FPV Screen
Instruction Manual. For your safety, please turn off power to both the controller and drone before handling.
 Instruction Manual For your safety, please turn off power to both the controller and drone before handling. 1. Parts Blade Protective shell Protective guards Motor Liquid Crystal Display Rudder Power 360
AXIS II RC DRONE WITH CAMERA
 AXIS II RC DRONE WITH CAMERA THANK YOU. Thank you for your purchase of Protocol s Axis II RC Drone With Camera. You are about to experience the best of what remote control flight has to offer. We strongly
Thank you for purchasing the Intel Aero Ready to Fly Drone! Getting Started
 Thank you for purchasing the Intel Aero Ready to Fly Drone! The Intel Aero Ready to Fly Drone is a pre-assembled quadcopter that is purposely built for professional drone application developers to enable
MOSQUITO HD VIDEO DRONE WITH LED LIGHTS. Item No User Manual
 MOSQUITO HD VIDEO DRONE WITH LED LIGHTS Item No. 206003 User Manual Thank you for purchasing the Sharper Image Mosquito HD Video Drone with LED Lights. This advanced nano quadcopter is designed for all
Max Speed Personal 3D Stunt Micro Drone
 Ages 14+ - Please read the instructions carefully before use. Max Speed Personal 3D Stunt Micro Drone Introduction Thank you for choosing the Inguity Max Speed Micro Drone from Ingenious Ingenuity Inc.
Grasshopper F210 Racing RC Quadcopter User Manual
 Grasshopper F210 Racing RC Quadcopter User Manual V2.0 Shenzhen Idea-Fly Technology Co., Ltd Warnings and Safety Notes Thanks for purchasing F210 quadcopter.please regularly visit F210 web page at www.ide-fly.com
M80 INSTRUCTION MANUAL
 M80 INSTRUCTION MANUAL WARNING Please read the ENTIRE instruction manual to become familiar with the features of the product before operating. Failure to operate the product correctly can result in damage
Sky Fighters Twin Pack
 Sky Fighters Twin Pack User Manual Model: PFBD101 Thank you for choosing ProFlight. Please read this user manual before using this drone and keep it safe for future reference. CONTENTS Safety 3 Battery
Instruction Manual ODY-1012
 Ages 8+ Instruction Manual ODY-1012 INCLUDED CONTENTS: 1 Fuselage Cover 2 Main Frame / Cage 3 Main Blades (x 4) 4 3.7 Rechargeable Lithium Battery 5 USB Charging Cable 6 Radio Transmitter Thank you for
DRONIUM 3X DRONE WITH LIVE STREAMING CAMERA
 DRONIUM 3X DRONE WITH LIVE STREAMING CAMERA THANK YOU. Thank you for your purchase of Protocol s Dronium 3X Drone with Live Streaming Camera. You are about to experience the best of what remote control
SKEYE. Mini Drone USER GUIDE
 SKEYE Mini Drone USER GUIDE Parts Identification SKEYE Mini Drone Replacement Rotor Blades MicroSD card reader USB Charging Cable Controller MicroSD Card Rotor Protection Cage Rechargeable Battery 2 Controller
TABLE OF CONTENTS INTRODUCTION SAFETY & PRECAUTIONS DRONE DIAGRAM TRANSMITTER DIAGRAM INSTALLING THE TRANSMITTER BATTERY INSTALLING THE DRONE BATTERY
 ITEM NO. 34937 TABLE OF CONTENTS INTRODUCTION SAFETY & PRECAUTIONS DRONE DIAGRAM TRANSMITTER DIAGRAM INSTALLING THE TRANSMITTER BATTERY INSTALLING THE DRONE BATTERY CHARGING THE DRONE BATTERY TRANSMITTER
TABLE OF CONTENTS CHAPTER 1 KEY INFORMATION # SECTION 1.1 COMPONENT CHECK # SECTION FUNDAMENTALS # SECTION 1.3 TRANSMITTER SETTINGS #
 FPV Racing Micro Quad Build Instructions TABLE OF CONTENTS CHAPTER 1 KEY INFORMATION # SECTION 1.1 COMPONENT CHECK # SECTION 1.2 - FUNDAMENTALS # SECTION 1.3 TRANSMITTER SETTINGS # CHAPTER 2 - ASSEMBLEY
Distributed in the UK by:
 For the most up to date Owner s Manual & Technical Information Guide, please visit www. Ares-RC.com or scan the QR code with your smart phone. Distributed in the US by: Firelands Customer Service/Product
DIY Block Drone. User Manual. Model: PFBD102
 DIY Block Drone User Manual Model: PFBD102 Thank you for choosing ProFlight. Please read this user manual before using this drone and keep it safe for future reference. CONTENTS Safety 3 Battery Charging
RED HERON HD+ With 120 wide-angle 720P HD Camera
 RED HERON HD+ With 120 wide-angle 720P HD Camera USER MANUAL U49C FOR MORE INFORMATION Visit us online at force1rc.com for product information, replacement parts, and flight tutorials. ATTENTION: BEFORE
THANK YOU. As with any aircraft, this is a precision flying machine. Treat it well and enjoy all the fun it has to offer, flight after flight.
 WWW. PROTOCOLNY.COM THANK YOU. Thank you for your purchase of Protocol s Dronium One AP With Camera. You are about to experience the best of what remote control flight has to offer. We strongly recommend
TITAN Quadcopter Assembly Instructions 1
 TITAN Quadcopter Assembly Instructions Even if you have built a multirotor before; please read these instructions carefully! There are a lot of tricks in here that can save you headaches in the future
INSTRUCTION & REFERENCE MANUAL Model no. ODY-2017BF1
 INSTRUCTION & REFERENCE MANUAL Model no. ODY-2017BF1 FOR AGES 14 + Thank you for your purchase of the Oblivion NX Live Streaming HD Video Drone. You re just moments away from creating stunning aerial acrobatics!
U28. Name of Parts 1. Drone. Blade Guard. Battery Cover. Drone Body Blade Motor. Body Light. Camera. Landing Gear. Blade Guard Installation Diagram
 Name of Parts 1. Drone Blade Guard Drone Body Blade Motor Body Light Camera Landing Gear Blade Guard Installation Diagram U8 TF Card Installation Diagram . Transmitter Power Switch Throttle/ Up and Down
INCLUDED CONTENTS. Thank you for your purchase of the Galaxy Seeker Quadcopter. You re just moments away from creating stunning aerial acrobatics!
 Thank you for your purchase of the Galaxy Seeker Quadcopter. You re just moments away from creating stunning aerial acrobatics! INCLUDED CONTENTS LCD ON/OFF SWITCH POWER LED 1 Galaxy Seeker Unit 2 Radio
SLIPSTREAM WIFI DRONE WITH LIVE STREAMING CAMERA
 SLIPSTREAM WIFI DRONE WITH LIVE STREAMING CAMERA THANK YOU. Thank you for your purchase of Protocol s Slipstream Wifi Drone With Live Streaming Camera. You are about to experience the best of what remote
OCEANA AMPHIBIOUS RC DRONE
 OCEANA AMPHIBIOUS RC DRONE THANK YOU. Thank you for your purchase of Protocol s Oceana Amphibious RC Drone. You are about to experience the best of what remote control flight has to offer. We strongly
2.4 GHz 4.5CH RC SUPERDRONE INSTRUCTION MANUAL 14+ FOR AGES 14 AND UP. 2.4GHz ITEM NO
 2.4 GHz 4.5CH RC SUPERDRONE INSTRUCTION MANUAL 14+ FOR AGES 14 AND UP 2.4GHz ITEM NO. 34887 INTRODUCTION Thank you for purchasing this amazing World Tech Toys product. This drone is suitable for indoor
Pro live Owner s Manual. For Owner s Manual updates, warranty information, and support, please visit:
 Pro live -4000 Owner s Manual For Owner s Manual updates, warranty information, and support, please visit: https://www.mota.com/pro-live-4000/ Please read this manual carefully before flying! It has information
KAPTUR WI-FI DRONE WITH HD CAMERA
 KAPTUR WI-FI DRONE WITH HD CAMERA THANK YOU. Thank you for your purchase of Protocol s Kaptur Wi-Fi Drone with HD Camera. You are about to experience the best of what remote control flight has to offer.
Arkbird VTOL Assembly Manual v1.0 (Beta)
") Thank you for purchasing Arkbird product. Before starting with the assembly of the VTOL plane, a few words regarding the new firmware of Autopilot 2.0: In vertical mode, newly developed settings are available
Thank you for purchasing Arkbird product. Before starting with the assembly of the VTOL plane, a few words regarding the new firmware of Autopilot 2.0: In vertical mode, newly developed settings are available
AERIAL ACROBAT VIDEO DRONE. Item No User s Guide
 AERIAL ACROBAT VIDEO DRONE Item No. 205982 User s Guide Thank you for purchasing the Sharper Image Aerial Acrobat Video Drone. Please read these instructions prior to using this device for the first time.
CAMERA DRONE. INSTRUCTION & REFERENCE MANUAL Model no. ODY-2017BF2 WHAT S IN THE BOX! FOR AGES 14 +
 INSTRUCTION & REFERENCE MANUAL Model no. ODY-2017BF2 FOR AGES 14 + CAMERA DRONE 1 Thank you for your purchase of the Stellar NX Camera Drone. You re just moments away from creating stunning aerial acrobatics!
NANO Q4 CAM PLUS NO. H002
 NANO Q4 CAM PLUS NO. H00 Content Introduction------------------------------------------------ Safety Notes------------------------------------------------- Safety check before flying---------------------------------
Thank you for your purchase of the Neptune II Live Streaming HD Video Drone. You re just moments away from creating stunning aerial acrobatics!
 INSTRUCTION & REFERENCE MANUAL Model no. ODY-1950WIFI FOR AGES 14 + CAMERA DRONE 1 Thank you for your purchase of the Neptune II Live Streaming HD Video Drone. You re just moments away from creating stunning
USER MANUAL ORBIT PFBD201
 USER MANUAL ORBIT PFBD201 Thank you for choosing ProFlight. Please read this user manual before using this drone and keep it safe for future reference. CONTENTS SAFETY WARNINGS 3 SAFETY PRECAUTIONS 4 BATTERY
Quick Guide Charging and Assembly
 Quick Guide Charging and Assembly 8 9 2 5 1 3 7 6 4 Copyright 2016-2017 Amimon LTD, All rights reserved. No part of this publication may be reproduced, transmitted, transcribed, stored in a retrieval system,
INSTRUCTION MANUAL FOR MORE INFORMATION
 INSTRUCTION MANUAL FOR MORE INFORMATION Visit us online at force1rc.com or our YouTube channel at youtube.com/usatoyz for product information, replacement parts and flight tutorials. ATTENTION: PLEASE
ITEM NO FOR AGES 14 AND UP
 I N S T R U C T I O N M A N U A L ITEM NO. 34895 14+ FOR AGES 14 AND UP I N TRO D UCT I O N Thank you for purchasing this amazing World Tech Toys product. This quadcopter is suitable for indoor and outdoor
Hero 550 User Manual
 Hero 550 User Manual IDF 1.01 2014.10.28 version Thanks for purchasing Hero-550.Please regularly visit Hero-550 web page at www.idea-fly.com which is updated regularly. product information,technical updates
INSTRUCTION MANUAL VR HD NANO DRONE
 Age: 14+ INSTRUCTION MANUAL VR HD NANO DRONE Thank you for purchasing our VR HD Nano Drone. Please read the instructions carefully to fully learn about the drone and fly it safely. Save this instructions
DroneCurriculum.net. Drone Theory & Design: FPV Add-on P a g e 1. FPV Add-on Quadcopter Frame
 Drone Theory & Design: FPV Add-on P a g e 1 DroneCurriculum.net FPV Add-on Quadcopter Frame GPS Kit with NAZA-M V2 Flight Controller and Turnigy 9X Transmitter/Receiver Drone Theory & Design: FPV Add-on
U818A HD. 1.Quadcopter. 2.Transmitter. Name for parts: LED Light. White Blade. White Blade. Forward/ backward/left/ right control stick.
 Name for parts: 1.Quadcopter LED Light HD video camera Low Voltage Warning 4GB memory card Headless Mode Return home function Black Blade Black Blade 2.Transmitter Power light Throttle/Direction Control
Storm Drone 6 GPS DEVO 7 Setup for NAZA-M Lite
 DEVO 7 Setup for NAZA-M Lite Step 1 - Set Fixed ID on the transmitter! Skip this part if you have a brand new Storm Drone 6 GPS, we have already done before we ship. 1. 2. 3. 4. 5. 6. 7. 8. 9. Turn on
DJI Flamewheel F550 RTF package DEVO 7 Setup for NAZA V2 / Lite
 Step 1 - Set Fixed ID on the transmitter Skip this part if you have a brand new DJI F550 RTF Package, we have already done before we ship. 1. 6. 7. 8. Make sure you have NOTHING plugged into BATT port
ITEM NO USER MANUAL
 ITEM NO. 35064 USER MANUAL Safety & Precautions 1. Fly in an open wide area without large obstacles like buildings, trees or electric wires within 100 feet as they may distort the GPS signals and you may
USER MANUAL FOR MORE INFORMATION. Visit us online at force1rc.com for product information, replacement parts, and flight tutorials. Altitude Hold Mode
 USER MANUAL 360 Altitude Hold Headless Mode Photo Video Flight Path Mode 3 Speed FPV Mode One Key Lift/Land 360 Inversion FOR MORE INFORMATION Visit us online at force1rc.com for product information, replacement
RXS255 INSTRUCTION MANUAL
 RXS255 INSTRUCTION MANUAL REQUIRED FOR COMPLETION 6 Channel Transmitter and Receiver 4S 1300 2200 mah LiPo Battery LiPo Battery Charger 5.8G FPV Receiver and Monitor or Goggles WARNING Please read and
GIGA Commercial Drone. Owner s Manual. For Owner s Manual updates, warranty information, and support, visit:
 GIGA -6000 Commercial Drone Owner s Manual For Owner s Manual updates, warranty information, and support, visit: www.mota.com/giga-6000 Please read the Owner s Manual before your first flight. It has information
U818A WIFI Operations Guide
 U818A WIFI Operations Guide Catalog Important Statement 3 Safety Precautions 3 Safe Notice for Drone Battery 4 Charging Instruction for Drone Battery 5 Checklist before Flight 5 Instruction for Drone and
Spare Blades (2 black, 2 color) Vista UAV Quadcopter
 Vista UAV Quadcopter") Radio Controlled Quadcopter Spare Blades ( black, color) Vista UAV Quadcopter AAA Batteries () Radio Flight Battery Screwdriver USB Charger CHARGING FLYING Plug the charger into a USB to AC adapter (DIDP
Radio Controlled Quadcopter Spare Blades ( black, color) Vista UAV Quadcopter AAA Batteries () Radio Flight Battery Screwdriver USB Charger CHARGING FLYING Plug the charger into a USB to AC adapter (DIDP
PANTONMA 2.4Ghz QUADCOPTER
 PANTONMA 2.4Ghz QUADCOPTER FEATURING: 1. Four-Rotor design allows great speed and maneuverability for both Indoor and outdoor use. 2. Built-in 6-axis Gyro ensures excellent stability. 3. Modular design
Introduction to Drones
 Introduction to Drones Introduction You can go backwards, you can hover, and you can go straight up or straight down. What is it? It s a bird, it s a plane, no it s a drone! If you are familiar with the
OWNER S MANUAL AGES 8+ JETJAT Nano-C.
 AGES 8+ TM OWNER S MANUAL JETJAT Nano-C TM For Owner s Manual updates, warranty information, instructional videos, and support, please visit: www.mota.com/jetjat-nano-c Table of Contents Fly Safely! 3
KAPTUR GPS WI-FI DRONE WITH HD CAMERA
 KAPTUR GPS WI-FI DRONE WITH HD CAMERA THANK YOU. Thank you for your purchase of Protocol s Kaptur GPS Wi-Fi Drone with HD Camera. You are about to experience the best of what remote control flight has
SLRD40 Operations Guide
 by SLRD40 Operations Guide www.udirc.com Charging Instruction for Drone Battery 1. Connect the drone battery with USB cable first and then choose one of the method as below picture shown to connect with
Storm Drone 6 GPS DEVO 7 Setup for NAZA Lite / V2
 DEVO 7 Setup for NAZA Lite / V2 Step 1 - Set Fixed ID on the transmitter Skip this part if you have a brand new Storm Drone 6 GPS, we have already done before we ship. Inside the drone, the RX701 Reciever,
USER MANUAL DRONE-WF20
 To help get you started, please refer to the quick connection guide below Action Drone Indicator Remote Indicator 1 Turn on Drone Fast then slow flash - 2 Turn on Remote Slow flash Slow RED flash Connection
INSTRUCTION MANUAL SPECIFICATIONS:
 INSTRUCTION MANUAL XK X250 Alien Specifications CONTENTS OF THE BOX: 1 x Quadcopter 1 x 2.4 GHz remote (6x AA-batteries not included) 1 x 3.7V 780 mah Li-po battery 4 x Spare propeller 1 x Charger 1 x
Conventions...2 Overview Kit Contents Quadcopter Introduction...3. Preparations before flight Preparing Batteries...
 Content Conventions...2 Overview...2 1 Kit Contents...2 2 Quadcopter Introduction...3 Preparations before flight...4 1 Preparing Batteries...4 1.1 Quadcopter Battery Introduction... 4 1.2 Charging the
Jingzhe SLK-5 Electric Multi-rotor agricultural drone User Manual
 Jingzhe SLK-5 Electric Multi-rotor agricultural drone User Manual Xi'an Wideworldz Aviation Technology Co., Ltd Table of contents 1. Product Overview 1.1Introduction (2) Functional highlights 2. Structures
USER GUIDE. ALPHA Drone HD 720p Quadcopter
 USER GUIDE ALPHA Drone HD 720p Quadcopter Languages English 4 English Community /kaiserbaas Tech support: e: helpdesk@kaiserbaas.com w: www.kaiserbaas.com/support p: Australia 1300 302 306 (business hours,
FPV 720P 120 Wide-angle HD Camera. Heading Hold Mode / 360 Flip / Low Battery Alarm / Out of Range Alarm / One Button Take Off/Landing U28-1
 FPV 720P 120 Wide-angle HD Camera First Person View / Aerial Photography / Real-time Transmission / Live Video and Photo Heading Hold Mode / 360 Flip / Low Battery Alarm / Out of Range Alarm / One Button
U845Wifi User Manual
 U845Wifi User Manual Catalog Important Statement 3 Safety Precautions 3 Safe Notice for Drone Battery 4 Charging Instruction for Drone Battery 5 Check List Before Flight 5 Instruction for Drone and Transmitter
Storm Drone 8 USER MANUAL V6.0
 Storm Drone 8 with Naza V2 GPS Flight Controller USER MANUAL V6.0 1 DISCLAIMER Please read this disclaimer carefully before using this product. This product is a hobby with motors but not a toy which is
Age User s Guide. Dominator Drone
 Age 12+ 6001359 User s Guide Dominator Drone BC Contents Features... 3 Package Contents... 3 Specifications... 3 Fly Safely... 3 Install Batteries in the Remote Control... 4 Battery Notes... 4 Lithium
Lily Next-Gen. Camera. Drone. Reinvented. Remote Controller Manual V1.1. For updated instruction and video please visit go.lily.
 Lily Next-Gen Camera. Drone. Reinvented. Remote Controller Manual V1.1 For updated instruction and video please visit go.lily.camera/4005 1 9 3 10 4 11 5 12 6 / 13 7 14 8 15 1, 2, 3 1. Know the rules.
DJI Flamewheel F550 RTF package DEVO 7 Setup for NAZA V2
 Step 1 - Set Fixed ID on the transmitter Skip this part if you have a brand new DJI F550 RTF Package, we have already done before we ship. Inside the drone, the RX701 Reciever, if it s flashing Red rapidly,
DJI Flamewheel F450 RTF package DEVO 7 Setup for NAZA V2 / Lite
 Step 1 - Set Fixed ID on the transmitter Skip this part if you have a brand new DJI F450 RTF Package, we have already done before we ship. Inside the drone, the RX701 Reciever, if it s flashing Red rapidly,
Storm Drone Anti Gravity USER MANUAL V1.0
 Storm Drone Anti Gravity with Naza GPS Flight Controller (Naza Lite / Naza m v2) USER MANUAL V1.0 1 DISCLAIMER Please read this disclaimer carefully before using this product. This product is a hobby with
SLRD42WIFI. Operations Guide
 by SLRD42WIFI Operations Guide Catalog Important Statement 3 Safety Precautions 3 Safe Notice for Drone Battery 4 Charging Instruction for Drone Battery 5 Check List Before Flight 5 Instruction for Drone
4CH 2.4G REMOTE CONTROL QUADCOPTER INSTRUCTION MANUAL IMPLEMENT STANDARD: GB/T
 AGES 14+ X 5C 4CH 2.4G REMOTE CONTROL QUADCOPTER 1 INSTRUCTION MANUAL IMPLEMENT STANDARD: GB/T26701-2011 Key features of quadcopter Four-axis struture makes the quadcopter more flexible and rapid when
MANUAL OF INSTRUCTIONS NANODRONE VCAM HD 3
 Age: 14+ MANUAL OF INSTRUCTIONS NANODRONE VCAM HD 3 Thank you for purchasing our Nanodrone VCAM HD 3. Please read the manual carefully in order to know in detail the drone and fly it safely. Keep this
LIVE STREAMING HD VIDEO DRONE
 INSTRUCTION & REFERENCE MANUAL Model no. ODY-1811FPV FOR AGES 14 + LIVE STREAMING HD VIDEO DRONE Thank you for your purchase of the Galaxy Seeker II Live Streaming HD Video Drone. You re just moments away
JETJAT ULTRA. Owner s Manual. For Owner s Manual updates, warranty information, and support, please visit: https://www.mota.com/ultra.
 JETJAT ULTRA Owner s Manual Ages 8+ For Owner s Manual updates, warranty information, and support, please visit: https://www.mota.com/ultra Please read this manual carefully before flying! It has valuable
U818A Plus-W. Operations Guide
 U818A Plus-W Operations Guide Catalog Important Statement 3 Safety Precautions 3 Safe Notice for Drone Battery 4 Charging Instruction for Drone Battery 5 Check List Before Flight 5 Instruction for Drone
Thank you for your purchase of the Neptune II Live Streaming HD Video Drone. You re just moments away from creating stunning aerial acrobatics!
 INSTRUCTION & REFERENCE MANUAL Model no. ODY-1950WIFI FOR AGES 14 + CAMERA DRONE 1 Thank you for your purchase of the Neptune II Live Streaming HD Video Drone. You re just moments away from creating stunning
USER MANUAL FOR MORE INFORMATION. 0.6 Miles. Visit us online at force1rc.com for product information, replacement parts, and flight tutorials.
 USER MANUAL 0.6 Miles FOR MORE INFORMATION Visit us online at force1rc.com for product information, replacement parts, and flight tutorials. ATTENTION: PLEASE WATCH THIS FLIGHT INSTRUCTION VIDEO BEFORE
Notice. 1. Important Statement: 2. Safety Precautions:
 U42W Catalog Notice 3 SAFETY ADVISORY NOTICE Lithium-Polymer (LiPo) Batteries 5 Charging Instruction 6 Transmitter 6 Transmitter Installation 7 Calibration Instruction 8 Pre-Flight Instruction 8 Pre-Flight