VERSION OMNISHIP. User Guide for Plantrol s Shipping System
|
|
|
- Julianna McCormick
- 5 years ago
- Views:
Transcription

1 VERSION OMNISHIP User Guide for Plantrol s Shipping System
2 Version DOCUMENT INFORMATION This document is applicable to standard Plantrol systems and may not reflect customizations for your company s system. Documents are also written for the latest revision of a Plantrol System and include instructions on the latest standard and optional components. This manual is designed to allow you to get started quickly, and to be a reference point for questions that may arise later. As each Plantrol product is somewhat customized to the user s needs, and functionality is steadily being added, it will not be all-inclusive. Copyright 2004 by Plantrol Systems, Inc. Printed and bound in the United States. All rights reserved. ii Plantrol Systems
3 OmniShip User Guide TABLE OF CONTENTS OVERVIEW... 9 VISUAL SYSTEM BASICS...10 Terminology...10 Working with Windows...12 Window Control Buttons...12 How to Resize a Window by Dragging...12 How to Move a Window...13 Working with Multiple Windows...13 Customizing your View...14 Working with Columns...14 Changing the Appearance of Headings and Columns...16 Working with Rows...18 Tool Bars and Menus...20 The Tool Bar...20 Using Menus...21 SETTING UP THE SYSTEM...22 System Requirements...22 Configuring the Software...22 HOW TO PROCESS SHIPMENTS...24 Understanding the Shipment Entry Window...24 Shipment Entry Window Area Definitions...25 How to Ship an Order or Release...25 How to Ship a Miscellaneous Item...28 How to Ship Items Together...30 How to Combine Jobs in One Carton...31 Changing or Deleting Shipments...33 Type 1 - Shipments that have been processed through Harvey (UPS)...33 Type 2 - Truck and other processed shipments...34 Type 3 Un-processed shipments...34 HOW TO END THE SHIPPING DAY...35 Plantrol Systems iii
4 Version How To End The Ups Shipping Day And Upload The Manifest To Ups...35 How to tell if your UPS transmission was successful...37 How to resend a file requested by UPS...38 UPS SHIPPING...39 Selecting UPS Service Levels...39 Selecting the UPS Billing Option...40 Using Optional UPS Services...41 Shipment Options...42 How to enter a Call Tag...43 Package Options...44 Using Multiple UPS Account Numbers...46 Adding an additional UPS account number...47 FED EX GROUND...53 Service levels...53 Billing Options...53 Optional FedEx Ground Services...54 Shipment Options Call Tags...54 Package Options...55 FedEx Ground End of Day...56 Initial Set up of Reports...56 Printing the FedEx Ground Manifest...58 Using EPDI to Upload Electronically...58 FEDEX AIR...61 Selecting FedEx Service Levels...61 Selecting FedEx Billing Options...62 FedEx Air bills, Labels, and Reports...63 Using Optional FedEx Services...64 FedEx Ship Manager Option...65 Benefits...65 How it works...65 Using the FedEx Ship Manager...66 US POSTAL SERVICE...67 iv Plantrol Systems
5 OmniShip User Guide Setting up USP as a Carrier...67 Selecting USP Service Levels...69 Using Optional USP Services...69 SPEE DEE DELIVERY...72 Setting up SpeeDee as a Carrier...72 Optional SpeeDee Services...76 Shipment Options Call Tags...76 Package Options...77 Spee Dee End of Day Reports...78 Initial Setup of Spee Dee Reports...78 Printing the Spee Dee Manifest...79 INTERNATIONAL SHIPMENTS...80 Set Up the Defaults...81 Add the UPW carrier to Auto text...81 Product Information...82 Data Imports...83 Shipping Labels...84 Export Documentation Copies...87 Adding States...89 Create and process the Shipment...90 Enter Worldwide Information...93 Enter Commercial Invoice Information...95 Add Package Weight Information...98 Process the UPW Shipment Reprinting The Commercial Invoice LABELS, PACKING LISTS, AND BILLS OF LADING How to Print Documents Printing documents BEFORE the shipment is processed How to print documents as part of the shipping process How to print documents AFTER the shipment is processed Standard forms Packing list/bill of Lading for impact printers Plantrol Systems v
6 Version Bill of Lading for laser printers Thermal Labels Custom Forms REPORTS Report Menu Visual Report Menu UBL Harvey Reports How to Print a Shipping Detail Report from History Standard reports Omni Ship Report UPS Shipping Detail Report Carrier Summary Page Declared Value Page INQUIRIES Shipment Lookup OE and FM Inquiries CPS Daily Entry Look-up RATE SHOPPING How to use Rate Shopping Rate Shop for an existing shipment Rate Shop Independently How to Create a Shortcut on your Desktop TRACKING How to Track UPS Shipments Through CPS SYSTEM MAINTENANCE Check System Files How to Add or Delete a Carrier Handling Charges Maintaining the Shipping Rules File vi Plantrol Systems
7 OmniShip User Guide Updating the Software How To Install Harvey CPS and Rate Updates How to Install Omni Upgrades System Utilities Deleting Incomplete Shipments Purging the Files System Files and Codes File Structure Service Level Codes Billing Option Codes Status Codes UPS Fuel Surcharge Instructions (Option) FREQUENTLY ASKED QUESTIONS Plantrol Systems vii
8 Version NOTES viii Plantrol Systems

9 OVERVIEW Plantrol s Omni Ship will allow you to process shipments efficiently, access carrier rates and services, print the shipping documents you need, and interface with your order entry, forms management, and billing systems. An overview of features is shown below. 9
10 VISUAL SYSTEM BASICS TERMINOLOGY To clarify communications, many of the standard terms that are used throughout Plantrol s Visual Systems are defined below, and shown on the associated screen shot. Term Window Click Double-click Right-click Grid Title Bar Column Row Heading Record selector column Refresh Tree control Drill down Speed Keys, Hot Keys, or Shortcut Keys Meaning The rectangular portion of your screen that displays an open program or the contents of a folder or file. You can have multiple windows open at the same time. Refers to clicking the left mouse button once. Refers to quickly clicking the left mouse button twice. Refers to clicking the right mouse button once. The area where data is displayed in columns and rows. The solid area at the top of the window where the Title of the window is displayed. Data displayed in a vertical column. Data displayed in a horizontal row. The title given to a column of data. The column to the left of the data in the grid. An arrow is displayed pointing to the active row. Clicking the Refresh button will update the data in the active window without closing the window. A manner of viewing data that allows you to view only the predominant file name, or all the subsidiary file names as well. Display the underlying details of a job or a field. Position the cursor in the record selector column and click, or double click on a field. The specific drill downs available are customized in each system. A quick way to get the cursor to move to a field without using the mouse. The underlined letter in the field title indicates that you can press the Alt key with the indicated letter, and the cursor will move to that field. 10

11 Tabs Title Bar Row Tree Control Grids Record Selector Column Omni Ship Windows 11
12 WORKING WITH WINDOWS There are many ways to resize or move windows, most of which are common with standard Windows tools. Using these tools, you can have many windows open at one time, and view the information within them simultaneously, or even move data between them. Window Control Buttons You can resize or close open windows by clicking one of the window control buttons located on the far right of the title bar. Button Name Use to Minimize Minimize a window. A minimized window is still open. A window button appears on the taskbar. Maximize Enlarge a window to its largest possible size. Restore Return a window to its previous size Close Close a window. How to Resize a Window by Dragging 1. Position the cursor on the edge or corner of the window you want to resize until the cursor turns into a bi-directional arrow. 2. Click and hold down the left mouse button as you use the mouse to move the window boundary. 3. Release the mouse button when the boundary is where you want it. 12

13 How to Move a Window 1. Click in the Title Bar of the window and continue to hold the left mouse button down as you drag the window to its new location. 2. Release the mouse button when the window is where you want it. Working with Multiple Windows You can have multiple windows open at one time. Only one window is active at a time. The active window is the one with the colored title bar. The inactive window s title bars are gray. To make a window active, click within it. It will become active and come to the front of the other windows. 13
14 CUSTOMIZING YOUR VIEW Working with Columns The width and depth of most display fields, as well as their order, fonts and alignment are fully customizable by each user. In this section we will describe the use of the tools which allow you to change the width and the order of the columns, and to lock columns at the left. Changing the width of the columns In order to display the full text of a field, you may want to widen the column. 1. Position the cursor in the heading to the right of the column you want to affect, until the cursor changes to a bi-directional arrow. 2. Click and hold the left mouse button down as you move the right boundary of the column left or right. 3. Release the mouse button when the column is the width you want. Moving the columns You will want to order the columns in the most meaningful view for you. 1. Click on the column heading. This selects the column. You will see it change color. 2. Click again and hold down the left mouse button as you use the mouse to drag the column to its new location. You will see the cursor change as the item starts to move. 3. Release the mouse button when the column is where you want it. Locking columns at the left Note: This functionality does not apply to Omni Ship. Columns that are locked at the left will remain in position in the window when you scroll right in the grid. A small white area is visible between the locked area and the rest of the grid. It is recommended that the job number column be locked at left. If you wish, you can lock additional columns as well. To add columns to the locked area, first unlock any columns that are already in the locked area. How to Unlock columns 1. Double click on an item within the grid of the locked area. 2. The menu displays. 3. Click on Unlock. 4. The area is no longer locked. 14

15 How to lock columns at the left 1. Move the columns you wish to lock at the left to the leftmost area of the grid. (See Moving the Columns above.) 2. Double click on an item within the grid of the rightmost column which is to be locked at the left. 3. The menu displays. 4. Click on Lock at left. 5. The columns are locked. The Job Number column is locked at left in all three grids shown. 15
16 Changing the Appearance of Headings and Columns The column settings tool gives you the ability to change the font, alignment, text, and number of lines of the column heading. You can also affect the font and alignment of the body of the column. (You can also select to hide certain columns from view, although the procedure for this is not detailed here.) The fore and background colors of the columns can also be adjusted, but these are preset and should not be changed! A change will affect the functionality of the system. Changing the type font of a heading or a column. 1. Double click on an item in the column. (not the heading) 2. The menu displays. 3. Click on Column Settings 4. To change the heading font, in the Headings section, click Font. 5. Use the mouse to highlight your selections. Click OK. 6. To change the column font, in the Body section, click Font. 7. Use the mouse to highlight your selections. Click OK. 8. Click OK. Changing alignment of a heading or a column. 1. Double click on an item in the column. (not the heading) 2. The menu displays. 3. Click on Column Settings 4. To change the alignment of the heading, in the Headings section, click the down arrow in the alignment box. 5. Select CENTER, LEFT, RIGHT, or GENERAL by hovering over and clicking your selection. 6. To change the alignment of the column, in the Body section, click the down arrow in the alignment box. 7. Select CENTER, LEFT, RIGHT, or GENERAL by hovering over and clicking your selection. 8. Click OK. 16

17 Changing heading text, or number of lines in the heading. 1. Double click on an item in the column. (not the heading) 2. The menu displays. 3. Click on Column Settings 4. To change the heading text, in the Column Heading text box, type the new heading. 5. To change the number of lines in the heading, in the Number of Headlines box, click on the up or down arrows to select the number of lines. 6. Click OK. The Column Settings Dialog Box 17
18 Working with Rows To further enhance the readability of your windows, you can make the rows within the grid taller or shorter as you prefer. Alternate row highlighting can also be added to the grids. Changing the height of the rows In order to display the full text of a field, you may want to increase the height of the rows. 1. Position the cursor in the record selector column on the boundary between two rows, until the cursor changes to a bi-directional (up and down) arrow. 2. Click and hold the left mouse button down as you move the boundary of the row up or down. 3. Release the mouse button when the row is the height you want. Adding alternate row highlighting to the grid 4. Double click on an item in the grid. 5. The menu displays. 6. Click on Column Settings 7. Click on Alternating Rows to check the box. 8. Click OK. Removing alternate row highlighting from the grid 1. Double click on an item in the grid. 2. The menu displays. 3. Click on Column Settings 4. Click on Alternating Rows to remove the check from the box. 5. Click OK. 18

19 The middle grid above, Ready for Planning, has alternate row highlighting turned on. The top and bottom grids do not. Also notice the different row heights between grids. These windows are taken from the Plantrol Scheduling and Machine Loading module. 19
20 TOOL BARS AND MENUS A standard tool bar is used throughout Plantrol systems. You can click the button on the tool bar, or use the associated function key to perform the task. Available menus display at the top, just below the title bar. The Tool Bar The Tool Bar is toggled on and off by clicking on Toggle Toolbar on the Window Menu. Not all options on the tool bar are active at any one time. The choices that are not available are grayed out. The chart below lists all possible choices. The Tool Bar BUTTON FUNCTION USE TO TITLE KEY Find F1 Find a new record. Next F2 Find the next sequential record. Shift F2 will find the previous record. Change F3 Make changes to the record. Add F4 Add a new record. Delete F6 Delete the current record. Save F9 Save changes to the record. Cancel F11 Clear the screen. Exit F10 Close the window. 20

21 Using Menus In the example below, taken from the Scheduling and Machine Loading module, the user clicked on File, and then on File Maintenance. Additional choices are now displayed The menu bar displays just below the title bar. Click on the menu name to display the menu. A right pointing arrow at the right of the menu indicates further choices are available. There may be several levels to the menus. Speed key options are shown to the right of the menu item. You can use the speed keys to activate the menu choice without going to the menu. 21
22 SETTING UP THE SYSTEM Although most of the set up will normally be done prior to installation, it is helpful to understand the steps required. Of course, there are minimum system requirements for the PC, printers, or other accessories used. These are listed below, as well as an overview of the steps that must be taken both in Harvey s CPS system, as well as directly in Omni Ship. SYSTEM REQUIREMENTS Stated in generalities check with Plantrol for specifics for your system PC Minimum Windows 95 or higher 300 mhz Pentium 64 mb 1024X768 resolution 17 monitor. Compatible modem Devoted phone line Thermal printer Printers for custom labels and other documents check with Plantrol for compatibility PC Anywhere for remote support CONFIGURING THE SOFTWARE The Setup program in Harvey CPS must be run on each PC in the installation. (Start Programs CPS for Windows Setup CPS) This program may be run again at any time to change the default information or add carriers. Also, the program Tools can be used to make minor changes. We recommend that you consult with Plantrol before using these programs. The items which are designated in this program include: User company name and address to be used for UPS billing, as well as default return address. For UPS and other carriers used account number, service and document preferences. Thermal label and report printer information Default settings The system defaults for Omni Ship are accessed from the file menu. Select Setup Options Omni Ship Options and Settings to display the box below. 22

23 Interface to Harvey. Selecting the interface to Harvey will enable UPS, FedEx Ground, FedEx, and US Postal interface. Use Log On Name as Shipped By. This allows you to avoid having to input the shipped by information on every shipment. Suppress Print Window. The print window alerts you that a report has been sent to the printer and can be turned off here. The print window provides useful information during the setup process. Harvey assign FEX #. If the optional FedEx server software is being used on the PC, check this box to automatically assign airbill numbers. Scale Port. Indicate if a scale has been interfaced to Omni, and its Com port. Scale Type. Specify scale type if used. Form names, print queues, and special form names. Indicate the que for each custom form, and input any special form names in the box. Access to this area allows you to change these at any time. The default report printer is set by choosing: File Setup Options Printer Setup. This printer must also be chosen as the default printer on the PC. 23

24 HOW TO PROCESS SHIPMENTS UNDERSTANDING THE SHIPMENT ENTRY WINDOW The shipment entry window is where you will be doing most of your work. It is used to enter and process new shipments or to display saved shipments. You need to know your way around this window. To open the shipment entry window, click on User Process Shipments. D: Freight Billing A: Shipment B: Carrier C: Addresses E: Printing Options F: Order Information I: Add or Remove Buttons G: Item Information J: Shipment Totals H: Package Details 24
25 Shipment Entry Window Area Definitions Item Name Used For A Shipment Identification Shipment or order number. Used to FIND shipments. B Carrier info Shipment carrier. Some carriers, like UPS, also have Service Levels and shipper ID numbers. C Addresses The ship-to address and ship-from address are visible by clicking on the appropriate tab. Third party billing info will appear under a tab if needed. D Freight Billing Freight bills can go to the shipper, receiver, or a third party. If a Bill of Lading is printed, the billing address will depend on your choices. E Printing Options UPS or RPS barcode labels can be generated, as well as custom labels, packing lists, or bills of lading. These can be printed as you need them or automatically generated when the shipment is processed. F Order Information Information is retrieved directly from the Order Entry, Forms Management, or other custom system. G Item Information Quantity ordered, shipped, numbering and other information for multiple items. Most of this will be displayed automatically when package information is input. H Package Details Package weights and quantities are input here. I Add or Remove Buttons You can add orders, releases, and miscellaneous items to the same shipment. J Shipment Totals Shipment information is displayed as you add items or packages. After processing, the shipment charges are shown. HOW TO SHIP AN ORDER OR RELEASE The steps to process a shipment are always the same, although certain steps may vary slightly. A procedure, which flows top to bottom and left to right through the computer form, allows the most efficient process. Base your steps on the order below. 25

26 1. Click on ADD AN ORDER or ADD A RELEASE. (A form similar to the one below is displayed.) 2. Input the job or release number. Verify that this is the correct order. If it is not, click the CANCEL button and input the correct number. 3. If more than one ship to address is available, select the correct address by clicking Use Address. 4. Click the OK button. NOTE: The order or release information is now displayed in the window as shown below. 5. Select Carrier and Service level (if appropriate). 6. Select payment terms. 7. Enter your initials. 8. Enter carton information (package type, number of cartons, weight, and quantity). 26
27 9. Repeat steps 1 to 8 to add additional orders to the shipment. 10. If UPS or other carrier s additional services are required, click on the Items tab and select them. 11. Select the documents you wish to generate when the shipment is processed. 12. Click PROCESS SHIPMENT. 13. Click OK when prompted. This shipment has already been processed. The PROCESS SHIPMENT button has been replaced with the shipped icon. 27

28 HOW TO SHIP A MISCELLANEOUS ITEM A miscellaneous item is any item that is not already defined on an order or release. This may be items being returned to a vendor, sales material being sent to a customer, or a personal item being shipped from work. Miscellaneous items can be combined with orders and releases in one shipment if they are all going to the same address by the same method. Follow the steps below to ship a miscellaneous item by itself. 1. Click MISCELLANEOUS on the Orders tab. (A shipment number is assigned.) Select MISCELLANEOUS here. 2. Input the Ship To address. A company name, street address, city, state, and zip code are required. On line help (Shift F12) is available to access the bill to and ship to files your system includes. 28

29 3. Your company name and address will default into the from area. Click the Ship From tab and change the information if you need to. 4. Select Carrier and Service level (if appropriate). 5. Select payment terms. 6. Enter your initials in the Shipped By field. 7. Enter the Package Merchandise Description. Input the Merchandise Description before entering the carton information. 8. Enter carton information (number of cartons, weight, and quantity). 9. If UPS or other carrier s additional services are required, click on the Items tab and select them. 10. Select the documents you wish to generate when the shipment is processed. 11. Click PROCESS SHIPMENT. 12. Click OK when prompted. 29
30 HOW TO SHIP ITEMS TOGETHER There are many benefits to combining jobs, releases, or both into one shipment, not the least of which is reduced shipping cost. Using the ADD ORDER and ADD RELEASE buttons, you can easily ship items together. Simply follow the steps listed under How to Ship an order or release. You can even add a miscellaneous item to the shipment, following the normal steps. After the first item you enter, the information on the top half of the shipment window will remain the same. Only the item and package information will change as you add additional items, as shown below. You can remove an order from the shipment by displaying the order, and pressing the REMOVE FROM SHIPMENT button. The orders combined in this shipment can be displayed by clicking on the Order No. down arrow. Click on an order number to display its package and item information. 30
31 How to Combine Jobs in One Carton You can process shipments with multiple items in one carton without indicating which cartons contain which items. However, you may prefer to be more specific for your internal records. This can be done using the carton types multi and other. The steps are detailed below. This example assumes items from two orders are combined. 1. Add the first order to the shipment. Use carton type Multi. 2. Add the next order to the shipment. Use carton type Other. Do not enter a carton weight. 3. Add additional orders to the shipment, the same as step Click on the ITEMS tab. Click all + nodes to expand the tree. The shipment below has 4 items all will be shipped in one carton. 5. The? question marks indicate items that have not yet been packed in cartons. Since these are to be packed in carton no. 1 we ll drag them into open Carton No. 1. Click to highlight a? carton, then click again and hold the left mouse button down as you drag it to the open carton. Release the left mouse button. Repeat the same procedure for each? carton. 31
32 6. Click Process Shipment In the example above, the? cartons have been dragged into Carton No. 1 In the example below shows how the shipment appears after it has been processed. 32


33 CHANGING OR DELETING SHIPMENTS To change or delete a saved shipment, you must first FIND it, and then CHANGE or DELETE it. If a shipments for a Harvey supported carrier is to be changed, the original shipment is deleted, and a new shipment number is created. Type 1 - Shipments that have been processed through Harvey (UPS) 7. CANCEL if necessary to bring the cursor to the Order Number field at the top. 8. Input the job number you wish to recall or click Shipment Number and input the shipment number you wish to recall. 9. The following message will appear. Click YES. Clicking NO will allow you to view the shipment only. Clicking YES will void (delete) the shipment from the Harvey files. 4. Next, the following message will appear. To delete the shipment, answer YES. The shipment will be deleted. To make a change to the shipment, answer NO. A new shipment number will be assigned, and the old shipment deleted. 33


34 Type 2 - Truck and other processed shipments 1. CANCEL if necessary to bring the cursor to the Order Number field at the top. 2. Input the job number you wish to recall. Or, click Shipment Number and input the shipment number you wish to recall. The message below will appear. 3. Click YES to un-process the shipment. Click NO just view the processed shipment. The Message below will appear. 4. To delete the shipment, click YES. To make a change to the shipment, click NO. Type 3 Un-processed shipments 1. CANCEL if necessary to bring the cursor to the Order Number field at the top. 2. Input the job number you wish to recall. Or, click Shipment Number and input the shipment number you wish to recall. The following message will appear. 3. To delete the shipment, click YES. To make changes to the shipment click NO. 34
35 HOW TO END THE SHIPPING DAY HOW TO END THE UPS SHIPPING DAY AND UPLOAD THE MANIFEST TO UPS. At the end of the shipping day, the manifest information is transmitted to UPS, and the driver scans a bar coded summary label. Updates are run to verify the UPS charges and update other system files. Daily reports are printed and the day s shipments are moved to the history file. Here is a detailed procedure, followed by an abbreviated checklist. Your end of day procedure may also include processes to complete the day s shipping for other carriers. 1. Complete all UPS shipments for the day. 2. Close Omni Ship and CPS on any slave PC s. 3. Close the Process Shipment window by clicking CANCEL and then clicking on the x. 4. Click on CPS on the task bar to open the daily entry window. You need to be in Find mode. If in Add mode, click the cancel button until Find is displayed at the top of the screen. 5. Click on the process menu. Select End of Day reports. 6. When prompted, click OK to print the summary label. 7. When prompted, click OK to print the detail report. Verify the number of air packages and other types listed are correct. Any corrections to shipments should be made before proceeding. 8. Click on the process menu. Select Transmit Data. When prompted, click OK to print the summary label. Watch to see that the transmission was successful. 9. Minimize the CPS daily entry window. 10. Click on the User Menu. Select Reconcile Harvey and Omni Ship to update any UPS rate adjustments. Click UPDATE, and OK when prompted. You may click PRINT to have a report of changes if you wish. Click QUIT. 11. Click on CPS on the task bar to open the daily entry window. 12. Click on the process menu. Select Move to History. When processing is complete, click OK. 13. Minimize the CPS daily entry window. 14. Click on the Reports Menu, or use the Ctrl P speed key to display the Reports Menu. 15. Select the Omniship report. Input the beginning ship date and ending ship date as today s date. Click PRINT. (Also select any custom reports you may wish to print daily.) Click CANCEL to close the report window. 16. Click on the User Menu. Select Set the new Ship Date. Input the new date and click OK. 17. Click on the User menu, update orders - to update the interfaced systems with the shipping information. 18. Close Omniship and any other open programs, and reboot your PC. 18. Click on the User Menu, Process Shipments to start shipping with the new date. 35

36 DAILY CHECKLIST End of Day Reports - CPS Transmit Data - CPS Reconcile Harvey and Omni Ship Move to History - CPS Print Omni Daily Shipping Report Set new ship date Update orders Reboot PC s What the Reconcile program does The Reconcile program ensures that your packages are rated the least expensive way. As part of the Transmit Data step, CPS checks your shipments and ensures that any that qualify for Hundredweight pricing receive it. (Note: UPH and FXG multi weight rates are estimated until this end-of-day step is done.) The Reconcile brings the revised rates back into the Omni files, and changes the method from UPS to UPH. Conversely, if shipments have been entered as UPH that do not qualify, they will be rated as UPS. The pick up record number is also written to the Omni files. HOW TO DEAL WITH ERRORS UPLOADING TO UPS It is not uncommon to encounter difficulties with the UPS transmissions. Many things can be the cause of the problems including UPS network problems, phone line disruptions, or internal modem or data errors. Most can be corrected by re-transmitting until you receive a 36
37 Transmission Successful message. Listed below are messages you may see, and suggestions for how to proceed if you do. AN ERROR HAS OCCURRED IN YOUR TRANMISSION. YOUR FILE MAY NOT HAVE BEEN RECEIVED SUCCESSFULLY BY UPS! Either of the messages above alert you to a problem with the transmission. Depending on when you encounter this message, the CPS system may immediately try the transmission again, without any further input from you. If not, click OK and then TRANSMIT DATA to try again. Depending on the cause of the problem, you may need to do this more than once to eliminate the error condition. The message above will be seen when there are packages that have been transmitted to UPS, but have not yet been moved to History. There is another more severe version of this warning, which insists that you immediately move to history before proceeding. How to tell if your UPS transmission was successful 1. Click START PROGRAMS CPS for WINDOWS VIEW UPSLINK Log Files. 2. This will display the window below. You will see a list of your transmissions to UPS. Look for SUCCESSFUL in the Status column to determine if the file was received without error. 37

38 How to resend a file requested by UPS If you are contacted by UPS and asked to resend a previous day's transmission, follow these steps: Close Omni-Ship. Click START Programs CPS for Windows Upload Previous Day File. Select the file you want to transmit from the CPSPLD subdirectory. Press OK to confirm the selection or Cancel to exit the program without transmitting.. If you don't know what file to transmit, you can double click the icon that says "List Previous Day's Files" in the CPS Reports Electronic Data Transmission folder. This will give a listing of the previous files. The file name includes the pickup record number, which is the book and page number. You can also print out a report for this pickup record number, by going to the Standard Report Folder inside of Reports, and double-clicking " Shipping Detail History Report." Input the 7 digit pickup record number and date of the file you wish to print 38

39 UPS SHIPPING SELECTING UPS SERVICE LEVELS UPS offers a variety of Service Levels. These can be viewed by clicking on the down arrow next to the Service Level window. You must first select UPS as the carrier. The Service Level window is shown below. UPS Service Levels 39

40 SELECTING THE UPS BILLING OPTION Several billing options are also available. Select these from the Billing Options window. If you select Third Party Billing, or Bill Receiver, you must input account numbers or other information in the tab that will appear over the ship to area. Bill Shipper and Consignee Billing do not require additional input. The charges will be normally be calculated and displayed, even though the bill may be sent to another party. The UPS shipping detail report will show the billing option chosen. Third Party Billing You must input the third party account number, company name, and address as shown. Choose the billing option here 40
41 Bill Receiver You must input the receiver account number as shown. Choose the billing option here USING OPTIONAL UPS SERVICES UPS optional services can be accessed from the ITEMS tab, after entering the package information on the SHIPMENT tab. Some services are only offered in combination with certain Service Levels. There are two types of optional services, those that must be applied to the entire SHIPMENT, and those that must be applied to each PACKAGE individually. The two types are grouped in boxes at the right of the screen. The shipment detail is shown graphically at the left using a tree control. The process to apply each type of service is outlined below. 41
. 3. Click the Shipment Number to enable the shipment options. 4.")
42 Shipment Options These currently include Saturday Delivery, Saturday Pickup, Ship Notification. To add one of these options to a shipment: 1. Enter the shipment as normal, but do not click the PROCESS SHIPMENT button. 2. Click the ITEMS tab (shown below). 3. Click the Shipment Number to enable the shipment options. 4. Click to check the box next to the option you want to add. 5. Complete any additional fields that display when you select the option. 6. If more services are to be added, repeat steps 4 and 5 to select them. 7. Click the PROCESS SHIPMENT button. Saturday Delivery has been added to the shipment below. Some options will have additional fields to complete. They will be in this area of the form. None are required for Saturday delivery. 42
43 How to enter a Call Tag Call Tags are also a shipment option. The Call Tag service allows you to instruct UPS to pick up packages from your customer and return them to you. The call tag must be entered as a miscellaneous shipment. The call tag will not be shown on your UPS manifest printout, as you will not be billed until UPS has picked up the carton. A label can be generated for your records. The label does not need to be given to the driver. All information for UPS will be transmitted electronically. The call tag can be tracked using the tracking number on the label. 1. Click MISCELLANEOUS on the Orders tab. (A shipment number is assigned.) 2. Input the address where the carton is to be picked up in the to address. 3. Click the From tab and input the address to which the carton should be returned. (This may be your distributor s name and your address.) 4. Select Carrier and Service level. 5. Select payment terms. 6. Enter your initials. 7. Enter the Package Merchandise Description. Include the job number or other reference information. This will print on the Omniship report. 8. Enter package information number of packages, weight and quantity per pkg. 9. Click the ITEMS tab. 10. Click the Shipment Number to enable the shipment options. 11. Click Call Tag under the shipment options to check the box. 12. Complete any additional information you choose in the box below. 13. Click the PROCESS SHIPMENT button. 14. A label may be generated for your records. Mark it call tag to identify it. 43
44 Package Options These currently include Additional Handling, COD, Declared Value, HAZMAT, Ship Notification, Delivery Confirmation, Oversized/Dimensional Weight, and Label Reference Fields. Listed below is the procedure to add package options to your shipment. How to use Package Options 1. Enter the shipment as normal, but do not click the PROCESS SHIPMENT button. 2. Click the ITEMS tab. 3. Click the + symbols to display all cartons. 4. Click the carton to receive the additional service. You can select multiple cartons by clicking the first one, then holding the Ctrl key down while you click the others. You can also select a group of cartons by clicking on the carton summary icon. 5. Click to check the box next to the option you want to add. 6. Complete any additional fields that display when you select the option. 7. Repeat steps 4 to 6 for additional cartons and / or services. 8. Click the PROCESS SHIPMENT button. The package that is selected will be sent COD. 44
45 Selecting multiple packages When you apply services to the Summary Level (as shown below), all packages contained in the summary will receive the identical service In the example below, each of the 4 cartons will received a Declared Value of $325 45

46 USING MULTIPLE UPS ACCOUNT NUMBERS If approved by UPS, you can use additional UPS account numbers. You must assign a unique three-letter designation to the new account number and use this in place of UPS as the carrier choice. Limitations The shipments for the new account will not receive Hundredweight rates, until after the end of day upload. At that time, any shipments that qualify for Hundredweight rates will be corrected. International shipments cannot be entered using additional account numbers. You can, however, enter these as third party billings. When UPS rates are updated, you must separately update any additional account numbers. To do this, select CPS for Windows Tools. Click the Carrier button to open the create a carrier dialog. Enter the name of the carrier you wish to update and press OK. The zones and rates will be updated. Adding a new UPS account number involves the steps listed below. 1. Add the carrier to the auto text file using a unique three-letter designation. (See How to add or delete a carrier (page 132). Must match 3 letter code in Harvey UPS account Number MUST be UPS if new carrier is like UPS UPS Fuel Surcharge percent (if used) 46
 4. Add the account to the end of day upload by editing the Transmit Data report folder and upload list. (Step 3) 5.")
47 The following steps are done from within the Harvey CPS system. 2. Set up the account by creating a custom carrier with the same three-letter designation on all PC s. (Step 1) 3. Commission the account by requesting book numbers from UPS electronically.(step 2) 4. Add the account to the end of day upload by editing the Transmit Data report folder and upload list. (Step 3) 5. Enter shipments for the new account by using the three-letter code as the carrier name. 6. Complete the end of day reports and upload to confirm everything works correctly, and correct any problems encountered. Adding an additional UPS account number STEP 1 Setting up the new account When you select UPS as a carrier on a shipment, the account number will be selected that you have set up as your default. To use a different UPS account number, a unique carrier code must be created, for example, UP1 or UP2. CPS calls this new code a custom carrier. The new account number must also be commissioned by UPS and then added to your end of day processes. (More information on custom carriers can be found by selecting Start Programs CPS for Windows CPS Online Help Tools Configuring CPS custom carriers.) 1. First follow the procedure to add a new carrier page 132. The new carrier must have a three letter alpha flag. 2. Close Omni ship on all PC s. On the master PC, select Start Programs CPS for Windows Tools. The CPS Tool Bar is displayed. 3. Press the Carrier - F3 button. The Carrier Information dialog opens. 47

48 4. Press the Create A Carrier button. The Create A Carrier dialog box is displayed. 5. Enter the three letter alpha flag of the new account in the Enter New Carrier Name field. It must be three characters in length. Be sure the box next to Carrier is Like UPS is checked. You may also add a description of the carrier in the Carrier Description field. Press OK when you have finished. You will be returned to the Carrier Information dialog, and the new carrier will appear in the Carrier field drop list box. 48
49 6. Change the shipper number to the new account number. The format should be a 2 letter state code, three digits, a hyphen, and three more digits. Also edit the company name and address to the correct billing information. Click CLOSE. STEP 2 - Commissioning the new account After setting up the "custom carrier" with a new three-letter code and account information, the new account must be "commissioned" by UPS with a unique book number. If there is more than one shipper ID to commission, do one at a time, going through all 10 parts of step 2 successfully before commissioning the next shipper ID. 1. Close Omni ship on all PC's. On the master PC, Click on Start Programs CPS for Windows Reports. 2. Maximize the report window titled "Electronic Data Transfer." 3. Double click the icon titled Send add shipper # request. Choose the 3-letter carrier designation you have added, and click Send Request. 49


50 4. An electronic request will be sent to UPS. You can watch the file transfer take place. When it is complete, close the reports program. 5. It will take from 1 to 72 hours to receive the book number back from UPS. To retrieve this information, again close Omni on all PC s. Click Start Programs CPS for Windows Reports. 6. Maximize the report window titled Electronic Data Transfer. 7. Double click the icon titled Get Add Shipper # Response. Click Check for Response, the response will be retrieved electronically from UPS. 50
 Click OK. 10.")
51 8. When the file transfer is complete, double click the Icon Edit PLD book information. 9. Use the arrow buttons to scroll through the list of shipper numbers. If the commissioning was successful, the new shipper number will be visible with a mailbox ID, book and page numbers. (The page numbers will be zeros.) Click OK. 10. If all fields are not filled in, you should delete this record, verify that you have entered the information correctly in the carrier file, and send the request again. You can double click the View UPSLINK log files icon to see any error messages that might have been received. STEP 3 Adding the account to the upload Once UPS has commissioned the new account and the book numbers are visible in the PLD book information (step 2), the account must be added to the end of day upload to UPS. 1. Close Omni ship on all PC s. On the master PC, Click on Start Programs CPS for Windows Reports. 2. Maximize the report window titled Transmit Data. 3. Click the Print Thermal and Upload icon to select it, and then press F3 to EDIT. A report item information box will appear as shown below. In the Command box, make changes if necessary to duplicate what is shown below, cpspldat ULL custid Click OK. 51


52 4. Minimize the Transmit Data folder. 5. Maximize the Electronic Data Transmission folder. 6. Double click the icon Edit Carrier Upload List. This opens the Notepad application allowing you to enter or edit the list of carriers to upload. 7. Type one carrier per line. Be sure to include UPS. See Below. 8. Save the upload file by selecting File, Save and then close Notepad. 9. When you select Transmit Data from the CPS process menu, a thermal summary label will be generated automatically for each account, and the list of accounts will be uploaded. 52

53 FED EX GROUND SERVICE LEVELS Fed Ex Ground offers a variety of Service Levels. These can be viewed by clicking on the down arrow next to the Service Level window after selecting FXG as the carrier. The Service Level window is shown below. Service to Hawaii, Alaska, and Canada has specific service levels as shown below. Service Levels BILLING OPTIONS Select the billing option from the Billing Options window. If you select bill receiver, input the receiver s account number in the tab that will appear over the ship to area. The charges will be calculated and displayed, even though the bill may be sent to another party. The billing options window is shown below. BILL RECEIVER You must input the receiver account number. 53

54 Choose the billing option here. OPTIONAL FEDEX GROUND SERVICES FXG optional services can be accessed from the ITEMS tab, after entering the package information on the SHIPMENT tab. Some services are only offered in combination with certain Service Levels. There are two types of optional services, those that must be applied to the entire SHIPMENT, and those that must be applied to each PACKAGE individually. The two types are grouped in boxes at the right of the screen. The shipment detail is shown graphically at the left using a tree control. The process to apply each type of service is outlined below. Shipment Options Call Tags Call tags are a Shipment Option. Follow the instructions below. Call tags must be entered as miscellaneous shipments. 1. Click MISCELLANEOUS on the Orders tab. (A shipment number is assigned.) 2. Input the address where the carton is to be picked up in the Ship To address. 3. Click the Ship From tab and input the address to which the carton should be returned. (This may be your distributor s name and your address.) 4. Select Carrier and Service level. 5. Select payment terms. 54
55 6. Enter your initials. 7. Enter the Package Merchandise Description. Include the job number or other reference information. This will print on the Omniship report. 8. Enter package information number of packages, weight and quantity per pkg. 9. Click the ITEMS tab. 10. Click off and then back on the Shipment Number to enable the shipment option. 11. Click Call Tag under the shipment options to check the box. 12. Click the PROCESS SHIPMENT button. 13. A label will be generated for your records. Mark it call tag to identify it. Package Options These currently include Additional Handling, COD, Declared Value, HAZMAT, Delivery Confirmation, Oversized/Dimensional Weight, and Label Reference Fields. Listed below is the procedure to add package options to your shipment. HOW TO USE PACKAGE OPTIONS 1. Enter the shipment as normal, but do not click the PROCESS SHIPMENT button. 2. Click the ITEMS tab. 3. Click the + symbols to display all cartons. 4. Click the carton to receive the additional service. You can select multiple cartons by clicking the first one, then holding the Ctrl key down while you click the others. 5. Use the mouse to check the box next to the option you want to add. 6. Complete any additional fields that display when you select the option. 7. Repeat steps 4 to 6 for additional cartons and / or services. 8. Click the PROCESS SHIPMENT button. Ex: The selected carton will be sent COD with Additional Handling. THE COD amount is $253.25, to be received in cash. 55
56 FEDEX GROUND END OF DAY FXG shipment records will not move from the CPS daily file to the CPS history file until they have been printed on a FXG Daily Manifest report. This step will also calculate Multi-weight rates. See below for instructions to set up this report in the Custom Report Group 1 and when and how to print this report. If you wish to make FXG shipments, but do not need to print the manifest report, contact Plantrol support for assistance in changing the set up. Another option is an electronic upload of the packages using EPDI; after setting up the reports, see Using EPDI below. Initial Set up of Reports To set up the FXG Daily Manifest in the Custom Report Group 1 folder, click on Start Programs CPS for Windows Reports. 1. Open the Fed Ex Ground Carrier Group folder by restoring it from its minimized state. 2. Also open the Custom Report Group 1 folder and resize it so you can see both windows. 56


57 3. Click on the FXG Daily Manifest icon to select it. Click again and hold the left mouse button down as you drag it to the Custom Report Group 1 window. When you release the mouse button, you will have a copy of the report in the Custom Report Group folder. 4. If you wish, you can drag other reports into this folder. When done, close all windows. 5. To rename this option on the process menu, select Start Programs CPS for Windows Tools. Click the system button, and then click the report groups tab. Change the prompt for custom report group 1 to FXG reports or whatever you choose. Click Close, and then click Exit. 57
58 Printing the FedEx Ground Manifest If you have Fed Ex Ground shipments in your shipping day, click Custom Report Group 1 or your renamed option FXG reports to print this report. Answer any prompts that are presented. You must do this step BEFORE you do the Reconcile and Move to History steps in your end of day process.. Using EPDI to Upload Electronically FedEx Grounds Electronic Package Data Information (E-PDI) allows you to upload directly to the Fed Ex server. To use this option, you must first obtain a 9-digit FXG mailbox id from your FedEx Ground account representative. EPDI Set up 1. Click Start Programs CPS for Windows Setup CPS. Click next until you see the carrier list. FXG must be selected as one of your carriers. Click next until you reach the FXG Electronic Package Data Information window below. Check the box next to I want to electronically upload files to FedEx Ground and input your mailbox ID. Click next until you reach the final setup window. Click Finish, and then click OK to the recommission message. 58


59 2. To set up the FXG upload in the Custom Report Group 2 folder, click on Start Programs CPS for Windows Reports. 3. Open the FXG E-PDI folder by restoring it from its minimized state. 4. Also open the Custom Report Group 2 folder and resize it so you can see both windows. 5. Click on the Create E-PDI File icon to select it. Click again and hold the left mouse button down as you drag it to the Custom Report Group 2 window. When you release the mouse button, you will have a copy of the report in the Custom Report Group folder. 6. Use the same method to move a copy of the Run E-PDI Upload icon to the Custom Report Group 2 window. Be sure you place this icon to the right of the Create E-PDI File icon. 59

60 To rename this option on the process menu, select Start Programs CPS for Windows Tools. Click the system button, and then click the report groups tab. Change the prompt for custom report group 2 to FXG upload or whatever you choose. Click Close, and then click Exit. How to Upload the FXG file When there are FXG shipments to upload, select the option from the Process menu. Be sure you have first printed your FXG report(s). You must select these options BEFORE you do the Reconcile and Move to History steps. Note: As of , call tag information is not uploaded electronically. Additional E-PDI options Additional options for setup and resending files can be found by choosing Start Programs CPS for Windows FXG E-PDI. 60
61 FEDEX AIR The information below pertains to normal FEX setup, without the optional FedEx Server. If your system is equipped with the optional FedEx Server, which requires an Internet connection, the airbill number will be automatically assigned and bar-coded labels will print. FedEx Server setup is done by Plantrol and Harvey technical support. SELECTING FEDEX SERVICE LEVELS FedEx offers a variety of Service Levels. These can be viewed by selecting FEX as the carrier, and then clicking on the down arrow next to the Service Level window. The Service Level window is shown below. Service Levels available 61
62 SELECTING FEDEX BILLING OPTIONS Select the billing option from the Billing Options window. If you select to bill receiver, third party, or credit card, additional input is necessary as shown. The charges will be calculated and displayed, even though the bill may be sent to another party. The billing options window is shown below. For credit card billing, the card number and expiration date are required. Choose the billing option here. 62
63 FEDEX AIR BILLS, LABELS, AND REPORTS Fill out the FedEx Air Bills manually. (If you wish to have a devoted impact printer set up to print the air bills automatically, contact Plantrol.) The Air Bill number is a required field when entering a FedEx shipment. If you forget to input it, you will get a reminder before the shipment is processed. You can track FedEx shipments (or any Harvey carrier) using OmniShip and an Internet connection see section 12 Tracking. Printing FedEx bar-coded labels requires the optional FedEx server configuration. Without the FedEx server, if you would still like a thermal address label to print, check thermal labels under the print options. Reports of FedEx information are available in the Harvey CPS system. For information, click Start Programs CPS for Windows CPS Online Help. In the contents, select CPS Reports Reports Group Descriptions Carrier Groups FedEx Carrier Group. More information on CPS reports can be found in Section 9.13 Harvey Reports. Be sure to input the Air Bill tracking number. Air Bill tracking Number 63
64 USING OPTIONAL FEDEX SERVICES FedEx optional services can be accessed from the ITEMS tab, after entering the package information on the SHIPMENT tab. Some services are only offered in combination with certain Service Levels. Saturday Delivery 1. Enter the shipment as normal, but do not click the PROCESS SHIPMENT button. 2. Click the ITEMS tab (shown below). 3. Click off and then back on the Shipment Number to enable the shipment options. 4. Use the mouse to check the box next Saturday delivery. Special packaging (FedEx Pak, Box, or Tube), COD, Declared Value, or Oversize 1. Enter the shipment as normal, but do not click the PROCESS SHIPMENT button. 2. Click the ITEMS tab (shown below). 3. Click to select the first carton. (The option will be added to all cartons in the shipment.) 4. Use the mouse to check the box next to the option you wish to add. 5. Complete any additional fields that display when you select the option. 6. If more services are to be added, repeat steps 5 and 6 to select them. 7. Click the PROCESS SHIPMENT button. 64
65 FEDEX SHIP MANAGER OPTION The FedEx Ship Manager is an optional feature of Plantrol s OmniShip shipping system. The Ship Manager enhances the capabilities for FedEx Air shipments. Benefits Without the FedEx Ship Manager installed, users must prepare an air bill document, and then input the air bill number. The benefits of the Ship Manager software over the standard functionality in CPS include automatic assigning of air bill numbers, printing barcode address labels, and electronic uploading of the shipment information. How it works The FedEx Ship Manager software is server software used specifically for FedEx Air shipments. Additional workstations can be networked to the server, but each shipment interacts with the server to get rating and other information. This is different from the Harvey software where rates are resident in each PC. The FedEx Ship Manager was created by FedEx and works together with CPS. It can be installed on any CPS workstation, and does not necessarily have to be installed on the master PC in a multi-pc setup. The software interacts with FedEx over the Internet on each shipment, and routinely polls the PC to retrieve current shipment information. An additional end of day step transfers the day s shipments to FedEx. System Requirements A Windows 2000 or NT operating system is required. Harvey technicians do the setup at their site. There is a charge for setup and also an increased support cost. After the initial setup for a site, additional PC s may be setup from an installation CD. Specific PC requirements follow. USQL license and other requirements for any Plantrol visual system also apply. Must have a Fresh installation of Windows 2000, either from original PC purchase or re-installation Processor - Pentium with minimum 350 MHz Memory 128 MB or higher Hard Drive Minimum of 4.2 GB of free space. Monitor SVGA Video, 1024x768 with high color Modem 56K v.90 minimum Dial-Up Networking and TCP/IP installed Dial-Up Adapter installed 65

66 CD-ROM Drive 3.5-inch floppy drive Mouse Microsoft Internet Explorer v6.0 or greater ODBC users must have MDAC v2.5 or higher PC Anywhere v10.0 or higher Appropriate scales and printers for reports and labels Using the FedEx Ship Manager Under File Set up Options Omniship options and settings, two check boxes must be marked as shown below. For FedEx Ship Manager, check these two boxes. All shipments made with the FedEx Ship Manager require a recipient phone number. At end of day, choose the Fed Ex step from the Process Menu. 66
 in your OmniShip manual.")

67 US POSTAL SERVICE SETTING UP USP AS A CARRIER There are three set-up tasks that need to be completed prior to using USP. 1. Add the USP carrier to Autotext. To add USP as a carrier, refer to section 13.1 (How to Add or Delete a Carrier) in your OmniShip manual. If you are currently using USP as one of your carrier codes, you will need to change this prior to using USP as the US Postal Service carrier. 2. Set Environmental Variables: Go to Start Programs CPS for Windows Tools Setup Environmental Variables. Check to see if USPMANIFNUM and USPMANIFDATE are listed. If these variables do not already exist (not visible in the list) press ADD to add USPMANIFNUM, and set the value to USP. Also add USPMANIFDATE and set the value to the current date, in the format shown on the screens pictured below: 67


68 3. Assign Standard USP Label: Go to Start Programs CPS for Windows Tools Setup Carrier Parameters. Chose USP as the carrier and click the Printing tab: Make sure Standard is checked Next, click the Assign Labels tab: Change this label only Change the Standard label to _ELTDCAP.USP. This label file can be found in the: C:\CPSW directory. Click the Close button. The others are standard and do not need to be changed. Next, go to Setup -- Change Label Printers (in CPS Tools): Check here Make sure the Standard Label Printer is set to LPT1 and click OK. Close the CPS Tools program. 68

69 SELECTING USP SERVICE LEVELS The US Postal Service offers a variety of Service Levels: These can be viewed by selecting USP as the carrier, and then clicking on the down arrow next to the Service Level window. The Service Level window is shown below. Service levels available for USP Bill Shipper is assumed as the billing option for the USP carrier. USING OPTIONAL USP SERVICES USP optional services can be accessed from the ITEMS tab, after entering the package information on the SHIPMENT tab. Some services are only offered in combination with certain Service Levels. Make sure you choose USP for Carrier and the appropriate Service Level BEFORE attempting to add optional services. Shipment Options are applied to the entire shipment, while Package Options are applied to the individual packages. The following options are available for shipments and packages: Option Shipment or Package? Service Level Restricted Delivery Shipment Priority & Parcel Post Certified Mail Shipment Priority Special Handling Shipment Parcel Post COD Package All Insured Value Package All Return Receipt Package All 69
, you ve selected an option or combination of options that are not allowed by the carrier.")
70 Some options require additional fields to be completed. Some combinations of options are not allowed. For more information on Service Levels and Options, visit: Warning: If you get any of the messages shown below (or similar messages), you ve selected an option or combination of options that are not allowed by the carrier. The message will indicate which option is not allowed. The option is dropped in Harvey. The shipment should be voided and re-entered. Disregard the following error message if you receive it. Tracking numbers are not required for USP shipments: 70
. 3. By default, the Shipment is selected. Use the mouse to check the box next to the Shipping Option(s) you wish to add. 4.")
71 To apply options to your shipment or package: 1. Enter the shipment as normal and select USP for Carrier and desired Service Level, but DO NOT click the Process Shipment button. 2. Click the ITEMS tab (shown above). 3. By default, the Shipment is selected. Use the mouse to check the box next to the Shipping Option(s) you wish to add. 4. Complete any additional fields that display when you select the Shipping Option. 5. Click to select the first carton. (The option will be added to all cartons in the shipment.) 6. Use the mouse to check the box next to the Package Option you wish to add. 7. Complete any additional fields that display when you select the Package Option. 8. If more services are to be added, repeat steps 5 and 6 to select them. 9. Click the PROCESS SHIPMENT button. Shipment Options Items Tab Package Options 71


72 SPEE DEE DELIVERY SETTING UP SPEEDEE AS A CARRIER There are two set-up tasks that need to be completed prior to using SPEE DEE. 1. Add the SPEE DEE carrier to Auto text. To add SPEE DEE as a carrier, refer to section 13.1 (How to Add or Delete a Carrier) in your OmniShip manual. You must use SPD as the Carrier Code 2. Setup CPS Start Programs CPS for Window Setup CPS 1. Next through the Setup until you get to the following screen 2. Check the Spee Dee Delivery box. Make No other changes. 3. Next Through the Setup again until you reach Set up for Spee Dee. 72

73 4. Enter Your Company Information, and Click Next 5. Choose I want CPS to automatically generate tracking Numbers, and Click Next 73


74 6. Choose I want to print Address Label, and Click Next. 7. Select the label description shown and Choose LPT1 for the printer port to print address labels, and click next. 74


75 8. Double Check to make sure the selections are correct, and click next. 9. Click Finish to finish the setup 10. This message will appear if everything was successful. Click OK. 75
76 OPTIONAL SPEEDEE SERVICES Spee Dee optional services can be accessed from the ITEMS tab, after entering the package information on the SHIPMENT tab. There are two types of optional services, those that must be applied to the entire SHIPMENT, and those that must be applied to each PACKAGE individually. The two types are grouped in boxes at the right of the screen. The shipment detail is shown graphically at the left using a tree control. The process to apply each type of service is outlined below. Shipment Options Call Tags Call tags are a Shipment Option. Follow the instructions below. Call tags must be entered as miscellaneous shipments. 1. Click MISCELLANEOUS on the orders tab. (A shipmet number is assigned.) 2. Input the address where the carton is to be picked up in the Ship To address. 3. Click the Ship From tab and input the address to where the carton should be returned. (This may be your distributor s name and your address.) 4. Select Carrier and Service level. 5. Select payment terms. 6. Enter your initials. 7. Enter the package Merchandise Description. Include the job number or other reference information. This will print on the Omniship report. 8. Enter package information number of packages, weight, and quantity per package. 9. Click the ITEMS tab. 10. Click on the Shipment Number to enable the shipment option. 11. Click Call Tag under the shipment options to check the box 12. Click the PROCESS SHIPMENT button. 13. A label will be generated for your records. Mark it Call Tag to identify it. 76
77 PACKAGE OPTIONS These currently include COD, Declared Value, HAZMAT, Delivery Confirmation, Oversized/Dimensional Weight, and Label Reference Fields. Listed below is the procedure to add package options to your shipment. HOW TO USE PACKAGE OPTIONS 1. Enter the shipment as normal, but do not click the PROCESS SHIPMENT button. 2. Click the ITEMS tab. 3. Click the + symbols to display all cartons. 4. Click the carton to receive the additional service. You can select multiple cartons by clicking the first one, then holding the Ctrl key down while you click the others. 5. Use the mouse to check the box next to the option you want to add. 6. Complete any additional fields that display when you select the option. 7. Repeat steps 4 to 6 for additional cartons and / or services. 8. Click the PROCESS SHIPMENT button. The selected (highlighted) carton will be sent COD with Additional Handling. The COD amount is $253.25, to be received in cash. 77

78 SPEE DEE END OF DAY REPORTS Spee Dee shipment records will not move from the CPS daily file to the CPS history file until after they have been printed on a Spee Dee Daily Manifest report. Section provides instructions to set up this report in the Custom Report Group 1. Section indicates when and how to print this report. Initial Setup of Spee Dee Reports To set up the Spee Dee Daily Manifest in the Custom Report Group 1 folder, click on Start Programs CPS for Windows Reports. 1. Open the Spee Dee Carrier Group folder by restoring it from its minimized state. 2. Also open the Custom Report Group 1 folder and resize it so you can see both windows. 3. Click on the SPEE DEE Daily Manifest icon to select it. Click again and hold the left mouse button down as you drag it to the Custom Report Group 1 window. When you release the mouse button, you will have a copy of the report in the Custom Report Group folder. 4. If you wish, you can drag other reports into this folder. Close the reports window. 5. When you select Custom Report Group 1 from the CPS process menu, the SPEE DEE Daily Manifest will be printed. Note: You may wish to rename Custom Report Group 1 to Spee Dee Manifest. You can do this by selecting Start Programs CPS for Windows Tools. Click the System button, and then select Report Groups. 78
79 Printing the Spee Dee Manifest If you have Spee Dee shipments in your shipping day, click Custom Report Group 1 to print this report BEFORE you do the Move to History step. 79
80 INTERNATIONAL SHIPMENTS Government regulations require export documentation for most international shipments. OmniShip works with Harvey to process international shipments for UPS, including the creation of the required documentation. Export documents, called Commercial Invoices, are required for all international shipments, excluding the shipment of documents. International shipments require three hard copies of the commercial invoice for each shipment. OmniShip facilitates the preparation of these documents to properly declare your shipment in both the country of export and the country of import. The purpose of the commercial invoice is to provide additional information pertaining to the value of shipped items for customs. Items required on the commercial invoice include: Name, address, contact person and phone number of shipper. Recipient s name, address (including destination country and postal code, if required), contact person, and telephone number. Name and address of purchaser, if different from recipient. Country of origin (where it is manufactured). Invoice date Purchase Order number or invoice number, if applicable. Complete description of each item shipped, including composition and use. Number of units, unit value, total value of each item. For samples of articles or articles of no commercial value, a value must be estimated and disclosed. Transportation charges and insurance. Number of packages and total weight. Total value of the shipment. Reason for export (sale, repair, etc.). Shipper s signature and date. Here are the main steps required to process an international order: 1. Set up international shipping defaults. 2. Create and process the shipment using UPW as the carrier. 3. Enter the worldwide information. 4. Enter the commercial invoice information. 5. Add information about package weights. 6. Process the UPW shipment. Labels and the commercial invoices will print. 80
 program on each PC that will process")
81 SET UP THE DEFAULTS When processing an international shipment using OmniShip, the UPW (United Parcel Service Worldwide) carrier is used. Before you process an international shipment, you first need to set up some defaults for this carrier using Harvey s Computerized Parcel System (CPS) program on each PC that will process international shipments. Defaults that need to be set up include Product Information, Shipping Labels and Commercial Invoice Copies. OmniShip must be closed prior to changing information in CPS. Some questions you need to answer before setting up the defaults include: What products do you ship internationally? Do the products you ship internationally require the use of commodity codes, ECCN and a license number? What is the value of the products you ship internationally? Which UPS international shipping/billing terms best suit your company s needs? Do you have products listed in a database? How many copies of the commercial invoice do you want to print? What other countries do you ship to? Are the states for these countries required for UPS shipping and are they in your system? Add the UPW carrier to Auto text. Check the SVIA$ variable to make sure the UPW has been added. To add UPW as a carrier, refer to section 13.1 (How to Add or Delete a Carrier) in your OmniShip manual: 81

82 Product Information The Product Information defaults set here contain the information about what types of commodities you are exporting. This information is stored and can be used repeatedly to make processing your commercial invoices more efficient. Products are entered by number. This can correspond to product number schema s you use at your company, but it doesn t have to. Defaults for Product Information are set up using the CPS Tools program. To launch the tools program: Start Programs CPS Tools The CPS Tools window displays: To add or edit product information: Open Edit Product The Product Editor displays: Click the Add button, enter a number and click OK and then complete the applicable fields for each product type that you ship. 82
 will be required.")
83 Since you are setting up defaults here, the only required field is Product Number. However, when you add product to your commercial invoice during shipment processing, the Description, Origin Country, and Unit Value (usually cartons) will be required. Please note that the Origin Country is specific to where the product originated, not where you are shipping it from. The Commodity Code, ECCN (Export Control Classification Number) and License Number (used for validated licenses) fields relate to controlled commodities and are not required by the system. You can also add NAFTA Certificate of Origin information specific to the product here. Data Imports If you already have products set up using another system, you can import the information into Harvey. You must export the product information from the other system into a TXT file (comma delimited), DAT file, DIF file or a WKS file. There should not be a header row in this file. Here is an overview of the process: 1. Go to Start Programs CPS for Windows Tools 2. Click on the Import menu 3. Choose Product in the Import To list: Choose Product here Type a name here, then click the New button. Browse to Text file here 4. Use the Browse button to navigate to your data file. 5. Select a Data Structure. Or, if it s the first time, enter a name in the Using Structure field and click the New button: 83


84 Match the fields to the order of your input Fields for Product Type display. Highlight and click Add to Reads first row of input file Clicking the Preview matches your data with the selected fields 6. Choose the fields to include in your data structure by selecting them and clicking the Add button. The selected fields list should match the order of data from your Input file. Click the Preview button to make sure your data ends up in the correct fields. Click OK. 7. Determine if you need to select the Prep and Background Importing options. For more information, click the Help button on the Import window. 8. Click the Import button. Product codes are created from your input file. 9. Shipping Labels The Shipping Labels are also set up using the CPS Tools program. To set up your shipping labels for UPW: Open Setup Carrier Parameters The Carrier Information window appears: Choose UPW 84
85 Choose UPW as the Carrier and confirm the information. Click the Printing tab to display the Printing Information window: Check these 2 boxes Check Other for both Defaulted at Entry and Printed Automatically. Note: After processing your first international shipment, return to the Printing tab and remove the checks from both of the Other boxes. This ensures the proper number of commercial invoices print: Remove these check marks. Once the entire set-up process is complete, Plantrol recommends creating a test UPW shipment, voiding it, and then coming back to this screen and clearing these two check boxes. 85
 _LEADELO.UPW Other Commercial Invoice 1CINVWIN.UPW COD COD Label CODTAG.")
86 Next, click the Assign Labels tab: Choose All Files to see these Check to make sure your printing labels match those in the above screen shot. Field Prints File Name Standard Standard carrier label _LEADELO.UPW Custom Thermal Waybill (lead package label) _LEADELO.UPW Other Commercial Invoice 1CINVWIN.UPW COD COD Label CODTAG.UPW World Wide Tracking Child Label _CHLDELO.UPW Note: If any of the above label files are missing from your system, call Plantrol for assistance. Click the Close button when done. Next, you need to change your label printers: Open Setup Change Label Printers The Label Configuration window appears: 86


87 Make sure your settings match the ones in the screen shot. LPT1 is the thermal printer: Orion Click OK when finished. Close the CPS Tools program. Export Documentation Copies The commercial invoice defaults to print 1 copy, but 3 hard copies are required for customs. You can change this default to print up to 9 copies by editing the CINVWIN.UPW file. To edit the number of copies: Start Programs CPS CPS Editor The CPS Editor displays. Open C:\Cpsw\Cinvwin.upw. You will need to change the files of type box to All Files and scroll over quite a bit to display the Cinvwin.upw file. Highlight Cinvwin.upw and click the Open button. Change to: All Files (*.*) The file displays: 87
 and the second is for all other shipments (nonafta.upw). You can edit the Set Copies line in these documents also to change the number of copies that print.")
88 Change the 1 to the desired number of copies Change the number of copies and save the file. By default, one copy of the Certificate of Origin (CO) is set to print with each international transaction. There are two versions of this document. One is for NAFTA shipments (nafta.upw) and the second is for all other shipments (nonafta.upw). You can edit the Set Copies line in these documents also to change the number of copies that print. To find this line easily: Select Edit Find Enter a search term in the Find What box. Then, click the Find Next button: The Certificate of Origin for non-nafta (nonnafta.upw) parcels contains the Vice President title as default. You can change this to whatever title you want. Follow the instructions above, except search for VICE. When you are done editing the export documentation files, be sure to save your work. Then, close the CPS Editor program. 88

89 Adding States To prepare for international shipments, you will need to add State codes for some of the countries you will be shipping to. For example, if you are shipping to Canadian provinces or the Virgin Islands, you will need to add the state codes for these places so they are available for use in OmniShip. You will also need to add a blank value to use for destinations that do not use state codes. State field To add additional state codes, refer to section 13.1 (How to Add or Delete a Carrier) in your OmniShip manual. Instead of changing the SVIA$ (carrier) variable, add codes to the STATE$ variable, which is the variable for the state codes. Here is a list of Canadian provinces for reference: Code NF NB NS PE QC ON MB SK AB BC NT YT Province Newfoundland New Brunswick Nova Scotia Prince Edward Island Québec Ontario Manitoba Saskatchewan Alberta British Columbia Northwest Territories Yukon Note: Shipments to Puerto Rico can be shipped via regular UPS, while shipments to other US territories need to be shipped with UPW. 89
90 CREATE AND PROCESS THE SHIPMENT The first step to process an international shipment is the same as any regular shipment: 1. Create the shipment, as you usually would, choosing UPW for the carrier. You may choose one of three service levels: Worldwide Expedited, Worldwide Express or Standard. 2. Verify the address. Make sure you select the correct country (UNITED STATES is the default). The Canadian provinces are included in the State field. Having the correct and complete address is critical here. OmniShip does verification of Canadian postal codes and will not allow a shipment to Canada to be processed without the correct postal code. 3. Make entries to the Items tab, if necessary. Some services may not be available for international shipping. 4. Click the Process Shipment button. The following screen appears: 90

91 When the Omni shipment is processed, the Harvey tab displays: Tracking # Text Box Cancel UPW Button Do not make changes to this screen. If you need to make changes, return to OmniShip by using the Cancel UPW button. The F11 key and the Shipment and Items tabs are functional in OmniShip, but not in Harvey. 91
92 To continue, click in the Tracking # text box. If no tracking number appears, try clicking the Tracking button: If you still do not receive a Tracking number or you receive an error message about the Tracking Number or Postal Code, click the Cancel UPW button to return to OmniShip and verify that the address is correct and complete. 92

93 ENTER WORLDWIDE INFORMATION When you click in the tracking number text box, the Worldwide Information window appears: These four fields are optional These fields populate after you enter Invoice info. Choose CPS Generated if needed The Shipper ID Number and other 3 fields in the first section are optional. The Payment of Charges defaults to Bill Duty, Tax & Charges. The other fields in this section are related to other types of payments. Here is a description of the UPS International Payment of Charges Options: Prepaid - Shipper pays all shipping charges; consignee or importer pays duty and Value Added Tax (V.A.T.). Freight Collect - Consignee or importer pays all shipping charges, duty and V.A.T. Delivered Duty Paid, V.A.T. Unpaid - Shipper pays shipping charges and duty; consignee pays V.A.T. Bill Duty, Tax, and Shipping Charges to Shipper - Shipper pays destination country's duty and tax as well as all shipping charges. The Type of Shipment defaults to Non Document CPS Generated Invoice. This shipment type collects information and creates the required commercial invoice. If you are creating 93
, click OK to continue. The other fields will populate automatically.")
94 your own invoices and you do not want a CPS generated invoice, choose Non Document Customer Supplied Invoice. Do not complete the Invoice section if you choose this option. If you chose the default Type of Shipment ( Non Document CPS Generated Invoice ), click OK to continue. The other fields will populate automatically. If you choose Non Document Customer Supplied Invoice, complete the applicable fields on this window and click OK. If you accidentally click cancel and the Worldwide Information window disappears, click the Other button from the Harvey tab, Add Parcel screen to bring it back: If your shipment requires an SED document, select Included for the Prepare SED field. Choosing Included while also choosing to not generate a Commercial Invoice brings the following window: 94

95 ENTER COMMERCIAL INVOICE INFORMATION Clicking OK or the Invoice button from the Worldwide Information window (for Non Document CPS Generated Invoice types) displays the Commercial Invoice Information window: The Bill To Information is pulled from the Ship To tab in OmniShip. If you are not billing a third party, you do not need to complete the bill to information (name, attention, address, terms and currency). If you are using a credit card, complete the Credit Card # and Expiration fields. Choose your destination country here. Next, you need to add the product information for the commercial invoice. To add this information, click the Add button. 95

96 The Product Information window appears: If you ve set up the Product Information as described in section 7.2, you can select your products by number in the Product Number box. You can add products here by completing the product information and clicking the Save button before clicking OK. The Quantity field refers to the number of cartons. Select the product, enter the required fields (Quantity, Unit Value, Description and both Country fields). The Origin Country selected here appears with the product on the Certificate of Origin and the SED. If you are printing an SED document, add the value will calculate automatically and a check will appear in the Print On SED box if the value is greater than $2,500. Click OK to return to the Commercial Invoice window. 96
97 Click the Add button if you need to add more products. Your total units should match your total number of cartons in the OmniShip record. Click the Close button when finished to return to the Harvey tab displaying your UPW shipment: 97


98 Finish UPW button Invoice and Waybill are now selected This screen is updated from information you ve entered and the Invoice and Waybill buttons are now selected. Click the Finish UPW button to process your shipment. It may take a while to process. ADD PACKAGE WEIGHT INFORMATION After clicking the Process UPW button, the Collect Weights window appears (if you have more than 1 carton): Indicates number of packages Select either the Same Weight for all Parcels or Different Weights. If you choose Same you will be asked to indicate the weight once: 98
: Indicates package number You need to enter the weight for all of the child packages")
99 If you choose Different, you need to specify the weight of each package. A window appears for each package, starting with the first child package (package 2 of N): Indicates package number You need to enter the weight for all of the child packages (package 2 to package N). The last package weight you enter will be for the lead package (package 1): 99
100 The child labels print as you enter each weight. When you ve completed entering the package weights, click OK. Note: At this time, there is no way to reprint a child label. You can reprint the lead package waybill, which contains information about the entire shipment but not the child labels. If your child labels are damaged or do not print, void the shipment and reprocess. 100


 print (to your default")
 are also required and prints the appropriate documents.")
101 PROCESS THE UPW SHIPMENT Clicking OK to the package weight window for your parent package processes your shipment: Click Yes to print the commercial invoice: Note: The first time you click Yes to print the commercial invoice, you should receive double the number you specified during set-up. Return section 7.2 Set-up Defaults Shipping Labels for information on correcting this. When complete, the parent label and commercial invoice(s) print (to your default printer) and this message displays: The Harvey program determines if Certificates of Origin (NAFTA and NON-NAFTA) are also required and prints the appropriate documents. Here is an example of a non-nafta commercial invoice: 101

102 102 Here is an example of a Certificate of Origin:
103 Here is an example of a NAFTA Certificate of Origin: Here is an example of a Shipper s Export Declaration: 103

104 REPRINTING THE COMMERCIAL INVOICE There may be instances when you need to reprint a copy of the commercial invoice for an international shipment. To reprint a commercial invoice: 1. In OmniShip, bring up the shipment. 2. Make sure no printing options are selected and click the Print button. 3. The commercial invoices will print. You will receive the default number of copies. Note: You can reprint a commercial invoice for the current ship day prior to conducting your end of day processing. Once shipments have been moved to history, reprints can only be made after incrementing the current ship day. 104
105 LABELS, PACKING LISTS, AND BILLS OF LADING HOW TO PRINT DOCUMENTS Your shipping documents are specific to your company. The layout and look of your labels, packing list, and bills of lading will be unique and customized to your needs. Not all installations will include all of these documents, and some will contain many more. There are several ways to print shipping documents. Which method works best will depend on the status of the shipment. Printing documents BEFORE the shipment is processed 1 st Method SAVE the shipment, then PRINT Use the print options to print documents for a saved shipment. Enter the shipment normally, but do not PROCESS SHIPMENT. SAVE (F9) the shipment, click the check boxes next to the documents you wish to print, click PRINT. The UPS labels cannot be printed until you process 2 nd the Method shipment. Use the LABEL PRINTING option If your system includes the Create Label option, found on the User Menu, you can enter shipments and print labels directly from this screen, shown below. Use the buttons in the upper right to SAVE shipments and PRINT labels. 105

106 106
107 How to print documents as part of the shipping process When you click the PROCESS SHIPMENT button, all checked documents will be printed. As shown below, Distributor carton labels and the Packing List/BOL form will be printed for shipment number when the PROCESS SHIPMENT button is clicked. How to print documents AFTER the shipment is processed Once the shipment has been processed, you can reprint the documents (including the UPS label) by finding the shipment, selecting the documents to be printed, and clicking the PRINT button, as shown in Method 1 below. Method 2, using the Reports Menu, can be used to reprint the forms other than the thermal labels, and is shown opposite. 107

108 1 st Method FIND the shipment, then PRINT Use the print options to print documents for a processed shipment. FIND the shipment normally, and do not void or delete it. You will not be able to make changes, but you can click the check boxes next to the documents you wish to print, click PRINT. UPS labels can be reprinted using this method. 108
109 2 nd Method Use the Reports Menu Click on REPORTS All Available Reports. Select the document you wish to print from the list at top left. Input the requested shipment and job information. Select the printer, and click PRINT. JOB TYPE CODES OE FM MS Order Release Miscellaneous STANDARD FORMS Although many shipping documents are customized for specific purposes and include company logos and requirements, Plantrol does support the formats shown here as standard forms. 109
110 110 Packing list/bill of Lading for impact printers
111 Bill of Lading for laser printers 111
112 112 Thermal Labels Shown below are labels generated from a thermal printer.
113 Custom Forms Plantrol Systems can provide whatever custom forms you may need for your shipping system. Shown below is an example of a custom shipping label. 113

114 REPORTS You can access Plantrol s Omni Ship report and other shipping documents through the Report Menu within Omni, and also from the Report Menu in your UBL SH system. In addition to the Shipping Detail Report, which is normally run as part of your UPS end of day process, Harvey s CPS system makes additional reports available. REPORT MENU VISUAL Click on REPORTS All Available Reports. Select the report you wish to print from the list at top left. Input the requested shipment and job information. Select the printer, and click PRINT. The Omni Ship report for all shipments made is about to be printed. 114


115 REPORT MENU UBL You can print the Omni Ship report, and most other customized shipping documents from a UBL dumb terminal by accessing the User Defined Reports menu from the SH system menu. HARVEY REPORTS The Harvey CPS for Windows system contains various reports that can be run as desired. Access these reports by clicking on Start Programs CPS for Windows Reports. Open the report group folder you want to work with by restoring it from its minimized state. You can drag report icons into other folders to group them appropriately. NOTE: Clicking on the Custom Report Group 1 from the CPS Process Menu will generate the reports in the report folder shown above. You can also double click a report icon to run a report. 115

116 How to Print a Shipping Detail Report from History This report is useful if the End of Day Shipping Detail Report is lost. Once you have moved the day s shipments to history, you must use this option to run the report. Note: If the day s upload file was corrupted, this report will not run successfully. In that case, you may use the UPS Manifest report which is found on the SH system report menu. Although the UPS Manifest report is not as complete as the Shipping Detail Report, UPS will accept it as a replacement for the upload file if necessary. 1. Find the upload file name. Click Start Programs CPS for Windows View UPSLINK Log Files. Locate the Upload file for the day needed. Write down the number of the day s filename. Click OK. 2. Locate the History Report icon. Click Start Programs CPS for Windows Reports. Maximize the Standard Reports folder. 116


117 3. Run the report. Double click the Shipping Detail History Report icon. Input the pickup record number you noted in step 1, omitting the numbers after the decimal point. Input the upload date. Click OK. Close Reports by clicking the x. 117
118 STANDARD REPORTS The two reports shown here are standard and most shippers run them daily as part of their close out process. Omni Ship Report This report lists all of the shipments processed for a day, or a range of days. 118
119 UPS Shipping Detail Report The UPS shipping detail report lists all the UPS packages included in the day s shipping, including charges, service level, and any accessorial services applied. 119
120 Carrier Summary Page Declared Value Page 120
121 INQUIRIES Omni Ship provides various ways to look up information. Depending on your needs, you may choose to use the Process Shipment window, the Shipment Look-up found on the Inquiry Menu, the inquiries found in your OE or FM systems or Harvey s Daily Entry window. WHICH INQUIRY METHOD SHOULD I USE? If you need to know Use this method All the shipments made on a date Tracking numbers for a shipment If a carton was sent for Saturday delivery Shipment information for a carton sent today All the shipments made for a job Tracking information for a UPS shipment Shipment Look-up by date Shipment Look-up from a PC, or OE or FM inquiry from a terminal Shipment Look-up Tracking tab Shipment Look-up Shipment Look-up from a PC, or OE or FM inquiry from a terminal Shipment Look-up, to find shipment number, Then reference section on Tracking SHIPMENT LOOKUP To use the Shipment Look- up, click the Inquiry Menu Shipment Look-up. You can look up shipments by order or release number, ship date, or shipment number. The check boxes at the left allow you to filter the types of shipments you wish to view. Click on the various tabs to view different types of information about the shipment. How to use 1. Input either the Order, Release, Ship Date, or Shipment Number 2. Click the check boxes for which statuses to include. 3. Click Find 121

122 122 NOTE: IN the example above, Job number has been inputted in the Job Number field. All shipments for this job are displayed. To view a specific shipment, click in the record selector row at the left of the shipment, or enter the number in the shipment number field.

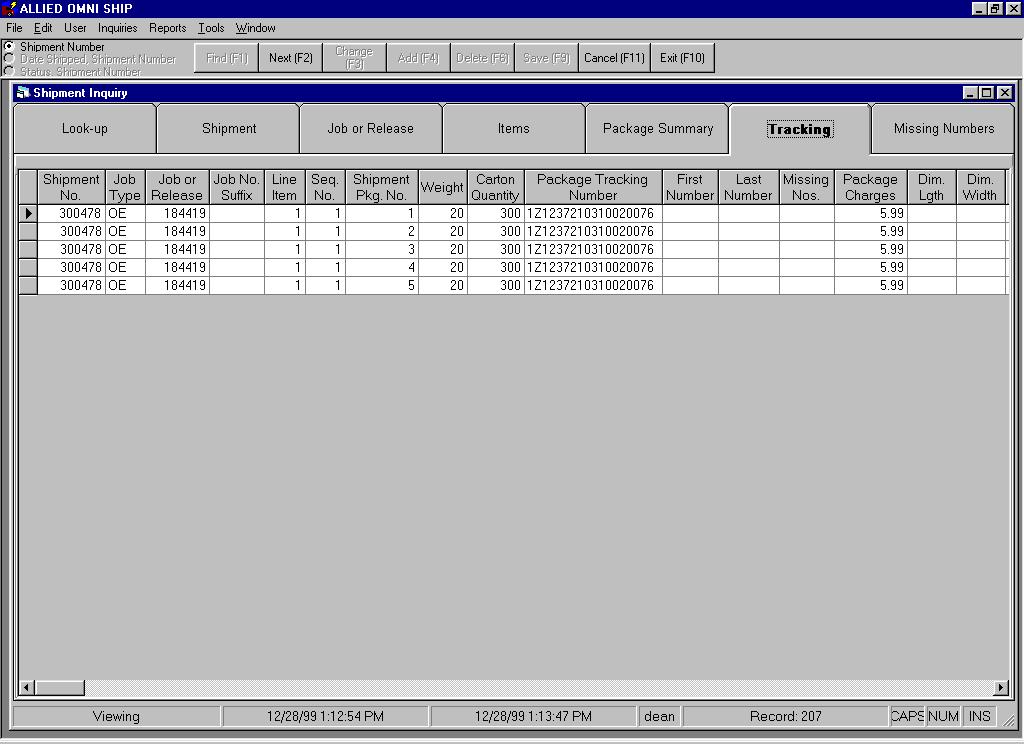
123 Shipment detail information 123


124 OE AND FM INQUIRIES Standard shipment inquiries are available for your OE or FM systems. These are look-ups by Order or Release number and are designed for the use of Customer Service representatives. 124
125 CPS DAILY ENTRY LOOK-UP Remember that only shipments that use the CPS interface to look up rates will be found in the CPS system. It should not be necessary to look up information directly in the CPS system except when trouble shooting a problem. 1. To work in CPS directly, close the process shipments window, and click on CPS on the tool bar to open the Daily Entry window. 2. You must be in FIND mode. If in ADD mode, click CANCEL (F12) until FIND is displayed. 3. Click on the History tab to find past shipments, or the Today tab to find shipments not yet moved to history. Click the FIND button on the tool bar, input the Invoice Number and click OK. You can find a specific carton number, or find the shipment and then use the arrow keys to page through all the cartons in the shipment. Use the conversion table below to determine the CPS invoice number you need. CPS uses Invoice Numbers to identify the cartons. The Omniship numbers relate to the CPS numbers as shown below. Conversion Table OMNI SHIP CPS Shipment Number Carton number Invoice number


126 The FIND button Input the Invoice Number here. Shipment , carton 1 is displayed below. 126
127 RATE SHOPPING Need a quick comparison of rates for a package? The BestWay Calculator can be used to compare rates for UPS, FXG, Federal Express, and US Postal Service with a couple of clicks. Various service levels and additional services can be compared. Of course, any special rate agreements you may have will not be taken into account. There are two ways to access the BestWay Calculator: from the Items tab to rate a package on an existing shipment, or in a stand-alone mode. Examples are shown here. CAUTION! Rate shopping is based on single cartons. If you select UPH, the total shipment must be above the minimum weight for UPS Hundredweight service to receive the estimated rate. HOW TO USE RATE SHOPPING There are two ways to rate shop. Rate Shop for an existing shipment 1. Click the ITEMS tab. 2. Click on the carton you want to rate shop 3. Click on the Rate Shop button. The BestWay Calculator will open, and the selected package s weight and destination zip code will be imported. 4. Click on the desired Service (or carrier) and Deliver By (time frame) to narrow your choices. 5. Use the buttons at the bottom to navigate. NOTE: In the example below, all the next day delivery options have been displayed for carton no.1 of this shipment. 127

128 Rate Shop Independently The BestWay Calculator can also be accessed directly by: 1. Selecting Start Programs CPS for Windows BestWay Calculator. 2. Input the zip code and package weight, and select the Services and Delivery By times you want to compare. NOTE: In the example below is a comparison of RPS and UPS rates for a 50 lb. Package to zip code 20410, where a service time of two or more days is acceptable 128

129 HOW TO CREATE A SHORTCUT ON YOUR DESKTOP You can create a shortcut to the BestWay Calculator on your desktop. To do this follow the steps below. 1. Click on Start Programs CPS for Windows. 2. Right click on BestWay Calculator 3. Select Create shortcut. A new copy of the icon will appear at the bottom of the program list. 4. Click this icon to select it. 5. Hold the left mouse button down as you drag the icon to your desktop. You can double click this copy of the icon to run the Rate Shopping program. BestWay Calculator 129

130 TRACKING Shipments can be tracked using the carrier s tracking number. Most carriers offer tracking via phone or web sites. UPS shipments may be tracked directly through Harvey if you have an Internet connection. HOW TO TRACK UPS SHIPMENTS THROUGH CPS To track UPS shipments through Harvey follow the steps below. You must have an open Internet connection. The same process may be used for FEX and FXG shipments. 1. To work in CPS directly, close the process shipments window, and click on CPS on the tool bar to open the Daily Entry window. 2. You must be in FIND mode. If in ADD mode, click CANCEL (F 12) until FIND is displayed. 3. Click on the History tab. Click the FIND button on the tool bar, input the Invoice Number and click OK. You can find a specific carton number, or find the shipment number and then use the arrow keys to page through all the cartons in the shipment. Use the conversion table in Section 10.3 to determine the CPS invoice number you need. 4. When the carton you wish to track is shown, click TRACK (F10). TRACK F10 button 130


131 5. Your package tracking number is now displayed on the CPS Ship elert website. 6. Click the TRACK button. 7. UPS tracking information is displayed, and can be printed using your web browser. 131
132 SYSTEM MAINTENANCE CHECK SYSTEM FILES At the end of each period, it is important to check the use of the system files to be sure none are reaching a critical size. If the percent used exceeds 85% on any file, consider purging the file, or contact Plantrol support if the file needs to be expanded. The exception to this is the ARGLB file, which will always be at 100%. Files must also be optimized to maintain optimal response time. From the UBL SH system, select 10 - System Manager Menu, then 10 File Utilization Analysis. Be sure all users are out of the Accounts Receivable system before starting the next process. Still in the System Manager Menu, select 11 Index File Optimization. Select all files, and answer Y to Proceed? HOW TO ADD OR DELETE A CARRIER You can change your carrier choices at any time. If the carrier will not have rates calculated by the CPS system for example, an LTL carrier or local delivery service the carrier just needs to be added or deleted from the list of names Omni Ship recognizes by following the steps below. If CPS will calculate rates for the new carrier, setup steps must be also performed in CPS. This only needs to be done if the carrier was not set up during the original installation. Contact Plantrol support for assistance if this is needed. In order for UPS functionality to work correctly, the carriers UPS, UPH, and UPW must be in your list of choices, UPS, UPH, and UPW must also appear on both the 1st and 2nd lines of the text field. DO NOT DELETE THESE! The three letter codes for FEX, FXG, USP, and SPD must also appear in the same way if these carriers are used. 1. In your UBL system, at the SH system manager menu, choose Data Dict - STDFM. (Or at a Unix prompt, type GOTO SH, and then at the prompt type Run DDSTDFM) 2. Select item 8 AutoText File Maintenance. 3. FIND variable name SVIA$. You can FIND NEXT through your current list of carrier choices. 4. With one of the current choices on the screen, press Shift ADD to create a new record. (To delete the carrier, press the DELETE key.) 132

133 5. If adding a carrier, use the ENTER key to move the cursor to the Alpha Flag field, and input the new carrier code. This will be what the user inputs or selects to identify the carrier. If the carrier will be used by the CPS system, the code must be the same three letters that CPS uses in its list of carrier choices, and the three-letter code must also appear on line Use the ENTER key to move the cursor to the Text field. Input the carrier name. 7. Press the STOP key to end. The new carrier will now appear on your list of choices. If the carrier also needs to be setup within CPS, use the Harvey setup program on all PC s. Contact Plantrol support for assistance if needed. HANDLING CHARGES You can add per-carton and/or per-shipment handling charges to the carrier s fee if you choose. Handling charges for UPS are maintained in the SH system global file, as shown below. 133
134 DCR per Carton = handling charge for delivery confirmation COD per Carton = handling charge for COD Handling charges for other carriers are maintained in the auto text file for the specific carrier and can be added or edited at any time by following the procedure below. 1. In your UBL system, at the SH system manager menu, choose Data Dict - STDFM. (Or at a Unix prompt, type GOTO SH, and then at the prompt type Run DDSTDFM) 2. Select item 8 AutoText File Maintenance. 3. FIND variable name SVIA$, and the alpha flag of the carrier you want to add charges to. 4. Use the CHANGE key to add or change the values in Numeric Value 3 (package charge) and/or Numeric Value 4 (shipment charge.) 5. Press the STOP key to end. 134
135 Numeric Value 3 = Amount to Add per Carton to Shipping Costs Numeric Value 4 = Amount to Add per Shipment to Shipping Costs NOTE: On shipments of multiple jobs, this amount will be added to the cost of the first job entered. These values are measured in cents. In the above example, Numeric Value 3 = $.15 MAINTAINING THE SHIPPING RULES FILE The Shipping Rules file allows you to set shipping requirements for each account, as shown below. Access the shipping rules file from the User menu. Use the Tool Bar function keys to FIND, FIND NEXT, CHANGE, ADD, DELETE, SAVE or CANCEL. Once you have made an entry for an account number, the Shipping Rules will pop up each time you ship an order for that account. The user must click OK to remove the rules from view. The rules are still accessible by clicking the shipping rules tab. 135


136 Rules have been set for account number , as shown above. The rules pop up when a shipment is entered for this account as shown below. Click OK to see the rules tab. Click OK for the rules to dissapear. 136
137 Rules Tab UPDATING THE SOFTWARE Both Harvey and Plantrol continue to develop their software as needs arise. As part of your support agreement, you will receive the current version of CPS on CD once a year or whenever carrier rates have changed. Plantrol will provide a new version of Omni whenever significant enhancements have occurred. Procedures to install these updates follow. How To Install Harvey CPS and Rate Updates Carrier rates included in Omni are part of the Harvey CPS component of Omni Ship. A CD will be sent to you if rates have changed, or as part of your annual update. Instructions will be sent with the CD; additional information may be communicated directly from Plantrol, if needed. Enhancements, if available may be installed between annual upgrades, by retrieving the new version from the Harvey support website at You will need your Harvey support serial number to log on. Install the update when you have completed your day s shipping. Best results are seen if the CPS daily file is empty. Make a backup of your current CPS daily file. (C:\CPSW\cps.dbf) Close Omni and all other programs on all connected shipping PC s. Follow the provided instructions to install the upgrade on the master PC first, followed by the slave PC s. If you have custom carriers set up in CPS, you must update these rates separately. 137


138 How to Install Omni Upgrades If a new version of Omni has been provided to you, it will be installed on your server by Plantrol support and you will be notified by phone, fax or . The next time you open Omni on a shipping PC, you will see the message below. To download the new version, click Yes. To keep working and download later, click No. Since each PC has its own copy of the Omni software, each PC can decide when to install the new version. SYSTEM UTILITIES System Utilities are provided to delete historic shipping records. Access these programs by clicking on File Tools/Utilities. Also included in this section is information on the Shipping Rules file. 138

139 Deleting Incomplete Shipments Incomplete shipments are usually records created when a shipment is partially entered and then aborted without having been properly deleted. This utility provides a way to delete shipment records where no package or package summary information was ever entered. It is recommended that this program be run on an occasional basis to clean out these leftovers. To Delete Incomplete Shipments, follow the steps below: 1. Select Delete Incomplete Shipping Records from the File Tools/Utilities Menu. 2. Shipments are displayed which have no package or package summary files. 3. Before clicking the DELETE button, click to uncheck any shipments you do NOT want to delete. 4. To print the list, click the PRINT button. At the print preview window, click the Printer Icon or File Print. Close the print preview window. 5. Click the DELETE button to delete the checked shipments 6. Click OK when you see the Deletion Complete message box. 139

140 Purging the Files The Omni SH system files and the Harvey CPS history file can be purged using the utilities provided. We recommend that you make purging the files a routine monthly process. Having large files will slow down some processes and inquiries. To Purge The Omni Files follow the steps below: 1. Select File Tools/Utilities Purge Shipping Files 2. Select the purge date The default is set to keep a minimum of three months of processed and updated shipments. You may change the date to keep more history if you wish. You can also choose to purge Unprocessed Shipments. (Remember that shipments that are entered and have had labels created, but are not yet shipped are Unprocessed.) 3. Click PURGE. 4. Click OK when you see the Purge Complete box. 5. Click QUIT. 6. After purging, optimize SH system files. On the SH system manager menu, select option 2. To Purge The Harvey CPS History File follow the steps below: 140


141 1. Close Omni on all stations 2. On the master PC click Start Programs CPS for Windows Tools. 3. Click F8 History. 8. Input the purge date. BE CAREFUL! The default date will purge all history records! 9. Click OK. 10. Click OK when you see the Delete from history file complete! box. 11. Click EXIT. 141

142 SYSTEM FILES AND CODES Behind the scenes, Omni Ship has files and codes to organize the data and simplify processing. Here is an overview of these to assist the system manager with troubleshooting problems. To access these files in your UBL system, at the SH system manager menu, choose, Standard File Maintenance. Or, at a Unix prompt, type GOTO SH, and then at the prompt type Run STDFM. 142
143 File Structure FILE NAME GLOBAL FILE SHIPMENT HEADER SHIPMENT JOB SHIPMENT ITEM SHIPMENT PACKAGE SUMMARY SHIPMENT PACKAGE MISSING NUMBER FILE MISCELLANEOUS ADDRESS FILE SHIPPING RULES SYSTEM KIND FILE DESCRIPTION System parameters, interfaces, UPS handling fees Information that pertains to the entire shipment Information that pertains to the entire order or release Information pertaining only to the specific line item on the order or release A package summary record is created for each group of identical packages A record is created for each individual package Contains the missing number info entered at shipping Not currently used or supported Rules set up by the user for specific accounts (see section 13.32) Maintained only by Plantrol 143
144 Service Level Codes Carrier = UPS Next Day Air 1 2 nd Day Air 2 Ground 3 2 nd Day Air A.M. 7 3 rd Day Select 12 Next Day Air Saver 13 Next Day Air Early AM 15 Carrier = UPH Next Day Air 1 2 nd Day Air 2 Ground 3 2 nd Day Air A.M. 7 3 rd Day Select 12 Next Day Air Saver 13 Carrier = FXG US Ground 44 Hawaii Ground 44 Hawaii Ground Outer Islands 44 Alaska Ground 44 Alaska Rural Ground 44 Canada Ground 44 Carrier = FedEx Priority Overnight 1 2 nd Day Service 2 Express Saver Service 8 Standard overnight 13 First Overnight 15 Carrier = UPW Express 66 Express Plus 54 Expedited 67 Standard (Canada only)
145 Billing Option Codes Carrier = UPS or UPH Shipper 1 Receiver 2 Third Party 3 Consignee C American Express 4 Master Card 5 Visa 6 Check 7 Carrier = FXG Shipper 1 Receiver 4 Third Party 3 Collect 2 Carrier = FEX Sender 1 Recipient 2 Third Party 3 Credit Card 4 Cash/Check 5 Status Codes Shipment Header File Unprocessed 0 Non Harvey Processed 1 Harvey Processed 2 Processed & Updated 3 145
146 UPS FUEL SURCHARGE INSTRUCTIONS (OPTION) UPS added a 1.25% fuel surcharge to shipping charges effective 8/7/00. Plantrol offers a program called RateChg, which adds the surcharge to the UPS rates. RateChg allows you to create a new rate schedule based on whatever percentage you enter. RateChg does not change the Published Rates file. It uses existing CPS functionality to add the surcharge percentage to the shipping cost. This process involves the following steps: 1. Back-up current files. 2. Check current rates. 3. Run the RateChg program. 4. Modify the AutoText file. 5. Rebuild the indexes and check new rates. 6. Process shipments, reconcile and update, as usual. 1. Back-up Current Files 1. Before making any changes, back-up the published rates files (UPSZP.DBF & UPWZP.DBF). Make sure that OmniShip and CPS are closed and do the following: 2. Double-click the My Computer icon on your desktop. 3. Navigate to C:\cpsw. 4. Right-click the UPSZP.DBF file and select Copy. 5. Right-click in the white area of the same window and select Paste. A file named Copy of UPSZP.DBF appears. 6. Right-click the Copy of UPSZP.DBF file and select Rename. 7. Change the name to origupszp.dbf. 8. Repeat steps 3-6 for the UPWZP.DBF file to create the origupwzp.dbf file. A Note Regarding Upgrades: Before installing any upgrade involving a rate change, it is important that you convert the rate changer back to 0. After installing the upgrade, re-enter the fuel surcharge adjustment. 146

147 2. Check Current Rates It s a good idea to see what the current rates are so that when you create the new rate schedule, you can be sure the change was correct. To check the current rates: 1. Launch the CPS Tools program by opening Start Programs CPS for Windows Tools. 2. Select Edit Costs. The following rates appear: 3. Change the carrier to UPW to check the international rates. 3. Run The RateChg Program After downloading the new version of the shipping application, find the RateChg.exe program on your desktop. Make sure OmniShip and CPS are closed before running this program. To run this program: 1. Double-click the RateChg icon: 2. The CPSW rate changer window appears: 147


148 Enter % Convert button 3. Enter 1.25 in the % Increase box and click the Convert button. Note: If UPS discontinues the fuel surcharge, enter a 0 here to go back to using the original rates. 4. Select Yes to continue: An update message appears: 5. Click OK to each message: 148
149 The CPSW Rate Changer now shows the increase in the Adjusted Cost box. The Approximate % displays the actual percentage applied after rounding: Click here to exit. This number is slightly higher due to rounding. 6. Click the in the upper right corner of the window to exit. 4. Modify The AutoText File. You now need to modify the AutoText file so the surcharge is applied to UPH records during reconciliation. To modify the AutoText file: 1. In your UBL system, at the SH system manager menu, choose Data Dict - STDFM. (Or at a Unix prompt, type GOTO SH, and then at the prompt type Run DDSTDFM) 2. Select AutoText File Maintenance (Item 8). 3. FIND the SVIA$ variable and enter UPH in the Alpha Flag field. 4. Press the F3 key to Change the file. 5. Enter 1.25 on the third line of the text field in column 3. Use Enter and the arrow keys to get to the correct position: 149

150 These messages vary by system Enter 1.25 in Column 3 6. Repeat steps 3,4 and 5 using UPS in place of UPH. 7. Press the Stop key (F10) to save. 5. Rebuild the indexes in CPS: To rebuild indexes in CPS follow the steps below. 1. Launch the CPS Tools program by opening Start Programs CPS for Windows Tools 2. Select File Rebuild All: 150

151 3. Click OK to the confirmation message: NOTE: If you check your new rates (Edit Costs in CPS Tools), you will notice the 1.25% increase: 6. Reconcile and Update When you reconcile as part of your normal end-of day processes, make sure the fuel surcharges are added to your UPH shipments: The reconcile window displays: 151

152 Update button When you click the Update button, the Harvey Charges number reflects the 1.25% increase. The updated field displays a checkmark to indicate that the Omni Ship records were updated. 152

153 FREQUENTLY ASKED QUESTIONS 1. What does it mean if I get the message service was left blank Harvey can t ship? Something in the data is causing CPS to not get a valid service level. Check to see if you re trying to ship a UPS letter via ground. The letters must ship via air. 2. What are those numbers I see at the bottom of the Harvey daily entry screen? These numbers are an accumulation of the packages you have shipped through CPS. This counter can be reset at any time by clicking on the Zero button (F 9) on the CPS tool bar. 3. What does it mean when I see a message when processing that An Accessorial that is not available has been used? A shipment or package option was selected from the Items tab that is not available for the carrier and service level combination you chose. 4. Why don t my FedEx or US Postal shipments move out of the CPS Daily File? If you are not running daily manifests for these carriers, CPS environment variables may need to be set. Go to Start Programs CPS for Windows Tools Setup Environmental Variables. (Example shown is for FedEx.) If it does not already exist (not visible in the list) press ADD to add FEXMANIFNUM, and set the value to FEX. Also add FEXMANIFDATE and set the value to the current date, in the format shown. For U.S. Postal, change the FEX to USP in the example above. 153


154 5. How do I rebuild the CPS index files? First, close Omni and CPS on all workstations. Then, on the master PC, select Start Programs CPS for Windows Tools. Click the file menu and select rebuild all. 6. I deleted the sequential numbering from the form I was shipping, but the package labels still printed with numbers. Why? The package info, including numbering ranges, is created when you enter the package info in the package grid. If you change the numbering after this is already done, the numbering will not get changed in the package records, which is where the label info comes from. Change or delete the starting number in the item grid BEFORE you enter the package information. If you forget, and have already entered the package info, you can use the REMOVE FROM SHIPMENT button to remove the job info from the shipment, and ADD the ORDER again to start over. 7. Why do I sometimes see the Harvey did not load message? What should I do? Because of variations in processor speeds, the Omni component may load before the Harvey program. In this case, you will see this message. Always click RETRY, more than once if needed. The system should come up normally. 154