Activant Prophet 21. Getting Started with PO Receipts and Inventory Adjustments
|
|
|
- Lionel Crawford
- 5 years ago
- Views:
Transcription
1 Activant Prophet 21 Getting Started with PO Receipts and Inventory Adjustments
2 This class is designed for Inventory personnel who participate in inventory receipts and adjustments
3 Objectives Generate PO Pre-receiving Report Put Away Report Purchase Order Receipts PO Receiving Report Adjust inventory quantities through Inventory Adjustments Print Inventory Adjustments Report
4 This course will NOT cover Purchase Order Creation Adjustment Reason Code Creation
5 PO Pre-Receiving Report Print report prior to PO Receipt View allocations of ordered material to assist in crossdocking
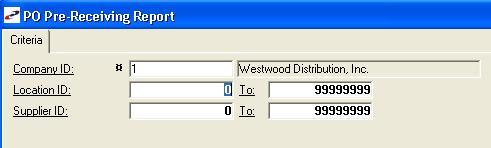
6 PO Pre-Receiving Report
7 PO Pre-Receiving Report
8 PO Pre-Receiving Report Crystal Report Print Report File/Print Select
9 Put Away Report Print report prior to PO Receipts Displays all bins associated with an item with or without current on-hand quantities

10 Put Away Report
11 Put Away Report

12 Purchase Order Receipts
13 Purchase Order Receipts Confirm material receipts through the Purchase Order Receipts window

14 Purchase Order Receipts Step 1: Recall the PO to be received. Step 2: Determine how to allocate the material.
15 Purchase Order Receipts Allocate Automatically: Allocates to the oldest backordered item first
16 Purchase Order Receipts Allocate Manually: You determine where material will be allocated
17 Purchase Order Receipts Receive Only: Material is received into the system but does not allocate to orders.
18 Purchase Order Receipts Receive All Receive Per Line Item Over-Receipts Partial Receipts Future Shipments No future shipments

19 Purchase Order Receipts Marks all lines items Complete Automatically places ordered/remaining amount in Receipt Amount field

20 Purchase Order Receipts
21 Over-Receipts Enter the amount to receive in the Quantity Received field.

22 Over-Receipts Confirm Over-Receipt

23 Partial Receipts - Future Shipments Enter the receipt amount in the Quantity Received field.

24 Partial Receipts - No Future Shipments Enter the receipt amount in the Quantity Received field and Select the Complete checkbox.
25 Purchase Order Receipts Additional Notes Enter bin, lot, serial information as necessary Enter Landed Cost information on the Landed Cost tab if necessary

26 Purchase Order Receipts Add a Note to communicate information to Payables Quantity differences or price discrepancies

27 Purchase Order Receipts Enter a Freight amount for the shipment, if known.
28 Exclude From Lead Time Use if shipment is exceptionally early or late based on average lead time Applies to Entire receipt if selected in top pane Line item if selected per line item in bottom pane

29 Exclude From Lead Time Select to exclude ALL line items from the lead time calculation Select to exclude specific line items from the lead time calculation.
30 Updates at PO Receipts Inventory Value MAC FIFO Inventory Quantities General Ledger Accounts: Inventory Asset Acct: Debit Inventory Receipts Clearing: Credit

31 PO Receiving Report Generate a report to view all receipts at a specific location, date, supplier, or PO

32 PO Receiving Report Enter the Receipt Location Enter a specific date or range.
33 PO Receiving Report Enter a Supplier ID or range.
34 PO Receiving Report Enter a PO Number or range.
35 PO Receiving Report Enter an Item ID or range.
36 PO Receiving Report Determine the type of POs to include.
37 PO Receiving Report Crystal Report Print report: File/Print Select
38 PO Receiving Report
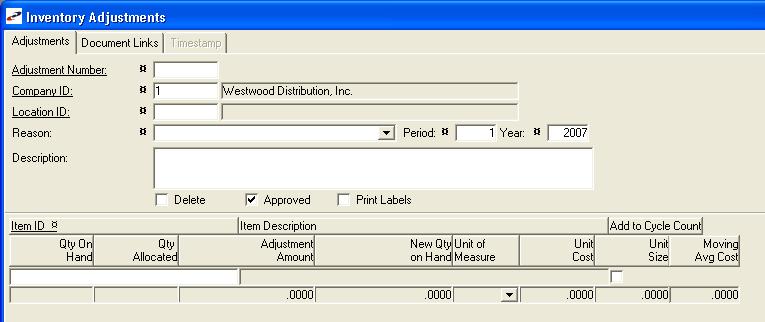
39 Inventory Adjustments
40 Inventory Adjustments Adjust inventory to rectify keying errors, shipping errors, damaged goods, etc
41 Inventory Adjustments Step 1: Enter the location affected by the adjustment Step 2: Select the Reason for the Adjustment.
42 Reason Codes Created in Inventory/System/Adjustment Reason Code Maintenance Indicate the offsetting G/L account during the adjustment
43 Inventory Adjustments Step 1 Step 2 Step 3: Enter a description for the adjustment, this will remain with the adjustment indefinitely
44 Inventory Adjustments Step 1 Step 2 Step 3 Step 4: Enter the item ID for adjustment.

45 Inventory Adjustments Increase On Hand Quantity Enter a positive number in Adjustment Amount field OR enter the total amount for the new quantity on hand in the New Qty on Hand field.
46 Inventory Adjustments Decrease On Hand Quantity Enter a negative number in Adjustment Amount field. Enter the total amount for the new quantity on hand in the New Qty on Hand field.

47 Inventory Adjustments Step 1 Step 2 Step 3 Step 5 Step 4 Step 6: If necessary, enter the cost of the item.
48 Inventory Adjustments Step 1 Step 2 Step 3 Step 5 Step 6 Step 4 Press [Enter] to begin a new line.
49 Inventory Adjustments Key Points Inventory Adjustments impact GL when saved Cannot edit saved Inventory Adjustments records Enter Bin, Lot, and Serial Number information as necessary
50 Inventory Adjustments Key Points Cannot adjust out of stock a qty greater than on-hand or amounts allocated Multiple adjustment lines allowed Positive and negative adjustments Must be applicable to same reason code
51 Inventory Adjustment Report Utilize to view adjustments by reason, item ID, date, or location ID

52 Inventory Adjustment Report Enter parameters as necessary Including time/date on the Timestamp tab
53 Inventory Adjustment Report
54 Summary Generate PO Pre-receiving Report and Put Away Reports Perform Purchase Order Receipts Generate PO Receiving Report Adjust inventory quantities through Inventory Adjustments Track quantity adjustments through Inventory Adjustments Report
55 For More Information Prophet 21 Help Files Visit Activant on the web: distribution.activant.com View Educational Services course offerings Browse Documentation Search the Solutions database Submit a Support case Professional Services Sales pss@activant.com