Prophet 21 CommerceCenter Warehouse Management Systems with Lots and Bins
|
|
|
- Jody Gilbert
- 5 years ago
- Views:
Transcription
1 Prophet 21 CommerceCenter 10.5 Warehouse Management Systems with Lots and Bins
2 This class is designed for Operations Managers Warehouse Managers
3 Objectives Understand Wireless Warehouse Management Understand scanners
4 This course will NOT cover Wireless Inventory Management with Tagging Advanced Bin Management Lot Functionality
5 Wireless Inventory Mgt Method of Inventory Tracking Bar Codes Hand Held Scanners Makes managing inventory faster and more accurate
6 Functionality Inventory Operations Put-Away Receiving Picking Inventory Counting
7 System Setup Bins MUST be enabled The Bin functionality is turned on in the System settings under the Inventory->Lots Serials and Bins System treats the scanner as a bin All Inventory movement is captured For instance, if moving material from a truck to a warehouse bin, the movement of the forklift taking the material to a bin, is recorded in an wireless bin Scanner bins will not appear in any inventory inquiry as they are not available for manual process

8 System Setup

9 System Setup Advanced Bins must be enabled

10 System Setup

11 System Setup
12 System Setup

13 Log In Only one location can be logged in at a time
14 Function Keys Shift [F2] HELP screen for Function Keys [F2] Look Up Shift [F1] Sweep [F1] Back, Exit [F9] Save
15 Wireless Inventory Mgt
16 Wireless Inv Mgt
17 Wireless Warehouse Mgt Menu Inventory Operations System can tell you what is most efficient bin to put material away in Picking System can provide you with a Picking List in an efficient order Receiving System Info Logout
18 PO Receipts Process Material will be received into the warehouse Enter information on scanner Receipt will be unapproved in CC Go to Purchase Order receipts, approve the receipt and print labels
19 PO Receipts Why is the scan an unapproved receipt? Why do you essentially have to receive twice? Because in CC: Material can be allocated Freight can be added Lines can be be marked as completed Notes and Links can be added
20 PO Receipts Remember! With scanning, the system knows how your material is organized and where it is at all times Scanning gives you control and efficiency in your warehouse!

21 PO Receipts
22 PO Receipts Enter or scan PO number

23 PO Receipts Enter or scan Item ID
24 PO Receipts PO Line Popup Item Popup

25 PO Receipts Enter in the Quantity

26 PO Receipts Enter appropriate lot information

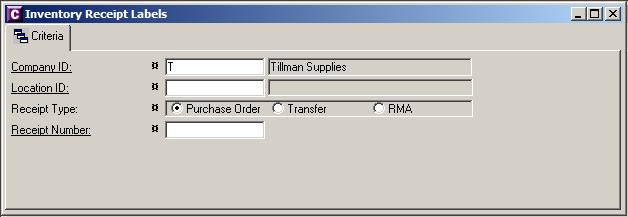
27 PO Receipts Lot Popup
28 PO Receipts Scan Bin or enter Bin

29 PO Receipts The PO is still open in the system, material is not received in system or allocated to orders

30 PO Receipts

31 PO Receipts Make sure to search for UNAPPROVED receipts

32 PO Receipts

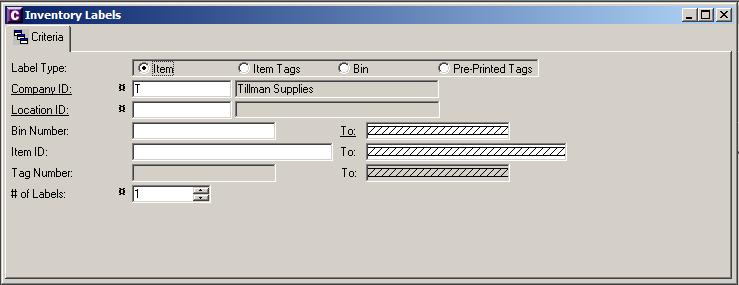
33 PO Receipts
34 PO Receipts 1 Label per Purchase UOM 1 label will be printed for each unit of measure indicated when receiving material 1 Label per SKU 1 label will be printed for each SKU or smallest unit of measure Number of Labels User will define the number of labels
35 Labels Item Item Description Date Created Lot if Applicable Serial if Applicable Bins are not put on labels, because you want to be able to move your material you will not be moving your bins.
36 Labels Fields on the Labels Item Label Item, Description, Qty and Date created. Bin Label Bin ID (Human Readable) and Barcode. Shipping Label Shipper Address, Receiver Address and Item details if homogenous.

37 Labels
38 Labels
39 Labels
40 Labels Label Types Item Bin Print or Reprint a Label Print Labels to put on Bin You want to be able to scan a bin, so you have to put a bar code on each bin
41 Inventory Operations Scan and receive all of your items at once and place them in a holding area in your warehouse After all the receipts are done, the items are placed in the proper bins Performed in Inventory Operations

42 Inventory Operations Moving Product from one Bin to another Bin
43 Self-Directed Self Directed Item Putaway You are telling the system where the material is from and where it is being moved to Move monitors from Bin 1 to Bin A100 The system is NOT recommending any bins to you.

44 Inventory Operations Scan Bin you are moving material from. Scan bin you are moving material to.
45 System Directed System Directed Item Putaway System will suggest a bin to move the material to based on a Putaway algorithm Move items in Bin 1 to the system suggestion, which would be the most efficient bin to move it to

46 System Directed System will suggest up to 6 Bins
47 Putaway Algorithm Putaway Algorithm Weight and Volume must be setup on package and bins Must be utilizing Advanced Bin Management Putaway Zones and Sequence Warehouse Sequence Putaway Ranks can be assigned to items Ranking determined by demand of the product

48 Put Away Algorithm The more in demand an item is, the more accessible you want that item to be.

49 Put Away Algorithm
50 Putaway Algorithm
51 Putaway Algorithm Goal-Maximize space that is used in warehouse Will suggest up to 6 locations First, Checks Primary Bin Second, Looks at Putaway List Is item already in a bin? If not, looks for another bin that has sufficient space Looks for a Bin that it can Squeeze into
52 Inv Adjustments Real Time Approved

53 Inv Adjustment Scan Bin, Item, Lot. Enter Reason ID. Enter New Qty\Hand.
54 Inv Adjustment Let s say 100 widgets are in a bin You need to add 10 widgets to the bin New Qty/Hand = 110 You need to adjust 10 out of stock New Qty/Hand = 90

55 Inventory Adjustments Real time transaction Cost can NOT be entered System setting to default cost
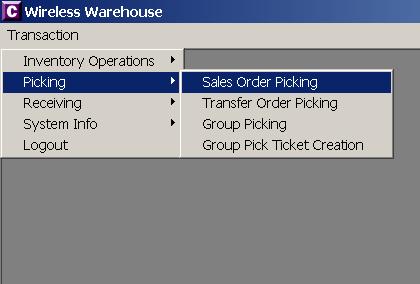
56 Inventory Counts Retrieve items that you want to count in Physical Count window in CC Check Paperless Count on Adjustment tab Retrieve count on scanner System will retrieve Bins Items are displayed in Warehouse Sequence Count Items

57 Inventory Counts Paperless Count must be checked!
58 Inventory Counts

59 Inventory Counts Enter Count #. Scan Bin and item in Bin

60 Inventory Counts Scan Lots Enter Qty Press [F3] to accept changes
61 Inventory Counts Continue with scanning Bins and items in the Bins Once you have completed counting all the items in the bins, press [F6] When count is completed, the system will give you a message stating that the bin you just entered was last on your count
62 Inventory Counts Found Items Report Wireless Warehouse > Reports Will display items that you have scanned that are not listed as being in the bin System will ask you to rescan for verification Item will be flagged to be on Found Items Report
63 Picking Order will be placed Pick ticket number will be created Items will be picked using scanner Pick will be unconfirmed Shipment will be confirmed in Shipping window in CommerceCenter system
64 Picking
65 Picking Sales Order Picking You tell the system what order/pick ticket you will pick Items will appear: Pick Zone and then Sequence or.. Warehouse Sequence
66 Picking Group Picking You tell the system the group of pick tickets you will be picking Orders and Items will appear: Pick Zone and then sequence or Warehouse Sequence
67 Sales Order Picking Sales Order Picking
68 Sales Order Picking Remember, entering a Pick Zone is optional


69 Sales Order Picking Two pickers Charlie picks in Pick Zone A Sam picks in Pick Zone B
70 Sales Order Picking How does the system consolidate the two picks for the order? Bins can be setup as consolidation Bins in Location/Bin Maintenance If Charlie picks the item first on the order, when Sam picks, the consolidation bin will be indicated as the deposit bin
71 Sales Order Picking If no pick zone is entered, the items will be arranged by Warehouse Sequence

72 Sales Order Picking Scan Bin

73 Sales Order Picking Scan item id. If appropriate, enter or scan Lot and Serial. Enter quantity.

74 Sales Order Picking Scan or enter Bin
75 Sales Order Picking Why choose a Put In Bin? If 2 different people are picking material you will need a consolidation bin You may put material on a moving platform. That platform needs to be identified Bin could be UPS, FEDEX
76 Sales Order Picking Remember! These will be unconfirmed shipments. You will need to go to the Shipping window and confirm the shipments.

77 Sales Order Picking

78 Sales Order Picking

79 Sales Order Picking
80 Group Picking Identify to the system what set of pick tickets you want to pick System will provide you with items to pick in an efficient order Zone-Pick Sequence, Sequence Warehouse Sequence As you are picking material, you will put the items in separate totes on your moving pallet
81 Group Picking Deposit consolidation Bins into Deposit Bin Retrieve shipments in Shipping in CommerceCenter Gather all information from Deposit Bin Ship Material

82 Group Picking

83 Group Picking Select Pick Tickets
84 Group Picking

85 Group Picking Enter Group Ticket User Defined Identifier, and if picking by Pick Zone, enter Zone

86 Group Picking Scan Bin you are picking material from
87 Group Picking Scan item. If necessary, scan Lot and Serial number and enter Qty.

88 Group Picking Scan Put In Bin
89 Group Picking Remember! All of the items from the selected orders will be in consolidation bins Retrieve shipments in Shipping window, and pick material from bins Confirm shipment in Shipping window
90 RMA Receipts Enter RMA in CommerceCenter system When material is returned to warehouse, scan return Confirm RMA in RMA Receipts window in CommerceCenter Return to stock Inventory Adjustment Inventory Return

91 RMA Receipts

92 RMA Receipts Enter or scan the RMA number

93 RMA Receipts Scan or enter Item, Lot and serial number if appropriate. Enter received quantity.

94 RMA Receipts Scan Bin
95 RMA Receipts Confirm the RMA Receipt in CommerceCenter
96 Transfers Create Transfer in CommerceCenter Print Transfer Source location will scan material that is being shipped Save shipment in Transfer Shipping in CommerceCenter Destination Location will scan received material Receipt will be unapproved Confirm receipt in Transfer Receipts in CommerceCenter
97 Transfer Picking
98 Transfer Picking If picking by Zone, items will appear by Pick Zone and then Sequence

99 Transfer Picking Scan Bin you are picking material from

100 Transfer Picking Scan item, and if appropriate lot and serial number. Enter quantity

101 Transfer Picking Scan Bin you are depositing material into
102 Transfer Shipping Save the shipment in Transfer Shipping Packing List can be printed

103 Transfer Receipts

104 Transfer Receipts Scan or enter the transfer number

105 Transfer Receipts Scan Item, Lot and enter Received Quantity

106 Transfer Receipts Scan the Bin you are placing material into

107 Transfer Receipts
108 Summary Understand Wireless Inventory Management Understand scanner
109 Wireless Management System suite Advanced Bin Management Prerequisite for this course 10.5 Warehouse Management Systems with Tagging