Q U I C K - S T A R T - G U I D E
|
|
|
- Spencer McKenzie
- 5 years ago
- Views:
Transcription

1 P H O R E S T S A L O N S O F T W A R E Q U I C K - S T A R T - G U I D E U S A
2 1 CONTENTS: Making Appointments 2 APPOINTMENT COLOURS 7 APPOINTMENT NOTES 8 CANCELLATIONS 12 RESCHEDULING & REBOOKING 14 ADDING A BREAK 16 PAYMENT 18 DEPOSITS 22 PURCHASE SCREEN 25 PRODUCTS & DISCOUNTS 25 PACKAGES 27 GIFT CARDS 28 REFUNDS 31 PETTY CASH 33 CASH UP - E.O.D 35 NEED MORE TRAINING? 40
.")

3 2 Making Appointments Double click on a free appointment slot (or double tap with a touchscreen). Enter the Name of the client. Click Add Client if you ve entered details to add to system records if this is a first visit.

4 3 Click the Service button which should be orange. Select the service category. ( These colors will vary linking to your own system setup )

5 4 Select the requested Service. ( Note: You can choose multiple services at time of booking )

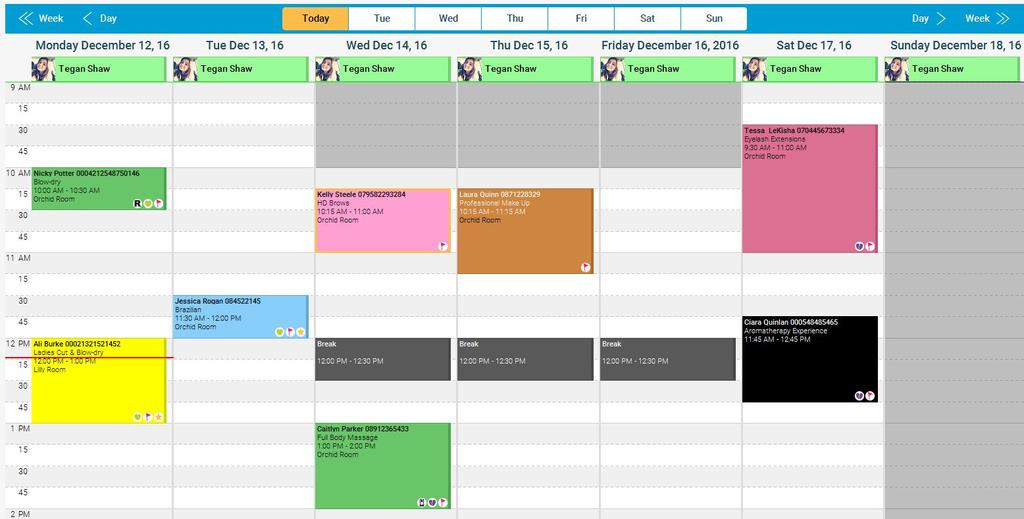
6 5 Click Done. The appointment will be added to appointment calendar as shown below.

7 6 Whilst making appointments, you ve options to move forward in the diary to more availability. You ll see the next 6 days at the top. To the right you have more forward buttons. 1. Move forward by a day 2. Move to the same day next week 3. Jump forward 6 weeks in the diary You can select Date to see a more flexible Calendar option.


8 7 You can select a particular Staff Member and opt for Week to see their schedule for the upcoming days.
9 8

10 9 APPOINTMENT COLOURS MULTI-COLOURED BLUE YELLOW RED LIGHT GREY GREEN OLIVE LIGHT GREEN Service Category / Service New Client Check In - Client in salon Late Client No-Show Paid Deposit paid Last treatment in Course You have a red line horizontally across your screen which is in real time linking with the clock and will gradually move down the screen, through appointments and will highlight whereabouts you are in your schedule.

11 10 APPOINTMENT NOTES The system can store two types of notes for clients and services. This will create a pop-up screen with two sections for Notes : A. Service or Colour Note B. Client Card Notes

12 11 1. The Service and Colour Note section allows you to enter records based on that client s current appointment. It will store these notes in the client s Service History. You will see a list of Previous Appointment Notes on the right hand side which will display a historical rundown of all the previous appointment notes for that specific client. 2. The Client Card Notes allows you to enter details specific to that individual client e.g. Mentioning a holiday to Spain in 2 weeks. On their return, you can ask them how it was. This makes the client feel valued because you remember their individual piece of information leading to future bookings from that person. You could also enter how they drink tea of coffee when they come in so you can prep it for them accordingly, again making them feel valued.


13 12 In this pop-up box, there is an easier way for you to check past Service History & Product History. If you are using Staff Pins, the Audit Trail tab will allow you to see who made changes whilst logged in to the selected appointment.


14 13 CANCELLATIONS Unfortunately at times, clients will need to cancel their appointments. 1. Delete - Remove an appointment with no reason. Commonly used if an error is made on a booking or if a client was to give sufficient notice e.g. 2 weeks

15 14 2. Cancellation - Removing an appointment with a reason. Mostly used for short term notice if unable to attend and best used for frequent offenders. This is an example of a reason. Not all clients will give a specific reason and occasionally can be very vague. A tip would be to write in how far in advance they called, so you may know by the Service History, to know if they are likely to call at the last minute.


16 15 RESCHEDULING & REBOOKING You can easily move an appointment to different screens to accommodate changing dates / times and adding future bookings. Using the Clipboard will attach all details so you don t need to enter all information a second time. Select an appointment to reschedule to another day if the client s original time doesn t suit. It is possible to select a paid appointment to rebook to another day if needed. You can be flexible when choosing the next alternative day / time as it does not necessarily need to match the original slot. Click once anywhere you choose to add the new slot.

17 16 You will then be given two Clipboard options. 1. Move - Reschedule. Moving an appointment from one day / screen to another to accommodate unavailability to attend the original time 2. Copy - Rebook. Copying appointment details to another day that would suit to visit in future


18 17 ADDING A BREAK You can set aside breaks for lunch, meetings, training or any personal time needed for the time and duration you require. 1. Adding a name for break that will show on screen 2. Opting whether staff is paid or unpaid

19 18 3. Choose duration 4. Repeating event e.g Sales Rep Meeting 5. Trailing who created / edited the break

20 19 PAYMENT You can opt to pay a client before or after their treatment. Even if you have not integrated your card system to Phorest, we recommend replicating the sale through our system so the information can be found on our detailed Reports. 1. Select the client who wants to make a payment 2. Click Pay below to go to the payment screen The next pop up screen below is for SMS marketing. It is required to obtain your client's permission to potentially send them marketing texts about special offers, promotions, news and salon updates.


21 20 If at the time you are not planning on sending out messages or are a start up business, bear in mind that to send messages in the future you ll need to opt clients in now to build a viable database. It doesn t cost you anything to build up the clients and would be such a benefit to your business to be able to use this feature. 1. Client information and service information will be brought automatically into the payment screen 2. You can scan a product into the white box or click Select to find it on a product list. It will add to the bill before payment


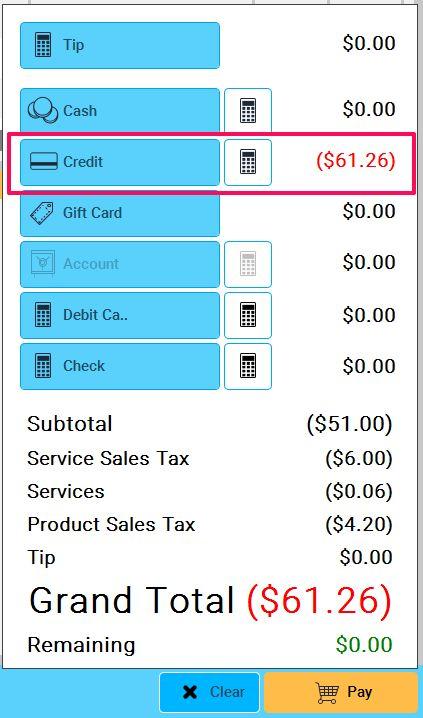
22 21 3. This is your payment pad to opt in the payment method of preference 4. You can add a tip for Staff 1. You can add a tip for Staff members 2. Blue is for full payment by preferred method and will automatically input the amount due 3. Calculator is to type in a monetary amount above or below the total amount due. Mostly used for creating change or splitting payment over 2 types 4. This is where any Service Sales Tax will show 1. If multiple staff do the different services you ll have a drop down of staff names with the small black arrow 2. You can opt for an Amount or Percentage, depending on what clients opt for on the card system To complete the payment you should get orange Pay to complete the sale.


23 22 Your receipt options and the prompt of Rebooking a client will be the final step before returning to the appointment screen and the appointment will be marked as complete in dark green. More than one client can pay together in the same bill e.g A Mother & Daughter can pay together, Bridal Party. 1. Click on the client who will be paying the bill 2. Hold down the Shift key on your keyboard 3. Keep holding shift and select other clients 4. Again keep hold of shift and click to Pay This should bring multiple clients and services to one pay screen with the one client name at the top and they will be giving you a payment method.

24 23 DEPOSITS For more expensive services, you may require to take a deposit to secure a booking or if a client fails to turn up. You can keep this on a client record which is viewable from the appointment screen. Create the client s booking as normal up until the point when you would press done. Choose to go directly to Pay instead as directed below. You will be looking for the small cog wheel beside the service price in the More column.


25 24 You will select Deposit from a small box and then be prompted to add in the amount you require. Pay this transaction as normal. The client may pay cash if there in person or you may need to take a card payment over the phone. The appointment will turn a Khaki green and have a Dollar symbol to highlight to you that a deposit was previously taken on arrival.

26 25 On the day of the booking, when you attempt to take payment as normal you will be prompted that the client has previously paid money to their account. The amount paid will automatically go on to the Payment pad beside the Account tab. The Client can then pay the remaining amount as a preferred method of payment.

27 26 PURCHASE SCREEN On the Purchase section you can do a variety of tasks such as selling retail, applying discounts, sell gift vouchers and packages. These may be to clients passing by as opposed to having a service appointment. PRODUCTS & DISCOUNTS 1. Enter the customers details. It will put any product sales on their client record for future reference 2. Walk -in is an option for clients who may want to remain anonymous or not from the area You will need to choose a staff member for the sale e.g Staff who recommended the product.

28 27 1. A Product is the item you will be opting for 2. You can scan a barcode in this box to search on your product list 3. Select will allow you to bring up the product list to manually select instead of using a scanner 4. View client s Product History of past products purchased. You can reselect a product from here 1. You can increase the Quantity rather than adding the same product twice 2. Apply a Discount on to the item e.g. Sale, Promotion, Birthday Treat

29 28 You can apply a Percentage or use the small arrow to switch to an Amount. You will pay the transaction off using the payment pad choosing the client s preferred payment method e.g. Cash, Card, Split Payment etc. PACKAGES A Package is a bundle / series of a service for a set price e.g. Buy 4 get 1 Free, Buy 5 get 15% off price. To sell a package to a client, you will need to get their details to link it with their client record. In the Items section, choose Packages. You should see the various package options to choose from then below.

30 29 When you complete the transaction, the number of sessions will attach to the client record. The client can then book in for their sessions when convenient. The system will recognise their have a prepaid Package and will ask if you want to choose a session from that as seen below.

31 30 GIFT CARDS To start the sale of a Gift Card, firstly enter the name of the purchasing customer or choose Walk-In.


32 31 1. Same Client - Customer is not sure of Recipients details or if Recipient isn t yet a salon customer 2. Different Client - Option to select a client from salon current records e.g Mother buying for her daughter 3. Top Up - Increase balance on an existing card on your records or a card presented to you
33 32 You can scan/type an existing card number into the white box. The Wand will create a number for you. Enter the value that wish to apply to card. After transaction completion and if you are using printable receipts, Phorest will print a receipt of the transaction and also a paper copy of the gift card. Note: If your salon is using receipts, do not enter the name of the recipient at the top of Purchase screen. As when you complete the sale, the recipient will receive a receipt of the Gift Card that may be intended as a gift and in tow, spoil a surprise.

 to get the option to Refund.")
34 33 REFUNDS You can refund the value for a Service or Product. Start by entering your client details and select a staff member. You ll need to select if it is a Service or Product that you are processing the refund for. In More, click on the cog wheel (seen on page 22 for Deposits) to get the option to Refund. It will turn the quantity and amount to a minus figure, owing back to client. Choose a payment method to return the funds by selecting one of the blue payment tabs.
35 34
 and give it a description.")
36 35 PETTY CASH Money could be taken from the cash register for small supplies for your salon and recorded for accounting purposes. It can be recorded in two ways, depending on your preference. Method 1: On the purchase Screen, a Petty Cash button will appear in bottom panel of screen. Enter the value, mark it down as Withdrawal (taking from till) and give it a description. Note: The system will remember descriptions and store them for future use in the drop down menu. After visiting the store, recreate the petty cash steps as earlier. Now you will enter the value of change and mark it as a Deposit. (money going into till)

 and give it a")
37 36 Method 2: Enter exact amount needed, mark it down as Withdrawal ( Money taken out) and give it a description.
38 37 CASH UP - E.O.D Closing up your cash register at the end of the day is vital to make sure all your takings are correct and logged on the Phorest system. Firstly, make sure all your appointments are paid off (dark green) and completed on the appointments screen. In Manager, click on Cash Up to start the process. Run a Transaction Report to see a log of all transactions throughout the day with details of time, discounts and payment types. This next image below is an example of what it should look like.
39 38 The report, like all reports on Phorest, can be printed or saved on to a device in one of the preferred file formats. Click on the orange Cash Up button to enter in your figures.
40 39 1. Expected - Figures Phorest has generated as expected to have through all transactions processed. 2. Actual - Amounts you will physically have in salon or on card machine. You ll need to enter amounts through different payment types. 3. Notes - You can leave any notes from Cash Up e.g discrepancies, amount of notes / coins etc. If the two columns, Expected & Actual, match you ll see the balance in green. Any money that is left in the cash drawer as a float for the next day should go into the Closing Bank box. If there ever is a situation that the two columns don t balance, it will highlight as red at the bottom of the columns. This may be due to incorrect counting, incorrect payment or any petty cash errors.

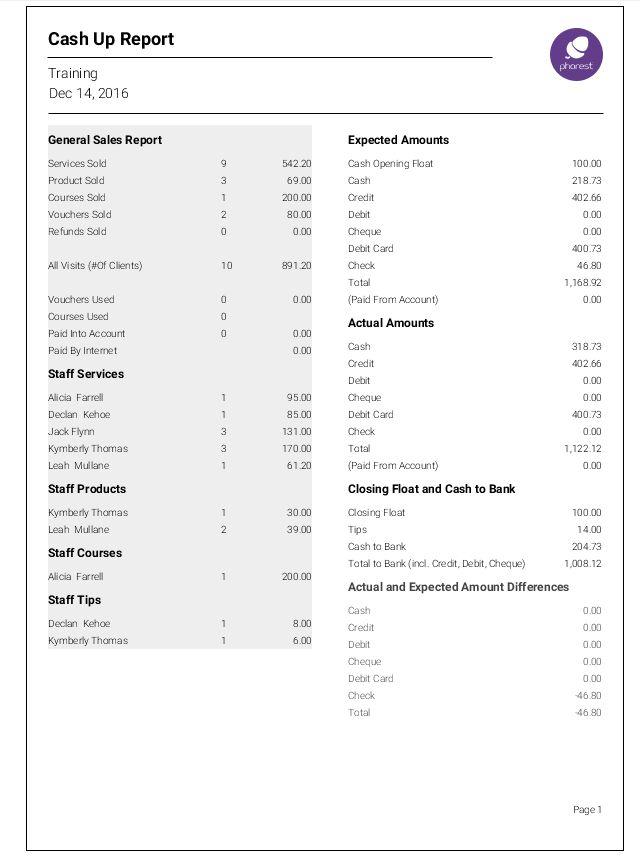
41 40 Only if a discrepancy is logged will you get this pop up box below when clicking Save on your cash up. It is just to make you aware before you save all details. Normally when finished cash up, click Save to the right corner. It will automatically generate a Cash Up Report which is accumulative of the day in full. On the report you ll also see a breakdown of tips and cash to bank for lodgements. There is an example below:
42 41
43 42 NEED MORE TRAINING? Make sure you're getting the most out of Consultation Forms and your Phorest Salon Software. Don't hesitate to contact a member of the Phorest Training team to see which areas we can help you with. Our award-winning trainers come from a salon background. They understand your business and how Phorest fits in. Training is unlimited to you and your team, whether they've never used Phorest or just need some refreshing. Training Modules we offer: 1. Go Live (Basic) 2. Products & Inventory 3. Essential Management 4. Text & Marketing 5. Treatcard 6. Online Booking 7. Consultation Forms 8. Bespoke (one-to-one) Q+A Call Us: US: Us: training@phorest.com Book Online Training: In Phorest, go to Manager > Training > Book Online Training. The more you know, the more you grow!