User Manual. Before plugging, starting or setting up your new terminal for the point of sale, please read carefully this User Manual
|
|
|
- Bernadette McKenzie
- 6 years ago
- Views:
Transcription


1 User Manual Before plugging, starting or setting up your new terminal for the point of sale, please read carefully this User Manual
2 Copyright This publication, including pictures, illustration and software, is protected by the international property laws, all rights reserved. Any part of this manual or anything inside this document can not be reproduced without the authors consent. Clarification The information in this document is subject to changes without previous notice. Registered trademark All products in this manual are property of their owners. Revision history Software version July 2014
3 Index 1. Download the HioPOS Cloud First installation Choose your language Identification Store Taxes Custom configuration Select your terminal All-in-one terminal Tablet (or other terminals) Printer Cash Drawer Scanner Display Magnetic Stripe Reader Items quick creation New items Margins Taxes Table Layout Modify the Table Layout Tables number Locked tables Sales The sale screen Changes on the receipt lines Changes over the receipt total The sale in cash The sale with different payment methods The subtotal Discounts Discount reasons Discount over the total Discount on the sale line Assign the sale to a client Send documents by Issue invoices Sales on hold Sales on hold without Table Layout (direct sale)...30
4 3.7.2 Sales on hold with Table Layout Split a sale Split an ongoing sale New split Tips and Service charge Tips The service charge Menu like items Menus creation and management Selling a menu Modifiers Consult sales Cash counts Z Cash count Declared amount Cash management Z Cash count report X Cash count Consult cash counts Payment methods Payment method configuration The Cash payment method The Card payment method Warehouse and providers Purchases Purchases by provider Consult purchases Inventory Providers Kitchen printers Kitchen printers Print situations Kitchen order Price rates and promotions Creating new price rates Create a promotion or special offer Items by sizes Creating new sizes Assign sizes to items Sell items by sizes Statistics... 74
5 11.1 Status charts Previous year comparative Sales average Advanced options Export data Multiple stores configuration Change series of documents User profiles New profile Permissions according to profiles Access stores Receipt design Currency Exchange rates Reset the app Lock app... 91

6 1. Download the HioPOS Cloud The HioPOS Cloud app can be downloaded in APK format from the following link: Accept the download and wait for the app to be downloaded. In order to install app that does not come from Google Play the user needs to enable the feature Unknown sources from the Android OS security settings. Once activated you can start the app installation, it is located in the Downloads folder of your Android device. 1 de 99


7 2. First installation HioPOS Cloud will guide you through setup where you can manage the initial settings. 2.1 Choose your language HioPOS Cloud will be displayed in your language, for this choose it from the list and start with the installation. You can change the language later on from the Configuration menu, after you finish the installation. 2 de 99

8 2.2 Identification Enter you User and Password to access the terminal, then press Continue. If you don't have a User or Password please contact your Dealer. If you don't have a User yet, you can ask for a demo version. Select Ask demo and enter the Promotion Code provided by your dealer. Demo versions have a limited duration, you can purchase the service at any time or when the demo expires. If you purchase the service, all data you entered will remain. 3 de 99

9 2.3 Store Enter the store information for the terminal you are configuring. This information will be printed in your receipts. You can change it after you finish the installation from the Configuration menu. 4 de 99

10 2.4 Taxes HioPOS Cloud comes ready with your local taxes. You can change them from this window or after you finish the installation, go to Taxes from the Configuration menu. 2.5 Custom configuration Choose here if prices include taxes or not. If you have a restaurant, choose if you want to work with a Table Layout or not. You can change these settings later on from the Configuration menu. 5 de 99


11 2.6 Select your terminal All-in-one terminal The all-in-one terminals come with all the features already configured, if have one from the list select it. To see if all the features are working fine press the Test button of each of them Tablet (or other terminals) If you don't have an all-in-one terminal, or if your terminal is not on the list, select the option Tablet. Now you can configure all parameters from the Printer, the Cash drawer, the Scanner or the Magnetic stripe reader. 6 de 99
12 After you configure each device, press the Test button to see if it works fine. According to the device you are configuring and the specifications of your tablet, you can choose between what type of connection to use (Local network, Bluetooth, USB Port, Printer port, Keyboard simulation or Audio port). If you want to change the settings of these devices or add new ones go to Devices in Configuration after you finish the installation Printer The printer you configure here will be the one HioPOS Cloud will use by default to print out receipts. HioPOS Cloud works with most of the ESC/POS receipt printers. You can also change the number of columns to print out. The standard is 42 columns. Now choose the Connection. It works with Local network, Bluetooth, or USB Port. If you have an Ethernet of Wi-Fi printer, choose Local Network and enter the printer IP address. By default the printer port should be 9100, if not check the printer user manual. If the printer is Wi-Fi choose the Local Network Connection. This time both, printer and tablet, have to be in the same wireless network. Enter the printer IP address and its port. Press Test to make sure it works fine. 7 de 99
13 If you want to connect it by Bluetooth you need to first connect it to the Android OS. Go to the Android Settings and there go to Bluetooth and select the printer from the Bluetooth devices in range. Once connected we'll go back to the HioPOS Cloud to choose the Device that will appear automatically on the list. Press Test to make sure it works fine. If you choose USB Port the printer must be connected by cable. In Device select the according port and press Test to make sure it works fine Cash Drawer For the all-in-one terminal, you may use the cash drawer provided or any 12V cash drawer. (Using any cash drawer that is not 12V may damage the terminal) If you don't have an all-in-one terminal but the receipt printer is compatible with ESC/POS, then the printer has a DK port to connect the cash drawer. Select Printer from the type of Connection Scanner The scanner, or bar code reader, can work by Bluetooth, USB Port or Keyboard Simulation. If you want to connect it by Bluetooth you need to first connect it to the Android OS. Go to the Android Settings and there go to Bluetooth and select the scanner from the Bluetooth devices in range. Once connected we'll go back to the HioPOS Cloud to choose the Device that will appear automatically on the list. Press Test to make sure it works fine. If you choose USB Port the scanner must be connected by cable. In Device select the according port and press Test to make sure it works fine. The entry by Keyboard Simulation doesn't need any device connected to the point of sale. Type in the keypad the item's bar code, and then press enter. HioPOS Cloud will put the item in the receipt Display Select the customer display model, as well as the according configuration Magnetic Stripe Reader In a tablet the magnetic card reader is connected to the Audio Port. Plug in the jack to the Audio Port and select the according Connection. Press Test to make sure it works fine. 8 de 99
14 2.7 Items quick creation HioPOS Cloud organizes items at three main levels: Families, Subfamilies and Items. To create new items first click New family. Once a family has been named, you can now create a New subfamily or go to Edit items. Select the second option New items From the Edit Items window you can create a New item and give it a Price, Reference number or Bar Code, also choose if it has stock. From the Edit Items window, you can select from the top menu the family whose items you want to edit, together with the price rate. The Gallery opens us a database of items with pictures that come ready to use in HioPOS Cloud, this way the installation and start up process is much shorter, it also helps to organize pictures of items that we are updating. Select your Business type where you'll find the specific families to your initial selection, together with its items. Select those items you want to add, HioPOS Cloud includes many business types that will allow you to configure your terminal quick and easy. 9 de 99


15 To modify more than one item at a time just select them before you make any change and the changes you make will apply to all of them. The button Search at the bottom right will help you find any item and so select them directly. 10 de 99


16 2.7.2 Margins The second feature from the bottom ones allows the user to calculate margins for each item. This feature is designed so you can set prices according to its cost and the margin you want to keep. The margin amount will be calculated as a real amount or as a percentage. First you need to enter the Cost of each item and then add the margin amount we want to keep after it's sold, the margin can be a nominal amount or a percentage over the item cost. Once the margin has been set, the software will give us the price we have to sell it for. This price can be changed, together with the other options, this way we can have a price according to the margins we want to keep. As you keep making purchases in HioPOS Cloud the cost of these items will be updated. 11 de 99

17 2.7.3 Taxes If items have different taxes you can set them from this menu. Choose the sales tax, the take away tax and the purchase tax. You can leave any of these fields blank if it doesn't apply. You can also set if an item is EBT, in case you are selling items subsidized by the government. If you don't know the meaning of EBT it means that there's no need for you to use it. If all the items you have the same tax, it's not necessary for you to go one by one and assign a tax to it. You can set taxes at a store level, go to Stores from the Configuration menu and set the Tax by default. 12 de 99


18 2.8 Table Layout If you chose to work with Tablet Layout at the Custom Configuration, HioPOS Cloud will show you the window where you can create your own 3D rooms with common furniture. It supports multiple rooms for each store. When you select a table the app takes us Sale screen, from where we can start a sale by adding items to the receipt and then leave it back On Hold. The table will go from being empty/free to be occupied. You can always go back to that sale by pressing on it. To move around a room press on one spot of the screen and drag you finger around the surface. Zoom in and out by pressing on the screen with two fingers and moving them in and out from the middle spot, depending on if you want to zoom in or out. 13 de 99

.")
19 2.8.1 Modify the Table Layout To make changes in the Table Layout go to Rooms from the Configuration menu. The position and zoom you set at this screen will be the one that will appear by default at the Table Layout when making a sale. There are two design tools: the one to pick up the furniture (top right) and the one to change the orientation (bottom right). To place a new table or any piece of furniture press at the top right spot, where you can choose between all the furniture you can add. 14 de 99
 to change its orientation. After you finish press Close and save all changes.")
20 Select the piece of furniture you want to add and then, after it appear at the top right spot, drag it to where you want to place it. Once in place turn the wheel (bottom left) to change its orientation. After you finish press Close and save all changes. To add new rooms with different seating, go to Rooms from the Configuration menu. You can also choose which room to load by default, go to Terminal from the Configuration menu. There you need to change the Room by default and then select that room that will be loaded each time we go to the Table Layout window. 15 de 99
21 2.8.2 Tables number The table number is assigned according to the number of the last one that was created. To change this number go to that room settings window, hold the table for three seconds and select the option Table number from the drop down list. Enter then a new number for that table. You can add any number you want, so different tables can have the same number. 16 de 99

22 2.8.3 Locked tables Tables might get locked by different users when working in an environment with more than one HioPOS sharing the database and rooms. A table is locked when, for example, Terminal 1 opens that table and puts an item on the receipt without finishing the sale and without leaving it on hold either; then Terminal 2 comes in and tries to enter that same table but finds out that it can't since it's locked by another terminal (in our case Terminal 1). When the Terminal 1 finished the sale or puts it on hold, any other terminal can enter that table and make changes on the sale. It can happen that a terminal enters a table to select some items but, without leaving the sale on hold and without finishing it either, the terminal is turned off and it's not connected any more. In this case the table would be locked indefinitely until that terminal gets back in to put it on hold or to finish it. To unlock a locked table we have to go to that room settings and press on that table for three seconds, until the drop down list appears, then select the option Unlock. Once the table's been unlocked it becomes available to any terminal. 17 de 99
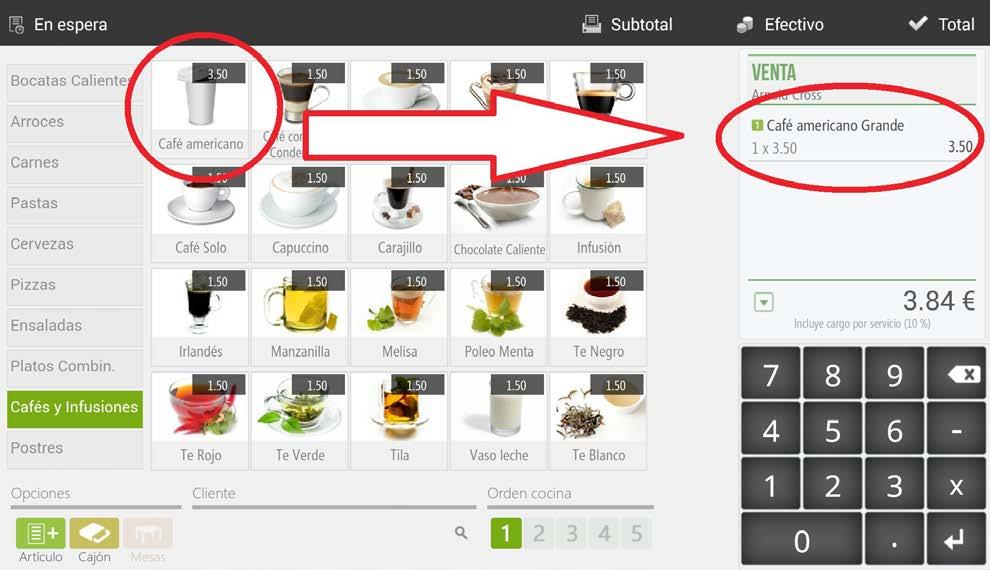
23 3. Sales HioPOS Cloud supports sales with different payment types, and to finish sales in different ways. 3.1 The sale screen The sale screen has three main parts: the families (left), the items (middle) and the receipt (right). The order in which families and items appear can be set from Items in the Configuration menu. If we select an item, the item will appear on the receipt. 18 de 99
24 3.1.1 Changes on the receipt lines You can make changes on each item you add to the sale. Select the item or items from the receipt and all the available options will appear: Units: Change the units on the receipt on the selected items. Discount: Assign a discount as a percentage on the selected items. Price: Changes the price from the selected items. Modifiers: Adds a modifier to the selected items. The modifiers have to be created beforehand at Modifiers from the Configuration. Kitchen order: Changes the order on which the items will be printed at the kitchen. Refund: Refunds / Voids the selected items. Refunded items will appear negative on the receipt, showing the negative price. Delete: Deletes the item from the sale. 19 de 99
25 3.1.2 Changes over the receipt total Press on the header of the receipt to see the menu with all the options to make changes on the whole receipt: Client: Assign a client to the sale so you can make an invoice of it or send it by . Guests count: Enter the number of guests per sale. It's has statistic purposes. Rate: Change the price rate that's being applied on the receipt. Discount: Apply a discount as percentage over the sale total. New split: Creates a second receipt inside the same sale, allowing you to finish two receipts at the same time but to cash them separately. Split: Divides the sale in two or more of them. Any item can go from one receipt to the other, drag the around to move them. 20 de 99
26 3.2 The sale in cash HioPOS Cloud has a special feature for those sales that are paid in cash. This way you automatically choose the payment method and the receipt is automatically printed out. - First choose the items to sell. - When the items are on the receipt select Cash from the top menu. Enter then the amount paid by the client and HioPOS Cloud will show you how much is the change. - Press Accept to finish the sale and print the receipt. 21 de 99

27 3.3 The sale with different payment methods If you are working with different payment methods select any of the ones you have available before finishing the sale. First choose the items to sell and press Total. HioPOS Cloud will then show you the available payment methods. Select the one you want and enter the tendered amount. To finish the sale press Print or Don't print, depending on if you want to print the receipt or not. 22 de 99
28 3.4 The subtotal While you are making a sale you can print a subtotal of it. For example, in a restaurant the waitress can bring the subtotal receipt to the client's table with the amount due. Once they have accepted the Subtotal the waitress can finish the sale by pressing Total, choosing the payment method and printing the receipt. 3.5 Discounts During the sale process you can make two different discounts: a discount on the total and a discount on a sale line (item or items). Each discount can also have a reason assigned Discount reasons To select a discount reason is mandatory when making a discount over the total. To create or modify a discount reason, go to Configuration and select Discount reasons. There you can change the name and select the maximum and minimum percentage of discounts that the cashier can apply. 23 de 99
29 The percentage discount can also be set to not be modified during the sale, this means that each time the cashier selects that discount reason a fixed percentage discount will be applied. This fixed amount will be the Maximum percentage over the total. 24 de 99

30 3.5.2 Discount over the total Apply a discount over the sale total by pressing on the total of the receipt on the sale window or on the receipt at the payment method window. Select Discount or Apply discount. The discount over the total will always require a discount reason; select one from the discount reasons list that will pop up. After choosing a discount reason you can enter the discount percentage and press Accept. To apply a new discount you need to remove first the current discount, press on the header of the receipt (or on the receipt if you are at the payment method window) and then Remove discount. Now you can apply a new discount. 25 de 99
31 3.5.3 Discount on the sale line The discount to an item is applied by sale line. To apply a discount on one or more items first select them from the receipt and, from the drop down list, choose Discount. The option Discount reduces the price of an item by a percentage. After the discount is set press Accept. 3.6 Assign the sale to a client HioPOS Cloud allows you to manage clients and assign them to a sale, this way you can issue invoices, send documents by and do a follow up of them. You can assign a client to the sale in three different ways: 1. Press on the bottom box from the sale screen (where it says Client). 2. Press on the receipt header and choose Client from the drop down list. 3. Press on the box at the bottom left of the payment method window (where it says Client). 26 de 99

32 Once you choose to assign a client to the sale HioPOS will take you a window where you can choose between all available clients. Search them by FID, Name, Phone or . The quickest way is to look them up by their phone number. Enter the phone number with the keypad, if it's not available the following message will appear, letting us create a new client. 27 de 99


33 You can also manage your available clients from the Clients feature in Configuration. Press New client from the bottom left side and a new empty profile will appear for you to fill it. Enter for each customer all available data you have and choose if you Issue an invoice or Send the document by each time you assign that client to a sale. 28 de 99
34 3.6.1 Send documents by HioPOS Cloud can send documents by to your clients. First enter a valid address to the profile and mark the Send document by box. If the option Send document by is marked, each time a sale is assigned to that client the document will be sent by to him from the no-reply@hiopos.com address Invoices From the clients' profile you can activate the Issue invoice option, so each time a sale is assigned to the client an invoice will be created instead of a receipt. 29 de 99

35 Note: HioPOS Cloud uses by default different series for each type of document (receipt, invoice, voided receipt and voided invoice). You can change these series by document and by point of sale from the Terminal in Configuration. 3.7 Sales on hold The feature to leave sales on hold will change depending on if we work with Table Layout or not. Here we explain both cases: Sales on hold without Table Layout (direct sale) If you are making a sale with items already in the receipt and you leave it on hold, you'll be able to go back to it later on, press the button On Hold at the top right of the sale window. 30 de 99
36 To this sale you'll have to add it a sale ID, it can be either numbers or letters. If you swipe a card, like working with Open Tab, the card ID will be saved, so when you look search that sale on hold all you have to do is swipe again the same card. To get back to a sale left on hold press Sales on hold from the receipt when there's not a sale in progress. 31 de 99


37 Select from the list the sale that has the ID we provided. Once you've recovered the sale you can keep adding items to the receipt, leave it back on hold or finish it by pressing Total. The direct sale on hold feature lets you filter between the sales from all the cashiers available or to just see the ones your user left on hold Sales on hold with Table Layout This sale on hold is much more visual because with one quick look you can see all the tables from the room that are, whether empty or occupied. A table that's occupied is because it already has an open receipt assigned to it, or what's the same, a sale on hold. 32 de 99
38 Select an empty table or an occupied one, depending on whether you want to go back to an already started receipt or you want to start a new one. How it works is similar to sales on hold, where you first select the items you want to put in the receipt and then you can finish the sale or leave it on hold. 3.8 Split a sale You can split a sale to divide the receipt between different guests Split an ongoing sale By splitting a sale the receipt will be divided in two or more, this way you can cash out separately all the guests. There are three ways to split the receipt during the sale process: - Press on the header of the receipt from at the sale screen and then press Split from the drop down list. 33 de 99


39 - From the window where you can choose the payment method, press anywhere on the receipt and from the drop down list select Split. - From the Table Layout window press for three seconds on an occupied table, then select Split. 34 de 99

40 The result will be the same, no matter where you start it from. When splitting a sale the HioPOS will show two, or more, receipt on the screen, the current one and the new ones, where we can send the items from the original one so we split the sale. To move items from one receipt to the other drag them with your finger. You can also divide a single item so this will appear by the divided amount on each receipt you put it in. Press on the items and then select Divide. 35 de 99
41 Now each divided item can go from one document to the other press on the rounded figure with wedges. Each wedge is one unit of division that you can send to another document. To undo a division press on the item and select Regroup. 36 de 99

42 When there is a sale that's been split, you can still see all the receipts from the sale screen. See the arrows that appear at the receipt header, jump from one to the other with them. To cash out each receipt follow the usual sale process, like you do when there's just one receipt. You'll finish them one at a time. 37 de 99
43 3.8.2 New split HioPOS Cloud can also start a new receipt on the same sale without having to finish or leave on hold the previous one. Press on the header of the receipt and select New split from the drop down menu. You'll see how the receipt goes to zero and a number appears at the header, this means that this a new receipt, to go back to the previous one press the left arrow. To cash out each receipt follow the usual sale process, like you do when there's just one receipt. You'll finish them one at a time. 38 de 99

44 3.9 Tips and Service charge Tips and Service charges can be configured from the Terminal type in the Configuration menu Tips Tips can be freely modified when finishing a sale; this means that the tipped amount is not linked to a percentage or a certain amount of the sale. To enter a tip, go to the payment method window, after the receipt has been totalized. Press on the box Tip and enter the according amount. Finish the sale with or without print out The service charge The service charge, unlike the tip, is always applied to the sale total. In Terminal type, from the Configuration menu, select the percentage to apply to each sale. 39 de 99


45 Once there's a minimum number of guests you can apply a different percentage as service charge. Configure it from Terminal type in Configuration. This second service charge replaces the first one, so you only apply one at a time Menu like items By creating menus you are grouping similar items, for example, if they are entrées, main courses, desserts, or drinks, this way you can sell items as a combo. To create new menus or manage the existing ones go to Menus from the Configuration window. Here you can create new menus or edit the ones you already have. 40 de 99


.")

46 Menus creation and management This is the main window from the menus module: From the main options of the menu you can change the name, number of courses to offer, the price f the whole combo and the family where the menu item will be created (a menu on the sale screen will look like any other item). Each course can have as many items as you want and you can choose the days of the week it will be available. Each item can also have an extra price that will be added to the total of the combo. 41 de 99

47 Selling a menu First you have to have a combo menu already created and available, as explained in the last paragraph, and this menu has to be assigned to a family. On the sale screen first select the family that has the combo menu item in it and then select the item from the list. All courses that compose the menu will then appear together with the items each course has (items can be set to be available only certain days of the week). 42 de 99


48 Select the items from the first course and press Next. Do the same for each course until you've selected an item from each course. If you want to finish without having selected all the courses press Accept. HioPOS Cloud lets you sell multiple combo menus at a time. First enter in the keypad from the sale screen the number of menus to sell, and then press on the item like menu. For example: if you select three menus you'll have to enter three items of each course, they don't have to be the same though Modifiers The modifiers are items added to the original item, in a way that customize the order. These modifiers can also add an extra price to the total amount. 43 de 99

49 First thing you have to do to create these modifiers is to go to Modifiers from the Configuration menu. Modifiers are created by groups, so you have to add a group of modifiers to an item, this means that when you select that item for a sale you can choose between all the modifiers that family has. Select an item, press on the modifiers box and then select one of the modifier s families that available. Each time you sell this item it will make you choose between the modifiers assigned to it. Examples of modifiers: Cook time: rare, medium or well done. Garnishing: with potatoes, with vegetables. Pizza ingredient: extra cheese, anchovies, ham, olives. 44 de 99

50 4. Consult sales To consult the documents already issued, you consult sales. Go to Consult from the top main menu and then Sales. Enter the sale number in the top left box to search for a sale, or filter by POS, Date, Client, or Seller from the top right side. 45 de 99
 and the X Cash count (it only shows us what a Z cash count at that moment). 5.")
51 5. Cash counts The cash count of cash closing gives us a picture of the transactions done from the last cash count issued. There are two types of cash closing: the Z Cash count (to issue a final cash count) and the X Cash count (it only shows us what a Z cash count at that moment). 5.1 Z Cash count The Z cash count is a permanent and final cash count. Once done it can't be modified and from then on any other transaction you make will become part of the next Z cash count. The Z cash count is made up of three parts, the declared amount, the cash management, and the Z cash count report Declared amount Enter the total amount of each payment method used during that period of time from the last cash count until now. 46 de 99

 that will be available the following day to start selling.")
52 This is useful to see if there is any cash discrepancy. If there's a discrepancy HioPOS will warn you when you press Next. You can also choose the currency you want to do the cash count with Cash management For a proper cash management you need to enter the amount to withdraw from the cash drawer and the New float (amount to start the day with) that will be available the following day to start selling. The first box shows the float amount from the previous day, it can't be modified. 47 de 99
 and the total declared,")

53 The next three boxes show the sales, cash-ins and cash-outs done during current Z cash count time period. If there's any discrepancy between the total amount (float + sales+ cash-ins + cash-outs) and the total declared, HioPOS will warn us with a red message and the discrepancy Z Cash count report Shows the total amount of the transactions done during the period of time you select, distinguishing between: - Cash control - Summary by currency 48 de 99
54 - Sales by user - Sales by family - Sales by series - Sales summary You can exit with or without printing the document. To see any cash count again, go to Cash counts from Consult at the top menu. 5.2 X Cash count Pictures what a Z cash count would look like at that precise moment, calculating from the last Z cash count. The X cash count becomes more useful, for example, when working with shift jobs, with different cashiers or day and night shifts. HioPOS doesn't keep track of the X cash counts. 49 de 99

55 5.3 Consult cash counts After a Z cash count has been issued, to see it again you'll have to go to Cash counts from Consult. Here you can find any Z cash count you've made. Find them by the cash count number from the top left or filter by Date or by POS from the top right. 50 de 99

56 6. Payment methods By default the HioPOS includes three payment methods: Cash, Card and Credit. Configure them or create new ones from Payment methods at the Configuration. This is where you can configure them, select one of the available ones or create a New payment method: 51 de 99
57 6.1 Payment method configuration Each payment method can be configured separately from the others. - Show in the total screen: the payment method will appear in the payment method window when finishing a sale, so the user can choose to cash in the sale. - Open cash drawer: Once the sale is one the cash drawer will open (to configure your cash drawer go to Devices in Configuration). - Credit sale: When making a credit sale you'll need to assign a client to that sale, this way you'll be able to manage those credits. Go to Credit sales from the POS at the top main menu. - Must assign a client: The document will have to be assigned to a client, their data will be printed on the receipt, and, if set, the document will be invoiced or sent by . - Allow overpayment: If enabled you'll be able to choose if the extra amount will be used as Change, Tips or Surplus, and will appear like this on the receipt. - Minimum amount: Enter the minimum amount required to use this payment method. From the Z Cash Count tab choose if this payment method will have to be declared during the Z cash count. Choose the payment it's Optional, Mandatory of if it's Never declared. 52 de 99
58 6.2 The Cash payment method This payment method has limited options because of its nature, and it can't be removed. From the regular options there are only those related available for the cash payment method. 53 de 99
59 6.3 The Card payment method This payment method also has a singular configuration and it can't be removed either. This payment method is also special because it's linked with another module from Configuration, the Electronic payment. The configuration of the Electronic payment depends on you provider, enter only the data you can modify, the rest will be by default. The electronic payment device can be connected by Bluetooth or USB Port. If it's connected by USB port, the HioPOS will find it automatically and all you'll have to do is select the port it's connected to. If you are connecting it by Bluetooth, make sure first that the device is on and connected to the Android OS from the Android Settings. The way to manage tips can be configured. Select from Enter tips if you will accept them Before the payment or Never. Depending on the electronic payment device the signature can be done on the HioPOS screen or on the Receipt, select yours from Signature. 54 de 99
60 55 de 99

61 7. Warehouse and providers At the top menu there's the Warehouse, including the Purchases and the Inventory modules. With these you'll be able to manage the stock you have, make better forecasts or avoid running out of stock. 7.1 Purchases Register any puchase of items from here. Go to Purchases from the Warehouse top menu. Enter the items to purchase, together with the quantity and the cost of it. The quantity you purchase will be added to the stock you have, and the cost of the purchase will update the previous cost. If you select one, or more, of the items in the receipt you can change the Units, make a Discount as a percentage over the cost, change the Cost by unit of it or Delete the selected lines. 56 de 99


62 From the top menu you can see any waybill you've done, select the module Purchases from Consult Purchases by provider From the purchases module go to where it says Providers at the bottom and pick one from the list. The waybill you issue when finishing the purchase will have the provider data printed on it. 57 de 99


63 7.1.2 Consult purchases You can search for any waybill by the Number or filter by POS, Date, Provider or Seller. You can reprint any waybill. 58 de 99

64 7.2 Inventory From the inventory you can modify the available stock. Go to Consult and select Inventory. Select the items that you want to modify their stock. Enter a new quantity and Accept. When you are about to modify the stock, HioPOS shows you the current stock of it. The receipt will show you the items you are making changes on, the description on the receipt includes the new stock amount [1] and the difference [2]. 59 de 99


65 If you select one or more items of the receipt you'll be able to change the Units of it, and to Delete those lines. 60 de 99


66 7.3 Providers The data of your provider will be added to the purchase document and registered in the waybill. To create a new provider or modify an existing one go to Providers from the Configuration menu. Pick one of the available providers or create a New provider. Enter the basic data of your provider. 61 de 99

67 8. Kitchen printers 8.1 Kitchen printers HioPOS Cloud can work with up to five kitchen printers. Configure them from the Kitchen printers module in Configuration. If this feature is not available in your HioPOS consult your dealer since it's an extra feature. Each printer needs to be configured according to its print out situation. A print out situation is the kitchen printer where the order to prepare will be printed. You can also choose which items to be prepared in each kitchen situation from the Edit items feature within the Items Configuration. Kitchen printers can only be configured in local network (by cable or wireless), this means any device will have to be in the same network. First select the Printer model, then enter the printer IP Address and its Port (by default 9100). Press Test to make sure everything is working fine. Each printer can be turned ON and OFF. 62 de 99

68 8.2 Print out situations Printing situations lets you manage from which kitchen printer each item will be printed. To assign a situation to each item or group of items go the Items module in Configuration. This lets us use different areas to prepare each product, for example: the bar printer for drinks and the kitchen printer for hot meals. 63 de 99

69 8.3 Kitchen order The seller can freely choose the preparation order in a receipt, this way each item will be printed to the kitchen following the appropriate preparation order. The feature Kitchen order is available at the bottom of the sale screen, and lets you select from one to five according to the preparation order they have to follow. First select an order number and then the items that are going to be printed out in the kitchen following this order. When the item is put in the receipt, a small number with green borders appears at the beginning of the description, it tells you the kitchen print out order. 64 de 99
70 To change the order of an item that's already in the receipt select the item, or items, and from the drop down list, select Kitchen order. You'll have to then enter a new order for it. You can issue then a Subtotal or leave the sale On Hold, so this one will be printed in the kitchen. 65 de 99


71 9. Price rates and promotions In Configuration there's the module Rates that shows items by price rates and families. It also allows you to make special offers or promotions, with special prices and for a certain time period. 9.1 Creating new price rates Go to Rates and select New rate. All items will appear by families. Enter in the menu above the Name of the new rate and select if prices include taxes or not. Select also the family of items that will be displayed below. Enter a price for each item. If multiple items share the same price you can select the boxes at the start of each line and then select one of the empty boxes so all the items you selected will have the same price. 66 de 99


72 9.2 Create a promotion or special offer Promotions are created by time periods, this means that the promotion will be available during those days. Next to the items description and the price, within the same line, you can find the Promotion period, to enter the days it will last, and the Promotion price, to set a new price for the days this promotion will be available. After you select the promotion period you'll need to enter the price those items will have during those days. 67 de 99

73 To remove a price rate press the button Delete at the top menu. 68 de 99

74 10. Items by sizes HioPOS Cloud has a Sizes module, find them in the Configuration menu. Working with size charts lets you select a different size from the chart each time you pick up an item with sizes assigned to it. It's also useful to keep account of stocks and purchases since these can also handle items by sizes Creating new sizes Go to Sizes in the Configuration menu, there select New chart. There appears the sizes chart configuration, select New size and add as many as you want. There you can also name this new size chart. 69 de 99


75 10.2 Assign sizes to items Go to Items in Cofiguration. There select the family and create a new item, while you name it check the option below the text box that reads Items by size. After you select the item go to the size chart that applies to the item. You can create a new chart here too. After you enter the price, a new item by sizes will be created. After you create a new item by sizes you'll see that at the end of the item line appears a small chart, this means that this item is sold by sizes 70 de 99


76 Press on the chart to change the prices of those sizes, together with the cost, margin, barcode and price rates. You can also create a new size. 71 de 99


77 10.3 Sell items by sizes Go to the sale screen and choose an item to sell. HioPOS knows it's an items sold by sizes and will show the windows with all the available sizes. After you choose a size, the item will go to the receipt, including the description of it and its size at the end of the description. You can add other items to the receipt and cash the sale like you usually do. 72 de 99
78 73 de 99


79 11. Statistics HioPOS Cloud comes with a complete set up of Status Charts and Reports. Go to Statistics from Administration at the top main menu. Each report will be displayed on the HioPOS screen. Select the time period by choosing: current Day, Week or Month, or filter by Store, Client, Family or Item. Select a line from the output you get and choose between the drop down list. 74 de 99

80 HioPOS Cloud also includes friendly charts to see all basic details in one quick look. Select from the three available charts Status charts The status charts include general data about all the transactions, to see how the point of sale is doing with just one look. On the top menu there are the filter options to get the output you want. See the value with or without taxes, choose the store you want to see and the year. 75 de 99


81 From the features at the top you can set sales Goals that will presented as black lines in the column diagrams placed below, allowing for a quick comparison between what's been sold and what the goal was. The Sales & Goals displays, by columns, the monthly sales, together with the amount and the black line to have a reference of the monthly goal. 76 de 99


82 Below the Sales & Goals there are the total amounts of Sales value, Voided sales value, Discounts value, and Net value. The Daily sales diagram represents the total monthly sales by days. Next to it there are the percentages over the total, with Top sellers, To families, and Top items Previous year comparative Using this module you can compare a year with the previous one. Choose to the see data by Sales amount or by Sales number from the menu above. Select the store and choose to see amounts with Taxes included or not. The third box at the top shows the current year, select a different year to see data from that year; the comparative will be done between the year you select and the previous one. 77 de 99


83 The columns diagram displays in blue the selected year and in grey the previous one, allowing you to compare at sight, together with the amount. Between columns there's the percentage of change that occurred. Right below the diagram there's the total amount by years and the change over the total, and below these there's the Difference by seller and the Difference by family between these years. 78 de 99


84 11.3 Sales average The sales average analysis is done by hours and week days. From the top menu select any time period or choose between the three short cuts that are today, the current week or the current month. Choose if data will include taxes or not. The button Filters will let you see data by Stores and by Sellers. The top graph shows sales by hours. HioPOS analyses all sales for the selected time period and divides them by the number of days, to then display an average for that period. 79 de 99

85 The columns below include the sales average by days of the week. These average sales are calculated making an average of each day you select, for example the average of every Monday within the selected time period, and the same for the other days. 80 de 99

86 12. Advanced options 12.1 Export data HioPOS Cloud can export sales, items and clients by , choose between two formats: XML or CSV. Go to the Export module in Configuration. To get a periodic and automated data export for you to import to an ERP software, or for any other purpose, please contact your dealer. 81 de 99


87 12.2 Multiple stores configuration Go to Stores from the Configuration menu, there you can manage the stores or point of sales that are linked with yours. From the available features there are the ones you configure during the installation process, go to Edit next to the name of the store. The Settings lets you choose between the groups of stores to apply the changes to. By grouping stores you'll be able to apply changed to all the stores of the same group at the same time, this way you don't have to go point of sale by point of sale and apply the same changed. 82 de 99


88 The Shared resources shares details from other points of sale with yours, like sales on hold, as long as they are in the same local network. In Sellers you can share the users you have between the other linked points of sale. Press Edit to select between the stores you want to share them with. In Rates choose between the available price rates the one that will be used by default in your point of sale. Press Edit to share the price rates with other linked points of sale. In the Currency feature you can choose the default currency to use in the point of sale from all the available ones. Press Edit to share the currency rates with the other linked points of sale. The feature Default taxes lets you choose the tax to apply by default according to each type of transaction. The Payment methods feature lets you share the one you have between any store of the group you select. Press Edit to share the payment methods with the other linked points of sale. The feature Discount reasons lets you share your available discount reasons with the other points of sale of the group. 83 de 99

89 12.3 Change series of documents The series are the initials that each document HioPOS issues has. These are used to distinguish between documents. To change the series of your documents go to Terminal in Configuration. There you can change the series as you want, as long as they are not already in use. Select from the left menu another terminal to make changes on it as well. The series you use will be printed on its documents followed by a dash and the document number, starting always by number one. 84 de 99

90 12.4 User profiles The user profiles allow you to create groups of sellers that will share the same allowances and permissions to allow or deny the access to certain HioPOS features. Each HioPOS user is linked with a profile. The profiles that come by default are Administrator, Manager and Seller New profile To create a new profile go to New from the menu above. The new profiles are created according to the existing ones; this means that a new profile will have by default the same permissions as the ones you selected. Select the profile you want it to be based on and name it. Once created, all the options and permissions can be changed. To Delete or Edit a profile press the according button next to the profile name. 85 de 99


91 Permissions according to profiles The distinctions between profiles are done so you can group sellers. These permissions allow or deny access to any functionality HioPOS has. In the permissions by default, for example, there's the Administrator, who has all of them; the Manager, who has all the permissions except Configuration and Statistics; and the Seller, who is only allowed to issue basic sales. Mark or unmark any box to activate or deactivate that permission for the profile you are making changes on. If it's marked, the user will be allowed to operate that function, if it's unmarked the user won't be able to do it Access stores User profiles can be configured so from any configuration menu you can apply changes to the other stores. To do so choose between: Seller store, to apply changes only in this terminal; Group of stores of the POS, to apply changes to any of the stores of the group; and All the stores, to apply changes on any store the POS is linked to. 86 de 99

92 12.5 Receipt design From the Receipt design module in Configuration you can add headers and footers on the sale receipt. The receipt design window is divided in two parts, the one above is for you to enter the headers, and the one below is for you to enter the footers. Press New to add a note on the receipt. The notes you add will appear centered on the receipt, following the creation order. 87 de 99
93 12.6 Currency The Currency module from Configuration lets you change between currencies to use during the payment. After you choose a currency to modify or you select New currency, you'll be able to name them, choose how many decimals it has, choose the currency sign and initials, and configure these initials to go after of before the amount. You can also create new denominations according to the denominations this currency has. 88 de 99
94 12.7 Exchange rates The Exchange rates module from Configuration lets you add the current exchange rate according to the Reference currency. Select a reference currency, that will appear by default as 1.00, then enter the exchange rate of the second currency. After you save it, any sale you make with any currency will be calculated according to the set exchange rate. 89 de 99

95 12.8 Reset the app The option Reset allows the user to delete all the data stored in the terminal. After you reset the app, the software will be like new, this means that the next time you run it, it will ask you to choose the language and to enter the User name and Password, as if it were a new installation. The Reset button is at the top left side of the Configuration screen. Press Reset and confirm to the following message to reset the app. By default the reset feature is not activated for any user profile. To activate it go to User profiles in the Configuration menu. The option you have to activate is Reset terminal ID. 90 de 99


96 12.9 Lock app This module will put a password to exit the software, it's called Lock app in the Configuration menu When you put a password to exit the app users will have to enter a password every time they want to turn off the app. To exit the app go to the users screen and press Turn off to the top menu. Enter then the password you set. 91 de 99


97 If you have set a password to exit the app and you press the Android Home button, the Android OS will show a message like the following one: This message lets you choose what to do when pressing the Home button. If you don't want users to go to the Android OS, select HioPOS Cloud and the press Always. Every time you press the Home button you will now relaunch the HioPOS Cloud. Moreover, every time you turn on your terminal, the HioPOS software will be the first thing to be launched. 92 de 99
POS Support Manual 01/10/2013
 POS Support Manual 01/10/2013 The purpose of this document is to give complete instructions on how to use the POS module of Infusion software. This document should be read in conjunction with the Infusion
WEB POS USER GUIDE. Phone: Extension Version 2.0. Magento Compatibility: CE 2.0.
 support@magestore.com sales@magestore.com Phone: +1-415-954-7137 WEB POS USER GUIDE Extension Version 2.0 Magento Compatibility: CE 2.0 yright (c) 2009 2016 www.magestore.com 1 Table of Contents 1. INTRODUCTION...
Users Manual BLITZKASSE GastroExpress for Android
 2016 v2.1 Users Manual BLITZKASSE GastroExpress for Android Dear Customer, Thank you for placing your trust in us by purchasing our POS system. For any questions and suggestions concerning our POS system,
Foreword. Sales Associates Managers
 Foreword This book is a pocket guide for using the Register module for the InfoTouch Store Manager. It outlines the basic steps and procedures for processing sales, from the beginning to the end of a day.
HARBORTOUCH ECHO USER GUIDE HARBORTOUCH SUPPORT LINE:
 HARBORTOUCH ECHO USER GUIDE INDEX EMPLOYEE FUNCTIONS: Clocking In/Logging In Logging Out Calculator, ECR and POS Mode Beginning a Transaction Item Functions Ticket Functions Payment Options Refunding a
Point Of Sales. Below is the step to enable Optimum Point Of Sales module. Step 1. As shown in the figure, click the menu from the ribbon bar.
 Point Of Sales Below is the step to enable Optimum Point Of Sales module. Step 1 As shown in the figure, click the menu from the ribbon bar. Step 2 Select the Modules item form the drop down list. 1 P
Business Software Solutions. BPA Restaurant Delivery Professional Quick Start Guide
 Business Software Solutions BPA Restaurant Delivery Professional Quick Start Guide Contents Initial System Startup... 3 Defining Employees... 4 Creating Your Menu... 5 Adding Product Information to Your
NorthStar Club Management System. Retail Point of Sale (RPOS) Version General Users Guide RPOS
 Version General Users Guide RPOS") Retail Point of Sale (RPOS) Version 2.3.0 RPOS-12052006 December 05, 2006 Copyright Statement Except as otherwise specifically noted, NorthStar Technologies, Inc. reserves the right to change all or part
Retail Point of Sale (RPOS) Version 2.3.0 RPOS-12052006 December 05, 2006 Copyright Statement Except as otherwise specifically noted, NorthStar Technologies, Inc. reserves the right to change all or part
ONE BUSINESS - ONE APP RESTAURANT VERSION USER MANUAL
 ONE BUSINESS - ONE APP RESTAURANT VERSION USER MANUAL 1 TABLE OF CONTENTS GETTING STARTED WITH SHOPBOX CREATE A PROFILE 4 CREATE YOUR RESTAURANT 4 HOW TO CREATE, EDIT AND DELETE ROOMS AND TABLES 6 CREATE
CommBank Small Business app User Guide
 CommBank Small Business app User Guide CommBank Small Business app user guide 2 Contents Welcome to the CommBank Small Business app 4 CommBank Small Business app in 5 easy steps 4 We re here to help 4
English ELECTRONIC CASH REGISTER CAISSE ENREGISTREUSE ELECTRONIQUE ER-A347 ER-A347A MODEL MODELE INSTRUCTION MANUAL MANUEL D INSTRUCTIONS
 Sharp ER-A347 and ER-A347A operation and programming Manual English ELECTRONIC CASH REGISTER CAISSE ENREGISTREUSE ELECTRONIQUE MODEL MODELE INSTRUCTION MANUAL MANUEL D INSTRUCTIONS ER-A347 ER-A347A CONTENTS
Feature List. Copyright 2014, LS Retail ehf. All rights reserved. All trademarks belong to their respective holders
 Feature List Copyright 2014, LS Retail ehf. All rights reserved. All trademarks belong to their respective holders 1 Introduction... 3 1.1 Functional overview... 3 2 Central Restaurant Management... 4
PURCHASE & SUPPLIER MANAGEMENT
 MAGENTO 1 PURCHASE & SUPPLIER MANAGEMENT USER GUIDE Confidential Information Notice Copyright 2016 All Rights Reserved. Any unauthorized reproduction of this document is prohibited. This document and the
CashierPRO Retail Systems Inc. Release Note
 Version 4.0.9.3-02/17/16 MAJOR ENHANCEMENTS: Moneris Integration for Home Hardware Stores. Includes processing of Debit and Credit transactions communicating directly with a Moneris Pinpad. Allows for
mpos 4.6 Quick Start Guide
 mpos 4.6 Quick Start Guide Disclaimer This document and its contents, including, but not limited to, screen shots, dates and functional content expressed herein are believed to be accurate as of its date
LS Easy Retail 1.0 User Manual
 LS Easy Retail 1.0 User Manual Armuli 7, 108 Reykjavík, Iceland Tel: +354 550 9000 Fax: +354 550 9010 Copyright 2006, Landsteinar Strengur. All rights reserved. All trademarks belong to their respective
CorrigoNet Mobile Technician Application User Guide. For Android Phones
 CorrigoNet Mobile Technician Application User Guide For Android Phones Copyright 2013 Corrigo, Inc. All Rights Reserved. This document may not be copied, disclosed, transferred, or modified without the
Moneyspire Help Manual Moneyspire Inc. All rights reserved.
 2018 Moneyspire Help Manual 2015-18 Moneyspire Inc. All rights reserved. Contents 2. Getting Started 8. Operating the Program 13. Adding Accounts 15. Adding Transactions 18. Adding Reminders 21. Adding
Automan. Point of Sale. AUTOMAN POS (Web based Point Of Sale) For Retailer & Supermarket
 For Retailer & Supermarket") AUTOMAN POS (Web based Point Of Sale) For Retailer & Supermarket 1 Welcome Welcome to Automan POS! Automan POS is an Open Source based Retail Management Solution for Independent Retailers. Automan POS
AUTOMAN POS (Web based Point Of Sale) For Retailer & Supermarket 1 Welcome Welcome to Automan POS! Automan POS is an Open Source based Retail Management Solution for Independent Retailers. Automan POS
How to Configure the Initial Settings in SAP Business One
 SAP Business One How-To Guide PUBLIC How to Configure the Initial Settings in SAP Business One Applicable Release: SAP Business One 8.8 European Localizations English July 2009 Table of Contents Introduction...
Copyright Wolf Track Software
 Copyright 2009. Wolf Track Software No part of this publication may be reproduced in any form, by Photostat, Microfilm, xerography, or any other means, which are now known, or to be invented, or incorporated
Using the Commonwealth Bank EFTPOS terminal with QuickPOS
 Q U I C K P O S S U P P L E M E N T Using the Commonwealth Bank EFTPOS terminal with QuickPOS This special supplement shows you how to set up and use QuickPOS with the Commonwealth Bank s EFTPOS terminal.
Point of Sale Quick Reference
 Eagle Point of Sale (POS) Quick Reference January 2012 This manual contains reference information about software products from Epicor Software Corporation. The software described in this manual and the
Billing and Invoices. March 31, 2016 Version 2016 Release 1
 March 31, 2016 Version 2016 Release 1 General Notices Sample Code NetSuite Inc. may provide sample code in SuiteAnswers, the Help Center, User Guides, or elsewhere through help links. All such sample code
User Manual For EPOS 4 Excel v1.8.1 Manual Version: 26/3/2016
 User Manual For EPOS 4 Excel v1.8.1 Manual Version: 26/3/2016 2 P a g e Contents License Agreement... 9 1. Introduction... 10 What is EPOS 4 Excel?... 10 System Requirements... 10 2. Opening EPOS 4 Excel
ASI Point Of Sale 6.0 Startup Guide.
 ASI POINT OF SALE 6.0 STARTUP GUIDE Anand Systems Inc. 35 East 10 th Street, Suite F, Tracy, CA, 95376, USA Phone: 1-800-431-4786 Sales Extension 1, Support Extension 2 Fax: 1-800-431-4919 Email: info@anandsystems.com,
PAYD Pro Plus. In-Store Solution. Hardware Installation Guide (11/17)
") PAYD Pro Plus In-Store Solution Hardware Installation Guide (11/17) Need help? Web: moneris.com/support-paydproplus-instore Toll-free: 1-866-319-7450 Record your Moneris merchant ID here: Contents Introduction...2
PAYD Pro Plus In-Store Solution Hardware Installation Guide (11/17) Need help? Web: moneris.com/support-paydproplus-instore Toll-free: 1-866-319-7450 Record your Moneris merchant ID here: Contents Introduction...2
Table of Contents.
 Quick Start Guide Table of Contents Equipment Setup and Break-Down 1 2 Processing a Sale 3 Payment Types 3 Tax Change 3 Scanning Items 4 Price Checks 4 Voids/Returns 4 Reprints 4 Gift Certificates 5 All
Welcome to the topic on purchasing items.
 Welcome to the topic on purchasing items. 1 In this topic, we will perform the basic steps for purchasing items. As we go through the process, we will explain the consequences of each process step on inventory
Register App Training Guide
 Register App Training Guide Outline 01 Making an Order: Page 3 02 Editing Order Details: Page 11 03 Using UPC and Barcode Scanner: Page 20 04 Executing a Transaction: Page 23 05 Customer Screen and Receipts:
Pocket Salon Booking. salonbiz.com
 Pocket Salon Guide Pocket Salon is a tool for your guests to carry your salon in their pocket! The app allows them to view, confirm, and manage their visits anytime, anywhere however they want. Logging
Copyright Aldelo, LP All Rights Reserved.
 Aldelo POS User Manual PUBLISHED BY Aldelo, LP 6800 Koll Center Parkway, Suite 310 Pleasanton, CA 94566 Copyright 1997-2017 by Aldelo, LP. All rights reserved. No part of the contents of this book may
Microsoft Dynamics GP. Sales Order Processing
 Microsoft Dynamics GP Sales Order Processing Copyright Copyright 2012 Microsoft. All rights reserved. Limitation of liability This document is provided as-is. Information and views expressed in this document,
At the end of this module, you will be able to:
 1 At the end of this module, you will be able to: Outline the principles of the Multiple UoM solution and its advantages. Define the basic Multiple UoM definitions. Describe how Multiple UoM are used across
Microsoft Dynamics GP. Shipping Documents
 Microsoft Dynamics GP Shipping Documents Copyright Copyright 2011 Microsoft Corporation. All rights reserved. Limitation of liability This document is provided as-is. Information and views expressed in
User Manual For EPOS 4 Excel v1.5.2 Manual Version: 24/5/2013
 User Manual For Manual Version: 24/5/2013 2 P a g e Contents License Agreement... 9 1. Introduction... 10 What is EPOS 4 Excel?... 10 System Requirements... 10 2. Opening EPOS 4 Excel and Enabling Macros
Sage MAS 90 and 200 Product Update 2 Delivers Added Value!
 Sage MAS 90 and 200 Product Update 2 Delivers Added Value! The second Sage MAS 90 and 200 4.4 Product Update 4.40.0.2 is available via a compact download from Sage Online. Delivering additional features
Table of Contents. Welcome to igo Figure...1 About this Guide...1 What does igo Figure do?...1 What is Expected of Me?...1
 Table of Contents Overview Welcome to igo Figure...1 About this Guide...1 What does igo Figure do?...1 What is Expected of Me?...1 Chapter 1: The Basics Clocking In and Out...3 In Case of Problems...3
MANAGING POS SALES. Sign In
 MANAGING POS SALES Sign In 1. Enter your PIN. 2. Select Sign In. Home Screen The Home screen is displayed when you first open the POS. Use the Home screen to do the following: Access the Journal. Open
01/18/2018 Blackbaud Altru 4.5 Tickets US 2018 Blackbaud, Inc. This publication, or any part thereof, may not be reproduced or transmitted in any
 Tickets Guide 01/18/2018 Blackbaud Altru 4.5 Tickets US 2018 Blackbaud, Inc. This publication, or any part thereof, may not be reproduced or transmitted in any form or by any means, electronic, or mechanical,
WELCOME TO THE WEB SHIPPING USER GUIDE
 Online Shipping WELCOME TO THE WEB SHIPPING USER GUIDE webshipping.dhl.com ON THE GO OR IN THE OFFICE, WEB SHIPPING GETS IT THERE. Ideal for busy small-business owners, office managers, or anyone on the
SAGE ACCPAC. Sage Accpac ERP. Converting from Simply Accounting by Sage
 SAGE ACCPAC Sage Accpac ERP Converting from Simply Accounting by Sage 2008 Sage Software, Inc. All rights reserved. Sage Software, Sage Software logos, and all Sage Accpac product and service names are
Authorize.Net Mobile Application
 Authorize.Net Mobile Application Version 3.3.1 for ios and Android User Guide November 2017 Authorize.Net Developer Support http://developer.authorize.net Authorize.Net LLC 082007 Ver.2.0 Authorize.Net
3M Ariba Light Account Network Collaboration for Suppliers
 SAP Training Source To Pay 3M Ariba Light Account Network Collaboration for Suppliers External User Training Version: 1.0 Last Updated: 31-Aug-2017 3M Business Transformation & Information Technology Progress
Purchase Requisitions and Receiving
 Purchase Requisitions and Receiving VERSION: February 2018 Table of Contents About the Purchasing Process 3 Working With Requester Preferences 5 Creating a New Purchase Requisition 9 Reporting a Misuse
Contents OVERVIEW... 3
 Contents OVERVIEW... 3 Feature Summary... 3 CONFIGURATION... 4 System Requirements... 4 ConnectWise Manage Configuration... 4 Configuration of Manage Login... 4 Configuration of GL Accounts... 5 Configuration
STARTER PACKAGE User guide
 MAGENTO 1 STARTER PACKAGE User guide Updated February 2018 MAGESTORE USER GUIDE Page 1 of 126 Confidential Information Notice Copyright 2018. All Rights Reserved. Any unauthorized reproduction of this
Retail POS Manual. User Guide - Table of Contents Fall Edition
 2016 - Fall Edition Retail POS Manual User Guide - Table of Contents Overview Use Case(s) Accessing the Tool Opening a Ticket Navigating the POS Screen POS Main Button Functionality Lookup Item Remove
Virtual Terminal User Guide
 Virtual Terminal User Guide Table of Contents Introduction... 4 Features of Virtual Terminal... 4 Getting Started... 4 3.1 Logging in and Changing Your Password 4 3.2 Logging Out 5 3.3 Navigation Basics
Juniper Newsletter. User Manual Booking Engine - Update April st of March, Juniper Innovating Travel Technology
 Juniper Newsletter User Manual Booking Engine - Update April 2017 31st of March, 2017 www.ejuniper.com Juniper Innovating Travel Technology Content 1. Accommodation 4 1.1. New field to enter the information
ALDELO POS Training Manual
 ALDELO POS Training Manual Aldelo POS Training Manual PUBLISHED BY Aldelo, LP 6800 Koll Center Parkway, Suite 310 Pleasanton, CA 94566 Copyright 1997-2014 by Aldelo, LP. Second Edition All rights reserved.
Sage ERP Accpac Online 5.6
 Sage ERP Accpac Online 5.6 Integration Resource Guide for Sage ERP Accpac And Sage CRM (Updated: December 1, 2010) Thank you for choosing Sage ERP Accpac Online. This Resource Guide will provide important
If you have 4 components installed on your Joomla! you can install and use Mighty Commerce.
 MightyExtensions Commerce Introductionv 1.2 There are several requirements before installation of MightyExtensions Commerce: 1. MightyExtensions Resources component installed. 2. MightyExtensions Invoice
SMALL BUSINESS ACCOUNTING. User Guide
 SMALL BUSINESS ACCOUNTING User Guide Welcome to QuickBooks We're going to help you get paid, pay others, and see how your business is doing. Use this guide to learn key tasks and get up and running as
PAYD Pro Plus In-Store Solution
 PAYD Pro Plus In-Store Solution Getting Started Guide (11/17) Need help? Web: moneris.com/support-paydproplus-instore Toll-free: 1-866-319-7450 Record your Moneris merchant ID here: Contents Introduction...3
Aura BackOffice Reports Coherent Software Solutions
 Aura BackOffice 6.0.0 Reports Contents 3 Table of Contents Part I Reports 6 1 Sales... 8 Category Sales... 9 Item Sales... 12 Invoice Summary... 14 Discounts Summary... 16 Discounts Detailed... 18 Hourly
Table of content. B1 Time Task Manual
 Table of content Table of content... 1 Overview... 2 Configuration... 2 Prerequisites... 2 Configuration Task... 3 Configuration Time Registration... 4 Configuration Billing... 5 Configuration Permissions...
onepos Management Console Manual Version 3.4
 onepos Management Console Manual Version 3.4 onepos Manager Console Manual - Version 3.3-1 Copyright (c) 2001-2012, onepos, LLC All rights reserved. Except as permitted under the copyright act of 1976,
Contents OVERVIEW... 3
 Contents OVERVIEW... 3 Feature Summary... 3 CONFIGURATION... 4 System Requirements... 4 ConnectWise Manage Configuration... 4 Configuration of a ConnectWise Manage Login... 4 Configuration of GL Accounts...
NAB EFTPOS MOBILE. Terminal Guide
 NAB EFTPOS MOBILE Terminal Guide YOUR NAB EFTPOS MOBILE TERMINAL 2 NAB EFTPOS Mobile Terminal Guide TABLE OF CONTENTS Getting to know your NAB EFTPOS terminal 6 Contactless Tap & Go 8 Understanding your
Greater Giving Terminal User Start Guide
 Greater Giving Terminal User Start Guide Card Holder Data Security (PCI) The Payment Card Industry (PCI) Data Security Standards were developed by the major credit card companies as a guideline to help
Winzer Corporation 1 Revision: 4.0
 Table of Content Section 1: Getting Started... 2 1.1 Overview... 2 Section 2: Installation Overview... 3 2.1 Install CD / Start.exe... 3 2.2 Welcome Screen... 4 2.3 Device Selection... 4 2.4 Auto or Industrial...
Aldelo Gift Card Server User Manual
 Aldelo Gift Card Server User Manual Aldelo Gift Card Server User Manual PUBLISHED BY Aldelo, LP 6800 Koll Center Parkway, Suite 310 Pleasanton, CA 94566 Copyright 1997-2014 by Aldelo LP. All rights reserved.
Torex ABS-POS POS User Guide
 Torex ABS-POS POS User Guide Torex ABS-POS POS User Guide Date: 9 th January 2008 Copyright 2005, 2016, Oracle and/or its affiliates. All rights reserved. This software and related documentation are provided
COMMON TRANSACTIONS AND FUNCTIONS
 ENTERING ITEMS MANUAL ENTRY UPC/SKU/Description Select QUANTITIES (+/-) OR ITEMS. Enter UPC, SKU, or item description in ITEM field. Select desired item in window on right of screen. USE HOT KEYS Hot keys
Workbook
 Workbook 00-21-601-35057 2005 Sage Accpac International, Inc. All rights reserved. Sage Accpac International, Inc. Publisher No part of this documentation may be copied, photocopied, reproduced, translated,
User s Manual. esims Web. Synthes Information Management Suite.
 User s Manual esims Web. Synthes Information Management Suite. Table of Contents Navigation and Interface Structure of the User Interface 1 Getting Around 2 Search and Edit Search 3 Cycle Count Recording
FULL FEATURES LIST. Direct Electronic Data Interchange
 FULL FEATURES LIST Inventory Management 1 Point of Sale 6 B2B ecommerce 9 Warehouse Management 9 Reporting and Forecasting 10 Third Party Logistics 10 Direct Electronic Data Interchange 11 Integrations
VIRTUAL TERMINAL USER GUIDE
 VIRTUAL TERMINAL USER GUIDE VERSION 17.2 NOVEMBER 2017 COPYRIGHT 2007-2017 GLOBAL PAYMENTS INC. ALL RIGHTS RESERVED. RELEASE NOVEMBER 2017 The Virtual Terminal User Guide contains proprietary information.
Contents OVERVIEW... 3 CONFIGURATION... 4
 Contents OVERVIEW... 3 Feature Summary... 3 CONFIGURATION... 4 System Requirements... 4 ConnectWise Manage Configuration... 4 Configuration of Manage Login... 4 Configuration of GL Accounts... 5 Configuration
The ioffice Essentials Cheat Sheet
 The ioffice Essentials Cheat Sheet We recommend using Mozilla Firefox (www.mozilla.org) or Google Chrome (www.google.com/chrome) when working with ioffice. Additionally, you ll need your ioffice user name
User s Guide for FrontRest
 User s Guide for FrontRest Index Installation of FrontRest... 4 Installation in ICG terminals......... 4 Installation in other terminals... 4 Installation of the software... 4 Terminals and devices..........
MARKET LINE COMPUTERS TOTAL RENTAL USER MANUAL
 MARKET LINE COMPUTERS TOTAL RENTAL USER MANUAL CONTRACT FUNCTIONS... 4 OPENING A NEW RENTAL CONTRACT... 5 CREATING A RENTAL RESERVATION... 6 RESERVATIONS... 7 LONG-TERM CONTRACTS... 8 CREATING A QUOTE...
Performing End of Day
 One Blue Hill Plaza, 16 th Floor, PO Box 1546 Pearl River, NY 10965 1-800-PC-AMERICA, 1-800-722-6374 (Voice) 845-920-0800 (Fax) 845-920-0880 Performing End of Day In order to close out a day at your store
user guide Tablet 2013 by Sysco. All rights reserved
 user guide Tablet 2013 by Sysco. All rights reserved welcome to sysco counts Time is money in the foodservice business and every second counts literally! Sysco Counts simplifies taking inventory and ordering
WasteMan 2G. Key Features. Newcastle Weighing Services Pty Ltd. Prepared by. Office: (02) Fax: (02)
 Fax: (02)") WasteMan 2G Key Features Prepared by Newcastle Weighing Services Pty Ltd Office: (02) 4961 4554 Fax: (02) 4962 1137 Email: sales@nws.com.au DATABASE MANAGEMENT SYSTEMS WASTEMAN 2G KEY FEATURES WasteMan
WasteMan 2G Key Features Prepared by Newcastle Weighing Services Pty Ltd Office: (02) 4961 4554 Fax: (02) 4962 1137 Email: sales@nws.com.au DATABASE MANAGEMENT SYSTEMS WASTEMAN 2G KEY FEATURES WasteMan
Sage 300 ERP Sage CRM 7.1 Integration Upgrade Guide
 Sage 300 ERP 2012 Sage CRM 7.1 Integration Upgrade Guide This is a publication of Sage Software, Inc. Version 2012 Copyright 2012. Sage Software, Inc. All rights reserved. Sage, the Sage logos, and the
NetSuite OpenAir Mobile for iphone User Guide Version 2.2
 NetSuite OpenAir Mobile for iphone User Guide Version 2 General Notices Attributions NetSuite OpenAir includes functionality provided by HighCharts JS software, which is owned by and licensed through Highsoft
Sage Accpac ERP Integration with SageCRM 6.1
 SAGE ACCPAC Sage Accpac ERP Sage Accpac ERP Integration with SageCRM 6.1 Update Notice 2008 Sage Software, Inc. All rights reserved. Sage Software, Sage Software logos, and all Sage Accpac product and
user guide phone 2014 by Sysco. All rights reserved.
 user guide phone 2014 by Sysco. All rights reserved. welcome to sysco counts Time is money in the foodservice business and every second counts literally! Sysco Counts simplifies taking inventory and ordering
Using PAYD Pro Plus for Gift Cards
 Using PAYD Pro Plus for Gift Cards (10/17) For more information and assistance: Web: moneris.com/support-paydproplus-mobile Toll-free: 1-855-423-PAYD (7293) Record your Moneris merchant ID here: Contents
Year End Close Procedures - 1 -
 Microsoft Dynamics GP 2011 Year-End Closing Procedures This manual should be used as a guide along with the screen specific help, printed Microsoft manuals and on-line help available through CustomerSource,
WAREHOUSE SUPPORT SITE
 WAREHOUSE SUPPORT SITE TUTORIAL NORTH AMERICA // EUROPE // +353 (0) 61 708533 AUST?RALIA // +61 2 8003 7584 THANK YOU Thank you for choosing B2BGateway for your warehousing EDI needs We are proud to have
Performance with a single touch
 Need stock and employees control? Need fast check-out time and loyal customers? Need a powerful POS without implementation headaches? Your search is over! Performance with a single touch Whether you open
Millennium. Release Notes. April 2013 Update. Version
 Millennium Release Notes April 2013 Update Version 2013.1.33 Copyright Information 2013 Millennium by Harms Software Inc. All rights reserved. Every effort has been made to ensure that the information
LightspeedEVO. Please read this entire document before loading the update
 Release Notes LightspeedEVO Version 6.1 Please read this entire document before loading the update IMPORTANT! Rental billing changes require new account setup Action Required: Dealers using the rental
We make business easy. One POS software To excel in all your retail challenges
 We make business easy One POS software To excel in all your retail challenges Designed for retailers of all sizes from small companies to large enterprises LS One is a feature rich, quick-to-learn and
Invoice Manager Admin Guide Basware P2P 17.3
 Invoice Manager Admin Guide Basware P2P 17.3 Copyright 1999-2017 Basware Corporation. All rights reserved.. 1 Invoice Management Overview The Invoicing tab is a centralized location to manage all types
QUICKBOOKS ONLINE ACCOUNTANT. QuickBooks Online Certification Training Guide
 QUICKBOOKS ONLINE ACCOUNTANT QuickBooks Online Certification Training Guide QuickBooks Online Certification Training Legal Notices 2017 Intuit Inc. All rights reserved. Intuit, the Intuit logo, QuickBooks,
Purchase Order, Requisitions, Inventory Hands On. Workshop: Purchase Order, Requisitions, Inventory Hands On
 Workshop: Purchase Order, Requisitions, Inventory Hands In this follow up session to the Operations Changes in Purchase Order, Requisition, and Inventory Theory course, this hands on session will look
Asset Management. Visit us at: or call SCAN
 Asset Management Why BarScan? The modern workplace is a complex combination of computer equipment, furniture, and other equipment with compliance, accounting and location tracking issues. To better manage
First Data EFTPOS. User Guide. 8006L2-3CR Integrated PIN Pad
 First Data EFTPOS User Guide 8006L2-3CR Integrated PIN Pad 2 Contents What are you looking for? Get to know your PIN pad Introduction 05 PIN Pad location and PIN privacy 05 PIN Pad ownership 06 Your PIN
Solar Eclipse Product Serial Numbers. Release 9.0.1
 Solar Eclipse Product Serial Numbers Release 9.0.1 Disclaimer This document is for informational purposes only and is subject to change without notice. This document and its contents, including the viewpoints,
ALLDAY TIME SYSTEMS LTD. Allday Time Manager Lite User Guide
 Allday Time Manager Lite User Guide 1 Table of Contents Table of Contents... 2 Starting Allday Time Manager... 3 Logging In... 3 Adding a New Employee... 4 Viewing / Editing an Employees Record... 5 General
Zebra s Repair Order Portal for Partners COURSE CODE: RPE01
 Zebra s Repair Order Portal for Partners COURSE CODE: RPE01 April 2017 Introduction Welcome to the Zebra s Repair Order Portal for Partners course. This course explains how to navigate the Repair Order
onepos Management Console Manual Version 5.0
 onepos Management Console Manual Version 5.0 onepos Manager Console Manual - Version 5.0-1 Copyright (c) 2001-2016, onepos, LLC All rights reserved. Except as permitted under the copyright act of 1976,
WELCOME TO THE ONLINE SHIPPING USER GUIDE
 Online Shipping WELCOME TO THE ONLINE SHIPPING USER GUIDE onlineshipping.dhl.com ON THE GO OR IN THE OFFICE, Online SHIPPING GETS IT THERE. Ideal for busy small-business owners, office managers, or anyone
CHAPTER I INTRODUCTION TO ZAHIR ACCOUNTING 5.1
 CHAPTER I INTRODUCTION TO ZAHIR ACCOUNTING 5.1 1.1 Introduction Welcome and thank you for choosing Zahir Accounting Version 5.1, we hope our product and service will fulfill your needs. Zahir Accounting