Process Hints and Tips INDEX
|
|
|
- Kerrie Sims
- 5 years ago
- Views:
Transcription
1 Process Hints and Tips INDEX IMS Tips Storage of & Retention of documents Internal invoices Adding Item to Personal items Raising a purchase order Changing account codes on purchase order Approve Order Approve a Purchase order without printing Printing to PDF Changing Tax Spec Receipting process Viewing receipt against purchase order Credit note process Fulfilling purchase orders Viewing invoice against purchase order Finding a supplier Link to Web form for Delivery note notification Which Tax code should I use? Uplifting a PO Foreign Purchase Order Dummy Purchase Order Is the supplier active? Has my supplier been paid? What are the payment terms for my supplier? PO accounts for Internal trading Receipting Report Find a Vendor when raising a purchase order (link within Purchase order) EAS reports Ease Opening View EAS 2 BvA Reports EAS2 Commitments/PO EAS2 General o o Account Status Check Voucher Report by item EAS2 Trx Reports

2 Saving an item to your personal menu Highlight the item you wish to save to your personal menu Actions < Add to Personal This item will now appear in your personal menu, as shown below Index


3 Fulfillment of Purchase orders Aptos > PO Management > Purchase Ordering > Update > Fulfil Pos Enter PO Prefix (example PGA)

4 Select F8 on your keyboard Check to ensure the purchase order can be close: For example has the goods arrived and all the invoices been paid, you can check this from the Purchase order by selecting the box to the right of the number.


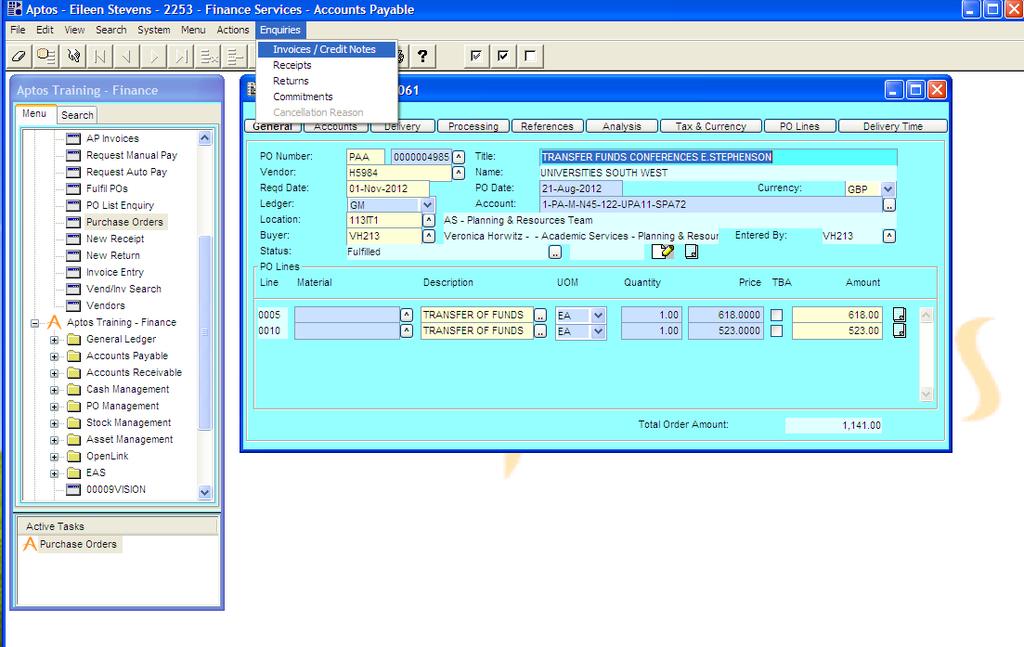
5 The purchase order is then seen, go to enquiries Invoice / credit notes as shown below.


6 As shown below you can see an invoice has been paid If there has been an invoice registered, scheduled for payment or paid this will be show as above. If the Net Amount on the invoice = the Net Amount on the purchase order and the status is Paid then this can be fulfilled. To do this close the windows to return to the Fulfil purchase orders view as below Select the items that you know are complete


7 And select the confirm button, bottom right The items will then show fulfilled as shown above. Index


8 PO Receipting Report Open an Excel workbook Select Add-Ins at the top of the menu bar Select Aptos < connect The Aptos sign on will appear as above, enter your user name and password, which you use to log into Aptos, click ok.


9 Select Aptos < Run Query Click on the + to open IPA and double click on PO_GR_AP_summary_report Enter your PO prefix example PCC and click ok

10 Column A-J details your purchase order Column K- W details your receipting. Column P details if it has been receipted or needs receipting Column X-Y details invoice amounts paid Colum Z details the supplier s name. Index
 you do not have to enter a PO number this will generate automatically. 2.")
11 Raising Purchase order PO Management < Purchase Ordering < Update < Purchase Order Tab between fields 1. PO number enter prefix (example PAA) you do not have to enter a PO number this will generate automatically. 2. Title field, enter relevant information (in this example I have placed the initials of the person where they are going date they are going to attend) this will make it easier to view details on certain reports. 3. Vendor, enter code if known, this is usually a single letter followed by 4 numbers) if unknown you can drill into the dropdown box to the right. 4. Enter the date of the event or when you are expecting to receive the goods. 5. The PO will automatically generate. 6. Enter the Ledger, example GM. 7. Enter the account code. 8. Tab to description, enter the details as you did in the title field and expand if you want to. 9. UOM, EA can be entered if you know the quantity required, then enter quantity in the next field, or leave UOM and Quantity and enter the value of the goods. F3 add a new line if required.


12 Enter the description and quantity or value to complete the second line. If you want to change the change account code of the second line click on the accounts tab Change the code Index


13 Change tax spec If you have items that have different tax specs < select the Tax & Currency tab Delete the Tax spec that has generated and click into the drill box You can then select the code you require OS is generally used when raising internal orders or to a supplier who are self employed Select ok

14 Approve the order Actions < Submit for Approval To avoid printing when making amendments remove the print required mark Purchase orders should be, ed, faxed or posted to suppliers as it obtains the Universities terms and conditions and vital information Index


15 To print to PDF Don t select the tick box and continue to print the purchase order, the following box will appear Make sure the tick is in Use STP Printing and drill down


16 Highlight EXPO_FULL and click OK This will take you back to the main screen click ok At this point do not select your printer but select PDF creator it may be called something slightly different according to what version of windows you have, however it will always say PDF. Once selected select print

17 If you want to add a title you can change this in the document title, select save You can save this anywhere on your PC. You may find it useful to save to your desktop to make it easy to find when ing. Select Save This is the saved Purchase order, which can now be ed to the supplier. Index


18 Receipt Purchase Order PO Management < Receipts and Returns < Update < New Receipt Enter the PO number as shown below Tab or F8


19 This will bring the purchase order lines through as shown above We are going to receipt both lines, tick both boxes as above and click ok If you only received 50 worth of packs you would change this figure at this stage by clicking into the box and amending and change GRN: You don t need to enter anything in this field however if you have to return with any queries in the future this will assist. Enter the receipt note if you have one Or Enter the name of the person who has contacted you to advise of the goods or services have taken place and the date of which they informed you.

20 Actions < Submit Receipt Select OK It is not necessary to keep the paper document once you have receipt Index


21 Find a Receipted purchase order Enquiries < Receipts

22 Receipt number you can drill down to view the details as below Index


23 Returning goods or Credit Process Find and note the Aptos delivery receipt PO Management < Receipts and Returns < Update < New Return Enter receipt number

24 Tab or F8 Tick the line you need to return Click OK

25 Enter the Value in this case of the amount you are returning select the down arrow and choose Resupply or Credit Note: Resupply, you will need to receipt the goods when they are received Credit note, you will need to fulfil the order once all invoices and credit notes have been paid. A credit note will not be paid against the purchase order but against the supplier and the account code you provide when you receive it in your in-tray. Select ok


26 Enter details of the return in the Rtn Note field Actions < Submit Return
27 Select OK Index
28 Viewing Invoice against Purchase order Retrieve the Purchase Order on Aptos Enter PO number TAB

29


30 Select box Index
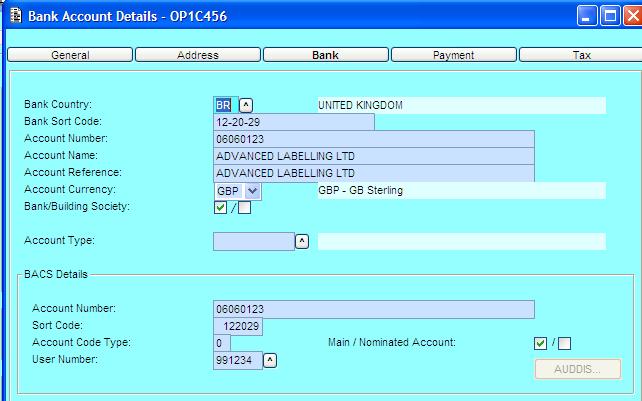
 In this example we are going to look for Advanced Labelling Ltd")

31 Finding a supplier Accounts Payable < Vendors Invoices < Enquiries < Creditor < Vend/Inv Search Remove AVL (if this is showing it will only provide you with the active suppliers) In this example we are going to look for Advanced Labelling Ltd always use Capital letters (ADVANCED LABELLING LTD) enter the wildcard at the beginning and end (+*ADVANCED LABELLING LTD+*) by doing this you do not need to enter the whole name as the wildcard picks up anything either side. Select F8 (keyboard shortcut)


32 Once you find the supplier there are many options. 1. Are they open 2. Bank Details 3. Address 4. Payment terms 5. Telephone number 6. Payment details We will look at this now. click in the box to the right of the suppliers (vendors) account code Are they open The status of this supplier shows as discontinued. Vendors name and address is shown on this screen Vendors Telephone number is at the bottom of the screen


33 To access the bank account details select the accounts tab Select the Ledger The select the Bank Tab
34 Index

35 Goods receipt Web form / Index


36 Is a Vendor open Double click Vend/inv Search Remove AVL By removing AVL means that Aptos will retrieve all suppliers that have been discontinues as well as available. Index
37 Which tax code should I use If you are uncertain what tax code to use, you can ring the supplier to check what they are going to charge. You will find further details from the following link. Index


38 Uplifting a purchasing order. Place your curser in the line you wish to change and press the space bar. The following message will appear Select OK Make the change then approve the order. Actions < submit for approval REMEMBER TO RECIEPT THE ADDITIONAL CHANGE Index


39 To see if a supplier is active. APTOS < Vend/Inv Search


40 Remove AVL Use the wild card at the beginning and end and enter the name of the supplier in the middle. Press F8 on your keyboard All the suppliers on Aptos will be shown below. Click in the box to the right of the name of the supplier


41 This supplier is discontinued If you want to view why it has been discontinued you can select:

42 This will identify the reason they are no longer on the system. If the reason codes. Housekeeping we regularly close suppliers that we have not used in months. Procurement They may have been set up as a one off supplier To re-open these suppliers you should submit a form to procurement, please make sure you have checked that all their details are still correct. Index
43 Foreign Dummy Suppliers All purchase should have a valid purchase order. If your supplier is not set up on Aptos and it is a one off purchase you can use a Foreign Dummy Supplier Raise your order and provide the PO number to the supplier. The invoice will arrive in Accounts Payable matching the PO and receipt that you have entered into Aptos The Accounts Payable team will manually enter them into Western Union and make payment Once payment has been recognised on your transaction report you should then close the order. List of Aptos codes Dummy Purchase order All expenditure made on behalf of the University should have a valid purchase order unless you are using a purchasing card. If you supplier is not on Aptos, is a one off payment, and they are not charging VAT you can raise the order using a Dummy Supplier code Raise your order and provide the PO number to the supplier. The invoice will arrive in Accounts Payable matching the PO and receipt that you have entered into Aptos The Accounts Payable team will manually enter them Aptos and make payment Once payment has been recognised on your transaction report you should then close the order.


44 List of Aptos codes Aptos codes

45 Index Internal PO vendor codes Index
46 Has my supplier been paid I know the invoice is on the system so does that mean they will be paid. Invoices to suppliers who are on Aptos are given payment terms when they are set up on our Finance System (Aptos) This will vary from 1 day Urgent to 30 days although most suppliers will be set up with 30 days. So if an invoice is dated on the 1 st October and they were on 30 days they would not receive payment until around the 31 st October. Aptos < Accounts Payable < Vendors < Enquiries < Vend/Inv Search Enter your wild card +* vendor name or partial name and the wild card at the end +* (EXAMPLE BELOW)
47 Select F8 on your keyboard top row Select which vendor you wish to search, as shown above Gemini Taxis Exeter have been selected Select the Transactions tab

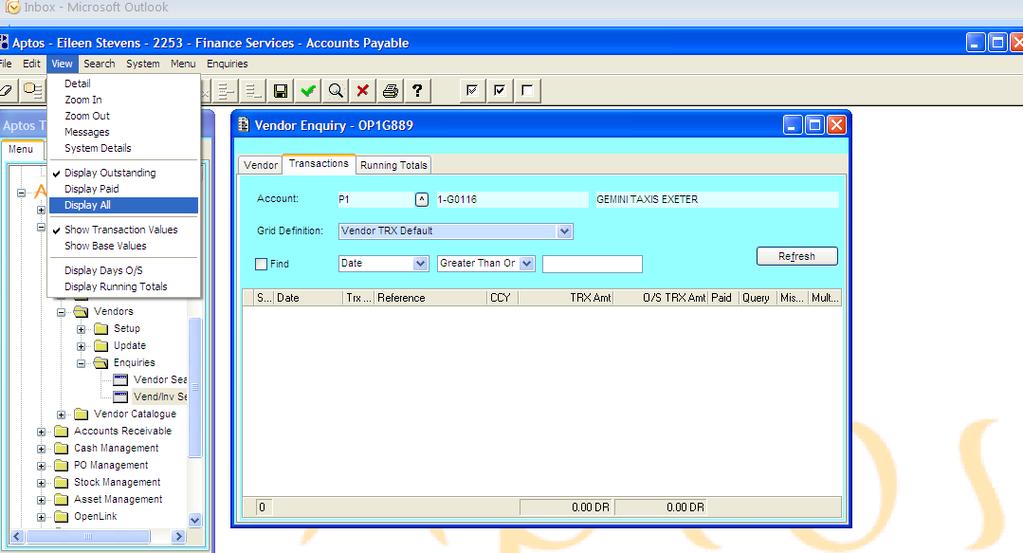
48 Select View


49 This will indentify invoices (PIN) and Payments (PBC) it will also indicate a Y at the end if it has been paid. The last payment date in this example was on 12 October 2012 if you select the box to the right of the Y it will give you further details This payment consisted of one invoice. Index

50 What are my vendors payment terms Payment terms are agreed when setting up a supplier on Aptos This will vary from 1 day Urgent to 30 days although most suppliers will be set up with 30 days. Aptos < Accounts Payable < Vendors < Enquiries < Vend/Inv Search Enter your wild card +* vendor name or partial name and the wild card at the end +* (EXAMPLE BELOW)


51 Select F8 on your keyboard top row


52 This shows their details < select Accounts select the box to the right of the vendor code
53 select the box under ledger This details the payment terms Index

54 Codes The structure of codes and a list of the subj1 and subj2 can be found by clicking on the link below: Opening View These notes will explain how to use: EAS2 Balance Reports EAS2 BvA Reports EAS2 Commitments/PO EAS2 General EAS2 Trx Reports When this screen appears it may look different this and have more or less reports. DON T PANIC! You can request to get them added if you don t have any of the above.

55 EAS 2 Balance Reports This report will show what has actually been spent YTD as a total and the total commitments still outstanding on each code. Double click on the GM Bal by Any Code This will then open into this screen


56 It helps to recognise the constants here so for example if you want to: 1. Extract travel from a budget unit you use N60 in Subj1 box and a budget unit e.g UPA01 in BUNIT code. or 2. You may want to extract information relating to a whole project so you would need to just put the project code in PROJ Code. Once EAS has run the report will look like this: Column A: The whole Aptos code Column B: Account description (can be deleted to simplify the report) Column C: Year Column D: Period Column E: Closing Balance Income is in brackets or a credit, expenditure is positive. Column F: Commitment Closing Balance A breakdown of the Aptos code can be then found to the right of this. Further breakdown needed?
57 If a further breakdown of this information is needed then you can run a EAS 2 Trx Report and a EAS2 Commitments/PO report.

58 EAS2 BvA Reports Double click on GM BvA by Any Code This will then open into this screen


59 Again it helps to recognise the constants here so for example if you want to: 1. Extract travel from a budget unit you use N60 in Subj1 box and a budget unit e.g UPA01 in BUNIT code. or 2. You may want to extract information relating to a whole project so you would need to just put the project code in PROJ Code. Once EAS has run the report will look like this: Column A: The whole Aptos code Column B: Account description (can be deleted to simplify the report) Column C: Original Budget Income is in brackets or a credit, expenditure is positive. Column D: Year Column E: Month Budget Movement Income is in brackets or a credit, expenditure is positive. Column F: Period Column G: Current Forecast Income is in brackets or a credit, expenditure is positive. Column H: Opening Actual Income is in brackets or a credit, expenditure is positive. Column I: Month Actual Income is in brackets or a credit, expenditure is positive. Column J: YTD Actual Income is in brackets or a credit, expenditure is positive.
60 Column K: Commitment Income is in brackets or a credit, expenditure is positive. Column L: Total Committed Spend Income is in brackets or a credit, expenditure is positive. Column M: Left to Spend Adverse (bad) is a credit, Favourable (good) is positive A breakdown of the Aptos code can be then found to the right of this. Columns C, E and G relates to the budget/forecast Columns H, I, J & K relates to actual
61 EAS2 Commitments/PO Double click on Current Commits by Any Code (this will show Purchase Orders which are not yet matched to invoices) This will then open into this screen
 code. or 2.")

62 Again it helps to recognise the constants here so for example if you want to: 1. Extract travel from a budget unit you use N60 in Subj1 box and a budget unit e.g UPA01 in BUNIT (shown as segment 6) code. or 2. You may want to extract information relating to a whole project so you would need to just put the project code in PROJ Code (shown as Segment 9 Code). Once EAS has run the report will look like this: Column A: The purchase order prefix e.g. PAA Column B: The purchase order number Column C: The purchase order line number Column D: Description of what is being purchased/sold Column E: General Ledger Code e.g. GM General Ledger Column F: The whole Aptos code Column G: Period Column H: Commitment date (date purchase order raised) Column I: Net amount charged
63 Column J: Amount of VAT charged Column K: Gross amount charged Column L: Aptos Vendor Code Column M: Aptos Vendor Name A breakdown of the Aptos code can be then found to the right of this.
64 EAS2 General Account Status Check Double click on Account Status Check This will show what codes are set up and whether they are active or inactive or simply not there! This will then open into this screen
 code. or 2.")

65 Again it helps to recognise the constants here so for example if you want to: 1. Extract travel from a budget unit you use N60 in Subj1 box and a budget unit e.g UPA01 in BUNIT (shown as segment 6) code. or 2. You may want to extract information relating to a whole project so you would need to just put the project code in PROJ Code (shown as Segment 9 Code). Once EAS has run the report will look like this: Column A: General Ledger Code e.g. GM General Ledger Column B: The whole Aptos code Column C: Account Type Code shows if it is a CLAIMS code as on a research code (can really be ignored) Column D: Account Status Active or Inactive
66 A breakdown of the Aptos code can be then found to the right of this.


67 Voucher Report by Item Double click on voucher report by item This report will give a breakdown of a journal posted This will then open into this screen Enter the journal reference e.g. JGFZ11059 where it says Voucher Reference Once EAS has run the report will look like this: Column A: Voucher Number each journal has a unique voucher number Column B: Voucher Line the line number within the journal Column C: Type of transaction e.g. GLJ General Ledger Journal Column D: General Ledger Code e.g. GM General Ledger Column E: The whole Aptos code Column F: Effective Posting Date - Column G: Voucher Post Date

68 Column H: Voucher Line Amount The amount posted on that line of the journal Column I: Voucher Status usually shows as posted at this point Column J: Unique User the person who has posted the journal Column K: Line Reference Journal reference e.g. JGFZ11059 Column L: Line Narrative description of that line of the journal Column M: Voucher Reference Journal reference e.g. JGFZ11059 Column N: Voucher Narrative description of the journal Column O:Amount type shows as TRX (transaction) EAS2 Trx Reports Double click on GM Trx by Any Code This report will give you a detailed breakdown of what has been posted to that account. This will then open into this screen
 code. or 2.")
 Column C: Transaction")
69 Again it helps to recognise the constants here so for example if you want to: 1. Extract travel from a budget unit you use N60 in Subj1 box and a budget unit e.g UPA01 in BUNIT (shown as segment 6) code. or 2. You may want to extract information relating to a whole project so you would need to just put the project code in PROJ Code (shown as Segment 9 Code). Once EAS has run the report will look like this: Column A: The whole Aptos code Column B: Account Description (this column can often be deleted once the report has run) Column C: Transaction Date Column D: Entered Date Column E: Year Column F: Period Column G: Transaction Type Column H: Transaction Reference Column I: Amount Column J: Narrative A breakdown of the Aptos code can be then found to the right of this.

70 PO List Report Aptos < PO Management<Purchase Ordering <Enquiries<PO list enquiry Enter your PO prefix in the PO number Range You can then search by PO Date from 1/8/12 if you leave the To: empty it will bring everything raised

71 Order Status Vendor Buyer
72 Web link to IMS Web link in The web link received in your will only take you direct to your in-tray if Internet Explorer is your default browser. Adobe To ensure the in-tray and invoice display correctly in IMS please ensure you are using the most up-to-date version of Adobe Internal Invoices. Internal Invoices will still be processed within the College or Service, there is no requirement to send them to Accounts Payable.
73 Storage and Retention of documents CH Record Keeping: How long must records be retained for: VAT: Minimum retention periods for manual records Type of manual record Sales or service dockets (mainly used by large organisations especially those involved mainly in retail trading e.g. mail order houses). Copies of orders, delivery notes, dispatch notes, goods returned notes, invoices for expenses incurred by employees. Production records, stock records (except those for second hand schemes), job cards, appointment books, diaries, business letters. Import, export and delivery from warehouse documents. Daybooks, ledgers, cashbooks, second hand scheme stock books. Minimum period to keep the record for No minimum period. May be destroyed when no longer needed. 1 year 3 years Purchase invoices, copy sales invoices, credit notes, debit notes, authenticated receipts. Daily gross takings records, records related to retail scheme calculations, catering estimates. 4 years Electronic Cash Registers (ECR) and Electronic Point of Sale (EPOS) records, see CH Bank statements and paying-in books, management accounts, annual accounts. Any record containing the VAT account. 5 years 6 years (No reduction) If a record falls within more than one of the categories above, apply the longer retention period. Any record that serves more than one purpose must be kept for the longest period required by those purposes, see CH This guidance is subject to any different requirements set out in a special scheme, see CH12400.