Regents of the University of California
|
|
|
- Anis Dean
- 5 years ago
- Views:
Transcription


1 Topography Issues Degradation of lithographic resolution PR step coverage, streaking Thickness differences pose problems for reduction steppers Direction of Spin PR PR PR Stringers Problematic when using anisotropic etching, e.g., RIE Nickel Surface-Micromachining Process Flow RIE Stringer EE C245: Introduction to MEMS Design LecM 5 C. Nguyen 8/20/09 34 EE C245: Introduction to MEMS Design LecM 5 C. Nguyen 8/20/09 35 Electrode Electroplating: Metal MEMS Photoresist Wafer Release Etchant Suspended Nickel Microstructure Use electroplating to obtain metal structures When thick: call it LIGA Pros: fast low temp deposition, very conductive Cons: drift, low mech. Q but may be solvable? Nickel Ti/Au Si 3 N 4 Isolation EE C245: Introduction to MEMS Design LecM 5 C. Nguyen 8/20/09 36 Oxide Nickel Metal Surface-Micromachining Photoresist Titanium Titanium Gold Gold Deposit isolation LTO: Target = 2 m 1 hr. 40 min. o C Densify the LTO o C for 30 min. Define metal interconnect via lift-off Spin photoresist and pattern lithographically to open areas where interconnect will stay Evaporate a Ti/Au layer Target = 30nm Ti Target = 270nm Au Remove photoresist in PRS2000 Ti/Au atop the photoresist also removed EE C245: Introduction to MEMS Design LecM 5 C. Nguyen 8/20/

2 Nickel Metal Surface-Micromachining Photoresist Evaporate Al to serve as a sacrificial layer Target = 1 m Lithography to define anchor openings Wet etch the aluminum to form anchor vias Use solution of H 3 PO 4 /HNO 3 /H 2 O Remove photoresist in PRS2000 Electroplate nickel to fill the anchor vias Use solution of nickel 50 C Time the electroplating to planarize the surface EE C245: Introduction to MEMS Design LecM 5 C. Nguyen 8/20/09 38 Nickel Metal Surface-Micromachining Electroplated Nickel Nickel seed layer Photoresist Evaporate a thin film of nickel to serve as a seed layer for subsequent Ni electroplating Target = 20nm Form a photoresist mold for subsequent electroplating Spin 6 um-thick AZ 9260 photoresist Lithographically pattern the photoresist to delineate areas where nickel structures are to be formed Electroplate nickel structural material through the PR mold Use a solution of nickel 50 o C Cathode-to-anode current density ~ 2.5 ma/cm 2 EE C245: Introduction to MEMS Design LecM 5 C. Nguyen 8/20/09 39 Nickel Metal Surface-Micromachining Nickel Surface-Micromachining Example Electroplated Nickel Strip the PR in PRS2000 Remove the Ni seed layer in Ni wet etchant Below: Surface-micromachined in nickel using the described process flow Electroplated Nickel Release the structures Use a K 4 Fe(CN) 6 /NaOH etchant that attacks Al while leaving Ni and Au intact Etch selectivity > 100:1 for Al:Ni and Al:Au EE C245: Introduction to MEMS Design LecM 5 C. Nguyen 8/20/09 40 EE C245: Introduction to MEMS Design LecM 5 C. Nguyen 8/20/

![, 1992] 3D Pop-up MEMS Corner Cube](/docs-images/89/100185447/images/3-1.jpg "Reflector [v.")
![Hsu, 1999] EE C245: Introduction to](/docs-images/89/100185447/images/3-2.jpg "MEMS Design LecM 5 C.")


![] [Ming Wu, UCLA] EE C245:](/docs-images/89/100185447/images/3-6.jpg "Introduction to Nguyen 8/20/09 44 EE")
3 Pop-Up MEMS First MEMS hinge [K. Pister, et al., 1992] 3D Pop-up MEMS Corner Cube Reflector [v. Hsu, 1999] EE C245: Introduction to MEMS Design LecM 5 C. Nguyen 8/20/09 42 EE C245: Introduction to MEMS Design LecM 5 C. Nguyen 8/20/09 43 Pop-Up MEMS 3D Direct-Assembled Tunable L Pictured: hinged Campanile made in SUMMiT process, assembled using probes [Elliot Hui, et al.] [Ming Wu, UCLA] EE C245: Introduction to MEMS Design LecM 5 C. Nguyen 8/20/09 44 EE C245: Introduction to MEMS Design LecM 5 C. Nguyen 8/20/


4 Hinge Process Flow Foundry MEMS: The MUMPS Process EE C245: Introduction to MEMS Design LecM 5 C. Nguyen 8/20/09 46 EE C245: Introduction to MEMS Design LecM 5 C. Nguyen 8/20/09 47 MUMPS: MultiUser MEMS ProcesS Originally created by the Microelectronics Center of North Carolina (MCNC) now owned by MEMSCAP in France Three-level polysilicon surface micromachining process for prototyping and foundry services Designed to service as many users as possible; basically an attempt to provide a universal MEMS process 8 photomasks $4,900 for 1 cm 2 dies Micromotor fabricated via MUMPS MUMPS: MultiUser MEMS ProcesS Micromotor Example EE C245: Introduction to MEMS Design LecM 5 C. Nguyen 8/20/09 48 EE C245: Introduction to MEMS Design LecM 5 C. Nguyen 8/20/

: in layout, boxes")


")
 mask (align to poly0) RIE anchor vias down to the nitride")


 EE C245: Introduction to MEMS Design LecM 5")
 Recoat with photoresist and do lithography using the ANCHOR2(df) mask to")


5 Minimum set set of of masks that must be be used in in MUMPS Masks in polymumps Extra masks for for more Field type: flexibility & ease of of release Light (or clear) field (cf): in layout, boxes represent features that will stay through fabrication Dark field (df): in layout, boxes represent holes to be cut out EE C245: Introduction to MEMS Design LecM 5 C. Nguyen 8/20/09 50 MUMPS Process Flow Deposit PSG on the starting n- type (100) wafers Anneal to heavily dope the wafers Remove the PSG LPCVD 600 nm of low stress nitride LPCVD 500 nm of polysilicon Lithography using the POLY0(cf) mask and RIE etching to pattern the poly0 ground plane layer LPCVD 2 m of PSG as the 1 st sacrificial layer Lithography using the DIMPLE(df) mask (align to poly0) RIE 750 nm deep to form dimple vias Lithography using the ANCHOR1 (df) mask (align to poly0) RIE anchor vias down to the nitride surface EE C245: Introduction to MEMS Design LecM 5 C. Nguyen 8/20/09 51 MUMPS Process Flow (cont.) LPCVD 2 m undoped polysilicon LPCVD 200 nm of PSG Anneal for o C This both dopes the polysilicon and reduces its residual stress Lithography using the POLY1(cf) mask to define structures (align to anchor1) RIE the PSG to create a hard mask first, then RIE the polysilicon LPCVD 750 nm of PSG Lithography using the P1_P2_VIA (df) mask to define contacts to the poly1 layer (align to poly1) EE C245: Introduction to MEMS Design LecM 5 C. Nguyen 8/20/09 52 MUMPS Process Flow (cont.) Recoat with photoresist and do lithography using the ANCHOR2(df) mask to define openings where poly2 contacts nitride or poly0 (align to poly0) RIE the PSG at ANCHOR2 openings LPCVD 1.5 m undoped polysilicon LPCVD 200 nm PSG as a hard mask and doping source Anneal for o C to dope the polysilicon and reduce residual stress Lithography using the POLY2(cf) mask (align to anchor2) RIE PSG hard mask RIE poly2 film Remove PR and hard mask EE C245: Introduction to MEMS Design LecM 5 C. Nguyen 8/20/
 MUMPS: MultiUser MEMS ProcesS Poly1 Rotor Poly1 Stator Final Structure: Micromotor Lithography using the METAL (df) mask (align to poly2) Evaporate titanium (Ti)")


6 MUMPS Process Flow (cont.) MUMPS: MultiUser MEMS ProcesS Poly1 Rotor Poly1 Stator Final Structure: Micromotor Lithography using the METAL (df) mask (align to poly2) Evaporate titanium (Ti) (as an adhesion layer for gold) Evaporate gold (Au) Liftoff to remove PR and define metal interconnects Coat wafers with protective PR Dice wafers Ship to customer Customer releases structures by dipping and agitating dies in a 48.8 wt. % HF solution or via vapor phase HF Anti-stiction dry, if needed Originally created by the Microelectronics Center of North Carolina (MCNC) now owned by MEMSCAP in France Three-level polysilicon surface micromachining process for prototyping and foundry services Designed to service as many users as possible; basically an attempt to provide a universal MEMS process 8 photomasks $4,900 for 1 cm 2 dies Micromotor fabricated via MUMPS EE C245: Introduction to MEMS Design LecM 5 C. Nguyen 8/20/09 54 EE C245: Introduction to MEMS Design LecM 5 C. Nguyen 8/20/09 55 polymumps Minimum Feature Constraints MUMPS Design Rules (cont.) Minimum feature size Determined by MUMPS photolithographic resolution and alignment precision Violations result in missing (unanchored), under/oversized, or fused features Use minimum feature only when absolutely necessary Nominal [ m] Min Feature [ m] Min Spacing [ m] POLY0, POLY1, POLY POLY1_POLY2_VIA ANCHOR1, ANCHOR DIMPLE METAL HOLE1, HOLE HOLEM Oxide1 Poly0 POLY0 ANCHOR1 Cross Sections Mask Levels EE C245: Introduction to MEMS Design LecM 5 C. Nguyen 8/20/09 56 EE C245: Introduction to MEMS Design LecM 5 C. Nguyen 8/20/
 ) Oxide1 Poly1 Poly0 G N")


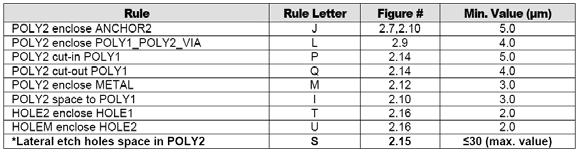
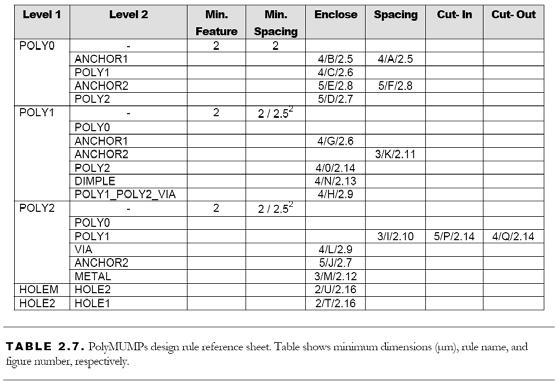
7 MUMPS Design Rules (cont.) MUMPS Design Rules (cont.) Oxide1 Poly1 Poly0 G N H O K R Cross Sections POLY0 POLY1 Mask Levels ANCHOR1 EE C245: Introduction to MEMS Design LecM 5 C. Nguyen 8/20/09 58 EE C245: Introduction to MEMS Design LecM 5 C. Nguyen 8/20/09 59 MUMPS Design Rules (cont.) The Sandia SUMMIT Process EE C245: Introduction to MEMS Design LecM 5 C. Nguyen 8/20/09 60 EE C245: Introduction to MEMS Design LecM 5 C. Nguyen 8/20/

")
 to maintain planarity as more")

 CMP: Not the Same as Lapping")


 to randomize the polishing")


8 Sandia s SUMMiT V SUMMiT V Layer Stack SUMMiT V: Sandia Ultra-planar Multi-level MEMS Technology 5 fabrication process Five-layer polysilicon surface micromachining process One electrical interconnect layer & 4 mechanical layers Uses chemical mechanical polishing (CMP) to maintain planarity as more structural layers are realized 14 masks Uses chemical mechanical polishing (CMP) to maintain planarity as more structural layers are realized EE C245: Introduction to MEMS Design LecM 5 C. Nguyen 8/20/09 62 EE C245: Introduction to MEMS Design LecM 5 C. Nguyen 8/20/09 63 Chemical Mechanical Polishing (CMP) CMP: Not the Same as Lapping Used to planarize the top surface of a semiconductor wafer or other substrate Uses an abrasive and corrosive chemical slurry (i.e., a colloid) in conjunction with a polishing pad Wafer and pad are pressed together Polishing head is rotated with different axes of rotation (i.e., non-concentric) to randomize the polishing Top View Carrier Chuck Pad Slurry Carrier/Chuck Pad Conditioner Wafer Backing-Film DI Water Slurry Platen Side View Pad Conditioner Pad Lapping Lapping is merely the removal of material to flatten a surface without selectivity Everything is removed at approximately the same rate Lapping Removes diff. materials at at same rate Chemical Mechanical Polishing CMP is selective to certain films, and not selective to others CMP Stops at at nonselective layer EE C245: Introduction to MEMS Design LecM 5 C. Nguyen 8/20/09 64 EE C245: Introduction to MEMS Design LecM 5 C. Nguyen 8/20/
 for more detailed information on masks and layout instructions EE C245: Introduction to MEMS")
9 Actual SUMMiT Cross-Section No CMP until after the first three polysi layers 1 m mmpoly1 and 1.5 m mmpoly2 can be combined to form a 2.5 m polysilicon film Refer to the SUMMiT V manual (one of your handouts) for more detailed information on masks and layout instructions EE C245: Introduction to MEMS Design LecM 5 C. Nguyen 8/20/