Computer Aided Engineering for Metal Die Casting Process
|
|
|
- Michael Scott
- 5 years ago
- Views:
Transcription


1 Computer Aided Engineering for Metal Die Casting Process Dr. Laith Abdullah Mohammed / Production Engineering 28.April.2009


2 Die Casting part Examples


3 This project dealing with die casting process because of: 1-It can widely used for manufacturing complex shaped metallic components (sculptured surface). 2-Low manufacturing costs. 3-Production of near net-shape. 4-Mass productivity and process automation.
 Metal solidifies under pressure. Die is opened. Casting removed.")
4 Die Casting Basics Die is closed. Metal is drawn in to tool (plunger). Tool injects metal into cavity. Cavity continues to fill. (fractions of a second) Metal solidifies under pressure. Die is opened. Casting removed. Machine recovers to initial orientation (cycle starts over)
5 Static analysis: Design check based on stress criteria. Displacement plot. Static strain plot. Hydrostatic pressure. Analysis mode Applied software: ABAQUS, Ansys Geometric data exchange format: SAT, STL Thermal analysis: Thermal distribution based on studying temperature. dependent of specific heat, thermal conductivity, enthalpy. Thermal distribution based on studying surface heat flux. CAD mode Applied software: AutoCAD, SolidWorks, Matlab Gemoetric data exchange format: DWG, DXF, SAT 3D solid modeling of cast and die. Check die model. Draft analysis. Deviation analysis. Interference detection. Undercut detection. Parting line. Machine & Die characteristics. Design Data Process & simulation Data Data features for Die Casting Process Machining Data CAM mode Applied software: MasterCAM X, ShopMill Geometric data exchange format: DWG, SAT Simulation of machining. Die set components milling Roughening, Finishing on CNC machine. Mathematical Model and Optimization Die Casting Machine Expert System Drafting Process CNC Cutting Machine Inspection and Measuring Machine Future Work Current Work

6 The Program (Process Parameters Design using Matlab envirnoment)

7

8 Database for Casting Alloys


9

10
.")
11 These result assume cast metal is Aluminum A380 alloy. Thickness of die: m Volume of cast : m 3 Qtotal: Total heat added to the die by casting (J). Qspray: Total heat removed by spray in each cycle (J).
12 Working Steps: 1- Create 3D solid modeling of part. 2- Forming 3D modeling of die casting using CAD/CAM software. Database required (machining allowance, shrinkage, taper, accuracy and surface rating of the parts, type of alloy). 3- Expert system: Process parameters of die casting (Injection pressure, Plunger speed, Gate velocity, filling time, type of alloy, wall thickness, structure of casting). 4- Design of gating system, overflows and cooling channels calculated projected area of the cavity and thermal balance of dies. 5- Put normalized component parts of dies thickness of inlays distance from the cavity to outer surface of die cover and ejector moulds, cores, gating system, overflows and cooling channels. 6- all these modeling data are translated into data files. 7- Define the most common defects occurring in casting like air holes and porosity. 8- Using simulation software to predict metal flow and solidification in dies and made correction on the design like correct gating system. 9-3D solid modeling of the cavities are machined (machining attributes: cutters, tool path, NC cutter procedures). 10- Evaluation of product based on computer measuring machine (CMM).
13 Features of CAD/CAM system for Mould Casting: 1- Define mould geometry. 2- validate aspects of mould designs before releasing them for production. 3- identify undercuts, complete side cores, verify draft angles, define parting lines, create parting surfaces, assess proper fill characteristics and ensure mould durability. 4- access to a complete set of mold bases and standard components. 5- Evaluate the mold ability of a part. 6- Integration with CNC machining applications. 7- integrated product data management: check mold assembly and generate a bill of materials and determine costs. 8- Mold design: the first step in designing the cavity and core for a mold is to apply a shrinkage factor to the part based on its material. And suggest the optimal parting line based on the direction of draft within the part. Identify all areas on the part that have insufficient draft. 9- create the parting surfaces that define the separation between the core and cavity. 10- build the core and cavity of the mold around the surfaces that defined in the tooling split. Then use these solid bodies to create an assembly that is associated to the original multi body part design. 11- provide libraries of complete mold bases and components, such as guide pins, guide bushings, ejector plates, ejector housings, and sprue bushings, fasteners, bearings, retaining rings, and Gears, bolts, nuts, and washers. 12- determine the stress, strain, deformed shape, and displacement of components during operation to avoid field failures & identify the weaknesses in initial design.
14 Take any product from industry (like machine component from automotive factory), and study the complete process plan for this product (from design to finished product) and build complete CAD/CAM system for this product. Study all elements of Die casting machine in the factory, and make a functional enhancement in this machine to be more automatic and production and shorten production cycle time. Focuses on manufacturing complicated product using die casting process (which is difficult to producing before using this method). Studying new alloy which is difficult to manufacturing using die casting method.


15 Das Rad

16

17

18

19

20
21
22
23
24


25 Hydraulic Press Punch Upper Die Molten Aluminum alloy Lower Die Schematic illustration of the die casting system
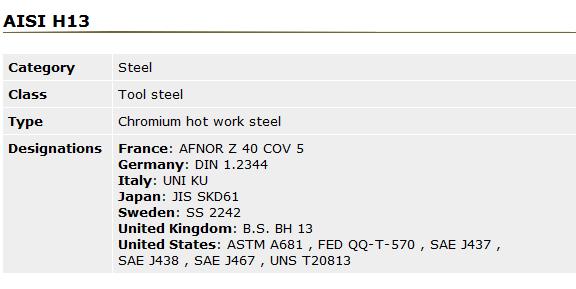


26 Physical properties of Die Material (Tool Steel H13)
27 Physical properties of Die Casting Material (A360) Reference Designation (ASTM, ANSI) Reference Designation (Germany) A360 Reference Designation (DIN 1725) 233 Applications GD-AlSi10Mg offers higher corrosion resistance, superior strength at elevated temperatures, and somewhat better ductility, but is more difficult to cast. Detailed Composition Si 9-10, Fe 1.3, Cu 0.6, Mg , Mn 0.35, Ni 0.5, Zn 0.5, Sn 0.15 Ultimate Tensile strength (MPa) 317 Elongation % (51 mm) 3.5 Yield strength (MPa) at 20 C 170 Hardness (BHN) 75 Shear strength (MPa) 180 Impact strength (J) - Fatigue strength (MPa) 120 Young Modulus (GPa) 71 Density (g/cm 3 ) at 20 C 2.63 Melting range ( C) Specific Heat (J/kg C) 963 Coefficient of thermal Expansion (µm/m K) 21 Thermal conductivity (W/m K) at 20 C 113 Poisson s Ratio 0.33 Latent heat of fusion [kj/kg] 389 Non-equilibrium solidification range [ C]

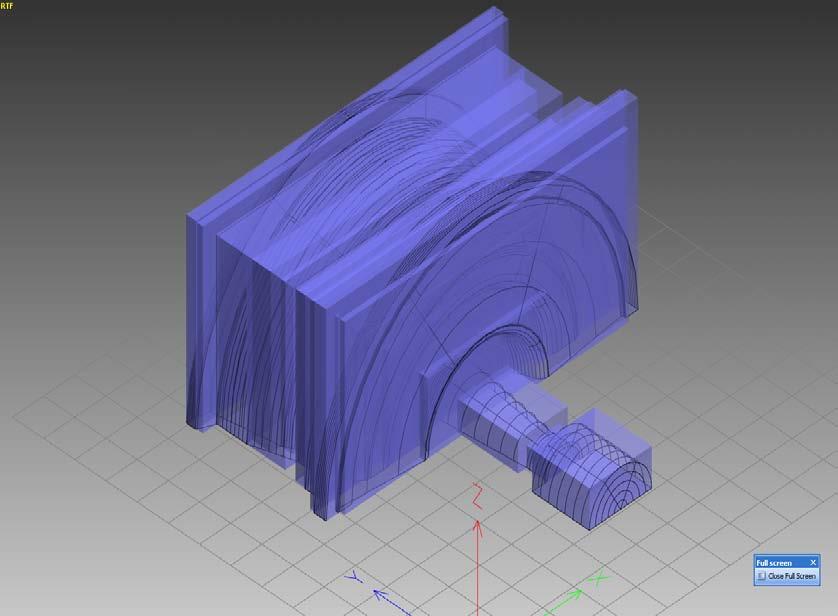
28 Solidification simulation model using SolidWorks:
29 Thermal Analysis using Ansys: The objective: track the temperature distribution in the Aluminum alloy cast and the mold during the solidification process which occurs over a duration of (4) hours. Boundary conditions and assumptions: Initial conditions Temperature of die (tool steel) 100 C Temperature of cast (Aluminum) 800 C Convection heat transfer coefficient (film coefficient) Ambient temperature 27 C 0.02 N/s mm C Convection occurs between the steel mold and the ambient air. Element type for mesh Thermal solid, Quadratic 4 nodes Time step size 0.01 Min time step size Max time step size 0.25


 as")
30 1. Thermal properties for Aluminum alloy: The enthalpy property table captures the latent heat capacity of the metal as it solidifies. Radiation effects are ignored. Smaller time step sizes will be used during the transition from molten metal to solid state. In this work, we consider (Enthalpy, Thermal conductivity, Specific heat) as temperature related properties. Specific Heat vs. Temp ( C) Enthalpy vs. Temp ( C) Thermal conductivity (J/m s C) vs. Temp ( C)

 vs.")
31 2. Material properties and Thermal properties for H13 steel: In this work, we consider (Thermal conductivity, Specific heat) as temperature related properties. Specific Heat (J/g C) vs. Temp ( C) Thermal conductivity (J/m s C) vs. Temp ( C)


32 Element profile Nodes profile

33
34 Thermal Analysis using COMSOL: This work model the thermal aspect of the die casting process. The model simplifies the 3D geometry to symmetrical 3D. Figure shows the dimensions of the 3D geometry. Table reviews the material properties of the die: Work plan in COMSOL Multiphysics v Specify application mode: Heat transfer module 2. Model Geometry definition. 3. Physics settings: A. Subdomain settings B. Boundary settings (Prescribed temperature) 4. Mesh Generation. 5. Solving. 6. Postprocessing and Visualization.
35 Sectional Map (Temperature (ºK)) Streamline Map (Total Heat Flux (W/m 2 ))
)")

36 Boundary Map (Temperature ( K)) Temp. distribution: Max.: 1117 K Min.: 328 K


37 Experimental Setup Work bench Computer controlled Thermal Sensors (Thermocouples K-type) Furnace (Melting Aluminum die casting alloy)


38 Thermal sensors setup in the die

39 Thermal Sensors positions S4 S5 S7 S6 S1 S2 S3

40

41
42 NC Programming Procedures: Prepare the workpiece drawing Define the workpiece zero Draw in coordinate system Calculate any missing coordinates Define machining sequence Which tools are used when and to machine which type of contour? In what order are the individual elements of the workpiece machined? Which individual elements repeat (possibly rotated) and should therefore be included in a subprograms? Possibility of perform rotation, mirroring or scaling. Create machining plan (Define all the machining processes in steps, e.g.: (Rapid traverse motions for positioning, Tool change, Retract to tool change point, Activiate/Decactivate spindle, coolant, Call tool data, Path override, Approach contour) Translate the work steps into programming language (Gcodes, APT) Enter each individual step in an NC block or blocks. Combine all the individual steps in a program

43 Programming using SINUMERIK 810D Shop Mill software Why choosing SinuTrain? Siemens CNC controls SINUMERIK 810D/840D/840DI Technology turning / milling / drilling Extensive standard cycles Programming Comfortable contour calculator / contour lines Tool administration and management Graphical simulation Shop Mill Shop Turn Manual Turn CAD Reader


44 Main functions in ShopMill control panel


45 Volumetric view Sectional view 3 Plane view

46 Online Control


47 CAD Reader


48 Data Printing
49 Data Management (Copy, Cut, Paste, Mark, New.)

50 Tool Magazine
51 Flat End Mill (multi blade cutter) Diameter (mm) 10 Total length (mm) 112 Cutting part length (mm) 70 Teeth Angle (degree) 30 Number of teeth 5 Type Material Tool code No Beneficial: Coolant type a e = 1 x D f z (mm) End Tool Angle (degree) 90 Drill Diameter (mm) 12 Length (mm) 102 Cutting part length (mm) 30 GARANT (Normal) DIN 1835-B (HSS Co8) especially for working on low-lying. Difficult to access or to mill large paragraphs in a single operation. Water (max) Tool code No Material Cutting Tip Angle (degree) 90 Type Coolant type f (mm/u) 0.07 HSS/E (High-speed steel with Cobalt or vanadium) DIN 1835-B (Normal) Oil or Water (Max)


52 In sculptured surface machining, divide the machining surface to multiple planes which are consider as tool path


53 Volumetric Model (3 Plans, Sectional, Volume)


54 Machining Program


55 Tool Manager


56 Surface Rough Flowline Tool parameters Surface parameters Rough flowline parameters


57 N5 G17 N10 G0G90G54 N10 M5 S50 N10 T219 N15 M6 N20 G0 X Y N25 Z N30 Z N35 G1 Z F4 N40 X Y N45 X Y N50 X Y N55 X Y N60 X Y N65 X Y N70 X Y N1205 T20 N1210 M6 N1215 G0G90G54 N1215 M5 S50 N1220 G0 X Y N1225 Z10. N1230 F2 N1230 MCALL CYCLE82 (10., 0., 2.,-155.,, ) N1235 X Y ( Z-155. ) N1240 MCALL N1245 M5 Tool Path Generation Finished Product Machining Simulation


58 N5 G17 N10 G0G90G54 N10 M5 S50 N10 T219 N15 M6 N20 G0 X Y9.688 N25 Z25. N30 Z-74.2 N35 G1 Z-75.2 F4 N40 X Y N45 X Y N50 X Y N55 X Y N60 X Y N65 X Y N70 X Y N9635 X Y47.54 N9640 X Y N9645 X Y47.07 N9650 X Y47.01 N9655 X Y N9660 X Y N9665 X Y N9670 X Y N9675 X Y N9680 X Y N9685 X Y N9690 X Y N9695 X Y N9700 X Y N9705 X Y N9710 X Y N9715 G0 Z N9720 Z25. N9725 M5 Tool Path Generation Finished Product Machining Simulation


59 N5 G17 N10 G0G90G54 N10 M5 S50 N10 T219 N15 M6 N20 G0 X Y N25 Z N30 G1 Z F4 N35 X Y N40 X Y N45 X Y N50 X Y N55 X Y N60 X Y N65 X Y N70 Y N75 X Y N80 X Y N85 X Y N90 X Y N2455 X19. Y ( Z ) N2460 Z N2465 Y Z N2470 Z N2475 X-261. Y Z N2480 Z N2485 Y Z N2490 Z N2495 MCALL N2500 M5 Tool Path Generation Finished Product Machining Simulation

60 Thank you