DIGIROCK-LC RSR DIGITAL ROCKWELL, ROCKWELL SUPERFICIAL, HARDNESS TESTER WITH TOUCH SCREEN & CLOSED LOOP TECHNOLOGY
|
|
|
- Godfrey Norris
- 5 years ago
- Views:
Transcription

1 DIGIROCK-LC RSR DIGITAL ROCKWELL, ROCKWELL SUPERFICIAL, HARDNESS TESTER WITH TOUCH SCREEN & CLOSED LOOP TECHNOLOGY OPERATIONAL MANUAL BMS Bulut Makina Sanayi ve Ticaret Ltd. Şti. İkitelli Organize Sanayi Bölgesi Dolapdere Sanayi Sitesi Ada 4 No : 7-9 Başakşehir / İSTANBUL-TURKEY Phone : / Fax : web : bms@bulutmak.com
2 1 Technical Specifications Standard Accessories Unpacking of Equipment Setting into Rockwell Hardness Testing (EN , ASTM E18) Test Method Prior to Test Choosing the Test Load Main Screen Testing Test Metod Records Settings Calibration Rev:00 2 / 17
3 1 Technical Specifications Pre-load (kgf) 3 / 10 Test loads (kgf) 15, 30, 45, 60, 100, 150 Load selection Automatic on touch screen Test method Rockwell, & Rockwell Superficial Load application Automatic by stepping motor Max. test height 220 mm Depth of throat 145 mm Machine dim's 720x520x280 mm Case dim's 790x590x420 mm Weight (net/gross) 82/110 kg 2 Standard Accessories Rockwell Diamond Indenter: 1 1/16" Ball Indenter: 1 HRC Test Block: 1 HRB Test Block: 1 Flat Testing Table: 1 V Testing Table: 1 Hardness Conversion Table: 1 Case for Accessories: 1 Cover: 1 Allen Spanner: 2 Rubber Bellow for Elevating Screw: 1 Instruction : 1 Calibration Certificate: 1 TABLE FOR HARDNESS TESTER HOLE ON TABLE ELEVATING SCREW MUST FREELY WORK IN HOLE Rev:00 3 / 17

4 Touch screen panel Top cover Load Cell Indenter Test table Elevating screw Rotating arm Rev:00 4 / 17
5 3 Unpacking of Equipment Unscrew fixing steel sheet plates of upper side to wooden base of case and hold up upper side of wooden case by means of carrying handles. Take out two M8 bolts fastening equipment to lower wooden case. Locate equipment on a special table (see drawing of table enclosed) and fasten two M8 bolts by means of eye bull putting on flat testing table. Open left cover. Take out wooden safety parts. Take out also 3 off M6 bolts of top cover by means of 5 mm special alien key which is in accessory box with care. Take out plastic safety parts. Equipment is now ready for testing. 4 Setting into Locate part to be tested on testing table, insert indenter to holder and choose load by means of load selector disc (according to testing method in attached table). For Rockwell tests, HRC, HRA, HRD tests Rockwell Diamond indenter to be chosen while 1/16 ball indenter for HRB, HR, and HRG tests (see enclosed table) Using 1/8, 1/4, 1/2 ball indenters (optional) others tests can be also archived. For Rockwell Superficial tests, using Rockwell Diamond indenter, as like HR15N, 30N and 45N can be archived while 1/16 ball indenter for HR15T, 30T and 45T tests. IMPORTANT: Pre-load selector disc has to be in position HR 10 KG for Rockwell Tests while HSR 3 KG for Rockwell Superficial Tests. 5 Rockwell Hardness Testing (EN , ASTM E18) Rockwell Hardness testing method is evaluated from penetration depth of 120 diamond cone or ball indenter with different dias (please refer to table enclosed). Below application shows working procedures using Rockwell diamond cone (HRC-HRA etc.) Surface of test specimen Reference point Hardness Rev:00 5 / 17
6 Nr Symbol Description Diamond cone 2 0 Radius of diamond tip= 0,2 mm 3 F0 Pre-Load 4 F1 Additional Load 5 F Total load F0+ F1 6 t0 Depth of penetration under pre-load, mm 7 t1 Depth of penetration under additional load, mm 8 tb Increase in depth of penetration from F1 to F0, mm 9 e Equality as of 0,002 mm increase of depth of penetration e= tb / 0, Rockwell hardness = 100-e Below application shows working procedures using 1/16 ball indenter (HRB etc.) Surface of test specimen Reference point No Symbol Description 1 D Ball dia=1/16 =1,5875 mm 3 F0 Pre-load 4 F1 Additional load 5 F Total load =F0+F1 6 t0 Depth of penetration under pre-load, mm 7 t1 Depth of penetration under additional load, mm 8 tb Increase in depth of penetration from F1 to F0, mm 9 e Equality as of 0,002 mm increase of depth of penetration e= tb / 0, HRB/HRF Rockwell hardness= 130-e Rev:00 6 / 17
7 6 Test Method Test method Indenter Preload (kgf) Total load (kgf) Field of application HRA Diamond cone Surface hardened parts with thin cases ( 0,4 mm) HRB 1/16" ball Nonferrous metals, unhardened steels HRC Diamond cone Hardened steels HRD Diamond cone Surface hardened parts with medium cases HRE 1/8" ball Aluminum and magnesium alloys, antifriction metals, syndetic metals HRF 1/16" ball Annealed cupper alloys, thin sheet metals ( 0,6 mm) HRG 1/16" ball Phosphor-bronze, malleable iron of medium hardness HRH 1/8" ball Aluminum, zinc, lead, grinding stones HRK 1/8" ball Antifriction and other metals of very low hardness HRL 1/4" ball As HRK and hard rubber HRM 1/4" ball As HRK and HRL, laminated wood HRP 1/4" ball HRR 1/2" ball HRK, HRL or HRM and synthetic materials HRS 1/2" ball HRV 1/2" ball As HRK, HRL, HRM, HRP, HRR or HRS HR 15 N HR 30 N HR 45 N HR15T HR30T HR45T HR15W HR30W HR45W HR15X HR30X HR45X HR15Y HR30Y HR45Y Diamond cone 3 1/16" ball 3 1/8" ball 3 1/4" ball 3 1/2" ball As HRA, HRC or HRD, but especially thin case depth ( 0,18 mm ) As HRB, HRF or HRG but especially for thin sheet metals ( 0,25 mm ) For metals with very low hardness and for very thin cases, for example thin linings of antifriction metals, HRX and HRY especially for sintered metals Rev:00 7 / 17
8 7 Prior to Test Using table, choose suitable indenter according to test method to be applied. Locate indenter on holder carefully and gently tighten alien screw using alien key. 8 Choosing the Test Load Choose suitable Rockwell test load according to table 2 using load selector disc. Locate part to be tested on testing anvil. 8.1 Main Screen CONNECTING TO THE COMPUTER OR PRINTER SIGN FOR LOWER AND UPPER TOLERANS LIMITS NAME OF CUSTOMER TEST NR TEST NR./AVERAGE NR. TEST METHOD TEST RESULT HARDNESS CONVERSIONS PRE-LOAD SIGN, MACHINE STARTS WHEN %100 REACHED, IF %120 EXCEEDED, WARNING MESSAGE WILL BE SHOWN IN DISPLAY BARGRAPH TESTING SITUATION Rev:00 8 / 17


9 9 Testing Swich on equipment by ON/ OFF button. Apply pre-load carefully and follow movement of bargraph until it comes to final position As soon as pre-load position is reached %100 position, automatic load application will start. When it is over, unloading will start automaticely & machine will come back to pre-laod position. Then, value will be shown on the screen. 10 Test Metod Rev:00 9 / 17

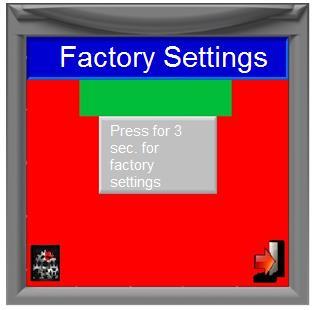
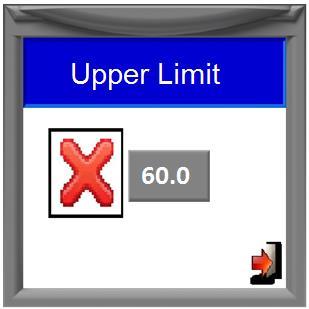
10 Choose required test method from TEST METHOD menu. Apply pre-load until bargraph reaches %100 using rotating arms of elevating spindle. When pre-load application is completed, total load loading, dwelling & unloading will be actuated automatically by motorized system 11 Records RECORDS section, registration number, name, min, max, mean, standard deviation, can be seen.stored values in the memory can be transferred to micro printer or computer. NOTE: The total memory capacity,along with 50 separete entries of 100 datas is You can see the test records on the main menu, you can delete and transfer saved data s to the printer or computer. 12 Settings Printer/PC, date / time average number of test time, factory setting, test the lower limit, upper limit, language can be entered using the function keys. Rev:00 10 / 17


11 You can edit the following options from the Settings Rev:00 11 / 17


12 Rev:00 12 / 17


13 During the preload, if overload occurs or wrong application applied related messages shown. Rev:00 13 / 17


14 Each of the 100 data capacity, 50 memory zones available. Total data capacity is Zones in the memory can easily be registirated & you can examine the results of tests Hardness conversions Rev:00 14 / 17


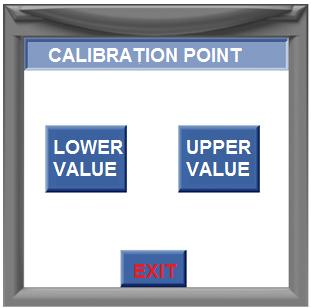
15 In case of sensor failure warning sign will be shown on the right For Rockwell tests, you can choose radius of round parts 13 Calibration Important Notice: During calibration, 2 point calibration system used. Therefore, for each hardness test calibration, uppest and lowest test blocks must be choosen according to test meothods. For example, for HRC method, uppest block value HRC, lowest block value HRC arasında can be choosen. Your equipment is calibrated under related EN norms. You do not need to calibrate the equipment again. But, if required, calibration can be made using EN norms by expert persons under suitable conditions. In case of making mistakes during calibration, we recommend to go SETTINGS menu and use FACTORY SEETINGS fonction. Then, you can return original calibrated values. Rev:00 15 / 17


16 Rev:00 16 / 17

17 To save the calibration values as the factory settings registration password should be requested from our company. NOTE: If wrong calibration is made, factory setting can be achieved again using setting menu. as the factory the calibration must be repeated. Rev:00 17 / 17