EE C247B ME C218 Introduction to MEMS Design Spring 2014
|
|
|
- Felix Harris
- 5 years ago
- Views:
Transcription
1 EE C247B ME C218 Introduction to MEMS Design Spring 2014 Prof. Clark T.-C. Nguyen Dept. of Electrical Engineering & Computer Sciences University of California at Berkeley Berkeley, CA Lecture EE C245: Introduction to MEMS Design LecM 5 C. Nguyen 8/20/09 1 Lecture Outline Reading: Senturia Chpt. 3, Jaeger Chpt. 11, Handout: Surface Micromachining for Microelectromechanical Systems Lecture Topics: Polysilicon surface micromachining Stiction Residual stress Topography issues Nickel metal surface micromachining 3D pop-up MEMS Foundry MEMS: the MUMPS process The Sandia SUMMIT process EE C245: Introduction to MEMS Design LecM 5 C. Nguyen 8/20/09 2 1

2 Polysilicon Surface-Micromachining Isolation Oxide Nitride Sacrificial Interconnect Oxide Polysilicon Structural Polysilcon Uses IC fabrication instrumentation exclusively Variations: sacrificial layer thickness, fine- vs. largegrained polysilicon, in situ vs. POCL 3 -doping Hydrofluoric Acid Release Etchant Wafer Free- Standing Polysilicon Beam 300 khz Folded-Beam Micromechanical Resonator EE C245: Introduction to MEMS Design LecM 5 C. Nguyen 8/20/09 3 Polysilicon EE C245: Introduction to MEMS Design LecM 5 C. Nguyen 8/20/09 4 2
3 Why Polysilicon? Compatible with IC fabrication processes Process parameters for gate polysilicon well known Only slight alterations needed to control stress for MEMS applications Stronger than stainless steel: fracture strength of polysi ~ 2-3 GPa, steel ~ 0.2GPa-1GPa Young s Modulus ~ GPa Extremely flexible: maximum strain before fracture ~ 0.5% Does not fatigue readily Several variations of polysilicon used for MEMS LPCVD polysilicon deposited undoped, then doped via ion implantation, PSG source, POCl 3,or B-source doping In situ-doped LPCVD polysilicon Attempts made to use PECVD silicon, but quality not very good (yet) etches too fast in HF, so release is difficult EE C245: Introduction to MEMS Design LecM 5 C. Nguyen 8/20/09 5 Polysilicon Surface-Micromachining Process Flow EE C245: Introduction to MEMS Design LecM 5 C. Nguyen 8/20/09 6 3
 Capacitive comb-drive for linear actuation Folded-beam support structure for stress relief EE C245: Introduction to MEMS Design LecM 5 C.")
4 Layout and Masking Layers A A At Left: Layout for a folded-beam capacitive combdriven micromechanical resonator Masking Layers: 1 st Polysilicon: POLY1(cf) Anchor Opening: ANCHOR(df) 2 nd Polysilicon: POLY2(cf) Capacitive comb-drive for linear actuation Folded-beam support structure for stress relief EE C245: Introduction to MEMS Design LecM 5 C. Nguyen 8/20/09 7 Surface-Micromachining Process Flow Cross-sections through A-A Isolation Oxide Interconnect Polysilicon Photoresist Nitride Deposit isolation LTO (or PSG): Target = 2μm 1 hr. 40 min. o C Densify the LTO (or PSG) o C for 30 min. Deposit nitride: Target = 100nm 22 min. o C Deposit interconnect polysi: Target = 300nm In-situ Phosphorous-doped 1 hr. 30 min. o C Lithography to define poly1 interconnects using the POLY1(cf) mask RIE polysilicon interconnects: CCl 4 /He/O Remove photoresist in PRS2000 EE C245: Introduction to MEMS Design LecM 5 C. Nguyen 8/20/09 8 4
5 Surface-Micromachining Process Flow Photoresist Sacrificial Oxide Deposit sacrificial PSG: Target = 2μm 1 hr. 40 min. o C Densify the PSG o C for 30 min. Lithography to define anchors using the ANCHOR(df) mask Align to the poly1 layer Structural Polysilcon Etch anchors RIE using CHF 3 /CF 4 Remove PR in PRS2000 Quick wet dip in 10:1 HF to remove native oxide Deposit structural polysi Target = 2μm In-situ Phosphorous-doped 11 hrs. o C EE C245: Introduction to MEMS Design LecM 5 C. Nguyen 8/20/09 9 Surface-Micromachining Process Flow Oxide Hard Mask Deposit oxide hard mask Target = 500nm 25 min. o C Stress Anneal o C Or RTA for o C in 50 sccm N 2 Lithography to define poly2 structure (e.g., shuttle, springs, drive & sense electrodes) using the POLY2(cf) mask Align to the anchor layer Hard bake the PR longer to make it stronger Etch oxide mask first RIE using CHF 3 /CF 4 Etch structural polysilicon RIE using CCl 4 /He/O Use 1 min. etch/1 min. rest increments to prevent excessive temperature EE C245: Introduction to MEMS Design LecM 5 C. Nguyen 8/20/
 Ash in O 2 plasma Soak in PRS2000 Release the structures Wet etch in HF for a calculated time that insures complete")


6 Surface-Micromachining Process Flow Hydrofluoric Acid Release Etchant Wafer Free-Standing Polysilicon Beam Remove PR (more difficult) Ash in O 2 plasma Soak in PRS2000 Release the structures Wet etch in HF for a calculated time that insures complete undercutting If 5:1 BHF, then ~ 30 min. If 48.8 wt. % HF, ~ 1 min. Keep structures submerged in DI water after the etch Transfer structures to methanol Supercritical CO 2 dry release EE C245: Introduction to MEMS Design LecM 5 C. Nguyen 8/20/09 11 Polysilicon Surface-Micromachined Examples Below: All surface-micromachined in polysilicon using variants of the described process flow Folded-Beam Comb-Driven Resonator Free-Free Beam Resonator Three-Resonator Micromechanical Filter EE C245: Introduction to MEMS Design LecM 5 C. Nguyen 8/20/
 Polysilicon E.R. ~ 0 Silicon nitride E.R. ~ 1-14 nm/min Wet thermal SiO 2 ~ 1.")
7 Structural/Sacrifical Material Combinations Structural Material Sacrificial Material Etchant Poly-Si SiO 2, PSG, LTO HF, BHF Al Photoresist O 2 plasma SiO 2 Poly-Si XeF 2 Al Si TMAH, XeF 2 Poly-SiGe Poly-Ge H 2 O 2, hot H 2 O Must consider other layers, too, as release etchants generally have a finite E.R. on any material Ex: concentrated HF (48.8 wt. %) Polysilicon E.R. ~ 0 Silicon nitride E.R. ~ 1-14 nm/min Wet thermal SiO 2 ~ μm/min Annealed PSG ~ 3.6 μm/min Aluminum (Si rich) ~ 4 nm/min (much faster in other Al) EE C245: Introduction to MEMS Design LecM 5 C. Nguyen 8/20/09 13 Wet Etch Rates (f/ K. Williams) EE C245: Introduction to MEMS Design LecM 5 C. Nguyen 8/20/
8 For some popular films: Film Etch Chemistries EE C245: Introduction to MEMS Design LecM 5 C. Nguyen 8/20/09 15 Issues in Surface Micromachining Stiction: sticking of released devices to the substrate or to other on-chip structures Difficult to tell if a structure is stuck to substrate by just looking through a microscope Residual Stress in Thin Films Causes bending or warping of microstructures Limits the sizes (and sometimes geometries) of structures Topography Stringers can limit the number of structural levels Substrate Beam Stringer Stiction EE C245: Introduction to MEMS Design LecM 5 C. Nguyen 8/20/


9 Microstructure Stiction EE C245: Introduction to MEMS Design LecM 5 C. Nguyen 8/20/09 17 Microstructure Stiction Stiction: the unintended sticking of MEMS surfaces Release stiction: Occurs during drying after a wet release etch Capillary forces of droplets pull surfaces into contact Very strong sticking forces, e.g., like two microscope slides w/ a droplet between In-use stiction: when device surfaces adhere during use due to: Capillary condensation Electrostatic forces Hydrogen bonding Van der Waals forces Rinse Liquid Stiff Beam Substrate Beam Anchor Wide Beam Substrate Stiction EE C245: Introduction to MEMS Design LecM 5 C. Nguyen 8/20/

10 Hydrophilic Versus Hydrophobic Hydrophilic: A surface that invites wetting by water Get stiction Occurs when the contact angle θ water < 90 o Hydrophobic: A surface that repels wetting by water Avoids stiction Occurs when the contact angle θ water > 90 o Lotus Surface [Univ. Mainz] EE C245: Introduction to MEMS Design LecM 5 C. Nguyen 8/20/09 19 Microstructure Stiction Microstructures Contact Angle Wetted Area Force Applied to Maintain Equilibrium Liquid Layer Thickness Thin liquid layer between two solid plates adhesive If the contact angle between liquid and solid θ C <90 o : Pressure inside the liquid is lower than outside Net attractive force between the plates The pressure difference (i.e., force) is given by the Laplace equation EE C245: Introduction to MEMS Design LecM 5 C. Nguyen 8/20/

11 Microstructure Stiction Modeling Microstructures Contact Angle Wetted Area Force Applied to Maintain Equilibrium Liquid Layer Thickness EE C245: Introduction to MEMS Design LecM 5 C. Nguyen 8/20/09 21 Avoiding Stiction Reduce droplet area via mechanical design approaches Standoff Bumps Meniscus- Shaping Features Avoid liquid-vapor meniscus formation Use solvents that sublimate Use vapor-phase sacrificial layer etch Modify surfaces to change the meniscus shape from concave (small contact angle) to convex (large contact angle) Use teflon-like films Use hydrophobic self-assembled monolayers (SAMs) EE C245: Introduction to MEMS Design LecM 5 C. Nguyen 8/20/


12 Supercritical CO 2 Drying A method for stictionless drying of released microstructures by immersing them in CO 2 at its supercritical point Basic Strategy: Eliminate surface tension-derived sticking by avoiding a liquid-vapor meniscus Procedure: Etch oxide in solution of HF Rinse thoroughly in DI water, but do not dry Transfer the wafer from water to methanol Displace methanol w/ liquid CO 2 Apply heat & pressure to take the CO 2 past its critical pt. Vent to lower pressure and allow the supercritical CO 2 to revert to gas liquid-to-gas Xsition in supercritical region means no capillary forces to cause stiction EE C245: Introduction to MEMS Design LecM 5 C. Nguyen 8/20/09 23 Hydrophilic Versus Hydrophobic Hydrophilic: A surface that invites wetting by water Get stiction Occurs when the contact angle θ water < 90 o Hydrophobic: A surface that repels wetting by water Avoids stiction Occurs when the contact angle θ water > 90 o Lotus Surface [Univ. Mainz] EE C245: Introduction to MEMS Design LecM 5 C. Nguyen 8/20/


 EE C245: Introduction to MEMS Design LecM 5 C.")


 Issues: Cannot be used when structural material")


13 Tailoring Contact Angle Via SAM s Can reduce stiction by tailoring surfaces so that they induce a water contact angle > 90 o Self-Assembled Monolayers (SAM s): Monolayers of stringy molecules covalently bonded to the surface that then raise the contact angle Beneficial characteristics: Conformal, ultrathin Low surface energy Covalent bonding makes them wear resistant Thermally stable (to a point) EE C245: Introduction to MEMS Design LecM 5 C. Nguyen 8/20/09 25 Dry Release Another way to avoid stiction is to use a dry sacrificial layer etch For an oxide sacrificial layer use HF vapor phase etching Additional advantage: gas can more easily get into tiny gaps Issue: not always completely dry moisture can still condense stiction soln: add alcohol For a polymer sacrificial layer Use an O 2 plasma etch (isotropic, so it can undercut well) Issues: Cannot be used when structural material requires high temperature for deposition If all the polymer is not removed, polymer under the suspended structure can still promote stiction Encapsulation Si Beams of Tuning Fork Sealing Oxide Electrode Released via vapor phase HF [Kenny, et al., Stanford] [Kobayashi] EE C245: Introduction to MEMS Design LecM 5 C. Nguyen 8/20/


14 Residual Stress EE C245: Introduction to MEMS Design LecM 5 C. Nguyen 8/20/09 27 Residual Stress in Thin Films After release, poorly designed microstructures might buckle, bend, or warp often caused by residual film stress Origins of residual stress, σ Growth processes Non-equilibrium deposition Grain morphology change Gas entrapment Doping Thermal stresses Thermal expansion mismatch of materials introduce stress during cool-down after deposition Annealing Tunable Dielectric Capacitor [Yoon, et al., U. Michigan] Buckled Double-Ended Tuning Fork bending EE C245: Introduction to MEMS Design LecM 5 C. Nguyen 8/20/

15 Need to Control Film Stress Resonance frequency expression for a lateral resonator: Since W «L, the stress term will dominate if σ r ~ E y Basic term Stress term E y = Young s modulus σ r = stress t = thickness W = beam width L = beam length M = mass Folded-beam suspension Anchor Shuttle Folding truss EE C245: Introduction to MEMS Design LecM 5 C. Nguyen 8/20/09 29 Tensile Versus Compressive Stress Under tensile stress, a film wants to shrink w/r to its substrate Caused, e.g., by differences in film vs. substrate thermal expansion coefficients If suspended above a substrate and anchored to it at two points, the film will be stretched by the substrate Under compressive stress, a film wants to expand w/r to its substrate If suspended above a substrate and anchored to it at two points, the film will buckle over the substrate Si-substrate tensile film Si-substrate Si-substrate compressive film buckled Si-substrate EE C245: Introduction to MEMS Design LecM 5 C. Nguyen 8/20/

16 Vertical Stress Gradients Variation of residual stress in the direction of film growth Can warp released structures in z-direction EE C245: Introduction to MEMS Design LecM 5 C. Nguyen 8/20/09 31 Stress in Polysilicon Films Stress depends on crystal structure, which in turn depends upon the deposition temperature Temperature 600 C Films are initially amorphous,then crystallize Get equiaxed crystals, largely isotropic Crystals have higher density tensile stress Small stress gradient Temperature 600 C Columnar crystals grow during deposition As crystals grow vertically and in-plane they push on neighbors compressive stress Positive stress gradient EE C245: Introduction to MEMS Design LecM 5 C. Nguyen 8/20/
, e.g. using 10-15 wt.")
17 Annealing Out Polysilicon Stress Control polysi stress by annealing at high temperatures Typical anneal temperatures: C Grain boundaries move, relax Can dope while annealing by sandwiching the polysilicon between similarly doped oxides (symmetric dopant drivein), e.g. using wt. % PSG Rapid thermal anneal (RTA) also effective (surprisingly) EE C245: Introduction to MEMS Design LecM 5 C. Nguyen 8/20/09 33 Topography Issues Degradation of lithographic resolution PR step coverage, streaking Thickness differences pose problems for reduction steppers Direction of Spin PR PR PR Stringers Problematic when using anisotropic etching, e.g., RIE RIE Stringer EE C245: Introduction to MEMS Design LecM 5 C. Nguyen 8/20/

18 Nickel Surface-Micromachining Process Flow EE C245: Introduction to MEMS Design LecM 5 C. Nguyen 8/20/09 35 Electroplating: Metal MEMS Photoresist Aluminum Wafer Use electroplating to obtain metal μstructures When thick: call it LIGA Pros: fast low temp deposition, very conductive Cons: drift, low mech. Q but may be solvable? Aluminum Release Etchant Electrode Suspended Nickel Microstructure Nickel Ti/Au Si 3 N 4 Isolation EE C245: Introduction to MEMS Design LecM 5 C. Nguyen 8/20/
19 Nickel Metal Surface-Micromachining Oxide Photoresist Deposit isolation LTO: Target = 2μm 1 hr. 40 min. o C Densify the LTO o C for 30 min. Titanium Titanium Gold Gold Define metal interconnect via lift-off Spin photoresist and pattern lithographically to open areas where interconnect will stay Evaporate a Ti/Au layer Target = 30nm Ti Target = 270nm Au Remove photoresist in PRS2000 Ti/Au atop the photoresist also removed EE C245: Introduction to MEMS Design LecM 5 C. Nguyen 8/20/09 37 Nickel Metal Surface-Micromachining Aluminum Photoresist Aluminum Aluminum Evaporate Al to serve as a sacrificial layer Target = 1μm Lithography to define anchor openings Wet etch the aluminum to form anchor vias Use solution of H 3 PO 4 /HNO 3 /H 2 O Remove photoresist in PRS2000 Aluminum Electroplate nickel to fill the anchor vias Use solution of nickel 50 C Time the electroplating to planarize the surface EE C245: Introduction to MEMS Design LecM 5 C. Nguyen 8/20/
20 Nickel Metal Surface-Micromachining Nickel seed layer Aluminum Photoresist Aluminum Electroplated Nickel Aluminum Evaporate a thin film of nickel to serve as a seed layer for subsequent Ni electroplating Target = 20nm Form a photoresist mold for subsequent electroplating Spin 6 um-thick AZ 9260 photoresist Lithographically pattern the photoresist to delineate areas where nickel structures are to be formed Electroplate nickel structural material through the PR mold Use a solution of nickel 50 o C Cathode-to-anode current density ~ 2.5 ma/cm 2 EE C245: Introduction to MEMS Design LecM 5 C. Nguyen 8/20/09 39 Nickel Metal Surface-Micromachining Electroplated Nickel Aluminum Strip the PR in PRS2000 Remove the Ni seed layer in Ni wet etchant Electroplated Nickel Release the structures Use a K 4 Fe(CN) 6 /NaOH etchant that attacks Al while leaving Ni and Au intact Etch selectivity > 100:1 for Al:Ni and Al:Au EE C245: Introduction to MEMS Design LecM 5 C. Nguyen 8/20/

21 Nickel Surface-Micromachining Example Below: Surface-micromachined in nickel using the described process flow EE C245: Introduction to MEMS Design LecM 5 C. Nguyen 8/20/ D Pop-up MEMS EE C245: Introduction to MEMS Design LecM 5 C. Nguyen 8/20/

![, 1992] Corner Cube](/docs-images/94/119475392/images/22-1.jpg "Reflector [v.")
![Hsu, 1999] EE C245:](/docs-images/94/119475392/images/22-2.jpg "Introduction to MEMS Design")


22 Pop-Up MEMS First MEMS hinge [K. Pister, et al., 1992] Corner Cube Reflector [v. Hsu, 1999] EE C245: Introduction to MEMS Design LecM 5 C. Nguyen 8/20/09 43 Pop-Up MEMS Pictured: hinged Campanile made in SUMMiT process, assembled using probes [Elliot Hui, et al.] EE C245: Introduction to MEMS Design LecM 5 C. Nguyen 8/20/


23 3D Direct-Assembled Tunable L [Ming Wu, UCLA] EE C245: Introduction to MEMS Design LecM 5 C. Nguyen 8/20/09 45 Hinge Process Flow EE C245: Introduction to MEMS Design LecM 5 C. Nguyen 8/20/
 now owned by MEMSCAP in France Three-level polysilicon surface")
24 Foundry MEMS: The MUMPS Process EE C245: Introduction to MEMS Design LecM 5 C. Nguyen 8/20/09 47 MUMPS: MultiUser MEMS ProcesS Originally created by the Microelectronics Center of North Carolina (MCNC) now owned by MEMSCAP in France Three-level polysilicon surface micromachining process for prototyping and foundry services Designed to service as many users as possible; basically an attempt to provide a universal MEMS process 8 photomasks $4,900 for 1 cm 2 dies Micromotor fabricated via MUMPS EE C245: Introduction to MEMS Design LecM 5 C. Nguyen 8/20/


")


25 MUMPS: MultiUser MEMS ProcesS Micromotor Example EE C245: Introduction to MEMS Design LecM 5 C. Nguyen 8/20/09 49 Minimum set set of of masks that that must be be used in in MUMPS Masks in polymumps Extra masks for for more Field type: flexibility & ease of of release Light (or clear) field (cf): in layout, boxes represent features that will stay through fabrication Dark field (df): in layout, boxes represent holes to be cut out EE C245: Introduction to MEMS Design LecM 5 C. Nguyen 8/20/

 mask (align to poly0) RIE 750 nm deep to form dimple")

")
 mask to define contacts to the poly1")
26 MUMPS Process Flow Deposit PSG on the starting n- type (100) wafers Anneal to heavily dope the wafers Remove the PSG LPCVD 600 nm of low stress nitride LPCVD 500 nm of polysilicon Lithography using the POLY0(cf) mask and RIE etching to pattern the poly0 ground plane layer LPCVD 2 μm of PSG as the 1 st sacrificial layer Lithography using the DIMPLE(df) mask (align to poly0) RIE 750 nm deep to form dimple vias Lithography using the ANCHOR1 (df) mask (align to poly0) RIE anchor vias down to the nitride surface EE C245: Introduction to MEMS Design LecM 5 C. Nguyen 8/20/09 51 MUMPS Process Flow (cont.) LPCVD 2 μm undoped polysilicon LPCVD 200 nm of PSG Anneal for o C This both dopes the polysilicon and reduces its residual stress Lithography using the POLY1(cf) mask to define structures (align to anchor1) RIE the PSG to create a hard mask first, then RIE the polysilicon LPCVD 750 nm of PSG Lithography using the P1_P2_VIA (df) mask to define contacts to the poly1 layer (align to poly1) EE C245: Introduction to MEMS Design LecM 5 C. Nguyen 8/20/
 Recoat with photoresist and do lithography using the ANCHOR2(df) mask to define openings where poly2 contacts nitride or poly0 (align to poly0) RIE the PSG at ANCHOR2 openings")

 Poly1 Rotor Poly1 Stator Lithography using the METAL (df) mask (align to poly2) Evaporate titanium (Ti) (as an adhesion layer for gold) Evaporate gold (Au)")
27 MUMPS Process Flow (cont.) Recoat with photoresist and do lithography using the ANCHOR2(df) mask to define openings where poly2 contacts nitride or poly0 (align to poly0) RIE the PSG at ANCHOR2 openings LPCVD 1.5 μm undoped polysilicon LPCVD 200 nm PSG as a hard mask and doping source Anneal for o C to dope the polysilicon and reduce residual stress Lithography using the POLY2(cf) mask (align to anchor2) RIE PSG hard mask RIE poly2 film Remove PR and hard mask EE C245: Introduction to MEMS Design LecM 5 C. Nguyen 8/20/09 53 MUMPS Process Flow (cont.) Poly1 Rotor Poly1 Stator Lithography using the METAL (df) mask (align to poly2) Evaporate titanium (Ti) (as an adhesion layer for gold) Evaporate gold (Au) Liftoff to remove PR and define metal interconnects Coat wafers with protective PR Dice wafers Ship to customer Final Structure: Micromotor Customer releases structures by dipping and agitating dies in a 48.8 wt. % HF solution or via vapor phase HF Anti-stiction dry, if needed EE C245: Introduction to MEMS Design LecM 5 C. Nguyen 8/20/

28 MUMPS: MultiUser MEMS ProcesS Originally created by the Microelectronics Center of North Carolina (MCNC) now owned by MEMSCAP in France Three-level polysilicon surface micromachining process for prototyping and foundry services Designed to service as many users as possible; basically an attempt to provide a universal MEMS process 8 photomasks $4,900 for 1 cm 2 dies Micromotor fabricated via MUMPS EE C245: Introduction to MEMS Design LecM 5 C. Nguyen 8/20/09 55 polymumps Minimum Feature Constraints Minimum feature size Determined by MUMPS photolithographic resolution and alignment precision Violations result in missing (unanchored), under/oversized, or fused features Use minimum feature only when absolutely necessary Nominal [μm] Min Feature [μm] Min Spacing [μm] POLY0, POLY1, POLY POLY1_POLY2_VIA ANCHOR1, ANCHOR DIMPLE METAL HOLE1, HOLE HOLEM EE C245: Introduction to MEMS Design LecM 5 C. Nguyen 8/20/
 Cross Sections Oxide1")


29 MUMPS Design Rules (cont.) Cross Sections Oxide1 Poly0 POLY0 Mask Levels ANCHOR1 EE C245: Introduction to MEMS Design LecM 5 C. Nguyen 8/20/09 57 MUMPS Design Rules (cont.) Oxide1 Poly1 Poly0 G N H O K R Cross Sections POLY0 POLY1 Mask Levels ANCHOR1 EE C245: Introduction to MEMS Design LecM 5 C. Nguyen 8/20/
 EE C245: Introduction to")

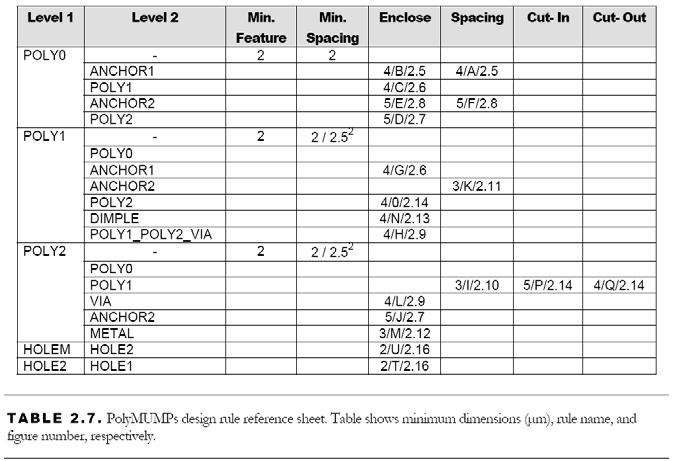
30 MUMPS Design Rules (cont.) EE C245: Introduction to MEMS Design LecM 5 C. Nguyen 8/20/09 59 MUMPS Design Rules (cont.) EE C245: Introduction to MEMS Design LecM 5 C. Nguyen 8/20/


31 The Sandia SUMMIT Process EE C245: Introduction to MEMS Design LecM 5 C. Nguyen 8/20/09 61 Sandia s SUMMiT V SUMMiT V: Sandia Ultra-planar Multi-level MEMS Technology 5 fabrication process Five-layer polysilicon surface micromachining process One electrical interconnect layer & 4 mechanical layers Uses chemical mechanical polishing (CMP) to maintain planarity as more structural layers are realized 14 masks EE C245: Introduction to MEMS Design LecM 5 C. Nguyen 8/20/

 Used to")

 in conjunction with a polishing pad Wafer and pad are")


32 SUMMiT V Layer Stack Uses chemical mechanical polishing (CMP) to maintain planarity as more structural layers are realized EE C245: Introduction to MEMS Design LecM 5 C. Nguyen 8/20/09 63 Chemical Mechanical Polishing (CMP) Used to planarize the top surface of a semiconductor wafer or other substrate Uses an abrasive and corrosive chemical slurry (i.e., a colloid) in conjunction with a polishing pad Wafer and pad are pressed together Polishing head is rotated with different axes of rotation (i.e., non-concentric) to randomize the polishing Top View Carrier/Chuck DI Water Side View Slurry Pad Conditioner Slurry Platen Carrier Chuck Pad Pad Conditioner Wafer Backing-Film Pad EE C245: Introduction to MEMS Design LecM 5 C. Nguyen 8/20/


33 CMP: Not the Same as Lapping Lapping Lapping is merely the removal of material to flatten a surface without selectivity Everything is removed at approximately the same rate Chemical Mechanical Polishing CMP is selective to certain films, and not selective to others Lapping Removes diff. materials at at same rate rate CMP Stops at at nonselective layer EE C245: Introduction to MEMS Design LecM 5 C. Nguyen 8/20/09 65 Actual SUMMiT Cross-Section No CMP until after the first three polysi layers 1 μm mmpoly1 and 1.5 μm mmpoly2 can be combined to form a 2.5 μm polysilicon film Refer to the SUMMiT V manual (one of your handouts) for more detailed information on masks and layout instructions EE C245: Introduction to MEMS Design LecM 5 C. Nguyen 8/20/