PEPperCHIP Immunoassay Protocol
|
|
|
- Frank Stanley
- 5 years ago
- Views:
Transcription
1 Support: Phone: Fax: Website: Address: PEPperPRINT GmbH, Rischerstr. 12, Heidelberg, Germany Table of Content: 1. Components PEPperCHIP Peptide Microarray Storage Additional material to be supplied by user Equipment: Antibodies: Staining Protocol Overview about array handling Recommended incubation volumes Pre-staining with secondary antibodies Staining with antibody, plasma or serum samples Staining with secondary antibodies Staining with labeled control antibodies Read-Out of Microarray Data Data Analysis Contact and Support
2 1. Components 1.1 PEPperCHIP Peptide Microarray PEPperCHIP Peptide Microarrays are provided on standard glass slides (3'' x 1'', 75.4 mm x 25.0 mm x 1 mm). Besides standard or custom peptide content, we implement HA peptides as internal controls and typically print spot duplicates. Depending on the size of the array, up to 16 array copies per slide can be printed. Multiple array copies can be separately assayed with a suited PEPperCHIP Incubation Tray. 1.2 Storage PEPperCHIP Peptide Microarrays should be stored at 4 C to ensure a long shelf life. If handled with care, chips are stable for months. 1.3 Additional material to be supplied by user Buffers: Standard buffer: PBS, ph 7.4, 0.05% Tween 20 Blocking buffer: Staining buffer: Rockland Blocking Buffer MB-070 or standard buffer with 1% BSA Standard buffer with 10% blocking buffer Dipping buffer: 1 mm Tris, ph 7.4 Secondary antibodies: Appropriate secondary antibodies labeled with a fluorescence dye Please note that the blocking buffer may affect the signal intensities of your PEPperCHIP Peptide Microarray. Highly efficient blocking buffers like BSA or milk powder can reduce the intensity of a given interaction by a factor of 10 or higher. Before use, we recommend filtering PBS buffer with a 0.45 µm filter to avoid particulate contaminations on the microarray. Strongly charged fluorescence dyes can interact with acidic and basic side chains of peptides. Therefore, we recommend the use of neutral dyes or dyes with few charged functional groups (e.g. DyLight dyes, Cy3, Cy5), as well as pre-incubation of your PEPperCHIP Peptide Microarray with the selected secondary antibodies to screen for background interactions. PEPperPRINT uses DyLight infrared dyes and the LI-COR Odyssey Infrared Imaging System. 1.4 Equipment: 1. Incubation tray: We recommend using the PEPperCHIP Incubation Tray to work with minimal sample volumes and separately stain multiple array copies per slide. The PEPperCHIP Incubation Tray is available in different array layouts. 2. Orbital shaking device
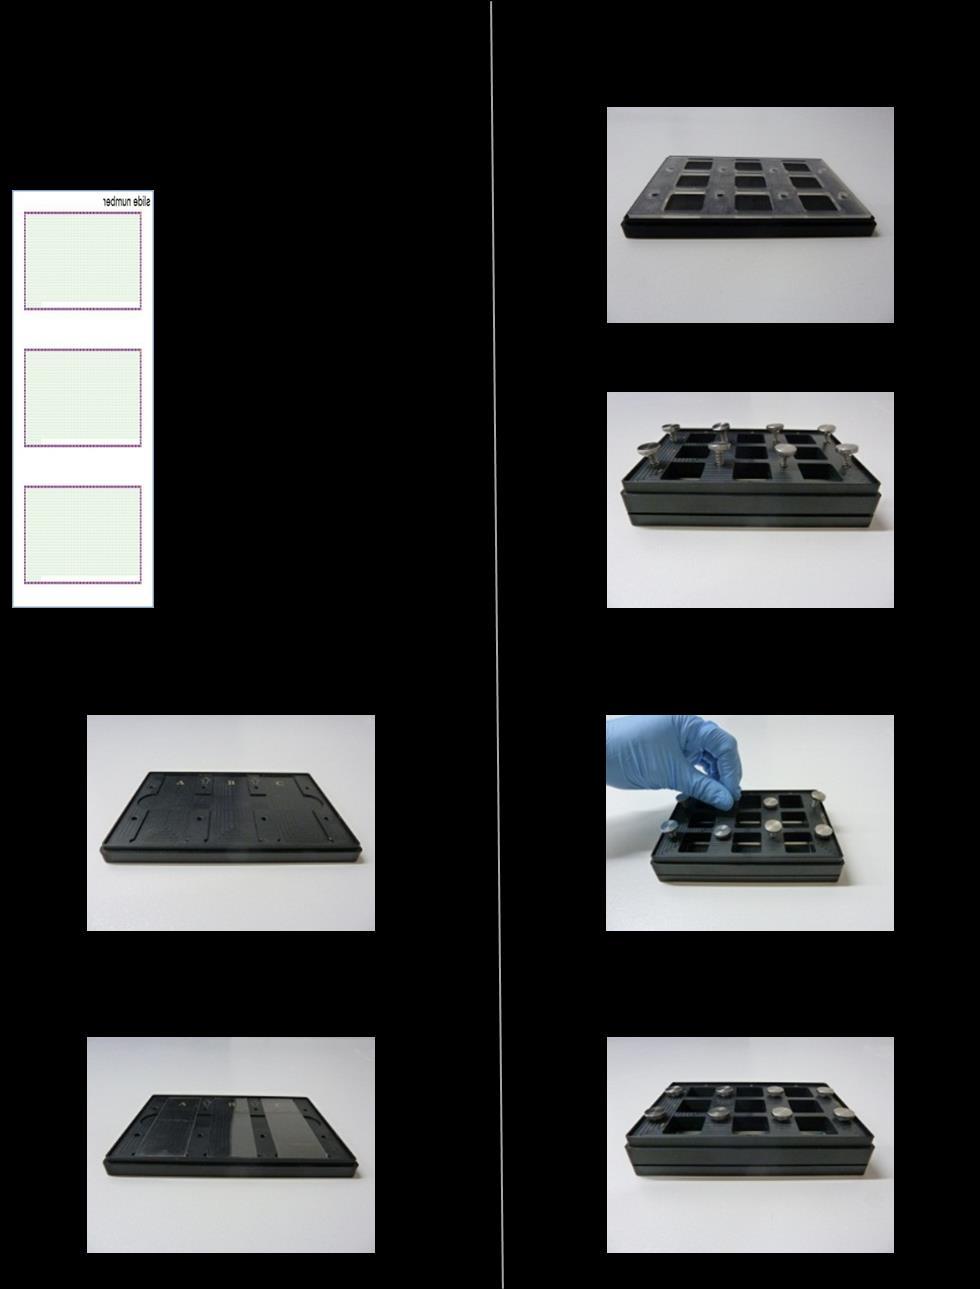
3 3. Microarray scanner/reader: Depending on the labeling of secondary and control antibodies, read-out can be done with either fluorescence scanners or plate readers with a resolution of 21 μm or better. Detailed protocols depend on the scanner and/or plate reader and should be available from the manufacturer. PEPperCHIP Peptide Microarrays are compatible with common microarray scanners (e.g. GenePix 4000B, 4100B and 4300/4400 Microarray Scanners, Tecan Laser and Power Scanner, Agilent High- Resolution and SureScan Microarray Scanner, Innopsys InnoScan 710 and 900, NimbleGen MS 200 Microarray Scanner, LI-COR Odyssey Imaging System and many more). 1.5 Antibodies: 2 1. Primary sample (e.g. antibodies or sera) 2. Labeled secondary antibody for staining of primary sample (e.g. goat anti-human IgG (Fc) conjugated with a fluorescence dye) 3. Labeled control antibodies, e.g. mouse monoclonal anti-ha (12CA5) DyLight 680 or mouse monoclonal anti-ha (12CA5) Cy5. 2. Staining Protocol 2.1 Overview about array handling The following pages summarize the handling of PEPperCHIP Peptide Microarrays as well as the use of PEPperCHIP Incubation Trays. Moreover, we recommend to watch the short tutorial movie in the Peptide Microarray Analysis section on our website. 2

4 4
5 5
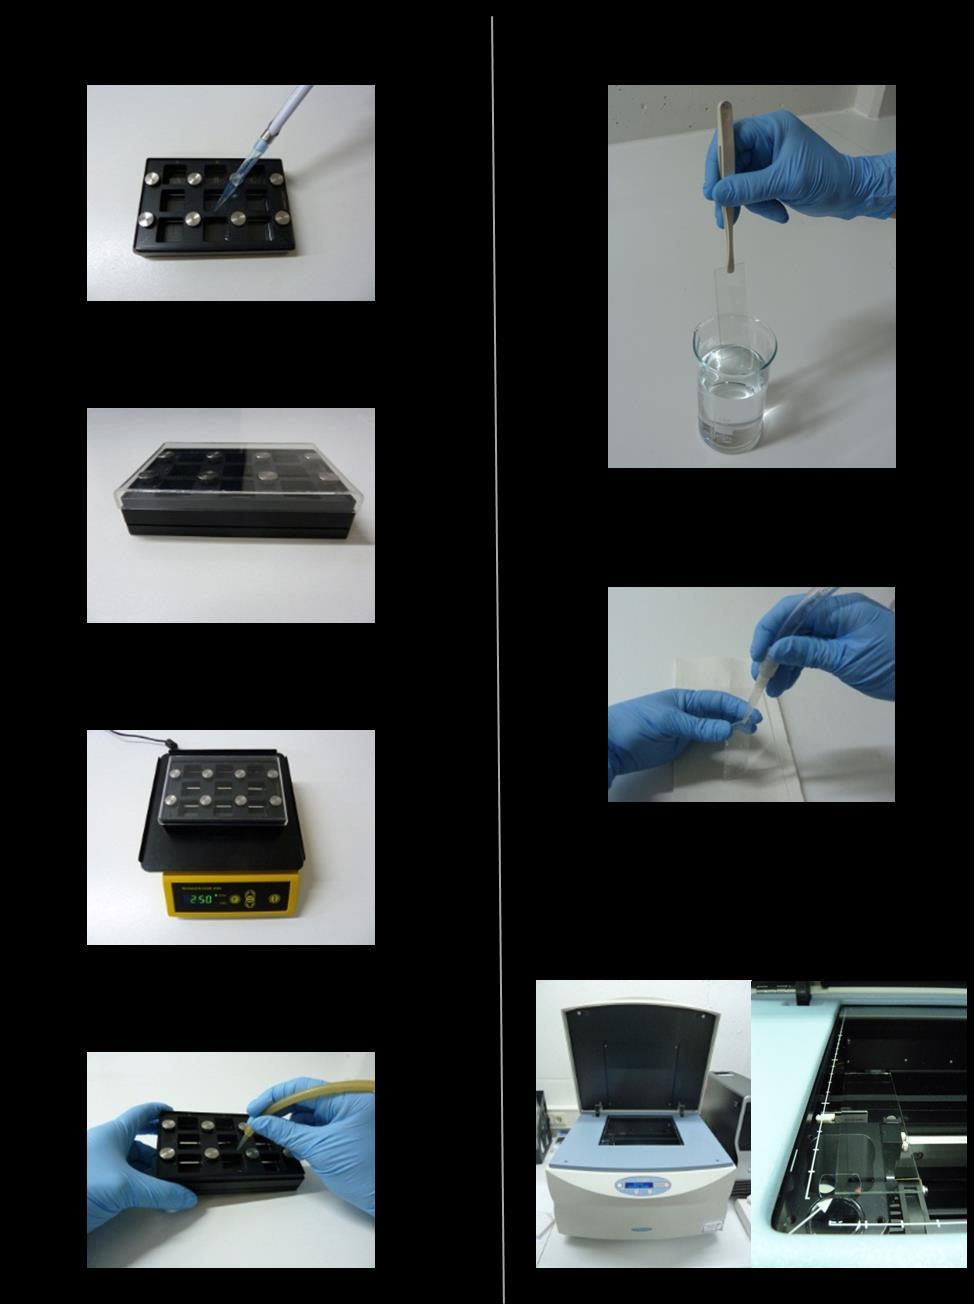
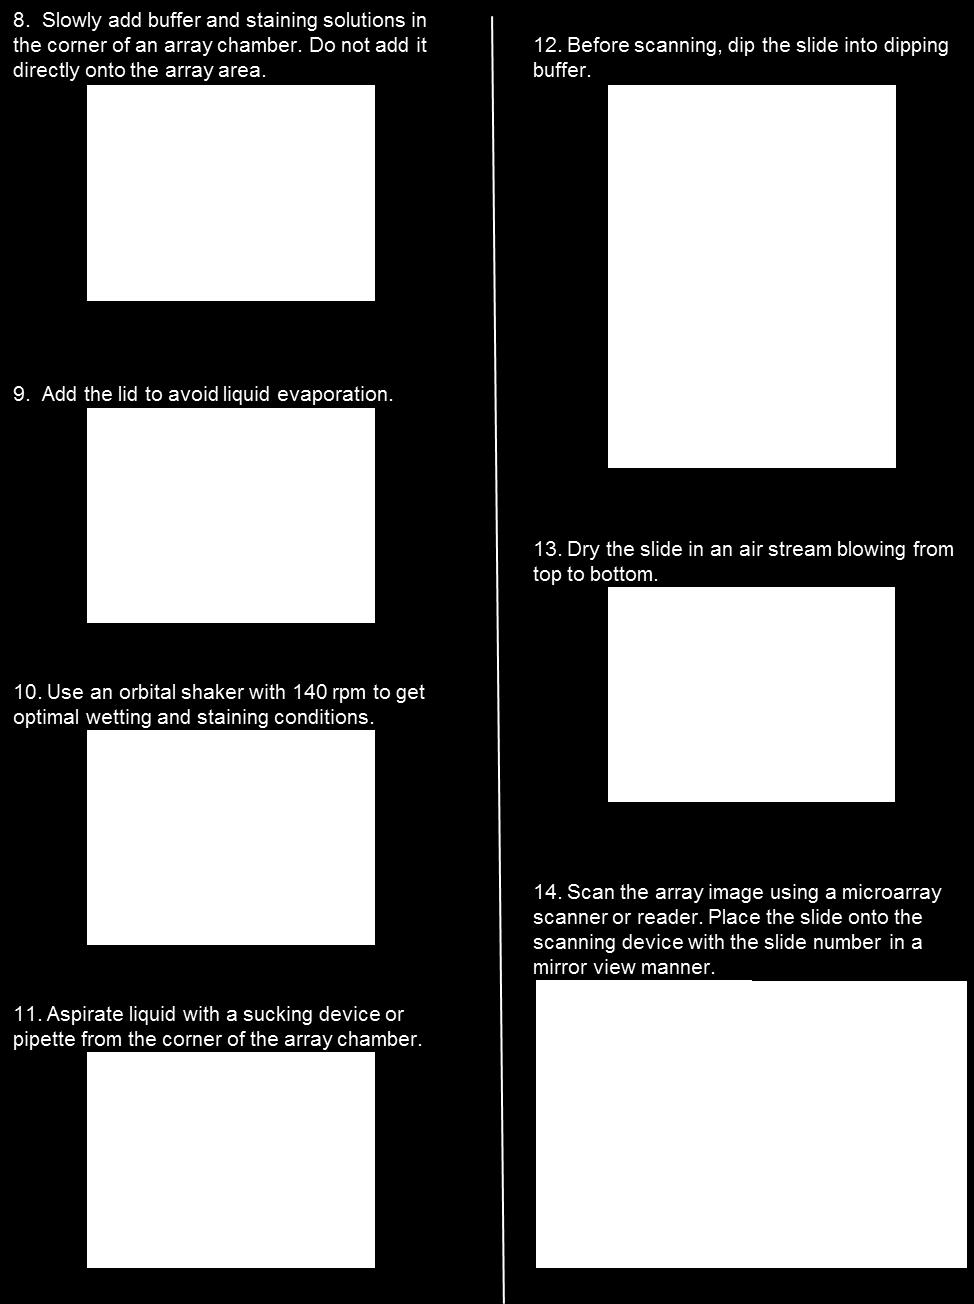
6 2.2 Recommended incubation volumes The PEPperCHIP Incubation Tray allows working with minimal sample volumes and staining of three chips in parallel. It is available in different layouts suitable for either staining of a full chip or separate staining of two, three, four, five or 16 array copies per chip. In the following table minimal incubation volumes are listed: PEPperCHIP Incubation Tray format Minimal incubation volume per well 3 x 1 well 1500 µl 3 x 2 wells 700 µl 3 x 3 wells 400 µl 3 x 4 wells 350 µl 3 x 5 wells 200 µl 3 x 16 wells 100 µl 2.3 Pre-staining with secondary antibodies Secondary antibodies used for staining of the primary sample can sometimes interact with peptide probes on the chip. To discriminate such background interactions from sample-specific signals, we recommend a preincubation and analysis of the PEPperCHIP Peptide Microarray with secondary antibodies. This can be done either on the array used for sample incubation or any other array copy, if available. 1. Incubate the PEPperCHIP Peptide Microarrays for 15 min at room temperature in standard buffer. 2. Incubate the PEPperCHIP Peptide Microarray with shaking (140 rpm) for min at room temperature in blocking buffer to reduce non-specific interactions with the sample or secondary antibodies. Shaking incubation significantly improves sample circulation to avoid gradients that may cause a bias in microarray data. 1 Therefore we recommend an orbital shaker at 140 rpm. Rocking incubation, however, may cause dewetting of the microarray surface and should be avoided. 3. Dilute the secondary antibody in staining buffer. Depending on the nature of primary and secondary antibodies, the dilution may vary from 1:500 to 1: We are usually starting from 1:5000. Please note that higher concentrations can cause stronger background signals. 4. Incubate the PEPperCHIP Peptide Microarray with slight shaking (140 rpm) for 30 min at room temperature in the dark with the secondary antibody diluted in staining buffer. 5. Wash 3x1 min at 140 rpm with standard buffer and dip the slide two times into dipping buffer. 1 W. Kusnezow et al., Optimal Design of Microarray Immunoassays to Compensate for Kinetic Limitations, Mol. Cell. Prot. 5: (2006). 6
7 6. Dry the PEPperCHIP Peptide Microarray carefully in a stream of air. 7. Analyze the PEPperCHIP Peptide Microarray in a microarray scanner or plate reader. Signals within the array have to be subtracted from signals arising from interactions with the primary sample. 2.4 Staining with antibody, plasma or serum samples 1. If a pre-staining with secondary antibodies has not been done on the given PEPperCHIP Peptide Microarray, please follow the blocking routine described in 2.3, (steps 1 and 2). Otherwise proceed with step For equilibration, incubate the PEPperCHIP Peptide Microarray with slight shaking (140 rpm) for 15 min at room temperature in staining buffer. 3. Dilute the primary sample in staining buffer. Depending on the nature of the sample and the interaction parameters, serum and plasma dilutions may vary from 1:10 to 1:10000 with 1:1000 as recommended starting dilution. For purified antibodies, we recommend a starting concentration of 1 µg/ml. Low antibody titers in sera, high off-rates and weaker affinities of mono- and polyclonal antibodies require higher sample concentrations. For CSF, we recommend a starting dilutionof 1:100, for IgE-based assays in serum a starting dilution of 1:20 4. Incubate the PEPperCHIP Peptide Microarray with slight shaking (140 rpm) overnight at 2-8 C with the primary sample diluted in staining buffer. 5. Wash 3x1 min at 140 rpm with standard buffer. Washing times and repeats have to be adjusted with low affinity interactions and/or high off-rates. Vigorous washing may release antibodies and other proteins from the peptides and thus cause a loss in primary signals. Washing can be reduced down to 2x10 sec. If a PEPperCHIP Incubation Tray is used for one-by-one assays with multiple array copies per slide, we recommend to remove incubation and washing buffers by careful suction of the solutions e.g. by a pipette under slight tilting of the incubation tray. Please avoid contact of any tip with the microarray surface. 2.5 Staining with secondary antibodies 1. Dilute the secondary antibody in staining buffer. Depending on the nature of primary and secondary antibodies, the dilution may vary from 1:500 to 1: We are usually starting from 1:5000. Please note that higher concentrations can cause stronger background signals. 2. Incubate the PEPperCHIP Peptide Microarray with slight shaking (140 rpm) for 30 min at room temperature in the dark with the secondary antibody diluted in staining buffer. 3. Wash 3x1 min at 140 rpm with standard buffer and dip the slide two times into dipping buffer. 7
8 For final dipping into dipping buffer and drying we recommend removing the PEPperCHIP Microarray from any incubation tray used. Peptide 4. Dry the PEPperCHIP Peptide Microarray carefully in a stream of air. 5. Analyze the PEPperCHIP Peptide Microarray in a microarray scanner or plate reader. If signal intensities and/or signal to noise ratios are low, the same array can be stained again with a lower serum dilution or higher antibody concentration. For this purpose, please repeat sections 2.4 and Staining with labeled control antibodies 1. Incubate the PEPperCHIP Peptide Microarray for min at 140 rpm at room temperature in staining buffer. 2. Mix both control antibodies (e.g. from the PEPperCHIP Staining Kit) at a dilution of 1:1000 in staining buffer. 3. Incubate the PEPperCHIP Peptide Microarray with slight shaking (140 rpm) for 45 min at room temperature in the dark with the control antibodies. 4. Wash 2x1 min at 140 rpm with standard buffer and dip the slide two times into dipping buffer. 5. Dry the PEPperCHIP Peptide Microarray carefully in a stream of air. 6. Analyze the PEPperCHIP Peptide Microarray in a microarray scanner or plate reader. If the primary sample used in step 2.4 is not a mouse antibody, and if there s no wavelength interference of secondary and control antibodies, the staining with labeled control antibodies can also be done in combination with the secondary antibody (see section 2.5). This is exemplified by the possible combination of the secondary antibody goat anti-human IgG (Fc) DyLight 800 with control antibody monoclonal anti-ha (12CA5) DyLight 680. Combinations with a wavelength interference (e.g. a secondary antibody goat antihuman IgG (Fc) DyLight 680 with control antibody monoclonal anti-ha (12CA5) DyLight 680) or with mouse samples (e.g. a secondary antibody goat anti-mouse IgG (Fc) DyLight 800 with control antibody monoclonal mouse anti-ha (12CA5) DyLight 680) are explicitly not recommended and should be avoided. 8

 and goat antihuman IgA (Fc) conj. DyLight800 (green) as well as control antibody anti-ha (12CA5) DyLight800 (green).")
9 3. Read-Out of Microarray Data Place the slide onto the microarray scanner. Follow the manual of your scanner for image recording. Save the image as 16-bit grayscale TIFF image. Epitope mapping of a polyclonal antibody sample against five antigens translated into overlapping 15mer peptides in duplicate with 14 amino acids peptide-peptide overlap. The array is surrounded by HA control peptides. The PEPperCHIP Custom Peptide Microarray was pre-stained with secondary antibodies goat anti-human IgG (Fc) conj. DyLight680 (red) and goat antihuman IgA (Fc) conj. DyLight800 (green) as well as control antibody anti-ha (12CA5) DyLight800 (green). The pre-staining revealed a cross-reaction of the anti-ha control antibody with peptides with the consensus motif DKLIDYA (green signal stretch in left image). Subsequent, incubation of the same microarray with a human serum (1:250) followed by staining with secondary and control antibodies revealed strongly polyclonal IgG and IgA responses against virtually all antigens covered by the microarray (right image). For further information about scanner compatibility, please visit the Peptide Microarray Analysis section on our website. 4. Data Analysis Each PEPperCHIP Peptide Microarray is provided with GAL files for image analysis with GenePix Pro, TIGR Spotfinder and other suited software solutions, as well as with Excel spreadsheets with the microarray layout for manual spot annotation. Please note that PEPperCHIP Peptide Microarray spot morphologies are rectangular, what may require certain adjustments of spot geometry settings in GenePix Pro and TIGR Spotfinder. We recommend usage of our own software solution PepSlide Analyzer as cost-effective and intuitive alternative to GenePix Pro. To acquaint yourself with the data analysis procedure you can start with a 14- days free trial version of PepSlide Analyzer. Subsequently, an annual or a perpetual version can be purchased. Each PEPperCHIP Peptide Microarray is accompanied by a psf file that assigns the peptide sequences to the spots. The psf file is a grid that can be aligned to the raw scanner image by simply drag and drop. A readout file is created, which is fully compatible with Excel and summarizes for each spot the signal intensity, the background value and the corresponding peptide sequence. PepSlide Analyzer also helps to find consensus motifs/epitopes within overlapping peptides and to decipher peptides with highest spot intensities of permutation scans. 9
10 5. Contact and Support For further questions and support, please don t hesitate to contact us by or phone