Using Contract Billing for T&M Billings
|
|
|
- Milton Chase
- 5 years ago
- Views:
Transcription


1 The purpose of this document is to outline the process for using Contract Billing to automatically load invoices with transactions from JD Edwards. The steps below will work for T&M type billings where transactions in the Cost to Date of the Job are being used as the basis to create the billing. Lump Sum type billings will require different steps. 1. Setup Accounts using Setup Accounts on Job Master program on the Operations/Project Management menu. 2. Assign each Billable Account a Bill Y/N value of Y.


.")
2 3. Create a Billing Mark-Up Table for the job using the Setup Billing Rate Table program on the Operations/Billing Management menu. 4. The Billing Rate Table will dictate the billing rates or mark-up percentages to be applied to costs coming in to the Workfile. Costs pulled into the Workfile will then be pulled into the Invoice when it is created. The table below shows a 50% mark-up being applied to all labor transactions and no mark-ups being applied to any other transactions. The 50% mark-up is being applied as a flat burden amount on top of labor cost. Mark-ups can be applied as a replacement for actual cost, a percentage on top of cost, or a flat amount on top of cost. They can also be applied in a number of different ways (i.e. by subsidiary, job type/step, employee, pay type, equipment number, etc). Billing Rate Tables should be setup as Generation Type 1 (Inv/Rev/Comp Amounts) and Key Type 6 (Job or Business Unit). The Table Key field should be populated with the Job Number. (NOTE: The system contains a default 10% mark-up to be applied to Billing transactions. A Billing Mark-Up Table with no mark-ups in it is required to pass through transactions at cost). 5. Setup the Contract Master on the job using the Contract Master Revisions program on the Operations/Billing Management menu. Multiple Contract Masters can be setup on the same job, but each has to have a unique Contract Number. In general, the Contract Number should match the Job Number to avoid confusion. Use the last two digits of the Contract Number to differentiate contracts if setting up more than one on a job.


 that indicates")
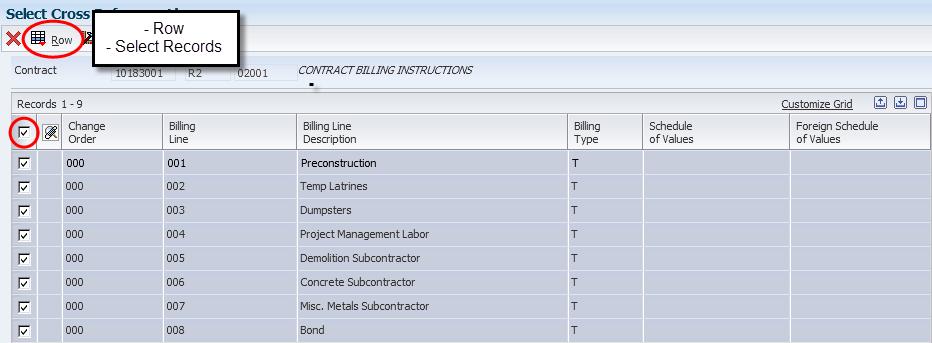
3 6. Setup the Billing Lines in the Contract Master. Billing Lines are essentially the line items on your Schedule of Values and should be setup accordingly. The Billing Lines will be used to print your Schedule of Values from the system. Billing Lines should be setup as Type T in the BL Column and will require an Eligibility Override code of 1 in the Elig Ovr Column. When saving the Billing Lines, you will get a soft error (yellow warning message) that indicates a cross reference is not setup. This is the next step in the process, but the Billing Lines must be saved first.


4 7. In order to add a Fee or Profit line item to your billings and automatically have that line calculate and bill a certain percentage on top of cost, add a Billing Line Type F as shown in the last line of the example above. This line will not have anything in the Elig Ovr Column. You will then cross reference this line to the billing lines above to calculate the designated percentage on top of the costs billed in those lines. 8. Save the Billing Lines which will return you to the Work with Contract Billing Line Details screen. Click the Green Checkmark to re-enter the Contract Billing Line Detail Revisions screen above and cross reference the Billable Accounts to the applicable Contract Billing Line. 9. Cross Reference your Billable Accounts to the proper Contract Billing Line. This step will tell the system which cost codes to associate with each Billing Line. When the invoice is created, the transactions on the crossreferenced cost codes will pull into the invoice on that line item (given that they are in the Workfile that will be created in Step #12). The association between cross referenced accounts and billing lines can also be used for reporting purposes. When a Billing Line has a Cross Referenced Account associated with it, the X Ref box will be populated with an X. Repeat the steps shown below until all lines except for Fee have the appropriate Billable Accounts cross referenced to them and each X Ref box is populated with an X.


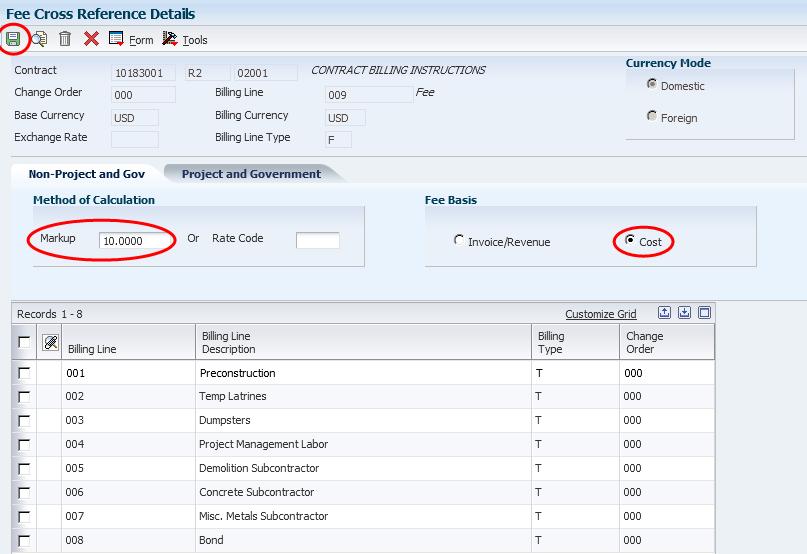
5 10. Setup the Cross Reference for the Fee Line. This cross reference will take all the Billing Lines in the contract and bill a set percentage on top of the costs pulled in to those lines.

6
.")

7 11. If your contract requires Retention to be held, ensure that your Billing Lines contain the proper Retainage Rule attached to them. NOTE: Steps #1 11 only need to be completed one time. The following steps make up the monthly process. 12. Create the Workfile. This will identify all the transactions charged to the billable accounts identified earlier in the process (Step 2). The building of the Workfile is subject to Payroll Security limitations which need to be managed closely. The person creating the workfile must have the Payroll Security to be able to see all applicable labor transactions charged to the job in order for them to appear in the Workfile. If this person does not have the proper security, the transactions will be marked as billed, but will not be viewable. (NOTE: This step is optional. The Workfile Generation can be setup on a scheduler to run nightly or over the weekend.)


8


9 13. The Workfile Revisions program can also be used to manually create the Workfile. The Workfile Revisions is also subject to Payroll Security limitations which need to be managed closely. The person managing the workfile must have the Payroll Security to be able to see all applicable labor transactions to the job in order for them to appear in the Workfile. (NOTE: This step is optional.)


 15. Create Invoice.")
10 14. Using the Workfile Revisions program you can also manage what gets billed by marking specific transactions as non-billable, removing them from the Workfile, or placing them On Hold. Keep in mind the Payroll Security limitations related to working with the Workfile. If your process requires this step, please contact a Job Cost Business Analyst for assistance. (NOTE: This step is optional.) 15. Create Invoice. Notice that when the invoice is created, it immediately is populated with an amount.


11


12 16. Select the Invoice to enter it and see what billed on each line item. Keep in mind the Payroll Security limitations related to working with the Workfile. Transactions will not appear when looking at the detail unless the User has the proper Payroll Security to view that transaction. Transactions can also be adjusted, removed and placed on hold in this step as well.
13 17. Generate Journal to verify the G/L postings will be correct. 18. Create G/L Journal Entry.
14 19. Post Batch. Using Contract Billing for T&M Billings