INSTALLATION GUIDE COMPOSITE DECKING
|
|
|
- Ferdinand Dalton
- 5 years ago
- Views:
Transcription


1 INSTALLATION GUIDE COMPOSITE DECKING
2 CONTENTS STORAGE & HANDLING 03 SAFETY & USE 04 TOOLS 05 CALCULATING BOARDS 06 DECKING COMPONENTS + ACCESSORIES 07 PRE INSTALLATION NOTES 09 FALLS AND GRADIENTS 10 INSTALLATION OF SUBSTRUCTURE - TIMBER 11 INSTALLATION OF SUBSTRUCTURE - ALUMINUM OR COMPOSITE 12 INSTALLATION 13 CLEANING AND CARE 26 2
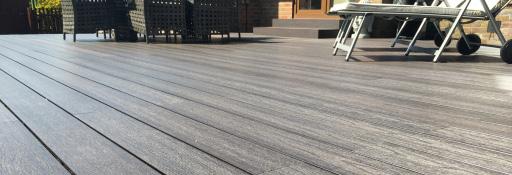
3 STORAGE & HANDLING Whilst our composite materials are highly durable we do recommended to follow the below guidelines for storage, handling and installing to ensure products are kept in the best possible condition. STORAGE - Materials should be stored under cover, protected from weather and in the shade, until ready to install. - Materials should be covered and kept dry until ready to install to ensure a clean surface. Products should not be stored outside and or covered with plastic sheeting. - All composite products should be stored supported above the ground at 500mm intervals on a flat clean surface. Supporting battens used in storage should align through the stack to equally transfer the load. - Boards must be stacked on top of each other - Where multiple pallets delivered these should not be stacked higher than 3m per stack. HANDLING - Decking materials should be placed and not dumped when unloading. Boards should be lifted and set down with care to avoid damage do not slide boards over one another. - Decking boards should be carried in the middle and on their edge for best support when moving. - During installation, avoid sliding or dragging any equipment across the board surface to avoid any tarnishing the surface - The surface of the decking boards should be kept free of construction debris and material to prevent damage to the boards. As with all sites surfaces should be kept clean and tidy for the best installation. - Ecoscape will not be held responsible for issues that arise from poor storage. 3
4 SAFETY & USE Prior to installing any composite system we recommended that you consult local building regulations for any special requirements or restrictions that may apply. The illustrations and accompanying instructions in this guide are for illustrative purposes to provide a typical installation scenario, and do not replace the advise of a licensed professional in the field. SAFETY USE - Personal Protection Equipment (PPE) should be worn at all times (COSHH Assessment summary available). When cutting and installing boards it is advised to wear gloves, protective eye wear, a dust mask, long sleeves and trousers. - Standard woodworking tools can be used to install our composite products. When using a chop saw we would recommend a 60T+ Multipurpose aluminum blade for maximum efficiency and neatness on cuts. - Dry and windy environments may result in a naturally occurring static build-up in composite products. The levels of static build up will not cause personal injury. - Composite decking boards MUST be installed onto a substructure to allow adequate air flow beneath - this prevents any excessive water absorption. Boards can not be laid directly onto a flat surface. A minimum of 25mm clearance beneath the decking should be provided to allow adequate drainage and drying. - Excessive heat my be felt on the surface of the composite decking products from external sources such as reflection of sunlight from Low-E glass. This may cause an unusual heat build-up on any exterior surfaces. Excessive heat exposure may cause boards to sag, warp, expansion/ contraction at increased levels, may accelerate weathering and in extreme circumstances melt the board surface. A rise to such adverse levels is deemed extremely unlikely in the UK due to the stable climate. -We recommend the ecoscape screws provided with the t-clips for installation of the boards - using any other screw system will invalidate the installation warranty. All fixings should be fastened at a 90 degree to the decking system. - It is imperative to plan your decking before starting to ensure the best looking layout is achieved. We would recommend to pay particular attention to fixed elements such as door thresholds, gutter outfalls and walls in order to determine the optimal laying pattern and starting position of the first boards. - Forma and Clarity Composite Decking Boards are not intended for use as primary load-bearing members. i.e. cantilevered structures, supports, beams, stringers. - Boards must be supported by a compliant substructure at 400mm centres and absolutely CANNOT be installed onto existing decking boards. 4
5 TOOLS RECOMMENDED TOOLS REQUIRED TO INSTALL FORMA AND CLARITY DECKING Standard woodworking tools can be used when working with Ecoscape Decking. If you are unsure on how to use any tool, please consult the tool s manufacturer s user manual. Circular Saw - we recommend a 60T+ multipurpose blade to achieve the cleanest cuts. Mitre Saw extremely helpful also for mitres and beveled edges Jig Saw Hand Drill - 3mm and countersink drill bits (SmartBit countersink tool available) Tape Measure Set Square Spirit Level Protective eye wear and relevant Personal Protection Equipment (PPE) 5
 2. Plan which direction to lay your decking 3.")
6 CALCULATING BOARDS To determine how much Ecoscape Decking material will be required, you can either use detailed plans or follow the method below. Alternatively, feel free to speak to one of our technical experts on. 1.Start Off by measuring the width and length of your proposed decking area(s) 2. Plan which direction to lay your decking 3. If the boards are laid length ways, to find the number of board rows, divide the deck width by the width of the boards, plus a 5mm spacing per board (allows for the hidden T-clip): Ecoscape boards are available in the following sizes: Clarity - 25mm (H) x 150mm (W) x 2900mm or 4800mm (L) Forma - 25mm (H) x 150mm (W) x 2900mm or 3600mm (L) Width Length For example, for decked area 3.1m Wide x 6m Long, boards (150 x 25mm) with 5mm hidden fasteners: 3.1m width / (0.150m m) = 20 boards wide 4. Now multiply the length of the deck by the number of boards wide (given above). This gives you the total linear meters of deck boards required: 6m length x 20 boards wide = 120 linear meters The same method of calculation can be used to work out the number of boards required to the vertical fascia s to the deck. 5. Next, divide the total linear meters of decking by the length of board being used: 120 linear meters / 2.9m board length = 41.3 lengths of 2.9m decking boards 6. Finally, multiply the number of total boards by 1.05 to include for 5% wastage: 41.3 x 1.05 = or 44 Boards. 6
 Various colours (25x150x4800mm) FORMA Decking Board (25x150x2900mm) Various Colours (25x150x3600mm) DECKING ACCESSORIES Starter / Finish Clip")
7 DECKING COMPONENTS Please ensure you are familiar with all the decking components prior to starting. CLARITY FORMA CLARITY Decking Board (25x150x2900mm) Various colours (25x150x4800mm) FORMA Decking Board (25x150x2900mm) Various Colours (25x150x3600mm) DECKING ACCESSORIES Starter / Finish Clip (Steel) Starter / Finish Clip (Steel) Hidden T-Clip (Plastic) and Screw Hidden T-Clip (Plastic) and Screw 7
 Flat Decking Trim")
 Colour Coded Screws")
8 DECKING ACCESSORIES CONT. CLARITY FORMA Angle Fascia Trim (42x6x2900mm) Flat Decking Trim (10x150x2900mm) (10x150x3600mm) Flat Decking Trim (10x90x2900mm) Colour Coded Screws (250pcs or Individual) Colour Coded Screws (250pcs or Individual) Colour Coded Poly Pin (50pcs) 8

9 PRE INSTALLATION NOTES TYPICAL INSTALLATION: DECKING AREA ADJACENT TO HOUSE Decking areas can take many forms and scales of complexity. The following guide portrays the steps to install the basic board system and side trim. The approach shown can be used to develop terraces and step details however these will require further planning and consideration. The diagrams shown use a external grade timber subframe on which to fix the decking. Boards can also be fixed onto aluminum or composite frames. Ecoscape are able to offer support with and design approaches which vary from that shown here. 9
, and so further reducing the risk")
10 FALLS AND GRADIENTS Whilst not absolutely necessary, it is recommended that composite decking boards are installed at a 1% gradient. Boards laid parallel to the direction of fall will encourage water to shed via the preformed groves in the boards (FORMA only), and so further reducing the risk of slipping when wet. 1% 10

11 INSTALLATION OF SUBSTRUCTURE Timber Joists DECKING JOIST LAYOUT: TYPICAL TIMBER SUB-FRAME Joists should be fixed to a secure legs in a concrete footing or similar. Ecoscape are unable to accept any liability for the installation of inadequate sub-frames. The contractor should ensure the frame is adequately prepared. JOIST SPECIFICATION: - Decking can be fixed to pressure treated softwood timber joists ( Grade C16 - EN14081 or similar) or composite battens depending on design requirements. - Joists should be fixed into position at 400mm centres using suitable A4 stainless steel countersunk wood/ masonry screws. All joists need to fixed in a minimum of 3 places. - All joists need to be minimum 45x95mm thick 11

12 INSTALLATION OF SUBSTRUCTURE Aluminum or Composite Joists with Pedestal System Ecoscape are also able to offer Aluminum or Composite sub frames. TYPICAL ALUMINUM / COMPOSITE SUB FRAME ON ADJUSTABLE PEDESTALS With solid flat foundations and flat roof areas the decking substructure can be supported with adjustable support pedestals. These are simply placed straight onto the ground with a protective rubber pad (flat roofs) and the height of each is adjusted by rotating the pedestal top. Joists can also be fixed to concrete block work or low walls. Please refer to separate manual for full pedestal system installation or contact or technical team for further information. 12


13 INSTALLATION STEP 1 - Orientation of decking boards a We recommend that decking boards are laid perpendicular to the direction of the sub-frame, however other configurations are possible. Decking boards also function and look best when laid perpendicular to building line / door / viewing point. a There are a wide variety of laying patterns that can be achieved but these are not covered in this manual. Ecoscape are able to assist with the design of non standard laying patterns. Decking Boards Joists


14 INSTALLATION STEP 2 - Fixing the starter clips B Once you have determined the location and orientation of the first decking board, you are ready to install the first starter clip. Align the clip to the end and centre of the joist, pre-drill, and screw in place the starter clip using the starter clip screw. B Starter Clip Screw Starter Clip C Using a deck board or string line install the remaining starter clips, taking care to ensure they are aligned. C String line One clip per joist 14


15 INSTALLATION STEP 3 - Install the first decking board D Take the first board and slide it into the starter clip using the grooves in the side of the board. D Slide the board into the clip Decking Board E Ensure the board is fully installed into the clip before proceeding. E Board fully installed into clip 15


16 INSTALLATION STEP 4 - Installing the T-Clips F Using the Hidden T Clips, Secure one end of the board in place by sliding the T clip into the side grove on the decking board and part screwing the T-clip screw into the joist. Do not fully screw the T Clip in place. F Hidden T Clip Screw Hidden T Clip G Install the remaining T Clips part way as above. One T-Clip should be installed per joist. G One Hidden T Clip per joist 16


17 INSTALLATION STEP 5 - Install the second decking board H Take the second decking board and slide into the T Clip fixings Slide board into place Board 2 Board 1 I Install the next row of T Clips to board 2 as described in step 4. I Install next row of T Clips part way 17


18 INSTALLATION STEP 6 - Fully secure first set of T Clips J Once the second board is in place you are ready to fully secure the first line of T Clips in place. J K When Installing the T Clips Take care to use a screw bit of a suitable width (5mm) to avoid damage to the boards. If using a drill to screw in the clips, ensure the chuck does not come in contact with the boards. K Distance between joists 5mm 18


19 INSTALLATION STEP 7 -Installing the remaining boards L Repeat steps 4 and 5 to install the remaining area of decking. If the decked area required joints to panels, plan where you want the joints to be visible. Joints should be made over a joist, with a T-Clip holding the two boards on either side to ensure a secure fixing. L Consider the location of joints within the decking M Install the remaining boards M 19

20 INSTALLATION STEP 8 - Installing boards end to end N Where a decking board is to be laid end-to-end with another, a 2/3mm gap is to be left between the boards. N Please note as a product that contains both timber and wood it is subject to movement with temperature change. The movement is 1mm per 10º C in temperature change of the product, not air temperature. In direct sunlight, darker composites will reach higher temperatures than lighter colours. Please take into consideration the boards temperature when laying. If particularly warm these may need tighter gaps during install. The boards should be supported by sub-frame joists, positioned 20mm apart as shown on the adjacent image. This allows the ends of the decking boards to be supported, whilst also allowing water to drain freely between the ends of the boards and prevent standing water. 20


21 INSTALLATION STEP 9 - Finishing the deck - Option A O Once the main boards have been installed the fascia trim can be attached to create a clean edge. Align the first Trim with the top edge of O Flat Fascia Trim the decking and fix into the joists using the colour coded fixing pins. 2 Pins per joist. O Flush to top surface Colour coded fixing pins 21

22 INSTALLATION STEP 10 - Finishing the sides - Option A P Use the flat fascia boards to finish the sides of the decking as required. P 22


23 INSTALLATION STEP 9 - Finishing the deck - Option B Q An alternative method to finishing the decking is to utilise additional decking boards to clad the face of the decked area. The boards should Q Decking Board be installed in a similar manner to the decking, however countersunk screws can be used rather than Hidden T-Clip fixings if the face of the decking isn t going to be in view. Q Hidden T-Clip fixings as per decking, or countersunk screws 23

24 INSTALLATION STEP 10 - Finishing the sides - Option B Angle Fascia Trim R Once the decking boards have been installed to the face, the Angle Fascia Trim accessory can be pinned to the top edge of the decking using colour coded poly pins, creating a smooth join. R 24

25 INSTALLATION Job Done! Please consult with the technical department for further advice. 25
26 CLEANING AND CARE ECOSCAPE Decking boards will require periodic maintenance to remove the build up of dirt and debris. We recommend the decking is cleaned once or twice a year using either: - A high pressure cleaner (Jetwash) with a fan shaped beam at a distance of at least 20cm in a lengthwise direction, or; - Scrubbing brush with a all-purpose cleaner and water Burn marks, from BBQ s or similar can also be removed using a course piece of sandpaper (80gsm or similar), by rubbing the deck length-ways gently. 26
27 Higher Broadfield Farm, Off Pilsworth Road, Greater Manchester, OL10 2TA T: E: 2018