A-ONE Insulated Forms Installation Manual
|
|
|
- Adela Hodges
- 5 years ago
- Views:
Transcription


1 A-ONE Insulated Forms Installation Manual Rockford, MN A-ONE Manual docx
2 Disclaimer Notice The information in the A-ONE Insulated Forms Installation Manual generally focuses on residential construction. Commercial construction, while similar, may have special requirements beyond the scope of this installation manual. Nothing in this installation manual should be construed as engineering advice for a particular project. The A-ONE Form is a stay in place formwork system for a steel reinforced or plain cast-inplace concrete wall. The cast-in-place, steel reinforced or plain concrete wall is the structural component. The prescriptive engineering information provided in this Installation Manual is generally applicable to residential or small commercial projects. It is the user s responsibility to make sure this information meets any local building codes or applicable governing standards by consulting with local building code officials. If the user s project varies from or does not meet the criteria listed in this Installation Manual, the user is responsible for retaining a local design professional to prepare proper documents to meet local building code standards or requirements. DiversiFoam Products does not provide project specific engineering or drawings. DiversiFoam Products reserves the right to make changes or corrections to the Installation Manual at any time without notice. The information contained in this Installation Manual is provided as is without warranty. 2
3 Table of Contents Introduction... 4 Footing Design... 5 Laying First Course... 5 V & H Wire Clips... 5 Preventing Shrinkage Cracks... 6 Rebar Prep and Wall Reinforcement before Pouring Concrete... 6 Wall Height... 7 Pouring the Concrete... 7 Water-Resistant Coating and Drain Tiles... 8 A-ONE Accessories... 9 A-ONE Form Technicians... 9 Tool and Material Checklist Illustrations Engineering Guidelines: Pages A-ONE Form Drawings: Pages Guideline Drawings: Pages Fastener Chart: Page 38 3
4 A-ONE Form Installation Manual Introduction A-ONE Form is the most energy and cost-efficient wall system available. Made of environmentally safe and durable expanded polystyrene, A-ONE Form is used with conventional reinforced concrete, to create a wall system that can be used from footing to rafter. Quick and convenient, the A-ONE Form wall has a continuous total R-Value for EPS insulation of 21+. Additional performance achieved with concrete mass and reduced air leakage. Construction costs are about the same as conventional construction. A-ONE Form creates a wall that is stronger than normal poured concrete walls, or typical wood frame construction. This manual is designed to be a reference guide for the contractor of residential, commercial or industrial properties of all sizes. IMPORTANT NOTE: A-ONE Form forms are lightweight. If left individually or bound in small groups, they may be subject to high winds and could be damaged. Care should be taken to make sure unattended forms are properly secured. This manual explains the correct installation methods for the A-ONE Form Super Insulated Concrete Building System. Basic to this building system is the lightweight A-ONE Form. It is manufactured using EPS (expanded polystyrene) molded with six integral plastic cross members. The ends of the cross members are located just below the surface of the block to prevent heat transfer and moisture consolidation during cold weather. The embedded heavy plastic studs also provide attachment points for the application of interior and exterior finishing materials. The studs are 2 ½ wide and 16 high, the same height as the block. When the A- ONE Forms are stacked together they create a smooth wall form into which rebar is inserted and concrete is placed to create a solid, super-insulated and super strong structure. A-ONE Forms have alignment tabs with protrusions every 4 to make alignment easy and to provide a complete insulated seal. The A-ONE Form system is appropriate for building walls below and above grade from footing to rafter. Waterproofing is recommended for the outside of belowgrade walls before backfilling. Walls built with A-ONE Form are ready for finishing once the concrete is set. Some of the many benefits for contractor and crew when building with the A- ONE Form versus traditional frame or masonry include fast, easy construction by smaller crews using lightweight materials with minimal waste. No special equipment is required and no unusual building techniques are necessary. With A-ONE Form, concrete can be poured in below freezing temperatures. Methods described here are designed to be a reference guide to the contractor for residential, commercial and industrial projects of all sizes. Once understood, they can be adjusted to fit the construction requirements of any special design. For your convenience, this manual is divided into five sections. Each section is labeled accordingly for your quick reference. In the next section of this manual we will begin building with A-ONE Form. In case of differences 4


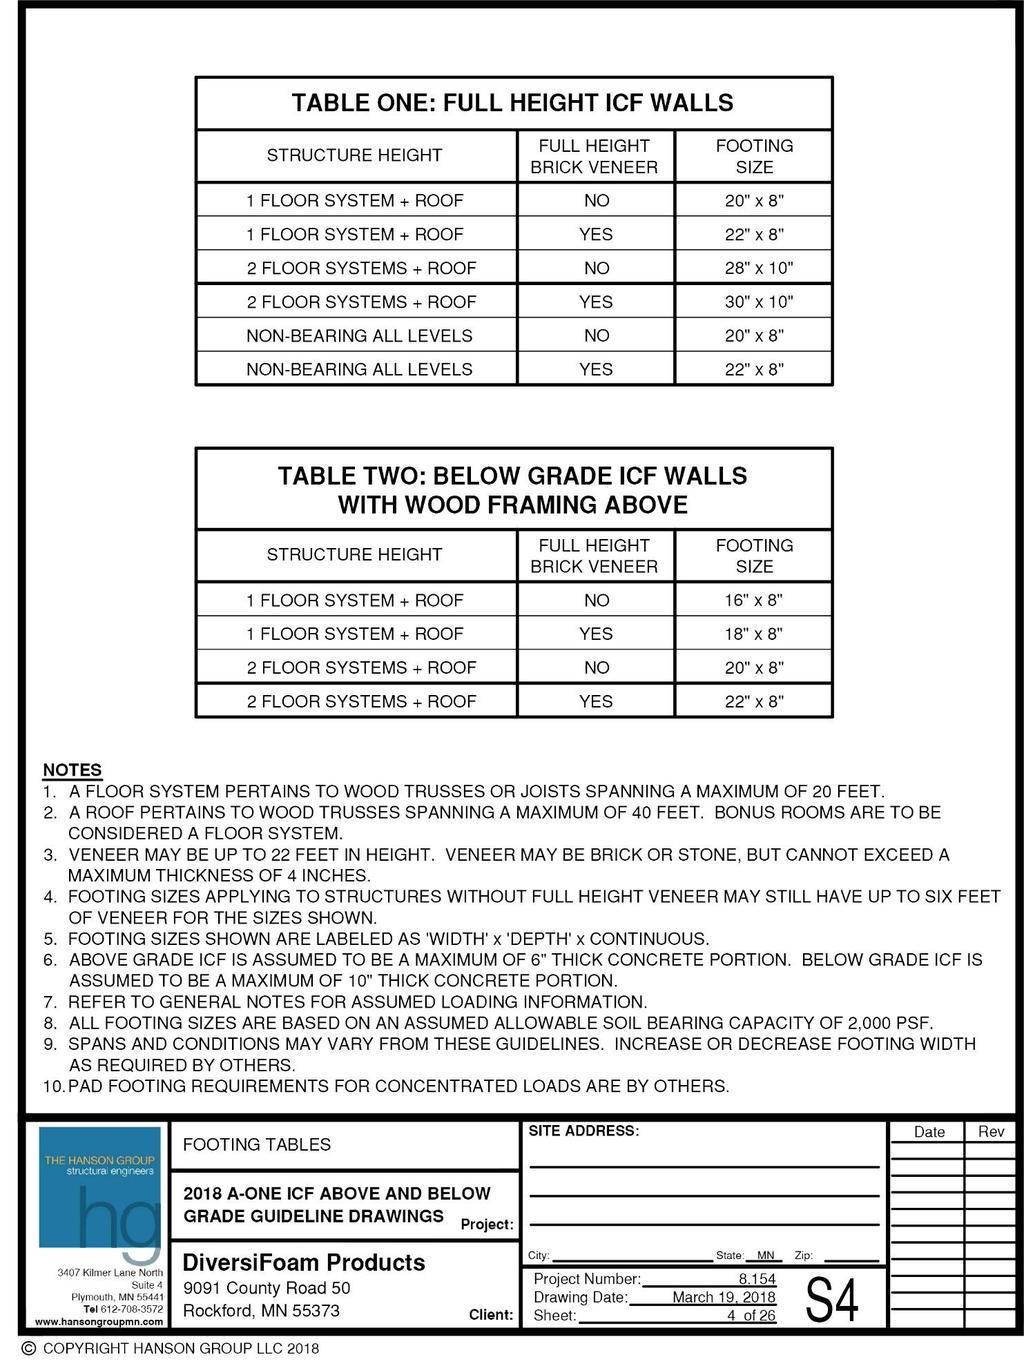
5 between your actual site requirements and this manual, your local building code or engineering specifications always take precedence. Footing Design Refer to A-ONE Footing Tables when designing footing layout. Once the footing design has been determined, the footing is formed in the conventional manner. The forms should provide for a finished footing that conforms to local code requirements. Reinforcing bars should be placed in the footing as required by local code. During this process, a crewmember places rebar vertically into the wet footing as per code and engineering specifications. Depending on the depth of the footing, the bar will extend approximately 24 above the footing. Care must be taken at this time not to stub up rebar excessively high through window, door, or other openings which would later cause unnecessary difficulties with construction or entry or exit of the building site. Laying First Course It is important that the first course of A-ONE Form be installed properly. This will determine how subsequent levels will stack as the work progresses. With this in mind, we will now prepare the footing to receive the first course of block. A chalk line may be used to mark the location of the forms. Next, fabricate and place corner bracing. Proceed to cut and stack first course, always working from a corner to a window or door. Bracing and plumbing the corners can be done at this time, securing the corner bracing with kickers. V & H Wire Clips Vertical and Horizontal wire clips are available to anchor the A-ONE forms together. The clips easily and securely snap onto the A-ONE form s internal brackets while building the wall. Typical recommended usage would be two horizontal clips and one vertical clip per A-ONE form. 5

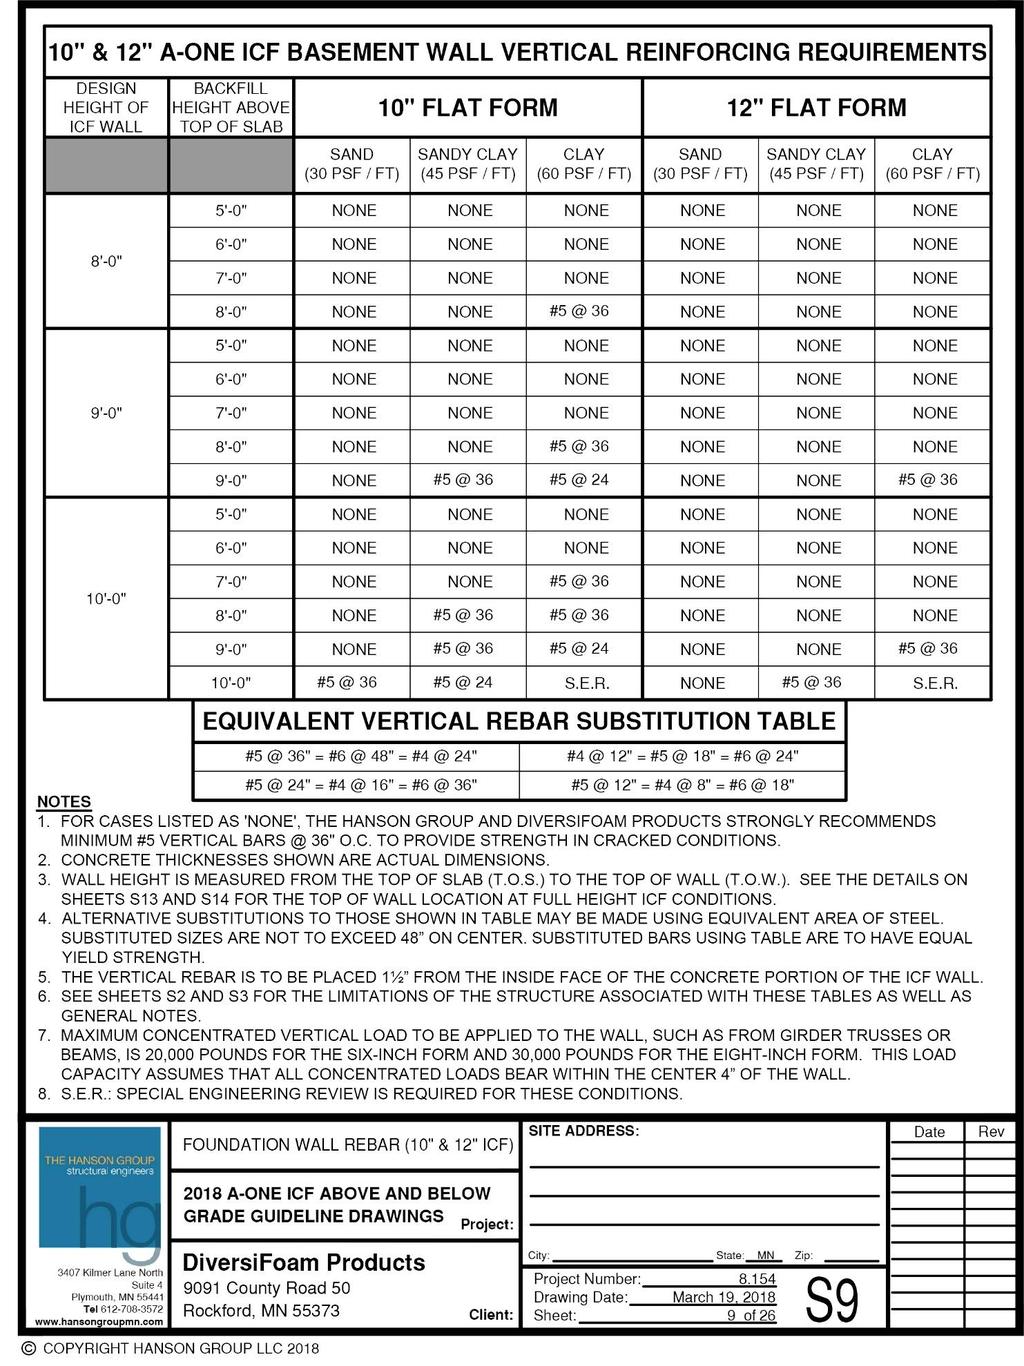
6 Preventing Shrinkage Cracks Minimum recommended rebar is three horizontal members used on an 8 wall on the 1 st row, 3 rd row and top row. Local code may require additional rebar both horizontal and vertical. These additional rebar add structural strength and help prevent excessive shrinkage cracks. Additional rebar should be added directly in the center of horizontal beams as required by structural engineers and/or local codes as strength members. Place all door and window bucks at proper elevation. Rebar Prep and Wall Reinforcement before Pouring Concrete #10 x 2 ½ screws are used as anchors to hold window bucks in place after pouring of walls. Vertical sleepers are used to protect the cut ends of the block around window and door bucks. When fabricating door and window bucks, the inside dimensions of the bucks must match the rough openings of the door and window assemblies. In addition to the internal framing, each buck should have attached 1x4 vertical sleepers using #10x2 ½ screws. This keeps the edges of the A-ONE Form from spreading during concrete placement. Also, locate #5 vertical rebar in the first core cavity on each side of the buck or as specified. Vertical 2x4 L bracing or adjustable metal wall bracing should be attached to the wall with #10 x 2 ½ screws. Bottom, middle and top of wall approximately 8 apart and braced back accordingly. Vertical L bracing should be on the inside and outside of the wall. Use horizontal rebar above and below all window and door bucks of a sufficient size and grade to ensure proper loading capacity. Each pair of vertical intermediate braces is supported by a 2x4 kick brace placed perpendicular to the wall. The kick brace can be installed inside or outside the wall, depending on the conditions of the site. The bottoms of braces, including corner braces, can also be secured by nailing with a spacer to the footing rail. Make sure all 2x4 intermediate braces are plumb. Run a string line at the top of the wall to check the alignment of the wall. Check wall height with a transit to insure proper wall height. Mark the proper wall height with a string line and remove excess block. Verify specified wall dimensions. Adjust bracing if needed to straighten walls. Make sure all window and door bucks are braced securely. 6


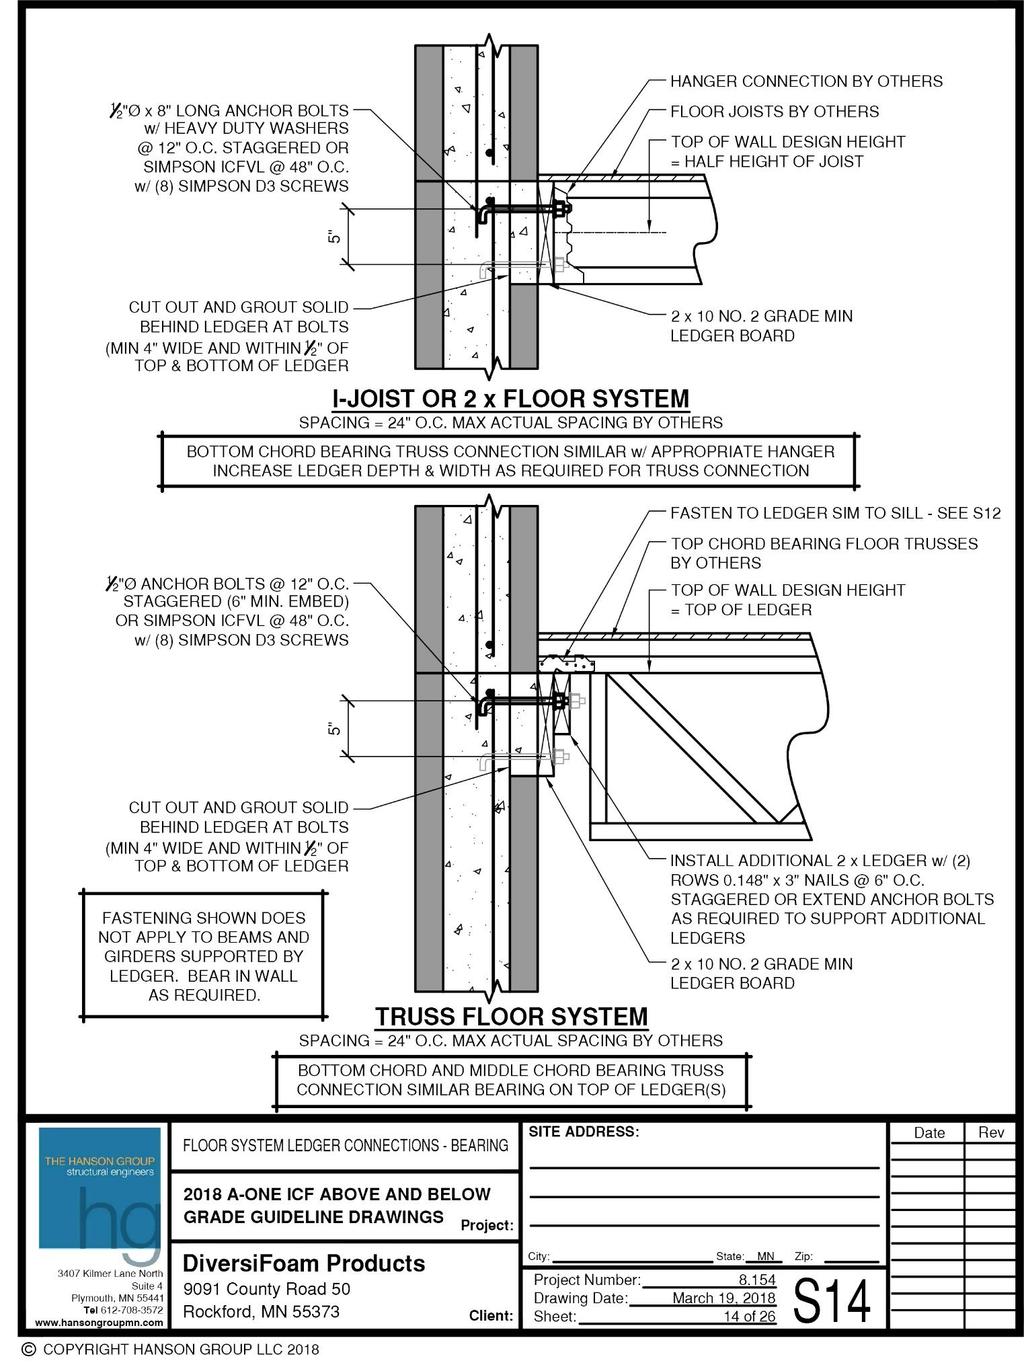
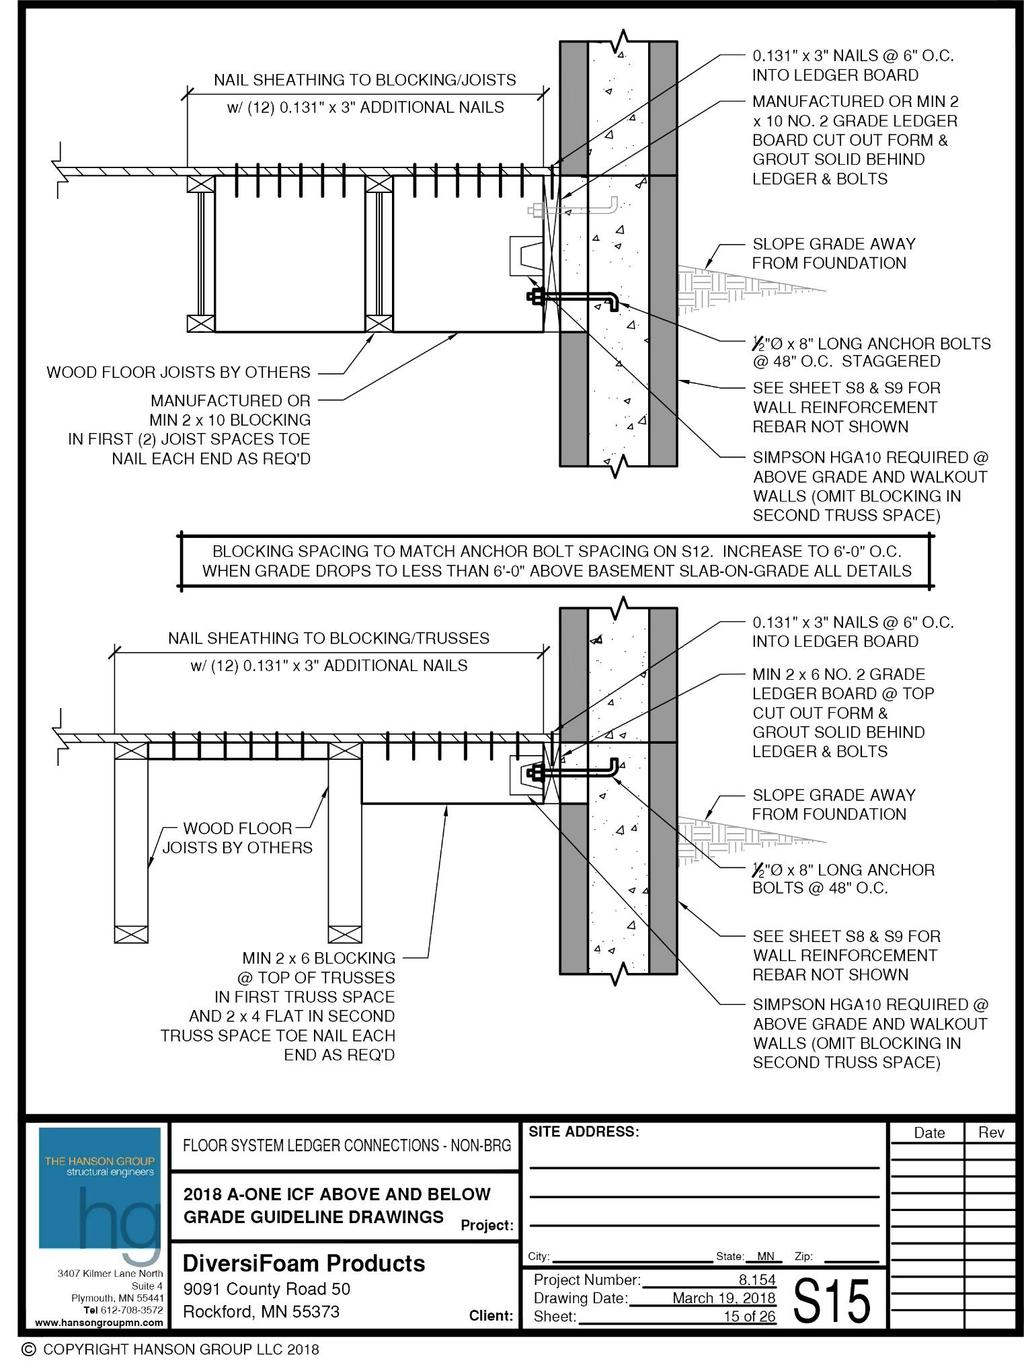
7 To create a T-wall intersection, cut an opening in the intersected wall that is the same as the inside or outside dimension of the intersecting wall block depending on bracket location. Lay the first course on the footing and stack the block in the described manner. Fabricate and place a T- brace or L-brace against the outside of the intersected wall, opposite the point of intersection. Brace each inside corner of the intersected wall. For grade changes, continue the foundation wall past the building s corner to the edge of the overdig. Use the earthen wall as a bulkhead and continue to stack until a course meets the higher grade. 'For the builder s convenience, all footing grade changes should be made in 16 inch increments; i.e., the height of an A-ONE Form. For wing-walls, use the same procedure as for T-walls at the intersection point. A wooden bulkhead will be required at the end of the wing wall. Wall Height It is best to plan the wall height to be evenly divisible by 16 inches, the height of the A-ONE Form or 8 utilizing our half blocks and corners. If the wall height is not evenly divisible by 16, use a common construction tool (i.e., hand saw, circular saw, etc.) to cut the A-ONE Form to the correct height. Remember the top course of block receives a horizontal bar placed directly on the cross-member and tied to the vertical bars. Before concluding this phase, the crew must prepare the top of the wall to incorporate floor or roof systems. Pouring the Concrete It is recommended that a minimum crew size of four be present when pouring the A-ONE Form walls. You will need two people to check consolidation of the concrete, one to place the concrete and one to handle finishing off the top of the wall and handling any other duties. It is recommended that the minimum concrete used be 3,500 PSI although this should be determined by code and engineering specifications, if applicable. The concrete should be delivered at a six (6) inch slump using ¾-gravel as the aggregate by boom pump truck. Placing concrete can begin at any location along the wall. 4 lifts are preferred. Care should be taken when filling cavities around window bucks, lintels and heavy concentrations of rebar to make sure the space is completely filled. The A-ONE Form system is designed so that all vertical cavities are filled completely and naturally with the inflow of the concrete. The use of a vibrator for consolidation is not recommended without proper training. If the wall is to continue upward, vertical rebar is extended above 7

8 the top of the form, concrete placement should stop 6 inches below the top form instead of being leveled off. After the concrete has been placed, the walls are again checked to be sure they are plumb, straight, level and true. For subsequent lifts, additional rebar is wired to the exposed vertical rebar extending above the previously placed concrete. Then, A-ONE Forms are stacked, braced, reinforced and filled with concrete as before. No rebar will extend above the top-most course. Installation of electrical or plumbing components is fast and easy using the A-ONE Form System. Once the necessary openings are located and marked, they are cut out using any one of various methods. You may use a hot-wire knife, a small saw, a router or a drill with grasp-tight bit. Brick ties are installed by screwing them directly to the plastic studs. Angled walls and gables are made by cutting A-ONE Form to the angle or slope required. If the angle is too steep, a bulkhead is required. Secure the bulkhead to prevent lifting and cut openings every 4 feet up the slope to place concrete. Retain cutouts to reinstall as you fill with concrete. The A-ONE Form System is easily adapted to a curved wall design. When a wall abruptly ends, a bulkhead is required using 2 x 10 s or 2x12 s, depending on the size of the A-ONE Form. Water-Resistant Coating and Drain Tiles All exterior basement walls should receive a water-resistant coating prior to backfilling and this includes A-ONE Form. Only coatings that are compatible with expanded polystyrene should be used. A drain tile must be installed at the bottom of each below-grade wall to drain water away from the footing. Protection board should be installed over the water-resistant coating prior to backfilling. Also, before backfilling A-ONE Form walls, concrete must be adequately cured and floor trusses installed. If you have any further questions about installation or are unsure about certain information contained herein, or would like to discuss applications not covered herein, please contact your A-ONE Form distributor. 8

9 A-ONE Accessories V & H Wire Clips Vertical & Horizontal Wire Clips are available to help anchor A-ONE forms to each other. They are shipped in cartons of 250 clips. Insulation Insert Panels 1 and 2 insulation panels are available to increase the R-Value of A-ONE forms. The panels are designed to fit inside the A-ONE form as they are being assembled. A-ONE Form Technicians A-ONE Form technicians are available as a training tool to work with you or your crew and ensure a quality-finished product. They are not intended as labor to complete your project and are not to be included in the count for minimum crew size requirements. It is important to schedule adequate labor for your project to avoid costly delays. To avoid these additional costs, complete all checklist items and prepare your site as thoroughly as possible prior to the arrival of the A-ONE Form technician. Note: most complicated layouts (i.e. numerous angles, extreme angles, radius walls, etc.) will require additional labor and architectural time. 9

10 Tool and Material Checklist (To be completed before arrival of A-1Form Technicians) TOOL LIST Rebar Bender/Cutter Framing Square Sawzall/Bi-Metal Blade Standard Carpentry Hand Tools Shears Cordless Drill/Screw Gun Skill Saw/Carbide Blade Levels Side Cutters MATERIALS AND ACCESSORIES Spray Paint #10 x 2 ½ Screws Bracing Material Scaffold Materials Tie Wire Plenty of String Line Stakes Spray Foam Insulation/Adhesive 10
11 11
12 25 12
13 13
14 14
15 15
16 16
17 17
18 18
19 19 En
20 20
21 21
22 22
23 23
24 24
25 25
26 26
27 27
28 28
29 29
30 30
31 31
32 32
33 33
34 34
35 35
36 36
37 37
38 ESR
Important: Before You Start
 Advantage ICF System Advantage ICF System TM Field Guide Important: Before You Start Does Your Building Inspector Know You Are Building with the Advantage ICF System? You are required to check with your
SECTION STAY-IN-PLACE INSULATED CONCRETE FORMING SYSTEM
 ARCHITECTURAL SPECIFICATIONS MANUFACTURER: InterBlock LLC PO Box 1123, Sheboygan, WI 53082 Phone Number 920-207-7234 SECTION 03100 STAY-IN-PLACE INSULATED CONCRETE FORMING SYSTEM PART 1 GENERAL 1.01 Summary
PS 3000 Installation Manual Step-By-Step Procedures C.9. DOOR AND WINDOW OPENINGS C.9.1 PREPARE IN ADVANCE. C.9.2 VBUCK CONSTRUCTION.
 C.9. DOOR AND WINDOW OPENINGS Openings for doors and windows are formed with bucks, or frames, which are constructed to the rough opening dimensions required for the doors and windows to be installed.
YOUR LITE-DECK SECTIONS
 General Information Warning - Serious injury or death may result from safety hazards caused by improper use or installation. When in doubt about proper use or installation of Lite-Deck, immediately contact
SECTION PERMANENT FORMS Insulating Concrete Forms Rev
 SECTION 03 11 19 PERMANENT FORMS Insulating Concrete Forms Rev 5.20.14 PART 1 GENERAL 1.01 SUMMARY A. Supply and installation of permanent insulating concrete forms as formwork, placement of steel reinforcement
INSULATED CONCRETE MASONRY UNITS Section 04220
 INSULATED CONCRETE MASONRY UNITS Section 04220 PART 1 GENERAL 1.01 Summary A. Section Includes 1. Insulated masonry wall units (CMU's) 2. Decorative insulated masonry wall units 1.02 SUBMITTALS A. Samples:
Chapter 7. Roof Framing
 Chapter 7. Roof Framing 7.1 ROOFING PREP WORK 7.2 INSTALLING ROOF TRUSSES 7.3 INSTALLING PORCH TRUSSES 7.4 SHEATHING ROOF 7.5 INSTALLING SUB-FASCIA 7.6 BUILDING AND INSTALLING SCUTTLE BOX 7.7 INSTALLING
SECTION PERMANENT FORMS - INSULATING CONCRETE FORMS Page 1 of 7
 SECTION 03 11 19 (03130). PART 1 GENERAL 1.01 SUMMARY A. Comply with the requirements for Division 1. B. Supply and installation of insulating concrete form system, installation of reinforcing steel and
10 EXTREME BASEMENT PANELS
 10 EXTREME BASEMENT PANELS On Granular Footings 1. The type of soil is a factor in determining foundation construction details such as footing design, backfill, and drainage provisions. Soils are classified
ACCESSORY STRUCTURE Building permit information For 1 & 2-family dwellings
 ACCESSORY STRUCTURE Building permit information For 1 & 2-family dwellings Building Safety Department 400-2 nd Street South St. Cloud, MN 56301 (320) 255-7239 A building permit is required for any accessory
Container Installation Guide
 Container Insulation Container Installation Guide Panels and Inserts The InSoFast CX Container panel and the Inserts are designed to fit most shipping containers. Containers have three types of corrugations:
The Advantage ICF System Installation Manual
 The Advantage ICF System Installation Manual The Advantage ICF System Recommendation: Review the Advantage ICF System Installation Videos. When building with the Advantage ICF System please review your
MID-RISE DESIGN & CONSTRUCTION
 TECHNICAL BULLETIN No.38-021616 Rev072116 MID-RISE DESIGN & CONSTRUCTION Logix effective R-values range from R-24 to R-28+ Insulated concrete forms (ICF) are becoming a main stream choice for the construction
Container Installation Guide
 Continuous Insulation Container Installation Guide Panels and InSerts The InSoFast CX Container panel and the InSerts are designed to fit most shipping containers. Containers have three types of corrugations:
Installation Guide Wall Panels
 Installation Guide Wall Panels Jointless or Dry-Stacked Installation (Read Prior to installation) The MStone system is a jointless / dry-stacked installation where panels and corners fit tightly together
The Ashland Project. Total Area: 1,778 Sq.Ft. 3 Bedroom, 2 Bath, 2 Car Garage
 The Ashland Project Total Area: 1,778 Sq.Ft. 3 Bedroom, 2 Bath, 2 Car Garage The garage and bedroom extend from the front of this three bedroom home, drawing you visually into the entryway. Brick and stucco
SECTION NON-STRUCTURAL METAL FRAMING
 PART 1 - GENERAL 1.1 DESCRIPTION SECTION 09 22 16 1. Use this section only for NCA projects. 2. Delete between //----// if not applicable to project. Also delete any other item or paragraph not applicable
POST FRAME BUILDING STANDARDS
 CASS COUNTY, MISSOURI BUILDING CODES, ENVIRONMENTAL HEALTH AND ZONING DEPARTMENT 30508 S. West Outer Road, Harrisonville, MO 64701 P- (816) 380-8134 F- (816) 380-8130 POST FRAME BUILDING STANDARDS 201.3
DIVISION 03 CONCRETE SPECIFICATION : FORMS AND FORMWORK
 DIVISION 03 CONCRETE SPECIFICATION 031000: FORMS AND FORMWORK PART 1.0 GENERAL 1.1 DESCRIPTION The work of this specification includes furnishing of all labor, materials, equipment and incidentals to install,
Haener Block General Building Tips
 Haener Block General Building Tips Haener Block General Building Tips By Robert Shepersky (Masonry Contractor of 38 years) Intro for the Masonry Contractor: Using Haener Block will change the way you think
Structural Tests and Special Inspections Form. Inspection of Fabricators (1704.2)
") Inspection of Fabricators (1704.2) Furnish inspection reports (1704.2.1) - Fabricators that have not been approved Provide a Certificate of Compliance (1704.2.2) - Approved Fabricators Steel Construction
Inspection of Fabricators (1704.2) Furnish inspection reports (1704.2.1) - Fabricators that have not been approved Provide a Certificate of Compliance (1704.2.2) - Approved Fabricators Steel Construction
Concrete weighs about 150 pounds per cubic foot
 At Bassora, where they have no timber, they make arches without any frame. The mason, with a nail and a bit of string, marks a semicircle on the ground, lays his bricks, fastened together with a gypsum
SpaVault TM Installation Guide for Bullfrog Spas (7-10 x 7-10 x 38 )
") SpaVault TM Installation Guide for Bullfrog Spas (7-10 x 7-10 x 38 ) WARNING - When unpacking SpaVault, DO NOT discard styrofoam pieces, these are not packaging materials. Step 1 Excavation Important:
SpaVault TM Installation Guide for Bullfrog Spas (7-10 x 7-10 x 38 ) WARNING - When unpacking SpaVault, DO NOT discard styrofoam pieces, these are not packaging materials. Step 1 Excavation Important:
INSPECTION REQUIREMENTS: FOUNDATIONS
 Foundations Page 1 of 9 Revision Date: 1/2/2018 DEVELOPMENT SERVICES BUILDING INSPECTION INSPECTION REQUIREMENTS: FOUNDATIONS INSPECTION CODE: 204 SCOPE: RESIDENTIAL APPLICABLE CODES: 2016 CBC, CRC, CPC,
Building Construction Occupations
 Job Ready Assessment Blueprint Building Construction Occupations Test Code: 2011 / Version 01 Measuring What Matters Specific Competencies and Skills Tested in this Assessment: Safety and General Knowledge
Anchor bolts ASTM F1554, Gr. 36 Wide flange beams ASTM A992, Fy = 50 ksi Misc. structural steel ASTM A36, Fy = 36 ksi
 STRUCTURAL NOTES MATERIAL STRENGTHS Structural Steel Reinforcing Steel Concrete Masonry Structural Lumber Anchor bolts ASTM F1554, Gr. 36 Wide flange beams ASTM A992, Fy = 50 ksi Misc. structural steel
STAY-FORM TRANSFORMING MATERIALS. into products that make a better world
 STAY-FORM TRANSFORMING MATERIALS into products that make a better world TABLE OF CONTENTS Product Information... Page 1 Blindside Walls...Pages 2-4 Bulkheads...Page 5 Pile Caps...Page 6 Grade Beams...
4 EXTREME FOUNDATION PANELS
 4 EXTREME FOUNDATION PANELS For House Crawl Space On Concrete Footings 1. The type of soil is a factor in determining foundation construction details such as footing design, backfill, and drainage provisions.
Superior strength, flexibility, safety and value.
 Installation Manual Insulated Suspended Structural Slab Residential Commercial Floor Deck Roof Green Roof Superior strength, flexibility, safety and value. PRODUCT MANUAL INSTALLATION GUIDE Beaver Plastics
PV Mounting System 2703 SERIES 200 UL GROUND MOUNT SYSTEM. SnapNrack Residential PV Mounting Systems Code Compliant Installation Manual
 PV Mounting System 2703 SERIES 200 UL GROUND MOUNT SYSTEM SnapNrack Residential PV Mounting Systems Code Compliant Installation Manual Series 200 UL Introduction Series 200 UL Introduction SnapNrack Series
MODULAR ACOUSTIC FENCING INSTALLATION GUIDE
 MODULAR ACOUSTIC FENCING WWW.QUICKBUILTSYSTEMS.COM.AU INSTALLATION GUIDE INTRODUCTION THE QUICKBUILT FENCE SYSTEM IS A SMARTLY DESIGNED MODULAR SYSTEM EASY AND FAST TO INSTALL AND COST EFFECTIVE. // THE
Technical Notes 11B - Guide Specifications for Brick Masonry, Part 3 Rev [Feb. 1972] (Reissued Sept. 1988) INTRODUCTION
![Technical Notes 11B - Guide Specifications for Brick Masonry, Part 3 Rev [Feb. 1972] (Reissued Sept. 1988) INTRODUCTION](/thumbs/78/77915427.jpg "Technical Notes 11B - Guide Specifications for Brick Masonry, Part 3 Rev [Feb. 1972] (Reissued Sept. 1988) INTRODUCTION") Technical Notes 11B - Guide Specifications for Brick Masonry, Part 3 Rev [Feb. 1972] (Reissued Sept. 1988) INTRODUCTION This Technical Notes contains the guide specifications in CSI format for Part III
Technical Notes 11B - Guide Specifications for Brick Masonry, Part 3 Rev [Feb. 1972] (Reissued Sept. 1988) INTRODUCTION This Technical Notes contains the guide specifications in CSI format for Part III
INSULATION RETROFIT DESIGN ENERGY SOLUTIONS CENTRE YUKON GOVERNMENT
 INSULATION RETROFIT DESIGN ENERGY SOLUTIONS CENTRE YUKON GOVERNMENT MAY 2009 prepared by N. A. JACOBSEN, P.Eng. CIVIL ENGINEERING CONSULTANT Whitehorse, Yukon ENERGY SOLUTIONS CENTRE YUKON GOVERNMENT MAY
Foundation Systems 1, spread foundations. What s the point? What types? The foundation s primary purpose is:
 Foundation Systems 1, spread foundations What s the point? The foundation s primary purpose is: Distribute building loads to the soil Prevent frost uplift of the building (act as frost barrier) Some foundation
Planning and installation instructions
 Planning and installation instructions Stofix Oy Ahlmaninkatu 2 E 40100 Jyväskylä Finland stofixgroup@stofix.com www.stofix.com 2 PLANNING AND INSTALLATION INSTRUCTIONS... 1 1 General... 3 2 Project Design...
Details for Exterior Brick Masonry Veneer Supported by Metal Plate Connected Wood Trusses
 Details for Exterior Brick Masonry Veneer Supported by Metal Plate Connected Wood Trusses Released May 20, 2009 Updated March 9, 2011 Introduction: Wood frame structures with attached brick masonry veneer
1 AND 2 FAMILY DWELLING REQUIREMENTS
 PLAN REQUIREMENTS: 1 AND 2 FAMILY DWELLING REQUIREMENTS All residential plans including additions and attached garages shall be designed to the current edition of the International Residential Code. Plans
PLATON FOUNDATION WRAP
 DRAINAGE SOLUTIONS SINCE 1908 PLATON FOUNDATION WRAP RUGGED, DIMPLED HIGH-DENSITY POLYETHYLENE (HDPE) MEMBRANE THAT KEEPS FOUNDATIONS DRY ADVANCED TECHNOLOGY EASY INSTALLATION PROVEN PERFORMANCE ARMTEC.COM
Sept 30, 2004 Page 1 PRODUCT DESCRIPTION PRODUCT FEATURES
 Sept 30, 2004 Page 1 PRODUCT FEATURES BASIC USES / RELATED USES LOGIX Insulated Concrete Forms are stackable, interlocking expanded polystyrene (EPS) blocks that serve as permanent formwork to create solid
Concrete Block Machines Typical Fixed Block Machine
 SEAOG 2016 Masonry Workshop Concrete Masonry Units and Terminology Concrete Masonry in Georgia Georgia World Congress Center Reference: Inspector s Handbook Masonry Institute of America Roy Keck, FACI
Panel Jack Pro System BRACING, ALIGNMENT AND SCAFFOLDING EQUIPMENT
 IMPORTANT SAFETY INFORMATION FOR USERS OF THE REECHCRAFT, BRACING SYSTEM PLEASE READ BEFORE USE Panel Jack Pro System BRACING, ALIGNMENT AND SCAFFOLDING EQUIPMENT UK Edition 1.3 26/11/2012 1 TABLE OF CONTENTS
SECTION WELDED STEEL PICKET FENCE. 1. Fusion welded and rackable ornamental steel picket fence system.
 PART 1 - GENERAL 1.1 SUMMARY A. Section includes: 1. Fusion welded and rackable ornamental steel picket fence system. B. Related sections: 1. Section 03310 Concrete Work for post support. 2. Section 09960
Administrative Changes
 Revised 11/29/06 Knox County Residential Building Codes Significant Changes From The 1995 CABO One And Two Family Dwelling Code To The 2006 International Residential Code All one and two family dwellings
SECTION COLD-FORMED METAL FRAMING
 SECTION 05400 PART I - GENERAL 1.01 DESCRIPTION A. Scope: Work of this Section shall include all materials and installation necessary to provide all cold formed metal framing. B. This Section includes:
DIVISION 04 MASONRY. Section Title Number MASONRY Maintenance of Masonry Masonry Mortaring Masonry Accessories
 04 00 00 MASONRY 04 01 00 Maintenance of Masonry 04 01 20 Maintenance of Masonry 04 05 13 Masonry Mortaring 04 05 23 Masonry Accessories 04 20 00 UNIT MASONRY 04 21 00 Clay Unit and Brick Veneer 04 22
Installation Instructions
 EconoDrain Trench Forming System Installation Instructions MultiDrain We Drain Your Site, Not Your Budget MultiDrain Systems, Inc. P.O. Box 88, Barium Springs, NC 28010 (704) 508-1010 or Toll Free 800-433-1119
Quality Control And Fabrication Manual Metal Stud Crete Metal Stud Crete Metal Stud Crete
 Metal Stud Crete Composite Concrete Panel System 6232 Santos Diaz Street Irwindale, California 91702-3267 (626) 334-6100 ext 229, FAX (626) 334-6106 E-Mail: paul@metalcrete.com Quality Control And Fabrication
SLAB ON GRADE Insul-Joint or Expansion Joint Material as Required by A/E Specifications AquaCheck Liquid Coating 400 (Waterproofing Membrane) with Aqu
 with Aqu") INSTALLATION INSTRUCTIONS Note: The following installation instructions are based off of ASTM E 1643 (Standard Practice for Installation of Water Vapor Retarders Used in Contact with Earth or Granular
INSTALLATION INSTRUCTIONS Note: The following installation instructions are based off of ASTM E 1643 (Standard Practice for Installation of Water Vapor Retarders Used in Contact with Earth or Granular
Freedom One-Piece Barrier Free Showers Installation Instructions
 Tools & Materials you might need for proper installation Materials: 2-1 gallon buckets of solid wood flooring adhesive or 100% silicone adhesive (non-shrink) 20-1.25 wood screws 1-5 gallon bucket (to mix
See the IRC for additional information. See CPD-DS Information Bulletin 100 for Requirements for 1 & 2 Family Dwelling plan submittals.
 As a customer service initiative, the Kansas City, Missouri, City Planning and Development Department/Development Services, in cooperation with the Greater Kansas City Home Builders Association, has developed
Pittsburgh Corning ProVantage Glass Block Installation System Assembly Instructions
 Pittsburgh Corning ProVantage Glass Block Installation System Assembly Instructions Introduction: The ProVantage Glass Block Installation System is the easiest way to install Pittsburgh Corning Premiere
Installation Manual. ArchCast Bridge. 3-Sided Precast Concrete Bridge Structure
 ArchCast Bridge 3-Sided Precast Concrete Bridge Structure Installation Manual Salem Location: 749 West Commercial Ave. Salem, IL 62881 (618) 548-1190 countymaterials.com Email: info@countymaterials.com
Steps in Building a Shed
 Steps in Building a Shed The design and location of your new shed will depend on how it will be used - a shed for storing tools will be much simpler than one you intend to use as a small shop. For example,
2.18 INTERIOR & EXTERIOR FINISHES VAPOR & AIR BARRIERS
 2.18 INTERIOR & EXTERIOR FINISHES 2.18.1 VAPOR & AIR BARRIERS The Logix wall assembly has no need for an additional vapor barrier, the solid concrete core covered with the low permeance EPS (Type II) foam
LOGIX INSULATED CONCRETE FORMS DESIGN MANUAL VERSION 2017
 Publication History LOGIX INSULATED CONCRETE FORMS DESIGN MANUAL VERSION 2017 List of changes from previous version 2016 includes Changes Sections 1 to 8 Removed all references to the following products
Lamit Industries, Inc. 710 Marion Road Columbus, Ohio P-(614) F-(614)
 F-(614)") Lamit Industries, Inc. 710 Marion Road Columbus, Ohio 43207 P-(614)444-3010 F-(614)444-4264 info@lamitindustries.com www.lamitindustries.com SECTION 06120 STRUCTURAL INSULATED PANELS PART 1 GENERAL 1.01
Lamit Industries, Inc. 710 Marion Road Columbus, Ohio 43207 P-(614)444-3010 F-(614)444-4264 info@lamitindustries.com www.lamitindustries.com SECTION 06120 STRUCTURAL INSULATED PANELS PART 1 GENERAL 1.01
The better way to build TM. Installation Manual FOUNDATION SIPs & FROST WALLS SIPs
 The better way to build TM Installation Manual FOUNDATION SIPs & FROST WALLS SIPs November 2016 PWF FOUNDATION & FROST WALL SIPs Installation Manual Table of Contents Topics General Requirements....................................
Project Address: Name of Person Completing Form:
 Statement of Inspections This form is provided as a way to list aspects of the project that require special inspection and testing in accordance with IBC Sections 107.1, 1704, and 1705 and define duties
NOVABRIK MORTARLESS CONCRETE BRICK VENEER SPECIFICATION. MASTERFORMAT SECTION (Mortarless Concrete Brick Veneer)
") NOVABRIK MORTARLESS CONCRETE BRICK VENEER SPECIFICATION MASTERFORMAT SECTION 04818 (Mortarless Concrete Brick Veneer) Spec_USA_En_18102005.doc 12/1/2005 Novabrik Page 2 Section 04818 NOVABRIK MORTARLESS
NOVABRIK MORTARLESS CONCRETE BRICK VENEER SPECIFICATION MASTERFORMAT SECTION 04818 (Mortarless Concrete Brick Veneer) Spec_USA_En_18102005.doc 12/1/2005 Novabrik Page 2 Section 04818 NOVABRIK MORTARLESS
Vertigo Cladding Board
 Installation guide Vertigo Cladding Board Geolam: a stunning alternative to wood cladding Vertigo is a composite wood cladding board requiring minimum maintenance. Durable and fade resistant, it will not
BEARING METAL STUD FRAMING
 L-1 Section 05410 Long Form Specification LOAD BEARING METAL STUD FRAMING This section includes axially loaded steel studs, with unique slotted top channels, usually of 0.91, 1.2 and 1.5 mm (16, 18, or
Preassembled steel stairs with concrete-filled treads.
 SECTION 055113 - PART 1 - GENERAL 1 RELATED DOCUMENTS Drawings and general provisions of the Contract, including General and Supplementary Conditions and Division 01 Specification Sections, apply to this
HILLSBOROUGH TOWNSHIP CODE ENFORCEMENT
 HILLSBOROUGH TOWNSHIP CODE ENFORCEMENT SAMPLE GUIDE FOR RESIDENTIAL DECKS revised 7 16 Call before you dig! 1 800 272 1000 New Jersey One Call. Utility Mark Out. THIS GENERIC GUIDE IS NOT ALL INCLUSIVE
COLLEGE CLASSROOM & DORMITORY SPECIFICATION SECTION 08100
 COLLEGE CLASSROOM & DORMITORY SPECIFICATION SECTION 08100 Part 1 General 1.01 Work Included A. The work under this section shall include the furnishing of all items shown on the drawings and as specified,
Freedom Barrier Free Shower Pan Installation Instructions
 Tools & Materials you might need for proper installation Materials: 2-1 gallon buckets of solid wood flooring adhesive (non-shrink) or 100% silicone adhesive 20-1.25 wood screws 1 - tube of non-shrink
SECTION A. ACSE 7 Minimum Loads for Buildings and other Structures.
 SECTION 06 12 00 STRUCTURAL INSULATED PANELS ------------------------------------------------------------------------------------------------------------ PART 1- GENERAL ----------------------------- 1.1
Se incluyen las instrucciones en español
 Page 1 of 16 Pittsburgh Corning Corporation Pittsburgh, PA 15239 1-800-624-2120 www.pittsburghcorning.com All trademarks and registered trademarks in this brochure are owned and protected by Pittsburgh
Safety on Heights: Our Policy
 11/17/14 Safety on Heights: Our Policy Only volunteers over the age of 18 are allowed to work on heights of more than six feet off the ground. This includes all work on scaffolds. Only volunteers who are
ROOF MOUNT KIT OWNERS MANUAL
 ROOF MOUNT KIT OWNERS MANUAL Made in the USA by: Primus Wind Power, Inc. 938 Quail St. Lakewood, CO 80215 Phone: (303) 242-5820 www.primuswindpower.com AIR is a trademark of Primus Wind Power, Inc. ROOF
Installation Guide (888)
") BamDeck Pro360 Installation Guide (888) 788-2254 The Collection Decking Systems BAMDECK PRO360 5-1/2 Wide Plank Dims: 96 L x 5-1/2 W x 7/8 H BAMDECK PRO360 16FT. 5-1/2 Wide Plank Dims: 192 L x 5-1/2 W
BamDeck Pro360 Installation Guide (888) 788-2254 The Collection Decking Systems BAMDECK PRO360 5-1/2 Wide Plank Dims: 96 L x 5-1/2 W x 7/8 H BAMDECK PRO360 16FT. 5-1/2 Wide Plank Dims: 192 L x 5-1/2 W
SECTION CHAIN LINK FENCES AND GATES (PARK)
") SECTION 02821 CHAIN LINK FENCES AND GATES (PARK) PART I GENERAL 1.1 SECTION INCLUDES A. Installation of chain link fences, and gate units provided by single source including erection accessories, fittings,
SECTION 02821 CHAIN LINK FENCES AND GATES (PARK) PART I GENERAL 1.1 SECTION INCLUDES A. Installation of chain link fences, and gate units provided by single source including erection accessories, fittings,
OWNER S REPONSIBILITIES AND PREPARATION INSTRUCTIONS. Schedule "C"
 OWNER S REPONSIBILITIES AND PREPARATION INSTRUCTIONS Schedule "C" Building Code All Ready To Move (RTM) Homes are built according to the Alberta Building Code and National Building Code. Please note that
0331 Brick and block construction
 0331 BRICK AND BLOCK CONSTRUCTION 1 GENERAL 1.1 STANDARDS Materials and construction: To AS 4773.1 and AS 4773.2. 2 PRODUCTS 2.1 DURABILITY Exposure environment: [complete/delete] Exposure locations: To
The GlasRoc Shaftliner Type X advantage...
 C e r t a i n T e e d SHAFTLINER F o r A r e a S e p a r a t i o n F i r e w a l l s Shaftliner S Type X for Area Separation GlasRoc Shaftliner is a specially formulated product for applications where
ICFs. Insulating Concrete Forms. Shorten Construction Schedule Enhance Comfort and Safety Reduce Energy Costs
 ICFs Shorten Construction Schedule Enhance Comfort and Safety Reduce Energy Costs Build An Environmentally Friendly Home Add up residential heating and cooling, lighting, appliances and other electronic
Table of Contents. Page Title
 Page Title Table of Contents 1 Floor plan/ Room utilization 2 Elevation (EAST) 3 Elevation (SOUTH) 4 Elevation (WEST) 5 Elevation (NORTH) 6 Foundation plan details 7 Foundation cross sections A Main grade
MASONRY. Level One. Competencies / Objectives MODULE INTRODUCTION TO MASONRY MODULE MASONRY TOOLS AND EQUIPMENT
 National Center for Construction Education & Research P. O. Box 141104, Gainesville, FL 32614-1104 Tel: (352) 334-0920 Fax: (352) 334-0931 E-mail: info@nccer.org MASONRY Competencies / Objectives Level
SECTION ORNAMENTAL ALUMINUM FENCING
 SECTION 032300 ORNAMENTAL ALUMINUM FENCING PART 1 - GENERAL 1.1 RELATED DOCUMENTS A. Drawings and general provisions of the Contract, including General and Supplementary Conditions and Division 01 Specification
1. Base plates, setting plates and anchor rods for columns. 8. Lintels if connected to structural steel columns.
 PAGE 051200-1 SECTION 051200 PART 1 - GENERAL 1.1 RELATED DOCUMENTS A. Drawings and general provisions of the Contract, including General and Supplementary Conditions and Division 01 Specification sections,
Smarter. Safer. Leaner.
 Smarter. Safer. Leaner. Fast Installation and Removal Decrease Leading Edge Exposure by 87% OSHA Compliant Versatile and Reusable Use Perimeter Protection Posts During Construction: At Building Perimeter
2003 International Residential Building Code
 2003 International Residential Building Code Section R305 Ceiling Height Habitable rooms, hallways, corridors, bathrooms, toilet rooms, laundry rooms and basements shall have a ceiling height of not less
1.02 STANDARD REFERENCES: The following standard specifications shall apply to the Work of this Section as indicated:
 SECTION 04220 CONCRETE UNIT MASONRY PART 1 - GENERAL 1.01 SCOPE: A. The CONTRACTOR shall furnish all labor, materials and equipment necessary for the masonry construction as shown on the drawings or as
Masonry Wall Bracing. A Simplified Approach To Bracing Masonry Walls Under Construction. Masonry Bracing Task Force.
 Masonry Wall Bracing A Simplified Approach To Bracing Masonry Walls Under Construction Produced by the Masonry Wall Bracing A Simplified Approach to Bracing Masonry Walls Under Construction Produced by
REINFORCING TABLES INSTALLATION MANUAL
 REINFORCING TABLES 201 REINFORCING TABLES Design Limitations Introduction The structural wall reinforcing and lintel design tables contained within the Appendix of NUDURA s Installation Manual have been
1.02 RELATED WORK: Refer to the following sections for related work:
 SECTION 4200 - CONCRETE STRUCTURES PART 1 - GENERAL 1.01 SCOPE: This Section covers installation of header curb, retaining walls, energy dissipation structures for drainage channels, reinforced concrete
Concrete basement walls are
 DESIGNING Concrete Basement Walls Make sure the wall is strong enough to resist the lateral pressure of the soil Concrete basement walls are designed to do two main jobs. One job is supporting the house;
POST AND FRAME STRUCTURES (Pole Barns)
") POST AND FRAME STRUCTURES (Pole Barns) Post and frame structures. The following requirements serve as minimum standards for post and frame structures within all of the following structural limitations:
POST AND FRAME STRUCTURES (Pole Barns) Post and frame structures. The following requirements serve as minimum standards for post and frame structures within all of the following structural limitations:
City of Hughson Building Safety Division 7018 Pine Street Hughson, CA (209)
") City of Hughson Building Safety Division 7018 Pine Street Hughson, CA 95326 (209) 883-4054 RESIDENTIAL ATTACHED PATIO COVERS Patio covers are one story roofed structures not more than 12 feet above grade,
City of Hughson Building Safety Division 7018 Pine Street Hughson, CA 95326 (209) 883-4054 RESIDENTIAL ATTACHED PATIO COVERS Patio covers are one story roofed structures not more than 12 feet above grade,
Construction Procedures
 Construction Procedures 2014 Rev. 1.6 1 Introduction This manual presents the methods and procedures necessary for the proper erection of a LOCK+LOAD retaining wall. problems later during the service life
INSTRUCTIONS AND GUIDELINES
 INSTRUCTIONS AND GUIDELINES NOISEBLOCK TM MODULAR PANEL SYSTEMS ENCLOSURES & PRESSURIZED PLENUMS PLANNING HINTS & NOTES: 1. Review the Kinetics Noise Control submittal and installation drawings and bill
PERM-FLEX ASSEMBLY DIRECT APPLICATION TO CEMENTITIOUS SUBSTRATES MANUFACTURERS SPECIFICATION / SECTION 09960
 STUC-O-FLEX PERM-FLEX ASSEMBLY DIRECT APPLICATION TO CEMENTITIOUS SUBSTRATES MANUFACTURERS SPECIFICATION / SECTION 09960 PART 1 - GENERAL 1.01 DESCRIPTION Provide all labor, materials and equipment necessary
Installation Guide and Safety Manual Resilient Sound Isolation Clips (SIC Clips)
") Installation Guide and Safety Manual Resilient Sound Isolation Clips (SIC Clips) SOUND ISOLATION CLIP SPECIFICATIONS Width...1.00 inch Height...1.06 inch Length...3.86 inch Weight....025 lbs Max Spacing...48
Installation Guide and Safety Manual Resilient Sound Isolation Clips (SIC Clips) SOUND ISOLATION CLIP SPECIFICATIONS Width...1.00 inch Height...1.06 inch Length...3.86 inch Weight....025 lbs Max Spacing...48
Statement of Special Inspections Michigan Building Code 2012 (MBC 2012)
") Gaines Charter Township 8555 Kalamazoo Ave SE Caledonia MI 49316 PH: 616 698-6640 Fax: 616 698-2490 www.gainestownship.org Building Department Statement of Special Inspections Michigan Building Code 2012
Gaines Charter Township 8555 Kalamazoo Ave SE Caledonia MI 49316 PH: 616 698-6640 Fax: 616 698-2490 www.gainestownship.org Building Department Statement of Special Inspections Michigan Building Code 2012
PATENTS ARE PENDING. Building Dimensions. Exterior Dimensions Roof Edge to Roof Edge
 Assembly Manual 8x9 PATENTS ARE PENDING Approximate Size 7640303 Storage Area Building Dimensions Exterior Dimensions Roof Edge to Roof Edge Interior Dimensions Wall to Wall Sq. Ft. Cu. Ft. Width Depth
SECTION CAST-IN-PLACE CONCRETE
 SECTION 03300 CAST-IN-PLACE CONCRETE PART 1 GENERAL 1.01 SECTION INCLUDES A. The Contractor shall furnish all work and materials, including cement, sand and coarse aggregate, water, admixtures, curing
Concrete Faced Insulated Perimeter Wall Panels. Durability. Sustainability. Energy Efficiency. Durable Finish & Superior Insulation in One Easy Step
 WallGUARD Concrete Faced Insulated Perimeter Wall Panels Durability. Sustainability. Energy Efficiency. Reduce heat loss & energy costs Protect perimeters from freeze-thaw cycling Recyclable & reusable
Elevated Slab Sequence
 Elevated Slab Sequence The following group of photos shows the sequence for installa4on of a one- way elevated slab. (Slab & Beam with Reinforcing & Post- Tensioning) Columns Placed & Form Support (Scaffolding)
Colorado Chapter of the International Conference of Building Officials. Building Guide. The Colorado Chapter of the International
 Building Guide Colorado Chapter of the International Conference of Building Officials Colorado Building Chapter of the International Guide Code Council Single Family Residential One Story Detached Garage
Thin Brick Façade. Façades Installation Guide
 Thin Brick Façade Façades Installation Guide October 2016 BENCHMARK Welcome to Kingspan, global leaders in the design and manufacture of insulated metal panels. Insulated panels serve as energy efficient,