Chapter 2 Timber Cruising
|
|
|
- Wesley Allison
- 5 years ago
- Views:
Transcription
1 Chapter 2 Timber Cruising Timber cruising is a procedure for determining the gross and net volume and value (timber quality) for a tract of timber. Cruising involves measuring tree diameter and height estimating defects, and making other determinations such as grade and form class. This chapter deals with the technical aspects of making essential tree measurements and the tools used The timber cruiser must be able to properly identify tree species. Stumpage rates and volume references are often species-related. Experience is required to identify tree species and correctly cruise timber Principles of Measuring Trees. Timber cruisers must know and adhere to the specifications the team leader gives them and those required for the final lumber products. In addition to minimum specifications, data must be recorded on the basis of end-product potential. End products are subdivided into the following categories: Material suitable for conversion into lumber. Material suitable for conversion into fuel. Material suitable for conversion into other products such as poles, pilings, rails, and ties. Timber cruisers must record individual tree measurements in appropriate product categories. To do so, each timber cruiser must know the minimum piece specifications for each end-product required. Minimum piece specifications are based on the following: Length. Diameter inside the bark at the small end. Net volume, in percent, of gross volume. Other end-product specifications, as given. Timber cruisers must also know what the minimum tree specifications are for each product category. Minimum tree specifications are based on the following: Number of minimum pieces a tree must contain to be considered useable. Minimum diameter at breast height (DBH). Piece net volume Tree Measuring Instruments. a. Diameter Tape. This is the most common device used to measure tree diameters. Tapes are either 20 or 50 feet long, are made of steel, usually have a bark hook on the zero end, and arc graduated on the outside surface in inches and tenths of inches of diameter equivalents ( inches) of circumference. Many tapes also have linear graduations in feet or meters on the inside surface. Many logger s tapes are graduated on the backside in diameter equivalents of circumference. 2-1


2 Diameter tapes come in right- and left-hand models. This refers to the hand in which the tape case must be held so that with the tape around a tree the numbers are reading right side up. If used correctly, the diameter tape numbers arc right side up, and the tape is crossed on the face of the tree so that the index or zero mark lies along the graduated edge of the tape. Tapes may be graduated on the upper or lower edge (Figure 2-l). b. Tree Calipers. You can also use calipers to measure tree diameters. They are available in either wood or metal and are graduated in English or metric graduations. English graduations are in tenths of inches and metric graduations are in centimeters. Caliper sizes range from 18 to 60 inches. The arm is attached at right angles to the beam. When using tree calipers, take two measurements at right angles and average the readings (Figure 2-2) Measuring the Tree. Measuring individual tree variables in a consistent and prescribed manner is essential. Use some or all of the following measurcments: DBH. Reference height, measured to a specific diameter inside outside bark (DOB). bark (DIB) or diameter 2-2

3 Total height. Stump height. a. Diameter. Take diameter tape readings to the next lower one-tenth inch (Figure 2-3). This is to compensate for the positive bias incurred by measuring out-ofround trees with a tape. Some diameter measurements are made and recorded to the nearest 1- or 2- inch diameter class. This may occur when the precision of the measuring instruments can only be to the closest one or two inches, when specific volume references are based on 1- or 2-inch DBH classes, or when field tally documents do not provide for the recording measurements of less than the even inch. Standard 1- and 2-inch diameter classes areas follows: One-inch diameter class: 5-inch class is from 4.6 to 5.5 inches, 9-inch class is from 8.6 to 9.5 inches, and so forth. Two-inch diameter class: 12-inch class is from 11.0 to 12.9 inches, 14-inch class is from 13.0 to 14.9 inches, and so forth. You will not round off diameter measurements when absolute measurements are specified. For example Minimum tree DBH specification = 7.0 inches. This means 6.95 would not be rounded to 7.0 inches. Minimum piece specification = 7.6 inches DIB. This means 7.55 would not be rounded up to 7.6 inches. b. Diameter at DBH. Measure DBH from the high ground side of the tree at 4.5 feet above the forest floor (Figure 2-4, page 2-4). If the diameter cannot be measured at 4.5 feet because abnormalities exist, measure the diameter as follows: 2-3
4 Leaning tree. Measure DBH with the diameter tape at a right angle to the centerline of the tree (Figure 2-5). Forked tree. This is a tree with two or more stems originating from one stump (Figure 2-6). Consider forking to start at the point where you can see daylight (beginning from the ground up). When a tree fork is below 4.5 feet, measure DBH on each stem at the 4.5-foot measurcmcnt. When a tree fork is above or at 4.5 feet, measure the smallest diameter at 4.5 feet or below (Figure 2-7). 2-4
5 2-4. Measuring Tree Heights. Height measurements are necessary for access to volume references. Errors in tree-height measurements will have a direct effect on final volumes. Since height measurements are based on similar triangles, any error in base distance measurements will be reflected in tree height measurements. You can use any height-measuring instrument when using the procedures described below. Usually, you will get a more accurate measurement if you measure the tree height from a point that is upslope from the tree or on the contour of the tree. Avoid measuring height downslope from the tree. Take tree height measurements to the tip of the tree on the high ground side of the tree. a. Total Tree Height. This is the distance from the base of the tree on the high ground side of the tree to the tip of the tree. Measure total tree height to the nearest foot. b. Reference Height. Reference height is the height above a standard stump height to a specific reference point (minimum DIB or DOB). Reference height is also the height above a standard stump height to a point where a tree will not yield any usable end products. The tree may not be merchantable because of the number and size of branches, defects, tree abnormalities, upper stem size, or log grade. c. Baseline Distance. This distance is the horizontal distance from the center of the tree to the measuring instrument. The baseline distance must be adjusted when measured off a slope. Use the following procedure to measure baseline distance from a slope: Attach a tape at any convenient height on the tree (Figure 2-8). Back off to the baseline distance. Determine the percent slope of the tape using a clinometer. Multiply the baseline distance by the slope correction factor (Table 2-1, page 2-6). Measure the tree height from the corrected baseline distance. For example, if the initial measured baseline distance equals 66 feet and the percent slope of tape to tree equals 25 (1.03 correction factor), the indicated slope distance for 66 feet equals 68 feet (66x 1.03). d. Height of Vertical Trees. Figure 2-9 (page 2-6) shows how to measure the height of a vertical tree on level ground and from the uphill side. The elevation angle from IB is a (+) and the depression angle is a (-). Add heights AB and BC to determine tree height. If both angles from the horizontal have the same sign, subtract the two readings to arrive at the correct tree height. 2-5
6 2-6
7 e. Height of Leaning Trees. Trees leaning 25 percent (about 15 degrees) or more from the vertical require special height-measuring techniques. Several measurements are necessary to determine tree height. Figure 2-10 shows a leaning tree on flat ground and where the direction of lean is along the contour of a slope. Use the following procedure and Figure 2-10 to measure a leaning tree: Measure height AB. Determine tree-lean angle (percent or degrees). Multiply AB by the slope correction factor (Table 2-1) to get the leaning-tree height. For example Lean percent = 40 Factor = 1.08 Lean angle = 22 Secant = 1.08 AB = 65 feet Leaning-tree height = 65x 1.08 = 70 feet. f. Forked Trees. Deduct standard stump height when measuring reference height (Figures 2-11 and 2-12, page 2-8). g. Abney Level. The Abney topographic hand level is issued to forestry teams for measuring height of trees. h. Percentage Reading. The percentage method is the best method to use with the Abney hand level. The method is fast, simple to calculate, and accurate enough for most timber-cruising efforts. However, large vertical angles cannot be measured accurately because of the effect of retraction on observations of the level bubble. Use the following procedure and Figure 2-13 (page 2-8) to measure tree heights: Set the vertical arc of the Abney hand level in position of indicate slope percentage. If you have to reverse the arc, unscrew the axis screw holding the level vial and index arm. Remove the two arc-attaching screws and reverse the position of the arc. Reinstall the level vial and index arm with the axis screw. Tighten all screws. 2-7
8 2-8
9 Position yourself at any convenient point upslope from the tree. Measure the horizontal distance to the base of the tree. Using Figure 2-13, determine the vertical angles from the horizontal to the tip of the tree (BAC) and from the horizontal to the base of the tree (BAD). Determine the total angle (CAD) from the observer to the base of the tree and multiply this angle by the horizontal distance to the tree. Next, point off two decimal places because the readings are in percentages. Example 1. CAB - BAD = CAD Example 2. CAB - BAD = CAD Example 3. BAD - BAC = CAD Sample calculation distance AB (1) angle BAC (1) angle BAD (1) = 100 feet = 30 percent = 4 percent ADD: BAC + BAD = 34 percent MULTIPLY: AB x (BAC + BAD) = feet The tree s height is 34 feet. (Note in the above calculation that if the angle readings are taken exactly 100 feet from the base of the tree, the calculation is reduced to a simple addition or subtraction of the two readings. Otherwise, a long multiplication problem results.) 2-5. Determining Tree Volume. The volume table is the best measurement standard for estimating the volume of standing trees. A volume table gives the average number of board feet a tree of a given size and type is estimated to contain. Tree size is its DBH (in inches) and its usable height (length) measured in number of 16-foot logs. Volume tables are not necessarily y interchangeable for different tree species. Table 2-2 (page 2-10) lists hardwoods (broad leaf) and Table 2-3 (page 2-11) lists softwoods (conifers). The standard unit of volume measurement for logs in the US is the board foot (12-by 12- by 1-inch thick or equivalent). The timber cruiser should be prepared to take measurements and make computations in the standard of measure for the country or area where the logging is to be accomplished. a. Estimating with Volume Tables. Volume tables are made to show the volumes of trees based on the diameters and number of logs in the trees. Prepare a tally sheet using the same units. After tallying all the trees, multiply the total number of each tree size by the number of board feet in that tree. For example, twelve 3-log white oaks that are 18 inches in diameter would contain 260 board feet each, according to the volume table (see Table 2-2, page 2-10), plus a correction factor of 10 percent. 2-9
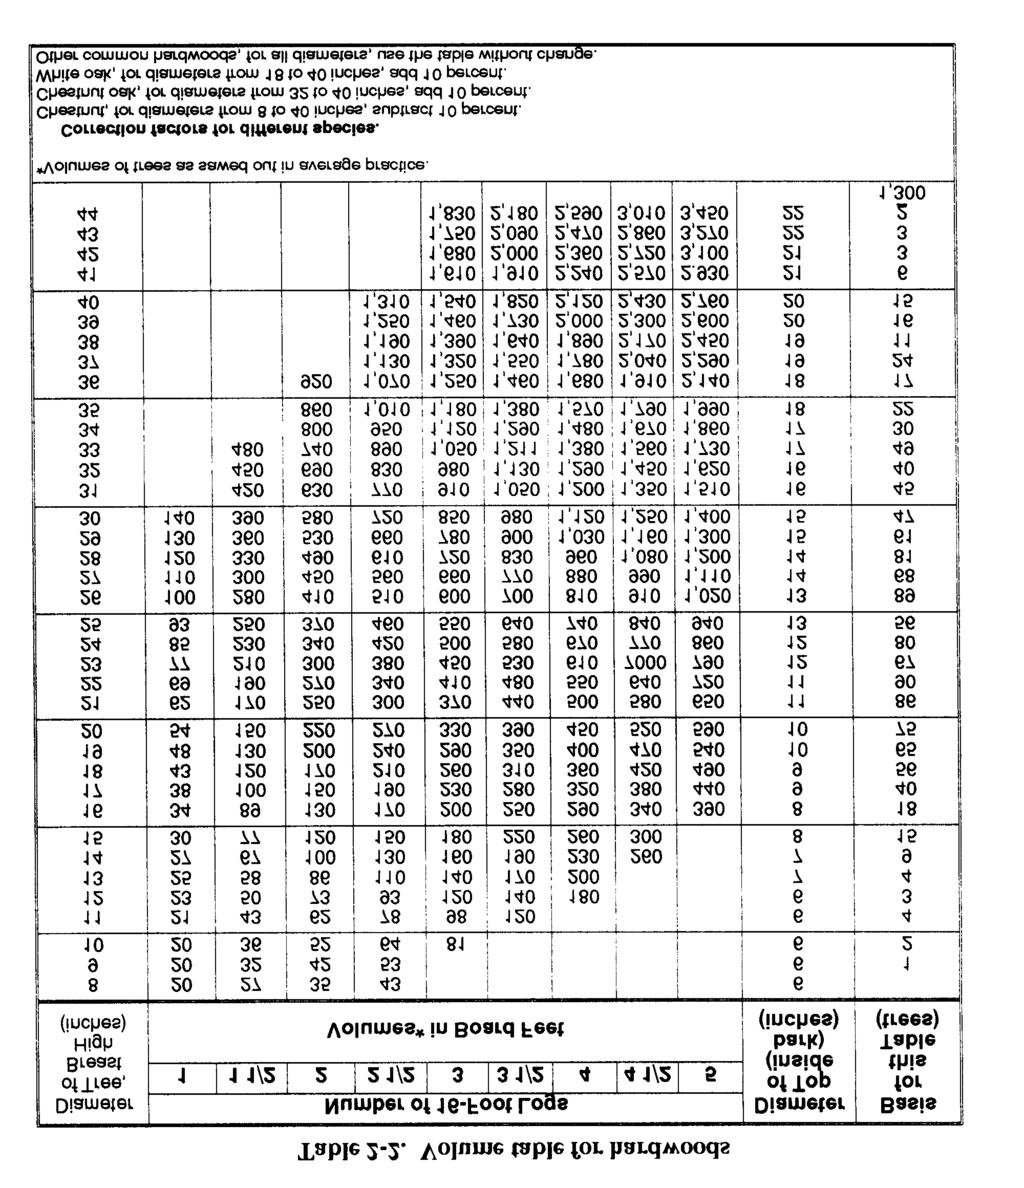
10 2-10
11 b. Estimating without Volume Tables. When you do not have a volume table, you can estimate standing timber fairly accurately by measuring the diameter and length of the tree and using the Scribner Decimal C Log Rule (Table 2-4, page 2-12). Similarly to estimating timber volume with the table, a tally sheet must be designed to accommodate the person, method and species being estimated. 2-11
12 2-6. Cruising Operations. In timber cruising, the two types of estimates are total and partial. For a total estimate, record the size of every tree in the stand. For a partial estimate, record the size of only some trees that are distributed over the whole stand or that are grouped in plots or strips. A stand is a group of trees in a limited area that are uniform in composition and condition. Composition refers to the principle tree species in the stand. Condition refers to the origin, age 2-12
13 distribution, and development of the stand. A limited stand should not exceed 200 acres. A forest type is a group of stands. There are many type classifications. Cover type, which is based on the vegetation of a specific area, is the most frequently used type in timber estimating. A cruising crew should consist of two to four people. One person is the recorder while the others are cruisers. A crew larger than four people is impractical because the recorder cannot keep up with all the cruisers. Single-man cruising is not recommended. When planning a cruising operation, include a map of the tract showing the location of roads, trails, buildings, lakes, streams, fences, power lines, and contours as well as the type of estimate to conduct. a. Total Estimate. The principal task in a total estimate is accurately recording the measurements of every tree or log in a stand. Mark the trees and logs with chalk, keel, paint, scribe, whitewash, or blaze to avoid recording the same tree or log twice and to avoid missing any tree or log. Mark the tract boundaries clearly so that you mark and record only the trees inside the boundary. Divide the tract into strips to make marking and recording trees an easier job. The density of the tract should govern how wide or how narrow to make each strip. b. Partial Estimates. In large timber areas, it is impractical to measure the diameter and height of every tree in the stand. Usually, you make a total estimate of several sample areas. To determine the entire timber stand volume, multiply the sample volume by the ratio of the entire stand area by the sample area. In partial estimates, ensure that the samples you take represent the whole tract. The size of the samples will depend on the variation in size and species of the trees in the area. When making partial timber estimates, the sample methods used are the sample-plot method or the parallel-strip method. (1) Sample-Plot Method. This is the simplest method of getting a sample from a limited stand. With circular plots, the center Of the plot is definitely marked; therefore, you can determine whether or not borderline trees are in or out of the plot. A circular plot has less perimeter than a rectangular plot of the same area, so you will have less borderline trees to consider. With rectangular plots, you use a steel tape on the centerline of the plot so you can rapidly and systematically progress through the plot. You are able to work forward continuously with a rectangular plot. (a) Baseline. When setting up the partial estimate, plot a baseline on a map of the area you will cruise. Project the cruise lines perpendicular to the baseline. Choose the baseline location so that the cruise lines cross streams and ridges perpendicularly. (b) Location of plots. Plot location may follow various patterns, but locate the plots in an unbiased (random) manner. Select the location of the starting plot, randomly, if the sample plots are to be located on a grid. Identify cruise starting points and plot locations so the locations are highly visible for the check cruiser to find them later. Mark plot centers with a wooden stake or wire pin. Number tallied trees clockwise from the north or from the direction of travel on the side of the tree facing the plot center. (c) Plot size. Samples about one-quarter acre or one-fifth acre are easier to measure. Results are likely to be more accurate on smaller samples. Round, dense, even-aged uniform stands require smaller plots. Older, uneven-aged stands of light density require larger plots. Establish plot boundaries by measuring, not by pacing. Determine circular plot boundaries by 2-13
14 measuring the radius from the centerline defined by the chain stretched between the marked end-line centers. Table 2-5 lists the radii for a variety of circular plot sizes. Problem trees, such as forked (Figure 2-14), leaning (Figure 2-15), or downed (Figure 2-16), will be counted in or out, depending on the location of the tree s DBH in relation to the plot boundary. Use the DBH as the point of reference rather than the base of the tree, particularly in the case of uprooted trees. (d) Computing volume. Compute the total volume of the area sampled as follows: Convert the volume of each plot to a per-acre basis by dividing the plot volume, in board feet, by the area of the plot, in acres. Add the volumes per acre for all the plots in a type and divide the sum by the number of plots in the forest type to find the average volume per acre for the type. Multiply the average volume per acre by the total number of acres to get the estimated total volume for the forest type. (2) Parallel-Strip Method. Use this method when making partial estimates of large timber stands. Establish a baseline with cruise lines perpendicular to the topography. Strip width will depend on the character of the timber being cruised. Timber density, size, and uniformity and brush amount are important criteria when making this choice. Make the strip as wide as is practical within the limits of speed and accuracy. Measure the trees in the strip using the same procedures as for the plot method. The number of trees you will measure will vary with every stand. The cruiser must decide which measuring system will yield the most accurate results. Compute the volume as for the sample-plot method. 2-14
15 2-15 FM 5-488