Model No. BWTDWFK-TRIFLO.
|
|
|
- Godwin Lenard Watts
- 5 years ago
- Views:
Transcription


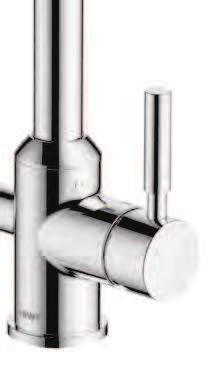

1 Model No. BWTDWFK-TRIFLO
2
.")
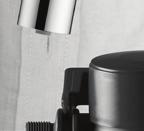
3 Before you start This tap is suitable for use at water supply pressures of 2 bar (min.) to 5 bar (max.). This product must be connected to the water supply in accordance with the UK Building Regulations. If you are in any doubt about these requirements, contact a qualified plumber, your local Water Company, or the Water Regulations Advisory Scheme (WRAS). (a) Identify all components and check pack contents. (b) Turn off mains water supply. The main stopcock is usually situated where the supply enters the building (c) It is also recommended that the hot water heating system is turned off. (d) Drain the cold and hot water system. It is recommended to ensure complete drainage, that all taps are opened. There is no need to drain the central heating system. After Care Ensure the tap is fully turned off after use. To maintain the appearance of this fitting, ensure it is cleaned only using a clean soft damp cloth. A solution of warm water and mild liquid detergent may be used where necessary and then rinsed thoroughly. Abrasive cleaners or acidic cleaners MUST NOT BE USED under any circumstances.avoid contact with solvents. Guarantee This Premium Drinking Water System is guaranteed to be free from faults arising from manufacturing defects for a period of 12 months from the date of purchase. Please retain proof of purchase Contains parts which if these become loose could be a choking hazard to small children. After installation please check that the bar levers into the tap head are secure, if required please use low strength thread lock to secure these parts. Please pass these instructions back onto householder for retention for future reference. Tap Assembly Bezel Spacer Rubber Clamp [01] x 1 [02] x 1 [03] x 1 [04] x 1 Metal Clamp Nut T Piece Washer [05] x 1 [06] x 1 [07] x 1 [08] x 3 Hoses M/F Hex Key Socket Wrench [09] x 2 [10] x 1 [11] x 1 Filter Cartridge Filter Head 7/16 x1/4 3/8 x1/4 Push-fit Push-fit [13] x1 [14] x1 [15] x1 [16] x1 Braided Flexible Hose [17] x1 NOTE! min. 80mm min. 15mm max. 3Nm 1/4" Tubing [12] x1 NOTE! Do not over bend the flexible hoses.
4 01 03 Please check sink thickness before installing. No (03) mounting seat is not needed if the thickness is more than 35mm. [01] > 35mm [02] [09] H [03] [04] [05] [06] 02 [11] Min.90mm 04 [07] Filter [08] Filter Cold Hot 07 08
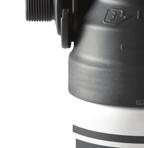
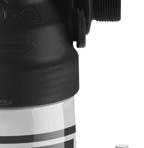
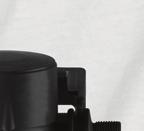
5 05 Installing the Filter Head and Bracket [14] To install the filter system, choose a location that enables simple connection to the water mains and tap. The distance between the filter cartridge and the floor should be a minimum of 65 mm to allow adequate space for installing the filter cartridge. The filter system must be securely fitted to a suitably robust surface using the filter bracket supplied. Remove the bracket from the filter head and use as a template to mark the appropriate location. Drill two pilot holes and fasten the bracket using two suitable screws or bolts (not supplied). Correctly fitting the mounting bracket will support the weight of the filter and help prevent strain on the attached pipes and fittings. 5 6 X2 Base of Tap X2 06 Connecting the filtered water supply Attach the 7/16 x 1/4 Push - fit adaptor [15] to the threaded tap tube being careful not to over tighten. Filtered Water supply Using a sharp hobby knife or similar cut the blue flexible hose [12] to a suitable length for it to reach between the Push - fit adaptor [15] and filter head [14] remember to allow sufficient length so that it can be routed with out kinks and be kept clear of any sharp edges. With the tube cut squarely ensure the end is clean and smooth before (A) pushing firmly and fully into the adaptor fitted to the tap, (B) pull back slightly to effect a water tight seal. A B Carefully fit the 3/8 x 1/4 push - fit adaptor [16] to outlet side of the filter head [14] taking care not to over tighten, and then slide the filter head into the bracket taking care to observe the direction of flow indicated by the arrow shown. 16 D Now take the other end of the blue flexible tube [12] and push firmly and fully (D) into the adaptor [16], pull back slightly to effect a seal (E) 7 E Place rubber washers [08] into the nuts on the braided hose [17] and connect to the previously fitted T piece [07] tightening to effect a water tight seal. Connect the other end to the inlet side of the filter head [14] do not over tighten. 07 Cold water Tap Mains water Supply
6 08: Installing the Cartridge Remove the cellophane shrink-wrap and hygiene cap from cartridge [13]. Before installing the filter cartridge, mark the installation date and the replacement date (no later than 6 months) in the space provided on the filter s label. Hold cartridge near the bottom when installing or changing the cartridge. Push the cartridge into the filter head [14] and the same time rotate anticlockwise when viewed from above. Installation can be simplified by turning the filter head in the filter bracket by 90 where space permits. 09: Bleeding the system - Please close all taps. Open the filter water tap [1] fully to allow for continuous flow, then slowly turn on the water supply allowing water to enter the filter slowly and displace trapped air and loose particles. (Please check installation carefully for leaks.) Allow water to flow through the system for around 5 minutes or until water runs clear and bubble free (Minimum 5 litres). Repeat flushing process whenever the filter is left unused for a prolonged period of time. Always 8 flush drinking water filter system for 10 seconds before use. Now ensure the hot and cold water taps are free from air by opening each slowly and closing them again when the water runs clear and bubble free. 10: Setting the bypass Your BWT filter head [14] is fitted with a 4 position bypass valve that can be used to allow filtered water to be mixed with incoming water from the mains for specialist applications. For domestic drinking water applications the By-Passshould be set according to the table below : Replacing the filter cartridge Turn off the water supply at the water supply valve before starting work. Unscrew the filter cartridge [13] out of the filter head [14] in a clockwise motion dismantling can be simplified by turning the filter head in the filter bracket by up to 90 where space permits Install new filter cartridge [13] as described in Section 9. Flush and bleed filter cartridge as outlined in Section 10. Dispose of the removed filter cartridge; observe the local disposal regulations. Your BWT Filter can be changed without isolating the water supply however turning off the water at the stop cock or other suitable isolation valve can help prevent unnecessary water spills.
7 NOTES
8 Model: BWT Premium Drinking Water Filter Kit Trouble Shooting Guide Fault Cause Action No filtered water Water intake or isolating valve closed Filter head reversed Filter not fitted correctly Check isolating valves and open if necessary Check flow direction a reverse head if necessary (see section 6) Unscrew filter by 1/2 a turn and re-insert (see section 8) Leaking around the filter head Filter cross threaded Unscrew filter by ½ rotation and reinsert as far as it will go (see Section 8) Low flow rate Cracked head System pressure is too low Isolate unit and replace filter head Check system pressure is greater than 2 bar Aquastop in filter head leaking when filter cartridge is removed Foreign particles deposited in Aquastop Flush system with built-in filter (see Section 9) Threaded connection leaking Faulty seal Check seal, replace if necessary Air bubbles Not completely bled Repeat the bleeding procedure (see Section 10) Water is milky/white in colour Filter head pipe connections leaking Process-related formation of carbonic acid that escapes as small white bubbles Incorrect tube assembly or damaged tube Cloudiness disappears after approx. 5 min. Turn off water supply and turn on drinking water tap. For plastic tubing, depress collar on Push - fit and remove the tubing from the housing. Inspect to see if the tubing is damaged. If damaged, remove problem area by cutting squarely across the tubing. Then reconnect tubing following procedure in section 6 to 7 Open the water supply valve, then close tap and check for leaks. If the leaks persist, or if there are other leaks on the unit, turn off the water supply then call our Customer Service Team. If your problem persists please call our Customer Service Team during office hours on Contact BWT UK Limited BWT House, The Gateway Centre, Coronation Road, High Wycombe, Buckinghamshire, HP12 3SU Tel: customerservice@bwt-uk.co.uk Europe s No.1 in Water Technology BWT In the interests of product development, we reserve the right to alter specifications without prior notice. All photographs and dimensions are given for guidance only. Terms and conditions apply. E&OE. ME