Disassembly of the CertiflexDimension software is also expressly prohibited.
|
|
|
- Pauline Hutchinson
- 5 years ago
- Views:
Transcription
1
2 All content included in CertiflexDimension programs, manuals and materials generated by the programs are the property of The Versatile Group Inc. (TVG) and are protected by United States and International copyright laws. Any use other than for information related to operation and use of licensed (TVG) software and services, including the reproduction, modification, distribution, transmission, republication, display or performance of the content on this site is strictly prohibited. Disassembly of the CertiflexDimension software is also expressly prohibited. CertiflexDimension, the CertiflexDimension logo and The Versatile Group logo are trademarks of The Versatile Group, Inc. All other brand and product names and trademarks are registered trademarks of their respective companies. Information in this manual is subject to change without notice and does not represent a commitment on the part of the vendor or The Versatile Group, Inc. The software described in this manual is furnished under a license agreement and may be used only in accordance with the terms of that agreement. The Versatile Group, Inc Spring Valley Road Dallas, TX (972) fax: (972) Version 10.0 All Rights Reserved. Printed in U.S.A. JC10U 07/12 2
3 Job Cost Operations Guide... 6 Introduction... 6 Start-Up Cycle... 7 Schedule of Events... 7 Job Cost Theory... 9 Job Cost Theory... 9 Account and Cost Code Updating... 9 Year End Closing for Jobs...14 Post Job Ledger Entries...15 Close and Delete Jobs...16 Maintain Jobs Adding a Job Cost Note Editing a Job Cost Note Deleting a Job Cost Note Adding a Job Additional Options Adding a Cost Code to a Job Changing a Cost Code for a Job Deleting a Cost Code for a Job Maintain Master Cost Codes...31 Designing the Cost Code Numbering Scheme Job Cost Code Number Rules Adding a Master Cost Code Editing a Master Cost Code Deleting a Master Cost Code Code Categories Adding a Code Category Changing a Code Category Deleting a Code Category Renumbering a Code Category Reset Codes Exporting Codes Exporting Detail Start New Year for Jobs...42 Close and Delete Jobs...43 Close a Job Open a Closed Job Delete a Job Retrieve an Archived Job Transactions Job Cost Post Job Ledger Entries...47 Record Job Billings...49 Record Job Estimates...50 Reviews Job Cost Reports Job Cost Job Cost Reports...58 Job Cost Summary Job Profit Summary Cash Flow Analysis Draw Report Job Cost Report Job Estimates
4 Job Notes Item History by Job Profit Statement Summary Profit Statement Job Audit Trail Job Check Register Job Transaction Register Job General Journal Unposted Ledger Report Contracts in Progress Completed Contracts Aged Accounts Payable by Job Job Listing Detailed Job Setup Cost Code Listing Cost Code Setup Report Job Detail Notes Job Cost WorkSheet Reports...71 WorkSheets Using with Other Dimension Programs Introduction...73 General Ledger...73 Journal Entries, Recurring Entries and Percentage Entries Consolidate Ledgers Review Accounts Accounts Payable...76 Vouchers, Cc Vouchers, Recurring Entries and Direct Checks Print Vendor Checks Remove Offsetting Transactions Special Checks Cash Management Reports History Reports Review Vouchers Maintain Vendors Set Up Open Items Set Up History Items Accounts Receivable...78 Record Invoices and Manual Invoices Invoices Statements Apply Payments Unposted Transactions Report History Reports Payroll...79 Maintain Departments Record Pay Data Print Payroll Summary Reports Payroll Check Run Void Checks Review Employees Standard Payroll Reports Certified Payroll Report (WH-347) Inventory...80 Record Inventory Entries
5 Order Entry...83 Record Customer Orders Backlog Reports Invoice Shipped Orders Invoices Purchase Order...84 Maintain Purchase Orders Commitment Reports Record Purchase Order Voucher Voucher History Report Maintain Purchase Codes
6 Job Cost Operations Guide Introduction Welcome to CertiflexDimension Job Cost! This Operations Guide is designed to help you get started using the program. It is organized in a fashion for first time users and details the steps you need to follow once the system is installed. It can also be used as a reference to help you with day-to-day processing. To get the most out of CertiflexDimension Job Cost and to guard against wasted definition time, it is very important that you read this guide and familiarize yourself with the product before you begin processing. This guide is used in conjunction with the CertiflexDimension System Manager Guide. The System Manager Guide details the CertiflexDimension terminology, functions, general program overviews, general program buttons, and fields. It also shows you how to: Configure Users and Define System Security Configure User Defined Memos Change the Processing Date Add Companies Print Reports It is extremely important that you read the System Manager Guide before you begin using the Job Cost program. 6
7 Start-Up Cycle Before you begin working, make sure that you have correctly installed CertiflexDimension Job Cost on your computer. To install the program, refer to the Installation Instructions included in your package. You are ready to begin processing after you: Schedule of Events Install CertiflexDimension, Read the CertiflexDimension System Manager Guide, Read the Job Cost Operations Guide, and Add Companies to your System Please use the following Schedule of Events as a guide on the proper steps in using the CertiflexDimension Job Cost program. Create the company files: Before the system will allow you to do anything in Job Cost for the company, you must first create the company files. For Job Cost processing, make sure that you check the Job Cost Company check box in the company s Properties. Refer to Maintain Company Information of the CertiflexDimension System Manager Guide for more information on this field. Define the Master Data: A part of creating the company files is to define the company s master data. You will need to define the master data of all CertiflexDimension programs that you installed and will use for the company. For proper Job Cost processing, the General Ledger master data must have the field Multiple Company J/E selected. Refer to the Master Data section in the General Ledger Operations Guide for more information on this field. For more information on the master data of each program, refer to the Master Data section of each respective CertiflexDimension manual. Define the Job Classes: The system will allow you to use job classes for many different purposes, allowing you to class jobs by any criteria you desire. For example, you may want to class jobs by job types, by geographical region, or territory, or by job supervisor. Refer to the Maintain Job Classes section for more information on Job Classes. 7
8 Define the Code Categories: The system uses the code categories you assign on each cost code to determine how to group cost codes on the Profit Summary report. The code categories should be defined before you define the cost codes. Refer to the Maintain Code Categories section for more information on Code Categories. Define Master Cost Codes: Refer to the Maintain Master Cost Codes section for detailed information on cost code numbering rules and instructions on how to add new cost codes. Define the Jobs: Refer to the Maintain Jobs section for detailed information on adding jobs to the system. Make a backup: You have now added all of the job information and you are ready to begin normal processing. It is very important that you make a backup of the data files to guard against the possibility of losing your work. 8
9 Job Cost Theory Job Cost Theory This section will explain the job cost accounting theory that the CertiflexDimension Job Cost program uses during processing. This includes: An explanation of the three different job cost processing methods most commonly used with the CertiflexDimension Job Cost program. How the system will update the ledger accounts for the main company and the cost codes for the individual jobs when recording journal entries. How to process a year-end for any jobs crossing the company s fiscal year end using the Post Job Ledger Entries option. How to close and delete jobs. This section will not give you the specific information needed to perform these functions. That information is found later in this manual. This section s purpose is to inform you of how the system processes the information you enter for job cost accounting. Account and Cost Code Updating There are probably hundreds of ways to process job cost accounting. However, there are really three main ways we commonly see people use the CertiflexDimension Job Cost with respect to accounting methods. Remember the golden rule of accounting, to closely match revenues with the cost incurred to produce these revenues. One very common method in job cost accounting is what we call the Completion Method. The Completion Method means that no revenue or costs are posted to the main company until the job is completed. This is a common method of job cost accounting used in industries that work with jobs that are usually completed in a short amount of time and normally the revenues are received when the job is completed. Any revenues received prior to the completion of the job are handled as deferred revenue (usually a retainage or deposit). 9
10 Another very common method in job cost accounting is what we will call the Full Cost Method. The Full Cost Method means that all revenues and costs are posted fully to the main company s ledger each accounting period. This is a common method of accounting used in industries that bill their jobs either by full percentage completed times the contract amount or on a cost plus method of billing. The last job cost accounting method we will discuss is what we call the Percentage Billed Method. The Percentage Billed Method is used in industries that are billing for only a partial percentage of the current Work in Progress. The easiest way to picture these three job cost accounting methods is to work through a simple example. For our example, we will use one company and two small jobs. The chart of accounts and cost code listing for our Example Company and jobs are as follows: Example Company Accoun t Numbe r Account Name Accoun t Type Financia l Report 100 Cash Asset Balance Sheet 130 Deferred Revenue Asset Balance Sheet 140 Intercompan y (WIP) 200 Owner s Equity Asset Equity Balance Sheet Balance Sheet 600 Revenue Sales Income Statemen t 710 Labor Cost of Goods Sold 720 Materials Cost of Goods Sold Income Statemen t Income Statemen t Example Job One Cost Code Cost Code Name Cost Type 140 Intercompany WIP 710 Labor Cost 720 Materials Cost Example Job Two Cost Code Cost Code Name Cost Type 140 Intercompany WIP 10
11 710 Labor Cost 720 Materials Cost To start our Example Company, our owner is investing $10, in cash to the company. The journal entry to the company for the investment would be as follows: Company Accounts Debits Credits 100 Cash 10, Owners Equity 10, , , Now it is time to spend some money. The Example Company pays someone $ for work on Example Job One and $ for work on Example Job Two. The Example Company also purchases $ worth of materials for Example Job One and $ worth of materials for Example Job Two. Since we are using job cost accounting, the journal entry would be as follows: Co/Job Account Debits Credits Company 100 Cash 1, Job Labor Job Materials Job Labor Job Materials , , Above is the journal entry that we would enter. However, the journal entry that the system will post to the company and job ledgers would look like the following: Company Accounts Debits Credits 100 Cash 1, Intercompany (WIP) 1, , , Job One Cost Codes Debits Credits 140 Intercompany (WIP) Labor Materials Job Two Cost Codes Debits Credits 11
12 140 Intercompany (WIP) 1, Labor Materials , , Our chart of accounts and cost code listing for our Example Company and jobs would now look like: Example Company Account Number Account Name Balance 100 Cash 8, Deferred Revenue Intercompany (WIP) 1, Owner s Equity 10, Revenue Labor Materials 0.00 Example Job One Cost Code Cost Code Name Balance 140 Intercompany Labor Materials Example Job Two Cost Code Cost Code Name Balance 140 Intercompany 1, Labor Materials Note that at this point, on the Example Company, the entire cost of all the jobs is reflected in the Intercompany (WIP) account and there are no costs for the company in the Labor and Materials accounts. In CertiflexDimension Job Cost, this is how the chart of accounts and cost code listings will always appear during the current accounting period, regardless of the job cost accounting method you are using. Now, let s look at the three individual methods at month end after receiving cash from billings associated with the jobs. For example, let's say that we collected $2, If we are using the Completion Method this is recorded as Deferred Revenue and our journal entry would be as follows: 12
13 Company Accounts Debits Credits 100 Cash 2, Deferred Revenue 2, , , Our chart of accounts and cost code listing for our Example Company and jobs would now look like: Example Company Account Number Account Name Balance 100 Cash 10, Deferred Revenue 2, Intercompany (WIP) 1, Owner s Equity 10, Revenue Labor Materials 0.00 Example Job One Cost Code Cost Code Name Balance 140 Intercompany Labor Materials Example Job Two Cost Code Cost Code Name Balance 140 Intercompany 1, Labor Materials Note that the cost codes on the jobs are not affected by the billing. Billing is, however, tracked internally on each job in the job control file. Also note that according to the golden rule of accounting of matching revenue and expenses, we are still correct in our accounting because our Example Company does not reflect any revenue or expense on the Income Statement. But what if we recorded the cash as revenue instead of deferred income? Using the Completion Method of job cost accounting, our above entries would be incorrect. Our Income Statement shows $2, in revenue with no offsetting cost and a Net Income of $2,
14 But our boss wants to see that revenue on the Income Statement. If we switched the job cost accounting method to the Full Cost Method or the Percentage Billed Method this would be correct. The easiest way to switch to the Full Cost Method is by simply changing the account type (financial statement line) for the Example Company for the Intercompany (WIP) account. You will want to change this account s type from Asset to Cost of Goods Sold. You may optionally want to change this account s name to Cost of Jobs (WIP) if it makes it easier for you. The chart of accounts for the Example Company would now look like the following: Example Company Account Number Account Name Balance 100 Cash 10, Owner s Equity 10, Revenue 2, Cost of Jobs (WIP) 710 Labor Materials , Now our Net Income would show a $ profit ($2, revenue less the $1, cost of jobs) which, when added to the Balance Sheet equity section, would bring our Balance Sheet back in balance. The jobs cost code listing would remain unchanged. To see the actual cost from jobs in the individual Start New Year expense accounts of the job, you would use the consolidation feature or the posting option. Year End Closing for Jobs Year-end closing for jobs, regardless of the job cost accounting method you are using, is as simple as selecting the for Jobs option. This process is fully detailed in the Maintain Lists Jobs: Start New Year for Jobs section of this guide. 14
15 Post Job Ledger Entries The Job Cost program includes an option to post the job journal entries to the main company s ledger. This option is called Post Job Ledger Entries. You use this option differently depending on the job cost accounting method you are using. In some job cost accounting situations, you may want to show the jobs expenses on the main company for financial statement printing before the job is completed. You can obtain these results in two different ways with the CertiflexDimension software. One way is to consolidate the main company s jobs together with the main company. You would then print financial statements for the consolidated company and jobs. Doing this will give you a simulated financial statement for the main company. The financial statements are simulated because the actual job expenses are not posted to the job. The consolidation shows you what the financial statements would be if the jobs were posted to the main company. The other way is to use the option Post Job Ledger Entries. This option allows you to cause the system to automatically post the job expense entries directly to the main company on any schedule you desire. After you post the job ledger entries to the main company, you can print the financial statements for the main company and the financials will reflect all expenses and revenues for the company and jobs. To summarize, using the consolidation feature allows you to simulate job ledger entries posted to the main company for financial printing. Posting the job ledger entries to the main company will automatically post the jobs entries directly to the main company. If you want financials to reflect the jobs expenses, which method you use to show the expenses will depend on your preferences. This section will discuss the use of the Post Job Ledger Entries option. For information on the consolidation feature, refer to the CertiflexDimension General Ledger Operations Guide. If you are using the Completion Method, you will not choose the Post Job Ledger Entries during the normal life of the job. You will select this option at the end of the job. The system will automatically create the journal entries necessary to close the job for you. The only entry you will need to manually make is one to move the deferred revenue (if any) into Revenue. If you are using the Full Cost Method, you will choose this option at the end of each processing period. After performing this option, you are ready to print any financials needed for the main company. All job expenses will reflect on the financials. At the end of the job, you will use this option one last time to update any final journal entries. No other processing or journal entries are required. 15
16 If you are using the Percentage Billed Method, you will choose this option at the end of each processing period. However, when you use this option, you will post for only one job at a time and you will enter the percentage to update to the main company s ledger. The system will calculate the journal entry for you. After performing this option, you are ready to print any financials needed for the main company. All job expenses will reflect on the financials for the percentage updated. At the end of the job you will use this option one last time at 100% to update any final journal entries and balances. No other processing or journal entries are required. This process is fully detailed in the Transactions Jobs: Post Job Ledger Entries section of this guide. Close and Delete Jobs To close a job, use the option Close/Delete Jobs. When closing a job, the system checks to make sure the job has been fully posted to the main company s ledger. The system will then change the job s status to Closed. The system will not allow you to post new journal entries to any job with a status of closed. When you close and delete jobs, the system can make a copy of all job files for retrieval purposes and then actually delete the job data from the computer. The system will also allow you to optionally add the job s detailed totals to the job record in the job control file before the system deletes the job data files. This process is fully detailed in the Maintain Lists Close and Delete Jobs section of this guide. 16
 before adding new jobs.")
17 Maintain Jobs This option allows you to perform maintenance functions to the jobs. You can add, modify, and delete Jobs. To select this option, click >Maintain Lists >Job Cost >Jobs. Note: If you are just getting started with CertiflexDimension Job Cost, remember that you should set your default cost code list (Maintain Master Cost Codes) before adding new jobs. The Maintain Jobs listing can display either all open jobs or all open, closed and deleted jobs. To define how the job listing is displayed select either Open Jobs Only or All Jobs in the upper right corner of the screen. 17

18 Job Cost Notes This option allows you to add, change, and delete a variety of notes for jobs. The system allows you to add different kinds of notes to the jobs for informational purposes only. To select this option from the Maintain Jobs screen, click >Job Cost Notes. There are four different Note Types you can define. Equipment Notes: These notes can be used to enter notations about the different types of equipment or machinery used for the selected job. Reminder Dates Notes: These notes can be used to define any important dates that need to be remembered for the selected job. Sub-Contractors Notes: These notes can be used to make any notations you may need for the different sub-contractors you may be using for the selected job. Miscellaneous Notes: These notes can be used to make any notations you may need for the selected job that do not fit in the other three categories. Adding a Job Cost Note To add a new note, select the job to add a new note from the job listing. When a valid job is highlighted, select the type of note you wish to add and then click >Job Cost Notes. Select the desired Note Type and click >New. The system will then prompt you for the following: Reference Number: Enter the note s reference number. Description: Enter the description for the note. Note One, Note Two, Note Three, Note Four, Note Five: Use these fields to enter the notes. Cost Code, Amount, Hours: You can use these three fields to make a notation of any dollar amounts or hours associated with a specific cost code if that information is applicable to the notes you added above. The system will not update the cost code or its balances. The inputs for these three fields are for informational purposes only. 18
19 Once you have defined the Job Cost Note click >Save. Once all Job Cost Notes have been defined and saved, click >Close to return to the Maintain Jobs screen. Editing a Job Cost Note When the Maintain Job Cost Notes screen is displayed, select the Note Type and click to highlight the Job Cost Note you wish to change. Click >Edit and the system will display the Edit Job Notes screen. Once all changes have been made, click >Save to retain your changes and return to the Maintain Job Cost Notes screen. Deleting a Job Cost Note When the Maintain Job Cost Notes screen is displayed, select the Note Type and click to highlight the Job Cost Note you wish to delete. Click >Delete and the system will display a confirmation screen confirming that you wish to delete the selected Job Cost Note. Click >Ok to delete the Job Cost note. Notes, Links, and Memos Notes, Memos and Links allow you to organize and access information about jobs from one location. Notes can be used to document cost delays, cost overruns, job specifications, etc. Memos are predefined information fields used for recording various pieces of information or standard amounts. The headings for the memo lines are defined in the Maintain Memo Names supervisor option. To access Maintain Memo Names from the CertiflexDimension System Manager screen, click >File >Supervisor Options >Maintain Memo Names. NOTE: You must have Supervisor rights (access level 10) to be able to modify the memo headings in the Configure Memos options. Links can be used to connect to photos of the job site, job order documents, web sites, etc. You can add and review Quick Notes and Links in Maintain Jobs and Review Jobs. For detailed steps on adding Quick Notes and Links, refer to the CertiflexDimension System Manager Guide. Default Job The Default Job is used to define standard fields that would be used in all or most jobs. For example, if all jobs had the same Supervisor Information or an identical Job Class or have the Update Billing from A/R feature enabled, you would assign these standard preferences on the Default Job accordingly. To edit the default job from the Maintain Jobs screen, click >Default Job. 19
20 For a detailed explanation of the fields available on the default job s Edit Job screen, please refer to the Edit Job section of this guide. 20

21 Adding a Job To add a new job, click following: >New. The system will prompt you for the New Job Number: Enter the new job number. The system maintains all job numbers as six digit numbers. If you enter a new job number that is less than six digits in length, the system will add 0 s to the entered number to cause the number to be six digits. If you enter a numeric job number, the system will add the additional 0 s to the beginning of the job number. For example, if you enter a job number of 100, the system will add the new job as If you enter an alpha job number, the system will add any additional 0 s to the end of the job number. For example, if you enter a new job number of ABC, the system will add the new job as ABC000. Even though the system is adding 0 s to the new job number to cause the job number to be six digits in length, you will still be able to access the job by the entered job number, such as 100 or ABC, throughout the system. Auto-Assign No.: If the New Job Number field is blank, click >Auto-Assign No. to have the system created a job number sequentially based on the last created job. 21
22 Hint: If using the first two characters of your job numbers to represent a job type or location, enter in the first two characters of the new job before clicking the Auto-Assign option. Job Name: Enter the name for the job. Project Number: Defined the job s project number. Select Cost Codes for Job: The system is preparing to define which cost codes to add to the new job. The system is displaying all the cost codes that are defined on the Master Cost Code list. The cost codes that have the Selected check box marked are the cost codes on the Master list that have Auto-Add Type Code selected. When you add new jobs, the system will only allow you to add cost codes that exist on the Master Cost Code list. If there are cost codes that you wish to add to this new job that are not defined on the Master list, you must first add the cost codes to the Master list before the system will allow you to add them to the individual job. The system will allow you to select or clear the check box for any cost code for the new job by double-clicking the cost code s Selected check box. All cost codes that are selected will be added to the new job. If the new job you are adding will have the exact or similar cost codes of a job previously defined, the system will allow you to select a job to copy from instead of copying from the Default Job. To copy from a specific job, click >Copy Codes from Another Job. They system will display all jobs in the Job Listing. Double-click on the company with the active job codes you want copied to the new job. The system will then return you to the Add New Job screen. Once the New Job Number, Job Name, Project Number, and Job Cost Codes have been defined, click >Create Job. The system will then prompt you to edit the new job. 22

23 Edit Job Number: This field displays the previously defined Job Number. Status: This field displays whether this is an active open job, a closed job, or a deleted job. For all of the active jobs, this field should be defined as Open. To properly close and/or delete a job, use the Close and Delete Jobs option detail later in this guide. When a job is set to Closed or Deleted, the system will not allow you to post a transaction to the job. Job Name: This field displays the previously defined Job Number. At any time, you may change the name here. Project Number: This field displays the previously defined Project Number. At any time, you may change the project number here. Location One, Location Two: These fields allow you to define the location of the job. Job Reminder: The data entered for this field is for informational purposes only for the job and is not used by the system in any way. Total Square Footage: This field allows you to define the total square footage of the job. The total square footage defined here will print on certain job cost reports and is also used in providing estimated completed square footage if the Print Square Footage check box is selected. Inventory Overhead %: If you are operating interactively with the CertiflexDimension Inventory program, you can enter the inventory overhead percentage. 23
24 When entering job stock withdrawals through the Inventory system, the system will allow you to specify the job and cost code that the inventory cost should be allocated to. This feature allows the system to automatically make the necessary journal entry to transfer inventory costs out of the main company s ledger file into the selected job s ledger file. The inventory overhead percentage defined here indicates whether or not to add inventory overhead to the job ledger when the journal entry for allocating the inventory is made by the system and if so, how much overhead to include. For example, defining the inventory overhead percentage here to % would cause the inventory withdrawal allocated to this job of $10.00 to be updated in the amount of $ If you set this field to 0.000%, then any inventory allocated to this job will update as the actual cost used for the overhead. No overhead is calculated or included. Retainage Payable: Enter the job s beginning balance for the retainage payable, if any. During job processing, the system will automatically update this field when you Record Vouchers to this job in Accounts Payable, provided you are operating interactively with the CertiflexDimension Accounts Payable program. Retainage Payable normally indicates a portion of an amount billed to you by a vendor (a sub-contractor) for which you are withholding payment pending your acceptance of their work. Retainage Receivable: When you add a new job, enter the beginning balance for the retainage receivable, if any. During job processing, the system will automatically update this field when you Record Job Billings in Job Cost or when you print the Unposted Transaction Register after recording invoices in Accounts Receivable, if you are operating interactively with the CertiflexDimension Accounts Receivable program and the Update Billing From A\R check box is selected. Percent Complete: Enter the beginning percent complete, if desired. If you do not enter a percentage complete, the system will calculate the percentage for you based on a comparison of actual costs versus estimated costs. Beginning Project Date: Enter the date that this job will begin. Estimated Completion Date: Enter the date that this job is estimated to be completed. Job Class (1 99): This field allows you to assign this job to a group or classification. The system allows you to select a class between 1 and 99. You can use Class Number for many different purposes. You can classify jobs by any criteria you desire. For example, you may want to classify jobs by job types, by geographical region or territory, or by job supervisor. Most reports in the Job Cost program will allow you to specify a range of classes to include. 24
25 Intercompany Account: Select the intercompany account for this job. The proper definition of the intercompany ledger account is very important to the operation of the job cost ledger system. It is used by the system to keep the company and job ledgers in balance when making journal entries between the jobs and the main company. Journal entries between jobs and the main company are a very common requirement in a job cost accounting environment. As an example, a common journal entry might be a check entry that covered the purchase of materials to be used by several different jobs of the main company. To properly account for such a check, you would want to debit an asset or expense cost code in each of the affected jobs and credit the cash account in the main company s ledger. To keep each of the individual job and company ledgers involved and this single journal entry in balance, the system will automatically make the appropriate debit or credit entry to the intercompany ledger account for each job and the main company. The type of intercompany ledger account that you define here for this job, whether the account is a Balance Sheet or an Income Statement account, will depend on the accounting method the main company is using. Common intercompany accounts include Work in Progress, Inventory, and Cost of Sales. For more information on the different accounting methods to use, refer to the Job Cost Theory section. Although not necessary, we STRONGLY recommend that the intercompany ledger account be the same account for the main company and all jobs associated with the main company. Print Square Footage: Select this check box if you want the square footage information printed on the job cost reports, if the report generates the information. If you do not want the square footage information printed on any job cost reports, do not select this check box. Certified Payroll: CertiflexDimension Payroll will print the WH- 347 form for reporting Certified Payroll. Not all jobs require this report. Select this option if this Job will require a certified payroll report. Update Billing from A/R: Do not select this check box if you are not operating interactively with the CertiflexDimension Accounts Receivable program. If you are operating interactively with the Accounts Receivable program, select this check box if you want the system to automatically update the job s billing information when you write an invoice in Accounts Receivable for this job. If you prefer to Record Job Billings instead of the system posting the billings for you automatically, do not select this check box. If you are operating interactively with the CertiflexDimension Accounts Receivable program, you may prefer not to select this check box. Record Job Billings allows you to record additional note information to the billing. You may find this beneficial to your processing needs. 25

26 Supervisor Information: This area is reserved for the name and contact information of the job s supervisor, if applicable. o o o o o Additional Options Contract/Customer Name: Enter the name of the supervisor. Phone Number: Enter the phone number of the supervisor. Beeper: Enter the beeper number of the supervisor. Memo: The data you enter for this memo field is for informational purposes only and is not used by the system in any way. Address: Enter the job supervisor s address. The Contract/Customer screen is reserved for job-specific contract and customer information. Contract Information Contract Number: This field allows you to define the contract number for this job. Fixed Contract Amount: Enter the contract amount for this job. If this job is a fixed rate job, please be sure to define the Job Contract Type. The system will use the contract amount in the calculation of the estimated profit for the job and in the calculation of the draw amount included on the Draw Report, depending on the draw type defined in Job Contract Type. Job Draw Type: This field will allow you to select either Bank or Customer. You use this field to define whether you will receive draws for this job from the bank or if you will bill the customer. Job Contract Type: This field will allow you to select either Fixed or Cost Plus. You use this field to define whether the job is a fixed rate job or a cost plus job. Cost Plus Percentage: If you defined the Job Contract Type as Cost Plus, enter the cost plus percentage here. 26
27 Original Contract Amount: If the contract amount has changed since the job s creation, enter the original amount here. Customer Information If you are not operating interactively with the CertiflexDimension Accounts Receivable program, this section allows you to define the customer information for this job. If you are operating interactively with the CertiflexDimension Accounts Receivable program, it is not necessary for you to define this section. However, you may still want to enter this information for informational purposes only. The system will not retrieve the customer information from Accounts Receivable for you. Number: Enter the customer s number. Name: Enter the customer s name. Street Address: Enter the address of the customer. City, State, Zip: Enter the city, state, and zip code of the customer. Attention: Enter the main contact person. Retainage %: Enter the job s standard retainage percentage. Memo: The data you enter for this memo line is for informational purposes only and not used by the system in any way. Customer Enter the customer s address here. 27


28 Additional Dates Date Last Posted to Ledger: The system will automatically update this field when you perform the option Post Job Ledger Entries. Date Job Was Closed: The system will automatically update this field when you choose to close a job through the Close and Delete Jobs option. First Date, Second Date, Third Date: The descriptions and dates you enter for these fields are for informational purposes only and are not used by the system in any way. For example, you can use these fields to define the lien dates or filing dates. Cost Codes This option allows you to add, edit and delete cost codes from the select job. To access the Cost Code option, click >Cost Codes and the system will display the Maintain Cost Codes List. 28


29 Adding a Cost Code to a Job At the Maintain Cost Code List, click >New and the system will display the Add New Cost Codes screen. Select the cost code to add to this job from the Master Cost Code listing and then click >OK. Changing a Cost Code for a Job Reminder: Cost codes are automatically added to individual jobs by accessing a master cost code during transaction processing. At the Maintain Cost Code List, select the cost code you wish to change and click >Edit. The system will then display the Edit Cost Codes screen. Description: Edit the cost code s description. GL Posting Account: If you plan to use the option Post Job Ledger Entries, you will need to define which main company ledger account you want the system to post to. GL Consolidation Account: If you plan to use the option Consolidate Ledgers in the General Ledger program, you may wish to define which main company ledger account you want the system to consolidate to for this cost code. 29

30 If you leave this field blank and you perform the consolidation, the system will consolidate this cost code to the ledger account number that is the same number as this cost code. Deleting a Cost Code for a Job At the Maintain Cost Code List, select the cost code you wish to delete and click >Delete. The system will display a confirmation screen. Click >Ok to delete the cost code from the selected job. There are several criteria that must be met before the system will allow you to delete a cost code from the cost code listing for a job. The current period, quarter-to-date, and year-to-date balances for the cost code must be zero. The system will not allow you to delete a cost code that has had any transactions posted to it for the selected job. For more information on maintaining cost codes, refer to the Master Cost Codes section of this guide. Period Billing This table displays the total billing amounts for each period. When you are adding a new job, click >Edit Period Billing Amounts to enter the total billings for each period of the fiscal year, if any. During job processing, the system will automatically update this table when you Record Job Billings in Job Cost or when you print the Unposted Transaction Register after recording invoices in Accounts Receivable, if you are operating interactively with the CertiflexDimension Accounts Receivable program and the Update Billing From A\R check box is selected. Date Last Billings: When you add a new job, enter the date the last billing was processed. During job processing, the system will automatically update this field when you Record Job Billings in Job Cost or when you print the Unposted Transaction Register after recording invoices in Accounts Receivable, if you are operating interactively with the CertiflexDimension Accounts Receivable program and the Update Billing From A\R check box are selected. 30
31 Total Billings: When you add a new job, enter the total project to date billing, if any. During job processing, the system will automatically update this field when you Record Job Billings in Job Cost or when you print the Unposted Transaction Register after recording invoices in Accounts Receivable, if you are operating interactively with the CertiflexDimension Accounts Receivable program and the Update Billing From A\R check box is selected. Maintain Master Cost Codes This option allows you to perform maintenance functions on the job cost codes. You can add, modify, and delete cost codes. To select this option, click >Maintain Lists >Job Cost >Master Cost Codes. Before we begin this section, we need to first explain some special features of the job cost code numbers that you need to know before defining cost codes in the system. It is important to read this information before you define the cost codes. Designing the Cost Code Numbering Scheme Job cost code numbering is very flexible in the CertiflexDimension Job Cost program. This is because the system allows up to 12- alphanumeric characters for the cost code number and because the Profit Statement report formatting is not dependent on the cost codes numbering scheme. This means that you can probably use your existing job cost code-numbering scheme if you choose. Before you use your existing cost code numbering scheme, however, we recommend that you read the following explanation. You may decide to change the existing cost code-numbering scheme to take advantage of some special features in the system. Job Cost Code Number Rules The maximum length allowed by the system for a job cost code is 12-alphanumeric character. The cost code numbering scheme can be as small as three characters. The Profit Statement prints entirely independent of the numbering scheme used by the cost codes. The way to access the Profit Statement printing in the exact manner desired by the company is dependent upon the print status of the cost code - whether it is set to print in a detailed format or a summary format. All job cost reports that print in cost code order use the computer s normal sort sequences to determine the print order of the cost codes. In general, this sort sequence reads special characters first (*, -, /, etc.) then numerical digits, and then alpha characters. The system left justifies when sorting cost codes. For example, the computer would sort these cost codes as follows: 31
32 / A R900 We recommend that unless you are going to use your existing cost codes exactly as they are currently defined, you do some preliminary cost code number design on paper before sitting down at the computer to define the cost codes. This way, you avoid any inconvenience and additional setup time caused by changing the design in mid-stream, after some or all of the cost codes are already defined. When you add master cost codes to the system, you add the cost codes to the Default Job, not to individual jobs. The system will add the cost codes to the jobs when and if the cost code is used for the job. Therefore, a cost code number will be the same cost code for all jobs, as it is used. For example, if you add master cost code 1000 as Labor, cost code 1000 will be Labor for all jobs using cost code Cost code 1000 cannot be Labor on some jobs and Materials on other jobs. Now that you understand the special features relating to the job cost codes in CertiflexDimension Job Cost, you are ready to begin actual cost code definition. Adding a Master Cost Code To add a new master cost code, click >Maintain Lists >Job Cost >Master Cost Codes. 32
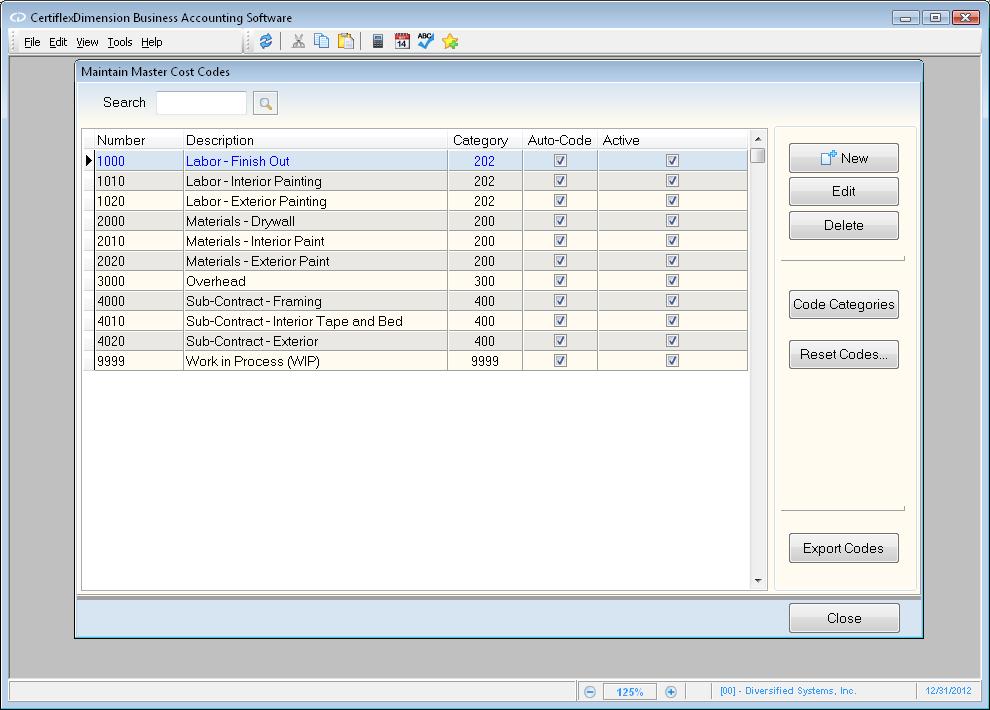
33 33

34 To add a new master cost code, click >New. The system will prompt you for the following: New Code Number: Enter the cost code number to use for the new cost code and click >Ok to continue to the Edit Master Cost Code screen. Description: Enter the cost code description. Category: Select a code category. When you add a new cost code, the system will default to the same code category used for the last cost code added. The system uses the code category to determine how to group cost codes when printing the Profit Statement report. For more information on code categories, refer to the Maintain Code Categories section. Posting Account: If you plan to use the option Post Job Ledger Entries, you will need to define which main company ledger account you want the system to post to for the cost code. If you are changing this field for the Default Job, the system will not automatically change this field for all existing jobs using this cost code. If you want the system to change this field for all existing jobs using this cost code, click >Reset Codes. Consolidation Account: If you plan to use the option Consolidate Ledgers in the General Ledger program, you may wish to define which main company ledger account you want the system to consolidate to for this cost code. If you leave this field blank and you perform the consolidation, the system will consolidate this cost code to the ledger account number that is the same number as this cost code. Quick Key: This is an optional user definable field. You can use the input here as an index Hot Key. For example, if you have code words for the cost codes that you would like to use when accessing the cost codes, you can define the index key here. When you access the cost code list, you can change the index to Quick Key. Then, instead of the system asking for the cost code number or name, it will look for matches in the Quick Key field. 34
35 Normally, you will only use the Quick Key method for cost codes you access often. For example, if the cost code number 2200 was Rock Materials and you posted numerous transactions to that cost code, you might define a Hot Key for it called Rock or RK. You can also use numbers (1-9 for the nine most used cost codes). This lets you access a cost code with a minimum number of keystrokes. Throughout the system, when you access a cost code, no matter what the index is set to, you can input an * followed by the Quick Key specified for a cost code and the system will search for the cost code by the Quick Key you specified. This eliminates having to switch the index to the Quick Key. User Key: This is a user definable field. You can use the input here as an index Hot Key. For example, if you would like to use code words for the cost codes, you can set up an index key here. When you access the cost code list, you change the index to User Key. Then, instead of the system asking for the cost code number or name, it will be looking for matches in the User Key field. NOTE: The User Key field is used almost identical to the Quick Key field. However, the User Key index does not allow the use of the * for quicker access. Auto-Add Type Code: Select this check box if you want the system to automatically mark this code to be added to new jobs when new jobs are added to the system. If you do not want this code to be added to new jobs, do not select this check box Detailed:: The system uses this field to determine whether to present the cost code in a summarized or detailed format on the Profit Statement report. If you select this check box, the cost code will print separately on the Profit Statement, with its cost code name and balance shown. If you do not select this check box, the cost code balance is added with all other cost codes sharing the same code category and print status setting. The description that prints for this line is the name defined for the code category used. For example, suppose we have a job that has five labor codes with a different ledger posting account defined for each code. We set each of these five cost codes to Code Category 100 (Labor, from the default code category file), and give each one a print status setting of summary (by not selecting this field). The balance in each cost code is $1, The information for these five cost codes will appear on the Profit Statement as follows: Labor $5, Given the same example except that each cost code has a print status setting of detailed (by selecting this field), the Profit Statement will show: 35
36 Labor - Sheetrock $1, Labor - Foundation $1, Labor - Brick $1, Labor - Structure $1, Labor - Landscape $1, Active Code: If this check box is selected, the system will allow you to enter transactions and maintain this cost code throughout the system for all jobs. If you do not select this check box, the system will not allow you to enter transactions to this cost code for any of the jobs. You might decide to make a cost code inactive rather than deleting it when there are transactions in the system for the cost code but you no longer will post to it in any of the jobs. Memos: The data you enter for these Memo fields are for informational purposes only. The system allows a maximum input of 20 characters per line. -!: You can use these fields as automatic fields. If you begin a line with an exclamation mark (!), all text following the exclamation mark displays on the screen anytime a transaction is made to this cost code. The exclamation mark must be on each line if you want multiple lines to display automatically. Editing a Master Cost Code To change a master cost code, select the code from the listing and click >Edit. The system will then display the Edit Master Cost Code screen. For a detailed explanation of the fields displayed here, please refer to Adding a Master Cost Code. Deleting a Master Cost Code To delete a master cost code, select the code from the listing and click >Delete. The system will then display a warning screen, confirming that you wish to delete the selected master cost code. Click >Yes to confirm and delete the selected code. You should only delete master cost codes when the cost code is no longer used by any job and the cost code has been deleted from all active jobs. If you attempt to delete a master cost code and that code is used by any job during the current fiscal year, the system will require you to re-add the master cost code before the system will allow you to print most of the job cost reports. 36

37 Code Categories This option allows you to perform maintenance functions on the code categories. You can add, modify, and delete code categories. To select this option, click >Code Categories. The system uses code categories you assign on each cost code to determine how to group cost codes on the Profit Statement report. Once the list of code categories is defined, you must determine what cost codes to assign to what code categories. There is no limit to the number of cost codes you can assign to the same code category. You can also have code categories defined that have no cost codes assigned to them for some of the jobs. When printing the Profit Statement, all cost codes with the same code category are grouped together. Whether the cost codes with the same code category are listed individually or all summarized on one line depends on the print status specified for the cost code. Adding a Code Category To add a new code category, click >New. The system will prompt you for the following: Code Number: Enter the new code category s number. Numbers (1-9) are considered by the system as Revenue code categories and any cost code assigned to a code category (1-9) would then be considered revenue cost codes for the Profit Statement printing. Since most job cost processing does not recognize a job receiving revenue, you will normally assign a new code category with numbers between 10 and 9,999. If your job cost processing does recognize a job receiving revenue, you will need to define the revenue code category(s) with a number between 1 and 9. Description: Enter the description for this code category. The description you enter will print on the Profit Statement for any cost code assigned to this code category. Changing a Code Category When the Maintain Code Categories screen is displayed, select the code category you wish to change and click >Edit, or simply doubleclick on the description and enter the new description. 37
38 Deleting a Code Category When the Maintain Code Categories screen is displayed, select the code category you wish to delete and then click >Delete. If the selected code category is actively used on the master cost code listing, the system will not allow you to delete the code category. If you delete a code category that is used on a regular job, that category will no longer print on the job s profit reports. 38


39 Renumbering a Code Category When the Maintain Code Categories screen is displayed, click the code category to renumber and click >Renumber. The system will then prompt you for the new code category number. Enter the code category s new number and click >Ok. Reset Codes This option will reset all Cost Code categories for all active jobs related to the active company. The cost codes will be matched to the default cost code listing. You may optionally choose to tell the system to include Cost Code descriptions and G/L posting and consolidation accounts by checking the corresponding boxes. The length of time required to complete this option will vary depending on the total number of jobs and cost codes you have created and applied. It is recommended that you make a back-up before performing the Reset Jobs Cost Codes to Defaults process. If you are operating in a network environment, no other users should be attempting to process data for any jobs. Click >Ok to reset all job cost codes to defaults. 39

40 Exporting Codes The system will allow you to export the cost code totals to a Tab Delimited text file for editing or importing into another program. Beginning Job: Select the beginning job to export. Ending Job: Select the ending job to export. Export Items: Select the items you would like to export for the cost codes of the selected jobs. Job Class Range: Enter the beginning and ending job class to export. Job Masking: Enter the job mask for this export. To include all jobs in the above job and job class range with common digits, space over to the digit location and enter its value. For example, if you need to export for all jobs that have a 3 for the fifth digit, you will define this field to be: 3 Create Data File: This field will display the data file name and path the system will export the information to. Please make a notation of this path and file name. To begin the export, click >Export. Exporting Detail The system will allow you to export the cost code detail information to a Tab delimited text file for editing or importing into another program. Beginning Job: Select the beginning job to export. Ending Job: Select the ending job to export. Export Items: Select the dates range and data format criteria for your export. 40
41 Job Class Range: Enter the beginning and ending job class to export. Job Masking: Enter the job mask for this export. To include all jobs in the above job and job class range with common digits, space over to the digit location and enter its value. For example, if you need to export for all jobs that have a 3 for the fifth digit, you will define this field to be: 3 Create Data File: This field will display the data file name and path the system will export the information to. Please make a notation of this path and file name. To begin the export, click >Export. 41

42 Start New Year for Jobs The job data files are yearly dated files. To process job transactions in a new fiscal year, you must first create the New Year files. NOTE: Even though you must start new fiscal year files at the beginning of each new fiscal year, you can still change the processing date to an old period to make adjusting entries and to print reports. If you do make adjustments in a prior fiscal year, you would execute this option again to cause the system to bring the adjustments forward into the current fiscal year. To start the new fiscal year files, first make sure that you have a current backup of the system. It is very important that a backup is performed prior to starting the New Year files. In case an error occurs during the New Year creation process, a backup may be required. When the backup is complete, set the system date to the last day of the fiscal year, click >Maintain Lists > Job Cost >Start New Year for Jobs. Start New Year file for all Jobs for current company: Select this option if you want the system to start the new fiscal year files for all jobs associated with the current company. Start New Year file for the one selected Job: Select this option if you want the system to prompt you for the one job to start the new fiscal year files for. When the selection is made, click >Next to begin the process. 42
43 Close and Delete Jobs When a job is complete, it should be closed and deleted. To close and delete jobs, click >Maintain Lists > Job Cost >Close and Delete Jobs. Close a Job Closing a job allows you to set a completed job s status to close. When a job is marked as closed, the system will not allow you to enter transactions for the job. The job will also not appear on any job cost reports unless you specify that the report include closed jobs. The system will allow you to reopen closed jobs. When the system displays the Close and Delete Jobs screen, click the >Close a Job tab. Select the job to close. The system will verify that the cost codes associated with the selected job have been fully updated to the main company s ledger. If at least one cost code is not fully updated, the system will not allow you to close that job. NOTE: Closing a job does not delete the job from the job listing nor does it delete any data files associated with the job. To close the selected job, click >Close Selected Job. 43
44 Open a Closed Job Opening a closed job allows you to reopen a job that was previously closed by changing its status from Closed to Open. This will allow you to enter transactions for the job once again. Select the job to reopen and then click >Open Selected Job. NOTE: The jobs listed that are available to reopen are only the jobs that have previously been marked as closed. 44

45 Delete a Job Deleting a job deletes the closed job s data files from the system and optionally removes the job from the job listing. Select the job to delete. NOTE: The jobs listed that are available to delete are only the jobs that have previously been marked as closed. If the job you wish to delete is not in this list, select the Close a Job tab to close the job and then you will be allowed to delete the job. Archive Job Before Deleting: Select this check box if you want the system to archive the job s data files for future retrieval, if needed. We strongly recommend that you always archive the job s data files when you delete jobs. If you accidentally delete a job by mistake or if you ever need to reopen a deleted job, you will be able to easily restore the deleted job if the job is archived. Archive Drive/Path: Select the data drive and path to store the archive information in. Remove from Job List: Select this check box if you want the system to delete the job s data files AND remove the job from the job listing. We recommend that you do not select this check box if you anticipate that you will be retrieving the deleted job s files sometime in the future or if you plan on including this closed job on any job cost reports. If you do not select this check box, the system will still delete the job s data files but the system will save the job s ending totals to the job listing for report printing. 45

46 Leaving this check box clear also ensures that you do not add any new jobs with an older job s job number. If you were to retrieve a deleted job s data files and the deleted job s job number is the same as an existing job, when the system retrieves the deleted job s data files, the system will overwrite the existing job s data files with the deleted job s data files. In a nutshell, you will lose the existing job s data. To delete the selected job, click >Delete Selected Job. Retrieve an Archived Job Retrieving an archived job allows you to restore a job that was previously deleted from the system and saved to your hard drive through the option Delete a Job. NOTE: When you retrieve a job, the job will be readded with a status of Closed. To actually use the job after the job is retrieved, you will need to select the option to Open a Closed Job. Archive Data Path: Select the data drive and path the archive information was stored in when the job was deleted. Archive Job File List: The system will list all jobs that have been deleted and archived to the path you specified. Select the specific job you wish to retrieve. To retrieve the deleted job, click >Retrieve Selected Job. 46
47 Transactions Job Cost This is the portion of the CertiflexDimension Job Cost program where you will do the majority of your work, if you are NOT consolidating the job ledger files or if you are NOT running interactively with the CertiflexDimension Accounts Payable or Accounts Receivable programs. Therefore, it is important that you read this chapter before you attempt to process. You will use the options of this chapter to record the job ledger entries to the main company s ledger, to record the job billings if you are not operating interactively with the CertiflexDimension Accounts Receivable program, and to record the jobs original estimates and any change orders. Post Job Ledger Entries This option allows you to post the job ledger transactions to the main company s ledger. If you are using the Full Cost Method or the Percentage Billed Method of job cost accounting, you may use this option to update the job entries to the main company. After processing this option, you can then generate financial statements in the ledger program that reflect the costs associated with those jobs. You would also use this option to post the job entries to the main company s ledger when the job is complete and you are ready to close the job. When you use this option, the system will only post the job entries that have been entered into the system for each job since the last time you performed this option. To post job ledger entries, click >Transactions >Job Cost >Post Job Ledger Entries. Post One Selected Job You would choose to post one selected job if you want to post only one specific job s transactions to the main ledger or if you want to post only a percentage of the job s totals to the main company s ledger. When the Post Job Ledger Entries screen is displayed, enter the job to post entries for in the Job field. When a valid job is entered, the system will immediately begin a verification process. If the system detects any errors during the verification process, the system will display an error listing screen showing you the errors the system discovered. 47

48 The system will require you to correct these errors before you can continue. In most instances, the errors will reflect missing ledger posting account numbers for the cost codes. If this is the error you receive, you will need to change the ledger posting account number on the jobs printed on the error report. For more information on editing a job s ledger posting accounts, please refer to the Maintain Jobs section of this guide. If no errors are discovered during the verification process, the system will display the job s posting information. The top section displays the date that this job was last posted to the main company s ledger, the total debits and credits for the current expected entry, and the total entry balance. The bottom section displays the cost codes associated with the selected job and the totals and ledger accounts that will update to the main company s ledger. These are the amounts that have not been updated to the main company. Edit: If you do not want the system to post an entire total for a cost code, select the cost code to change and click >Edit. The system will prompt you for the specific amount to post for the selected cost code. If you make a change to a cost code total, the journal entry must balance before the system will allow you to validate this screen. Clear: Click this button to change all cost code totals to zero. Adjust by %: If you want the system to adjust all cost codes by a set percentage, click Adjust by %. The system will then prompt you for the percentage amount. Reset: Click this button to change all cost codes back to the amount the cost codes originally had when you first entered this screen. 48
49 Post Range Of Jobs This option allows you to post all jobs or a range of jobs to the main company s ledger. When the Post Job Ledger Entries screen is displayed, click >Post Range of Jobs. Job Range: Enter the beginning and ending job for the current company that you want to update. Job Class Range: Enter the beginning and ending job class that you want to update. Job Mask: Enter the job mask for this update process. To include all jobs, leave this field blank. To update only for jobs in the specified range with common digits, space over to the digit location and enter its value. For example, if you need to update for all jobs that have a 3 for the fifth digit, you will define this field to be: 3 Record Job Billings If the system detects any errors during the updating process, the system will display an error listing screen. The system will require you to correct these errors before you can continue. In most instances, the errors will reflect missing ledger posting account numbers for the cost codes. If no errors were discovered, the system will display a message stating that all jobs are verified and prompt you to review the journal entries the system will update to the main company s ledger. NOTE: The system will use a transaction type of 99 for all job total entries posted to the main company s ledger. This option allows you to enter billings and retainage (receivable and payable) for tracking each job. You will use this option if you are not operating interactively with the CertiflexDimension Accounts Receivable program. NOTE: If you are operating interactively with the CertiflexDimension Accounts Receivable program, you may prefer to use this option instead of having the system update the billings automatically. When you use this option to record billings, the system will allow you to enter notes for the billings. You do not have this notes feature when entering invoices through Accounts Receivable. 49

50 If you wish to take advantage of the notes feature when recording billings, you will still use the Accounts Receivable program as normal for invoices, journal entries, and statements. You will also need to record the billings in this option. However, you need to make sure that the option to Update Billing from A\R, in Maintain Jobs is not selected. If you are operating interactively with Accounts Receivable and you also record billings through this option and the Update Billing from A\R is selected, you will double post the billings for the jobs. To record job billings, click >Transactions >Job Cost >Record Job Billings. Reference Number: Enter the job billing alphanumeric reference number. Description: Enter the description for this billing. If you leave this field blank, the system will use a description of Invoice. Billing Amount: Enter the amount of this billing. Retainage Amount: If this billing includes a retainage amount, enter the amount of the retainage. Hours: If you are tracking the total number of hours associated with this billing, enter the total hours of the billing. Note 1, Note 2, Note 3, Note 4, Note 5: Use these five fields to enter notes about this billing. Record Job Estimates This option allows you to record the dollar amount and hour estimates for each of the cost codes on the jobs. This option will also allow you to enter any change orders for the original estimates. 50

51 To enter a new estimate, click >Transactions >Job Cost >Record Job Estimates. When the Record Job Estimates screen is displayed, enter the job to record for in the Job field. If you are entering an original estimate, be sure the Change Order check box is selected. If you are entering a change order, be sure the Change Order check box is not selected. Click >Start. The top section of this screen will display the original estimate dollar amount and hours, the original change order dollar amount and hours, the current adjustments dollar amount and hours, and the total new estimate dollar amount and hours. If you are entering a change order, the system will display the existing estimates for the selected job. If you make a change to the total estimates, the system will back calculate the change order amounts for you. In the middle of the screen, the system will prompt you for the Reference Number for the new original estimate or change order you are entering. The bottom section displays the cost codes assigned to the current job and the estimate for each cost code. To enter the original estimate or change order, double-click on the cost code to change. 51

52 Options: This section allows you to define whether you want to enter amounts, hours, or both amounts and hours for this cost code. New Ending Estimate - Amounts: If Options is defined to prompt you for this field, enter the original or change order estimate amount. New Ending Estimate - Hours/Units: If Options is defined to prompt you for this field, enter the original or change order estimate hours. Notes: Click this button to record additional notes for the estimate or the change order you are entering. The system will allow you to enter up to five lines of notes. The notes that you enter are for the specific cost code you are editing. This allows you to define up to five lines of notes for each cost code. The job notes are not saved unless you make a change to the estimate amount. Importing Estimate and Change Order Amounts This option allows you to import an ASCII file containing the estimate or change order amounts. To import, click >Transactions >Job Cost >Record Job Estimates. When the Record Job Estimates screen is displayed, enter the job to import for in the Job field. If you are importing estimates, be sure the Change Order check box is selected. If you are importing change orders, be sure the Change Order check box is selected. Click >Start. The system will prompt you for the ASCII file. The system will default to a file name of j######es.txt in the CertiFLX\ADVX\xconnect directory. If the ASCII file name to import is different or located in a different directory, select the correct file to import. In the application you are using to create the estimate or change order totals, you need to have the application export the information in a standard ASCII text format with the cost code number in spaces 1-12, the description of the cost code in spaces 13-42, the estimate or change order total in spaces 43-57, and the hours/units in spaces
53 The system will not require you to export an hours/unit amount; therefore, these spaces can be left blank. However, the system will require each record (each line) to be 72 spaces in length and there must be a carriage return and a line feed at the end of each record. Also make sure that each record contains only one cost code entry. For example, the import ASCII file may look similar to the following: Labor -Employees Labor -Contract Materials -Non-Inventory The system will not allow you to validate an import entry that includes cost codes that do not exist for the job. If you anticipate importing cost codes that do not exist for the job, add the new cost codes to the job (and the Default Job, if the cost code does not exist on the Default Job) prior to importing the ASCII file. 53

54 Reviews Job Cost Reviewing jobs allows you the ability to look up and review information about a job without accessing the job through the Maintain Lists screen. When you need to verify information for a job, you can use the Review option instead of the Maintain option. To select this option, click >Reviews >Job Cost >Review Jobs. The Review Jobs listing can display either all open jobs or all open, closed and deleted jobs. To define how the job listing is displayed select either Open Jobs Only or All Jobs in the upper right corner of the screen. The following options are available from the Review Jobs screen. 54

55 Job Supervisor : Click this icon to send an to the selected job s supervisor. Doing so will launch your client and, provided a valid address has been assigned to the supervisor in Maintain Jobs, the system will automatically populate the message s recipient field with the supervisor s address. Quick-Copy Address Label : Click this icon to copy the selected job s name and location to your Windows clipboard. Customer : Click this icon to send an to the selected job s customer. Doing so will launch your client and, provided a valid address has been assigned to the customer in Maintain Jobs, the system will automatically populate the message s recipient field with the customer s address. Reminder Memo : If the selected job has a reminder memo associated with it, this icon will become active. Click on the icon to review the selected job s reminder memo. Estimated Profit: Click this link to review the selected job s estimated profit, which displays amounts for Total Estimates, Total Cost, Cost Over-runs, Cost Ratio, Contract Amount, Total Billing, Total Cost, and Job Profit. 55


56 Reviewing Job Detail When the Review Jobs screen is displayed, enter the job to review in the Search field and click > Drill Down, or simply double-click on the job you wish to review. When a valid job is selected, the system will display the Job Detail screen for the selected job. For detailed information for each field displayed, please refer to the Maintain Lists Job Cost: Maintain Jobs: Adding a Job section of this guide. Additional Options Cost Codes Click >Cost Codes and the system will display the Cost Code List for the selected job. 56
57 Transactions: Click this link to review transaction detail for the selected cost code. Period Totals: Click this link to review the period totals for the selected cost code. To review prior year totals, select the desired year from the drop-down at the top of the screen and click >Apply. Vendor Transactions If you are interactive with the CertiflexDimension Accounts Payable program, click >Vendor Transactions to review the transactions made for the job while processing in the Accounts Payable program. The system will display information for all years. Customer Transactions If you are interactive with the CertiflexDimension Accounts Receivable program, click >Customer Transactions to review the transactions made for the job while processing in the Accounts Receivable program. The system will display information for all years. Period Billings Click >Period Billings to review the selected job s beginning balance, total billing amounts per period, the date of the last billing, and the total year s billing amount. For detailed information on the fields displayed in the Additional Dates, Contract/Customer, Job Cost Notes, and the Notes, Links and Memos options, please refer to the Maintain Lists Job Cost: Maintain Jobs: Adding a Job section of this guide. 57

58 Reports Job Cost Job Cost Reports Printing reports in CertiflexDimension is an easy, yet powerful portion of the program. You can define the system to print almost any report based on almost any criteria you desire. To print a report in Job Cost, click >Reports >Job Cost >Standard Job Cost Reports. Select the report you wish to print. Click Options to define the reporting criteria. Refer to your CertiflexDimension System Manager Guide for an explanation of each field on the Print Reports & Graphs screen and how to use the Sort/Selects feature. Below is a list of Job Cost reports and the printing options available for each report. 58