CDS LOGON SCREEN. ! Type your assigned logon (may be case sensitive) to the Cashier Deposit System (CDS).
|
|
|
- Joshua Hunter
- 5 years ago
- Views:
Transcription
1
2 TABLE OF CONTENTS Logging into CDS (Cashiers Deposit System) Main Menu... 3 Uploading Files... 4 Deposit Form (Blank)... 5 Entering Information on a Deposit Form Sample with data entered... 8 Sample with error messages Sample with corrected information Saving a Deposit Form Editing an existing Deposit Form Sample of saved but not submitted Deposit Form Viewing a Deposit Form Viewing a Deposit List Sample Miscellaneous Receipt Adding Chart Strings to CDS Editing Chart Strings CDS User Information Exiting CDS... 21
3 CDS LOGON SCREEN! Type your assigned logon (may be case sensitive) to the Cashier Deposit System (CDS).! Press the Enter/Return Key on your keyboard or click Submit.
.")
4 CDS PASSWORD SCREEN! Enter your Password (may be case sensitive).! Press the Enter/Return Key on your keyboard or click Submit.
! Manually enter new deposit information.")
 existing chart strings on the template for the Processing Unit.")
5 MAIN MENU The Cashier Deposit System (CDS) allows users to:! Upload ASCII text files (*) for deposit from an existing spreadsheet or database. (* Contact Cashiers Office for file specifications)! Manually enter new deposit information.! Manually edit an existing deposit form by Miscellaneous Receipt Number prior to submitting to the Cashier s Office.! View deposit information.! Enter new chart strings on the template for the Processing Unit.! Edit (i.e., Delete or Exclude) existing chart strings on the template for the Processing Unit.! View your User ID set-up information. # Be sure to log-out when you are finished. # On subsequent screens, this menu displays as a tool bar across the top of the screen.

6 UPLOADING FILES TO CDS To upload a file to CDS, you must:! Have created a text file based on Cashier's Batch Upload File Specifications! Enter the path where your home file is located.! Press the Load button.

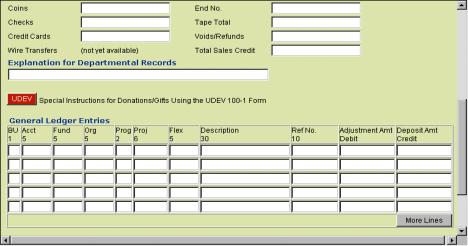
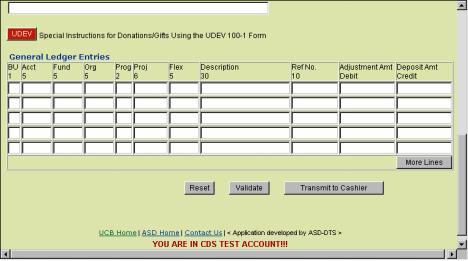
7 DEPOSIT FORM
8 Complete the information in the Deposit Form. When done, you can transmit the data to the Cashier s Office or validate the information and save the form for later addition/revision prior to transmission to Cashier s. Upon transmission, CDS will issue a Miscellaneous Receipt form. To create deposit transactions on the Deposit Form:! Indicate the deposit type.! Enter Begin Date the deposit items were collected in your department.! Edit End Date for the collection of these deposit items.! Enter amount of deposit by Currency, Coin, Checks and Credit Cards. The system will total the amounts in this section.! Enter Cash Register information, if applicable.! Enter Explanation for this deposit based on your departmental needs. This field is displayed in CDS on the View Deposit screen and may be helpful when researching deposits.! If you need assistance with how to process a UDEV Form in CDS, click the UDEV button. (See next page for UDEV Special Instructions)! General Ledger Entries display default chart strings set up on the Processing Unit's template. If you will not be using one or more of the default chart strings, leave the amount blank. It will not print on the Miscellaneous Receipt. Enter Chart strings, Descriptions, Reference, and Amounts for your deposit. Deposit items are listed in the Credit column; adjustments to deposits are listed in the Debit column. Program is only used with expense accounts (account numbers beginning with 5).! When entries are complete, you may: Click Validate to verify your work. CDS will match the Cash Distribution total to the total for the General Ledger Entries. If they do not balance, an error message will display at the top of the form. CDS will also validate the values in the Account, Fund, Org and Program fields. You will then have the option to Save the deposit information or Transmit it to Cashier s. Click Transmit to Cashier s. CDS will match the Cash Distribution total to the total for the General Ledger Entries. If they do not balance, an error message will display at the top of the form. CDS will also validate the values in the Account, Fund, Org and Program fields. If no errors are detected, the deposit information will be sent to Cashier s. CDS will respond with a uniquely numbered Miscellaneous Receipt for the deposit.
9 To conclude the process:! Deliver a copy of the Miscellaneous Receipt and the deposit items to the Cashier s Office, 130 University Hall.! The Cashier s Office will validate the deposit items and indicate the validation in CDS.! Any adjustments will be made via a journal transaction to the default adjustment chart string for your Processing Unit.! The following business day, you will receive an confirmation of your deposit transaction and notification of any adjustments.! Within two business days of your deposit, the Journal ID for the daily Cashier s batch to BFS will be posted to CDS. You may find this Journal ID helpful when researching deposit transactions.


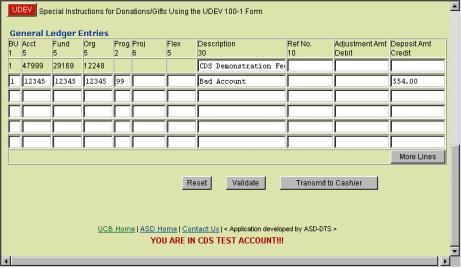
10 DEPOSIT FORM AT TIME OF INPUT

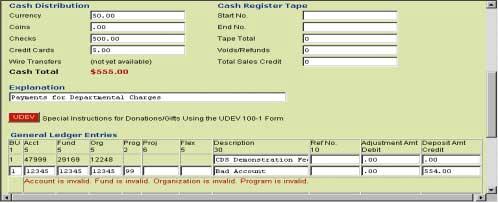
11 DEPOSIT FORM DISPLAYING ERROR MESSAGES
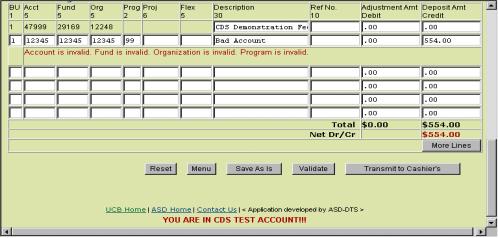
12 ! Note: At the top of the form, the error message box is located beneath the CDS toolbar and above the Deposit Type field.! Note: Near the bottom of the form, the error message box is located beneath the problematic chart string. 12

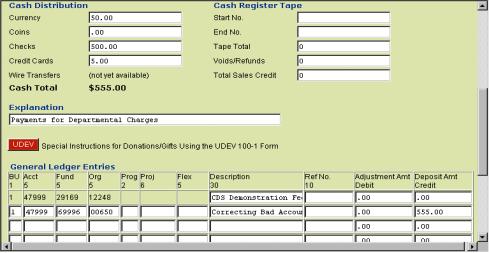

13 DEPOSIT FORM WITH CORRECTED INFORMATION 13

14 SAVING A DEPOSIT FORM! Note: By selecting the SAVE AS button, you are issued a Miscellaneous Receipt Number, but you have not transmitted your deposit to the Cashier s Office.! To edit your deposit information, select the Edit Dep button on the CDS toolbar. 14

15 EDITING AN EXISTING DEPOSIT FORM The Edit Deposit Form is used for the following purposes:! Editing a previously saved Miscellaneous Receipt.! Editing and adjusting Miscellaneous Receipts that have been submitted to the Cashier s Office, but not verified by the Cashier s Office.! Transmitting saved Miscellaneous Receipt transactions to the Cashier s Office. To Select an existing Deposit Form:! Enter the Miscellaneous Receipt Number in the MR# Field or! Use your left mouse button and select the LOOK UP BY MR# field. A menu will appear with Deposit Forms that you may select from.! Select the GO button to continue or RESET button to redraw the screen. 15


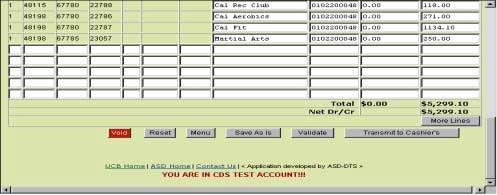
16 SAVED BUT NOT SUBMITTED DEPOSIT FORM 16

17 VIEWING DEPOSIT FORMS The View Form is for viewing Miscellaneous Receipts:! Enter the Miscellaneous Receipt Number, or! Enter the Journal ID Number. If you would like to select from a list of Miscellaneous Receipts:! Enter a Beginning Date to search from a particular date, or! Enter the Beginning Date and an Ending Date to search through a range of dates.! Enter your User ID. (See sample search on next page) 17


18 VIEW DEPOSIT LIST! A list of all Miscellaneous Receipts fitting your specified criteria will appear.! Use your mouse and click on the Miscellaneous Receipt Number to make your selection. 18
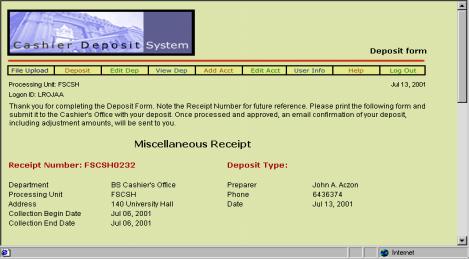
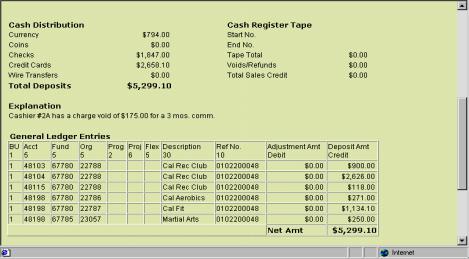
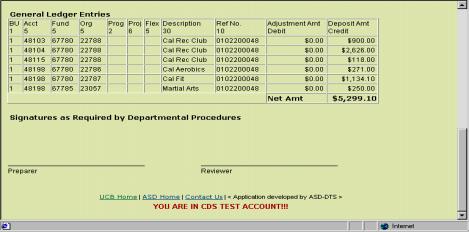
19 MISCELLANEOUS RECEIPT 19


20 ADDING CHART STRINGS The Add Chart Strings screen is for entering new chart strings to your Processing Unit s deposit template. 20

 a chart string from this list.")
21 EDITING CHART STRINGS The Edit Chart strings screen lists all chart strings and descriptions set up for your Processing Unit s Deposit Form template. Use this screen for:! Editing an existing chart string or description on the template.! Excluding an existing chart string from the template on the Deposit Form.! Deleting (i.e. permanently removing) a chart string from this list. 21

22 USER INFORMATION The User Information screen displays information related to your log-on. Note that multiple addresses for deposit verifications can be designated. To change any of the information displayed, contact the Cashier s Office via to cashiers@uclink.berkeley.edu. 22

23 LOGGING OUT Be sure to log-out at the end of your session. Select the YES! Button if you want to immediately log back into the system. 23