USER MANUAL DRONE-WF20
|
|
|
- Thomasina Gilmore
- 5 years ago
- Views:
Transcription
 3")

1 To help get you started, please refer to the quick connection guide below Action Drone Indicator Remote Indicator 1 Turn on Drone Fast then slow flash - 2 Turn on Remote Slow flash Slow RED flash Connection (Throttle up then down before begin) 3 Connection successful Solid light RED light off 4 Press launch / land button, then throttle up to take off 5 Press the launch / land button / throttle down to land Note: Drone Double flashes Drone not paired Drone Fast flashes Flat battery / Cannot connect
2 SAFETY PRECAUTIONS Keep the battery away from heat sources such as fire and sun Store the battery in a cool dry place When recharging, only use the battery charger intended for that purpose Don t over-charge the battery Don t charge the battery for more than two hours Don t leave a charging battery unattended Please read through the manual before use and store for later reference. Please store small parts in a place well out of the reach of small children Keep all body parts away from the drone while the rotor blades are spinning Never try to repair internal circuitry. This product has no serviceable parts Keep small parts out of reach of children as they can be a choking hazard. Do not rush your flight. Always stay in control. After flight, turn the DRONE off first, then turn the controller off. Do not fly your Drone in prohibited areas, such as near airports or near/above people Children should operate a drone only with adult supervision Always keep sight of your drone while flying and resist the urge to fly too high Always turn the power off on the controller and DRONE when not in use. BATTERY PROTECTION This DRONE is equipped with low-voltage protection. When a battery is low on charge, the programmed control system will stop the DRONE s rotors. The battery will then need re-charging before use MAINTENANCE Clean the DRONE with a clean, dry soft cloth only. To avoid irreparable damage, keep the DRONE dry and away from water such as rain. Check the DRONE and accessories for damage before flight. If damage is found, do not use the DRONE until it is repaired. REMOTE CONTROL BATTERY INSTALLATION Remove the battery cover screw using the supplied screwdriver. Remove the battery cover and insert 4 X 1.5V AAA batteries, according to indicated polarity (batteries not included). Reattach the cover and tighten the screw. Note: Battery installation should be done under adult supervision. Do not mix old and new batteries inside the controller.
3 CHARGING YOUR DRONE BATTERY Connect your drone battery to a USB charger, such as a PC, using the supplied USB cable. You can also remove the battery from the drone for charging. (See details below.) Note: The battery is fully charged once the GREEN status indicator on the battery turns off. HOW TO REMOVE THE BATTERY FROM THE DRONE Depress both top and bottom locking latches together and carefully slide the battery out.
4 REMOTE CONTROL No. Function Description 1 Power Indicator Illuminates when power is turned on 2 3 Connection indicator Camera Indicator (Not available on this model) Take picture / record video (Not available on this model) 4 Flip Flashes RED during the connection process. Turns off when connected. The light will blink once while taking picture and remain on while recording video (Not available on this model) Press one time for taking picture, press for 3 seconds for recording video (Not available on this model) Push the control stick in (as opposed to up or down). A repeating BEEP will then sound alerting you that you are in FLIP mode. Then, use the right control stick to flip the drone in the selected direction. Once the flip is complete, the BEEP sound will stop. Repeat this process for multiple flips. 5 Right Stick Drive the drone forwards, backwards, left or right 6 Trim button (See explanation below) 7 Trim button (See explanation below) 8 Headless mode 9 One key return function Press once to select headless mode. Press again to exit headless mode. Note: Headless mode will always drive the drone forwards, no matter which way the front of the drone is facing. Drives the drone back to its original start area (manual landing then required) Note: The DRONE and user must stay in the same orientation from each other, in order for this function to operate correctly. 10 Trim button (See explanations below) 11 Left Stick Move up and down to control speed and side to side to rotate 12 Speed Select Press in (as opposed to up or down) There are 3 different speeds; slow, medium and fast. These are indicated by one, two or three BEEPs) 13 Unlock / Take off / Land / Emergency Press once to unlock the drone and to start the rotors for take-off. Press after your flight, to land the drone. Note: During flight press and hold for 5 seconds for an emergency stop.


.")

5 SIMPLE OPERATING STEPS Check the left stick is in the center position. Turn on the controller by sliding the power button across Turn on the DRONE. (The LED light on the drone will flash rapidly then, slowly) Place the DRONE on a level position. BASIC OPERATION CONTROLS Slowly push the left stick up then down. A double beep will sound (when successful). The LED light on the drone will then remain on. The DRONE is ready to fly. Press the start button to start flying. Press again after your flight to begin your landing. Note: When the drone is flying towards you, the control directions are reversed.

6 AUTO TRIM FUNCTION Press both control sticks down and left to 45 degree circle (image right) for 10 second. The indicators on the drone will begin to flash rapidly. When complete, the indicators will then stop flashing. MANUAL TRIM FUNCTION From time to time your drone can benefit from a trim adjustment. Trim adjustment can be used to keep your drone hovering in the same place, which is especially useful while taking photos or manoeuvring in tight places. Left / Right rotation Trim Forward / Backward Trim Left / Right side Trim


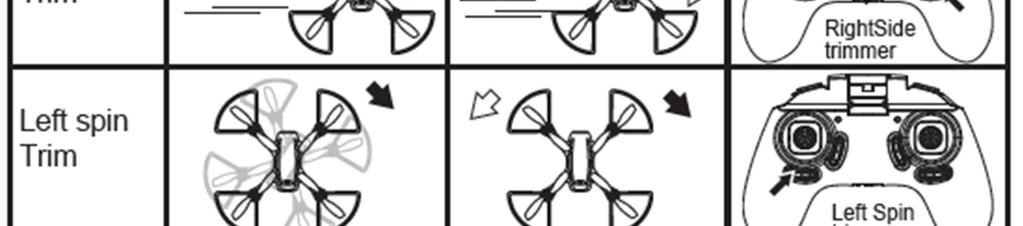

7 MANUAL TRIM EXPLAINED USER MANUAL DRONE-WF20
 Note: Before you perform a flip trick, always make sure you have enough space both")


8 TRICKS: FLIPS & ROLLS Press the right stick in once (as opposed to up or down) A continuous beep will then sound. Then move the right stick again in the direction you wish the drone to flip (Left, right, forwards or backwards) Note: Before you perform a flip trick, always make sure you have enough space both above and below your DRONE. Press the right stick in, and then steer to the left Press the right stick in, and then steer to the right Press the right stick in, and then steer to the front Press the right stick in, and then steer to the rear ONE KEY RETURN FUNCTION Press the button as depicted (right) for one key return. You can move the control stick in any direction to cancel this command. Note: When the drone is first turned on and the LED indicators stop flashing, this is when the drone sets the forward facing side as the front of the drone. If the drone isn t pointing the right way at take off, it will not be able to effectively return to the start area. If you want to reset the front direction, you need to turn your Drone off then on again to reset. HEADLESS FUNCTION In headless mode, the drone will always fly forward if flown forward (and in any other direction) regardless of which way the drone is facing. Essentially, this features removes the drone s awareness of orientation when it has been rotated. To enter this mode, press the controller button as depicted (right). A beep will continuously sound as a reminder. You are then then in headless flying mode. To quit this mode, just press the same button again. A beep will sound as confirmation.

![Find the Wi-fi network called NAVIG[8]R WD or HELICUTE 720P FPV Click the connect button Open your App and press the Play icon The control panel will then display as the screen shots below.](/docs-images/91/104727683/images/9-2.jpg "A streaming image will then finally appear on screen. REPLACING DAMAGED BLADES Your drone will come with 4 replacement propellers, two type A and two type B.")
9 APP DOWNLOAD AND INSTALLATION Visit the App Store (for Apple devices) or Google Play (for Android Devices). Search for and install NAVIG[8]R WD or HELICUTE 720P FPV CONNECTING YOUR DRONE Ensure you have a Wi-Fi connection on your smart device and that it is turned on. Find the Wi-fi network called NAVIG[8]R WD or HELICUTE 720P FPV Click the connect button Open your App and press the Play icon The control panel will then display as the screen shots below. A streaming image will then finally appear on screen. REPLACING DAMAGED BLADES Your drone will come with 4 replacement propellers, two type A and two type B. Use the supplied screwdriver to remove the rotars. Attached the new propeller then, tighten back down the screws. Note: "A" and "B" will be mark on your drone, next to the propellers. SPECIFICATIONS Battery requirements for remote: 4 X 1.5V AAA size batteries (not included)


10


11

12 NOT AVAILABLE ON THIS MODEL TAKE PICTURE / RECORD VIDEO NOT AVAILABLE ON THIS MODEL