Preparing to Enter/Update Items
|
|
|
- Gyles Bradford
- 5 years ago
- Views:
Transcription

1 Preparing to Enter/Update Items There are some files that are required before you can enter in your items. Units of Measure Item Tax Done in QuickBooks Locations Categories Credit Reasons Units of Measure You will need to build your units of measure, for example, Case, Each, Pound, Can, Bag, Dozen, Box, Barrel, Gallon, Pint, Quart, etc. These codes will be used in Item Maintenance for the Selling UOM, Alternate UOM, and Billing UOM. The codes will display in the UOM field on Sales Orders, Purchase Orders, and on reports. Page 1 of 15


2 Unit of Measure: Enter in up to a three alphanumeric code. Example: LB for Pound or EA for Each. Description: Enter in a description for your unit of measure. Enter in up to 15 characters. When you have completed your entry, choose the Write button at the bottom of the screen to save your entry. Item Tax Item Tax IDs are entered in QuickBooks. Page 2 of 15

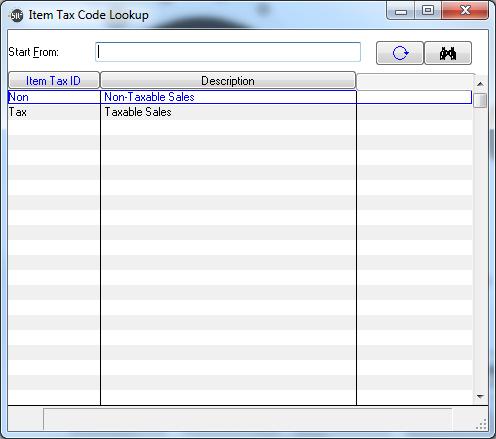
3 Page 3 of 15


4 Locations Locations are physical locations. They represent where the items are in your warehouse. These locations print on the pick ticket. You can set the sort order for the Pick Ticket by location in Company Setup. Location ID: Enter in up to a 10 alphanumeric code. Description: Enter in a description of the location. Enter in up to 30 characters. Short Description: Optional. Enter in a short description. Enter in up to 15 characters. You can setup your locations as simple as: Cooler, Freezer, Dry Area, Dock Page 4 of 15

5 ADVANCED LOCATION SETUP: You can setup your locations based on the Area, Row, Bay, and Shelf. For example: Location ID= Area, Row, Bay, Shelf Location ID: DA Description: Dry Area, Row 1, 3 rd Bay, on Shelf 3 Short Description: DRY-A-3-3 Location ID: DA Description: Dry Area, Row 1, 3 rd Bay, on Shelf 2 Short Description: Dry-A-3-2 Location ID: DA Description: Dry Area, Row 1, 3 rd Bay, on Shelf 1 Short Description: Dry-A-3-1 When you have completed your entry, choose the Write button at the bottom of the screen to save your entry. Categories You have the ability to group similar items together for pricing levels. You can setup and group like items such as: Fresh Beef Fresh Seafood Frozen Seafood Page 5 of 15

6 You can setup a price matrix such as: Deli Restaurant Hotel You can set General Ledger accounts to be more specific and select a specific Sales Account and COGS Account General Ledger account instead of using the default that was setup in Company Maintenance, for Sales G/L# and COGS G/L#. For example: Dry Goods Paper Goods Can Goods ***Once this is setup do not change it due to the integration with QuickBooks if you assign a GL account to a category. Category ID: Enter in up to a 3 alphanumeric code. NOTE: Since this is an alphanumeric field, sorting by numbers or range will work off the first digit in reports as follows: 10, 100, 11, 12, 20, 200, 30. Description: Enter in a description of this category. Enter in up to 30 characters. Price Level 1 through Price Level 8: These were defined in System Maintenance. Calc Method: Choices are Cost Plus, GP% (Gross Profit %), Markup %, Fixed. Prices are calculated from the Market Cost in Item Maintenance. Cost Plus: Enter in a dollar amount in the Factor field that will be added to the Market Cost for this Price Level. For example: I always want to add $.50. You would enter in.50 in the Factor field. Page 6 of 15
7 Fixed: Enter in an amount you want to receive no matter what the cost is in the Factor field. **There is a difference between GP% (Gross Profit %) and Markup %--See below GP% for Gross Profit % enter in the Factor field a profit you want to make on an item. If you want to make 25% Gross Profit on the item, you would enter in in the Factor field. How to calculate the Gross Profit Price: If your cost is $10, what would the Gross Profit Price be? Cost/ (1.00-% rate you want to make) =GP Price I want to make 25% so that formula is =.75 $10/.75=13.34 The GP price for $10 would be $13.34 Markup% for Markup% enter in a percentage in the Factor field you want to mark your cost up by and multiply this by what the cost is to calculate the price. If you want to Markup the price by 25%, you would enter in in the factor field. How to calculate the Markup Price: If your cost is $10 and you want to mark it up by 25% $10 X ( rate you want to mark it up) =Markup Price I want to mark it up by 25%, so the formula is =1.25 $10 X 1.25=12.50 The Markup Price for $10 would be $ Broken Case and choice of % or $: If you have an item in this category, would you break the selling unit? If so, would you charge a flat rate or percentage and what amount? Note: You can add a broken case charge per item in Item Maintenance. You can exclude a Customer from this charge in Customer Maintenance ***You can only enter a Broken charge in a new category to be used in a new item. *** You can add a new category with a broken charge and add it to an existing item. Min OE Line GP%: Enter in a minimum GP% to check at the time of Sales Order Entry. Sales GL Account: Select the General Ledger Account from QuickBooks using the dropdown query. This will override the default that was setup in Company Setup, Parameter Tab, for Sales G/L #. **DO NOT CHANGE THIS IF YOU SETUP A SPECIFIC GL CATEGORY. COGS GL Account: Select the General Ledger Account from QuickBooks using the dropdown query. This will override the default that was setup in Company Setup, Parameter Tab, for COGS G/L#. **DO NOT CHANGE THIS IF YOU SETUP A SPECIFIC GL CATEGORY. When you have completed your entry, choose the Write button at the bottom of the screen to save your entry. Page 7 of 15

8 Credit Reasons You will need to build your credit reasons. These codes will be used in customer credits to state why something is being returned and whether or not the item should be added back into inventory. Credit Reason ID: Enter in up to a two alphanumeric code. Description: Enter in a description for your unit of measure. Enter in up to 40 characters. Add Back to Inventory: If checked the item will be added back into inventory. Page 8 of 15


9 Print on Invoice/Credit Memo: If checked the reason code will print on the credit memo. Entering/Updating Items Item Entry is used to enter all the items that are going to be bought and sold through the system. Item ID: Enter in up to 10 alphanumeric characters for the Item ID you wish to use. You can create the first 2 digits to represent a category. For example: 20 could represent beef. The Item ID could be You can use acronyms. For example: WMG to represent Whole Milk Gallon or APP for Apple. You can use alphanumeric codes. For example: PTOA3 to represent Peeled Tail On Shrimp A3 color. Description: Enter in up to 30 characters for a description of the item. This will print on the Pick Ticket, Invoice, display in the Sales Order screen, History screen, and print on reports. The second line is controlled in Company Maintenance, Invoice Tab, Show 2 nd Description parameter. Page 9 of 15

10 General Tab Category ID. These were setup in System Maintenance, Category. See section on Categories. Vendor ID (if applicable). The Vendors are built in QuickBooks. Alpha Sort: Leave blank or enter in characters as another way to search for an item. Selling UOM: Select the Unit of Measure that represents the way you will always sell an item. These were built in System Maintenance. This would be your Case, Each, Piece, Pound, etc. Alternate UOM: Choose the Unit of Measure that defines the breaking up of an item. Example, you may sell by the case but you also sell by the piece or each. Checkbox by Alt UOM: If you check the box, the default in the Sales Order screen will be the Alternate Unit of Measure. Billing UOM: Choose the Unit of Measure you bill for. This would be your Case, Each, Piece, Pound, etc. Pack Qty: is the number of alternate units in the Selling UOM. Example: 5 would represent 5 items in a case. Pack Size: is a descriptive field. It describes the Selling Units. Example: 15 pounds per item. Weight: is the actual weight of the billing unit. If you need to weigh the item enter in the average weight. Example: 75 to represent 75 pounds. Also see Variance field below Page 10 of 15
11 Catch Weight checkbox: Checking the box states that you require the item to be weighed. The Pick Ticket will display line(s) on it so the picker can enter in the weight on the Pick Ticket. There will be a prompt on the sales order screen for the user to enter in the weight. CW lines: Choose S for Single or M for multiple for the # of lines for the weight on the invoice. If you use barcodes, look at the Company Setup, Barcode Tab at Catch Single weight in Confirmation. If you choose M for multiple, look in Company Setup, Invoice Tab at the parameter Catch Weight Lines to see if it is set to 5, 6, 7, or 8. This will determine the number of lines displayed across an invoice for weights. Allow Break: Check this box if the item will be sold in broken units. You can exclude a customer from broken case charges in Customer Maintenance, Credit Tab, Ignore Break Upcharge checkbox. Also look at Item Maintenance, Broken Case Charge and 2 nd ALT UOM by LB and Alt UOM. Restrict From Online Ordering: Check this box if the item will not be available for purchase on the online system. Restrict From Report Totals: Check this box if the item will not be in any report totals by default. This option is good for landed cost, delivery charges or fuel surcharges Variance: Enter in the weight percentage that is allowed for a catch weight item. The system will warn the user at Sales Order Entry if the weights are above or below the variance. The fields will turn yellow on the screen as you enter the weight. Example: You know your item weighs approximately 75 pounds you could set the variance at 10, 15, or 20. Cube: For future use. Density: Used for Order Confirmation and Barcodes. Rate the Density of the product so at shipping time, the items will be displayed in density/weight order and packing pallets become more efficient. The number 9 is the heaviest and 1 is the lightest. For example: 8 or 9 would be a can item and 1 or 2 would be a case of tomatoes. Non-Stock: Check this box for generic items. For example: You can create an Item ID of or SPECIAL or MISC for any generic item. In the Sales Order screen, the user would enter in the code or SPECIAL or MISC and click on the button at the end of the line and click the Notes button to enter in a description in Invoice Remark 1. This remark will print on the Invoice, display on Order History, and be pulled into QuickBooks when the End of Day Invoice Register is performed. (You can setup specific Item IDs for your generic items if you choose.) Landed Cost: Check this box if this item is going to be used on the Purchase Order Screen for Landed Cost Items. Example: Palette charges. Exclude Discount: Check this box if this item is going to be excluded from companywide discounts. Include on Pricelist: Check this option if you would like this item to appear on refined pricelists. Processed Item: Check this box if the item is a processed item and you want to appear on a custom processed item pick ticket. Print Proc. Item Labels: Check this box if you are going to print processed item labels for each order. Proc. Item Label Factor: Specify what the break factor is for labels on processed items. Catalog Information: This information is used to specify the graphic and other information that is used in the catalog module in sales orders. Taxable Item?: Should be checked if this is a taxable item. Example: paper goods. SU s on Hand and BU s on Hand: Display only. Shows you the selling and billing units you have on hand. Page 11 of 15
12 Location ID: Where the item is located in the warehouse. These were built in System Maintenance, Locations. Manufacturer #: The number the manufacturer uses for this item. This prints on the Purchase Order. UPC Code: The UPC code for this item. Brand Name: The brand name for this item. Reorder Point: The number of selling units you want to keep on hand until it is time to reorder. This field is used for the Inventory Re-Order and Stock Status reports. There is a checkbox to include Reorder Point on the reports. 2 nd Alt UOM by LB: You would check this box if you wanted to sell this item by more than one alternate unit of measure. This is usually used with produce items. For example: I sell peppers, bananas or peaches by the Case, Each, and Pound. So the Selling UOM and Billing UOM would have to be the same, which would be Case and the Alt UOM would be Each. Lot Control Item: You would check this box if you are going to use lot control on this item. See Company Maintenance, Parameter Tab for Multiple Warehouse; Use Lot Selector; Ignore Lot Quantity; Lot Refresh Minutes, second Parameter Tab OE Auto Lot Selection, and Invoice Tab Show Lot Information. NOTE: If OE Auto Lot Selection is used, different Item ID s need to be created for the same item if it can be sold as Fresh or Frozen. From Item: Usually used by meat cutters. If you want to track Inventory on the Original item you cut from, use this field and Yield %. Enter in the item you cut this item piece from. Yield %: Used in conjunction with From Item. This is the % amount to add to the inventory for the Item. Example: If you cut some hamburger from another piece of meat, how much did you use? Yield Balance Item: What item do you want the balance of the from item to be sent to. Yield Balance %: Used in conjunction with Yield Balance Item. This is the % amount to add to the inventory for the Item. The remainder of the excess will be sent to the scrap item defined in company maintenance. To Item: Usually used by meat cutters. It is the item you want to use to represent vendor item. For example: you may sell a Ribeye and pack 5 per case, but you purchase from different vendors and they pack in different sizes, maybe 6 in a case or 8 in a case and different weights. You have the ability to choose the vendor to represent this item. This is used for calculation in the Purchase Order screen. EXAMPLES Of Selling UOM, Alternate UOM, Billing UOM, Pack Qty, Pack Size and Weight: I sell by the case but bill by the weight. There are 5 pieces in a case and it weighs 75 pounds. Sell UOM CS Pack Qty 5 Alt UOM CS Pack Size 15 pounds Bill UOM LB Weight 75 The Pack Qty is 5 because they are packed 5 to a case The pack size is 15 because the total weight is 75 and there are 5 per case. So 75/5=15. I sell tomato sauce by the case only and there are 6 cans in a case and it weighs 47 pounds. Sell UOM CS Pack Qty 6 Alt UOM CS Pack Size #10 Size Cans Bill UOM CS Weight 47 I sell Milk. There are 4 in a case. I always sell by the case but bill by the gallon. Sell UOM CS Pack Qty 4 Alt UOM EA Pack Size 1 Gallon Page 12 of 15

13 Bill UOM EA Weight 32 No matter how I sell milk, it will be billed by the each. I sell Eggs. There are 30 dozen of eggs in a case. Sell UOM CS Pack Qty 30 Alt UOM DZ Pack Size 1 Dozen Bill UOM DZ Weight 30 Produce: Peppers, Peaches, Bananas, etc I sell produce. They are packed 65 per case and weigh 24 pounds. I want to sell by the Case, Each, and Pound. Sell UOM CS Pack Qty 65 Alt UOM EA Pack Size Bill UOM CS Weight 24 2 nd AU by LB box checked ***NOTE: If you Sell by the Case and Bill by the Pound and the item is a Catch Weight Item, when you do Physical Inventory, you will have to count and weigh every item for accurate counts. Costing/Pricing Tab Page 13 of 15
14 Last Cost and Average Cost: Display only fields. They are controlled by the Purchase Order system or Inventory system. Also, look at Company Maintenance. Market Cost: The cost you pay for this item. This is the amount that will be used to calculate all pricing per customer, per item, per price level, etc. If you manually change the Market Cost, click on the Recalculate Current Prices Button below to recalculate your Price Matrix. Also look at Company Maintenance, Parameter Tab, Update Market Cost. Also look at Company Maintenance Parameter Tab Auto Update Prices. Future Mkt Cost: You can manually enter in a Future Cost you will be paying for this item. Click on the Recalculate Future Prices button to recalculate your Price Matrix. If you wish to activate them immediately press the Activate Future Prices button. Effective Date: The date you wish to have the Future Market Costs take effect. Click on the Activate Future Prices Button below to recalculate your Price Matrix. Rounding Factor: Allows you to round based on the factor but is only used when you have more than 2 digits after the decimal. Usually used for cheese items. For example, if you enter in.005, it will round the amount to the next half cent. So if the amount is the system will calculate and round it to Look at Company Maintenance, Invoice Tab, SO Price Decimals and PO Tab, PO Price Decimals. Fractional Case Charge: The amount in $ or % that would be an added charge for selling only ½ or ¼ of your selling unit. Fractional Case Type: Choose % or $ to be added to the customers price. Market Cost Adjustment: Adds to the amount of the cost you entered in Purchase Order Entry. The Market Cost field pulls from Purchase Order Entry. For example, if I wanted to add $0.05 to this item s price that was entered in the Purchase Order Entry screen, you would enter in 0.05 in this field. Last Purchased Date: The date the last time the item was purchased on a purchase order. The next 3 fields work in conjunction with each other: Flyer Price: A special price for this item Flyer Start: The date the special price will begin Flyer End: The date the special price will end If, in Item Maintenance, under File, there is a specific customer that has a special price, they will get the lower Price. If there are charges for Broken Cases or Fractional Cases, they will still be added to the Flyer Price. Price Level 1 through Price Level 8: These were defined in the System Maintenance, Price Levels. Calc Method: Choices are Cost Plus, GP% (Gross Profit %), Markup % and Fixed. Prices are calculated from the Market Cost. C: For Cost Plus; Enter in a dollar amount in the Factor field that will be added to the Market Cost for this Price Level. For example: I always want to add $.50. You would enter in.50 in the Factor field. F: For Fixed price: Enter in an amount you want to receive no matter what the cost is in the Factor field. **There is a difference between GP% (Gross Profit %) and Markup %--See below Page 14 of 15
15 G: For Gross Profit % enter in the Factor field a profit you want to make on an item. If you want to make 25% Gross Profit on the item, you would enter in in the Factor field. How to calculate the Gross Profit Price: If your cost is $10, what would the Gross Profit Price be? Cost/ (1.00-% rate you want to make) =GP Price I want to make 25% so that formula is =.75 $10/.75=13.34 The GP price for $10 would be $13.34 M: For Markup% enter in a percentage in the Factor field you want to mark your cost up by and multiply this by what the cost is to calculate the price. If you want to Markup the price by 25%, you would enter in in the factor field. How to calculate the Markup Price: If your cost is $10 and you want to mark it up by 25% $10 X ( rate you want to mark it up) =Markup Price I want to mark it up by 25%, so the formula is =1.25 $10 X 1.25=12.50 The Markup Price for $10 would be $ Broken Case Charge: The amount in $ or % that would be an added charge for breaking a case or selling by the Alt UOM. Make sure that on the General Tab of the Item Maintenance screen, you have checked the Allow Break checkbox. Look at the General Tab in Item Maintenance for Alternate UOM, Allow Break box. Look at System Maintenance, Category at the bottom of the screen for Broken Case. You can exclude a customer from being charged this additional fee in Customer Maintenance, Credit Tab, Ignore Break Upcharge. Broken Case Type: Choose % or $ to be added to the customers price. When you have completed your entry, choose the Write Button at the bottom of the screen to save your entry. Page 15 of 15