MagMAX Express 96 User Manual
|
|
|
- Henry Adams
- 6 years ago
- Views:
Transcription
1

2 MagMAX Express 96 User Manual Rev. 1.5
3 Copyright 2011, 2011 Applied Biosystems. All rights reserved. Information in this document is subject to change without notice. Applied Biosystems assumes no responsibility for any errors that may appear in this document. APPLIED BIOSYSTEMS DISCLAIMS ALL WARRANTIES WITH RESPECT TO THIS DOCUMENT, EXPRESSED OR IMPLIED, INCLUDING BUT NOT LIMITED TO THOSE OF MERCHANTABILITY OR FITNESS FOR A PARTICULAR PURPOSE. IN NO EVENT SHALL APPLIED BIOSYSTEMS BE LIABLE, WHETHER IN CONTRACT, TORT, WARRANTY, OR UNDER ANY STATUTE OR ON ANY OTHER BASIS FOR SPECIAL, INCIDENTAL, INDIRECT, PUNITIVE, MULTIPLE OR CONSEQUENTIAL DAMAGES IN CONNECTION WITH OR ARISING FROM THIS DOCUMENT, INCLUDING, BUT NOT LIMITED TO, THE USE THEREOF. For Research Use Only. Not for use in diagnostic procedures. NOTICE TO PURCHASER: License Disclaimer Purchase of this product alone does not imply any license under any process, instrument or other apparatus, system, composition, reagent or kit rights under patent claims owned or otherwise controlled by Applied Biosystems, either expressly or by estoppel. TRADEMARKS: Applied Biosystems, and AB (Design) are registered trademarks, and MagMAX is a trademark of Applied Biosystems or its subsidiaries in the U.S. and/or certain other countries. All other trademarks are the sole property of their respective owners. Part Number N07849 Rev. B Applied Biosystems MagMAX Express 96 User Manual; Rev. 1.4; January
4 Contents Contents 1 Safety Symbols and Markings About the User Manual Introduction to the MagMAX Express Functional Description Installation Routine Operation Maintenance Technical Specifications Troubleshooting Guide Warranty Information Ordering Information Glossary and Abbreviations Index Appendix A. MagMAX Express 96 Brief User s Guide Appendix B. MagMAX Express 96 Feedback Form Appendix C. Certificate of Instrument Decontamination Appendix D. Addresses Applied Biosystems MagMAX Express 96 User Manual; Rev. 1.4; January
5 Table of Contents Table of Contents 1 Safety Symbols and Markings Instrument safety and guidelines for use Chemical Safety Guidelines Biohazard Warning About the User Manual Preface Purpose of This Guide Audience Assumptions Text Conventions User Attention Words Safety Alert Words How to Obtain More Information Related Documentation How to Obtain Support Introduction to the MagMAX Express Intended use Principle of operation Advantages of processing magnetic particles with MagMAX Express Functional Description Instrument layout Front view Back / Side view MagMAX Express 96 magnetic particle processor Principle of magnetic particle processing Working with a magnetic rod Collecting magnetic particles Releasing magnetic particles Washing magnetic particles Incubation Changing the volume during the magnetic particle processing Installation What to do upon delivery How to unpack Checking delivery for completeness Checking for damage during transport Environmental requirements Things to avoid Technical prerequisites Setups before you put the instrument into operation How to release the transport locks How to ensure startup How to fit the subassemblies of the instrument into place Applied Biosystems MagMAX Express 96 User Manual; Rev. 1.4; January
6 Table of Contents 5.3 Operational check How to pack the instrument for transportation How to refit the transport lock of the heating block How to refit the transport lock of the tip comb holder Routine Operation Do s and Don ts of the MagMAX Express Do s Don ts Switching on How to use the keypad and display How to handle tip combs How to start Changing the heating block Shutdown Emergency situations Maintenance Regular and preventive maintenance How to clean the turntable How to clean the magnetic rods How to clean the shield plate Disposal of materials Decontamination procedure How to pack for service Disposal of the instrument Technical Specifications General specifications Safety specifications In conformity with the requirements Troubleshooting Guide Error messages and warnings Troubleshooting guide Frequently asked questions (FAQ) about MagMAX Express 96 processing Service request protocol Warranty Information Ordering Information List of accessories List of spare parts Glossary and Abbreviations Keywords for web pages Literature Index Appendix A. MagMAX Express 96 Brief User s Guide Appendix B. MagMAX Express 96 Feedback Form Appendix C. Certificate of Instrument Decontamination Appendix D. Addresses Applied Biosystems MagMAX Express 96 User Manual; Rev. 1.4; January
7 List of Figures and Tables List of Figures and Tables Fig. 3.1 MagMAX Express 96 magnetic particle processor Fig. 4.1 MagMAX Express 96 front view without see-through lid Fig. 4.2 MagMAX Express 96 front view with see-through lid and plates Fig. 4.3 MagMAX Express 96 back view Fig. 4.4 MagMAX Express 96 side view Fig. 4.5 MagMAX Express 96 magnetic particle processor Fig. 4.6 Inverse magnetic particle processing Fig. 4.7 A concentration step during magnetic particle processing Fig. 5.1 MagMAX Express 96 transport locks fitted Fig. 5.2 Removing the transport lock of the tip comb holder (A) Fig. 5.3 Removing the transport lock of the tip comb holder (B) Fig. 5.4 Tip comb holder transport lock removed Fig. 5.5 Removing the transport lock of the heating block (A) Fig. 5.6 Removing the transport lock of the heating block (B) Fig. 5.7 Fastening the transport lock of the heating block to its storage site Fig. 5.8 Mains supply cable and serial cable connected Fig. 5.9 Fastening/changing the heating block Fig Two different heating blocks available Fig Shield plate prior to fitting Fig Inserting the shield plate Fig Fastening/loosening the shield plate Fig Shield plate fitted Fig Interchangeable MagMAX Express 96 heads and tip combs available Fig MagMAX Express 96 heads in their storage boxes Fig Inserting the MagMAX Express 96 head Fig MagMAX Express 96 head for deep well plate fitted Fig See-through lid fitted Fig Unfastening the transport lock screw from its storage site Fig Refitting the transport lock of the heating block (A) Fig Refitting the transport lock of the heating block (B) Fig Fitting the transport lock of the tip comb holder (A) Fig Fitting the transport lock of the tip comb holder (B) Fig Fitting the transport lock of the tip comb holder (C) Fig Both transport locks refitted Fig. 6.1 MagMAX Express 96 keypad Fig. 6.2 Tip comb package with two tip combs Fig. 6.3 Separating the two tip combs Fig. 6.4 Storing the other tip comb on a MagMAX Express 96 plate for further use Fig. 6.5 Combining the tip comb and MagMAX Express 96 plate (A) Fig. 6.6 Combining the tip comb and MagMAX Express 96 plate (B) Fig. 6.7 Loading the tip-plate Fig. 6.8 Loading the plates Fig. 6.9 Plates loaded Fig Tip comb in the tip comb holder Fig Shield plate in function Fig MagMAX Express 96 plate Fig Fastening/changing the heating block Fig Two different heating blocks available Fig KingFisher Software CD Fig MagMAX Express 96 keypad Table 6.1 Processing volumes vs. plate types Applied Biosystems MagMAX Express 96 User Manual; Rev. 1.4; January
8 Chapter 1: Safety Symbols and Markings 1 Safety Symbols and Markings These symbols are intended to draw your attention to particularly important information and alert you to the presence of hazards as indicated. Safety symbols and markings used on the MagMAX Express 96 Power ON Power OFF Warning: Hot surface, risk of burns. Warning: Risk of body parts, hair, jewelry or clothing getting caught in a moving part. Serial number Catalog number Date of manufacture Consult instructions for use WEEE symbol This product is required to comply with the European Union s Waste Electrical & Electronic Equipment (WEEE) Directive 2002/96/EC. A black label with the following text (Fig. 4.3, item 6): WARNING: DISCONNECT SUPPLY BEFORE SERVICING AVERTISSEMENT: COUPER L'ALIMENTATION AVANT L'ENTRETIEN ET LE DEPANNAGE Warning markings used in the documentation Warning: Risk of electric shock. Applied Biosystems MagMAX Express 96 User Manual; Rev. 1.4; January

9 Chapter 1: Safety Symbols and Markings Warning: Biohazard risk. Warning: Risk of injury to the user(s). Other markings used in the documentation Note: Marks a hint, important information that is useful in the optimum operation of the system, or an item of interest. 1.1 Instrument safety and guidelines for use 1. Always follow basic safety precautions when using the MagMAX Express 96 to reduce the risk of injury, biohazardous contamination, fire, or electrical shock. 2. Read the user manual in its entirety prior to operating the instrument. Failure to read, understand, and follow the instructions in the manual may result in damage to the instrument, injury to laboratory and operating personnel or poor instrument performance. 3. Observe all Warning and Note statements as well as safety symbols and markings on the instrument and in the documentation. 4. The device shall be operated only with software specifically designed for the device. 5. Never open any other covers of the MagMAX Express 96 than the seethrough lid (Fig. 4.2, item 1) or the sliding door (Fig. 4.2, item 2) while the instrument is plugged into a power source. 6. Only when the instrument is switched off, can you push in the heads or turn the turntable manually. 7. Never force a microplate into the instrument. 8. The MagMAX Express 96 is intended for laboratory research use only. Observe proper laboratory safety precautions, such as wearing protective clothing and following approved laboratory safety procedures. 9. Preventative maintenance instructions should be followed closely to keep the instrument in the best condition for maximum reliability. A poorly maintained instrument will not give the best results Chemical Safety Guidelines To minimize the hazards of chemicals: Read and understand the Material Safety Data Sheets (MSDSs) provided by the chemical manufacturer before you store, handle, or work with any chemicals or hazardous materials. Minimize contact with chemicals. Wear appropriate personal protective equipment when handling chemicals (for example, safety glasses, gloves, or protective clothing). For additional safety guidelines, consult the MSDS. Applied Biosystems MagMAX Express 96 User Manual; Rev. 1.4; January
10 Chapter 1: Safety Symbols and Markings Minimize the inhalation of chemicals. Do not leave chemical containers open. Use only with adequate ventilation (for example, fume hood). For additional safety guidelines, consult the MSDS. Check regularly for chemical leaks or spills. If a leak or spill occurs, follow the manufacturer s cleanup procedures as recommended in the MSDS. Comply with all local, state/provincial, or national laws and regulations related to chemical storage, handling, and disposal Biohazard Warning Biological samples such as tissues, body fluids, infectious agents, and blood of humans and other animals have the potential to transmit infectious diseases. Follow all applicable local, state/provincial, and/or national regulations. Wear appropriate protective equipment, which includes but is not limited to: protective eyewear, face shield, clothing/lab coat, and gloves. All work should be conducted in properly equipped facilities using the appropriate safety equipment (for example, physical containment devices). Individuals should be trained according to applicable regulatory and company/institution requirements before working with potentially infectious materials. Read and follow the applicable guidelines and/or regulatory requirements in the following: U.S. Department of Health and Human Services guidelines published in Biosafety in Microbiological and Biomedical Laboratories (stock no ; Occupational Safety and Health Standards, Bloodborne Pathogens (29 CFR ; 29cfr1910a_01.html). Your company s/institution s Biosafety Program protocols for working with/handling potentially infectious materials. Additional information about biohazard guidelines is available at: Applied Biosystems MagMAX Express 96 User Manual; Rev. 1.4; January
11 Chapter 2: About the User Manual 2 About the User Manual The user manual has been written for the actual user (for example, laboratory technician) and provides information on the MagMAX Express 96 magnetic particle processor, including the installation and operating instructions. Read the manual in its entirety prior to operating the instrument. The user manual has been designed to give you the information you need to: Review safety precautions Install the MagMAX Express 96 Use the MagMAX Express 96 in routine jobs the processing step Perform basic cleaning and maintenance procedures Troubleshoot the instrument performance The user manual also describes all the features and specifications of the MagMAX Express 96 hardware and on-board software. Sections 4.2 through 4.4 explain the processing principles and procedures. In Chapter 9 Troubleshooting Guide you will find explanations of all error messages and a problem-solving guide. The user should be familiar with the contents of Chapter 7 on maintenance. For warranty and ordering information, refer to Chapters 10 Warranty and 11 Ordering Information. For further software-related issues, refer to the KingFisher Software User Manual (Cat. no ). In an effort to produce useful and appropriate documentation, we appreciate your comments on this user manual. 2.1 Preface Purpose of This Guide The Applied Biosystems MagMAX Express 96 User Guide provides reference material related to the Applied Biosystems MagMAX Express 96 Magnetic Particle Processor. It describes the system, theory of operation, and how to prepare, maintain, and troubleshoot the system Audience This guide is intended for novice and experienced MagMAX Express 96 users who will: Install the Applied Biosystems MagMAX Express 96 Perform routine runs using the Applied Biosystems MagMAX Express 96 Perform planned maintenance procedures Assumptions This guide assumes that your Applied Biosystems MagMAX Express 96 has been installed by an Applied Biosystems technical representative. This guide also assumes that you have a working knowledge of the Windows operating system. Applied Biosystems MagMAX Express 96 User Manual; Rev. 1.4; January
12 Chapter 2: About the User Manual Text Conventions This guide uses the following conventions: Bold text indicates user action. For example: Type 0, then press Enter for each of the remaining fields. Italic text indicates new or important words and is also used for emphasis. For example: Before analyzing, always prepare fresh matrix. A right arrow symbol ( ) separates successive commands you select from a drop-down or shortcut menu. For example: Select File Open Spot Set. Right-click the sample row, then select View Filter View All Runs User Attention Words Two user attention words appear in Applied Biosystems user documentation. Each word implies a particular level of observation or action as described below: Note: Provides information that may be of interest or help but is not critical to the use of the product. IMPORTANT! Provides information that is necessary for proper instrument operation, accurate chemistry kit use, or safe use of a chemical. Examples of the user attention words appear below: Note: The Calibrate function is also available in the Control Console. IMPORTANT! To verify your client connection to the database, you need a valid user ID and password Safety Alert Words Safety alert words also appear in user documentation. For more information, see Safety Symbols and Markings on page How to Obtain More Information Related Documentation The following related documents are shipped with the system: Applied Biosystems MagMAX Express 96 User Guide Describes the Applied Biosystems MagMAX Express 96 hardware and software and provides information on preparing, maintaining, and troubleshooting the system. Applied Biosystems MagMAX Express 96 Service Guide Provides explanatory procedures for servicing the Magnetic Particle Processors. Applied Biosystems MagMAX Express 96 User Manual; Rev. 1.4; January
13 Chapter 2: About the User Manual 2.3 How to Obtain Support For the latest services and support information for all locations, go to then click the link for Support. At the Support page, you can: Search through frequently asked questions (FAQs) Submit a question directly to Technical Support Order Applied Biosystems user documents, MSDSs, certificates of analysis, and other related documents Download PDF documents Obtain information about customer training Download software updates and patches In addition, the Support page provides access to worldwide telephone and fax numbers to contact Applied Biosystems Technical Support and Sales facilities. Applied Biosystems MagMAX Express 96 User Manual; Rev. 1.4; January
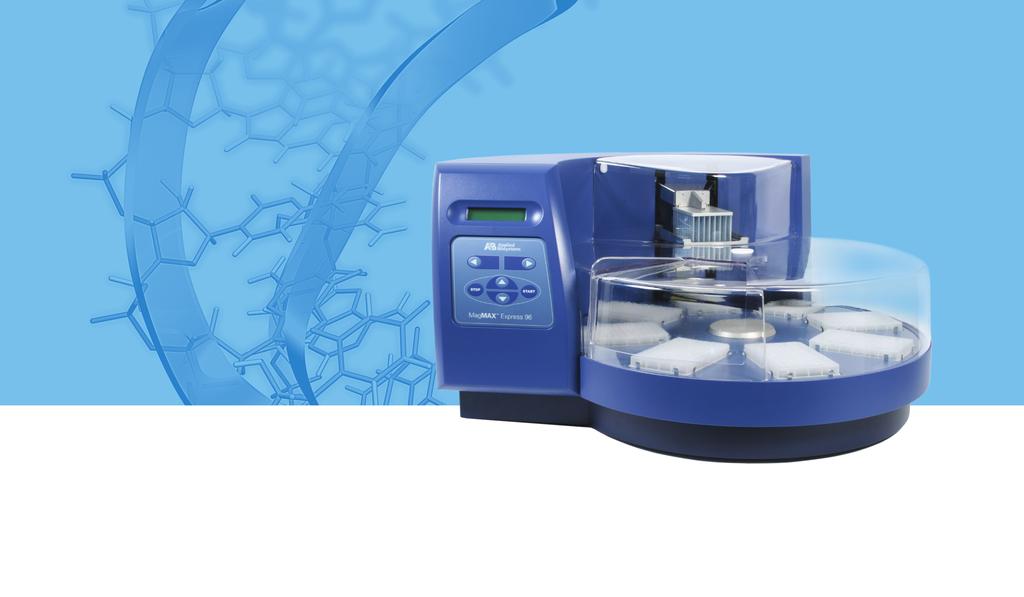
14 Chapter 3: Introduction to the MagMAX Express 96 3 Introduction to the MagMAX Express Intended use The MagMAX Express 96 magnetic particle processor (Fig. 3.1) is intended for professional research by trained personnel. The instrument is intended for automated transfer and processing of magnetic particles in a microplate scale. Use for self-testing is excluded. It is recommended that Good Laboratory Practices (GLP) are followed to guarantee reliable analyses. Refer to Chapter 8 Technical Specifications. 3.2 Principle of operation The MagMAX Express 96 magnetic particle processor (Fig. 3.1) is designed for automated transfer and processing of magnetic particles in microplate format. The technology of the MagMAX Express 96 system is based on the use of magnetic rods covered with a disposable, specially designed tip comb and plates. The instrument functions without any dispensing or aspiration parts or devices. Samples and reagents including magnetic particles are dispensed into the plates according to the corresponding instructions. The protocol that is selected by the user via the keypad and display have already been preloaded into the onboard software. KingFisher PC software can be used to create and run protocols. Fig. 3.1 MagMAX Express 96 magnetic particle processor 3.3 Advantages of processing magnetic particles with MagMAX Express 96 The MagMAX Express 96 magnetic particle processor provides several advantages relating mainly to the principle of operation in that it: Enables automation of complicated manual steps Enables simultaneous processing and purification Incubation is enhanced due to the heating option Enables concentration of the sample during processing Facilitates a good collection of bead-bound sample due to the efficiency of the magnet Enables a quicker reaction and a more efficient wash due to the simultaneous shaking during incubation and washing No carryover No cross contamination Facilitates the whole processing with the aid of an internal program/ KingFisher Software. Applied Biosystems MagMAX Express 96 User Manual; Rev. 1.4; January

 Fig. 4.")

15 Chapter 4: Functional Description 4 Functional Description 4.1 Instrument layout Front view Display 2. Keypad 3. Loading station 4. Heating block 5. Interchangeable MagMAX Express 96 head 6. Shield plate 7. Turntable 8. Plate station (1 8) Fig. 4.1 MagMAX Express 96 front view without see-through lid See-through lid 2. Sliding door Fig. 4.2 MagMAX Express 96 front view with see-through lid and plates Applied Biosystems MagMAX Express 96 User Manual; Rev. 1.4; January


16 Chapter 4: Functional Description Back / Side view Cooling-air inlet 2. Type label 3. USB port (not in use) 4. Ethernet (not in use) 5. Serial port RS-232C 6. Warning marking 7. Mains power supply connector 8. ON/OFF switch 9. Cooling-air outlet Fig. 4.3 MagMAX Express 96 back view Fig. 4.4 MagMAX Express 96 side view Applied Biosystems MagMAX Express 96 User Manual; Rev. 1.4; January


17 Chapter 4: Functional Description 4.2 MagMAX Express 96 magnetic particle processor The MagMAX Express 96 (Fig. 4.5) has room for eight plates. The tip combs are compatible with the plates. During the individual steps, the plates are kept stationary, and the only moving assembly is the processing head with tip comb and magnetic rods. The head consists of two vertically moving platforms. One is needed for the magnetic rods (96 pieces) and the other one for the plastic tip comb (Fig. 5.15). Up to eight plates can be simultaneously on the turntable. However, during one sample processing, the protocol enables the use of more than eight plates in total. One tip comb contains 96 tips used for processing 96 samples at a time. Before starting the magnetic particle processing via the keypad and display, the samples and reagents are dispensed into the plates and the tip comb is placed onto a MagMAX Express 96 plate, from which it is automatically loaded. The plates are placed onto the turntable into the corresponding plate stations according to the protocol instructions. During the operation, the sliding door can be closed or open (Fig. 4.2) or the whole see-through lid can be absent. The closed door protects the processing against environmental contamination. The operating principle employed is MPP (inverse magnetic particle processing) technology (Fig. 4.6). Rather than moving the liquids, the magnetic particles are moved from plate to plate containing specific reagents, in contrast to the external magnet method. Magnetic particles are transferred with the aid of magnetic rods covered with a disposable, specially designed plastic tip comb. Fig. 4.5 MagMAX Express 96 magnetic particle processor Applied Biosystems MagMAX Express 96 User Manual; Rev. 1.4; January

18 Chapter 4: Functional Description 4.3 Principle of magnetic particle processing Fig. 4.6 Inverse magnetic particle processing 4.4 Working with a magnetic rod Working with magnetic particles can be divided into five separate processes: collecting magnetic particles releasing magnetic particles washing magnetic particles incubation concentration Collecting magnetic particles During the collection of the magnetic particles, the magnetic rod is fully inside the tip. The magnetic rods together with the tip comb move slowly up and down in the plate and the magnetic particles are collected onto the edge of the tips. The magnetic rods together with the tip comb, having collected the magnetic particles, can be lifted out of the plate and transferred into the next plate Releasing magnetic particles After collection of the magnetic particles, the magnetic rods together with the tip comb are lifted from the plate, the magnetic rods are lifted off and the tip comb is lowered into the next plate containing a reagent. Magnetic particles are released by moving the tip comb up and down several times at considerably high speed until all the particles have been mixed with the substance in the next reaction. Applied Biosystems MagMAX Express 96 User Manual; Rev. 1.4; January

19 Chapter 4: Functional Description Washing magnetic particles Washing the magnetic particles is a frequent and an important processing phase. Washing is a combination of the release and collection processes in a plate filled with washing solution. To maximize washing efficiency, the magnetic rods together with the tip comb are designed to have minimized liquid-carrying properties Incubation To keep the magnetic particle suspension evenly mixed in long-running reactions, the tip comb can be moved up and down in the solution Changing the volume during the magnetic particle processing The volume of the first plate can be larger than the volume of the next plate, and this is used for concentration purposes (see Fig. 4.7 below). Fig. 4.7 A concentration step during magnetic particle processing Applied Biosystems MagMAX Express 96 User Manual; Rev. 1.4; January
20 Chapter 5: Installation 5 Installation 5.1 What to do upon delivery How to unpack Move the packed instrument to its site of operation. Unpack the MagMAX Express 96 instrument and accessories carefully with the arrows on the transport package pointing upwards. The following notes and instructions are sent with the instrument and are immediately available when you open the package: the packing instructions/packing list the MagMAX Express 96 Feedback Form the Warranty Certificate card the MagMAX Express 96 User Manual/Quick Reference Guide Note: Do not touch or loosen any screws or parts other than those specifically designated in the instructions. Doing so might cause misalignment and will void the instrument warranty. Warning: The MagMAX Express 96 weighs approximately 28 kg [62 lbs.] without the transport package and should be lifted with care. It is recommended that two persons lift the instrument together, taking the proper precautions to avoid injury. To lift the instrument, put your fingers under the bottom on either sides and lift it with your back straight, while another person is helping offset the weight. Retain the original packaging for future transportation. The packaging is designed to assure safe transport and minimize transit damage. Use of alternative packaging materials may invalidate the warranty. Also retain all instrument-related documentation provided by the manufacturer for future use Checking delivery for completeness Check the enclosed packing list against order. If any parts are missing, contact your local Applied Biosystems representative or Applied Biosystems Checking for damage during transport Visually inspect the transport package, the instrument and the accessories for any possible transport damage. If the carton has been damaged in transit, it is particularly important that you retain it for inspection by the carrier in case there has also been damage to the instrument. Visually check all interconnections in the basic instrument. Check that there are no loose parts inside the instrument. If any parts are damaged, contact your local Applied Biosystems representative or Applied Biosystems Environmental requirements When you set up your MagMAX Express 96, avoid sites of operation with excess dust, vibrations, strong magnetic fields, direct sunlight, draft, excessive moisture or large temperature fluctuations. Applied Biosystems MagMAX Express 96 User Manual; Rev. 1.4; January
21 Chapter 5: Installation Make sure the working area is flat, dry, clean and vibration-proof and leave additional room for cables, lids, etc. Make sure the ambient air is clean and free of corrosive vapors, smoke and dust. Make sure the ambient temperature range is between +10 C (50 F) and +40 C (104 F). Make sure relative humidity is between 10% and 80% (non-condensing). Leave sufficient space (at least 10 cm) at both sides and at the back/side of the unit to allow adequate air circulation. The MagMAX Express 96 does not produce operating noise at a level that would be harmful. No sound level measurements are required after installation. Note: Do not operate the instrument in an environment where potentially damaging liquids or gases are present Things to avoid Do not smoke, eat or drink while using the MagMAX Express 96. Wash your hands thoroughly after handling test fluids. Observe normal laboratory procedures for handling potentially dangerous samples. Use proper protective clothing. Use disposable gloves. Be sure the working area is well-ventilated. Never spill fluids in or on the equipment. Note: The MagMAX Express 96 should not be kept in close proximity to magnetic tapes, computer discs or other magnetic storage systems, such as credit cards, as these can be damaged by the strong magnetic field of the MagMAX Express 96 heads. Do not hold the MagMAX Express 96 heads close to a PC display, since this may cause damage to the display. Do not use metal tools when handling MagMAX Express 96 heads. Warning: This product contains very strong permanent magnets. People wearing a pacemaker or metallic prostheses should not use this product. A pacemaker or prostheses may be affected or damaged if it comes in close contact with a strong magnetic field Technical prerequisites Place the instrument on a normal laboratory bench. The net weight of the unit is approx. 28 kg [62 lbs.]. The instrument operates at voltages of Vac and the frequency range 50/60 Hz. 5.2 Setups before you put the instrument into operation How to release the transport locks Note: THERE ARE TWO TRANSPORT LOCKS PRESENT (Fig. 5.1): the tip comb holder transport lock, and the heating block transport lock. Remove both the transport locks. Ensure that the transport locks have been released before you put the instrument into operation. Applied Biosystems MagMAX Express 96 User Manual; Rev. 1.4; January


 Applied Biosystems MagMAX Express")
22 Chapter 5: Installation Tip comb holder transport lock Heating block transport lock Fig. 5.1 MagMAX Express 96 transport locks fitted 1. To remove the transport lock of the tip comb holder, take firmly hold of the lock and press tightly on both sides of the lock according to Fig. 5.2 so that the lock ends are released. Keep hold of the tip comb holder and lock simultaneously and start gradually lifting the holder. Fig. 5.2 Removing the transport lock of the tip comb holder (A) Applied Biosystems MagMAX Express 96 User Manual; Rev. 1.4; January


 Two eccentric pins Fig. 5.")
23 Chapter 5: Installation 2. Lift the tip comb holder higher and continue pressing the transport lock of the tip comb holder. Remove the transport lock from its location by ejecting it from the two eccentric pins (Fig. 5.3 and Fig. 5.4). When relocating the instrument, refer to Section How to refit the transport lock of the tip comb holder. Fig. 5.3 Removing the transport lock of the tip comb holder (B) Two eccentric pins Fig. 5.4 Tip comb holder transport lock removed Applied Biosystems MagMAX Express 96 User Manual; Rev. 1.4; January


24 Chapter 5: Installation 3. The transport lock of the heating block is removed according to Fig Unscrew the transport lock screw counterclockwise (Fig. 5.5). Lift the screw with the label attached (Fig. 5.6). Fig. 5.5 Removing the transport lock of the heating block (A) 4. Remove the transport lock screw from the label (Fig. 5.6). Fig. 5.6 Removing the transport lock of the heating block (B) Applied Biosystems MagMAX Express 96 User Manual; Rev. 1.4; January
 on the heating block base guide the heating block into the correct position. Keep the transport locks (Fig. 5.")
25 Chapter 5: Installation 5. Then fasten the screw clockwise to its storage site on the heating block base (Fig. 5.7). The two screws (shown with light gray arrows) on the heating block base guide the heating block into the correct position. Keep the transport locks (Fig. 5.4 and Fig. 5.7) for future transportation of the instrument. Both the transport locks have been successfully removed. When relocating the instrument, refer to Sections How to refit the transport lock of the heating block and How to refit the transport lock of the tip comb holder. Fig. 5.7 Fastening the transport lock of the heating block to its storage site How to ensure startup Warning: Ensure that the mains switch (Fig. 4.3, item 8) on the bottom left of the back/side panel is in the OFF position. Never operate your instrument from a power outlet that has no ground connection. 1. Connect the mains supply cable to the mains power connector (Fig. 5.8) at the bottom left of the back/side panel. If you need to use any other type of mains supply cable than supplied, use only cables certified by the local authorities. Before you plug in the power cable, ensure that the voltage on the rating label at the bottom left of the back/side panel (Fig. 4.3) corresponds to the local voltage. 2. Connect the instrument to a correctly installed line power outlet that has a protective conductor that is grounded. Note: Ensure the power is off before disconnecting or connecting the serial cable. Applied Biosystems MagMAX Express 96 User Manual; Rev. 1.4; January

26 Chapter 5: Installation Fig. 5.8 Mains supply cable and serial cable connected How to fit the subassemblies of the instrument into place Heating block Fastening/changing the heating block is controlled by the software. To fit the heating block, choose the.change_heatblock protocol by using the up and down cursor keys. Then press start. The heating block will thus rise. First insert the four heating block retaining screws (shown with arrows), then insert the heating block and finally fasten the screws clockwise (Fig. 6.13). Keep the screwdriver in an absolutely upright position while screwing and do not slant it. Press the start key when the task has been completed. Fig. 5.9 Fastening/changing the heating block You can add a heating step of ambient temperature +4 C to +96 C to a protocol. The heating block is preheatable but no cooling can be carried out. Both MagMAX Express 96 plates and PCR plates (skirted)** can be heated. ** not available for this product Applied Biosystems MagMAX Express 96 User Manual; Rev. 1.4; January
 (not available) 2. Heating block for MagMAX Express 96 plates Fig. 5.")
 PCR plate (20 100 µl*), skirted** * = recommended filling volume 5.2.3.2 Shield plate 1.")
27 Chapter 5: Installation There are two different kinds of interchangeable heating blocks available for PCR plates (skirted)** and MagMAX Express 96 plates (Fig. 6.14) Heating block for PCR plates (skirted) (not available) 2. Heating block for MagMAX Express 96 plates Fig Two different heating blocks available Warning: The heating block surface can be hot, whereby there can be risk of burns. You can only use the following 96-well plates: MagMAX Express 96 plate ( µl*) PCR plate ( µl*), skirted** * = recommended filling volume Shield plate 1. Ensure that the power is switched OFF. 2. The shield plate has to be installed prior to use of the instrument. Follow the instructions below. Use a hexagonal screwdriver (Allen key) to fasten the two screws (Fig. 5.11). Fig Shield plate prior to fitting ** not available for this product Applied Biosystems MagMAX Express 96 User Manual; Rev. 1.4; January


, be careful not to drop them inside the")

28 Chapter 5: Installation 2. First insert the shield plate into its slot (Fig. 5.12). Fig Inserting the shield plate 3. When fastening the two plate retaining screws (Fig. 5.13), be careful not to drop them inside the instrument. Fig shows the shield plate installed. Fig Fastening/loosening the shield plate Applied Biosystems MagMAX Express 96 User Manual; Rev. 1.4; January
. Note: Do not place the MagMAX Express 96 heads on top of the instrument or any metal surfaces.")

29 Chapter 5: Installation Fig Shield plate fitted Interchangeable MagMAX Express 96 heads There are three kinds of interchangeable MagMAX Express 96 heads available (Fig. 5.15), for MagMAX Express 96 plates, deep well plates (squared well) and PCR plates (skirted)**. The MagMAX Express 96 heads all have corresponding disposable plastic tip combs (Fig. 5.15). Note: Do not place the MagMAX Express 96 heads on top of the instrument or any metal surfaces. Keep the MagMAX Express 96 heads always in their respective plastic boxes when not in use. It is very important to keep the MagMAX Express 96 heads away from each other and other magnets at all times. Clashing of the magnets together may cause serious damage to the magnets Tip comb and MagMAX Express 96 head for deep well plate 2. Tip comb and MagMAX Express 96 head for MagMAX Express 96 plate 3. Tip comb and MagMAX Express 96 head for PCR plate (not available) Fig Interchangeable MagMAX Express 96 heads and tip combs available ** not available for this product Applied Biosystems MagMAX Express 96 User Manual; Rev. 1.4; January

30 Chapter 5: Installation When not in use, keep the MagMAX Express 96 heads always in their respective plastic storage boxes (Fig. 5.16). Fig MagMAX Express 96 heads in their storage boxes Note: The MagMAX Express 96 should not be kept in close proximity to magnetic tapes, computer discs or other magnetic storage systems, such as credit cards, as these can be damaged by the strong magnetic field of the MagMAX Express 96 heads. Do not hold the MagMAX Express 96 heads close to a PC display, since this may cause damage to the display. Do not use metal tools when handling MagMAX Express 96 heads. Warning: This product contains very strong permanent magnets. People wearing a pacemaker or metallic prostheses should not use this product. A pacemaker or prostheses may be affected or damaged if it comes in close contact with a strong magnetic field. To insert MagMAX Express 96 heads, choose the.change_magnet protocol by using the up and down cursor keys. Then press start. Insert the MagMAX Express 96 head so that the three pins (shown with black arrows) slot into place (Fig and Fig. 5.18). When you remove the MagMAX Express 96 head, be careful not to damage the magnet rods against the tip comb holder frame. Applied Biosystems MagMAX Express 96 User Manual; Rev. 1.4; January


31 Chapter 5: Installation Fig Inserting the MagMAX Express 96 head Fig MagMAX Express 96 head for deep well plate fitted Applied Biosystems MagMAX Express 96 User Manual; Rev. 1.4; January

32 Chapter 5: Installation See-through lid During operation, the sliding door can be open or closed (Fig item 2) or the whole see-through lid (Fig item 1) can be absent. The closed door protects the processing against environmental contamination See-through lid 2. Sliding door Fig See-through lid fitted 5.3 Operational check First switch the instrument ON. The instrument performs initialization tests and adjustments. The display quickly shows the internal software version and after that one of the protocols in the internal memory. This happens when the initialization tests and adjustments have been completed. It is recommended that you carry out a check run using a demo protocol to verify proper instrument operation. Run the check protocol (.check_dw_tip,.check_kf_tip or.check_pcr_tip) according to the MagMAX Express 96 head and plastics you are using. If the check is all right, proceed with your own runs. 5.4 How to pack the instrument for transportation How to refit the transport lock of the heating block 1. Remove the heating block in the following way: First choose the.change_heatblock protocol. Then press start. After that loosen the four heating block retaining screws. Then remove the heating block. Press the start key when the task has been completed. 2. Switch off the power. 3. Unfasten the transport lock screw counterclockwise from its storage site (Fig. 5.20). Applied Biosystems MagMAX Express 96 User Manual; Rev. 1.4; January


33 Chapter 5: Installation Fig Unfastening the transport lock screw from its storage site 4. Insert the transport lock screw into the label and refit the transport lock of the heating block into its place (Fig. 5.21). Fig Refitting the transport lock of the heating block (A) Applied Biosystems MagMAX Express 96 User Manual; Rev. 1.4; January

. Fig. 5.")
34 Chapter 5: Installation 5. The transport lock of the heating block is refitted according to Fig Screw the transport lock screw clockwise (Fig. 5.22). Fig shows both the transport locks refitted. Fig Refitting the transport lock of the heating block (B) Applied Biosystems MagMAX Express 96 User Manual; Rev. 1.4; January


. Fig. 5.23 Fitting the transport lock of the tip comb holder (A) 2.")
 all the way down to lock position (Fig. 5.25).")
35 Chapter 5: Installation How to refit the transport lock of the tip comb holder Note: Ensure that the power is switched off. 1. The transport lock of the tip comb holder is refitted according to Fig through Fig Press the transport lock from both sides and insert the two eccentric pins back into place into their respective holes (Fig. 5.23). Fig Fitting the transport lock of the tip comb holder (A) 2. Press the tip comb holder transport lock ends together with both hands and insert (Fig. 5.24) all the way down to lock position (Fig. 5.25). Note that the turntable can move slightly although the transport lock is fitted. Fig Fitting the transport lock of the tip comb holder (B) Applied Biosystems MagMAX Express 96 User Manual; Rev. 1.4; January

36 Chapter 5: Installation Fig Fitting the transport lock of the tip comb holder (C) Fig Both transport locks refitted Fig shows both the transport lock of the heating block and the tip comb holder refitted. Applied Biosystems MagMAX Express 96 User Manual; Rev. 1.4; January
37 Chapter 6: Routine Operation 6 Routine Operation 6.1 Do s and Don ts of the MagMAX Express Do s In case of any emergencies occurring during operation, switch off and unplug the instrument immediately. Carry out corrective measures. If the corrective measures taken do not help, contact authorized technical service. Carry out the operational check prior to normal use. Only when the instrument is switched off, can you push the heads or turn the turntable manually. When placing a microplate onto the tray, always make sure that the correct plate type has been selected in KingFisher Software (Plate Editor Plate Configuration ) before you do anything else Don ts Use for self-testing is excluded. Do not touch or loosen any screws or parts other than those specifically designated in the instructions. Doing so might cause misalignment and will invalidate the instrument warranty. Never open any other cover of the MagMAX Express 96 than the seethrough lid (Fig. 4.2, item 1) or the sliding door (Fig. 4.2, item 2) while the instrument is plugged into a power source. Do not disconnect the RS-232C cable before the PC and the instrument are switched off. Do not use the instrument if it appears that it does not function properly. Do not under any circumstances use formaldehyde. Do not spill any 0.1 M NaOH onto any instrument surfaces to avoid damage of the instrument. If needed, use suitable protection covering. 6.2 Switching on Before you switch on the MagMAX Express 96, ensure that the voltage on the type label at the bottom left of the back/side panel (Fig. 4.3, item 2) corresponds to the local voltage. Warning: Never operate your instrument from a power outlet that has no ground connection. Applied Biosystems MagMAX Express 96 User Manual; Rev. 1.4; January
38 Chapter 6: Routine Operation 6.3 How to use the keypad and display The liquid crystal display is a 20 character by 2 line LCD. The lower line of the display can show the steps of the protocol, while the processing is running. Furthermore, if errors occur, they will be displayed on the lower line. The keypad and display are shown in Fig Fig. 6.1 MagMAX Express 96 keypad The keys available are: Four cursor keys (or arrow keys, direction keys): 5 To select the next protocol by scrolling up. 6 To select the next protocol by scrolling down. < To rotate the turntable to the left. > To rotate the turntable to the right. Two function keys: start stop To initiate the processing step. To confirm a performed step in the protocol, for example, plate loading or removal. To pause/terminate the processing step. In short: stop (paused)/start (the instrument continues after a Pause step) stop (paused)/stop (the processing is terminated). Applied Biosystems MagMAX Express 96 User Manual; Rev. 1.4; January
 and placing one of the tip combs on the MagMAX Express 96 plate (= tip-plate) (Fig. 6.5 and Fig.")
 to ensure proper instrument operation. Applied Biosystems MagMAX Express 96 User Manual; Rev. 1.4; January 2011 38")
39 Chapter 6: Routine Operation 6.4 How to handle tip combs 1. Take a tip comb package containing two tip combs (Fig. 6.2). Fig. 6.2 Tip comb package with two tip combs 2. Unpack the package by separating the two tip combs (Fig. 6.3) and placing one of the tip combs on the MagMAX Express 96 plate (= tip-plate) (Fig. 6.5 and Fig. 6.6). Fig. 6.3 Separating the two tip combs 3. Place the other unused tip comb on another plate for storage to avoid bending of the tip combs (Fig. 6.4) to ensure proper instrument operation. Applied Biosystems MagMAX Express 96 User Manual; Rev. 1.4; January
. 3.")
40 Chapter 6: Routine Operation Fig. 6.4 Storing the other tip comb on a MagMAX Express 96 plate for further use 6.5 How to start 1. Select a protocol by using the cursor keys and press start OR use KingFisher Software to run the desired protocol via the PC. 2. Open the sliding door if the see-through lid is in place (Fig. 4.2). 3. Load the plates in the order that the protocol requests (Fig. 6.7 through Fig. 6.9). Place the A1 well of the plate so that it is in the upper right corner. The first A1 row is consequently always in the inner circle. Once you have loaded the requested plates into the plate stations, press start. The tip comb always has to be placed manually onto a MagMAX Express 96 plate (Fig. 6.5 through Fig. 6.7). The instrument also functions with either one plate or up to eight plates depending on the amount of steps. Only one tip comb (Fig. 5.15) is placed onto a MagMAX Express 96 plate (= tipplate) per run (Fig. 6.6). Confirm the plate loading by pressing start. Fig. 6.5 Combining the tip comb and MagMAX Express 96 plate (A) Applied Biosystems MagMAX Express 96 User Manual; Rev. 1.4; January
41 Chapter 6: Routine Operation Plate station 1 Loading position, plate station 4 Fig. 6.6 Combining the tip comb and MagMAX Express 96 plate (B) The loading position, that is, plate station 4, is labeled. The eight plate stations and the A1 positions of the eight plate stations are clearly marked on the turntable. When the instrument is in its basic position, plate station 1 is under the MagMAX Express 96 head. After the protocol has been run, note that the turntable may stop in a different position than the basic position. A1 corner Fig. 6.7 Loading the tip-plate Applied Biosystems MagMAX Express 96 User Manual; Rev. 1.4; January


42 Chapter 6: Routine Operation Tip-plate Fig. 6.8 Loading the plates Tip comb holder Magnetic rods Tip-plate Fig. 6.9 Plates loaded Applied Biosystems MagMAX Express 96 User Manual; Rev. 1.4; January
.")

43 Chapter 6: Routine Operation 4. The tip comb is automatically locked onto the tip comb holder from the tipplate (Fig. 6.10). Tip comb in tip comb holder Fig Tip comb in the tip comb holder 5. When the turntable moves, the shield plate moves over the plate underneath (Fig. 6.11) forming a protective cover. Shield plate Fig Shield plate in function Applied Biosystems MagMAX Express 96 User Manual; Rev. 1.4; January
 according to the protocol request.")
44 Chapter 6: Routine Operation 6. Close the sliding door. The see-through lid (if in place) protects the instrument against environmental contamination. Note: The sliding door can be left open or the see-through lid can be absent if desired. This action does not break the run. 7. After the run, remove the plate(s) according to the protocol request. Confirm each plate removal by pressing the start key. Note that the plate containing your samples is removed first. 8. Press the stop key after completing the run. For startup refer to Section 6.2 Switching on. Fig MagMAX Express 96 plate The MagMAX Express 96 is compatible with PCR plates**, MagMAX Express 96 plates (Fig. 6.12) and deep well plates (Table 6.1). Specially designed magnetic rods (MagMAX Express 96 heads) and tip combs that protect the magnets during the process are available for different plate types and applications. Table 6.1 Processing volumes vs. plate types Plate PCR plate** skirted MagMAX Express 96 plate Deep Well plate squared well Processing volume µl µl µl 6.6 Changing the heating block Changing the heating block is controlled by the software. To change the heating block, choose the.change_heatblock protocol by using the up and down cursor keys. Then press start. The protocol requests you to remove the magnets and in the end to insert them. The heating block will thus rise. After that remove the four heating block retaining screws (shown with arrows), replace the heating block and then refasten the screws (Fig. 6.13). Keep the screwdriver in an absolutely upright position while screwing and do not slant it. Note that the two screws (shown with light gray arrows in Fig. 5.7) on the heating block base guide the heating block into the correct position. Press the start key when the task has been completed. ** not available for this product Applied Biosystems MagMAX Express 96 User Manual; Rev. 1.4; January
45 Chapter 6: Routine Operation Fig Fastening/changing the heating block You can add a heating step of ambient temperature +4 C to +96 C to a protocol. The heating block is preheatable but no cooling can be carried out. Both MagMAX Express 96 plates and PCR plates (skirted)** can be heated. There are two different kinds of interchangeable heating blocks available, for PCR plates (skirted)** and MagMAX Express 96 plates (Fig. 6.14) Heating block for PCR plates (skirted) (not available) 2. Heating block for MagMAX Express 96 plates Fig Two different heating blocks available Warning: The heating block surface can be hot, whereby there can be risk of burns. ** not available for this product Applied Biosystems MagMAX Express 96 User Manual; Rev. 1.4; January
46 Chapter 6: Routine Operation You can only use the following 96-well plates for heating: MagMAX Express 96 plate ( µl*) PCR plate ( µl*), skirted** * = recommended filling volume 6.7 Shutdown 1. Switch the MagMAX Express 96 off by pressing the power switch (Fig. 4.3, item 8) at the bottom left of the back/side panel of the instrument into the OFF position. Warning: Discard the plastic tip comb onto the plate. Dispose of all tip combs as biohazardous waste. Remove any plates still in the instrument. Dispose of all microplates as biohazardous waste. 2. Wipe the turntable surface and the adjacent instrument surface with a soft cloth or tissue paper moistened with distilled water, a mild detergent (SDS, sodium dodecyl sulfate) or soap solution. 3. If you have spilt infectious agents on the turntable, disinfect with 70% ethanol or some other disinfectant (see Section 7.3 Decontamination procedure). 6.8 Emergency situations In case there is any abnormal situation during operation, such as fluids spilling inside the instrument, follow these steps: 1. Switch OFF the instrument (Fig. 4.3, item 8). 2. Unplug the instrument immediately from the power supply (Fig. 4.3, item 7). 3. Carry out appropriate corrective measures. However, do not disassemble the instrument. 4. If the corrective measures taken do not help, contact authorized technical service or your local Applied Biosystems representative. ** not available for this product Applied Biosystems MagMAX Express 96 User Manual; Rev. 1.4; January
47 Chapter 7: Maintenance 7 Maintenance 7.1 Regular and preventive maintenance For reliable daily operation keep the instrument free of dust and liquid spills. Abrasive cleaning agents are not recommended, because they are likely to damage the paint finish. It is recommended that you clean the case of the instrument periodically to maintain its good appearance. A soft cloth dampened in a warm, mild detergent solution will be sufficient. Clean the outside of the instrument and the turntable with clean low-pressure compressed air or a cloth dampened with water or a mild detergent when necessary. Although the MagMAX Express 96 is constructed from high-quality materials, you must immediately wipe away spilt saline solutions, solvents, acids or alkaline solutions from outer surfaces to prevent damage. Note: Painted surfaces can be cleaned with most laboratory detergents. Dilute the cleaning agent as recommended by the manufacturer. Do not expose painted surfaces to concentrated acids or alcohols for prolonged periods of time as damage may occur Clean the display areas with a mild laboratory detergent. The keypad has a wipe-clean surface. Plastic covers and surfaces can be cleaned with a mild laboratory detergent or alcohol. Warning: If any surfaces have been contaminated with biohazardous material, a mild sterilizing solution should be used Note: Do not autoclave any part of this instrument except the shield plate How to clean the turntable Keep the turntable surface clean to avoid dust and dirt entering into the instrument. Clean the turntable surface at least once a week using a soft cloth or tissue paper soaked in a mild detergent solution (SDS), soap solution or alcohol. The turntable should only be removed by authorized technical service personnel. If you have spilt infectious agents on the turntable, clean it with a cloth dampened with water or a mild detergent. Clean the black spill shield and the turntable using a soft cloth or tissue paper soaked in a mild detergent solution (SDS), soap solution or alcohol. You can gently rotate the turntable while the instrument is switched off. Applied Biosystems MagMAX Express 96 User Manual; Rev. 1.4; January
48 Chapter 7: Maintenance How to clean the magnetic rods If required, wipe the magnetic rods using a soft cloth or tissue paper soaked in a mild detergent solution (SDS), soap solution or alcohol. Note: The MagMAX Express 96 should not be kept in close proximity to magnetic tapes, computer discs or other magnetic storage systems, such as credit cards, as these can be damaged by the strong magnetic field of the MagMAX Express 96 heads. Do not hold the MagMAX Express 96 heads close to a PC display, since this may cause damage to the display. Do not use metal tools when handling MagMAX Express 96 heads. Be careful not to break the magnets while cleaning. Warning: This product contains very strong permanent magnets. People wearing a pacemaker or metallic prostheses should not use this product. A pacemaker or prostheses may be affected or damaged if it comes in close contact with a strong magnetic field How to clean the shield plate If required, wipe the shield plate using a soft cloth or tissue paper soaked in a mild detergent solution (SDS), soap solution or alcohol. The shield plate is autoclavable (at 1 bar pressure and 121 C for 20 minutes). 7.2 Disposal of materials Refer to local regulations for the disposal of infectious material. Warning: The samples can be potentially infectious. Dispose of all used plates, tip combs, disposable gloves, syringes, disposable tips, etc., as biohazardous waste. 7.3 Decontamination procedure Decontamination should be performed in accordance with normal laboratory procedures. Any decontamination instructions provided with the reagents used should be followed. A decontamination procedure is only recommendable when infectious substances have been in direct contact with any part(s) of the instrument. If there is any risk of contamination with biohazardous material, the procedure recommended below or some other corresponding decontamination procedure must be performed. It is strongly recommended that the complete decontamination procedure is performed before relocating the instrument from one laboratory to another. Decontamination is not required for the proper functioning of the instrument. Example of decontaminants Ethanol 70% Virkon solution 1 3% Glutaraldehyde solution 4% Chloramine T Microcide SQ 1:64 Applied Biosystems MagMAX Express 96 User Manual; Rev. 1.4; January
49 Chapter 7: Maintenance Warning: Always use disposable gloves and protective clothing and operate in a well-ventilated area. 1. Prepare the decontaminant: 200 ml 4% glutaraldehyde solution (or another agent recommended by your safety officer). 4. Empty the turntable. 5. Switch OFF the power and disconnect the mains supply cable (Fig. 5.8). 6. Disinfect the outside of the instrument using a cloth dampened with 70% ethanol. 7. Place the instrument in a large plastic bag. Ensure that the see-through lid has been removed. 8. Place a cloth soaked in the prepared solution into the bag. Ensure that the cloth does not make contact with the instrument. 9. Close the bag firmly and leave the instrument in the bag for at least 24 hours. 10. Remove the instrument from the bag. 11. Clean the instrument using a mild detergent. 12. Remove any stains using 70% ethanol. 13. After performing this decontamination procedure, enclose a signed and dated Certificate of Decontamination both inside the transport package and attached to the outside of the package. 7.4 How to pack for service When you ship the instrument for service remember to: Inform about the use of hazardous materials. Decontaminate the instrument beforehand. Install the transport locks. Pack the instrument according to the enclosed packing instructions. Use the original packaging to ensure that no damage will occur to the instrument during shipping. Any damage will incur additional labor charges. Enclose a dated and signed Certificate of Instrument Decontamination (see Appendix C) both inside and attached to the outside of the package, in which you return your instrument (or other items). Enclose the return goods authorization number (RGA) given by your Applied Biosystems representative. Indicate the fault after you have been in touch with your local Applied Biosystems representative or Applied Biosystems service department. See Section 8.1 for details on storage and transportation temperatures. Applied Biosystems MagMAX Express 96 User Manual; Rev. 1.4; January

50 Chapter 7: Maintenance 7.5 Disposal of the instrument If the MagMAX Express 96 is exposed to potentially infectious chemical samples, toxic or corrosive chemicals or radioactive chemicals, waste management of the complete instrument must be carried out to ensure that there is no risk of contamination. Warning: Decontaminate the instrument prior to disposal. See Section 7.3 and Appendix C on decontamination. Follow laboratory and country-specific procedures for biohazardous or radioactive waste disposal. Dispose of the instrument according to the legislation stipulated by the local authorities concerning take-back of electronic equipment and waste. The proposals for the procedures vary by country. Pollution degree Method of disposal 2 (see Section 8.2 Safety specifications) Electronic waste Contaminated waste (Infectious waste) Do not dispose of this product as unsorted municipal waste. Follow local municipal waste ordinances for proper disposal provisions to reduce the environmental impact of waste electrical and electronic equipment (WEEE). European Union customers: Call your local Applied Biosystems Customer Service office for equipment pick-up and recycling. See for a list of customer service offices in the European Union. Retain the original packaging for future transportation. Regarding the original packaging and packing materials, use the recycling operators known to you. For further information, contact your local Applied Biosystems representative or Applied Biosystems. Applied Biosystems MagMAX Express 96 User Manual; Rev. 1.4; January
51 Chapter 8: Technical Specifications 8 Technical Specifications 8.1 General specifications Technical specifications Overall dimensions instrument transport package Weight instrument incl. transport package Operating conditions Transportation conditions Storage conditions Mains power supply ca. 680 mm (W) x 600 mm (D) x 380 mm (H) [26.8 (W) x 23.6 (D) x 15 (H)] 800 mm (W) x 1200 mm (D) x 710 mm (H) [31.5 (W) x 47.2 (D) x 28 (H)] ca. 28 kg [62 lbs.] ca. 44 kg [97 lbs.] +10 C +40 C; maximum relative humidity 80% for temperatures up to 31 C decreasing linearly to 50% relative humidity at 40 C. Indoor use only -40 C +60 C, packed in transport packaging -25 C +50 C, packed in transport packaging Vac, 50/60 Hz, nominal Automatic voltage detection Power consumption Heat dissipation 150 VA max., 55 VA standby 512 BTU max. Computer interface Serial RS-232C port. Baud rate Character format 1 start bit, 8 data bits, 1 stop bit, no parity. Flow control XON/XOFF. Normal use 10 runs/day, 250 days/year, with 40 min protocols having a medium speed setting, RT Performance specifications Processing volume µl Capacity Collection efficiency of the particles 96 samples/run Magnetic particle size ca. > 1 µm Magnet rods Plate types (disposable) * Recommended filling volume Tip combs (polypropylene disposable) Heating temperature Heating accuracy Keyboard / Display Internal software > 95%, MagMAX Express 96 plate, neutral wash buffer containing detergent, 2.8 µm particles, 3 collections, RT 96 in one frame Interchangeable MagMAX Express 96 heads 96-well plates: MagMAX Express 96 plate ( µl*) PCR plate ( µl*), skirted** Deep well plate ( µl*), squared well 96 in one frame for MagMAX Express 96 plate for PCR plate, skirted** for deep well plate, squared well From +4 C above ambient temperature to +96 C ± 6 C, up to +80 C with MagMAX Express 96 plate, up to +96 C with PCR plate**, instrument in RT start/stop/four cursor keys /LCD Space for ca. 100 internal protocols ** not available for this product Applied Biosystems MagMAX Express 96 User Manual; Rev. 1.4; January
52 Chapter 8: Technical Specifications KingFisher Software specifications Compatibility MagMAX Express and MagMAX Express 96 Supported operating system Microsoft Windows NT 4.0, 2000 and XP Professional 8.2 Safety specifications In conformity with the requirements MagMAX Express 96 bears the following markings: Type Vac 50/60 Hz, 150 VA CE mark CSA monogram C-Tick MagMAX Express 96 conforms to the following requirements: 2006/95/EC (Low Voltage Directive) 2004/108/EC (Electromagnetic Compatibility Directive, EMC) 2002/96/EC (Waste of Electrical and Electronic Equipment) Safety performance: EN : A2:1995/IEC : A1: A2:1995 including CENELEC Common Modifications, US and CA National differences -Installation Category (Overvoltage Category) II; Pollution Degree 2 EN :2001 (Ed. 2) The safety specifications are also met under the following environmental conditions in addition to or in excess of those stated in the operating conditions: Altitude Temperature Humidity Mains supply fluctuations Installation category (overvoltage category) up to 2000 m +5 C +40 C maximum relative humidity 80% for temperatures up to 31 C decreasing linearly to 50% relative humidity at 40 C ± 10% from nominal II according to IEC (see Note 1) Pollution degree 2 according to IEC (see Note 2) Note: 1. The installation category (overvoltage category) defines the level of transient overvoltage, which the instrument is designed to withstand safely. It depends on the nature of the electricity supply and its means of overvoltage protection. For example, in CAT II, which is the category used for instruments in installations supplied from a supply comparable to public mains, such as hospital and research laboratories and most industrial laboratories, the expected transient overvoltage is 2500 V for a 230 V supply and 1500 V for a 120 V supply. Applied Biosystems MagMAX Express 96 User Manual; Rev. 1.4; January
53 Chapter 8: Technical Specifications 2. The pollution degree describes the amount of conductive pollution present in the operating environment. Pollution degree 2 assumes that normally only nonconductive pollution, such as dust, occurs with the exception of occasional conductivity caused by condensation. Both of these affect the dimensioning of the electrical insulation within the instrument. EMC performance: EN :2001 EN :2001 EN : A1:1998+ A2:2001 Generic emission standard. Residential, commercial and light industry. Generic immunity standard. Residential, commercial and light industry. Product family standard. Test standards EN 55022:1998 EN : A1: A2: A13: A14:2000 EN :1995 EN : A1:1998 EN : A1:1998 EN :1995 EN :1995 EN :1996 EN :1994 Performance limits Class B, 150 khz 1 GHz Class A 4 kv CD, 8 kv AD, Criteria B 3 V/m, 80 MHz 2 GHz, Criteria A 1 kv, Criteria B 2 kv line to ground, 1 kv line to line, Criteria B 3 V rms, 150 khz 80 MHz, Criteria A 30%/10 ms, Criteria B 60%/100 ms, Criteria C 100%/20 ms, Criteria B > 95%/5 s, Criteria C Applied Biosystems MagMAX Express 96 User Manual; Rev. 1.4; January
54 Chapter 9: Troubleshooting Guide 9 Troubleshooting Guide Note: Do not use the instrument if it appears that it does not function properly. Note that the instrument does not verify the logic flow of the received commands. 9.1 Error messages and warnings When an error is detected, the current operation is terminated. After an error, it is best to abort the current run and restart from the beginning after the problem is fixed. Code Error message Description 0 No error 1 Command error The command was not recognized as a valid MagMAX Express 96 command. 2 Head position error The magnetic head position is in error. 3 Turntable pos. error The turntable position is in error. 4 Magnets pos. error The magnetic tips lift position is in error. 5 Heater pos. error The heater lift position is in error. 6 Tip shield pos. error The shield plate position is in error. 7 Serial number set Attempt to set the serial number when it is already set. 8 Invalid argument Invalid command argument. 9 Parameters lost Nonvolatile parameters lost. 10 IEEE addr. set Attempt to set the IEEE address when it is already set. 11 Internal error Internal software error. This error is actually never reported because the firmware halts on detection of an internal error. However, this error may show up in the error log. 12 Cannot move Cannot perform the requested movement. For example, the head and the magnets cannot move down when the shield plate is in place, or the turntable cannot rotate when the heater is up. 13 Error no tips No plastic tips attached to the head. The range of movement of the head and the magnets is limited if the tips are not attached to the head. This is to prevent bringing the magnets in direct contact with the magnetic particle solution. 14 Error no magnets The magnets are missing. The range of movement of the head and the magnets is limited if the magnets are not attached to the magnet lift. This is to prevent running a purification sequence without the magnets. 15 Nonrecordable cmd The command is not recordable. This error is reported if a nonrecordable command is received when recording is on. 16 Out of memory Not enough memory available for operation. For example, maximum exceeded in recording. Code Warning Description 100 Timer expired Timer already expired. This warning is reported if a wait for a timer (WAI) command is executed and the timer has already expired. Applied Biosystems MagMAX Express 96 User Manual; Rev. 1.4; January
55 Chapter 9: Troubleshooting Guide 9.2 Troubleshooting guide Code Error message Action 0 No error 1 Command error Contact authorized technical service. 2 Head position error Switch the instrument OFF and ON, and try again. If the error appears during initialization or is otherwise repeated, contact service. 3 Turntable pos. error Switch the instrument OFF and ON, and try again. If the error appears during initialization or is otherwise repeated, contact service. 4 Magnets pos. error Switch the instrument OFF and ON, and try again. If the error appears during initialization or is otherwise repeated, contact service. 5 Heater pos. error Switch the instrument OFF and ON, and try again. If the error appears during initialization or is otherwise repeated, contact service. 6 Tip shield pos. error Switch the instrument OFF and ON, and try again. If the error appears during initialization or is otherwise repeated, contact service. 7 Serial number set Contact authorized technical service. 8 Invalid argument Contact authorized technical service. 9 Parameters lost Contact authorized technical service. 10 IEEE addr. set Contact authorized technical service. 11 Internal error Contact authorized technical service. 12 Cannot move Press the stop button twice. 13 Error no tips Check if the tips are present. If it looks all right, turn ON and OFF, and run the check protocol according to the MagMAX Express 96 head and plastics you are using (see Section 5.3). 14 Error no magnets Check that the magnets are fully inserted. 15 Nonrecordable cmd Contact authorized technical service. 16 Out of memory Delete some unnecessary protocols from the internal memory with KingFisher Software and try again. Repeat this procedure until the protocol fits. It is recommended that you clean up the program memory from unnecessary protocols about once a month to prevent this error from occurring. Code Warning Action 100 Timer expired Contact authorized technical service. Applied Biosystems MagMAX Express 96 User Manual; Rev. 1.4; January
56 Chapter 9: Troubleshooting Guide 9.3 Frequently asked questions (FAQ) about MagMAX Express 96 processing Q1. What does the MagMAX Express 96 system do? A1. Applied Biosystems now offers a complete MagMAX Express 96 system the magnetic particle processor for the purification and processing of proteins, DNA, RNA and cells in a 96-well format. The processor handles particles automatically according to the preloaded purification protocols. For more information on these applications, contact Applied Biosystems. Q2. What plates can be used with the MagMAX Express 96? A2. The MagMAX Express 96 is compatible with three different plate types: MagMAX Express 96 plates; deep well plates (squared well), and PCR plates (skirted)**. Each plate type has an optimized MagMAX Express 96 head and tips. Of the three plates, the MagMAX Express 96 plate can be used with all three kinds of magnets (for example, MagMAX Express 96 plates can be used together in a protocol with either deep well plates or PCR plates**). The volume of the deep well plates has to be a minimum of 2.2 ml (2.0 ml capped) with squared wells. Q3. Will the magnet get weaker? If so, how long can they be used? A3. The MagMAX Express 96 magnets are made of material that is very stable. The magnetic field will not get weaker. However, extreme mechanical force or heating can cause damage to the magnets. Note: It is very important to keep the MagMAX Express 96 heads away from each other and other magnets at all times. Clashing of the magnets together may cause serious damage to the magnets. Q4. How strong are the magnets? Can they, for example, disturb some sensitive equipment? A4. The MagMAX Express 96 should not be kept in close proximity to magnetic tapes, computer discs or other magnetic storage systems, such as credit cards, as these can be damaged by the strong magnetic field of the MagMAX Express 96 heads. Do not hold the MagMAX Express 96 heads close to a PC display, since this may cause damage to the display. Do not use metal tools when handling MagMAX Express 96 heads. Warning: This product contains very strong permanent magnets. People wearing a pacemaker or metallic prostheses should not use this product. A pacemaker or prostheses may be affected or damaged if it comes in close contact with a strong magnetic field. Q5. How can the MagMAX Express 96 heads be changed? A5. By running the.change_magnet protocol using the up and down cursor keys. ** not available for this product Applied Biosystems MagMAX Express 96 User Manual; Rev. 1.4; January
57 Chapter 9: Troubleshooting Guide Q6. Can I concentrate the sample during the run? A6. Both deep well plates and MagMAX Express 96 plates can be used during the same run. Therefore, it is possible to start the processing by using larger volumes (in a deep well plate) and elute the purified sample to a smaller volume (in a MagMAX Express 96 plate). Q7. How does the heating block work? A7. The heating block is located inside the instrument and can be used automatically during the protocol. Both MagMAX Express 96 plates and PCR plates (skirted)** can be heated using specially designed, interchangeable heating blocks. Any number of heating steps can be added to the protocol. During the protocol, when the protocol enters the heating step, the plate is automatically moved to the dedicated heating position for heating. After the heating step the protocol continues automatically to the next step. Note: No cooling steps can be added. Q8: How long does it take the heater to warm up from RT to 80 C? A8: The heating block warms up about 10 degrees per minute, so it will take about 6 minutes. Q9. What should I do if the magnets set are dirty? A9. Wipe the magnetic rods with a soft cloth or tissue paper soaked in a mild detergent solution, soap solution or alcohol. Q10. What should I do if I forget to insert the tip combs into the tip comb holder? A10. The protocol will not start without the tip combs inserted into the tip comb holder. Q11. What if the magnetic particles remained in the sample well? A11. If the starting material is too viscose, the magnetic rods will not be able to collect the particles. Dilute the sample and check that the sample is properly homogenized/lysed. Q12. What if the magnetic particles are attached to the tip combs after the run? A12. This happens sometimes but it will not affect the yield because the sample has been released from the particles. Q13. Are the volumes of reagents in each well critical? A13. It is strongly recommended that you keep the specified volumes within the defined limits to avoid spillover in the performance of the chemical reactions and the processor. Q14. Is it always compulsory to use the transport locks? A14. The transport locks are only necessary when relocating the instrument. ** not available for this product Applied Biosystems MagMAX Express 96 User Manual; Rev. 1.4; January
58 Chapter 9: Troubleshooting Guide 9.4 Service request protocol If the MagMAX Express 96 requires service, contact your local Applied Biosystems representative or Applied Biosystems service department. Do not under any circumstances send the instrument for service without any prior contact. It is imperative to indicate the fault and nature of the required service. This will ensure a faster return of the instrument to the customer. Your Applied Biosystems representative or distributor will take care of sending a complaint form (Complaint-order) to Applied Biosystems service department. The Complaint-order contains a more detailed description of the fault, symptom or condition. Give all the necessary information to the distributor, who will fill in and forward the Complaint-order to Applied Biosystems service department. Check Section 7.4 How to pack for service. You will find instructions on how to proceed before shipping the instrument for service. Check that any necessary decontamination procedure has been carried out before packing. See Appendix C on decontamination. Refer also to Section 7.3 Decontamination procedure. Ensure that the Certificate of Decontamination as well as the return goods authorization number (RGA) are sent with the instrument. Applied Biosystems service department will keep you up to date with the progress of service and provide you with any further details you might need, for example, on maintenance, serviceability, troubleshooting and replacement. Applied Biosystems MagMAX Express 96 User Manual; Rev. 1.4; January
59 Chapter 10: Warranty Information 10 Warranty Information Instrument Warranty Information Computer Configuration Applied Biosystems supplies or recommends certain configurations of computer hardware, software, and peripherals for use with its instrumentation. Applied Biosystems reserves the right to decline support for or impose extra charges for supporting nonstandard computer configurations or components that have not been supplied or recommended by Applied Biosystems. Applied Biosystems also reserves the right to require that computer hardware and software be restored to the standard configuration prior to providing service or technical support. For systems that have built-in computers or processing units, installing unauthorized hardware or software may void the Warranty or Service Plan. Limited Product Warranty Limited Warranty Applied Biosystems warrants that all standard components of its Applied Biosystems MagMAX Express 96 Magnetic Particle Processor will be free of defects in materials and workmanship for a period of one (1) year from the date the warranty period begins. Applied Biosystems will repair or replace, at its discretion, all defective components during this warranty period. After this warranty period, repairs and replacement components may be purchased from Applied Biosystems at its published rates. Applied Biosystems also provides service agreements for post-warranty coverage. Applied Biosystems reserves the right to use new, repaired, or refurbished instruments or components for warranty and post-warranty service agreement replacements. Repair or replacement of products or components that are under warranty does not extend the original warranty period. Applied Biosystems warrants that all optional accessories supplied with its Applied Biosystems MagMAX Express 96 Magnetic Particle Processor, such as peripherals, printers, and special monitors, will be free of defects in materials and workmanship for a period of ninety (90) days from the date the warranty begins. Applied Biosystems will repair or replace, at its discretion, defective accessories during this warranty period. After this warranty period, Applied Biosystems will pass on to the buyer, to the extent that it is permitted to do so, the warranty of the original manufacturer for such accessories. With the exception of consumable and maintenance items, replaceable products or components used on or in the instrument are themselves warranted to be free of defects in materials and workmanship for a period of ninety (90) days. Applied Biosystems warrants that chemicals and other consumable products will be free of defects in materials and workmanship when received by the Applied Biosystems MagMAX Express 96 User Manual; Rev. 1.4; January
60 Chapter 10: Warranty Information Warranty Period Effective Date Warranty Claims buyer, but not thereafter, unless otherwise specified in documentation accompanying the product. Applied Biosystems warrants that for a period of ninety (90) days from the date the warranty period begins, the tapes, diskettes, or other media bearing the operating software of the product, if any, will be free of defects in materials and workmanship under normal use. If there is a defect in the media covered by the above warranty and the media is returned to Applied Biosystems within the ninety (90) day warranty period, Applied Biosystems will replace the defective media. Applied Biosystems does not warrant that the operation of the instrument or its operating software will be uninterrupted or error free. Any applicable warranty period under these sections begins on the earlier of the date of installation or ninety (90) days from the date of shipment for hardware and software installed by Applied Biosystems personnel. For all hardware and software installed by the buyer or anyone other than Applied Biosystems, and for all other products, the applicable warranty period begins the date the product is delivered to the buyer. Warranty claims must be made within the applicable warranty period, or, for chemicals or other consumable products, within thirty (30) days after receipt by the buyer. Warranty Exceptions The above warranties do not apply to defects resulting from misuse, neglect, or accident, including without limitation: operation with incompatible solvents or samples in the system; operation outside of the environmental or use specifications or not in conformance with the instructions for the instrument system, software, or accessories; improper or inadequate maintenance by the user; installation of software or interfacing, or use in combination with software or products, not supplied or authorized by Applied Biosystems; and modification or repair of the product not authorized by Applied Biosystems. Warranty Limitations THE FOREGOING PROVISIONS SET FORTH APPLIED BIOSYSTEMS SOLE AND EXCLUSIVE REPRESENTATIONS, WARRANTIES, AND OBLIGATIONS WITH RESPECT TO ITS PRODUCTS, AND APPLIED BIOSYSTEMS MAKES NO OTHER WARRANTY OF ANY KIND WHATSOEVER, EXPRESSED OR IMPLIED, INCLUDING WITHOUT LIMITATION, WARRANTIES OF MERCHANTABILITY AND FITNESS FOR A PARTICULAR PURPOSE, WHETHER ARISING FROM A STATUTE OR OTHERWISE IN LAW OR FROM A COURSE OF DEALING OR USAGE OF TRADE, ALL OF WHICH ARE EXPRESSLY DISCLAIMED. THE REMEDIES PROVIDED HEREIN ARE THE BUYER'S SOLE AND EXCLUSIVE REMEDIES. WITHOUT LIMITING THE GENERALITY OF THE FOREGOING, IN NO EVENT SHALL APPLIED BIOSYSTEMS BE LIABLE, WHETHER IN CONTRACT, TORT, WARRANTY, OR UNDER ANY STATUTE (INCLUDING WITHOUT LIMITATION, ANY TRADE PRACTICE, UNFAIR COMPETITION, OR OTHER STATUTE OF SIMILAR IMPORT) OR Applied Biosystems MagMAX Express 96 User Manual; Rev. 1.4; January
61 Chapter 10: Warranty Information Damages, Claims, and Returns ON ANY OTHER BASIS, FOR DIRECT, INDIRECT, PUNITIVE, INCIDENTAL, MULTIPLE, CONSEQUENTIAL, OR SPECIAL DAMAGES SUSTAINED BY THE BUYER OR ANY OTHER PERSON OR ENTITY, WHETHER OR NOT FORESEEABLE AND WHETHER OR NOT APPLIED BIOSYSTEMS IS ADVISED OF THE POSSIBILITY OF SUCH DAMAGES, INCLUDING WITHOUT LIMITATION, DAMAGES ARISING FROM OR RELATED TO LOSS OF USE, LOSS OF DATA, FAILURE OR INTERRUPTION IN THE OPERATION OF ANY EQUIPMENT OR SOFTWARE, DELAY IN REPAIR OR REPLACEMENT, OR FOR LOSS OF REVENUE OR PROFITS, LOSS OF GOOD WILL, LOSS OF BUSINESS, OR OTHER FINANCIAL LOSS OR PERSONAL INJURY OR PROPERTY DAMAGE. NO AGENT, EMPLOYEE, OR REPRESENTATIVE OF APPLIED BIOSYSTEMS HAS ANY AUTHORITY TO MODIFY THE TERMS OF THIS LIMITED WARRANTY STATEMENT OR TO BIND APPLIED BIOSYSTEMS TO ANY AFFIRMATION, REPRESENTATION, OR WARRANTY CONCERNING THE PRODUCT THAT IS NOT CONTAINED IN THIS LIMITED WARRANTY STATEMENT, AND ANY SUCH MODIFICATION, AFFIRMATION, REPRESENTATION, OR WARRANTY MADE BY ANY AGENT, EMPLOYEE, OR REPRESENTATIVE OF APPLIED BIOSYSTEMS WILL NOT BE BINDING ON APPLIED BIOSYSTEMS, UNLESS IN A WRITING SIGNED BY AN EXECUTIVE OFFICER OF APPLIED BIOSYSTEMS. THIS WARRANTY IS LIMITED TO THE BUYER OF THE PRODUCT FROM APPLIED BIOSYSTEMS AND IS NOT TRANSFERABLE. Some countries or jurisdictions limit the scope of or preclude limitations or exclusion of warranties, of liability, such as liability for gross negligence or willful misconduct, or of remedies or damages, as or to the extent set forth above. In such countries and jurisdictions, the limitation or exclusion of warranties, liability, remedies or damages set forth above shall apply to the fullest extent permitted by law, and shall not apply to the extent prohibited by law. Damages Claims If shipping damage to the product is discovered, contact the shipping carrier and request inspection by a local agent. Secure a written report of the findings to support any claim. Do not return damaged goods to Applied Biosystems without first securing an inspection report and contacting Applied Biosystems Technical Support for a Return Authorization (RA) number. After a damage inspection report is received by Applied Biosystems, Applied Biosystems will process the claim unless other instructions are provided. Applied Biosystems MagMAX Express 96 User Manual; Rev. 1.4; January
62 Chapter 10: Warranty Information Returns Do not return any material without prior notification and authorization. If for any reason it becomes necessary to return material to Applied Biosystems, contact Applied Biosystems Technical Support or your nearest Applied Biosystems subsidiary or distributor for a return authorization (RA) number and forwarding address. Place the RA number in a prominent location on the outside of the shipping container, and return the material to the address designated by the Applied Biosystems representative. Applied Biosystems MagMAX Express 96 User Manual; Rev. 1.4; January

63 Chapter 11: Ordering Information 11 Ordering Information Code Instrument / System MagMAX Express 96 Standard, V MagMAX Express 96 Deep Well, V 11.1 List of accessories Code Item Quantity N07849 MagMAX Express 96 User Manual MagMAX Express 96 Head for 96 plate MagMAX Express 96 Head for Deep Well plate MagMAX Express 96 Tip Comb for KF magnets 10 x 10 pcs/box MagMAX Express 96 Tip Comb for DW magnets 10 x 10 pcs/box MagMAX Express 96 Plate (200 ul) 48 plates/box 11.2 List of spare parts Code Item Quantity Serial cable F9/F25 (for RS-232C port) KingFisher Software (Fig. 11.1) 1 Fig KingFisher Software CD Applied Biosystems MagMAX Express 96 User Manual; Rev. 1.4; January
64 Chapter 12: Glossary and Abbreviations 12 Glossary and Abbreviations Heating block MagMAX Express 96 head Magnetic bead (Magnetic particle) Magnetic rod Plate There are two different kinds of interchangeable heating blocks available, that is, for PCR plates** and MagMAX Express 96 plates (Fig. 6.14). You can only use the following 96-well plates: MagMAX Express 96 plate ( µl*) PCR plate ( µl*), skirted** * = recommended filling volume There are three kinds of interchangeable MagMAX Express 96 heads available (Fig. 5.15), for MagMAX Express 96 plates, deep well plates and PCR plates (skirted)**. The MagMAX Express 96 heads all have corresponding disposable plastic tip combs. The magnetic particles attach to the magnetic rods (Fig. 4.6 and Fig. 4.7) that are protected by a disposable tip comb. The magnetic particles enable the purification of a variety of target molecules. The rods which are magnetic and collect magnetic particles (Fig. 6.10). The rods do not collect the particles on their own, the magnetic rods must always be protected by a tip comb. The disposable plates (1 8) where all the reagents and samples are located and where the processing takes place. Three different types of 96-well plates that can be used are as follows: MagMAX Express 96 plate ( µl*) (Fig. 6.12) PCR plate ( µl*), skirted** Deep well plate ( µl*), squared well * = recommended filling volume Shield plate Tip comb When the turntable moves, the shield plate moves over the plate underneath (Fig. 6.11) forming a protective cover. Protects the magnetic rods (96 in a frame). A disposable tip comb always has to be placed onto the microplate prior to processing. There are three different kinds of disposable tip combs available (Fig. 5.15): for the MagMAX Express 96 plate for the PCR plate, skirted** for the deep well plate, squared well Turntable A turntable with eight plate stations that can be detached for cleaning purposes (Fig. 4.1, item 7). ** not available for this product Applied Biosystems MagMAX Express 96 User Manual; Rev. 1.4; January
65 Chapter 12: Glossary and Abbreviations 12.1 Keywords for web pages Applied Biosystems bead-based beads biopanning cell enrichment cell purification cell separation DNA DNA immobilization DNA purification DNA strand separation DNA template double-stranded DNA genomic DNA genomics GST-tag proteins His-tag proteins immunomagnetic separation immunoprecipitation MagMAX Express 96 magnetic beads magnetic capture magnetic microspheres magnetic particles magnetic separation microspheres nucleic acids oligo-dt particles PCR product phage display post PCR purification primer processing processor protein purification proteomics purification RNA mrna recombinant protein purification RT-PCR separation silica-coated particles streptavidin-coated beads streptavidin-coated particles superparamagnetic beads superparamagnetic microspheres 12.2 Literature Aasheim, H.-C., Deggerdal, A., Smeland, E. B. and Hornes, E. (1994): A simple subtraction method for the isolation of cell-specific genes using magnetic mono-disperse polymer particles. Biotechniques 16 (4), Boom, R., Sol, C. J. A., Salimans, M. M. M., Jansen, C. L., Wertheim-van Dillen, P. M. E. and van der Noordaa, J. (1990): Rapid and simple method for purification of nucleic acid. J. Clin. Microbiol., Boom, W. R., Adriaanse, H. H., Kievits, T. and Lens, P. F. (1993): Process for isolating nucleic acids. Che, S. and Ginsberg, S. D. (2004): Amplification of RNA transcripts using terminal continuation. Laboratory Investigation 84, Coche, T., Dewez, M. and Beckers, M.-C. (1994): Generation of an unlimited supply of subtracted probe using magnetic beads and PCR. Nucleic Acids Res. 22, Coty, C. (2002): Purifying Nucleic Acids. Genomics & Proteomics 2 (1), Cudjoe, K. S. (1999): Immunomagnetic particle based techniques: Overview. In: Eds.: Robinson, R. K., Batt, C. A. and Patel, P. D. Encyclopaedia of Food Microbiology. Academic Press, London, UK. Pp Ginsberg, S. D. (2002): High quality mrna extraction with KingFisher for molecular fingerprinting. Focus 1, 5. Applied Biosystems MagMAX Express 96 User Manual; Rev. 1.4; January
66 Chapter 12: Glossary and Abbreviations Ginsberg, S. D. and Che, S. (2002): RNA Amplification in Brain Tissues. Neurochem. Res. 27 (10), Hawkins, D. J., O Connor-Morin, T., Roy, A. and Santillan, C. (1994): DNA purification and isolation using a solid-phase. Nucleic Acids Res. 22, Hornes, E. and Korsnes, L. (1990): Magnetic DNA hybridisation properties of oligonucleotide probes attached to superparamagnetic beads and their use in the isolation of poly(a) mrna from eukaryotic cells. Genet. Anal. Tech. Appl. (GATA) 7, Jakobsen, K. S., Breivold, E. and Hornes, E. (1990): Purification of mrna directly from crude plant tissues in 15 minutes using oligo dt microspheres. Nucleic Acids Res. 18, Jakobsen, K. S., Haugen, M., Sæboe-Larsen, S., Hollung, K., Espelund, M. and Hornes, E. (1994): Direct mrna isolation using magnetic Oligo (dt) Beads: A protocol for all types of cell cultures, animal and plant tissues. In: Eds.: Uhlén, M., Hornes, E. and Olsvik, Ø. Advances in Biomagnetic Separation. Eaton Publishing. Pp Kim, I.-J. et al. (2003): Development and Applications of a β-catenin Oligonucleotide Microarray: β-catenin Mutations Are Dominantly Found in the Proximal Colon Cancers with Microsatellite Instability. Clin. Cancer Res. 9, Konthur, Z. and Walter, G. (2002): Automation of phage display for highthroughput antibody development. TARGETS 1 (1), Lambert, K. N. and Williamson, V. M. (1993): DNA library construction from small amounts of RNA using paramagnetic beads and PCR. Nucleic Acids Res. 21, Lee, Y.-H., and Vacquier, V. D. (1992): Reusable cdna libraries coupled to magnetic beads. Anal. Biochem. 206, Lund, M., Wedderkopp, A., Wainø, M., Nordentoft, S., Bang, D. D., Pedersen, K. and Madsen, M. (2003): Evaluation of PCR for detection of Campylobacter in a national broiler surveillance programme in Denmark. J. Appl. Microbiol. 94, Mäkinen, J., Marttila, H. and Viljanen, M. K. (2001): Automated purification of Borrelia burgdorferi s.1. PCR products with KingFisher magnetic particle processor prior to genome sequencing. Journal of Magnetism and Magnetic Materials 225, Rudi, K., Kroken, M., Dahlberg, O. J., Deggerdal, A., Jakobsen, K. S. and Larsen, F. (1997): Rapid, universal method to isolate PCR-ready DNA using magnetic beads. BioTechniques 22, Sinclair, B. (1998): To bead or not to bead. Applications of magnetic bead technology. Scientist 12, Valenzuela, D. M. et al. (2003): High-throughput engineering of the mouse genome coupled with high-resolution expression analysis. Nature Biotechnology 21 (6), Applied Biosystems MagMAX Express 96 User Manual; Rev. 1.4; January
67 Chapter 13: Index 13 Index A Abbreviations About the User Manual Accessories... 19, 62 Advantages of processing magnetic particles Application... 8, 34 B Brief User s Guide C Certificate of Decontamination , 57, 71 Clean... 20, 46, 47, 48, 54 magnetic rods shield plate turntable Concentration... 13, 17, 18 D Decontamination , 47, 48, 49, 57, 71 Decontamination procedure , 47, 48, 57 Deep well plate , 28, 30, 43, 50, 55, 56, 62, 63 Dimensions Directives Dispenser sliding cover Disposal of instrument Disposal of materials DNA... 55, 64, 65 E Environmental requirements Error message... 10, 53, 54 F FAQ Feedback Form... 19, 70 Frequently asked questions G Glossary H Heating block , 20, 23, 24, 25, 26, 31, 32, 33, 35, 43, 44, 56, 63 How to clean the magnetic rods How to clean the shield plate How to clean the turntable How to decontaminate the instrument , 47, 57 How to ensure startup How to fit the sub-assemblies of the instrument into place How to install the MagMAX Express , 51 How to maintain the instrument How to pack for service... 48, 57 Applied Biosystems MagMAX Express 96 User Manual; Rev. 1.4; January
68 Chapter 13: Index How to refit the transport lock of the heating block , 31 How to refit the transport lock of the tip comb holder , 24, 34 How to release the transport locks How to setup the instrument before you put it into operation How to shut down How to switch on... 36, 43 How to troubleshoot the instrument How to unpack How to use the keypad and display How to work with a magnetic rod I Incubation... 13, 17, 18 Installation , 19, 20, 48, 51, 70 Instrument layout Intended use Inverse magnetic particle processing K Keypad and display... 13, 16, 37 Keys... 25, 29, 37, 39, 43, 50, 55 Keywords for web pages KingFisher Software L Literature Loading position M Magnet head , 20, 28, 29, 30, 31, 40, 43, 47, 50, 54, 55, 62, 63 Magnetic particles , 16, 17, 18, 56, 63, 64 collection of release of wash of... 17, 18 Magnetic rod , 16, 17, 18, 29, 43, 47, 50, 56, 63 Maintain Maintenance... 8, 10, 46, 57 Measurement chamber chamber door O Operational check... 31, 36 Ordering information... 10, 62 P Packing... 19, 48, 49, 57 instructions... 19, 48 list materials PCR , 26, 28, 31, 43, 44, 45, 50, 55, 56, 63, 64, 65 plate , 26, 28, 43, 44, 45, 50, 55, 56, 63 Plate.. 8, 13, 14, 16, 17, 18, 25, 26, 27, 28, 30, 36, 37, 38, 39, 40, 41, 42, 43, 44, 45, 46, 47, 50, 53, 55, 56, 62, 63, 69, 73 station , 16, 39, 40, 63 tray type Pollution degree Applied Biosystems MagMAX Express 96 User Manual; Rev. 1.4; January
69 Chapter 13: Index Processing head Protocol , 16, 25, 29, 31, 37, 39, 40, 43, 44, 54, 55, 56, 57, 65, 69 R Refitting the transport locks , 23, 24, 31, 34 Releasing the transport locks S Samples , 16, 20, 43, 47, 49, 50, 56, 63, 69 See-through lid.... 8, 14, 16, 31, 36, 39, 43, 48, 69 Service , 45, 46, 48, 54, 57 pack for... 48, 57 request protocol Shield plate , 26, 27, 28, 42, 46, 47, 53, 63 Shutdown Sliding door.... 8, 14, 16, 31, 36, 39, 43, 69 Software Specifications , 13, 49, 50, 51 general performance safety... 49, 51 Startup... 24, 36, 43 T Tip comb , 16, 17, 18, 20, 21, 22, 24, 28, 29, 34, 35, 38, 39, 40, 42, 43, 45, 47, 50, 56, 62, 63, 69 holder , 21, 22, 24, 29, 34, 35, 42, 56 Transport , 20, 21, 22, 23, 24, 31, 32, 33, 34, 35, 48, 49, 50, 56 damage locks , 21, 22, 23, 24, 31, 32, 33, 34, 35, 48, 56 package... 19, 48, 50 Tray Troubleshooting... 10, 53, 54, 57 guide U Unpack... 19, 38 V View... 14, 15 front rear/side Voltage W Warnings.... 7, 8, 15, 19, 20, 24, 26, 29, 36, 44, 45, 46, 47, 48, 49, 53, 54, 55 Warranty... 10, 19, 36, 58 Weight... 20, 50 Applied Biosystems MagMAX Express 96 User Manual; Rev. 1.4; January
70 Appendix A: MagMAX Express 96 Brief User s Guide 14 Appendix A. MagMAX Express 96 Brief User s Guide 1. Switch the MagMAX Express 96 ON (p. 36). 2. Pipette the samples, reagents and wash buffers into the plates (pp. 13 and 16). 3. Combine the tip comb and MagMAX Express 96 plate manually (p. 38) (Fig. 6.5 and Fig. 6.6). 4. Select the desired protocol, for example, Demo, from the keypad (p. 39) OR use KingFisher Software to run the protocol. Use the RS- 232C cable to connect the instrument and PC. 5. Press the start button (p. 39). Alternatively, if the PC connection is used, follow the instructions on the instrument display carefully. 6. Open the sliding door if the see-through lid is in place (p. 14) (Fig. 4.2). 7. Then load the plates onto the loading station according to the protocol. Press start after each plate to confirm loading (p. 39) (Fig. 6.8 and Fig. 6.9). 8. After the process remove all the plates according to the protocol. Confirm removal by pressing start after each plate (p. 43). Note that the plate containing your samples is removed first. 9. Finally, END_OF_RUN is displayed. At the end of the run press the stop button (p. 43). 10. Switch OFF the MagMAX Express 96 (p. 45). Fig MagMAX Express 96 keypad Applied Biosystems MagMAX Express 96 User Manual; Rev. 1.4; January
71 Please send to Applied Biosystems Fax: (512) Appendix B: MagMAX Express 96 Feedback Form 15 Appendix B. MagMAX Express 96 Feedback Form Instrument: MagMAX Express MagMAX Express 96 Instrument serial no.: Software serial no. (from the KingFisher Software installation CD cover) PURCHASED BY Company/Institute PURCHASED FROM Distributor Department Address Address Tel. Fax Tel. Date of delivery Internet home page Date of purchase Your research area Dr. Mr. Mrs. Ms. Job title/position Surname (block capitals) First name (block capitals) Internet address Excellent Above As Below Comments expectations expected expectations Software installation Ease of use Flexibility Design User manual Customer support Overall Additional software features desired: Did you encounter any problems? Where did you first learn about the product? Would you like to receive information about other Applied Biosystems products? Applied Biosystems MagMAX Express 96 User Manual; Rev. 1.4; January

72 Please send to Applied Biosystems Fax: (512) Appendix C: Certificate of Instrument Decontamination 16 Appendix C. Certificate of Instrument Decontamination Applied Biosystems MagMAX Express 96 User Manual; Rev. 1.4; January
MagMAX Express User Manual
 MagMAX Express User Manual Rev. B Copyright 2008, 2011 Applied Biosystems. All rights reserved. Information in this document is subject to change without notice. Applied Biosystems assumes no responsibility
Protocol. Path-ID Multiplex One-Step RT-PCR Kit Protocol TaqMan probe-based multiplex one-step real-time RT-PCR detection of RNA targets
 Protocol TaqMan probe-based multiplex one-step real-time RT-PCR detection of RNA targets For Research Use Only. Not for use in diagnostic procedures. Information in this document is subject to change without
Applied Biosystems QuantStudio 12K Flex Real-Time PCR System
 USER GUIDE Applied Biosystems QuantStudio 12K Flex Real-Time PCR System SITE PREPARATION Publication Part Number 4470654 Rev. B Revision Date 5 May 2012 This guide contains the information needed to prepare
MagMAX FFPE RNA Isolation
 QUICK REFERENCE MagMAX FFPE RNA Isolation Automated or manual isolation of RNA from FFPE samples Catalog Number 4463365 Pub. No. 100033279 Rev. A Note: For safety and biohazard guidelines, refer to the
Table of contents. 1. Introduction
 2 Year Warranty Table of contents 1. Introduction 1-1. Transportation 1-2. Preliminary steps 1-3. Initial setup 1-4. Important safety instructions 1-5. Maintenance, service and faults 2. Operation 2.1
PrepFiler Express and PrepFiler Express BTA Forensic DNA Extraction Kits
 QUICK REFERENCE CARD PrepFiler Express and PrepFiler Express BTA Forensic DNA Extraction Kits Note: For safety and biohazard guidelines, refer to the Safety section in the PrepFiler Express and PrepFiler
! CAUTION: Read and follow these instructions.
 OmniLog SAFETY AND INSTALLATION INSTRUCTIONS! CAUTION: Read and follow these instructions. Avoid Contact with Hazardous Live Parts WARNING: Risk of electrical shock. Refer servicing to qualified personnel.
Operation guide. High Capacity Stacker-H1
 Operation guide High Capacity Stacker-H1 Copyright Copyright CANON INC. 2015 No part of this publication may be reproduced, transmitted, transcribed, stored in a retrieval system, or translated into any
Saphyr System Safety Guide for Saphyr P/N 60325
 Saphyr System Safety Guide for Saphyr P/N 60325 Document Number: 30253 Document Revision: A For Research Use Only. Not for use in diagnostic procedures. Copyright 2019 Bionano Genomics Inc. All Rights
Carbon Canister Vapor Polisher
 Manual No: 577013-984 Revision: A Carbon Canister Vapor Polisher Removal Guide Notice Veeder-Root makes no warranty of any kind with regard to this publication, including, but not limited to, the implied
Thermo Scientific KingFisher Cell and Tissue DNA Kit Instruction Manual Rev. 1.2
 Thermo Scientific KingFisher Cell and Tissue DNA Kit Instruction Manual Rev. 1.2 Thermo Scientific KingFisher Cell and Tissue DNA Kit Instruction Manual Rev. 1.2, Cat. no. N11997 Copyright 2012 Thermo
PrepSEQ Residual DNA Sample Preparation Kit
 USER GUIDE PrepSEQ Residual DNA Sample Preparation Kit for use with: resdnaseq Quantitative E. coli DNA kit resdnaseq Quantitative Vero DNA kit Publication Part Number 4460663 Rev. B Revision Date May
Tube Revolver. Catalog # & Operation Manual User Manual
 Tube Revolver Catalog #88881001 & 88881002 Operation Manual 9240-11-021 User Manual Preface Important Read this instruction manual. Failure to read, understand and follow the instructions in this manual
2200-Lb. Semi-Electric Stacker OWNER S MANUAL
 2200-Lb. Semi-Electric Stacker OWNER S MANUAL WARNING: Read carefully and understand all ASSEMBLY AND OPERATION INSTRUCTIONS before operating. Failure to follow the safety rules and other basic safety
Polymer Block Cleaning Kit
 Polymer Block Cleaning Kit For Applied Biosystems 3730/3730xl DNA Analyzers Protocol April 29, 2003 11:17 am, Title.fm Copyright 2003, Applied Biosystems. All rights reserved. For Research Use Only. Not
VetMAX -Plus Multiplex One-Step RT-PCR Kit TaqMan probe-based multiplex one-step real-time RT-PCR amplification of RNA targets.
 VetMAX -Plus Multiplex One-Step RT-PCR Kit TaqMan probe-based multiplex one-step real-time RT-PCR amplification of RNA targets Protocol Copyright 2010, Life Technologies Corporation. All rights reserved.
Manual Rotary Heat Sealers. Type: F108TX. List of content : Introduction 2. General description 3. Application 4. Safety precautions 5
 Manual Rotary Heat Sealers Type: F108TX List of content : Page: Introduction 2 General description 3 Application 4 Safety precautions 5 Transport and storage 6 Installation 7 First Set-up 8 Connection
nual k Excella E-1 Open Air Shaker N) manual New Brunswick Excella E-1 Open Air Shaker Operating manual
 manual New Brunswick Excella E-1 Open Air Shaker Operating manual") nual k Excella E-1 Open Air Shaker N) manual New Brunswick Excella E-1 Open Air Shaker Operating manual Copyright 2014 Eppendorf AG, Germany. No part of this publication may be reproduced without the prior
nual k Excella E-1 Open Air Shaker N) manual New Brunswick Excella E-1 Open Air Shaker Operating manual Copyright 2014 Eppendorf AG, Germany. No part of this publication may be reproduced without the prior
PrepSEQ Residual DNA Sample Preparation Kit
 QUICK REFERENCE PrepSEQ Residual DNA Sample Preparation Kit Catalog Numbers 4413686 (kit), 4415414 (kit with protocol and quick reference card), 4413713 (combo kit ), and 4415413 (combo kit with protocol
User Manual. Precision Balances XSR models
 User Manual XSR models Overview balances with S weighing platform 4 3 5 2 3 1 6 7 2 8 8 10 9 10 9 Legend balances with S weighing platform 1 MagicCube Draft Shield 6 MagicCube Draft Shield side door 2
Agilent 1220 Infinity LC Mobile Upgrade Kit
 Agilent 1220 Infinity LC Mobile Upgrade Kit User Manual Agilent Technologies Notices Agilent Technologies, Inc. 2012 No part of this manual may be reproduced in any form or by any means (including electronic
DJ Switch 10F V2 ORDERCODE 50365
 DJ Switch 10F V2 ORDERCODE 5035 Congratulations! You have bought a great, innovative product from Showtec. The Showtec DJ Switch brings excitement to any venue. Whether you want simple plug-&-play action
6 Closet light. Model Due to continuing improvements, actual product may differ slightly from the product described herein.
 6 Closet light Model 95792 Assembly And Operation Instructions Due to continuing improvements, actual product may differ slightly from the product described herein. 3491 Mission Oaks Blvd., Camarillo,
Instruction Manual HT 24 BM-D2400 Homogenizer
 Instruction Manual HT 24 BM-D2400 Homogenizer Foreword Thank you for purchasing a HT 24 Homogenizer. This manual contains instructions for the proper operation and care of this instrument. Please read
Viral Prep Adem-kit. AutoMag Solution
 Viral Prep Adem-kit AutoMag Solution 06231 Version 1.0 Instruction manual for automation protocol Prefilled reagents for the AutoMag Instrument The kit is used for optimal viral RNA/DNA extraction from
7 PIECE TUBE FLARING KIT
 7 PIECE TUBE FLARING KIT Model 5969 Set up And Operating Instructions Diagrams within this manual may not be drawn proportionally. Due to continuing improvements, actual product may differ slightly from
Circular Expansion Cement Curing Kit Instruction Manual
 Circular Expansion Cement Curing Kit Instruction Manual Manual No. 101443617, Revision C Instrument No. 205814 2015 Fann Instrument Company 2015 Fann Instrument Company Houston, Texas, USA All rights reserved.
64C Amplification Block. Instruction Manual
 64C Amplification Block Instruction Manual Caution: All rights reserved. Quidel Corporation reserves the right to modify this manual at any time without notice. Any part of the manual shall not be duplicated,
Operation Manual. Dual Temperature Digital Dry Block Incubator. Catalog No. INCUBATOR Rev C. April 2016
 Operation Manual Dual Temperature Digital Dry Block Incubator Catalog No. INCUBATOR2 Rev C. April 2016-1 - Thank you for your purchase. This manual contains operation information for the Dual Temperature
STI Extraction Kit. REF: ; 48 extractions. Store at 15 C - 35 C. For use with the Nextractor Instrument. For Professional Use Only
 STI Extraction Kit REF: 651-01; 48 extractions 652-01; 96 extractions Store at 15 C - 35 C For use with the Nextractor Instrument For Professional Use Only Savyon Diagnostics Ltd. 3 Habosem St. Ashdod
Owner s Manual & Safety Instructions
 Owner s Manual & Safety Instructions Save This Manual Keep this manual for the safety warnings and precautions, assembly, operating, inspection, maintenance and cleaning procedures. Write the product s
Protocol. PrepSEQ Nucleic Acid Extraction Kit
 Protocol PrepSEQ Nucleic Acid Extraction Kit Copyright 2009, 2010 Applied Biosystems. All rights reserved. For Research Use Only. Not for use in diagnostic procedures. Information in this document is subject
USER GUIDE. for. Automated purification of genomic DNA from bacteria with. KingFisher 96/ KingFisher ml and chemagic DNA Bacteria Kit
 USER GUIDE for Automated purification of genomic DNA from bacteria with KingFisher 96/ KingFisher ml and chemagic DNA Bacteria Kit 6.9.2006 Descripition Purification of DNA from bacteria with chemagen
GI DNA Extraction Kit
 GI DNA Extraction Kit REF: 655-01; 48 extractions (32 wells plate) 656-01; 48 extractions (96 wells plate) Store at 15 C-35 C For use with the Nextractor Instrument For Professional Use Only Savyon Diagnostics
BQ Revision : 1 ( )
") Bioneer Corporation 8-11,Munpyeongseo-ro, Daedeok-gu, Daejeon 34302, Republic of Korea Tel: +82-42-930-8777 Fax: +82-42-930-8688 Email: sales@bioneer.co.kr 1 Warranty and Liability All BIONEER products
Bioneer Corporation 8-11,Munpyeongseo-ro, Daedeok-gu, Daejeon 34302, Republic of Korea Tel: +82-42-930-8777 Fax: +82-42-930-8688 Email: sales@bioneer.co.kr 1 Warranty and Liability All BIONEER products
C60 Standby UPS. 800VA Models. User & Installation Manual Xtreme Power Conversion Corporation. All rights reserved.
 For more information, visit www.247technology.com/on-line-ups/c60-standby-ups C60 Standby UPS 800VA Models User & Installation Manual 2015. All rights reserved. (Rev 6/23/15) Table of Contents Package
MagMAX CORE Mechanical Lysis Module
 MagMAX CORE Mechanical Lysis Module USER GUIDE Automated purification of high-quality nucleic acid from Mycobacterium avium subspecies paratuberculosis (MAP) and other difficult-to-lyse samples for use
MagMAX CORE Nucleic Acid Purification Kit
 MagMAX CORE Nucleic Acid Purification Kit USER GUIDE Automated purification of high-quality DNA and RNA from veterinary samples Catalog Number A32700 and A32702 Publication Number MAN0015944 Revision A.0
Quick-release pins swing the rack open from left to right to simplify installing and maintaining your equipment.
 RM070A-R3 RM080A-R3 Wallmount Frame User s Manual Quick-release pins swing the rack open from left to right to simplify installing and maintaining your equipment. Customer Support Information Order toll-free
FLARING MACHINE MAINTENANCE & INSTRUCTIONS MANUAL. Allswage UK. Roebuck Street, West Bromwich, B70 6RB
 FLARING MACHINE MAINTENANCE & INSTRUCTIONS MANUAL A. WARRANTY AND RESPONSIBILITY Warranty: It's the supplier's responsibility to guarantee the conformity of the product, assuring that it's manufactured
Installation, Operation & Maintenance Manual
 Original Instructions Installation, Operation & Maintenance Manual Sentry IC Indexing Cabinet Automatic Sampling Accessories S-AS-IOM-00462-2 11-17 Do not install, maintain, or operate this equipment without
Simplexa EBV Quantitation Standards
 Simplexa EBV Quantitation Standards REF MOL2410 Rev. C Simplexa EBV Quantitation Standards are intended to establish a standard curve with the Simplexa EBV assay on the 3M Integrated Cycler. For in vitro
Professional Weighing Equipment. K-Series Scales. Operation Manual KHR 6000 KHR 123 KHR 502 KHR 3001
 Professional Weighing Equipment K-Series Scales Operation Manual KHR 6000 KHR 123 KHR 502 KHR 3001 Table of Contents Section Page Declaration of Conformity 3 Customer Service 4 Introduction 5 Safety 6
Automate Express Instrument. Site Preparation Guide
 Automate Express Instrument Site Preparation Guide Copyright 2010, Applied Biosystems Corporation. All rights reserved. For research use only. Not intended for human or animal therapeutic or diagnostic
Industrial flue gas probes. Instruction manual
 Industrial flue gas probes Instruction manual 2 1 Contents 1 Contents 1 Contents... 3 2 Safety and the environment... 4 2.1. About this document... 4 2.2. Ensure safety... 4 2.3. Protecting the environment...
Applied Biosystems 7500 Fast Real-Time PCR System
 User Bulletin Applied Biosystems 7500 Fast Real-Time PCR System July 2006 SUBJECT: Using Expert Mode on the Applied Biosystems 7500 Fast Real-Time PCR System with the Applied Biosystems 7500 Fast System
AP5K-C Precision AC Double-Pulse Spot Welding Machine User s Manual Shenzhen Will-Best Electronics Co., Ltd
 AP5K-C Precision AC Double-Pulse Spot Welding Machine User s Manual Shenzhen Will-Best Electronics Co., Ltd 1 Content 1. Introduction...3 1.1 Functions...3 1.2 Units of AP5K-C...4 2. The Initial Installation
User Manual. Precision Balances and Comparators XPR models
 User Manual XPR models Overview balances with S weighing platform 0. mg 5 mg / 0 mg 4 3 2 5 2 8 7 6 0 9 8 0 9 Legend balances with S weighing platform DripTray 6 Safety foot 2 SmartPan weighing pan 7
Glide-Line Heavy Duty Lift Locate Unit (HLLU)
") V1.0 Glide-Line Heavy Duty Lift Locate Unit (HLLU) Installation & Maintenance Manual Easy Flexible Precise Fast i V1.0 Manual Information Throughout this manual are the following information blocks indicated
V1.0 Glide-Line Heavy Duty Lift Locate Unit (HLLU) Installation & Maintenance Manual Easy Flexible Precise Fast i V1.0 Manual Information Throughout this manual are the following information blocks indicated
Operating Manual. Professional Weighing Equipment. TB Series intelligent weighing machine. Touch Color Screen HIGH RESOLUTION BALANCE
 Professional Weighing Equipment Operating Manual TB Series intelligent weighing machine Touch Color Screen HIGH RESOLUTION BALANCE 1 Introduction What you should know about these Operating Instructions:
Bioneer Corporation 8-11, Munpyeongseo-ro, Daedeok-gu, Daejeon 34302, Republic of Korea Tel: Fax:
 Bioneer Corporation 8-11, Munpyeongseo-ro, Daedeok-gu, Daejeon 34302, Republic of Korea Tel: +82-42-930-8777 Fax: +82-42-930-8688 Email: sales@bioneer.co.kr Safety Warnings and Precautions ExiPrep TM Plus
MagMAX mirvana Total RNA Isolation Kit
 USER GUIDE MagMAX mirvana Total RNA Isolation Kit High-throughput isolation of RNA (including small RNA) from cells Catalog Number A27828 Pub. No. MAN0011138 Rev. A.0 WARNING! Read the Safety Data Sheets
MiT. MOVING image TECHNOLOGIES INSTRUCTIONS FOR INSTALLATION, OPERATION, AND MAINTENANCE. MPL Digital Pedestal. Manual Version 0.2
 MiT MOVING image TECHNOLOGIES INSTRUCTIONS FOR INSTALLATION, OPERATION, AND MAINTENANCE OF MPL Digital Pedestal Manual Version 0.2 MOVING image TECHNOLOGIES, LLC. 17760 Newhope St. Fountain Valley, CA
This product has been tested and certified to conform to ASTM F2456, Youth Resistant Firearms Container.
 Owner s Manual This product has been tested and certified to conform to ASTM F2456, Youth Resistant Firearms Container. RAPiD SAFE 2600KP Item No. 98177 Fold out for mounting template This device complies
OPERATION MANUAL. A220 Arc Welding Machine. Serial Number: Where Purchase: Date of purchased:
 OPERATION MANUAL A220 Arc Welding Machine Serial Number: Where Purchase: Date of purchased: CONTENT 1.Safety... 2 2. Summary... 4 3. Electrical principle drawing... 5 4. Specifications... 6 5. Operation
Operating Manual for Stacker 902. Revision E
 Operating Manual for Stacker 902 Revision E Operating Manual Stacker BMG LABTECH The Stacker is designed for use with BMG LABTECH microplate readers. In order to minimize manual microplate handling, you
HydroLink Watering System with Snake Tubing Installation, Operation & Maintenance Manual
 HydroLink Watering System with Snake Tubing Installation, Operation & Maintenance Manual This manual provides detailed instructions for safely installing, operating and maintaining the HydroLink Watering
Isolation of total nucleic acids from animal and human cells using the EZ1 RNA Cell Mini Kit
 QIAGEN Supplementary Protocol: Isolation of total nucleic acids from animal and human cells using the EZ1 RNA Cell Mini Kit This protocol is designed for the isolation of total nucleic acids (NA) from
MagMAX DNA Multi-Sample Ultra Kit
 MagMAX DNA Multi-Sample Ultra Kit High-throughput isolation of PCR-ready DNA from buccal swabs Catalog Numbers A25597 and A25598 Pub. No. MAN0010293 Rev. D.0 WARNING! Read the Safety Data Sheets (SDSs)
Instrument Manual. Revision C
 Instrument Manual Revision C Stacker II, project number 0901 Operating Manual BMG LABTECH This manual was designed to guide Stacker II users through the basic hardware features of the automatic plate handling
MagMAX -96 DNA Multi-Sample Kit MagMAX Express-96 Magnetic Particle Processor
 Protocol MagMAX -96 DNA Multi-Sample Kit MagMAX Express-96 Magnetic Particle Processor Protocol For Research Use Only. Not for use in diagnostic procedures. Information in this document is subject to change
Agilent Technologies 11752D/E Option K01 Connector Gage Kit. User s Guide
 Agilent Technologies 11752D/E Option K01 Connector Gage Kit User s Guide Manufacturing Part Number: 11752-90008 Print Date: September 2008 Copyright Agilent Technologies, Inc. 2000, 2008 i Warranty Statement
Bravo Platform Unpacking Guide
 This guide describes how to unpack the Bravo device from the shipping carton. Depending on the order, the shipment can include additional packages for the Bravo utilities, pipetting head, computer, and
FW66 FORESTRY WINCH FW66. Owner s Manual 19/02/2016
 FW66 FORESTRY WINCH FW66 19/02/2016 Owner s Manual TABLE OF CONTENTS INTRODUCTION ---------------------------------------------------------------------------------- 2 INTENDED USE -----------------------------------------------------------------------------------
VISE MOUNTED. Model 97359
 VISE MOUNTED Small English wheel Model 97359 Set up And Operating Instructions Diagrams within this manual may not be drawn proportionally. Due to continuing improvements, actual product may differ slightly
Turbocharger / TPL-C Original assembly instructions English
 Assembly Instructions Turbocharger / TPL-C Original assembly instructions English This document is valid for the TPL-C series: TPL79-C Purpose The assembly instructions explain how the ABB turbocharger
TallSlateTM Grandee Installation Manual
 TallSlateTM Grandee Installation Manual PLEASE READ THIS GUIDE COMPLETELY BEFORE INSTALLING OR USING THE SOLAR ELECTRIC MODULES Disclaimer of Liability...2 General Information...2 General Safety...2 TM
SelfCheck System R-Series. Site Planning Guide
 SelfCheck System R-Series Site Planning Guide Copyright 2006 2007, 3M. All rights reserved. SelfCheck System R-Series Site Planning Guide 78 8129 2082 1 Rev. C 3M, Tattle-Tape, and SelfCheck are trademarks
4 rotary milling table
 4 rotary milling table Model 97208 Set up And Operating Instructions Diagrams within this manual may not be drawn proportionally. Due to continuing improvements, actual product may differ slightly from
Operational Manual. Spectrophotometer Model: SP-830 PLUS. Metertech Inc. Version 1.07
 Operational Manual Spectrophotometer Model: SP-830 PLUS Metertech Inc. Version 1.07 Metertech Inc. provides this publication as is without warranty of any kind, either express or implied, including, but
PrepSEQ Nucleic Acid Extraction Kit
 Quick Reference Card PrepSEQ Nucleic Acid Extraction Kit Note: For safety and biohazard guidelines, refer to the Safety appendix in the PrepSEQ Nucleic Acid Extraction Kit Protocol (PN 4400739). For all
Glide-Line Standard Lift Locate Unit (SLLU)
") V1.0 Glide-Line Standard Lift Locate Unit (SLLU) Installation & Maintenance Manual Easy Flexible Precise Fast i V1.0 Manual Information Throughout this manual are the following information blocks indicated
V1.0 Glide-Line Standard Lift Locate Unit (SLLU) Installation & Maintenance Manual Easy Flexible Precise Fast i V1.0 Manual Information Throughout this manual are the following information blocks indicated
MagMAX DNA Multi-Sample Ultra 2.0 Kit
 USER GUIDE MagMAX DNA Multi-Sample Ultra 2.0 Kit High throughput isolation of DNA from saliva Catalog Number A36570 Pub. No. MAN0017324 Rev. C.0 WARNING! Read the Safety Data Sheets (SDSs) and follow the
78-RK VARIABLE SPEED HEAVY DUTY VIBRATOR OPERATING MANUAL
 78-RK VARIABLE SPEED HEAVY DUTY VIBRATOR OPERATING MANUAL IMPORTANT INSTRUCTIONS WARNING! FOR YOUR SAFETY PLEASE READ INSTRUCTIONS BEFORE OPERATING TOOL & WEAR EYE PROTECTION FD.08/2009 THANK YOU FOR PURCHASING
ENGLISH Compact Half Coupler 50 mm, SWL: 50 kg
 MANUAL ENGLISH Compact Half Coupler 50 mm, SWL: 50 kg V3 Highlite International B.V. Vestastraat 2 6468 EX Kerkrade the Netherlands Table of contents Warning... 2 Safety Instructions... 2 Operating Determinations...
PD6770 VANTAGEVIEW LOOP-POWERED PROCESS METER
 PD6770 VANTAGEVIEW LOOP-POWERED PROCESS METER 4-20 ma input 1 V drop (4 V with Backlight) 3½ Digits LCD, 1" High Loop-Powered Backlight Option HART Protocol Transparent Plastic NEMA 4X, IP65 Enclosure
Agilent Technologies 7620-AS Sample Changer Site Preparation Checklist Hardware Site Preparation Specification
 Thank you for purchasing an Agilent instrument. To get you started and to assure a successful and timely installation, please refer to this specification or set of requirements. Correct site preparation
Rocker Tool Post ASSEMBLY AND OPERATING INSTRUCTIONS
 Rocker Tool Post 94540 ASSEMBLY AND OPERATING INSTRUCTIONS Machine tool shown in photo not included. Due to continuing improvements, actual product may differ slightly from the product described herein.
USER GUIDE. for. Automated purification of total RNA from cultured mammalian cells, animal tissues and plant tissues with
 USER GUIDE for Automated purification of total RNA from cultured mammalian cells, animal tissues and plant tissues with KingFisher instrument and MagMAX TM -96 Total RNA Isolation Kit 9.2.2006 1 Descripition
BrightStar -Plus Membranes
 BrightStar -Plus Membranes Positively Charged Nylon Membrane Part Number AM10100, AM10102, AM10104 A. Product Description Part Number AM10100 AM10102 AM10104 Contents 5 membranes: 15 cm x 15 cm Small roll:
TaqMan PreAmp Master Mix Kit. Protocol
 TaqMan PreAmp Master Mix Kit Protocol Copyright 2007, 2010 Applied Biosystems. All rights reserved. For Research Use Only. Not for use in diagnostic procedures. Information in this document is subject
PMA 31-G. English. Printed: Doc-Nr: PUB / / 000 / 00
 PMA 31-G English 1 Information about the documentation 1.1 About this documentation Read this documentation before initial operation or use. This is a prerequisite for safe, trouble-free handling and
Operation Manual. Professional Weighing Equipment. MRB Series Mid Resolution Balances. MRB 500g MRB 1200g MRB 2500g MRB 6000g MRB 10000g
 Professional Weighing Equipment MRB Series Mid Resolution Balances Compact Scales MRB 500g MRB 1200g MRB 2500g MRB 6000g MRB 10000g Operation Manual Section Table of Contents Page Declaration of Conformity
Use the AccuSEQ Software v2.0 Mycoplasma SEQ module
 QUICK REFERENCE Use the AccuSEQ Software v2.0 Mycoplasma SEQ module Publication Part Number 4425586 Revision Date 25 January 2013 (Rev. B) Mycoplasma SEQ Experiments Note: For safety and biohazard guidelines,
Quick Start Guide. Corporation Rev. 1
 Quick Start Guide Corporation 600269 Rev. 1 System Installation Note: Retain all packing materials. 1. Following the instructions provided in the SMART Turbo shipping carton, carefully remove the instrument
EXPRESS5800/1080Xd. Installation Procedures
 EXPRESS5800/1080Xd () Installation Procedures Proprietary Notice and Liability Disclaimer The information disclosed in this document, including all designs and related materials, is the valuable property
Applied Biosystems 7900HT Fast Real-Time PCR System. Performing Fast Gene Quantitation with 384-Well Plates DRAFT
 User Bulletin Applied Biosystems 7900HT Fast Real-Time PCR System October 3, 2005 SUBJECT: Performing Fast Gene Quantitation with 384-Well Plates In This User Bulletin System Overview System Requirements
Horizontal Belt Stacker
 Shipping & Mailing Inserter Horizontal Belt Stacker TM for Relay Systems Operator Guide International English Edition August 1, 2015 Note: This equipment has been tested and found to comply with the limits
8 DIAL CALIPER. Model Diagrams within this manual may not be drawn proportionally.
 8 DIAL CALIPER Model 97389 Set up And Operating Instructions Diagrams within this manual may not be drawn proportionally. Due to continuing improvements, actual product may differ slightly from the product
Reagent Kit Selection Guide
 Reagent Kit Selection Guide Introduction The BioChain Nucleic Acid Preparation Technology Introduction BioChain Institute Inc. specializes in developing advanced, efficient and reliable technologies in
2200 lb. Semi-Electric Stacker
 2200 lb. Semi-Electric Stacker Owner s Manual WARNING: Read carefully and understand all ASSEMBLY AND OPERATION INSTRUCTIONS before operating. Failure to follow the safety rules and other basic safety
LASER GUIDED PARKING SYSTEM
 LASER GUIDED PARKING SYSTEM Model 94318 ASSEMBLY AND OPERATING INSTRUCTIONS Due to continuing improvements, actual product may differ slightly from the product described herein. 3491 Mission Oaks Blvd.,
HighPrep FFPE RNA 96. RNA isolation from FFPE (Formalin-Fix, Paraffin-Embeded) Tissue Magnetic beads based chemistry High-throughput capable PROTOCOL
 Tissue Magnetic beads based chemistry High-throughput capable PROTOCOL") MAGBIO ACCELERATING genomic research HighPrep FFPE RNA 96 Catalog Nos. HPFF-R96, HPFF-R96X4 Manual Revision v3.00 RNA isolation from FFPE (Formalin-Fix, Paraffin-Embeded) Tissue Magnetic beads based chemistry
MAGBIO ACCELERATING genomic research HighPrep FFPE RNA 96 Catalog Nos. HPFF-R96, HPFF-R96X4 Manual Revision v3.00 RNA isolation from FFPE (Formalin-Fix, Paraffin-Embeded) Tissue Magnetic beads based chemistry
Wireless Freezer Manual Installation Guide
 Wireless Freezer Manual Installation Guide Doc # 152-11103-01 Revision DRAFT May 2009 Copyrights Copyright 2008 by. All rights reserved. The information in this document is subject to change without notice.
Safety Precautions. 3. Cabinet Assembly 4. Operating buttons / functions.5-6. Machine Operation
 USER MANUAL Contents Safety Precautions. 3 Cabinet Assembly 4 Operating buttons / functions.5-6 Machine Operation...7-11 Convert from Inches to Millimeters / Millimeters to Inches.. 7 Programming in Manual
InviMag Forensic Kit / KingFisher 96 for extractions of genomic DNA from forensic samples using KingFisher 96 instrument (Thermo Electron)
") InviMag Forensic Kit / KingFisher 96 for extractions of genomic DNA from forensic samples using KingFisher 96 instrument (Thermo Electron) Kit components (storage at room temperature) Important: Store
InviMag Forensic Kit / KingFisher 96 for extractions of genomic DNA from forensic samples using KingFisher 96 instrument (Thermo Electron) Kit components (storage at room temperature) Important: Store
POWER PINNER BENCH HAND WELDER 7250 OPERATOR S MANUAL
 POWER PINNER BENCH HAND WELDER 7250 OPERATOR S MANUAL Copyright: November 20, 2018 Revised: Serial No. Gripnail Corporation An Employee Owned Company 97 Dexter Road East Providence, Rhode Island 02914-2045
Installation Qualification/Operational Qualification Protocols and Instructions
 Installation Qualification/Operational Qualification Protocols and Instructions AquaLab VSA Vapor Sorption Analyzer Decagon Devices, Inc June 28, 2016 11:03 AM 1 Table of Contents Section 1 Section 2 Section