Virtual Terminal User Guide
|
|
|
- Marian Davidson
- 6 years ago
- Views:
Transcription
1 Virtual Terminal User Guide
2 Table of Contents Introduction... 4 Features of Virtual Terminal... 4 Getting Started Logging in and Changing Your Password Logging Out Navigation Basics 5 Sub-Users Adding a Sub User Searching for a Sub-User Editing a Sub-User Unlocking a Sub-User Resetting a Sub-Users Password Removing a Sub-User 11 Starting Virtual Terminal Run Transactions Credit & Debit Transactions Credit Authorization Only Voiding & Crediting a Credit Authorization Credit Card Authorization Only with Approved External Device Voiding & Crediting a Credit Authorization with Device AVS (Address Verification Service) Credit Force Sale Voiding & Crediting a Credit Force Sale Credit and Debit Sale Voiding & Crediting a Credit and Debit Sale Credit and Debit Sale with Approved External Device Voiding & Crediting a Credit and Debit Sale with Approved External Device Check Sale Voiding a Check Sale 35 Recurring Billing Recurring Billing- Check Sale Reports... 39
3 8.1 Transaction Summary Summary View Detailed View Printer Friendly View Download to Excel/CSV Transaction Search Scheduled Transactions Search 44 Profile General Information POS Information Card Types Accepted Phone Numbers 47
4 Introduction Virtual Terminal allows you to process credit card transactions from any computer with an Internet connection. Virtual Terminal has comprehensive web-based reports of all transactions and orders within the Virtual Terminal. Virtual Terminal not only gives you the convenience of managing and tracking transactions from any location, but provides business continuity too. The virtual terminal acts as a back-up to the payment application inside of your business management software. Virtual Terminal supports credit, debit, check conversion and guarantee, and ACH processing solutions. Features of Virtual Terminal Convenience process transactions around the clock, from any computer with an Internet connection. Easy-to-use Interface Virtual Terminal's Web-based interface is intuitive and easy to use. Flexible Virtual Terminal gives you multiple ways to pre-authorize and process transactions. Secure Protecting customer's data through using the strongest SSL-encryption available. PCI Compliant Credit and Debit Solution. Getting Started 3.1 Logging in and Changing Your Password Once your merchant account has been set up, you will receive a welcome for Core Management System. In this , you will be provided with your user name needed for Core Management System, as well as a temporary password. You will be prompted to change your temporary password upon initial login. To access Core Management System, you can click on the link provided in the welcome or go to

5 3.1.1 Login Screen Keep your password safe and secure. If you forget your password, submit your user name and address in the white box on the login screen. A new password will be ed to you. 3.2 Logging Out To log out of the system click on the Logout link at the top-right portion of the screen. Users will be automatically logged out of the system after 15 minutes of inactivity Logout Screen 3.3 Navigation Basics To navigate through Virtual Terminal use either the menu tabs along the top of the screen or the navigation menu on the left side of the screen. You can easily find where you are within the series of menus by looking at the crumb trail beneath the menu tabs. To access previous screens, just click on its name. Please use these links rather than the back arrow of the browser. Links appear in bold, blue type and are underlined to make them easy to find. If a field has a dotted line beneath it, more information will appear when you place your cursor over it.
, then click on the Sub-Users link.")
6 3.3.1 Navigation Basics Menu Tabs Crumb Trail Navigation Menu Hover Help Link Sub-Users Users have the ability to create additional users (sub-users) under their main account. Sub-users will login using their own username and password. To add a sub-user, click on the My Account tab (Figure 4.1.1), then click on the Sub-Users link. If you do not see the Sub-Users link, please contact customer care to request access.

7 4.1.1 My account 4.2 Adding a Sub User Click Add Sub-User on the left hand side navigation menu. The Add Sub-User screen will then populate. (Figure 4.2.1) The red asterisks on the screen indicate a required field. The required fields are: First Name, Last Name, and . The address provided is where the sub-user s login information is sent. After the sub-user information is entered, select the user privileges. A sub-user can have multiple permissions assigned to them. Virtual Terminal- Grants Access to Virtual Terminal credit card processing Virtual Terminal- Check- Grants access to Virtual Terminal check processing only Virtual Terminal- Scheduled Transactions- Grants access to Virtual Terminal Scheduled Transactions only Core Reporting- Grants access to Core Reporting only Once the sub-user information and permissions have been completed, click Save. A confirmation line will appear saying that login information has been ed to the sub-user.

8 4.2.1 Add Sub-User 4.3 Searching for a Sub-User To search for sub-users, enter the necessary search criteria and click Search. You can search for sub-users by their username, name, address, and account status. To search for all users, do not enter any search criteria. Sub-users will appear below the search criteria fields.
 The subusers information will then populate (Figure 4.4.1). Click Edit on the upper right hand side to edit the sub-users information.")
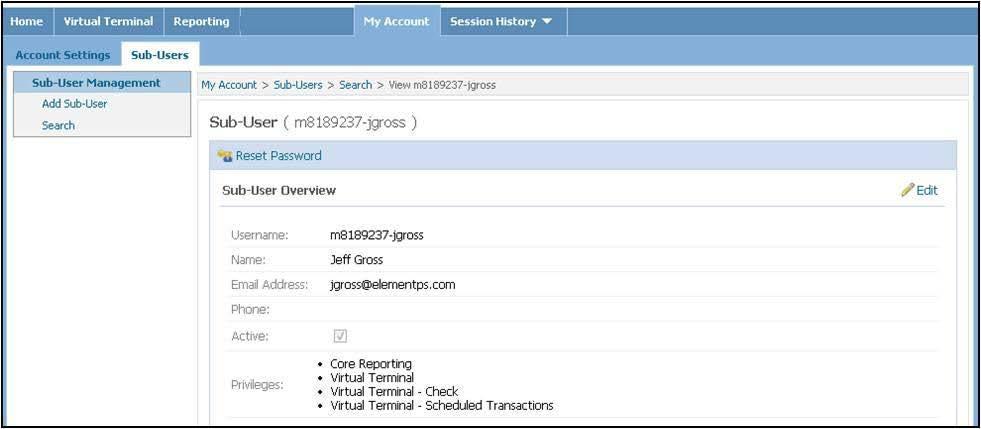
9 4.3.1 Sub-User Search Screen 4.4 Editing a Sub-User To edit a sub-user, click View next to the username on the search screen. (Figure 4.3.1) The subusers information will then populate (Figure 4.4.1). Click Edit on the upper right hand side to edit the sub-users information Sub-User Information Screen You can edit the sub-users name, contact information, privileges, and status. (Figure 4.4.2) If the Active box is unchecked the sub-user will be marked as inactive and will be unable to log into Core Management System.

10 Click Save to update the changes, or Cancel to return to the previous screen Edit User Screen 4.5 Unlocking a Sub-User As a security feature of Core Management System, users are automatically locked out of their account if they try to login with an incorrect password more than three times. If a user is locked out, on the search screen (Figure 4.3.1) the locked checkbox will be checked. To unlock the sub-user, you will need to go into their account and click Unlock. (Figure 4.5.1)

11 4.5.1 Unlocking a Sub-User Screen 4.6 Resetting a Sub-Users Password Click Reset Password (Figure 4.5.1), the user will receive an with a system generated temporary password. The sub-user will be required to enter a new password when they login again. 4.7 Removing a Sub-User To remove a sub-user s entire access from Core Management System uncheck the Active box on the Edit User Screen (Figure4.4.2). Starting Virtual Terminal To access the Virtual Terminal, click Virtual Terminal in the Core Management System home page.

")
12 5.1.1 Core Management System Home Page The Virtual Terminal main menu has links to the four functions that are available Virtual Terminal Main Menu 5.2 Run Transactions To run a credit or debit transaction, click Run Transaction from the Virtual Terminal Main Menu. (Figure 5.1.2) The Run Transaction screen (Figure 5.2.1) displays two transaction options: Credit and Debit, and Check.


13 5.2.1 Run Transaction Screen 5.3 Credit & Debit Transactions To run a transaction, click Credit and Debit. The Credit and Debit Options screen (Figure 5.3.1) will populate, and the user will be able to choose from the six functions listed in Figure Credit and Debit Options Screen 5.4 Credit Authorization Only The Authorization Only function is used to manually enter credit card information to verify that the credit card has sufficient funds available to cover the amount of the sale. The authorization will hold the funds for up to 30 days. Funds are not released until the transaction is captured. Authorizations can only be done for credit cards. To create a credit authorization only, enter the transaction information and the card information in the Credit Authorization Only Screen. (Figure 5.4.1)

14 5.4.1 Credit Authorization Only Screen If you have the customer s billing and/or shipping address, click Show Address to enter the card holder s address information.
 in green.")

15 5.4.2 Show Address Screen Once all of the information has been entered into the Credit Authorization Only screen (Figure 5.4.1), click Submit to process the authorization. If the authorization is approved, Approved displays in the Transaction Result Box (Figure 5.4.3) in green. To print a receipt, click View Receipt and a new window will populate with the receipt information Authorization Only Approval Screen To complete the sale, you must click on View Transaction Details for the final steps.

16 5.4.4 Authorization Transaction Details Screen Click Capture on the Transaction Details screen (Figure 5.4.4) The Capture Screen (Figure 5.4.5) will then populate with the sales information. The subtotal and sales tax fields can be modified if needed. To complete the Capture, click Submit.
. 5.4.6 Capture Successful Screen 5.")

17 5.4.5 Capture Screen If the capture is successful, Success displays in green in the Transaction Result field (Figure 5.4.6) Capture Successful Screen 5.5 Voiding & Crediting a Credit Authorization To void or credit an authorization, the sale must be captured first. Click View Transaction Details on the approval screen. (Figure 5.4.6)
18 5.5.1 Transaction Details Screen- Void & Credit The void option is only available up to 24 hours after the authorization is completed. To void the authorization, click Void. To credit an authorization, click Credit. A Credit Screen will populate and the user will need to enter the amount to credit. The system will not allow you to credit more than the original amount that was authorized. If the credit is approved, a confirmation screen will appear with Approved in the Transaction Results field.
19 5.5.2 Submit Credit Screen 5.6 Credit Card Authorization Only with Approved External Device The Authorization Only Device function allows the user to use an approved external device to authorize credit transactions. To use this feature, click Authorization Only (Device) on the Run Transaction Screen. (Figure 5.2.1) Verify that you re approved external device is plugged into your computer, and place the cursor in the box on the Authorization Only (Device) home screen. (Figure 5.6.1) Swipe the card using a secured card reader, or enter the card number manually on the device s pin pad Authorization Only (Device) Home Screen After the card is swiped or keyed, a Transaction Information screen (Figure 5.6.2) will populate for the user to enter the transaction information. The card information is automatically filled in by the card reader and cannot be changed. If billing and shipping information has been provided, click Show Address to enter the information. Once all of the information has been entered, click Submit to process the authorization.
 screen (Figure 5.6.")
20 5.6.2 Credit Card Authorization Only (Device) Transaction Information Screen If a required field has been left blank, an error will occur. The user will have the opportunity to fix the error and submit again. Once all of the information has been entered into the Credit Authorization Only (Device) screen (Figure 5.6.2), click Submit to process the authorization. If the authorization is approved, Approved displays in the Transaction Result box (Figure 5.6.3) in green. To print a receipt, click View Receipt and a new window will populate with the receipt information Credit Authorization Only (Device) Transactions Results Screen
21 To complete the sale, you must click on View Transaction Details for the final steps. Click Capture on the Transaction Details screen (Figure 5.6.4) Credit Authorization (Device) Transaction Details Screen The Capture Screen (Figure 5.6.5) will then populate with the sales information. The subtotal and sales tax fields can be modified if needed. To complete the Capture, click Submit Credit Authorization Only (Device) Capture screen If the capture is successful, Success displays in green in the Transaction Result field. (Figure 5.6.6)
22 5.6.6 Capture Successful Screen 5.7 Voiding & Crediting a Credit Authorization with Device To void or credit an authorization the sale must be captured first. Click View Transaction Details on the capture screen. (Figure 5.6.6) Transaction Details Screen- Void & Credit The void option is only available up to 24 hours after the authorization is completed. To void the authorization, click Void. To credit an authorization, click Credit. A Credit Screen will populate and the user will need to enter the amount to credit. The system will not allow you to credit more than the original amount that was
23 authorized. If the credit is approved, a confirmation screen will appear with Approved in the Transaction Results field Credit Authorization Only: Submit Credit Screen 5.8 AVS (Address Verification Service) Address Verification Service (AVS) is the process of validating a cardholder's given address against the issuer's records, to determine accuracy and deter fraud. This service is for mail order/telephone order transactions. A code is returned with an authorization result that indicates the level of accuracy of the address match. The code returned helps secure the most favorable interchange rates. The AVS Only function does not complete the transaction. To complete the sale, you must use one of the Sale functions. To use the AVS feature, click AVS Only on the Run Transaction screen (Figure 5.2.1) Enter the transaction information, card information, billing address and click Submit.
")
24 5.8.1 AVS Only Screen The AVS results (Figure 5.8.2) will populate with the transaction result confirmation, AVS response code, and Transaction ID AVS Transaction Results Screen To view additional transaction details, click View Transaction Details. (Figure 5.8.2)
 To run a force sale, click Force Sale on the Run Transaction Screen.")

25 5.9 Credit Force Sale Force Sale is used to complete a credit card transaction after a merchant has obtained a voice authorization approval code from the merchant s authorization center. The Voice Authorization number can be found in the Virtual Terminal Profile page. (Figure 8.7.3) To run a force sale, click Force Sale on the Run Transaction Screen. (Figure 5.2.1) Enter the transaction and credit card information, and click Submit Force Sale Transaction Information Screen If the transaction is accepted, Success displays in the Transaction Result field in green Credit Card Force Sale Transaction Results Screen To view additional transaction details, click View Transaction Details. (Figure 5.9.2)

26 5.9.3 Force Sale Transaction Details Screen Click View Receipt to view or print the receipt for this sale transaction. A receipt will populate in a new window Voiding & Crediting a Credit Force Sale To void or credit a force sale, go to the Force Sale Transaction details screen. (Figure 5.9.3) The void option is only available up to 24 hours after the authorization is completed. To void the authorization, click Void. (Figure 5.9.3) To credit an authorization, click Credit. A Credit Screen will populate (Figure ) and the user will need to enter the amount to credit. The system will not allow you to credit more than the original amount that was authorized. If the credit is approved, a confirmation screen will appear with Approved in the Transaction Results field.
27 Submit Credit Screen 5.11 Credit and Debit Sale Credit and Debit Sale is used to manually enter card information into Virtual Terminal. To receive the most favorable interchange rates, use the AVS feature before running a keyed entry credit card sale. To run a credit and debit sale click Sale on the run transaction screen. (Figure 5.2.1) Enter the transaction and card information, and click Submit.


28 Credit and Debit Sale Transaction Information Screen If the transaction is accepted, Success displays in the Transaction Result field in green Credit and Debit Sale Transaction Results Screen To view additional transaction details, click View Transaction Details. (Figure )
29 Credit and Debit Sale Transaction Details Screen Click View Receipt if you would like to view or print the receipt for this sale transaction. A receipt will populate in a new window Voiding & Crediting a Credit and Debit Sale To void or credit a credit and debit sale, go to the Credit and Debit Sale Transaction details screen. (Figure ) The void option is only available up to 24 hours after the credit authorization is completed. To void the authorization, click Void. To credit the sale, click Credit. A Credit Screen will populate and the user will need to enter the amount to credit. The system will not allow you to credit more than the original amount that was charged. If the credit is approved, a confirmation screen will appear with Approved in the Transaction Results field.
 on the run transaction screen. (Figure 5.2.")
30 Submit Credit Screen 5.13 Credit and Debit Sale with Approved External Device Sale (Device) is used to run a credit or debit card sale using an approved external device. To run a credit and debit sale using an approved external device, click Sale (Device) on the run transaction screen. (Figure 5.2.1) Verify that your approved external device is plugged into your computer, and place the cursor in the box on the Sale (Device) home screen. (Figure ) Swipe the card using a secured card reader, or enter the card number manually on the device s pin pad Credit and Debit Sale (Device) Screen After the card is swiped or keyed using the pin pad, a Transaction Information screen will populate for the user to enter the transaction information. The card information is automatically filled in by the card reader and cannot be changed. If billing and shipping information has been provided, click Show Address to enter the information. Once all of the information has been entered, click Submit to process the sale.
 screen (Figure 5.13.")
31 Credit and Debit Sale (Device) Transaction Information Screen If a required field has been left blank, an error will occur. The user will have the opportunity to fix the error and click submit again. Once all of the information has been entered into the Credit Card Sale (Swipe) screen (Figure ), click Submit to process the sale. If the sale is approved, Approved displays in the Transaction Result box (Figure ) in green. To print a receipt, click View Receipt and a new window will populate with the receipt information Credit and Debit Sale (Device) Transaction Results screen
32 To view additional transaction details, click View Transaction Details. (Figure ) Credit and Debit Sale (Device) Transaction Details Click View Receipt to view or print the receipt for this sale transaction. A receipt will populate in a new window Voiding & Crediting a Credit and Debit Sale with Approved External Device To void or credit a sale (device), go to the Credit Sale Transaction details screen. (Figure ) The void option is only available up to 24 hours after the authorization is completed. To void the Sale (Device), click Void. To credit the sale, click Credit. A Credit Screen will populate and the user will need to enter the amount to credit. The system will not allow you to credit more than the original amount that was charged. If the credit is approved, a confirmation screen will appear with Approved in the Transaction Results field.


33 Submit Credit Screen 5.15 Check Sale You must have ACH capabilities set up through your merchant account in order to process a Check sale. The Check Sale function is used to run Check transactions using Virtual Terminal. To run Check sale, click Check on the run transaction screen. (Figure 5.2.1) Enter the transaction and check information, and click Submit Check Sale Transaction Information Screen

34 Enter the required information for your check transaction and click Submit (Figure ). All fields marked with red asterisks are required. Click Show Address to enter the address information that is on the check. Click Submit once all of the information has been entered. If the check sale transaction is successful, Approved will display in the Transaction Result field in green Cheek Sale Transaction Results Screen To view additional transaction details, click View Transaction Details. (Figure ) Check Sale Transaction Details
35 Click View Receipt to view or print the receipt for this sale transaction. A receipt will populate in a new window Voiding a Check Sale To void a check sale, click View Transaction Details (Figure ) The void option is only available up to 24 hours after the check sale is completed. To void the check sale, click Void. A confirmation screen will appear with Approved in the Transaction Results field. (Figure ) Recurring Billing The Add Schedule feature allows you to setup a recurring series of transactions on a customer s credit account. You must have recurring billing capabilities set up through your merchant account in order to use this feature. Recurring billing can be added to Credit Card Sales, Credit Card Swipe Sales, and Check Sales. To run setup Recurring Billing, click the Add Schedule link on the transaction information screen. (Figure , Figure , Figure )

36 6.1.1 Add Schedule Screen Enter the schedule information, transaction, and card information. Click Submit to save. If the setup was successful, a scheduled transactions results screen will display with Schedule Transaction Created in the Scheduled Transaction Result field in green.
 6.1.3 Scheduled Transaction Details Screen To make changes to click Edit Scheduled Transaction. (Figure 6.1.3)")
37 6.1.2 Scheduled Transaction Results Screen To view scheduled transaction details, click View Schedule Details (Figure 6.1.2) Scheduled Transaction Details Screen To make changes to click Edit Scheduled Transaction. (Figure 6.1.3)

38 6.1.4 Scheduled Transactions Task Update Screen The user will be able to make changes to the Scheduled Transaction in the Scheduled Transaction update screen. (Figure 6.1.4) If the user un-checks the Active checkbox, the scheduled transaction will be marked as inactive, and the scheduled tasks will not run. Click Submit to save. If the edit was successful, a scheduled transactions results screen will display with Schedule Transaction Created in the Scheduled Transaction Result field in green. (Figure 6.1.2)

39 Recurring Billing- Check Sale To set up recurring billing on a customer s checking account, this feature must be turned on through your merchant account. To add recurring billing to a customer s checking account, follow the same steps for adding Recurring Billing to a credit account. Reports Virtual Terminal has Transaction reporting information available in several pre-defined reports, as well as a several search capabilities. To access Virtual Terminal Reporting, click View Transactions in the Virtual Terminal Main Menu (Figure 5.1.2). 8.1 Transaction Summary A Transaction summary screen will populate with all of the current day s transactions in Virtual Terminal. The left hand side menu bar has the list of pre-defined reports that are available and the search options View Transactions Home Screen The pre-defined reports available in Virtual Terminal are: yesterday s transactions, the current day s transactions, the current week s transactions, transactions from the last 7 days, transactions for the current month, and transactions for the last 30 days. To access a pre-defined report, click on the link on the left hand side menu bar. The report that is selected will populate on the screen.

40 8.1.2 Pre-Defined Transactions Report Screen Reports can be viewed in several different formats: Summary, Detailed, Printer Friendly, and Excel/CSV. 8.2 Summary View To view a summary of valid transactions during the time period selected, click Summary on the Transactions View Screen. (Figure 8.1.1) A new window will populate with the Date, Visa Charge, MasterCard Charge, and Total. (Figure 8.2.1) To export the summary view to Excel, click Download to Excel/CSV. To Print the Summary view, click Print..

41 8.2.1 Summary View 8.3 Detailed View For a detailed view of valid transactions during the time period selected, click Detailed on the Transactions View Screen. (Figure 8.1.1) A new window will populate with the transaction details. The details included are: Transaction ID, Approval #, Ticket #, Reference #, Amount, Type, Status, Name, Card Type, Card #, Expiration, Result, Date and Time. To export the summary view to Excel, click Download to Excel/CSV. To Print the Summary view, click Print Detailed View Screen
42 8.4 Printer Friendly View For a printer friendly view of the reports in Virtual Terminal, click Printer Friendly on the Transactions View Screen. (Figure 8.1.1) A new window will populate with a printer friendly version of the report. (Figure 8.4.1) Printer Friendly View 8.5 Download to Excel/CSV To download a report to Excel, click Download to Excel/CSV. (Figure 8.1.1) The Excel file contains additional transaction information about each transaction. Transaction information included in the Excel file is: Transaction ID, Name, Terminal ID, Approval Number, Approved Amount, AVS Response Code, Expiration Month, Expiration Year, Host Response Message, Reference Number, Ticket Number, Transaction Amount, Transaction Status, Transaction

43 Type, Masked Card Number (last 4 digits), Card Logo, Card Type, Track Data Present, Billing Address, Billing Zip, Sales Tax, Customer Code, Payment Account Id, Scheduled Task ID, Billing Name, Time Stamp 8.6 Transaction Search Users have the ability to search for transactions using the Transaction Search feature. Click Transaction Search on the View Transactions left hand side menu (Figure 8.1.1). A search screen will populate with search fields Transaction Search Screen Enter the search criteria. If searching for a specific transaction a begin date and end date must be selected. Click Search after all the necessary search criteria has been entered. The search results will populate below the search fields. (Figure 8.6.2)

44 8.6.2 Transaction Search Results Screen To start another search, Click Reset to clear the fields and search results. 8.7 Scheduled Transactions Search Users have the ability to search for scheduled transactions using the Scheduled Transactions Search feature. Click Scheduled Trans Search on the View Transactions left hand side menu (Figure 8.1.1). A search screen will populate with search fields.


45 8.7.1 Scheduled Transactions Search Screen Enter the search criteria. When searching for a specific scheduled transaction, a Run Status must be selected. Click Search after all the necessary search criteria has been entered. The search results will populate below the search fields Scheduled Transactions Search Results Screen To start another search, Click Reset to clear the fields and search results.
 The Virtual Terminal Profile includes your Merchant Account Information, Merchant Credentials, Terminal Information, Card Types Accepted, and Help Desk Phone Numbers. 9.1.1 Profile Screen 9.")
46 Profile To access your Virtual Terminal Profile, click Profile in the Virtual Terminal Main Menu (Figure 5.1.2) The Virtual Terminal Profile includes your Merchant Account Information, Merchant Credentials, Terminal Information, Card Types Accepted, and Help Desk Phone Numbers Profile Screen 9.1 General Information The general information is what is on file for your merchant account. If this information is incorrect, or needs to be updated please contact Customer Care.
47 9.2 POS Information When using a third-party or custom POS software application, refer to your POS application s documentation for instructions on how to enter your merchant account credentials. The merchant account credentials are the necessary pieces of information required to begin processing transactions. There are three necessary pieces of information that are needed, your Account Token, Account ID, and Acceptor ID. Your account credentials are sensitive pieces of information and should not be shared with any 3rd parties or copied into any files other than your POS application. Also, included in the POS Information is the Terminal ID. Some POS applications require a Terminal ID. If the software application your business is using requires a Terminal ID, use the # provided in the profile screen. 9.3 Card Types Accepted The Card Types Accepted section has your account numbers for each of the card brands. If you do not have a merchant account number next to a specific card brand, please contact Customer Care to set up additional card types. 9.4 Phone Numbers The Voice Authorization number is the number used to obtain credit card authorization. The help desk number is the number to customer care.
VIRTUAL TERMINAL USER GUIDE
 VIRTUAL TERMINAL USER GUIDE VERSION 17.2 NOVEMBER 2017 COPYRIGHT 2007-2017 GLOBAL PAYMENTS INC. ALL RIGHTS RESERVED. RELEASE NOVEMBER 2017 The Virtual Terminal User Guide contains proprietary information.
Volume PLANETAUTHORIZE PAYMENT GATEWAY. SugarCRM Payment Module. User Guide
 Volume 2 PLANETAUTHORIZE PAYMENT GATEWAY SugarCRM Payment Module User Guide S A L E M A N A G E R M E R C H A N T S E R V I C E S User Guide and Installation Procedures Information in this document, including
GLOBAL TRANSPORT VT USER GUIDE VERSION 17.2 NOVEMBER Global Payments Inc. 10 Glenlake Parkway, North Tower Atlanta, GA
 GLOBAL TRANSPORT VT USER GUIDE VERSION 17.2 NOVEMBER 2017 Global Payments Inc. 10 Glenlake Parkway, North Tower Atlanta, GA 30328-3447 COPYRIGHT 2007-2017 GLOBAL PAYMENTS INC. ALL RIGHTS RESERVED. RELEASE
QUICK REFERENCE GUIDE Online POS Terminal. Thank you for choosing the Online POS Terminal. Chase is pleased to announce an
 QUICK REFERENCE GUIDE ONLINE POS TERMINAL 1 ipp 320 PIN Pad QUICK REFERENCE GUIDE Online POS Terminal Thank you for choosing the Online POS Terminal. Chase is pleased to announce an enhanced version of
Quick Service Cashier Manual
 Version: 01/01/2012 Table of Contents Getting Started 3 Post a Credit Card Transaction 8 System Time... 3 Approved 8 Connectivity Indicator Light. 3 Declined 8 Sign-in Pad 3 Credit Unavailable. 8 Clock
Editing an Existing Account on an Invoice Payment Creating a New Account on an Invoice Payment... 47
 ebilling User Guide Table of Contents About This Guide Chapter 1 ebilling Basics... 6 Getting Started with ebilling... 6 Logging into ebilling... 6 Working with the ebilling Home Page... 8 Updating Your
Payments - EMV Review. EMV Functionality Inside OpenOne
 Payments - EMV Review EMV Functionality Inside OpenOne A Brief History EMV stands for Europay, MasterCard and Visa. It is a global standard for cards equipped with computer chips and the technology used
Integrated Payment Processing. User Guide V0409
 Integrated Payment Processing User Guide Welcome! Thank you for choosing POMIS and TransFirst Health Services as your complete payment processing solution! We believe the following steps will ensure your
VeriFone VX QUICK REFERENCE GUIDE
 QUICK REFERENCE GUIDE VeriFone VX This Quick Reference Guide will guide you through understanding your terminal s functionality and navigation, and will help you with troubleshooting. INDUSTRY Retail and
Then enter your PIN, also created during the enrollment process. After entering this data, select Submit.
 The screens you will see in this guide were made for demo purposes, and may contain unrealistic payment or payee information. If you have questions not addressed in the tutorial, contact your Bill Pay
Brink Admin Portal Quick Reference Guide
 Brink Admin Portal Quick Reference Guide How to Enter Employees Step 1: Log in to the Admin Portal and go to Configuration>Settings Editor>Employees. Step 2: Click Add to enter a new employee record. Step
HealthEquity Employer Portal Guide HealthEquity All rights reserved.
 HealthEquity Employer Portal Guide 2013-2015 HealthEquity All rights reserved. INTRODUCTION 09 ACCESSING PENDING PAYMENTS 01 LOGIN PROCESS 09 MODIFYING EMPLOYER INFORMATION 01 ADDING INSURANCE INFORMATION
Contents OVERVIEW... 3
 Contents OVERVIEW... 3 Feature Summary... 3 CONFIGURATION... 4 System Requirements... 4 ConnectWise Manage Configuration... 4 Configuration of Manage Login... 4 Configuration of GL Accounts... 5 Configuration
PAYMENT EXPRESS EFTPOS GETTING STARTED GUIDE. Version 0.2
 PAYMENT EXPRESS EFTPOS GETTING STARTED GUIDE Version 0.2 CONTENTS Payment Express... 1 What s Required... 2 Components... 2 Verifone SC5000... 2 Ingenico i3070... 3 Ingenico ipp320... 3 Uniform UIC PP790SE...
Cargo Online Payment. Electronic Payment Portal Instructions
 Cargo Online Payment Electronic Payment Portal Instructions Frequently Asked Questions and Answers Question: Is the Electronic Payment Portal available to all customers? Answer: No, the tool is currently
Terminal Guide. VeriFone. VX520 with VX820 PIN Pad VX820 Duet VX680 3G
 Terminal Guide VeriFone VX520 with VX820 PIN Pad VX820 Duet VX680 3G Getting Started The VeriFone Terminal Guide will help you set up your terminal, understand your terminal s functionality, and troubleshoot
Poynt Lodging App. Merchant Guide - Version 2.0
 Poynt Lodging App Merchant Guide - Version 2.0 1 Poynt Co 490 South California Ave, Suite 200 Palo Alto, CA 94306 https://poynt.com COPYRIGHT 2017 BY POYNT CO This publication is proprietary to Poynt Co
Greater Giving Terminal User Start Guide
 Greater Giving Terminal User Start Guide Card Holder Data Security (PCI) The Payment Card Industry (PCI) Data Security Standards were developed by the major credit card companies as a guideline to help
Citi Pay App Frequently Asked Questions
 Citi Pay App Frequently Asked Questions 1. What is Citi Pay? Citi Pay provides the convenience of making secure, in-store payments using your compatible Android mobile phone. This is an optional feature
MyDHL USER GUIDE.
 PC-Based Custom Web-Based Built Vendor PC-Based Partner Web-Based Integrated 1 MyDHL USER GUIDE MyDHL helps you accomplish more in fewer steps, with quick and easy access to the full online suite of DHL
HARBORTOUCH ECHO USER GUIDE HARBORTOUCH SUPPORT LINE:
 HARBORTOUCH ECHO USER GUIDE INDEX EMPLOYEE FUNCTIONS: Clocking In/Logging In Logging Out Calculator, ECR and POS Mode Beginning a Transaction Item Functions Ticket Functions Payment Options Refunding a
How to Guide. &FAQ s
 How to Guide &FAQ s About Rewards Being part of the Landcare family means you can access hundreds of discounted offers from leading Australian retailers. Take up these offers and you'll also build rewards
Online Bill Payment and Presentment Quick Start Guide. By Paul A. Murphy Author of Banking Online for Dummies
 Online Bill Payment and Presentment Quick Start Guide By Paul A. Murphy Author of Banking Online for Dummies What s Inside Why Bill Payment and Presentment?...3 How Safe Is It?...4 Logging In...5 Add Payees...6
Contents OVERVIEW... 3
 Contents OVERVIEW... 3 Feature Summary... 3 CONFIGURATION... 4 System Requirements... 4 ConnectWise Manage Configuration... 4 Configuration of Manage Login... 4 Configuration of GL Accounts... 5 Configuration
Terminal Guide VeriFone VX520 & VX820 Duet Retail Restaurant
 Terminal Guide VeriFone VX520 & VX820 Duet Retail Restaurant This Quick Reference Guide will guide you through understanding your terminal s functionality, and will help you with troubleshooting your payment
Peoples Bank Benefit Manager. Employer User Guide. Member FDIC
 Peoples Bank Benefit Manager Employer User Guide www.peoplesbank-wa.com/benefitmanager Member FDIC Contents Welcome... 3 Login to the Employer Portal... 4 First-time Use... 4 Login... 4 Forgot Your Password?...
VX675 VERIFONE TERMINAL REMEMBER TO LOG ON DAILY HERE IS HOW GUIDE TO A PERFECT SALE DEBIT CARD AND CREDIT CARD TRANSACTIONS
 FOR 24 HOUR ASSISTANCE PLEASE CALL 627-3348 TO REQUEST PAPER ROLLS AND RESOLVE TERMINAL ISSUES. VERIFONE TERMINAL VX675 GUIDE TO A PERFECT SALE DEBIT CARD AND CREDIT CARD TRANSACTIONS REMEMBER TO LOG ON
Authorize.Net Mobile Application
 Authorize.Net Mobile Application Version 3.3.1 for ios and Android User Guide November 2017 Authorize.Net Developer Support http://developer.authorize.net Authorize.Net LLC 082007 Ver.2.0 Authorize.Net
SHO LAUNCHPAD S USER MANAGER GUIDE (COMPANY STORES ONLY)
") \ SHO LAUNCHPAD S USER MANAGER GUIDE (COMPANY STORES ONLY) TABLE OF CONTENTS OVERVIEW... ACCESSING USER MANAGER (SALARIED MANAGERS ONLY)... ACCESSING INSPIRED TO LEARN... 5 MARKING EMPLOYEE INACTIVE...
\ SHO LAUNCHPAD S USER MANAGER GUIDE (COMPANY STORES ONLY) TABLE OF CONTENTS OVERVIEW... ACCESSING USER MANAGER (SALARIED MANAGERS ONLY)... ACCESSING INSPIRED TO LEARN... 5 MARKING EMPLOYEE INACTIVE...
HIA Timesheets - User Guide for Hosts
 Table of Contents 1 Introduction... 1 2 Conventions... 1 3 Login... 2 3.1 Forgotten Password... 3 4 Main Menu... 4 4.1 Timesheets... 5 4.1.1 View Timesheet... 5 4.1.2 Email notification for submitted timesheets...
Guide for Administrators and Shippers
 Guide for Administrators and Shippers UPS CampusShip 2014 United Parcel Service of America, Inc. UPS, the UPS brandmark and the colour brown are trademarks of United Parcel Service of America, Inc. All
QUICK REFERENCE GUIDE Chase Petroleum Fleet
 VERIFONE VX 520 QUICK REFERENCE GUIDE Chase Petroleum Fleet Review this Quick Reference Guide to learn how to run a sale, settle your batch, and troubleshoot terminal responses. INDUSTRY Petroleum Fleet
MSI Cash Register Version 7.5
 MSI Cash Register Version 7.5 User s Guide Harris Local Government 1850 W. Winchester Road, Ste 209 Libertyville, IL 60048 Phone: (847) 362-2803 Fax: (847) 362-3347 Contents are the exclusive property
Dispatcher Portal Application User Guide. Ver. 1.0
 Dispatcher Portal Application User Guide Ver. 1.0 Table of Contents What is WellRyde?... 4 What are the Benefits of WellRyde?... 4 Client and Membership Benefits... 4 Dispatcher Portal Training Overview...
Create the rewards you want to offer to your customers, when you want to offer them.
 Contents Fanfare Overview... 3 Accessing the Business Dashboard... 5 Things to Remember... 6 Navigating the Fanfare Business Dashboard... 7 Reports... 7 Members... 17 Loyalty... 20 Promo Cards... 22 Terminal...
Contents OVERVIEW... 3
 Contents OVERVIEW... 3 Feature Summary... 3 CONFIGURATION... 4 System Requirements... 4 ConnectWise Manage Configuration... 4 Configuration of a ConnectWise Manage Login... 4 Configuration of GL Accounts...
Version Table of Contents
 Table of Contents 1. CLUB ADMINISTRATORS/ MANAGERS... 8 1.1 CLUBHOUSE... 8 1.1.1 Group Home... 8 1.1.2 Club Home... 8 1.1.3 Course Home... 9 1.1.4 Customer Home... 9 1.1.5 Gopher Notes... 9 1.1.6 Contact...
PayWay. User Guide. Version 1.4 November Page 1
 PayWay User Guide Version 1.4 November 2016 Copyright 2009, St.George Bank - A Division of Westpac Banking Corporation ABN 33 007 457 141 AFSL. All rights reserved. Page 1 Table of Contents 1 Introduction...
GREYHOUND EXPRESS. User Guide. August Version 3.0. Greyhound EXPRESS - User Guide
 GREYHOUND EXPRESS User Guide August 2007 Version 3.0 Greyhound EXPRESS - User Guide Registered Trademarks Greyhound, the Greyhound "running dog, the Greyhound running dog and shield, the Greyhound running
Employer Portal 3. Access the Employer Portal 4. Home Page 5. View Reports and Notifications 6. Access Employees in the Portal 7
 Table of Contents Employer Portal 3 Access the Employer Portal 4 Home Page 5 View Reports and Notifications 6 Access Employees in the Portal 7 Access Plan Information 9 Access Resources 10 Create A New
Payment Processing Solutions for MEDICAL OFFICES
 Payment Processing Solutions for MEDICAL OFFICES Payment Solutions Medical Payment Solutions 1. Create Planned Payment Schedules and Card On File transactions 2. Accept payments online a. Order Form Generator
Maintenance and Service Interruption Alerts (archived)
") Maintenance and Service Interruption Alerts (archived) 6/1/2018 12:00 pm EDT Paya has turned off communication via any protocol below TLS 1.2 as part of PCI Compliance At 12 pm EDT on Friday, June 1st,
Maintenance and Service Interruption Alerts (archived) 6/1/2018 12:00 pm EDT Paya has turned off communication via any protocol below TLS 1.2 as part of PCI Compliance At 12 pm EDT on Friday, June 1st,
Manager Dashboard User Manual
 Manager Dashboard User Manual Manager User Guide The Manager User Guide is designed to provide a supervisor or a manager with step-by-step instructions for their daily tasks. Although every database will
CONVERGE MOBILE User Guide - Android
 How to take payments with the Converge Mobile app? CONVERGE MOBILE User Guide - Android Version 1.4 CONTACT 4576 Yonge Street, Suite 200, Toronto, ON M2N 6N4, Canada DOWNLOAD Google Play 2017 Elavon Canada
After logging into PrintGizmo create your profile and complete the information requested by navigating the menu to Configuration > Profile.
 Printer Guide Quick Start Guide Step 1: Setup your Profile See Profile under Configuration After logging into PrintGizmo create your profile and complete the information requested by navigating the menu
Outline. 01 Terminal Overview: Page The Basics: Page Transactions: Page Settlements: Page Poynt.
 Merchant Overview 1 Outline 01 Terminal Overview: Page 3 02 The Basics: Page 6 03 Transactions: Page 13 04 Settlements: Page 29 05 Poynt.net HQ: Page 34 2 01 Terminal Overview 3 Spec Sheet: Merchant Facing
SWIPESIMPLE CUSTOMERS
 SWIPESIMPLE CUSTOMERS Merchant User Guide Easily Manage and Save Customer Infomation TABLE OF CONTENTS 03 Viewing Customers 1. Customers Overview 2. Managing Customers Easily 3. Creating Customers Profiles
ConnectWise-Sage 50 Accounts User Guide
 ConnectWiseSupport@mobiusworks.com www.mobiusworks.com ConnectWise-Sage 50 Accounts Version 3.0.0.7 September 11, 2015 Table of Contents Table of Contents... 2 INSTALLATION AND CONFIGURATION... 4 Introduction...
Daily Operations Guide
 Daily Operations Guide Detailed Overview of The Reports in The Envision Software I Day-to-Day Operations Guide Table of Contents Part I Welcome to Envision Cloud 1 Part II Daily Operations 2 1 Clocking
Virtual Terminal Plus Product Insights for Merchants and Sales Offices. A virtual terminal that does virtually everything"
 Virtual Terminal Plus Product Insights for Merchants and Sales Offices A virtual terminal that does virtually everything" Learning Objectives Connect the dots ü Understand the capabilities, features and
NOTE: Close any security window that pops up (McAfee, MalwareBytes, etc.)
") Table of Contents Cashier Start-of-Day Process... 2 Logging in as a cashier and Opening the Terminal... 2 Turn the computer on and log in... 2 Cashier Instructions for Sales Events... 7 Checkout Process...
Table of Contents Cashier Start-of-Day Process... 2 Logging in as a cashier and Opening the Terminal... 2 Turn the computer on and log in... 2 Cashier Instructions for Sales Events... 7 Checkout Process...
HARBORTOUCH HOSPITALITY USER GUIDE. Harbortouch Technical Support: or
 HARBORTOUCH HOSPITALITY USER GUIDE INDEX EMPLOYEE FUNCTIONS: Clocking In/Logging In Clocking Out Beginning a Transaction Payment Options Host Mode Customer Database List View Ticket Functions Item Functions
Contents OVERVIEW... 3 CONFIGURATION... 4
 Contents OVERVIEW... 3 Feature Summary... 3 CONFIGURATION... 4 System Requirements... 4 ConnectWise Manage Configuration... 4 Configuration of Manage Login... 4 Configuration of GL Accounts... 5 Configuration
Maintenance and Service Interruption Alerts (archived)
") Maintenance and Service Interruption Alerts (archived) 7/17/2018 2:00 pm Telephony Service Interruption July 17, 2018 (RESOLVED) Service was restored at approximately 4:00 pm EDT on July 17, 2018. Paya
Maintenance and Service Interruption Alerts (archived) 7/17/2018 2:00 pm Telephony Service Interruption July 17, 2018 (RESOLVED) Service was restored at approximately 4:00 pm EDT on July 17, 2018. Paya
WELCOME TO SANTANDER TREASURY LINK
 WELCOME TO SANTANDER TREASURY LINK You are on your way to experiencing a customizable and central hub from which to effectively manage your company s finances. To ensure you have a positive first experience
Commuter Benefit Center Ordering Platform
 ADP TOTALSOURCE Commuter Benefit Center Ordering Platform Participant Reference Guide Version 17.5.6 WageWorks Copyright Information 2017 WageWorks, Inc. ALL RIGHTS RESERVED. The information contained
Online Payment Services
 A NetPay Guide to... Online Payment Services Online payments, also commonly referred to as CNP or Cardholder not present are those that provide the capability for a purchase to be made without physically
Verizon Enterprise Center CALNET 3 Invoices User Guide
 Version 1.17 Last Updated: March 2017 2017 Verizon. All Rights Reserved. The Verizon name and logo and all other names, logos, and slogans identifying Verizon s products and services are trademarks and
Alegeus. Table of Contents EMPLOYER GUIDE
 1 P a g e Table of Contents Introduction to Your New Benefits Program... 3 The Employer Administration Site Getting Started... 4 Logging In... 4 Logging Out... 4 Managing Your Password... 5 Managing Employer
Contents OVERVIEW... 3
 Contents OVERVIEW... 3 Feature Summary... 3 CONFIGURATION... 4 System Requirements... 4 ConnectWise Manage Configuration... 4 Configuration of Manage Login... 4 Configuration of GL Accounts... 5 Configuration
1 Table of Contents. Point of Sale
 1 Table of Contents 1. Table of Contents 1 2. How to Log on to the POS Terminal 2-4 3. How to Log Off the POS terminal 5 4. How to Run a POS Transaction 6-23 5. POS Receipt Examples 24-32 6. How to Void
Copyright Basware Corporation. All rights reserved.. Vendor Portal User Guide Basware P2P 17.3
 Copyright 1999-2017 Basware Corporation. All rights reserved.. Vendor Portal User Guide Basware P2P 17.3 Table of Contents 1 Vendor Portal Registration... 4 1.1 Register for Vendor Portal...4 2 Vendor
NAB EFTPOS User Guide. for Countertop & Mobile Terminals
 NAB EFTPOS User Guide for Countertop & Mobile Terminals YOUR NAB EFTPOS TERMINAL 2 NAB EFTPOS User Guide TABLE OF CONTENTS Getting to know your NAB EFTPOS Ingenico terminal 5 Contactless Tap & Go 8 Sale
POS Transactions with a Partial Approvals 1
 POS Transactions with a Partial Approvals 1 1 Table of Contents 1. Table of Contents 1 2. How to Run a POS Transaction with Partial Approvals 2-11 3. POS Receipt Example with Partial Approvals 12-14 4.
First Data Merchant Solutions EFTPOS. 8006L2-3CR Integrated PIN Pad. User Guide
 First Data Merchant Solutions EFTPOS 8006L2-3CR Integrated PIN Pad User Guide 2 Contents What are you looking for? Get to know your PIN pad Introduction 5 PIN Pad location and PIN privacy 5 PIN Pad ownership
New Client Training. Paychex Time and Labor Online Paychex, Inc. All rights reserved. TLO
 New Client Training Paychex Time and Labor Online 2013 Paychex, Inc. All rights reserved. TLO-4016-130617 Table of Contents WELCOME TO TIME AND LABOR ONLINE SUMMARY............................ 33 NEW CLIENT
BUSINESS ONLINE BANKING Primary Administrator & User Guide
 BUSINESS ONLINE BANKING Primary Administrator & User Guide #BetterTogether TABLE OF CONTENTS SPECIAL PREVIEW PERIOD 3 LOGIN Login Instructions 4 DASHBOARD Dashboard Setup 5 Review Your Dashboard 6 Review
DIRECT SUPPLIER ROSTER TOOL HOW TO GUIDE
 DIRECT SUPPLIER ROSTER TOOL HOW TO GUIDE Version 3.0 March 2015 Copyright 2013 Coles Supermarkets Australia Pty. Ltd. Contents 1 Overview 2 Log In 4 Create a Roster Set 9 Edit a Roster Set 11 Delete a
Delaying Count. Totaling the Register THEN
 Login 1. Select the POS icon. 2. Choose your name from the Name list. 3. Select Keyboard on Login screen. 4. Enter password in Password field. 5. Select Enter on Keyboard screen. Open for a Serving Period
Penny Lane POS. Basic User s Guide
 Penny Lane POS Basic User s Guide Penny Lane POS Basic User s Guide - Contents PART 1 - Getting Started a) Powering on the Equipment 2 b) Launching the System 2 c) Float In/Float Out 2 d) Assigning Cashier
Credit Card Processing Guide
 Credit Card Processing Guide Detailed Overview of The Reports in The Envision Software I Credit Card Processing Within Envision Cloud Table of Contents Part I Introduction 1 Part II Processing On A Computer
Management System. Simplify The Switch. CashANALYZER Support Line
 Management System Simplify The Switch CashANALYZER Support Line 844-663-5291 Your company s conversion to enhanced CashANALYZER will occur during the next few weeks. u Your CashANALYZER Administrator will
Release Notice. Version Release Date: June 18, 2015
 Release Date: June 18, 2015 SedonaOffice 8401 Chagrin Blvd Suite 15-B 45185 Joy Road Chagrin Falls, OH 44023 Canton, MI 48187 440.247.5602 Contents About this Document... 5 Overview... 5 Application Enhancements/Improvements...
MyBill. DHL MyBill User Guide
 DHL User Guide Content Page DHL MYBILL INTRODUCTION What does offer? Registering via THE SCREENS The Dashboard The Archive, Reports & Download Screens The Search Screen The My Account Screen The Help Screen
1 Table of Contents. Point of Sale
 1 Table of Contents 1. Table of Contents 1 2. How to Log on to the POS Terminal 2-3 3. How to Log Off the POS Terminal 4 4. How to Run a POS Transaction 5-14 5. POS Receipt Examples 15-19 6. How to Void
Your Gateway to Electronic Payments & Financial Services Getting Started Guide - English
 Your Gateway to Electronic Payments & Financial Services Getting Started Guide - English Contents Introduction Register online for noqodi How to fund? How to execute Transactions and Payments? Conclusion
MyBill. DHL MyBill User Guide
 DHL User Guide Content Page DHL MYBILL INTRODUCTION What does offer? Registering via THE SCREENS The Dashboard The Archive, Reports & Download Screens The Search Screen The My Account Screen The Help Screen
User Guide Veezi Loyalty. Vista Entertainment Solutions
 User Guide Veezi Loyalty Vista Entertainment Solutions 2016-05-02 Copyright Notice Copyright 1996-2016 Vista Entertainment Solutions Ltd. All rights reserved. Veezi is a Registered Trademark of Vista Entertainment
Kitsap Bank Bill Pay FAQ s
 Kitsap Bank Bill Pay FAQ s Why Bill Pay? With Bill Pay you re doing your part for the environment. If only 2% of American households switched from paper to electronic bills and statements, 1,493,685 gallons
Card Present. User Guide for Resellers
 Card Present User Guide for Resellers Table of Contents Card Present... 1 User Guide for Resellers... 1 Table of Contents... 2 Introduction... 3 Card Present Services... 3 Benefits of IP-Based Card Present
Universal Time Clock TM. QuickBooks Plug-in User Guide
 Universal Time Clock TM QuickBooks Plug-in User Guide Table of Contents Table of Contents...2 Chapter 1: Getting Started...3 Support and Troubleshooting... 3 System Requirements... 3 Installing the QuickBooks
DHL MyBill USER GUIDE
 DHL MyBill USER GUIDE CONTENT PAGE DHL MYBILL INTRODUCTION What does MyBill offer? Registering via MyBill THE SCREENS The Dashboard The Archive, Reports & Download Screens The Search Screen The My Account
PO Boxes Online Key Navigation Steps
 Welcome to PO Boxes Online! This is not a step-by-step guide, but a key steps document to keep you on track as you navigate through the application https://www.usps.com/manage/po-boxes.htm. Landing Page
Integration Manual Valitor NetSuite Module
 Integration Manual Valitor NetSuite Module Integrating with Valitor could not be easier. Choose between Hosted, HTTP POST or XML integration options, or alternatively browse our selection of client libraries
Printing the Study Guide
 Ceridian Self Service Version 2.4 Printing the Study Guide If you are using a version of Adobe Reader that is prior to 6.0, Ceridian recommends clearing the Shrink oversized pages to paper size check box
Bridge. Billing Guide. Version
 Bridge Billing Guide Version 2.5.112 Table of Contents Page i Table of Contents Table Of Contents I Introduction 2 Managing Bill To Parties 3 Creating a New Bill to Party 3 Viewing and Navigating Bill
Introduction to ASP s new mobile friendly digital platform. (c) Automotive Service Products, Inc.
 Automotive Service Products, Inc.") Introduction to ASP s new mobile friendly digital platform Welcome to ASP Connect WE LISTENED TO YOU... AND CREATED A WEB PORTAL THAT: PROVIDES SEVERAL FEATURES NOT OTHERWISE AVAILABLE: Estimated Ship
Introduction to ASP s new mobile friendly digital platform Welcome to ASP Connect WE LISTENED TO YOU... AND CREATED A WEB PORTAL THAT: PROVIDES SEVERAL FEATURES NOT OTHERWISE AVAILABLE: Estimated Ship
01/02/ Delta Faucet Inbound Compliance Program. Dear Delta Faucet Supplier,
 01/02/2013 Subject: - Delta Faucet Inbound Compliance Program Dear Delta Faucet Supplier, This is to inform you that on 01/28/2013, Delta Faucet will be utilizing the web-based Inbound System to facilitate
Features from Previous Releases
 Features from Previous Releases This document lists the new features from CounterPoint V7.5.10 through V7.5.17. Click a version number to browse the new features for that version or click a particular
Content Page. DHL MyBill Guide. DHL MyBill. DHL MYBILL INTRODUCTION 01 Content Page 02 What does DHL MyBill offer?
 01 Guide Content Page DHL MYBILL INTRODUCTION 01 Content Page 02 What does offer? REGISTRATION AND ACCESS 03 Registration 04 Registration (continued) MAIN TABS 05 Dashboard 06 Archive, Reports & Download
Proxama PIN Manager. Bringing PIN handling into the 21 st Century
 Proxama PIN Manager Bringing PIN handling into the 21 st Century I am not a number I am a free man So said the The Prisoner in that 1960s cult TV show, but Personal Identification Number, or PIN, was adopted
GETTING STARTED WITH QUICKEN with Online Bill Pay 2010, 2009, and for Windows
 GETTING STARTED WITH QUICKEN with Online Bill Pay 2010, 2009, and 2008-2007 for Windows Refer to this guide for instructions on how to use Quicken s online account services to save time and automatically
Your Questions Answered
 Your Questions Answered When you want the scoop on a new restaurant, you probably ask a friend. If you want to know what s causing your car to make that strange noise, you ask a mechanic. And when you
OneOne Infinity Loyalty System
 Arch User Guide ver. 26 Classification: Document History Date Version Changed By Details 2015-08-18 1.0 Michelle Lategan Created Document 2016-02-18 1.1 Michele Lategan Updated Document 2016-03-03 1.2
Verifone Vx520. Restaurant/Retail Quick Reference Guide
 Verifone Vx520 Restaurant/Retail Quick Reference Guide Technical Support (800) 966-5520 - Option 3 Customer Service (800) 966-5520 - Option 4 www.electronicpayments.com CREDIT CARD SALE MANUALLY KEYED
Employer Portal Quick Start Guide-Tax Advantaged Plans
 Benefit Extras, Inc. P.O. Box 1815 Burnsville, MN 55337 Phone: (952) 435-6858 (Toll-free 1-866-435-6858) Fax: (952) 435-8435 (Toll-free 1-800-886-8793) www.benefitextras.com Employer Portal Quick Start
You will be notified if your company has fallen below their service level expectation. Suppliers not
 June 15, 016 Subject: Wurth DMB Supply Inbound Compliance Program Dear Supplier This is to inform you that on July 5, 016 Wurth DMB Supply will be utilizing the web based Inbound System to facilitate the
Clients maintain their own accounts, but cannot access another client s account.
 Looking for an affordable, comprehensive online time clock for your clients? With our Combined Billing feature, you are able to combine all of your clients separate accounts into one monthly bill. This
Skipjack Payment Plug-in for QuickBooks User Guide
 Skipjack Payment Plug-in for QuickBooks User Guide About this Document...3 Copyright Notice... 3 Publication History... 3 Documentation Conventions... 4 Obtaining Additional Information... 4 Contacting