IKO Ruberseal EPDM Roofing System Guide
|
|
|
- Everett Berry
- 6 years ago
- Views:
Transcription


1 IKO0317 April 2017 IKO Ruberseal EPDM Roofing System Guide
2 IKO is a worldwide enterprise, with more than 3000 employees, and manufacturing plants in Canada, the United States, United Kingdom, Belgium, Holland, France and Slovakia. The company s operations ships products to 96 countries around the globe. The IKO Group Despite tremendous growth, IKO has also remained firmly rooted in its family values of entrepreneurial spirit,craftsmanship and innovation. The company maintains the fierce independence of its founder, and his belief of the importance of controlling the raw materials used in its manufacturing process. IKO also strives to back the best products in the industry with the best service. The IKO family includes not just the ownership, but the thousands of dedicated employees across its global operations who share the company s ideals of craftsmanship, attention to detail and world class service for our customers. The commitment of IKO s employees is the key pillar in the company s success in today s competitive marketplace. The ultimate proof of the company s commitment to quality and innovation is its own success. From humble beginnings to a modern manufacturer with global reach, IKO has remained committed to the values that were the foundation of the business envisioned by our founder, Israel Koschitzky. That combination of old-time values, combined with cutting edge technology and innovation, means IKO will continue to Set the Standard both now and in the future. 2 Technical:
3 BRITISH MADE FOR BRITISH TRADE IKO Ruberseal EPDM Roofing System Guide IKO in the UK In the UK, the IKO name has become synonymous with delivering dependable waterproofing solutions backed by supreme levels of customer service. This hard earned reputation has been built on a foundation of quality and an ethos of customer service which permeates through the organisation and remains as strong today as it did 100 years ago. The rewards speak for themselves. IKO PLC is now well established as the UK market leader in the design, manufacture and installation of roofing and waterproofing systems. With this enviable position comes an unwavering commitment and responsibility to continue investing in new product solutions, new manufacturing facilities and people, all dedicated to achieving excellence at every level. Contents What is EPDM? 4 Key & Build-Ups 5 EPDM Membrane 6 Ancillaries 6 Tapes 7 Adhesives & Primers 8 Termination Bars, Trims & Corners 9 Outlets & Pipe Boots 10 Installing IKO Ruberseal EPDM Roofing System and Preparation Installing EPDM Membrane 12 to the Roof Substrate 2. Seam Jointing Installing EPDM Membrane 15 to Upstands 4. Upstand Terminations Using EPDM Membrane 17 as Counter Flashing 6. Using Ruberseal Cover Tape 18 as Counter Flashing 7. Using Ruberseal Reinforced 19 Perimeter Strip (RPS) 8. Internal Corner Detailing External Corner Detailing Pipe Detailing Rainwater Outlet Installation Installing Roof Trims 26 IKO Ruberseal EPDM Product Estimator Guide 29 Technical Drawings 30 Product Estimator
 is an unreinforced elastomeric waterproofing membrane that is black in colour with a textured surface on both sides.")
4 What is EPDM? EPDM (ethylene propylene diene monomer) is an extremely durable synthetic fire retardant rubber roofing membrane. IKO Ruberseal EPDM Membrane (EPDM Membrane) is an unreinforced elastomeric waterproofing membrane that is black in colour with a textured surface on both sides. Both a G Grade version and FR (Fire Retardant) version are available. Hassle-Free, Long-Lasting Waterproof Roofing Both IKO Ruberseal EPDM Systems are a high performance single ply waterproofing systems that are quick and easy to install and incredibly long-lasting. A variety of lengths are available creating an exceptional weatherproofing protection solution for both new builds and refurbishment projects. IKO Ruberseal EPDM System includes all of the components needed to complete the perfect job. Only basic tools are required and accessories are available in a range of common sizes to make installation simple and straightforward. CERTIFICATE No: 15/5277 Why choose IKO Ruberseal EPDM? Simple and quick to install Minimal maintenance In roll or pre-fabricated format Durable and highly elastic UV and root-resistant Contains no dangerous substances Why choose IKO Ruberseal FR EPDM? BBA approved (Certificate No.15/5277) Fire retardant, high quality membrane Life expectancy of up to 40 years At the heart of the system is the EPDM Membrane. Available on the roll or in bespoke pre-fabricated sheets jointed by heat weld technology in our state of the art facility at Clay Cross, Derbyshire. The EPDM Membrane provides the ultimate in versatility, flexibility and performance. With a thickness of 1.2mm, the EPDM Membrane can be supplied in a choice of widths and a variety of lengths to suit the requirements of your waterproofing project. From jointing and flashing tapes, to high performance primers and adhesives, the IKO Ruberseal EPDM System offers all the accessories you ll need to ensure a secure and lasting waterproof roofing system. 4 Technical:
 Reinforced Perimeter Strip Seam Tape Saw Broom Screwdriver 229mm 152mm 25-150mm 75-125mm")
 attached with suitable adhesive 6 Substrate 1 3 2 1 3 2 5 4 4 6")
5 Key Products & Ancillaries Tools EPDM Membrane Contact Adhesive PUR Adhesive Tape Primer Sealant Gun Claw Hammer Scissors Tape Measure Cleaning Wash Peelstop Bar Clamping Strip Sealant Penny Brass Roller Silicone Seam Roller Chalk/Crayon Brush/Roller 152mm 75mm IKO Flash Corner Patch (RPS) Reinforced Perimeter Strip Seam Tape Saw Broom Screwdriver 229mm 152mm mm mm Flashing Tape Cover Tape Pipe Boot Rain Water Outlet Quicktrim System Fixing Pins Joint Clip Jubilee Clip Cold Roof Build-Up Warm Roof Build-Up 1 EPDM Membrane 2 Seam Tape 3 PU Adhesive 4 Substrate 1 EPDM Membrane 2 Seam Tape 3 PU Adhesive 4 IKO enertherm Insulation Board 5 Specified IKO VCL (Vapour Control Layer) attached with suitable adhesive 6 Substrate


6 EPDM Membrane A waterproof roof covering. 1.2mm thick G or FR grade EPDM rubber, suitable for exposed and ballasted roof types. Additional material should be allowed for upstands to walls, rooflights and for termination at roof edges. Product Dimensions m 2 per Roll G Grade EPDM Membrane FR EPDM Membrane m x 1.7m 42.5m m x 3.35m 83.75m m x 5m 125m m x 1.7m 42.5m m x 3.35m 83.75m m x 5m 125m 2 Roof in a Box - Our bespoke Roof Service (POA) * We can provide you with everything you need to complete your roofing installation, all in one box. This includes a prefabricated membrane to your own specification, tapes, adhesives, trims and any other accessories you may require. * Additional lengths and bespoke prefabricated services (FR EPDM Membrane only) are available. Additional material should be allowed for upstands to wall, roof lights and for terminations at the roofing edge. Lead time: 5 working days from receipt of order. The Contractor / Distributor are responsible for all measurements and quantities submitted. Contact your Local IKO Business Manager. See page for further information. Ancillaries Seam (Silicone) Roller Penny (Brass) Roller Used for rolling seams and installation details after laying EPDM membrane with tape. Compresses EPDM membrane in corners and at angles. Size (Coverage) n/a Size (Coverage) n/a 6 Technical:


.")

. Size 22700229 229mm x 15.24m roll IKOflash Lead-Free Flashing Rolls 3.5mm thickness.")
 Reinforced Perimeter Strip")
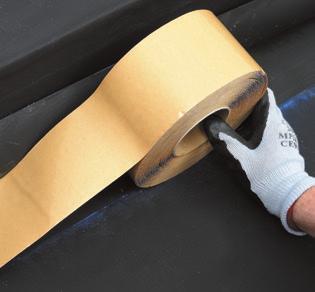
7 Tapes Cover Tape Cover Tape consists of a semi-cured EPDM membrane that has been laminated to a 0.7mm EPDM, pressure sensitive tape adhesive. Designed to cover, protect and seal mechanical fastening bars, membrane fasteners, membrane repairs, T-Joint reinforcement and seam overlays. To be used with Ruberseal Tape Primer ( ). Seam Tape Size mm x 30.5m roll Seam Tape is an extruded, vulcanised, black, pressure sensitive rubber adhesive tape. It is designed to provide high strength, watertight seams for EPDM membrane. Soft and tacky providing a quick grab onto EPDM Membranes, yet possesses high initial strength. To be used with Ruberseal Tape Primer ( ). Size mm x 30.5m roll Flashing Tape Flashing Tape consists of an uncured EPDM membrane that has been laminated to a 0.7mm EPDM, pressure sensitive tape adhesive. Extremely flexible, it can be formed to fit irregular shapes and surfaces such as internal and external corners as well as pipe detailing. To be used with Ruberseal Tape Primer ( ). Size mm x 15.24m roll IKOflash Lead-Free Flashing Rolls 3.5mm thickness. Ideal for use in areas such as chimney, abutment flashings, roof lights and pitched valley linings. Size mm x 12m mm x 12m mm x 12m mm x 12m Reinforced Perimeter Stri p (RPS) Reinforced Perimeter Strip (RPS) is designed for non-penetrating securement of the EPDM membrane in roofing applications. Strips consist of a reinforced EPDM membrane strip laminated with an EPDM, pressure sensitive tape adhesive. Corner Patch Pre-cut circular patches of Flashing Tape. Ideal for detailing internal and external corners. To be used with Tape Primer ( ). Size mm x 30.48m roll Size mm dia. 7

 22710010 10 Litre tin (approx. 28m²) 22705100 Size (Coverage) 305ml cartridge (6-6.")

 Sealant Cleaning Wash Sealant is used for sealing between EPDM Membrane and substrates such as brickwork and PVC pipes, where the EPDM Membrane is terminated.")
8 Adhesives & Primers PUR Adhesive Edge Sealant Used for adhering EPDM Membrane to a roof deck. Can be roller applied to concrete, timber or suitable thermal insulation boards. The adhesive must only be applied in dry conditions at temperatures of at least 5 C. Ruberseal Edge Sealant is used for sealing cut edges of Cover Tape, Flashing Tape and Rain Water Outlets. Size (Coverage ) Litre tin (approx. 14m²) Litre tin (approx. 28m²) Size (Coverage) 305ml cartridge (6-6.5 linear metres) Contact Adhesive Contact Adhesive is used for adhering EPDM Membrane to upstands. The adhesive must only be applied in dry conditions at temperatures of at least 5 C. Surfaces must be clean, dry and free from oil or grease. The adhesive should be applied to both the upstand and the EPDM Membrane using a brush or roller. Tape Primer Tape Primer is to be applied to EPDM Membrane surfaces prior to installing Tapes. Size (Coverage) Litre tin (approx. 9m²) Size (Coverage) Litre tin (18-23m²) Sealant Cleaning Wash Sealant is used for sealing between EPDM Membrane and substrates such as brickwork and PVC pipes, where the EPDM Membrane is terminated. The Cleaning Wash is used for cleaning EPDM Membrane prior to installation or repair, removing dirt and other such substances that may effect installation Size (Coverage) 310ml cartridge (8-12 linear metres) Size Litre bottle 8 Technical:


9 Termination Bars, Trims & Corners Clamping Strip Quicktrim Watercheck Kerb Clamping Strips are used to secure the EPDM Membrane to an upstand where termination occurs. Designed to clamp the EPDM Membrane and allow for a bead of sealant to be applied to the upper edge to maintain a watertight termination against the substrate. A simple and effective way of securing the membrane at the roof perimeter. A Quicktrim Watercheck Kerb prevents rainwater flowing off the roof edge. Supplied with clips and colour matched fixing pins. Size m x 50mm Peelstop Bar Size m length Quicktrim Drip Edge A Peelstop Bar is used to secure EPDM Membrane at the perimeter of a roofing system. Installation should occur at the base of upstands / penetrations using suitable fasteners. A simple and effective way of securing the membrane at the roof perimeter. A Quicktrim Drip Edge allows rainwater to flow off the roof edge into a gutter. Supplied with clips and colour matched fixing pins. Size m x 30mm Size m length Quicktrim External Corner A pre-made External Corner unit for use with Quicktrim Watercheck Kerb Size 150 x 100mm per corner edge (300mm total length) 9


10 Outlets & Pipe Boots 1 2 Rain Water Outlet Rainwater outlets for draining the roofing area. Either installed vertically or horizontally with a pre applied EPDM membrane flange for effective sealing to the main roof EPDM Membrane. Size mm dia mm dia mm dia mm dia Pipe Boot Flexible rubber flashing to weather pipe penetrations from 25mm - 150mm in diameter. A self-adhesive pressure sensitive tape is applied to the base for ease of application. To be used with Tape Primer ( ). Size mm - 150mm 10 Technical:
. The substrate should be clean, dry and free of any debris and grease.")
11 Installing IKO Ruberseal EPDM Roofing System The IKO Ruberseal EPDM Roofing System can be can be installed over most common substrates such as timber or certain insulation products with sufficient compressive and interlaminar strength and a suitable facing (check with insulation manufacturer for advice). The substrate should be clean, dry and free of any debris and grease. Preparation Brush the roof surface to remove any loose particles. Any loose or protruding nails or screws should be either fully inserted or removed before laying the membrane. The roof deck should be of sufficient strength and quality to support the EPDM Membrane and insulation system (if required). 11


12 1. Installing EPDM Membrane to the Roof Substrate 1 2 Check that the EPDM Membrane is placed evenly over the entire roof surface, the edges of the roof should be covered by a minimum of 150mm. The EPDM Membrane should be allowed to relax for at least 30 minutes before continuing. Fold back the EPDM Membrane by approximately 50% to expose the underlying deck surface. Note: This may require longer time during colder weather. 3 Using a paint roller and tray apply PUR Adhesive to the roof substrate, or pour small amounts directly onto the roof substrate and spreading with a roller or small notched adhesive spreader. Ensure a full coat is applied to the substrate. Note: If the EPDM Membrane is to be site jointed to another roll or panel it is important to keep the overlapping areas of the joint free from this adhesive. 4 5 Lay the EPDM Membrane into the adhesive and use a soft brush/broom or squeegee to ensure full contact between the EPDM Membrane and the adhesive is achieved and that there are no trapped air pockets. 12 Technical:


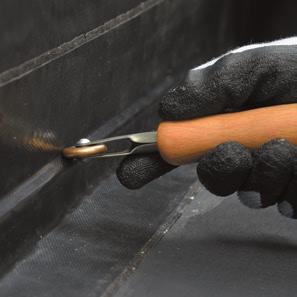
13 2. Seam Jointing 1 2 Ensure the EPDM Membrane is dry, clean and free from debris or grease. Use Cleaning Wash if the area to be joined is contaminated and allow to flash off until dry. Where two EPDM Membrane panels are to be joined, position them so that the overlap is at a minimum of 75mm. With chalk or crayon, mark approx 8-10mm beyond the overlapped sheet edge as a guide for applying the Tape Primer. 3 4 Peel back the EPDM Membrane and apply the Tape Primer to both surfaces from the chalk or crayon mark to the edge of the EPDM Membrane and the reverse side of the overlapped EPDM Membrane using a paintbrush or small roller and let them become dry to the touch. Place the 75mm wide Seam Tape on to the laid, primed EPDM Membrane on the roof surface and roll the paper with a Seam Roller. 13


14 5 6 Remove a piece of the release paper from the Seam Tape. Allow the top EPDM Membrane layer to fall onto the full length of the Seam Tape. Gradually pull away the release paper at an angle of 45 from the Seam Tape and sweep the tape with your hand as you release. Using a Seam Roller, roll the seam at right angles to the seam tape to ensure adhesion. 14 Technical:


15 3. Installing EPDM Membrane to Upstands At all upstands and change of angles, the EPDM Membrane is required to be mechanically attached using a Peelstop Bar and counterflashed using a separate flashing of EPDM Membrane, Cover Tape or using the Reinforced Perimeter Strip method. Note: Peelstop Bars should be stopped approx. 200mm short of internal and external corners to allow for detailing. Contact Adhesive should be used when bonding the EPDM Membrane to any upstands. Before using the Contact Adhesive stir the contents thoroughly and ensure the area to be bonded is clean and dry. The below stages within this section are to be used in conjunction with sections 4, 5 & 6, depending on the desired method of application. 1 2 Apply a thin coat of Contact Adhesive to both the upstand and the reverse side of the EPDM Membrane using a brush or roller. The adhesive should then be left to go tacky before pressing the 2 surfaces together. 3 4 Carefully press the EPDM membrane to the now tacky upstand. Use a Seam Roller to apply pressure to the flashing making sure any trapped air is removed to ensure adhesion. Note: Contact Adhesive should NOT be used in temperatures below 5ºC. 15

16 4. Upstand Terminations 1 To ensure a watertight finish at the top of all upstands the EPDM Membrane should be secured using a Clamping Strip (secured at maximum 300mm centres) and applying Sealant between the upper lip of the clamping strip and the wall. Alternative Termination Method Alternatively the EPDM Membrane should be clamped with a Peelstop Bar and counter flashed using IKOflash lead free flashing or traditional lead. Contact the IKO Technical Department for further details on or technical.uk@iko.com 16 Technical:


.")
17 5. Using EPDM Membrane as Counter Flashing 1 2 Return the EPDM Membrane vertically up the upstand face. Trap and secure the EPDM Membrane with a Peelstop Bar adequately secured at maximum 300mm centres. Using chalk or crayon, mark 75mm horizontally away from the Peelstop Bar. Counter flash by bonding a separate piece of EPDM Membrane to the upstand using Contact Adhesive as described within Section 3 Installing EPDM Membrane to Upstands Stages 1-3 (page 7) and return the counter flashing piece of the EPDM Membrane onto the horizontal roof area to weatherproof the fixing area. Note: Contact Adhesive must not be placed over the areas to be sealed with the 75mm Seam Tape. 3 4 The seam joint between the counter flashing piece of EPDM Membrane and the main field EPDM Membrane should be made by using the 75mm Seam Tape, applied using the same method as used within Section 2 Seam Jointing, Stages 3-6 (page 5). Use a Seam Roller to ensure adhesion between Seam Tape and the EPDM Membrane. To ensure a water tight finish to the upstand, the EPDM Membrane should be secured suing a Clamping Strip and Sealant as shown in Section 4 Upstand Terminations. 17
 vertically up the upstand by bonding using")
.")


 and Tape Primer applied to the EPDM Membrane where")

18 6. Using Cover Tape as Counter Flashing 1 2 In some circumstances it may be desirable to return the same EPDM Membrane (without cutting) vertically up the upstand by bonding using Contact Adhesive and the same process as seen within Section 3 Installing EPDM Membrane to Upstands (page 7). Install a Peelstop Bar positioned at the base of the upstand, adequately secured at a maximum 300mm centres. 3 4 A length of 150mm wide Cover Tape should be positioned over the Peelstop Bar to ensure a watertight finish. The position of the Cover Tape should be marked using a suitable chalk or crayon (75mm to the horizontal side of the Peelstop Bar) and Tape Primer applied to the EPDM Membrane where the tape is to be applied and allowed to dry. 5 6 The Cover Tape can now be positioned and the release paper removed. Using a Seam Roller, roll the Cover Tape at right angles to the seam tape to ensure adhesion. To ensure a water tight finish to the upstand, the EPDM Membrane should be secured suing a Clamping Strip and Sealant as shown in Section 4 Upstand Terminations. 18 Technical:


19 7. Using Reinforced Perimeter Strip (RPS) 1 2 Secure the RPS using a Peelstop Bar at the base of the upstand fixing the bar at maximum 300mm centres. The RPS should be fixed through the area where there is no seam tape present. Peel back and prime the underside of the EPDM Membrane in the area where it will make contact with the seam tape on the RPS and allow to dry. The RPS seam tape is bonded to the primed underside of the EPDM Membrane along the length of the upstand base or change in angle line by removing the release paper at a 45 degree angle and rolling the EPDM Membrane with a Seam Roller in a similar way to carrying out a standard seam joint, as is show within Section 2 Seam Jointing Stages 5-6 (page 6). 3 The EPDM Membrane can then be bonded to the upstand using Contact Adhesive and a Seam Roller using the same method as described within Section 3 Installing EPDM Membrane to Upstands, Stages 3-4 (page 7). To ensure a water tight finish to the upstand, the EPDM Membrane should be secured suing a Clamping Strip and Ruberseal Sealant as shown in Section 4 Upstand Terminations. 19


20 8. Internal Corner Detailing 1 2 When using the main EPDM Membrane to form the upstand bond at an internal corner detail, Contact Adhesive can be used. Fold the membrane into the corner to form a triangular pocket. Using Contact Adhesive bond the internal faces of the EPDM Membrane pocket together using a small brush. Allow the adhesive to go tacky before closing the pocket off. 3 4 Bond the triangular pocket to one of the upstands using Contact Adhesive. Apply a bead of Sealant to the diagonal edge of the triangular section to prevent water ingress behind the pocket. 20 Technical:
.")
.")

.")
21 9. External Corner Detailing 1 2 Bond the membrane flashings to the upstands using Contact Adhesive following one of the aforementioned upstand detailing methods used in Sections 3-6 (pages 7-10). Using chalk or crayon mark the position of a pre-cut Corner Patch or a piece of Flashing Tape (cut to approximately 200mm diameter). This should be positioned at the base of the upstand corner so approximately one third of the diameter returns up the vertical face of the upstand. Apply Tape Primer to the marked area and allow to dry. 3 4 Remove 1/3 of the release paper from either the Corner Patch or Flashing Tape to be applied to the vertical section and place in position (this can be done by gently scoring the release paper with a knife ensuring the waterproofing layer is not damaged). Use a Seam Roller or Penny Roller to ensure adhesion. Remove the remaining release paper and working from the base of the corner outwards stretch the Corner Patch or Flashing Tape in to position on the horizontal surface. 21


22 5 6 Ensure complete adhesion using a Seam Roller or Penny Roller. Cut a section of Cover Tape to fit the upstand height and position over the corner of the upstand ensuring that it covers approximately 50mm of the previously installed patch. Mark its position using a chalk or crayon. Note: Using additional Cover Tape on an external corner (steps 6-9 within this section) is only necessary when two separate sheets of EPDM Membrane flashing join at the corner. 7 8 Apply Tape Primer to the marked area and allow to dry. Remove the release paper from the Cover Tape and apply to the previously primed area. 9 Ensure good adhesion using a Seam Roller. The cut edges of the Corner Patch or Flashing Tape and Cover Tape should be sealed using Edge Sealant, applied with a standard sealant gun as described in Section 4 Upstand Terminations (page 8). 22 Technical:


23 10. Pipe Detailing 1 2 Cut the EPDM Membrane so it fits over the pipe. Using a Pipe Boot cut the top of the pipe boot to the correct diameter to suit the pipe using a knife or scissors. 3 4 Place the pipe boot over the pipe and mark around the base with chalk or crayon. Apply Tape Primer to the marked area and allow to dry. 23


24 5 6 Remove the release paper from the Pipe Boot and place into position. Ensure good adhesion by applying pressure to the base using a Seam Roller. Install a jubilee clip to secure the top of the Pipe Boot to the pipe and apply a bead of Sealant all the way around the top of the Pipe Boot, where it meets the external pipe. 24 Technical:


25 11. Rainwater Outlet Installation 1 2 Cut the EPDM Membrane and substrate to suit the diameter of the Rainwater Outlet pipe and insert the outlet into position. Using chalk or a crayon mark the position of the outlet flange on the EPDM Membrane. Remove the outlet and apply Contact Adhesive to the underside of the flange and the marked area of EPDM Membrane. Allow the adhesive to go tacky and then insert the outlet back into position. 3 4 Ensure good adhesion by applying pressure to the base using a Seam Roller.. Apply Edge Sealant to the edge of the outlet flange, where it meets the EPDM Membrane 25
 around the roof perimeter, level with the top of the roof deck.")

26 12. Installing Roof Trims Where there is no upstand around the roof edge, e.g. a garage, the Quicktrim System should be installed. Preparation Before fixing the edge of the EPDM Membrane, fix a planed timber batten (approximate size 25mm x 50mm) around the roof perimeter, level with the top of the roof deck. We recommend painting the bottom of the batten for better appearance and to protect the timber. Extend the membrane approximately 80mm over the edge of the roof to fully cover the back edge detail. 1 2 The Drip Edge Trim backing piece should be fixed onto the batten adjacent to the gutter using suitable screws or the flat headed nails provided. Make sure that the curved top section of the back edge trim is level, or just below the top of the batten. Apply the EPDM Membrane over the roof and cut off any surplus at the bottom edge of the batten, or the bottom edge of the back drip edge trim. Cut and fold membrane flat around the roof corners. This allows the corner trim to fit snugly against the corner of the roof. 26 Technical:


27 3 4 Slide a corner section into position and secure using the black headed nails. 5 Butt the first Drip Edge Trim length to a corner piece allowing a gap of 5mm for expansion. Fix the front Drip Edge Trim over the membrane by firmly pushing down on the trim to compress the seal and at the same time drill a 2mm pilot hole through the front trim slot, into the back trim. Now pin through both trims using the fixing provided. The top section of the trim should now be level or just below the level of the roof to allow the water to pass over it and into the gutter. Allow 5mm gap for expansion between lengths of trim. 6 7 Install a Joint Clip between the corner section or separate lengths of the Drip Edge Trim and fill the gap with Sealant. 27


28 8 9 Butt the first Check Kerb trim up to a corner section, compressing both seals together. On very cold days allow a minimum expansion gap of 5mm between the trims. Then gently hammer the fixing pins through the centre of fixing slots. Apply a bead of sealant to one side of the joint to hold the Check Kerb joint clip in place. Apply the joint clip by hooking it under the bottom edge of the trim and at the same time snap the top of the clip over the top section of the Check Kerb. This will keep the clip in place and allow for the thermal movement behind the clip. Notes: Use a sharp saw to cut the trims down to size. Drill trims with a 5mm long slot if further fixings are required. Always make sure two rubber seals are between joints. To insert a trim between corners measure between the corners of trims and deduct 10mm. Slight marks on the trims can be removed using household cream cleaner and soft cloth. On very cold days, allow a minimum expansion gap of 5mm between the trims. 28 Technical:


29 IKO Ruberseal EPDM Product Estimator Guide The IKO Ruberseal EPDM product estimator guide makes ordering the right amount of materials for individual roofing projects quick and easy. From EPDM Membrane configuration to ordering the correct amount of contact adhesive, this guide makes it easy for you to plan ahead, minimising the need for multiple reorders and maximising the efficiency of each roofing installation. 29
30 Technical Drawings 1. EPDM Membrane 2. Seam Tape & Primer 3. Cover Tape & Primer 4. Flash Tape & Primer 5. PUR Adhesive 6. Contact Adhesive 7. Clamping Strip 8. Peelstop Bar 9. Sealant 10. Reinforced Perimeter Strip & Primer 11. Edge Sealant 12. Quicktrim Water Check Kerb 13. Quicktrim Drip Edge 14. Quicktrim Corner 15. Pipe Boot 16. Corner Patch B. Standard Upstand Detail 150mm MIN 150mm MIN A. Overlap Detail C. Hidden Upstand Detail D. Advanced Upstand Detail 150mm MIN E. Quicktrim Watercheck Detail F. Quicktrim Edge Detail 30 Technical:

31 D. Advanced Upstand Detail C. Hidden Upstand Detail B. Standard Upstand Detail A. Overlap Detail E. Quicktrim Watercheck Detail F. Quicktrim Edge Detail 1. EPDM Membrane 2. Seam Tape & Primer 3. Cover Tape & Primer 4. Flash Tape & Primer 5. PUR Adhesive 6. Contact Adhesive 7. Clamping Strip 8. Peelstop Bar 9. Sealant 10. Reinforced Perimeter Strip & Primer 11. Edge Sealant 12. Quicktrim Water Check Kerb 13. Quicktrim Drip Edge 14. Quicktrim Corner 15. Pipe Boot 16. Corner Patch 31
32 Product Estimator Membrane (25m) Product Item No (1.7m) Quantity Calculation (all calculations in m unless specified) Materials Required (3.35m) G Grade EPDM Membrane 1 Roof length x roof width** m² m² (5m) m² Membrane (25m) (1.7m)* m² (3.35m)* FR EPDM Membrane 1 Roof length x roof width** m² (5m)* m² Seam Tape 2 Total length of seams (Detail A & D) 30.5 Roll(s) Tapes Cover Tape 3 Total length of upstand (Detail B) T-joints and butt joints 30.5 Roll(s) Flashing Tape 4 Total number of internal/external corners + length of details to be completed *** Roll(s) Reinforced Perimeter Strip (RPS) 10 Total length of upstand to be fixed with RPS (Detail C) Roll(s) PUR Adhesive 5 Roof length x roof width 15 Tin(s) PUR Adhesive 5 Roof length x roof width 30 Tin(s) Adhesives & Primers Contact Adhesive 6 Upstand length x upstand height 9 Tin(s) Sealant 9 Total length of upstand to be completed 8 Cartridge(s) Edge Sealant 11 Total length of cut tape edges to be sealed 6 Cartridge(s) Tape Primer 17 Total m² of surfaces to be primed 76 Tin(s) Clamping Strip 7 Total length of upstand to be completed 2.5 Length(s) Peelstop Bar 8 Total length of upstand to be completed Length(s) Termination Bars, Trims & Corners Quicktrim Watercheck Kerb 12 Total length of perimeter to be completed using Watercheck Kerb (Detail E) 2.5 Length(s) Quicktrim Drip Edge 13 Total length of perimeter to be completed using Drip Edge (Detail F) 2.5 Length(s) Quicktrim External Corner 14 Number of external corners to be completed using Quicktrim Corner(s) Corner Patch 16 Number of external corners to be formed using EPDM Membrane *** Corner(s) Pipe Boot 15 Number of pipe penetrations to be weathered Jubilee Clip included Pipe Boots & Outlets mm dia mm dia. Rain Water Outlet 18 Number of internal Rain Water Outlets required mm dia mm dia Cleaning Wash n/a Number of units required (we suggest maintaining one in stock at all times) Ancillaries Silicone Roller n/a Number of units required (we suggest one per installer, when required) Penny (Brass) Seam Roller n/a Number of units required (we suggest one per installer, when required) *Additional lengths and bespoke prefabricated services are available. **Additional material should be allowed for upstands, roof lights, seam joints, overhangs and for terminations at the roofing edge. ***Flashing Tape can be used instead of Corner Patches or other detailing if desired. Lead time: 5 working days from receipt of order


33 Take a look at the latest IKO Ruberseal EPDM Roofing System video and many more on the IKO YouTube Channel: Or scan the QR with your smartphone * CERTIFICATE No: 15/5277 *EPDM Membrane only. IKO PLC Appley Lane North Appley Bridge Wigan Lancashire WN6 9AB Member of the IKO Group Customer Services t: f: sales.uk@iko.com Technical Services t: technical.uk@iko.com April 2017 Whilst every care is taken to see that the information given in this literature is correct and up to date it is not intended to form part of any contract or give rise to any collateral liability, which is hereby specifically excluded. Intending purchasers of our materials should therefore verify with the company whether any changes in our specification or application details or otherwise have taken place since this literature was issued.
PVC Single Ply Roofing System
 PVC Single Ply Roofing System BRITISH MADE FOR BRITISH TRADE Armourplan PVC roofing system Premium waterproofing with a proven track record IKO Polymeric s Armourplan PVC roofing system offers flexible
DURABILITY PUNCTURE RESISTANCE LONG TERM PERFORMANCE
 DURABILITY PUNCTURE RESISTANCE LONG TERM PERFORMANCE DuoPly EPDM Flat Roofing System DuoPly EPDM is an EPDM roofing membrane with a polyester fleece laminated to the underside. The exceptional ageing resistant
Tools & Equipment Chalk line Caulk gun 50-75mm brushes 2 hand roller Hammer Hook blade knife/scissors Pencils
 Installation Guide This installation Guide is to give the user a general overview of the application of an EPDM roof. It is intended as a broad reference guide. Safety Awareness The bonding adhesive MUST
BRANZ Appraisal Certificate # 461 (2010) Internal wet areas.
 Internal wet areas.") SPECIFICATION FOR PROTECTO WRAP AFM-WM FOR INTERNAL WET AREAS BRANZ Appraisal Certificate # 461 (2010) Internal wet areas AFM/WM INTERNAL 0104 Page 1 AFM-WM INTERNAL SPECIFICATION PRODUCT DESCRIPTION Anti
SPECIFICATION FOR PROTECTO WRAP AFM-WM FOR INTERNAL WET AREAS BRANZ Appraisal Certificate # 461 (2010) Internal wet areas AFM/WM INTERNAL 0104 Page 1 AFM-WM INTERNAL SPECIFICATION PRODUCT DESCRIPTION Anti
Gas Protection System Components
 Page 1 Visqueen Gas Protection Visqueen Building Products is recognised as the leader in the development, production and supply of high quality construction related ground gas protection membranes. The
Pipe Flashing Systems
 Uniclass L52944:P71 EPIC E375:X71 CI/SfB (47) In6 Pipe Flashing Systems Pipe Flashing Systems The widest range of pipe flashings available to the market Contents Page Front Cover 1 Contents 2 Introduction
Outline NBS Specification. Protec System to PVC Single Ply (Waterproofing Only)
") Outline NBS Specification Protec System to PVC Single Ply (Waterproofing Only) This document is a guide to assist in the production of tender documents only and is not project specific. A site survey is
Outline NBS Specification Protec System to PVC Single Ply (Waterproofing Only) This document is a guide to assist in the production of tender documents only and is not project specific. A site survey is
PRECAUTIONS AND WARNINGS!
 GENERAL INFORMATION This handbook has been designed to give the user a general description of a Rubberall fully adhered roof system. It is intended as a broad reference aid and not intended or meant to
RubberBond FleeceBack EPDM flat and low slope roofing system
 RubberBond FleeceBack EPDM flat and low slope roofing system Handy Technical Installation Guide Contents 1. Introduction... 3 2. Installers Preparations... 4 3. Substrate Considerations... 5 4. Installations...
J41 Reinforced bitumen membrane roof coverings
 J41 Reinforced bitumen membrane roof coverings To be read with Preliminaries/General conditions. A comprehensive waterproofing system comprising two reinforced bituminous membranes fully adhered to thermal
84 Lapping & Jointing 86 Service Pipe Penetrations 87 Sealing to Cavity Wall Constructions 88 Protecting Membranes System Components.
 84 Lapping & Jointing 86 Service Pipe Penetrations 87 Sealing to Cavity Wall Constructions 88 Protecting Membranes 90 System Components installation/ SYSTEM COMPONENTS INSTALLATION ADVICE LAPPING and JOINTING
An Effective Solution for Drainage Falls and Levelling for Flat Roofs, Walkways and Vehicle Decks
 An Effective Solution for Drainage Falls and Levelling for Flat Roofs, Walkways and Vehicle Decks IKO Permascreed - An effective solution for drainage falls and levelling for flat roofs, walkways and vehicle
84 Lapping & Jointing 86 Service Pipe Penetrations 87 Sealing to Cavity Wall Constructions 88 protecting Membranes 90 System Components.
 84 Lapping & Jointing 86 Service Pipe Penetrations 87 Sealing to Cavity Wall Constructions 88 protecting Membranes 90 System Components installation/ SYSTEM COMPONENTS INSTALLATION ADVICE LAPPING and JOINTING
PermaroofUK. Frequently asked questions
 PermaroofUK Frequently asked questions What is Firestone RubberCover membrane? Firestone RubberCover EPDM is a 100% cured single-ply roofing membrane made of a synthetic rubber Ethylene-Propylene-Diene
Self Adhesive EPDM TRAINING MANUAL
 Self Adhesive EPDM TRAINING MANUAL Rubber4Roofs Ltd, Unit 4 Kingswood Close Page 1 of 7 Copyright Rubber4Roofs Ltd GeneralHealth&Safety Extreme care must be exercised when working on ladders, roofs, below
J41 Reinforced bitumen membrane roof coverings
 J41 Reinforced bitumen membrane roof coverings To be read with Preliminaries/ General conditions. TYPES OF COVERING 115A SINGLE LAYER REINFORCED BITUMEN MEMBRANE WARM DECK ROOF COVERING warm roofing system
Fully Adhered EPDM. Installation Instructions. Single-Ply Simplified
 Fully Adhered EPDM Installation Instructions Single-Ply Simplified P.O. Box 251 Plainfield, PA 17081 866.471.5125 FAX: 717.960.4034 www.weatherbondroofing.com 2018 WeatherBond. 03.26.18 REPRINT REQUEST
.2 Flashings at grade to extents shown on the Drawings. .3 Membrane and polyethylene slip sheets at perimeter of walls.
 RWPS Foundations and Concrete Structures Page 1 of 8 1. GENERAL 1.1 Work Included.1 Supply and installation of ethylene propylene diene monomer (EPDM) membrane and insulation to extents shown on the Drawings
GRP Flat Roofing Edge Trims
 GRP Flat Roofing Edge Trims Compatible with GRP, rigid and flexible polyester, polyurethane, acrylic and alkyd systems. Trim Brochure and Technical Specification Guide General Information The Easy To Use
J41 Reinforced bitumen membrane roof coverings
 J41 Reinforced bitumen membrane roof coverings To be read with Preliminaries/General conditions. TYPES OF COVERING 110 BUILT-UP REINFORCED BITUMEN MEMBRANE WARM DECK ROOF COVERING Substrate: Plywood to
Outline NBS Specification. Protec System to Felt (Waterproofing Only)
") Outline NBS Specification Protec System to Felt (Waterproofing Only) This document is a guide to assist in the production of tender documents only and is not project specific. A site survey is always recommended.
Outline NBS Specification Protec System to Felt (Waterproofing Only) This document is a guide to assist in the production of tender documents only and is not project specific. A site survey is always recommended.
Desmopol Application Guide onto Ply/OSB Deck
 Board and Trim Selection and Application For new roofs or when overboarding is necessary, we recommend using an 18mm Far Eastern WBP plywood or 18mm OSB3 in line with standard roofing practice. Before
LIQUID APPLIED WATERPROOF ROOF COATINGS
 J31 LIQUID APPLIED WATERPROOF ROOF COATINGS To be read with Preliminaries/General conditions. TYPE(S) OF COATING 120 WARM DECK ROOF COATING Substrate: Suitable structural roof deck (e.g. Plywood, OSB3,
LIQUID APPLIED WATERPROOF ROOF COATINGS
 J31 LIQUID APPLIED WATERPROOF ROOF COATINGS To be read with Preliminaries/General conditions. TYPE(S) OF COATING 110 COLD DECK ROOF COATING Substrate: New / existing concrete deck / screed. o Preparation:
LIQUID APPLIED WATERPROOF ROOF COATINGS
 J31 LIQUID APPLIED WATERPROOF ROOF COATINGS To be read with Preliminaries/General conditions. TYPE(S) OF COATING 120 WARM DECK ROOF COATING Substrate: Suitable structural roof deck (e.g. Plywood, OSB3,
GUARANTEED ASPHALT LIMITED
 GUARANTEED ASPHALT LIMITED GuaraTEC Installation Guide Installing our fully bonded hot melt system. 2016 Barratt Homes, Osiers Road Guaranteed Asphalt Limited 2 Mercury Way, London, SE14 5RR, 020 7277
Colphene BSW Training and Application Guide. Colphene BSW Waterproofing Membrane. 1. Prepare substrate
 Colphene BSW Training and Application Guide Colphene BSW Waterproofing Membrane. 1. Prepare substrate Substrate must be structurally sound. Surface must be free of voids, spalled areas, loose aggregate,
30mm Height Linear Drain Shower Trays
 Installation Instructions 30mm Height Linear Drain Shower Trays 9. Parts Supplied Description Qty Shower Tray Parts Supplied (Fitting Kit) Description Qty Description Qty Shower Drain Base Fix-KST Adhesive
VINITEX INSTALLATION PROCEDURES
 VINITEX INSTALLATION PROCEDURES 1 INDex INTRODUCTION PAGE 2 HOT AIR manual WELDING PAGE 6 AUTOMATIC WELDING PAGE 10 WELDING TRANSVERSE JOINTS PAGE 13 T-JOINTS MULTIPLE WELDING SEAMS PAGE 15 PERIMETER
LIQUID APPLIED WATERPROOF ROOF COATINGS
 J31 LIQUID APPLIED WATERPROOF ROOF COATINGS To be read with Preliminaries/General conditions. TYPE(S) OF COATING 120 WARM DECK ROOF COATING Substrate: Suitable structural roof deck (e.g. plywood, OSB3,
CCW MiraPLY Installation Instructions
 CCW MiraPLY Installation Instructions www.carlisleccw.com Support: 800.527.7092 Introduction Carlisle Coatings & Waterproofi ng Incorporated (CCW) has prepared this installation guide to assist applicators
1850 x 40/50mm Raised Shower Tray Kit
 Installation Instructions 850 x 40/50mm Raised Shower Tray Kit Parts Supplied Description Qty Shower Tray Shower Tray Extension Parts Required (Fitting Kit) Materials Required Description Qty Description
Sarnavap 5000E SA Vapour Control Layer
 Roofing Product Data Sheet Edition 09.2008 Identification no. 02 09 01 05 402 0 000007 Version no. 02 Sarnavap 5000E SA Vapour Control Layer Product Description Sarnavap 5000E SA is a multi-layer self-adhesive
WATERPROOFING. MiraPLY Installation Instructions SCIENCE. SERVICE. SOLUTIONS. Introduction. Description. Substrate Preparation. Features and Benefits
 Introduction Carlisle Coatings & Waterproofi ng Incorporated (CCW) has prepared this installation guide to assist applicators in the use of MiraPLY and accessories. Every project is different, and this
Installation Instructions ALUTRIX 600 ALUTRIX FR
 SELF-ADHESIVE VAPOUR BARRIER Installation Instructions ALUTRIX 600 ALUTRIX FR WWW.ALUTRIX.COM 3 FOREWORD This publication is designed to assist the contractor when working with ALUTRIX self-adhesive vapour
INSTALLATION GUIDELINE. Hertalan EPDM roofing and DPC systems
 INSTALLATION GUIDELINE Hertalan EPDM roofing and DPC systems WWW.HERTALAN.CO.UK FOREWORD In the market for sealed roofing systems EPDM continues to be regarded as an innovative product. This is fairly
RUBBERGARD EPDM SA APPLICATION GUIDE
 RUBBERGARD EPDM SA APPLICATION GUIDE I. MEMBRANE APPLICATION... 2 A. MEMBRANE... 2 II. MEMBRANE ATTACHMENT... 2 A. MEMBRANE PREPARATION... 2 B. MEMBRANE APPLICATION... 2 III. SEAMING... 3 VI. MEMBRANE
Bid Opportunity Wilkes Reservoir North Cell Rehabilitation
 Water and Waste MONOMER (EPDM) ROOFING Page 1 of 11 Part 1 General 1.1 REFERENCES.1 ASTM International Inc..1 ASTM D4637-14E1, Standard Specification for EPDM Sheet Used In Single-Ply Roof Membrane..2
BUILT-UP REINFORCED BITUMEN MEMBRANE WARM DECK ROOF COVERING Two layer, EXCEL/SPOT fully adhered waterproofing system
 J41 Reinforced bitumen membrane roof coverings To be read with Preliminaries/General conditions. TYPES OF COVERING 110A BUILT-UP REINFORCED BITUMEN MEMBRANE WARM DECK ROOF COVERING Two layer, EXCEL/SPOT
Roofers Guide to Underslating Membranes
 Roofers Guide to Underslating Membranes IKO is a worldwide enterprise, with more than 3000 employees, and manufacturing plants in Canada, the United States, United Kingdom, Belgium, Holland, France and
Installation Manual. Foundations. Version 4.3ᵠ
 Installation Manual Foundations Version 4.3ᵠ (*) - Denotes Current Revisions throughout this Installation Manual Version 4 (ᵠ) - Denotes Current Revisions for Version 4.3 of this Manual Manual updated
Roofing. Sarnavap 500E. Vapour control layer. Product Description. Tests. Product Data. Form. Storage
 Product Data Sheet Edition 02.2015 Identification no. 02 09 01 05 402 0 000001 Version no. 02 Sarnavap 500E Vapour control layer Product Description Sarnavap 500E is an unsupported vapour control layer
INSTALLATION INSTRUCTIONS KÖSTER TPO
 INSTALLATION INSTRUCTIONS KÖSTER Contents Contents Basics Installation Products 4 KÖSTER Characteristics 5 Mechanical fastening 7 Full surface adhesion 8 Loose installation 9 Tools 10 Welding temperature
Sarnavap 1000E is an unsupported vapour control layer based on PE-LD (Low Density Polyethylen).
.") Roofing Roofing Product Data Sheet Edition 06.2013 Version no. DE 01 English Vapour control layer Product Description Uses Characteristics / Advantages Tests is an unsupported vapour control layer based
Roofing Roofing Product Data Sheet Edition 06.2013 Version no. DE 01 English Vapour control layer Product Description Uses Characteristics / Advantages Tests is an unsupported vapour control layer based
4422WE SEALCO EPIROOF & EPISPAN EPDM MEMBRANES
 4422WE SEALCO EPIROOF & EPISPAN EPDM MEMBRANES 1. GENERAL This section relates to Sealco Waterproofing Systems Ltd epiroof / epispan membrane roofing, bonded to: - construction plywood, including all underlays
1 Firestone EPDM Roofing Systems
 1 Firestone 1. Firestone EPDM Systems To ensure a long-lasting, trouble-free roof today, it is not sufficient to manufacture high quality roofing membranes. Experience learned that roofing membranes need
Firestone UltraPly TPO The light colored roofing choice
 TM Firestone UltraPly TPO The light colored roofing choice TPO Roofing Systems Firestone UltraPly TPO roofing systems Firestone: over a century of experience Firestone Building Products entered the commercial
Standard specification for the application of Danosa Two-Layer waterproof roofing membrane to plywood & concrete surfaces.
 Standard specification for the application of Danosa Two-Layer waterproof roofing membrane to plywood & concrete surfaces. BRANZ Appraised No. 678 Ref: P3200 Rev 1 February 2016 Page 1 of 5 1.0 PREAMBLE:
Fascia Systems. oofing 7.1
 Systems oofing 7.1 TremLock TM A Pre-engineered, Non-Penetrating Metal Edge System oofing TremLock TM Pre-engineered, Non-penetrating Metal Edge System The TremLock is a pre-engineered, non-penetrating
Please Note: PhoneStar was previously branded as Phonewell
 Soundproofing Floors Timber Joist or Concrete Floors Installation Instructions Acoustic Insulation Please Note: was previously branded as Phonewell There are two options to achieve noise reduction through
SECTION ELASTOMERIC MEMBRANE ROOFING ADDENDUM 10 APRIL 20, 2011
 SECTION 07553 ELASTOMERIC MEMBRANE ROOFING ADDENDUM 10 APRIL 20, 2011 PART 1 GENERAL 1.01 SUMMARY A. Section Includes: 1. Elastomeric roofing membrane (EPDM), conventional application at low slope roof
1 PVC or ABS drain with strainer
 Patents Pending ProBase II Single-Slope Shower Base and Kit CONTENTS 1. General Information...1 2. Materials...1 3. Planning...2 4. Preparation...3 5. Layout...3 6. Install Base and Shims...4 7. Install
ROOFING EPDM ELASTOMERIC SHEET ROOFING FULLY ADHERED- CONVENTIONAL
 ROOFING EPDM ELASTOMERIC SHEET ROOFING FULLY ADHERED- CONVENTIONAL PART 1 GENERAL 1.1 SECTION INCLUDES A. Insulation, membrane roofing, base flashings roofing membrane accessories joints, and counter flashings.
SECTION 07530CP EPDM MEMBRANE ROOFING
 PART 1 GENERAL 1.1 SUMMARY SECTION 07530CP EPDM MEMBRANE ROOFING A. Section includes: 1. Adhered membrane roofing and flashing 2. Mechanically fastened roof insulation 3. Walkway pads 1.2 ARCHITECTURAL
Sample Specification for the application of De Boer Duo HT 4 Slates/F C180 Two-Layer waterproof warm roofing membrane system to concrete.
 Sample Specification for the application of De Boer Duo HT 4 Slates/F C180 Two-Layer waterproof warm roofing membrane system to concrete. This system incorporates a vapour barrier and Equus PIR insulation
Start the installation at one corner of the building. Unroll the first sheet of MiraPLY-H square/parallel to the building wall, starting at one corner
 Installation Instructions C A R L I S L E C O A T I N G S & W A T E R P R O O F I N G Carlisle Coatings & Waterproofing Incorporated (CCW) has prepared this installation guide to assist applicators in
SECTION FLUID-APPLIED WATERPROOFING
 SECTION 07140 FLUID-APPLIED WATERPROOFING PART 1 GENERAL 1.1 SUMMARY A. Section includes fluid applied rubberized asphalt and/or elastomeric membrane waterproofing; and surface dusting and/or protective
7.6 EPDM Preformed Membrane Installation Method Installation of EPDM on Large RCC Roof Slab
 Waterproofing of New Roofs and Terraces [Excerpts from Dr. Fixit Healthy Construction Booklet Construct Your Ideas, 2012, pp.17-19, 24-27 & 46, Continuation of Rebuild Vol. 7 No. 2, pp.15] 7.6 EPDM Preformed
TUFF-TAC TM BRIDGE MEMBRANE INSTALLATION GUIDE
 5 pages TUFF-TAC TM BRIDGE MEMBRANE INSTALLATION GUIDE The following will describe the proper procedure to use when installing Tuff-Tac TM bridge deck membrane. The guide will cover recommended tools to
COSMOFIN FG Welding Guidelines
 COSMOFIN FG roofing membranes can be welded homogeneously to produce a permanently waterproof seal using hot air and solvent welding (diffusion bonding) processes. It is preferable to weld larger seam
Installation Instructions
 Warning: Do not remove outer shrink wrapping from the Fire Rated Foam stick until you have read and understand the FULL instructions for proper installation. Failure to follow these directions may degrade
Monarfin Durable TPO waterproofing systems
 Monarfin Durable TPO waterproofing systems Durable - > decades of experience Fast application Flexible methods of application High reflection values Easy to use Monarfin High performance TPO waterproofing
Specification. Project Name: Project reference: Written: by: Cathal Quinn Tel:
 Project reference: 010050 Specification Written: by: Cathal Quinn Email: cathal@moymaterials.com Tel: 07788 934895 Project Name: Moy Materials Victoria House (4 th Floor) Victoria Road Chelmsford CM1 1JR
4422WT SEALCO ECOTUFF TPO SUPERROOF WATERPROOFING MEMBRANE
 4422WT SEALCO ECOTUFF TPO SUPERROOF WATERPROOFING MEMBRANE 1. GENERAL This section relates to Sealco Waterproofing Systems Ltd ecotuff membrane roofing, bonded to: - construction plywood, including all
4422WT SEALCO ECOROOF ECOTUFF TPO GREEN ROOF WATERPROOFING MEMBRANE
 4422WT SEALCO ECOROOF ECOTUFF TPO GREEN ROOF WATERPROOFING MEMBRANE 1. GENERAL This section relates to Sealco Waterproofing Systems Ltd ecotuff membrane roofing, bonded to: - construction plywood, including
G October 2018
 G-14-18 October 2018 The information contained in this supplement serves as a criteria for Specifiers and Authorized Applicators regarding the design and installation of Carlisle Roofing Systems and use
SECTION TPO WATERPROOFING MEMBRANE FOR FLAT ROOFS INSTALATION
 SECTION 07 54 23 TPO WATERPROOFING MEMBRANE FOR FLAT ROOFS INSTALATION PART 1 GENERAL 1.1 SECTION INCLUDES A. Waterproofing of flat and sloped roofs. Application by loose laying with ballast, mechanical
Permaroof 500 Liquid Membrane application onto:- Corrugated asbestos roofs
 Permaroof 500 Liquid Membrane application onto:- Corrugated asbestos roofs Permaroof UK Ltd www.permaroof.co.uk sales@permaroof.co.uk Tel: 0800 161 3722 Substrate preparation for existing asbestos roof
NBS SECTION J42 - SCOPE OF WORKS
 NBS SECTION J42 - SCOPE OF WORKS Section J42 deals with the installation of the Bauder Single Ply System, comprising single layer coverings of polymeric sheets, including vapour control layers and insulation
ITEM 458 WATERPROOFING FOR STRUCTURES
 ITEM 458 WATERPROOFING FOR STRUCTURES 458.1. Description. This Item shall govern for the furnishing and placing of waterproofing on concrete and steel bridge decks of railroad structures and on other structures
The Freudenberg Politex Group
 Waterproofing easy to lay dimensionally stable waterproof resistant PATENT PENDING New-generation of waterproofing METHOD FOR LAYING is laid dry on both wooden and cement supports. Laying is easy and fast:
Garage Conversion - Between and Under Joist Applications
 Issue 1, August 2013 CI/SfB (2 -) Rn7 (M2) Garage Conversion - Between and Under Joist Applications Flat Roof Insulation Introduction Celotex is the brand leading manufacturer of PIR insulation boards,
adjustable fusion shower pan on wood joists installation guide
 a a) Wall b) Tile c) Shower Pan d) Liquid Membrane e) Crack Isolation Tape f) Cement Board g) Subfloor h) Joists b d c f h g e adjustable fusion shower pan on wood joists installation guide www.trendingaccessibility.com
SECTION MODIFIED BITUMINOUS MEMBRANE ROOFING Peel & Seal
 SECTION 07550 MODIFIED BITUMINOUS MEMBRANE ROOFING Peel & Seal This section is based on the products of MFM Building Products Corp., which is located at: 525 Orange St. P. O. Box 340 Coshocton, OH 43812
Installation Specification. Preface
 Installation Specification The information in this manual is a guideline to providing sound waterproofing. The base for the guideline is many years of practical and design experience obtained by SealEco.
LIQUID APPLIED WATERPROOF ROOF COATINGS
 J31 LIQUID APPLIED WATERPROOF ROOF COATINGS Section J31 deals with the installation of the Bauder Bakor Hot Melt roof system comprising monolithic membrane (incorporating reinforcement), access/protection/root
PROTEUS HOT MELT WATERPROOFING MANUAL
 PROTEUS HOT MELT WATERPROOFING MANUAL 1. PRODUCT RANGE AND SYSTEM COMPONENTS Primers Pro-Prime Bitumen is suitable for application to a variety of substrates, in order to seal and improve the adhesion
ONDULINE MINI 18. The stylish Do it Once roofing upgrade for your garden buildings.
 CI SfB (4-) Nn2 ONDULINE MINI 18 The stylish Do it Once roofing upgrade for your garden buildings Exciting new low profile Proven durability low maintenance roofing www.onduline.co.uk ONDULINE MINI 18
tra-load Damp Proof Courses Product and Systems Overview
 tra-load Damp Proof Courses Product and Systems Overview Xtra-Load DPC s and Tray Systems Icopal, one of the world s largest manufacturers of waterproofing products, has long been a pioneer in the development
DeltaTrayTamar PCS. Installation Guide for Centre and Offset Drain. INSTALLING DELTATRAY tamar A PCS GUIDE TO CREATING THE PERFECT WETROOM
 INSTALLING DELTATRAY tamar DeltaTrayTamar Installation Guide for Centre and Offset Drain PCS High Performance Construction Products A PCS GUIDE TO CREATING THE PERFECT WETROOM INSTALLING DELTATRAY TAMAR
SQUARE SUN TUNNEL INSTALLATION INSTRUCTION
 SQUARE SUN TUNNEL INSTALLATION INSTRUCTION Please leave these installation instructions with the owner of the Sun Tunnel. This will enable them to carry out the straightforward maintenance mentioned below.
INSTALLATION INSTRUCTIONS
 REPAIR SPALLING INSTALLATION INSTRUCTIONS A CSW Industrials Company BCSW Wall Compression Seals IMPORTANT The following instructions are very important. Read them carefully, and be sure you understand
Sheetseal GR RIW. Sheetseal GR
 CI/SfB Ln2 April 2009 Sheetseal GR is a cold applied, high density polyethylene film bonded to aluminium foil and coated with a bitumen / rubber self adhesive layer with a removable reinforced silicone
Rubber Roofing Pocket Application Guide
 Rubber Roofing Pocket Application Guide Table of Contents Page 2.......................... General Information Page 2........................ Cautions and Warnings Page 3.......................... Recommended
G October 2018
 G-13-18 VacuSeal TM Vent Secured Roofing Systems October 2018 The information contained in this supplement serves as a criteria for Specifiers and Authorized Applicators regarding the design and installation
Protan Exposed Membrane Roof. Your design - Our solution
 Protan Exposed Membrane Roof Your design - Our solution Exposed membrane roof The principle function of a roof is to provide durable protection against the external environment to a building. Unprotected
Sheetseal 226 RIW. Sheetseal 226
 CI/SfB Vs1 April 2009 CERTIFICATE No 92/2817 Sheetseal 226 is a cold applied, high density polyethylene film, coated with a bitumen/rubber self adhesive layer with a removable reinforced silicone paper.
WPM WATERPROOFING MEMBRANE
 WPM 300 - WATERPROOFING MEMBRANE Description WPM 300 Waterproofing Membrane is a single-pack, water based polyurethane modified synthetic rubber polymer, liquid membrane developed specifically as a tough,
Polymeric membrane for roof waterproofing
 Roofing Product Data Sheet Edition 06.2012 Identification no. 02 09 05 05 100 0 180000 Version no. 01 Sikaplan -SGK 1.8 (Trocal SGK 1.8 mm) Polymeric membrane for roof waterproofing Construction Product
NBS SECTION J41 - SCOPE OF WORKS
 NBS SECTION J41 - SCOPE OF WORKS Section J41 deals with the installation of the Bauder Waterproofing System, comprising coverings of multiple layers of reinforced bituminous membranes laid and jointed
EPDM. Product Selector & Quick Installation Guide. Simple and fast installation with the FIX-R EPDM membrane and accessories
 EPDM Product Selector & Quick Installation Guide Simple and fast installation with the FIX-R EPDM membrane and accessories The FACTS speak for themselves FIX-R EPDM roofing membranes have a life expectancy
Firestone RubberGard The EPDM reference
 Firestone RubberGard The EPDM reference EPDM Roofing Systems 1 1.000.000.000 m 2 of proven performance The Firestone heritage of success and quality is extended to the construction industry through the
For wooden fabricated underlay e.g. plywood, care must be taken to store the material in an area where it will not become damp or contaminated.
 Page 1 The preparation/dryness of the subfloor and installation procedures should all be as BS 8203: 2001. i.e.: The relative humidity of a solid subfloor should be below 75%RH when tested with a Hygrometer
GenFlex EZ TPO Peel & Stick SA (HW) APPLICATION GUIDE
 APPLICATION GUIDE") GenFlex EZ TPO Peel & Stick SA (HW) APPLICATION GUIDE I. MEMBRANE APPLICATION... 2 A. MEMBRANE... 2 II. MEMBRANE ATTACHMENT... 2 III. SEAMING... 3 A. SEAMING FOR GENFLEX EZ TPO PEEL & STICK SA (HW)...
GenFlex EZ TPO Peel & Stick SA (HW) APPLICATION GUIDE I. MEMBRANE APPLICATION... 2 A. MEMBRANE... 2 II. MEMBRANE ATTACHMENT... 2 III. SEAMING... 3 A. SEAMING FOR GENFLEX EZ TPO PEEL & STICK SA (HW)...
NOTE: Components must be stored at 12 C (min) for at least 24 hours prior to use.
 for at least 24 hours prior to use.") PUB. NO. 360.5.2002 LEADERS IN CORROSION PREVENTION THE PROTECTION OF STRUCTURAL STEEL AND PIPEWORK USING THE DENSO STEELCOAT 400 SYSTEM INSTRUCTIONS FOR USE Due to the wide variety of structures, access
PUB. NO. 360.5.2002 LEADERS IN CORROSION PREVENTION THE PROTECTION OF STRUCTURAL STEEL AND PIPEWORK USING THE DENSO STEELCOAT 400 SYSTEM INSTRUCTIONS FOR USE Due to the wide variety of structures, access
Fosroc TPO Membranes Application Guide.
 Fosroc TPO Membranes Application Guide www.fosroc.com ABOUT FOSROC INTERNATIONAL Since the company s beginnings over 80 years ago, Fosroc has developed into an International leader in delivering Constructive
INSTALLATION GUIDELINES
 Please Note: Read these instructions thoroughly before installation to ensure proper use of VaporBlock Plus. ASTM E 1465, ASTM E 2121 and, ASTM E 1643 also provide valuable information regarding the installation
Installation Manual. Foundations. Version 2
 Installation Manual Foundations Version 2 Contents Overview...1 Planning the Job... 2 Introducing DMX FlexSheet...2 Supplies Required...3 Tools Required...4 Preparing the Site...4 Where to Start?...5 Installing
Installation Guidelines for all Quaker products with nail fins New construction nail fin installation with a drainable weather resistant barrier.
 www.quakerwindows.com www.quakercommercialwindows.com PO Box 128 504 Highway 63 South Freeburg, MO 65035 800-347-0438 573-469-4151 (fax) Installation Guidelines for all Quaker products with nail fins New
Enviroflex Liquid-Applied Roof Waterproofing
 Enviroflex Liquid-Applied Roof Waterproofing The User Friendly Liquid-Applied Roof Waterproofing Solution Enviroflex liquid waterproofing membrane is the latest innovation in liquid roofing technology