Installation Guide. MEA-JOSAM 300 Size Pro-Plus Trench Drain
|
|
|
- Sheryl Wells
- 5 years ago
- Views:
Transcription


1 Installation Guide for MEA-JOSAM 300 Size Pro-Plus Trench Drain Josam Company 525 W. U.S. Hwy 20 Michigan City, IN WARNING: Cancer and Reproductive Harm - REV A 08/29/11
2 GUARANTEE: All MEA-JOSAM products are guaranteed against defective materials and workmanship or errors in shipping, and any material or part proving defective will be replaced free of charge provided that MEA-JOSAM is notified within a reasonable time for inspection after delivery, and the equipment, material, or part claimed to be defective has been properly maintained and used in accordance with instructions and is delivered prepaid to Seller at Michigan City, Indiana. Under no circumstances will MEA-JOSAM assume any liability for damages or labor charges resulting there from. EXPRESS LIMITED WARRANTY: All recommendations on the use of MEA-JOSAM products are made without any warranties or guarantees. The products described in our literature are sold with an Express Limited Warranty which is in lieu of all other express or implied warranties. It is the responsibility of the customers of MEA-JOSAM to ensure that each particular product is fit for its intended purpose and that the conditions in which it will be used are suitable. Any products supplied by MEA-JOSAM will be done solely upon the standard Conditions of Sale, incorporated into all contracts. MEA-JOSAM develops and improves its products on a regular basis and information provided in this document is subject to change without prior notification. DELAYS: MEA-JOSAM will not assume any liability for delays or defaults occasioned by strikes, fires, or exercised by governmental authorities, failure to obtain material, or by any cause unavoidable beyond its control. RETURNED GOODS: Material may be returned subject to the following conditions. 1. Must first be referred to your local MEA-JOSAM Representative for prompt handling; 2. Minimum value of $ net; 3. Replacement parts will not be accepted for return; 4. Buyer must identify original shipment of material by invoice number and invoice date; 5. Buyer must obtain prior written authorization; 6. 25% restocking charge; 7. Less any charges necessary to put the material into saleable condition; 8. Credit will be issued to apply only against future purchases; 9. Outgoing freight will be deducted from the credit; 10. Material must be returned freight prepaid; 11. Products designated non-stock or special are not subject to cancellation nor are they acceptable for return; 12. Discontinued or obsolete material is not returnable. ILLUSTRATIONS AND DESCRIPTIONS: All illustrations, detail drawings, and accompanying descriptions refer to standard features of each product and do not necessarily show or describe the variations available. All designs are subject to change without notice, and unless specifically stated on order, material will be furnished of design in effect at the time the order is filled. All weights are approximate. RISKS: Our responsibility ceases after product has been delivered to the carrier in good order. It is the responsibility of the consignee to inspect each shipment carefully and file a claim with the carrier for any damage or shortages. Content shortages must be reported within 15 days after receipt of material. Any claim received after this time will be disallowed. ***Please contact Josam Company for a full list of Terms & Conditions. Page 2
3 Table of Contents 1.0 Tools Installation Figures Page 3
4 1.0 Tools Some or all of the following tools may be required during installation: Sledge or large hammer Stringline Chalkline Level Square Drill ¼ or similar size drill bits Core drill Ø5/8 threaded rod Duct tape Vibrator (finger type) Rubber mallet Concrete saw Cold chisel Caulking gun Shovel or spade Grinder Acetone if using sealants Standard socket set Visqueen or plastic wrap Safety glasses or goggles Gloves Respirator mask Phillips screwdriver Utility knife Page 4
5 2.0 Installation ***IMPORTANT: READ ALL INSTALLATION INSTRUCTIONS PRIOR TO STARTING THE JOB. THIS WILL AVOID COSTLY MISTAKES*** 1) Excavate soil or saw cut existing concrete to a sufficient width and depth to create a trench. Ensure that at least 3 inches (class A15) of bedding concrete can be placed under and alongside the channel. For higher loadings see the chart in figure A. The carrying capacity of the subsoil must also be taken into account, or respectively, the carrying capacity of the trench floor must be established. When sawing concrete always wear gloves, protective eyewear and a respirator mask! Avoid breathing the dust. 2) The direction of flow is marked on the inside of every channel element by directional arrows on both sides of the channel body. The arrows point downstream or in the direction of the outlet. In rare cases, a channel section may be reversed from normal flow direction (usually a neutral section) to facilitate easier run assembly. See layout. 3) Visible numbers on the inside ends of the channel mate with like numbers on the downstream channel. For example, a 1 on the downstream end of the first channel will mate with a 1 on the upstream end of the second channel. A 2 on the downstream end of the second channel will mate with a 2 on the upstream end of the third channel and so on. Page 5
 supports a male-to-female")
 For male-to-male connections, middle outlets and low points, a 300-BSC")
6 4) There are three types of brackets available. A standard bracket 300-BS (bracket support) supports a male-to-female connection. See illustration below. 5) For male-to-male connections, middle outlets and low points, a 300-BSC (bracket support center) bracket is used. See illustration below. Page 6
 is used. See illustration below.")

7 6) For 20 x24 GRP catch basin connections, a 300-BSCB (bracket support catch basin) is used. See illustration below. 7) Unlike 100 and 200 Pro-Plus, a 300-BS is also used on male and female ends where it is necessary to hold an endcap or endcap outlet. See illustration below. Page 7

 Insert one threaded rod into one of the holes. Drive the rod into the soil until it is firm.")
8 8) Lay out and orient the channel elements in the proper sequence in the excavated trench (as per installation plan, if available) to ensure correct layout. Remove all channel elements. Starting at the downstream or outlet end, place the first bracket in the desired location on the ground. If this is the end of a run, use a 300-BS (shown). If it is a low point in the middle of a sloped run or where two male ends meet, use a 300-BSC. 9) Insert one threaded rod into one of the holes. Drive the rod into the soil until it is firm. All rods must be at least 2 below the top of the trench, yet high enough to support the bracket. If the rod is too long, cut it down. If the rod is too short, longer rod must be substituted. Page 8
 Remove the bracket and thread one nut onto each rod so that the bracket is at approximately the correct elevation.")
9 10) Insert another threaded rod into other hole and drive into soil until it is firm. 11) Remove the bracket and thread one nut onto each rod so that the bracket is at approximately the correct elevation. Place bracket back onto rods. Page 9
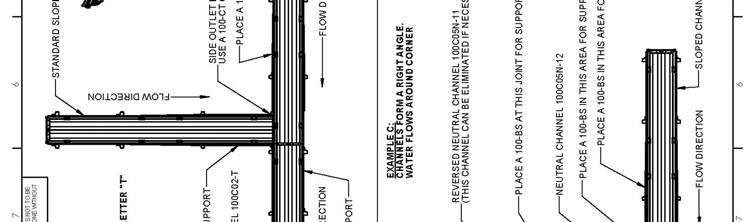
 If the layout has a T connection or right angles, you must use -T channels as explained in the appendix.")
10 12) Insert another nut onto each threaded rod. Adjust nuts so bracket is at correct elevation and is level. Tighten all nuts to the bracket. 13) If the layout has a T connection or right angles, you must use -T channels as explained in the appendix. 14) If required, remove preformed knockouts from the channel or silt box for the discharge outlet. Knockouts must be removed with the aid of suitable tools (drill, grinder, chisel, etc.). Always use protective equipment while drilling, grinding, or chiseling. Assemble bottom outlets or corner connectors to channel. Page 10

11 15) Embed silt boxes and gullies similar to the installation of channels so that the thickness of concrete surround is identical. 16) Stretch a stringline for use as a straight edge. Set the channel into the first bracket. Ensure that directional arrows point towards the outlet or reference the layout drawing. Place next bracket into opposite end of channel. This will set the location of the second bracket. Remove the channel. Repeat process with next bracket using steps Page 11
 Install the gratings (do not unwrap protective plastic) in the channel upside down.")
12 17) Trim height of endcaps to match trench height. When using endcaps and endcap outlets, remove 1 long thumbscrews from brackets and replace with 4 long thumbscrews (supplied with bracket). 18) Install the gratings (do not unwrap protective plastic) in the channel upside down. This may slightly expand the channels and prevent lateral compression to maintain channel dimensions and protect the trench interior from any concrete spillage. Place the grates across section joints. This will aid in channel alignment at the top surface. Page 12

13 19) Ensure the concrete surround is equal on both sides of the channel. If installing in concrete slabs, provide for expansion/contraction joints and do not let the drainage line interrupt existing expansion/contraction joints. If possible, locate the expansion/contraction joints near the channel joint. Maximum distance between expansion joints is 25 feet. 20) Lay the upper channel surface about 1/8 lower than the ground surface to provide slope for the water to run into drain. 21) Pour concrete. Do not chute concrete directly against channels! This will disturb the alignment. Allow concrete to cure fully. 22) If the drain system requires sealant in the joints to prevent leakage, apply this now. Make sure the sealant is compatible with any corrosive fluids that may be in use. Insert 300-RI, if ordered. Page 13

14 23) Clean any spilled concrete from gratings, channels, and outlet points. Remove plastic wrap from gratings. Insert and secure gratings to channel body using the grating locking system. 3.0 Figures Figure A: Concrete dimensions (inches) Page 14
15 Page 15

16 APPENDIX Page 16
17 Josam Company 525 W. U.S. Hwy 20 Michigan City, IN Page 17
Installation Guide. MEA-JOSAM Pro-Plus Trench Drain
 Installation Guide for MEA-JOSAM Pro-Plus Trench Drain Josam Company 525 W. U.S. Hwy 20 Michigan City, IN 46360 1-800-365-6726 www.josam.com WARNING: Cancer and Reproductive Harm - www.p65warnings.ca.gov
Installation Guide. MEA-JOSAM 100 & 200 Size Pro-Plus Trench Drain
 Installation Guide for MEA-JOSAM 100 & 200 Size Pro-Plus Trench Drain In addition to this installation guide, please reference Josam Proplus 100 installation 1080p video on youtube.com Josam Company 525
Zurn Z874. Trench Drain System. Installation Instructions
 Zurn Z874 Trench Drain System Installation Instructions Z874 Accessories Trench Drain System Below are the components of the Z874-X trench drain typical to an installation. Check your order to verify you
Zurn Z874. Trench Drain System. Installation Instructions
 Zurn Z874 Trench Drain System Installation Instructions Z874 Accessories Trench Drain System Below are the components of the Z874-X trench drain typical to an installation. Check your order to verify you
Installation instructions. MEA Drainage systems
 80 210 400 General installation instructions Our installation instructions are general suggestions only. The planners must ascertain whether site conditions necessitate special requirements as regards
WARNING: Cancer and Reproductive Harm -
 WARNING: Cancer and Reproductive Harm - www.p65warnings.ca.gov TABLE OF CONTENTS Terms and Conditions... Page 1 Josam Push-Fit Advantages... Page 2 Push-Fit Stainless Steel Pipe... Page 3 Push-Fit Stainless
Linear Drainage Z886. Perma-Trench. Installation Instructions. 100mm Clear Opening
 Linear Drainage Z886 100mm Clear Opening Perma-Trench Installation Instructions Z886 Tools Required Tape Measure Phillips Head Screwdriver Hammer Utility Knife Marker Cordless Drill Reciprocating Saw Ear
II TECHNICAL INSTALLATION GUIDE
 SMITH CUSTOMER DRIVEN SINCE 1926 SINCE 1926 ENVIRO-FLO II TECHNICAL INSTALLATION GUIDE Easy Installation with Smith s Enviro-Flo II Modular Trench Drain System Jay R. Smith Mfg. Co. 2781 Gunter Park Dr.
BioPrism Solid Surface
 Please read all instructions before installing products. STORAGE & HANDLING: Check for damage that may have occurred during transit. Keep receptor flat on pallet, as it was shipped, until ready to install.
LINEAR DRAINAGE. Z886 Perma-Trench. 6" Perma-Trench Installation Instructions
 LINEAR DRAINAGE Z886 Perma-Trench 6" Perma-Trench Installation Instructions Z886 Accessories 6" [152MM] WIDE TRENCH DRAIN SYSTEM Below are the components of the Z886 trench drain typical to an installation.
PLEASE READ ENTIRE INSTRUCTION MANUAL BEFORE PROCEEDING!
 INSTALLATION GUIDE This guide is intended to aide in the installation of Dura-Trench systems. There are many different applications and situations for the use of this product and the installation procedures
Zurn Z886. 6" Perma-Trench. Installation Instructions
 Zurn Z886 6" Perma-Trench Installation Instructions Z886 Accessories 6" [152mm] Wide Trench Drain System Below are the components of the Z886 trench drain typical to an installation. Check your order to
Installation Instructions
 EconoDrain Trench Forming System Installation Instructions MultiDrain We Drain Your Site, Not Your Budget MultiDrain Systems, Inc. P.O. Box 88, Barium Springs, NC 28010 (704) 508-1010 or Toll Free 800-433-1119
Linear Drainage ZF806 ZF812
 Linear Drainage ZF806 ZF812 Fiberglass Trench Installation Instructions ZF806 Accessories 6" [152mm] Wide Fiberglass Trench Drain System Below are some of the ZF806 trench drain components typical to an
The Next Generation of Trench Drains PROFESSIONAL TRENCH DRAIN SOLUTIONS. STARFIX Grate Securing System. MEA-JOSAM Pro-Plus With and Without Slope
 The Next Generation of Trench Drains PROFESSIONAL TRENCH DRAIN SOLUTIONS STARFIX Grate Securing System MEA-JOSAM Pro-Plus With and Without Slope ABOUT MEA-JOSAM MEA, Aichach, Germany Mea, Zelhem, Holland
INSTALLATION GUIDE PLEASE READ ENTIRE INSTRUCTION MANUAL BEFORE PROCEEDING!
 DURA - TRENCH INSTALLATION GUIDE This guide is intended to aide in the installation of Dura-Trench systems. There are many different applications and situations for the use of this product and the installation
ACO DRAIN Site Installation Manual
 ACO Construction & Building Products EXPANSION JOINT TO ENGINEER S DETAILS CONCRETE ACO DRAIN Site Installation Manual Fiberglass Drain Systems Getting Started ACO Drain consists of a full range of modular
DRAINAGE SOLUTIONS SINCE 1908 SURFACE DRAINAGE. Installation Guide ARMTEC.COM
 DRAINAGE SOLUTIONS SINCE 1908 SURFACE DRAINAGE Installation Guide ARMTEC.COM RECYFIX PRODUCTS RECYFIX trench drain systems are available in a wide range of load class ratings and grate options. They are
INSTALLATION INSTRUCTIONS
 INSTALLATION INSTRUCTIONS OBJECTS www.multidrainsystems.com www.arcat.com Sweets www.sweets.com 1 EXAMINE GOODS BEFORE FREIGHT COMPANY LEAVES! LOST OR DAMAGED GOODS YOU MUST THOROUGHLY INSPECT THIS SHIPMENT
FLO-THRU ACCESSORIES Above are some of the trench drain components typical to an installation. Double check your order to ensure that you have all com
 Z-882 12 PERMATRENCH TM ZURN INDUSTRIES, INC., FLO-THRU DIV., 2855 Girts Road, Jamestown, NY 14701 Phone: 716/665-1132, Fax: 716/665-1135, World Wide Web: www.zurn.com In Canada: ZURN INDUSTRIES LIMITED,
TF-14. TF-14 Installation Guide
 TF-14 Trench Drain Forming System Installation Manual TF-14 Installation Guide P.O. Box 837 # 259 Murdock Road # Troutman, NC 28166 Tel (704) 528-9806 # Fax (704) 528-5478 Toll free in the U.S., Canada,
ZURN INDUSTRIES, INC., FLO-THRU DIV.,
 FLO-THRU TM ZURN INDUSTRIES, INC., FLO-THRU DIV., 2855 Girts Road, Jamestown, NY 14701 Phone: 716/665-1132, Fax: 716/665-1135, World Wide Web: www.zurn.com In Canada: ZURN INDUSTRIES LIMITED, 3544 Nashua
Stainless Steel Drainage Products by ATT Inox. LIST PRICE SHEET Effective July 1,
 Stainless Steel Drainage Products by ATT Inox LIST PRICE SHEET Effective July 1, 2018 www.josam.com JOSAM STAINLESS STEEL PUSH-FIT DRAINAGE SYSTEM As a complement to Josam Company s full line of stainless
BioPrism Solid Surface
 Please read all instructions before installing products. STORAGE & HANDLING: Check for damage that may have occurred during transit. Keep receptor flat on pallet, as it was shipped, until ready to install.
Z884 SHALLOW TRENCH DRAIN SYSTEM INSTALLATION INSTRUCTIONS
 WARNING: Cancer and Reproductive Harm - www.p65warnings.ca.gov ADVERTENCIA: Cáncer y daño reproductivo - www.p65warnings.ca.gov AVERTISSEMENT: Cancer et effets néfastes sur la reproduction - www.p65warnings.ca.gov
Installation Instructions
 Installation Instructions This document should be printed and readily available at the installation site. QDuct is a userfriendly system that will save installation time and labor. Installation videos,
Precast Concrete Trench Drain Systems INSTALLATION INSTRUCTIONS
 Precast Concrete Trench Drain Systems INSTALLATION INSTRUCTIONS GENERAL INSTALLATION INSTRUCTIONS 1 Ensure that the trench where the channels are going to be installed has enough room for the appropriate
Fiberglass Dispenser Sump
 Fiberglass Dispenser Sump Large Mouth LMM-XXXX-X models Single Wall and Double Wall Installation Instructions Franklin Fueling Systems 3760 Marsh Rd. Madison, WI 53718 USA Tel: +1 608 838 8786 800 225
Euro Corner Entry Shower Screen Installation Instructions
 Euro Corner Entry Shower Screen Installation Instructions Corner Entry Space Saving Design Dual Sliding Doors, magnetic seals Silver Frame 6mm Clear Safety Glass Can be installed on shower base or tiled
Euro Frameless Sliding Shower Screen Installation Instructions
 Euro Frameless Sliding Shower Screen Installation Instructions Frameless Reversible Chrome Fittings 8mm Clear Safety Glass Can be installed on shower base or tiled floor Front Only Available sizes: To
US Pool Lift Model #114 (Independence) Installation Guide
 Installation Guide") US Pool Lift Model #114 (Independence) Installation Guide This manual has been provided to assist with lift installation. For further assistance please contact your authorized US Pool Lift dealer. Toll
US Pool Lift Model #114 (Independence) Installation Guide This manual has been provided to assist with lift installation. For further assistance please contact your authorized US Pool Lift dealer. Toll
OWNER S MANUAL SERIES MDS-96-BK, SM, DR
 SERIES MDS-96-BK, SM, DR OWNER S MANUAL Introduction... 1 Bill of Materials... 2 Assembly Instructions. 3 Warranty....12 IMPORTANT NOTES, WARNINGS AND SAFETY INSTRUCTIONS Ensure that all employees understand
Spacia Curved Shower Screen Installation Instructions
 Spacia Curved Shower Screen Installation Instructions Enclosure comprises of screen, wall & base Chrome D Handles Available size 1000mm x 1000mm Base, Screen height: 2000mm Base entry height 70mm, overall
Install Instructions. Helix Z1. Important Information. Important:
 Congratulations, you have just purchased the highest quality entrance mat available. Proper installation is necessary to ensure that your warranty will be honored by Impact Specialties. Important Information
INSTALLATION INSTRUCTIONS FOR BALCO, INC. TRENCH AND ACCESS COVER TSA/ACA-X-250 W/O LINER FOR CAST-IN-PLACE INSTALLATION
 2626 South Sheridan PO Box 17249 Wichita, Kansas 67217 Phone: (316) 945-9328 Fax: (316) 945-0789 INSTALLATION INSTRUCTIONS FOR BALCO, INC. TRENCH AND ACCESS COVER TSA/ACA-X-250 W/O LINER FOR CAST-IN-PLACE
Installation instructions. MEA Drainage systems
 Preliminary remarks: The installation instructions given here are to be regarded as general information for the proper installation and operation of MEA channel systems. It is recommended that professional
Assembly Instructions Legacy Basic Acoustical Shell
 Assembly Instructions Legacy Basic Acoustical Shell Contents Important User Information...........................2 Safety Precautions.................................3 Required Tools.....................................3
OWNER S MANUAL SERIES MDS-96-BK, SM, DR
 VESTIL MANUFACTURING CORP. 2999 N. Wayne St., Angola, IN 46703 Ph: 260-665-7586 Fax: 260-665-1339 E-mail: sales@vestil.com Website: www.vestil.com SERIES MDS-96-BK, SM, DR OWNER S MANUAL Introduction...
CRESTONE STRAIGHT FIRE PIT SKU:
 CRESTONE STRAIGHT FIRE PIT SKU: 198-6257 Approximate Weight: 2200 lbs. Approximate Size: 4 8 Exterior Dimension x 3 Interior Dimension x 1 4 H www.midwestmanufacturing.com CRESTONE BLOCK MATERIALS CONCRETE
Infant Warmer Care Station Cabinet Light
 IMPORTANT File in your maintenance records Infant Warmer Care Station Cabinet Light OPERATIONS AND MAINTENANCE MANUAL For Parts or Technical Assistance 1 800 327 0770 Introduction The Adel Cabinet Light
Model # 800SM-PS3. 8/3/2016 Page 1 of 8
 Model # 800SM-PS3 8/3/2016 Page 1 of 8 /3/2016 Page 2 of 8 1675 Locust Street Red Bud, IL 62278 Phone: 618-282-8200 Fax: 618-282-8202 WARRANTY & TERMS WARRANTY: 5 Year Limited Warranty on Thermoplastic
INSTALLATION PROCEDURE
 INSTALLATION PROCEDURE VOLU-probe/1, /3, /4 for Round Ducts INSPECTION & HANDLING. VOLU-probes should be carefully inspected for damage prior to installation. Report damage to your Freight Department,
NOVELLA. Installation Instructions for Wall Mount Lavatory with Corner Cabinet and Storage System INTRODUCTION
 NOVELLA Installation Instructions for Wall Mount Lavatory with Corner Cabinet and Storage System INTRODUCTION Thank you for selecting our Porcher product. To ensure that your installation proceeds smoothly,
PEN SEAL. Pipe Penetration Seals
 PEN SEAL Pipe Penetration Seals PROCO s Pipe Penetration Seals have been designed to assist in achieving an efficient, low-cost mechanical seal between any Electrical Conduit, Concrete, Cast Iron, Steel,
QUADLUX SHOWER ENCLOSURE INSTALLATION INSTRUCTIONS
 QUADLUX SHOWER ENCLOSURE INSTALLATION INSTRUCTIONS IMPORTANT DreamLine TM reserves the right to alter, modify or redesign products at any time without prior notice. For the latest up-to-date technical
General Guidelines. Tools Required. Steel Folding Scooter & Wheelchair Carrier Instructions for Part # SC400-V2. Safety
 Steel Folding Scooter & Wheelchair Carrier Instructions for Part # SC400-V2 General Guidelines It is the user s responsibility to read and follow all instructions. Keep these instructions with the product
This Installation Guide uses the following symbols to indicate important information. Always observe the instructions indicated by these symbols.
 VIGO INDUSTRIES INSTALLATION GUIDE FOR STANDING SHOWER CABIN (MODEL VG06062) SAFETY PRECAUTIONS This Installation Guide uses the following symbols to indicate important information. Always observe the
Model # 95-S8. Page 1 of 8
 Model # 95-S8 Page 1 of 8 Page 2 of 8 WARRANTY & TERMS WARRANTY: 5 Year Limited Warranty on Thermoplastic coated elements. Ultra Play guarantees all items for one full year to be free of defects in workmanship
Model # V. 1/31/2014 Page 1 of 8
 Model # 110-16V 1/31/2014 Page 1 of 8 /31/2014 Page 2 of 8 1675 Locust Street Red Bud, IL 62278 Phone: 618-282-8200 Fax: 618-282-8202 WARRANTY & TERMS WARRANTY: 5 Year Limited Warranty on Thermoplastic
General Guidelines. Tools Required. Safety. Deluxe Steel Folding Scooter & Wheelchair Carrier Instructions for Part # SC500-V3
 Deluxe Steel Folding Scooter & Wheelchair Carrier Instructions for Part # SC500-V3 General Guidelines It is the user s responsibility to read and follow all instructions. Keep these instructions with the
Model # 338SM-OP. 9/30/2011 Page 1 of 12
 Model # 338SM-OP 9/30/2011 Page 1 of 12 9/30/2011 Page 2 of 12 1675 Locust Street Red Bud, IL 62278 Phone: 618-282-8200 Fax: 618-282-8202 WARRANTY & TERMS WARRANTY: 5 Year Limited Warranty on Thermoplastic
FORMWORK 66 x 40 x 24 Lithic Freestanding or Alcove Box Bathtub Installation Guidelines. STYLE No. CAUTION: BATHTUB IS EXTREMELY HEAVY
 STYLE No. STYLE No. FMBT6L (With Left Drain) FMBT6R (With Right Drain) CAUTION: BATHTUB IS EXTREMELY HEAVY PACKAGED WEIGHT... 1200 LBS [544.3 KG] DRY WEIGHT... 1050 LBS [476.3 KG] FILLED WEIGHT... 1750
1675 Locust Street Red Bud, IL Phone: Fax: WARRANTY & TERMS
 Model # 349S-P6 1675 Locust Street Red Bud, IL 62278 Phone: 618-282-8200 Fax: 618-282-8202 WARRANTY & TERMS WARRANTY: 5 Year Limited Warranty on Thermoplastic coated elements. Ultra Play guarantees all
PIPE COUPLINGS PRICE SHEET
 WARD MANUFACTURING PIPE PRICE SHEET PRICE SCHEDULE #640418 EFFECTIVE: APRIL 2, 2018 117 Gulick Street, Blossburg, PA 16912 www.wardmfg.com (800) 248-1027 STANDARD & XH MERCHANT ASTM specifications require
SMITH/ACO DRAINAGE SYSTEMS
 SMITH/ACO DRAINAGE SYSTEMS Commercial Trench Drains EXPANSION JOINT TO ENGINEER S DETAIL CONCRETE BEDDING L ACO DRAIN Site Installation Manual 1 Polymer Concrete Drain Systems SMITH CUSTOMER DRIVEN SINCE
DLB-23 Shower Enclosure Installation and User s guide
 DLB-23 Shower Enclosure Installation and User s guide I. Mounting Preparation 1. After opening the case, read this introduction carefully, check all the packed parts, examine the shower cabinet for shipping
PREMIER V Bucko Cast In Place
 PREMIER V Bucko Cast In Place 28972 R. Ave Adel, Iowa 50003 800-343-9370 1850 West Adriatic Place Englewood, Colorado 80110 303-935-4679 Visit Monarch Materials Group, Inc. at www.monmatgrp.com Premier
TORERO TUB DOOR INSTALLATION INSTRUCTIONS
 TORERO TUB DOOR INSTALLATION INSTRUCTIONS IMPORTANT DreamLine TM reserves the right to alter, modify or redesign products at any time without prior notice. For the latest up-to-date technical drawings,
Model # 940PPS-V3. 2/12/2014 Page 1 of 10
 Model # 940PPS-V3 2/12/2014 Page 1 of 10 /12/2014 Page 2 of 10 1675 Locust Street Red Bud, IL 62278 Phone: 618-282-8200 Fax: 618-282-8202 WARRANTY & TERMS WARRANTY: 5 Year Limited Warranty on Thermoplastic
1675 Locust Street Red Bud, IL Phone: Fax: WARRANTY & TERMS
 Model # 347SM-V8 1675 Locust Street Red Bud, IL 62278 Phone: 618-282-8200 Fax: 618-282-8202 WARRANTY & TERMS WARRANTY: 5 Year Limited Warranty on Thermoplastic coated elements. Ultra Play guarantees all
INSTALLATION INSTRUCTIONS FOR BALCO, INC. TRENCH GRATES MR-X-P
 2626 South Sheridan PO Box 17249 Wichita, Kansas 67217 Phone: (316) 945-9328 Fax: (316) 945-0789 INSTALLATION INSTRUCTIONS FOR BALCO, INC. TRENCH GRATES MR-X-P 2012, Balco, Inc. 04/05/12 Document Control
Model # 940S-P6-BB. 6/7/2017 Page 1 of 10
 Model # 940S-P6-BB 6/7/2017 Page 1 of 10 /7/2017 Page 2 of 10 1675 Locust Street Red Bud, IL 62278 Phone: 618-282-8200 Fax: 618-282-8202 WARRANTY & TERMS WARRANTY: 5 Year Limited Warranty on Thermoplastic
SlimLine Single Threshold Base & Q-Wall-5.1 BASE & BACKWALL INSTALLATION INSTRUCTIONS
 SlimLine Single Threshold Base & Q-Wall-5.1 BASE & BACKWALL INSTALLATION INSTRUCTIONS IMPORTANT DreamLine reserves the right to alter, modify or redesign products at any time without prior notice. For
Model # 815P-VCA3. 3/31/2011 Page 1 of 10
 Model # 815P-VCA3 3/31/2011 Page 1 of 10 3/31/2011 Page 2 of 10 1675 Locust Street Red Bud, IL 62278 Phone: 618-282-8200 Fax: 618-282-8202 WARRANTY & TERMS WARRANTY: 5 Year Limited Warranty on Thermoplastic
Model # 158-P4. 12/12/2013 Page 1 of 11
 Model # 158-P4 12/12/2013 Page 1 of 11 2/12/2013 Page 2 of 11 1675 Locust Street Red Bud, IL 62278 Phone: 618-282-8200 Fax: 618-282-8202 WARRANTY & TERMS WARRANTY: 5 Year Limited Warranty on Thermoplastic
Wabo ElastoFlex - EFJ/EFJ-C Horizontal Expansion Joint System
 Installation Procedure Last Updated: May 16 th, 2018 Wabo ElastoFlex - EFJ/EFJ-C Horizontal Expansion Joint System The following installation procedure is very important and must be fully understood prior
1850 x 40/50mm Raised Shower Tray Kit
 Installation Instructions 850 x 40/50mm Raised Shower Tray Kit Parts Supplied Description Qty Shower Tray Shower Tray Extension Parts Required (Fitting Kit) Materials Required Description Qty Description
Single Post Anchor Part Number Spectrum Lane ~ Missoula MT ~
 Single Post Anchor Part Number 21700 7100 Spectrum Lane ~ Missoula MT 59808 800.791.8056 ~ www.spectrumproducts.com 21700 Man Rev B You have purchased a Spectrum Aquatics Single Post Anchor. Providing
Model # 940SM-V8. Page 1 of 10
 Model # 940SM-V8 Page 1 of 10 Page 2 of 10 WARRANTY & TERMS WARRANTY: 5 Year Limited Warranty on Thermoplastic coated elements. Ultra Play guarantees all items for one full year to be free of defects in
INSTALLATION MANUAL MOSER STAINLESS STEEL KITCHEN FAUCET MODEL MANCHESTER
 INSTALLATION MANUAL MOSER STAINLESS STEEL KITCHEN FAUCET MODEL MANCHESTER Thank you for your purchase of a MoSER faucet. With proper care and maintenance, your new faucet will bring you years of trouble
Model # 238HS-P8. 4/27/2011 Page 1 of 11
 Model # 238HS-P8 4/27/2011 Page 1 of 11 4/27/2011 Page 2 of 11 1675 Locust Street Red Bud, IL 62278 Phone: 618-282-8200 Fax: 618-282-8202 WARRANTY & TERMS WARRANTY: 5 Year Limited Warranty on Thermoplastic
Model # 600H-D. 4/2/2012 Page 1 of 6
 Model # 600H-D 4/2/2012 Page 1 of 6 4/2/2012 Page 2 of 6 1675 Locust Street Red Bud, IL 62278 Phone: 618-282-8200 Fax: 618-282-8202 WARRANTY & TERMS WARRANTY: 5 Year Limited Warranty on Thermoplastic coated
Model # 612H. 7/11/2016 Page 1 of 6
 Model # 612H 7/11/2016 Page 1 of 6 /11/2016 Page 2 of 6 1675 Locust Street Red Bud, IL 62278 Phone: 618-282-8200 Fax: 618-282-8202 WARRANTY & TERMS WARRANTY: 5 Year Limited Warranty on Thermoplastic coated
MODEL GEK E3 Guard Enclosure Kit. Operator s Manual for Morse Guard Enclosure Kit Model GEK E3 for Can Tumbler Model E3
 Contents Page Receiving Procedures.................... 1 Warranty............................. 1 Safety Information..................... 1-2 Assembly Instructions................... 3-7 Parts List and
MODEL GEK E1 Guard Enclosure Kit. Operator s Manual for Morse Guard Enclosure Kit Model GEK E1 for Can Tumbler Model E1
 Contents Page Receiving Procedures.................... 1 Warranty............................. 1 Safety Information..................... 1-2 Assembly Instructions................... 3-7 Parts List and
Model # 338S-PR. 5/1/2014 Page 1 of 12
 Model # 338S-PR 5/1/2014 Page 1 of 12 /1/2014 Page 2 of 12 1675 Locust Street Red Bud, IL 62278 Phone: 618-282-8200 Fax: 618-282-8202 WARRANTY & TERMS WARRANTY: 5 Year Limited Warranty on Thermoplastic
Model # 338S-OP. 9/30/2011 Page 1 of 13
 Model # 338S-OP 9/30/2011 Page 1 of 13 9/30/2011 Page 2 of 13 1675 Locust Street Red Bud, IL 62278 Phone: 618-282-8200 Fax: 618-282-8202 WARRANTY & TERMS WARRANTY: 5 Year Limited Warranty on Thermoplastic
TFX - Toggle Lock Installation Guide
 Trench Former Pre-Engineered Cast In Place Trench Drain Forming System TFX - Toggle Lock Installation Guide P.O. Box 837-259 Murdock Road - Troutman, NC 28166 Tel (704) 528-9806 - Fax (704) 528-5478 -
Model # 338S-P. 7/31/2012 Page 1 of 13
 Model # 338S-P 7/31/2012 Page 1 of 13 7/31/2012 Page 2 of 13 1675 Locust Street Red Bud, IL 62278 Phone: 618-282-8200 Fax: 618-282-8202 WARRANTY & TERMS WARRANTY: 5 Year Limited Warranty on Thermoplastic
INDOOR RUBBER FLOORING INTERLOCKING INSTALLATION / MAINTENANCE GUIDELINES MARATHON SERIES. Four-Side Interlock Loose Lay Installation
 INDOOR RUBBER FLOORING INTERLOCKING INSTALLATION / MAINTENANCE GUIDELINES MARATHON SERIES Four-Side Interlock Loose Lay Installation The following pages are guidelines only... please read this manual thoroughly
Model # 362S-RDP. 9/17/2012 Page 1 of 12
 Model # 362S-RDP 9/17/2012 Page 1 of 12 9/17/2012 Page 2 of 12 1675 Locust Street Red Bud, IL 62278 Phone: 618-282-8200 Fax: 618-282-8202 WARRANTY & TERMS WARRANTY: 5 Year Limited Warranty on Thermoplastic
Model # 940SM-P8. Page 1 of 10
 Model # 940SM-P8 Page 1 of 10 Page 2 of 10 WARRANTY & TERMS WARRANTY: 5 Year Limited Warranty on Thermoplastic coated elements. Ultra Play guarantees all items for one full year to be free of defects in
MECHANICAL LEVELERS. P.O. Box 338 Spring Hill, Tennessee /486/ /251/3382 Fax 931/486/0316
 EDE & BLE Owner s Manual MECHANICAL LEVELERS P.O. Box 338 Spring Hill, Tennessee 37174 931/486/2296 800/251/3382 Fax 931/486/0316 www.pioneerleveler.com SM SECTION 1 RECEIVING: INSTALLATION INSTRUCTIONS
Model # 338S-RDP. 7/31/2012 Page 1 of 13
 Model # 338S-RDP 7/31/2012 Page 1 of 13 7/31/2012 Page 2 of 13 1675 Locust Street Red Bud, IL 62278 Phone: 618-282-8200 Fax: 618-282-8202 WARRANTY & TERMS WARRANTY: 5 Year Limited Warranty on Thermoplastic
Installation Manual. Foundations. Version 2
 Installation Manual Foundations Version 2 Contents Overview...1 Planning the Job... 2 Introducing DMX FlexSheet...2 Supplies Required...3 Tools Required...4 Preparing the Site...4 Where to Start?...5 Installing
Fire Protection Valves price sheet
 Fire Protection Valves price sheet Price Schedule #010415 effective: APRIL 1, 2015 117 Gulick Street, Blossburg, PA 16912 (800) 248-1027 Gate Valve, Resilient Wedge OS&Y UL/FM, NSF/ANSI 372 Pre-Grooved
30mm Height Linear Drain Shower Trays
 Installation Instructions 30mm Height Linear Drain Shower Trays 9. Parts Supplied Description Qty Shower Tray Parts Supplied (Fitting Kit) Description Qty Description Qty Shower Drain Base Fix-KST Adhesive
Installation Guide Document No BioSafe Cleanroom Windows Copyright 2017 Terra Universal Inc. All rights reserved. Revised December 2017
 Document No. 1788-20 Copyright 2017 Terra Universal Inc. All rights reserved. Revised December 2017 Terra Universal, Inc. TerraUniversal.com 800 S. Raymond Ave. Fullerton, CA 92831 TEL: (714) 578-6000
DESCRIPTION SAFETY: WARNINGS ORDERING INFORMATION T01-B INSTALLATION INSTRUCTIONS DROP-IN AND FREESTANDING BATH K-11343T / K-11344T
 INSTALLATION INSTRUCTIONS DROP-IN AND FREESTANDING BATH K-11343T / K-11344T BEFORE YOU BEGIN Turn off the water supply. The plumbing installation must comply with all local water supply and building regulations.
Ubau Flo Shower Element Installation Manual
 Ubau Flo Shower Element Installation Manual The information pertained within this guide is for reference only and does not supersede instructions from other product manufacturers or building codes. Always
Model #369SM-RDP. 8/23/2016 Page 1 of 10
 Model #369SM-RDP 8/23/2016 Page 1 of 10 /23/2016 Page 2 of 10 1675 Locust Street Red Bud, IL 62278 Phone: 618-282-8200 Fax: 618-282-8202 WARRANTY & TERMS WARRANTY: 5 Year Limited Warranty on Thermoplastic
INSTALLATION INSTRUCTIONS RETAIL PRO HORIZONTAL SLIDING DOOR
 INSTALLATION INSTRUCTIONS RETAIL PRO HORIZONTAL SLIDING DOOR JAMISON DOOR COMPANY P.O. BOX 70 HAGERSTOWN, MARYLAND 21741 1-800-532-3667 301-733-3100 INTERNET: http://www.jamisondoor.com E-MAIL: contact@jamisondoor.com
2/24/2015 Page 1 of 5
 2/24/2015 Page 1 of 5 2/ 24/ 2015 Page 2 o f 5 WARRANTY & TERMS WARRANTY: 5 Year Limited Warranty on Thermoplastic/Canine coated elements. Guarantees all items for one full year to be free of defects in
TABLE OF CONTENTS. 1.0 INTRODUCTION 1.1 Greenstone Structural Engineered Panels 1.2 Drawing and Element Numbers
 version 2.5 updated as of 08.04.2017 2 TABLE OF CONTENTS 1.0 INTRODUCTION 1.1 Greenstone Structural Engineered Panels 1.2 Drawing and Element Numbers 2.0 ASSEMBLY 2.1 Sequence of Assembly 2.2 Preparation
ERS2010 ERSW2010. Users Manual. Seismic Restraint System
 ERS2010 ERSW2010 Seismic Restraint System Users Manual II. ii Warranty Newport Corporation warrants that this product will be free from defects in material and workmanship and will comply with Newport
Installation Instructions
 Installation Instructions Thank you for choosing the Synergy Reef Shadow Overflow. Please note that this is a Do-It-Yourself project and can be installed in either glass or acrylic aquariums. Always keep
INSTALLATION PROCEDURE
 INSTALLATION PROCEDURE VOLU-probe/1SS for Round Ducts WARRANTY Air Monitor Corporation (hereinafter referred to as "Seller") warrants that at the time of shipment, products sold pursuant to this contract
QUAD Rectangular Hinged Door Shower Enclosure Installation Instructions
 QUAD Rectangular Hinged Door Shower Enclosure Installation Instructions IMPORTANT Please read carefully the following instructions before installing your shower enclosure. If you have any questions on