Home Legend Uniclic Cork Product Installation Instructions
|
|
|
- Aubrey Watts
- 5 years ago
- Views:
Transcription

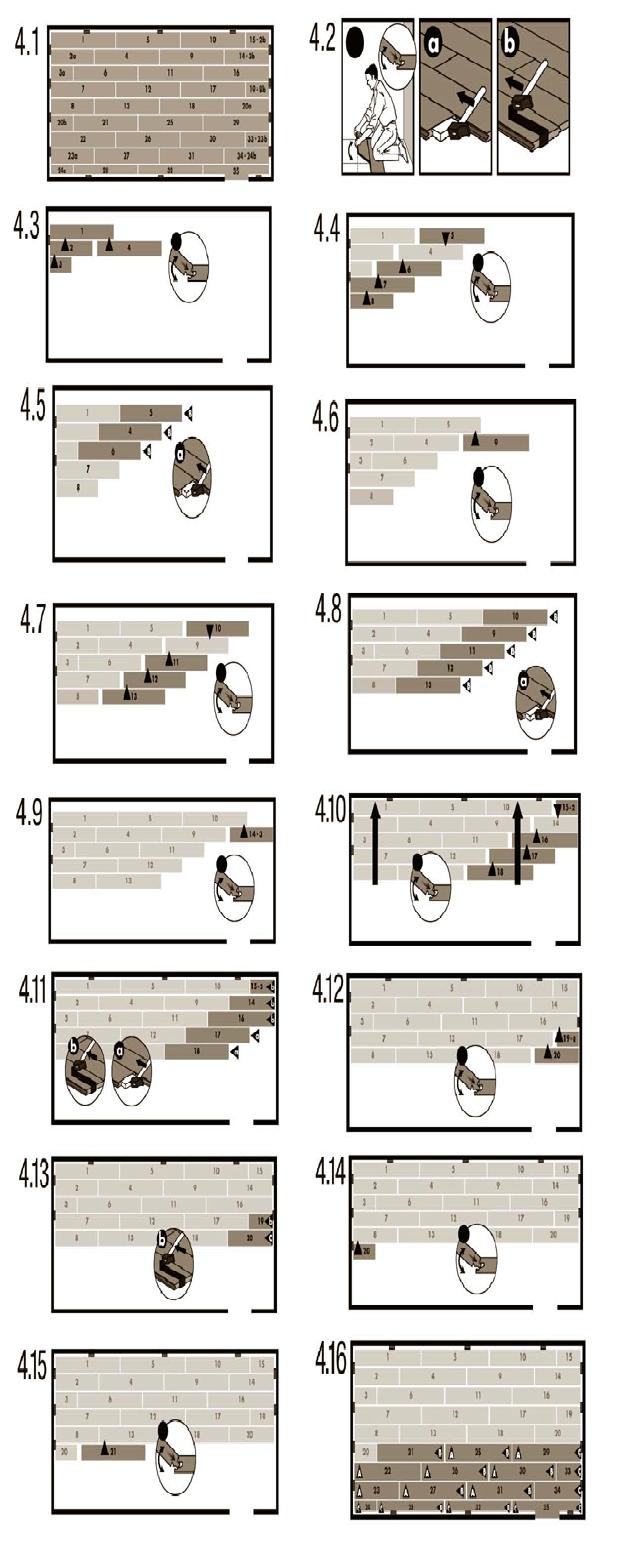
1 Home Legend Uniclic Cork Product Installation Instructions General Uniclic angle is a revolutionary system for installing cork floors without using glue. The panels can be clicked together simply, thanks to the ingenious shape of the tongue and groove. Position the panel to be installed at an angle of 20 to 30 to the panel already installed. Move the panel gently up and down while exerting forward pressure. The panels will automatically click into place. You can either insert the tongue into the groove, or the groove on to the tongue. The tongue into the groove is the easiest method. (See diagrams 1A 1B 1C.) easiest way to install the floor. We will demonstrate the installation for right-handed people, from left to right. You can work in the other direction if you want. 3. Make sure the panels are mixed sufficiently when you install them so that you do not end up with too many identical, light or dark panels next to each other. 4. Check all panels in daylight before and during installation. Defective panels must never be used. 5. The floor should preferably be installed parallel to how the light enters the room. The ideal conditions are F at a relative humidity of 35-60%. Tools for installing the floor For best results, it is essential that you follow the installation instructions exactly. Besides the regular tools for installing cork floors - (I.e. hammer, saw, pencil, measure) you will also need the following accessories. - A pull bar, spacers and a tapping block - underlayment system - maintenance products It will generally be necessary to saw some flooring panels during installation. To obtain a clean cut, the pattern side should face down when you use a jigsaw, saber saw or circular handsaw (with a carbide tipped blade) and up when you use a handsaw or a crosscut saw. 10 focus points 1. Thanks to the Uniclic system, the floor floats and is installed without glue. You can walk on the floor during and immediately after installation. 2. With Uniclic panels you can choose where you want to begin. Think about what will be the 6. Under normal conditions, Home Legend flooring requires no acclimation period. Outside of the normal conditions, let the planks acclimate for 48 hours in the unopened packaging at the normal room temperature in the middle of the room where the floor is to be installed. *Normal conditions means a difference of no less than 60 F and 20% relative humidity between the stocking/transportation environment of the flooring and the final installation environment of the flooring. 7. Room humidity can vary according to the season, so it is vital that the floor is able to expand and contract. For this reason, make sure you leave a minimum expansion joint of 5/16" to 3/8 on all sides of the floor, around pipes, thresholds and under doors. 8. Large rooms must have expansion joints every 40 feet width-wise to the panels and every 40 feet length-wise. We recommend having an expansion joint between different rooms (e.g. under the door). Expansion joints can be finished


2 by means of a molding that is attached to the subfloor. 9. Ensure the end joints of the panels in two successive rows are never in line. Always ensure that the joints are staggered by at least 6 inches. 10. We recommend you purchase a few extra cartons of flooring. This will be useful to you if you have some damaged pieces, miscalculate the size of the room or miss cut some pieces. This also will help you if your floor needs a repair but your product is no longer manufactured. Preparing the room - Check that the doors can still open and close after the floor and underlayment have been installed (3/8 ). - Check whether the old molding can be removed. You can also leave the wall base and finish the floor with transitional profiles. - Make sure the subfloor is flat. Any unevenness greater than 3/16 over the length of 10 feet must be smoothed out. It is vital that you use an underlayment to smooth any unevenness in the base floor. - Make sure the subfloor is clean and dry. CONCRETE SUBFLOOR: New Construction: - A new concrete floor must dry at least 1 week per 3/8 thickness up to 1-1/2". Subfloors thicker than 1-1/2" require twice as much drying time. For example, a 2-1/2" concrete subfloor must dry for at least 8 weeks. The moisture content must be less than 2.5% (CM method) or less than 5 lbs/24 hours per 1000sqft (Calcium chloride method ASTM 1869). - If there is underfloor heating, the subfloor must not exceed 84 F and the moisture content must be less than 1.5% (CM method). You do need to follow special installation instructions. Renovation: Remove any damp-porous floor covering (carpet, needle felt, etc.) first. Damp-sealed floor covering (PVC, linoleum, VCT, etc.) does not have to be removed. WOODEN SUBFLOOR Remove any existing damp porous floor covering first. Make sure the subfloor is stable. Nail down any loose parts and apply a leveling layer. It is necessary that the crawl space under the plank floor be sufficiently ventilated. Remove any obstacles and provide sufficient ventilation (1-1/2") of total ventilation holes per 40 of floor. The moisture content of the wood may not exceed 14%. Installing the floor First install the underlayment, per width and gradually as you progress. If the underlayment is pre-mounted on the panels, then only use the damp-proof moisture barrier with adhesive tape as provided. For Concrete, let the moisture barrier run up the wall a bit before cutting to size. For wood, cut the moisture barrier 1 inch from the wall. A molding will be attached to this later. (See diagram 3A.) Begin the first row with a whole plank. First saw off the tongue on both the long and the short sides. (See diagram 3B.) Put the plank with the sawn off sides against the walls. Put spacers between the planks and the wall. This will ensure that your expansion joint is wide enough: (5/16" to 3/8 ). (See diagram 3C.) The diagrams below indicate where the Uniclic panels are clicked together by angling up and down.
3
 Pipes In rows where there is a pipe, make sure the pipe falls exactly in line with the short side of two panels. Take a drill bit with the same diameter as the pipe plus 3/4 for the expansion.")
 When sawing the panels, ensure that the expansion joint under the door is at least 3/8.")
 There must be an 5/16 to 3/8 expansion joint between the last row and the wall. Keep this in mind when sawing the last row of panels.")


4 In places where it is too difficult to install the Uniclic planks with the tapping block (e.g. against the wall), you can tap them together using the pull bar and a hammer. (See diagrams 5A 5B - 5C.) Pipes In rows where there is a pipe, make sure the pipe falls exactly in line with the short side of two panels. Take a drill bit with the same diameter as the pipe plus 3/4 for the expansion. Click the panels together on the short side and drill a hole in the center of the joint between the two panels. Now you can install the panels in the floor. (See diagrams 6A- 6B-6C.) When sawing the panels, ensure that the expansion joint under the door is at least 3/8. If you cannot lift the panel, use an adapted tapping block or pull bar and hammer to tap the panels together with the planks flat on the floor. (See diagrams 7A-7B.) There must be an 5/16 to 3/8 expansion joint between the last row and the wall. Keep this in mind when sawing the last row of panels. Wet Areas Since prolonged water exposure could damage your cork flooring, the following installation recommendations should be closely followed to validate your residential water warranty. Wet areas would include bathrooms, powder rooms, kitchens, mud rooms, foyers, and laundry rooms. No Home Legend flooring panels or Home Legend accessories are recommended for extreme humid applications such as in saunas or swimming pool areas. An expansion area of 5/16" 3/8" must be provided around all vertical obstructions including walls, permanent cabinets, pipes etc. All perimeter expansion areas must be completely filled in with a water repellant sealant, a silicone based sealant. When applying sealant, it is helpful to first apply a strip of masking tape parallel to and approximately 1/32" from the edge of the flooring. Then fill the expansion area with sealant, remove any excess with a plastic scraper or putty knife, then remove the tape. Let dry for 24 hours before exposure to water. Remove all spacers. Install the molding on the plastic membrane that runs up the wall from under the floor. Never attach the molding to the floor. This method allows the floor to expand and contract under the molding. For a perfect finish around pipes, use rosettes or caulking. In places where profiles or base board cannot be placed, fill expansion gaps with caulking. (See diagram 8A.) Precautions - Protect furniture and chair legs with proper felt or plastic caps. - Avoid bringing dirt, water and sand indoors by providing a suitable floor mat at the door. - Use (office) chairs and seats with soft wheels that
5 are suitable for a cork floor and/or use a suitable desk mat. - Ensure that humidity in the room is always at least 50%. Use a humidifier if you need to. Maintenance - Never use wax or varnish coating on the floor. - For dry maintenance, we recommend using a duster mop. - For slightly damp maintenance, we recommend using a hard surface cleaner, spray mist mop only! Always wipe dry immediately until no more moisture is visible on the floor. We strongly recommend dry cleaning only for beveled edge products. - Wet maintenance is absolutely forbidden. Remove any standing water immediately. - To remove stubborn stains carefully, we recommend using denatured alcohol. Never use scouring products! - In case your floor needs repair, use a tool called Unifix, which allows the damaged floor plank to be easily removed in minutes without replacing the entire floor. For Unifix to work properly the required expansion gap must be in place around the room's perimeter and extra flooring should be available for use in the repair. Enjoy your floor. ATTN: INSTALLERS Caution: Wood Dust Sawing, sanding and machining wood products can produce wood dust. Airborne wood dust can cause respiratory, skin and eye irritation. The International Agency for Research on Cancer (IARC) has classified wood dust as a nasal carcinogen in humans. Precautionary Measures: Power tools should be equipped with a dust collector. If high dust levels are encountered use an appropriate NIOSH-designated dust mask. Avoid dust contact with skin and eyes. IMPORTANT HEALTH NOTICE FOR MINNESOTA RESIDENTS ONLY: THESE BUILDING MATERIALS EMIT FORMALDEHYDE. EYE, NOSE, AND THROAT IRRITATION, HEADACHE, NAUSEA AND A VARIETY OF ASTHMA-LIKE SYMPTOMS, INCLUDING SHORTNESS OF BREATH, HAVE BEEN REPORTED AS A RESULT OF FORMALDEHYDE EXPOSURE. ELDERLY PERSONS AND YOUNG CHILDREN, AS WELL AS ANYONE WITH A HISTORY OF ASTHMA, ALLERGIES, OR LUNG PROBLEMS, MAY BE AT GREATER RISK. RESEARCH IS CONTINUING ON THE POSSIBLE LONGTERM EFFECTS OF EXPOSURE TO FORMALDEHYDE. REDUCED VENTILATION MAY ALLOW FORMALDEHYDE AND OTHER CONTAMINANTS TO ACCUMULATE IN THE INDOOR AIR. HIGH INDOOR TEMPERATURES AND HUMIDITY RAISE FORMALDEHYDE LEVELS. WHEN A HOME IS TO BE LOCATED IN AREAS SUBJECT TO EXTREME SUMMER TEMPERATURES, AN AIR- CONDITIONING SYSTEM CAN BE USED TO CONTROL INDOOR TEMPERATURE LEVELS. OTHER MEANS OF CONTROLLED MECHANICAL VENTILATION CAN BE USED TO REDUCE LEVELS OF FORMALDEHYDE AND OTHER INDOOR AIR CONTAMIANTS. IF YOU HAVE ANY QUESTIONS REGARDING THE HEALTH EFFECTS OF FORMALDEHYDE, CONSULT YOUR DOCTOR OR CALL YOUR LOCAL HEALTH DEPARTMENT. WARNING! DO NOT MECHANICALLY CHIP OR PULVERIZE EXISTING RESILIENT FLOORING, BACKING, LINING FELT, ASPHALTIC CUTBACK ADHESIVES OR OTHER ADHESIVES. These existing products may contain either asbestos fibers and/or crystalline silica. Avoid creating dust. Inhalation of such dust is a cancer and respiratory tract hazard. Smoking by individuals exposed to asbestos fibers greatly increases the risk of serious bodily harm. Unless positively certain that the product is a non-asbestos containing material, you must presume it contains asbestos. Regulations may require that the material be tested to determine asbestos content and may govern the removal and disposal of material. See current edition of the Resilient Floor Covering Institute (RFCI) publication Recommended Work Practices for Removal of Resilient Floor Coverings for detailed information and instructions on removing all resilient covering structures.
INSTALLATION INSTRUCTIONS
 CLICK BAMBOO FLOORING INSTALLATION INSTRUCTIONS General The locking system is a revolutionary system for installing bamboo floors without using glue. The panels can be clicked together simply. Position
Solid Click-Lock Bamboo Product Installation Instructions
 Solid Click-Lock Bamboo Product Installation Instructions General The Valinge locking system is a revolutionary system for installing bamboo floors without using glue. However, it can be glued if necessary.
Mega Clic Laminate Floor Installation Instructions
 Mega Clic Laminate Floor Installation Instructions GENERAL Mega Clic is a revolutionary system for installing laminate floors without using glue. The planks can be clicked together simply, thanks to the
UNICLIC INSTALLATION INSTRUCTIONS
 UNICLIC INSTALLATION INSTRUCTIONS General Uniclic is a revolutionary system for installing laminate floors without using glue. The panels can be clicked together simply, thanks to the ingenious shape of
Concrete 1,8 2,0 Anidrite 0,3 0,5
 GUIDE FOR FLOATING CORK FLOORS TRANSPORT, STORAGE AND ACCLIMATIZATION Transport and store cartons in a horizontal position. Tiles and adhesive must be acclimated on-site in its original packaging. Store
Quick Step Studio Laminate Flooring Installation Instructions
 Quick Step Studio Laminate Flooring Installation Instructions Tools Required for Installation Job Site Site Requirements Laminate is a durable floor covering, not intended as structural material. Laminate
For more information, call PERGO
 SILICONE SILICONE SYSTEM SYSTEM MADE IN THE USA SPECIALLY DEVELOPED FOR LAMINATE FLOORING FL OZ (.ml) 0 0 0 00 ON Non Destructive Moisture 0 Concrete Encounter Plus 00 0 dlfwej dtra djflsv dlfwe vtra alskdjf
Life. Home. In Harmony.
 Life. Home. In Harmony. Harmonics Toasted Cinnamon Oak with SplashDefense Floor Installation Instructions Tools Required for Installation Common Tools Other Tools and Supplies Job Site Site Requirements
SELECT SURFACES LAMINATE FLOORING INSTALLATION GUIDE DRIFTWOOD
 TOOLS AND MATERIALS SELECT SURFACES LAMINATE FLOORING INSTALLATION GUIDE DRIFTWOOD Vapor barrier (minimum 6 mil/0.15 mm) (if needed) Transitional moldings (if needed) Measuring tape Carpenter s square
Mohawk SolidTech. SolidTech Installation Guidelines. Preparation
 55 85ºF (13 30ºC) Preparation We recommend placing a single order for all cartons required for a commercial flooring project. 1. Always store and transport SolidTech Luxury Vinyl Flooring on a flat surface
premium click optimum click
 1 In order to obtain a good result, we advise to follow all given instructions carefully. PREPARATION We recommend to order all panels for the same flooring project at the same time. 2 Always store and
Rigid Core (White Label) Planks with Interlocking Joints (Glueless) Installation Instructions
 Planks with Interlocking Joints (Glueless) Installation Instructions") Rigid Core (White Label) Planks with Interlocking Joints (Glueless) Installation Instructions Rigid Core Planks are constructed with a joint that locks the planks together to form a tight, durable, water
Rigid Core (White Label) Planks with Interlocking Joints (Glueless) Installation Instructions Rigid Core Planks are constructed with a joint that locks the planks together to form a tight, durable, water
Luxury Vinyl Planks with Interlocking Joints (Glueless) Installation Instructions
 Installation Instructions") Luxury Vinyl Planks with Interlocking Joints (Glueless) Installation Instructions Luxury Vinyl Planks are constructed with a joint that locks the planks together to form a tight, durable, water resistant
Luxury Vinyl Planks with Interlocking Joints (Glueless) Installation Instructions Luxury Vinyl Planks are constructed with a joint that locks the planks together to form a tight, durable, water resistant
LAMINATE GENERAL INSTALLATION INSTRUCTIONS FOR ANGLE-TO-ANGLE FLOORING
 LAMINATE GENERAL INSTALLATION INSTRUCTIONS FOR ANGLE-TO-ANGLE FLOORING WARNING Prior to installation, please ensure that the product received is the correct style and color as well as to the customer s
LAMINATE GENERAL INSTALLATION INSTRUCTIONS FOR DROP LOCK FLOORING
 LAMINATE GENERAL INSTALLATION INSTRUCTIONS FOR DROP LOCK FLOORING WARNING Prior to installation, please ensure that the product received is the correct style and color as well as to the customer s satisfaction.
Laminate Flooring Charlestowne Collection
 Laminate Flooring Charlestowne Collection Warranty This quality laminate flooring is under warranty for 25 years not to fade, wear through or stain. This warranty applies only to the original purchaser.
premium click optimum click
 5 golden rules Install your floor between 18 and 30 C. 48h Pergo Vinyl must be acclimatized in the room of installation between 18-30 (64-86 F) for a period of at least 48 hours before installation. This
ALL DRAWINGS/ILLUSTRATIONS ARE LOCATED AT THE END OF THE INSTRUCTIONS.
 Saxony Installation Instructions Planks are constructed with a joint that locks the planks together to form a tight, durable, water resistant joint. Saxony is installed as a floating floor so it's quick
1. PREPARATION 2. INSTALLATION 3. FINISHING 4. MAINTENANCE
 In the following text vinyl floor(s) refers to floors from the Quick-Step Livyn Ambient Glue+ and Balance Glue+ collections. The branded accessories refer to the specific Quick-Step vinyl accessories.
Quick Step TIMBER Multifit installation instructions
 Quick Step TIMBER Multifit installation instructions please read these instructions carefully prior to installation. TIP: Check out our installation videos on www.youtube.com/user/quickstepfloors in GeneRal
INSTALLATION INSTRUCTIONS LAMINATE
 INSTALLATION INSTRUCTIONS LAMINATE DROP LOCK GENERAL INSTRUCTIONS FOR LAMINATE HARDWOOD FLOORING ACCLIMATION Acclimation is a recommended procedure prior to installation of laminate flooring either on
The use of wood putty, wood filler and wood stain for enhancement of the flooring should be accepted as normal.
 3/4 SOLID HARDWOOD STRIP AND PLANK FLOORING INSTALLATION INSTRUCTIONS FOR MECHANICALLY FASTENED, STAPLE, NAIL OR CLEAT APPLICATIONS I. GENERAL INFORMATION Owner/Installer Responsibility: Beautiful hardwood
Premium Glueless Luxury Vinyl with Interlocking Joints Installation Instructions
 Premium Glueless Luxury Vinyl with Interlocking Joints Installation Instructions Premium Glueless Luxury Vinyl planks are constructed with the patented Uniclic interlocking joint that locks the planks
INSTALLATION GUIDE. Please read all the instructions before you begin the installation. Improper installation will void warranty.
 INSTALLATION GUIDE I. Before You Start / Preparations Please read all the instructions before you begin the installation. Improper installation will void warranty. Important notice All wood based products,
QUICK STEP READYFLOR MULTIFIT INSTALLATION INSTRUCTIONS
 QUICK STEP READYFLOR MULTIFIT INSTALLATION INSTRUCTIONS Please read these instructions carefully prior to installation. TIP: Check out our installation videos on www.youtube.com/user/quickstepfloors IN
Use a special underlay above 45 C. Click-it! Never use a hammer or tapping block. Keep indoor climate conditions above 0 C.
 GOLDEN RULES 8-0 C Install your fl oor between 8 and 0 C. Quick-Step Livyn must be acclimatized in the room of installation between 8-0 C (- 8 F) for a period of at least 8 hours before installation. This
Installation instruction
 TACKY TILE Installation instruction Introduction Tacky Tile has a Tacky technology backing that bonds firmly but not permanently to the subfloor, making installation easy, fast and clean. If at any time
INSTALLATION INSTRUCTIONS FOR WICANDERS HYDROCORK
 INSTALLATION INSTRUCTIONS FOR WICANDERS HYDROCORK GENERAL INFORMATION Hydrocork floors are intended for indoor use only. Please read the following instructions before installation. Hydrocork connection
Installation Instructions for SuperFast Hurricane
 SuperFast Hurricane Installation Instructions for SuperFast Hurricane I. Before You Start / Preparations Please read all the instructions before you begin the installation. Improper installation will void
optimum glue Preparation INSTALLATION INFORMATION We recommend to order all panels for the same commercial flooring project at the same time.
 Preparation We recommend to order all panels for the same commercial flooring project at the same time. Always store and transport your vinyl floor carefully to prevent distortions. Store and transport
Scuba Seal Installation / Floor Care Instructions With Video Link
 Scuba Seal Installation / Floor Care Instructions With Video Link 04/12/18 Congratulations on choosing ScubaSeal. ScubaSeal Rigid Core Flooring has the beautiful designs that are perfect for your active
Click Refresh with In*Step Locking System
 1. Test before starting installation All substrates to receive moisture sensitive floor covering must be tested for moisture. CONCRETE SUBSTRATES: Internal Relative Humidity tests should be performed per
INSTALLATION INSTRUCTIONS FOR WICANDERS 2G FLOORS
 INSTALLATION INSTRUCTIONS FOR WICANDERS 2G FLOORS GENERAL INFORMATION Wicanders 2G floors are intended for indoor use only. Please read the following instructions before installation. Store planks at room
INSTALLATION INSTRUCTIONS FOR WICANDERS 5G-C FLOORS
 INSTALLATION INSTRUCTIONS FOR WICANDERS 5G-C FLOORS GENERAL INFORMATION Wicanders 5G-C floors are intended for indoor use only. Please read the following instructions before installation. Store planks
For more information, call PERGO
 SYSTEM SYSTEM MADE IN THE USA SPECIALLY DEVELOPED FOR LAMINATE FLOORING FL OZ (33.ml) 0 ON 0 2 0 00 Non Destructive Moisture 3 0 Concrete Encounter Plus 200 20 dlfwej dtra djflsv dlfwe vtra alskdjf vmwjc
ALL DRAWINGS/ILLUSTRATIONS ARE LOCATED AT THE END OF THE INSTRUCTIONS.
 Normandy Installation Instructions Planks are constructed with a joint that locks the planks together to form a tight, durable, water resistant joint. Normandy is installed as a floating floor so it's
INSTALLATION INSTRUCTIONS
 About PROTECH Luxury Vinyl Planks 8.7mm WPC Click Lock Contemporary Collection features patented interlocking planks for easy installation and is installed as a glue less floating floor. The interlocking
VESDURA ENGINEERED VINYL PLANK INSTALLATION GUIDE
 VESDURA ENGINEERED VINYL PLANK INSTALLATION GUIDE Vesdura Engineered Vinyl Plank features the patented Unilin interlocking planks for easy installation and is installed as a glueless floating floor. The
Berkshires Glueless and Full Spread Installation Instructions
 INSTALLATION INSTRUCTIONS Berkshires Glueless and Full Spread Installation Instructions March 22, 2012 PRIOR TO INSTALLATION Carefully check flooring material for any defects. Contact your supplier immediately
INSTALLATION INSTRUCTIONS
 1 of 6 INSTALLATION INSTRUCTIONS IMPORTANT! Store the floorboards at room temperature for at least 48 hours, still in their packaging, prior to commencing installation. Ideal room temperature is 18-22
ENGINEERED LUXURY VINYL GENERAL INSTALLATION INSTRUCTIONS FOR ANGLE-TO-ANGLE FLOORING
 ENGINEERED LUXURY VINYL GENERAL INSTALLATION INSTRUCTIONS FOR ANGLE-TO-ANGLE FLOORING WARNING Prior to installation, please ensure that the product received is the correct style and color as well as to
INSTALLATION INSTRUCTIONS
 VINYL PLANKS 6.5MM HDPC CLICK LOCK REVIVAL COLLECTION General Information 1. Flooring should be transported and stored in a neatly stacked fashion on a smooth flat surface. Be sure to inspect the run numbers/production
1. TEST BEFORE STARTING INSTALLATION All substrates to receive moisture sensitive floor covering must be tested for moisture.
 LVT With In*Step Locking System 1. TEST BEFORE STARTING INSTALLATION All substrates to receive moisture sensitive floor covering must be tested for moisture. CONCRETE SUBSTRATES: Internal Relative Humidity
Rigid Core Installation & Maintenance Instructions
 Rigid Core Installation & Maintenance Instructions Suitability Rigid Core Click Vinyl Flooring is completely waterproof floating floor and has got exceptional acoustic and insulation properties due to
premium rigid click optimum rigid click
 In order to obtain a good result, we advise to follow all given instructions carefully. www.pergo.com Preparation We recommend to order all panels for a commercial flooring project at the same time to
INSTALLATION INSTRUCTIONS
 INSTALLATION INSTRUCTIONS Dear customer, Thank you for buying our veneer Par-ky floor. Please read our installation instructions carefully. If these instructions are not followed, the installer will be
ENGINEERED WATERPROOF FLOORING GENERAL INSTALLATION INSTRUCTIONS FOR VÄLINGE 2G LOCKING FLOORING
 ENGINEERED WATERPROOF FLOORING GENERAL INSTALLATION INSTRUCTIONS FOR VÄLINGE 2G LOCKING FLOORING SITE CONDITIONS Always store the boxes of Engineered Waterproof Flooring (EWF) on a flat and level surface;
INSTALLATION INSTRUCTIONS
 VINYL PLANKS 6.5MM HDPC CLICK LOCK PERSPECTIVE COLLECTION General Information 1. Flooring should be transported and stored in a neatly stacked fashion on a smooth flat surface. Be sure to Inspect the run
INSTALLATION INSTRUCTIONS
 VINYL PLANKS 4MM HDPC CLICK LOCK FORESIGHT COLLECTION General Information 1. Flooring should be transported and stored in a neatly stacked fashion on a smooth flat surface. Be sure to Inspect the run numbers/production
LUXURY VINYL GENERAL INSTALLATION INSTRUCTIONS FOR LOCKING FLOORING
 LUXURY VINYL GENERAL INSTALLATION INSTRUCTIONS FOR LOCKING FLOORING ACCLIMATION Acclimation is required prior to the installation of Luxury Vinyl Flooring (LVF). Store the UNOPENED BOXES in the room where
IVC US Residential Installation Guide - Laminate. Leading the Way
 IVC US Residential Installation Guide - Laminate Leading the Way IVC US Residential Installation Guide - Laminate PressXpress & DropXpress IVC US Residential Installation Guide Laminate & DXP Materials
PLEASE READ BEFORE INSTALLATION
 PLEASE READ BEFORE INSTALLATION Comprehensive Installation and Maintenance Instructions It is important to work out of several cartons to mix the patterns when installing this select flooring product to
USA USA USA PURE CLICK
 MADE IN BELGIUM MADE IN BELGIUM 0. MADE IN BELGIUM 100 % QUALITY USA USA USA 100 100 % % QUALITY QUALITY PURE CLICK CLICK CLICK DESIGN CLICK DESIGN FLOOR FLOOR INSTALLATION MANUAL 2 Pure Click 40 is a
ATTENTION! READ BEFORE INSTALLING!
 ATTENTION! READ BEFORE INSTALLING! Uniclic Glueless Floating Floor Installation Instructions COLOR VARIATION This flooring is a natural product and color variations are to be expected. For best visual
TARKETT EASIUM. Instrucciones de Instalación & Mantenimiento
 TARKETT EASIUM Instrucciones de Instalación & Mantenimiento Product usage Recommended tools Easium flooring is not recommended for use in high humidity areas where the floor is usually wet (steam rooms,
Lock Installation Instructions for BT Strand Lock, BT Strand Engineered & BT Bamboo Engineered
 Lock Installation Instructions for BT Strand Lock, BT Strand Engineered & BT Bamboo Engineered Please read the following instructions before starting the installation Applications... 1 Pre installation...
Installation Procedure of Floating floors
 SUBFLOOR PREPARATION OF WICANDERS FLOATING FLOORS WITH CORKLOC Wicanders floating floors with Corkloc can be installed in most domestic areas and in almost all commercial areas except in bathrooms, saunas
PARKAY XPR Installation Instructions (Architect Collection)
") Parkay Floors 1-855-5-PARKAY www.parkayfloors.com PARKAY XPR Installation Instructions (Architect Collection) BEFORE YOU START PARKAY XPR FLOORING has a patented locking system making it ideal for a floating
Parkay Floors 1-855-5-PARKAY www.parkayfloors.com PARKAY XPR Installation Instructions (Architect Collection) BEFORE YOU START PARKAY XPR FLOORING has a patented locking system making it ideal for a floating
Installation Guidelines: Magnolia
 Installation Guidelines: Magnolia 3/8 Engineered Hardwood Staple Down Installation ATTENTION Inspect ALL materials carefully BEFORE Warranties DO NOT cover materials with visible defects once they are
Wellmade En VogueTM Engineered Vinyl Plank Installation Guide
 Wellmade En VogueTM Engineered Vinyl Plank Installation Guide Wellmade En VogueTM is a one of a kind engineered vinyl plank flooring that uses no adhesive to bond the vinyl layers together and features
IN ORDER TO OBTAIN A GOOD RESULT, WE ADVISE TO FOLLOW ALL GIVEN INSTRUCTIONS CAREFULLY.
 IN ORDER TO OBTAIN A GOOD RESULT, WE ADVISE TO FOLLOW ALL GIVEN INSTRUCTIONS CAREFULLY. 8-0 C < C > C Basic a b SunHeat. PREPARATION Always store and transport Quick-Step Livyn floors carefully to prevent
WPC Vinyl Floor Installation Guide
 WPC Vinyl Floor Installation Guide Introduction This guide will take you through the necessary steps to install your Bel-Air WPC Vinyl Flooring. Make sure to carefully read through this guide so that you
HIGUERA HARDWOODS SOLID STRAND WOVEN FLOORING PRE-INSTALLATION JOBSITE REQUIREMENTS
 HIGUERA HARDWOODS SOLID STRAND WOVEN FLOORING PRE-INSTALLATION JOBSITE REQUIREMENTS Carefully examine the wood flooring prior to installation for color, finish and quality. Ensure adequate lighting for
INSTALLATION INSTRUCTIONS - Please read before installation
 INSTALLATION INSTRUCTIONS - Please read before installation The floor panels should be transported in a lying down position. Floor panels should be stored in this position in their unopened packages in
LOOSE LAY INSTALLATION GUIDE PAGE 1 of 6
 INSTALLATION GUIDE PAGE 1 of 6 MATERIALS REQUIRED FOR INSTALLATION: Tape Measurer Square Ruler Utility Knife 100lb Roller (if using adhesive) ACCEPTABLE SUBFLOORS: Happy Feet International will not warrant
PARKAY LAMINATE FLOORING (UNILIN DROP) Installation Instructions
 Installation Instructions") Parkay Floors 1855-5-PARKAY www.parkayfloors.com PARKAY LAMINATE FLOORING (UNILIN DROP) Installation Instructions BEFORE YOU START PARKAY LAMINATE FLOORING has a patented UNILIN DROP system. The collections
Parkay Floors 1855-5-PARKAY www.parkayfloors.com PARKAY LAMINATE FLOORING (UNILIN DROP) Installation Instructions BEFORE YOU START PARKAY LAMINATE FLOORING has a patented UNILIN DROP system. The collections
FEATHERWEIGHT Uniclic Luxury Vinyl Installation Sheet
 FEATHERWEIGHT Uniclic Luxury Vinyl Installation Sheet page 1 PLEASE READ ALL INSTRUCTIONS PRIOR TO INSTALLATION FIGURE 1 FIGURE 2 FIGURE 3 FIGURE 4 TOOLS REQUIRED Utility Knife Tape Measure Straight Edge
Pry Bar or Pull bar Hammer Spacing Wedges Rubber Mallet Safety Equipment (Goggles and Mask)
") strand at ease installation instructions strand at ease installation instructions: ECOFINISHES RECOMMENDS USING THE SERVICES OF A PROFESSIONAL HARDWOOD FLOORING INSTALLER. READ THESE INSTRUCTIONS THOROUGHLY
strand at ease installation instructions strand at ease installation instructions: ECOFINISHES RECOMMENDS USING THE SERVICES OF A PROFESSIONAL HARDWOOD FLOORING INSTALLER. READ THESE INSTRUCTIONS THOROUGHLY
glue E Installation instructions General Acclimatization and storing conditions Subfloor
 E Installation instructions General glue 1. We recommend to order all panels for the same flooring project at the same time. Compatibility of panels in repeated orders cannot be guaranteed. 2. Make sure
DeZignCore Ultra Luxury Vinyl Planks
 DeZignCore Ultra Luxury Vinyl Planks v.7-17 Brushed Handscraped Southern Pecan 6 x 48 x 5.5mm DEDCU-162 $4.73/sf Auburn Oak 6 x 48 x 5.5mm DEDCU-921 $4.73/sf Maple 6 x 48 x 5.5mm DEDCU-630 $4.73/sf Hazelnut
WPC VINYL PLANK INSTALLATION GUIDE
 WPC VINYL PLANK INSTALLATION GUIDE Please check color selection and style before Installation. NO CLAIMS will be accepted after installation if installation instructions are not followed. NO CLAIMS will
sono BETTER TO THE CORE SONO INSTALLATION GUIDE GLUE-DOWN INSTALLATION 1. GENERAL INFORMATION 2. TOOLS AND MATERIALS 3.
 SONO INSTALLATION GUIDE GLUE-DOWN INSTALLATION Congratulations and thank you for choosing SONO floors! Your new floors are among the most fashionable, long-lasting and easy-to-maintain floors available.
MEDLEY XL INSTALLATION & MAINTENANCE INSTRUCTIONS LUXURY VINYL
 REVISED 1/24/2017 MEDLEY XL INSTALLATION & MAINTENANCE INSTRUCTIONS LUXURY VINYL PLEASE READ ALL INSTRUCTIONS CAREFULLY, BEFORE YOU BEGIN INSTALLATION. IMPROPER INSTALLATION WILL VOID WARRANTY. Thank you
STANDARDS LAMINATE FLOORING (UNILIN A2A) Installation Instructions
 Installation Instructions") STANDARDS LAMINATE FLOORING (UNILIN A2A) Installation Instructions BEFORE YOU START 1. STANDARDS LAMINATE FLOORING has a patented UNILIN A2A locking system. The collections that carry this particular Click
STANDARDS LAMINATE FLOORING (UNILIN A2A) Installation Instructions BEFORE YOU START 1. STANDARDS LAMINATE FLOORING has a patented UNILIN A2A locking system. The collections that carry this particular Click
L. W. Mountain, Inc. Floating Glue Installation Instructions *For use with engineered floors only*
 L. W. Mountain, Inc. Floating Glue Installation Instructions *For use with engineered floors only* Inspect the job site carefully before you begin the installation. Some conditions require specific installation
COMPOSITE (WPC) ENGINEERED VINYL FLOORING INSTALLATION
 ENGINEERED VINYL FLOORING INSTALLATION") COMPOSITE (WPC) ENGINEERED VINYL FLOORING INSTALLATION PLEASE READ ALL INSTRUCTIONS CAREFULLY BEFORE YOU BEGIN INSTALLATION! IMPROPER INSTALLATION WILL VOID WARRANTY. STOP! WPC Engineered Vinyl Flooring
COMPOSITE (WPC) ENGINEERED VINYL FLOORING INSTALLATION PLEASE READ ALL INSTRUCTIONS CAREFULLY BEFORE YOU BEGIN INSTALLATION! IMPROPER INSTALLATION WILL VOID WARRANTY. STOP! WPC Engineered Vinyl Flooring
HYBRID. Pre-Laying Checks
 Warning Veles CK has been developed for exceptional stability in low and high temperatures, however, after installation extreme temperatures (under 5 C or over 50 C) should be avoided by use of interior
HDWPC Flooring Installation Guidelines
 HDWPC Flooring Installation Guidelines 02.22.17 The purpose of this manual is to provide general installations recommendations based on certain installation environments. If there are other questions about
1.2 Reference Standard: NOFMA - National Oak Flooring Manufacturers Association Grading Standards.
 WOOD FLOORING GENERAL INFORMATION 1.1 This section applies to factory finished wood strip flooring. 1.2 Reference Standard: NOFMA - National Oak Flooring Manufacturers Association Grading Standards. 1.3
Wellmade HDPC Engineered Vinyl Plank/Tile Installation Guide
 Wellmade HDPC Engineered Vinyl Plank/Tile Installation Guide Wellmade HDPC is a High Density Plastic Composite (HDPC) flooring with patent pending technology, HDPC is an engineered vinyl plank/tile flooring
ATTENTION! READ BEFORE INSTALLING!
 Glueless Hardwood & Bamboo Flooring Installation Instructions ATTENTION! READ BEFORE INSTALLING! COLOR VARIATION This flooring is a natural product and color variations are to be expected. For best visual
WATER TUFF VINYL FLOORING ATTENTION! READ BEFORE INSTALLING! Angle-Tap Installation Instructions
 WATER TUFF VINYL FLOORING ATTENTION! READ BEFORE INSTALLING! Angle-Tap Installation Instructions FLOORING MATERIAL SHOULD BE INSPECTED PRIOR TO INSTALLATION Responsibility for the suitability of this flooring
General Commercial Installation Guide LAMINATE
 General Commercial Installation Guide LMINTE Laminate & DXP IVC US Commercial Installation Guide - Laminate PressXpress & DropXpress Materials Required for Installation: Small hand saw Jigsaw Pencil ox
Installation instruction
 Installation instruction BJELIN PARQUET PLANK Locking system G/G . Installation preparations 8 h ( h) - C -0% at 0 C - C. Subfloor preparations PE-foil over floor heating mm underlay material: CS > 0 /
General and Installation Instructions Laminate - 2G + 2G
 STOP Please inspect product for color, finish, quality and style BEFORE installing any material. SLCC Enterprise, Inc. warranty DOES NOT cover materials with visible defects once they have been installed.
DO-IT-YOURSELF SELF ADHESIVE PLANK INSTALLATION
 Woodland Creek Series Self-Adhesive Residential Vinyl Plank Pattern Numbers: Sku 725-6664 PLK1102 Sable Sku 725-6666 PLK1106 Gray Wolf DO-IT-YOURSELF SELF ADHESIVE PLANK INSTALLATION MATERIALS YOU MAY
Wellmade. - Installation Guide. General Information. Pre-Installation
 - Installation Guide Wellmade Wellmade WREW is a real wood veneer on a High Density Plastic Composite (HDPC ) flooring with patent pending technology. WREW is a Water Resistant Engineered Wood plank flooring
PURE INSTALLATION MANUAL
 INSTALLATION MANUAL Pure Click 40 is an LVT floor, designed for use in residential areas. Pure Click 55 is suited for both residential and commercial areas such as shops, hotel rooms, etc. To obtain a
STONE PRODUCT COMPOSITE (SPC) FLOORING INSTALLATION INSTRUCTIONS
 FLOORING INSTALLATION INSTRUCTIONS") Read all instructions before installing. Incorrect installation will invalidate and void warranty. IMPORTANT Goodfellow Dubaï is guaranteed for use only as a floor covering. Goodfellow Dubaï is intended
Read all instructions before installing. Incorrect installation will invalidate and void warranty. IMPORTANT Goodfellow Dubaï is guaranteed for use only as a floor covering. Goodfellow Dubaï is intended
Yanchi Flooring Installation Guide HDF Engineered Color-blended Strand Woven Bamboo Flooring
 Yanchi Flooring Installation Guide HDF Engineered Color-blended Strand Woven Bamboo Flooring PLEASE READ BEFORE INSTALLING INSTALLATION PLEASE READ THOROUGHLY BEFORE BEGINNING INSTALLATION. THESE INSTALLATION
PURE INSTALLATION MANUAL
 INSTALLATION MANUAL Pure Click 40 is an LVT floor, designed for use in residential areas. Pure Click 55 is suited for both residential and commercial areas such as shops, hotel rooms, etc. To obtain a
Yanchi Bamboo Flooring Installation Guide Pre-Installation Checklist Conditioning and Acclimating Your Bamboo Floor Before Installation
 Yanchi Bamboo Flooring Installation Guide READ COMPLETELY BEFORE STARTING INSTALLATION. Congratulations on choosing Yanchi bamboo flooring. Please take time to read the following procedures before you
Installation Instruction Laminate Flooring
 Installation Instruction Laminate Flooring Congratulations on the purchase of your new floor. We thank you for your excellent selection of an Eclipse product that is designed to offer you years of use
LUXURY VINYL GENERAL INSTALLATION INSTRUCTIONS FOR DRYBACK FLOORING
 LUXURY VINYL GENERAL INSTALLATION INSTRUCTIONS FOR DRYBACK FLOORING WARNING Prior to installation, please ensure that the product received is the correct style and color as well as to the customer s satisfaction.
1) Understanding how the floor will look once installed the installer and owner must meet prior to installation to review:
 Understanding how the floor will look once installed the installer and owner must meet prior to installation to review:") Attention: Please only open the packs directly before installation! HARDWOOD FLOORING Please read installation instructions carefully before installation! The hardwood flooring is the ideal flooring for
Attention: Please only open the packs directly before installation! HARDWOOD FLOORING Please read installation instructions carefully before installation! The hardwood flooring is the ideal flooring for
RESIDENTIAL 15 YEARS W A RRANTY
 R I DE NT I AL ES W A Y 15 YEARS RRANT RESIDENTIAL 15 YEARS W A R R A N T Y KEY FEATURES SUNLITE LOOSELAY LVT TRADITIONAL LAMINATE Sun-proof (withstands direct sunlight) 4 4 7 7 Will not warp or deform
Color/graining - do certain dark/light pieces or wild grained planks need to be graded out to meet the owners expectations?
 Attention: Please only open the packs directly before installation! HARDWOOD FLOORING Please read installation instructions carefully before installation! The hardwood flooring is the ideal flooring for
SOUND-TEC ENGINEERED LVT
 INSTALLATION GUIDE: SOUND-TEC ENGINEERED LVT In any floor covering installation there are six basic requirements to insure a proper long lasting and attractive floor. These requirements are the same for