SAFETY AND USER MANUAL FOR: WALL SAW PE 400.
|
|
|
- Naomi Stevenson
- 6 years ago
- Views:
Transcription
, Italy tel. +39 035 795029 fax.")
1 SAFETY AND USER MANUAL FOR: WALL SAW PE 400. USA - CANADA CARDI s.r.l. via Leonardo da Vinci, 21 I Pontida (BG), Italy tel fax info@cardi.biz


2 1 A C B H 3 E 2


3 4 5 P N O 6 I II
4 7 SERIAL # 8 NO LASER 9 LASER OK OK


5 10 10/A 10/B 10/C 10/D 10/E 10/F


6 11 11/A 11/B 11/C 11/D 11/E 11/F 11/G 11/H
7 12 I

8 13

9 1 Your CARDI hand-held wall saw is a power tool designed to make straight cuts in stonelike materials like reinforced concrete, bricks, masonry, natural stone, using laser-welded diamond blades only. Warning: Do NOT use circular saw blades or other kinds of blades not laserwelded. Failure to follow this warning may result in serious personal injury. See figure 8 and 9. General safety Rules WARNING! Read all instructions. Failure to follow all instructions listed below may result in electric shock, fire and/or serious injury. The term "power tool" in all of the warnings listed below refers to your mains operated (corded) power tool or battery operated (cordless) powertool. SAVE THESE INSTRUCTIONS 1) Work area a) Keep working area clean and well lit. Cluttered and dark areas invite accidents. b) Do not operate power tools in explosive atmospheres, such as in the presence of flammable liquids, gases or dust. Power tools create sparks which may ignite the dust or fumes. c) Keep children and bystanders away while operating a power tool. Distractions can cause you to lose control. 2) Electrical safety a) Power tool plugs must match the outlet. Never modify the plug in any way. Do not use any adapter plugs with earthed (grounded) power tools. Unmodified plugs and matching outlets will reduce risk of electric shock. b) Avoid body contact with earthed or grounded surfaces such as pipes, radiators, ranges and refrigerators. There is an increased risk of electric shock if your body is earthed or grounded. c) Do not expose power tools to rain or wet conditions. Water entering a power tool will increase the risk of electric shock. d) Do not abuse the cord. Never use the cord for carrying, pulling or unplugging the power tool. Keep cord away from heat, oil, sharp edges or moving parts. Damaged or entangled cords increase the risk of electric shock. e) When operating a power tool outdoors, use an extension cord suitable for outdoor use. Use of a cord suitable for outdoor use reduces the risk of electric shock. 3) Personal safety a) Stay alert, watch what you are doing and use common sense when operating a power tool. Do not use a power tool while you are tired or under the influence of drugs, alcohol or medication. A moment of inattention while operating power tools may result in serious personal injury. b) Use safety equipments: always wear eye protection. Safety equipment such as dust mask, non-skid safety shoes, hard hat, or hearing protection used for appropriate conditions will reduce personal injuries. c) Avoid accidental starting. Ensure the switch is in the off position before plugging in. Carrying power tools with your finger on the switch or plugging in power tools that have the switch on invites accidents. d) Remove any adjusting key or wrench before turning the power tool on. A wrench or a key left attached to a rotating part of the power tool may result in personal injury. e) Do not overreach. Keep proper footing and balance at all times. This enables better control of the power tool in unexpected situations. f) Dress properly. Do not wear loose clothing or jewellery. Keep your hair, clothing and gloves away from moving parts. Loose clothes, jewellery and long hair can be caught in moving parts. g) If devices are provided for the connection of dust extraction and collection facilities, ensure these are connected and properly used. Use of these devices can reduce dust related hazards. h) Use auxiliary handles supplied with the tool. Loss of control can cause personal injury. 4) Power tool use and care a) Do not force the power tool. Use the correct power tool for your application. The correct power tool will do the job better and safer at the rate for which it was designed. b) Do not use the power tool if the switch does not turn it on and off. Any power tool that cannot be controlled with the switch is dangerous and must be repaired. c) Disconnect the plug from the power source before making any adjustments, changing accessories, or storing power tools. Such preventive safety measures reduce the risk of starting the power tool accidentally. d) Store idle power tools out of the reach of children and do not allow persons unfamiliar with the power tool or these instructions to operate the power tool. Power tools are dangerous in the hands of untrained users. e) Maintain power tools. Check for misalignment or binding of moving parts, breakage of parts and any other condition that may affect the power tools operation. lf damaged, have the power tool repaired before use. Many accidents are caused by poorly maintained power tools.
10 2 f) Keep cutting tools sharp and clean. Properly maintained cutting tools with sharp cutting edges are less likely to bind and are easier to control. g) Use the power tool, accessories and tool bits etc., in accordance with these instructions and in the manner intended for the particular type of power tool, taking into account the working conditions and the work to be performed. Use of the power tool for operations different from intended could result in a hazardous situation. 5) Service a) Have your power tool serviced by a qualified repair person using only identical replacement parts. This will ensure that the safety of the power tool is maintained. Additional safety rules for wall saws Always wear safety goggles Always wear safety shoes Always wear safety gloves Always wear dust mask Instructions before use Always wear ear protection In the following text, figures are identified by numbers, details inside the figures by letters. Figures are depicted on the first pages of this user manual. Power supply Earth since your wall saw operates with water, its metallic parts are connected to the earth; make sure that the socket and possible extension cords and multiple sockets have the earth connection and that your electrical system is properly connected to the earth. Warning: for your safety, it is important that the whole system (electrical system, extension cords, sockets etc.) is connected to the earth. If you are not sure, ask a qualified electrician for a check. Extension cords when you have to operate with your wall saw far from an electrical socket, you can use an extension cord. If you use it, make sure that the section of the cord is suitable and that the cord is provided with ground conductor; the extension cord (made up of cable, plug and socket) must be suitable for outdoor use. It is better if the cord is made of rubber and it is H07RN-F; follow the chart shown in figure 13 on this manual for the choice of the right section of the conductors; if you use more than one extension cord make sure that every cable in each extension cord has a section not lower than the value shown on the chart in figure 13; remember that the more an extension cord is long the more the voltage drop is high and the worse is the operation of your wall saw. Do not use extension cords if you have to operate too far from the electrical socket. Preliminary operations In order to prepare your wall saw to operate, follow these steps. Before proceeding with preparation make sure that the plug is disconnected from the power supply. a) b) fix the main handle (A) in the more comfortable position for the application as shown in figure 4. Warning: not using handles can result in loss of control of your wall saw and serious personal injury. b) connect the quick hose connector (C) to a proper water supply; PRCD: portable residual current device your wall saw is equipped with a safety portable residual current device (PRCD) assembled on the cord. This device is shown in figure 5; never use the wall saw without PRCD; before starting to cut, make sure the PRCD works properly. In order to do so, plug the wall saw in and press the button Reset (O): a red led will light up (P) showing that electricity is available toward the wall saw. Than press the button Test (N) that tests if the device works properly. When you press it the circuit breaker inside the PRCD should cut the power off leading the switch automatically to go to the off position and the red led to go off; if, when cutting, the PRCD cuts the power: stop working, set the switch on OFF position and bring your chain saw to an authorized service centre in order to remove the causes of the electrical dissipation. ON/OFF switch See figure 6 in order to understand how to use the switch (figure 2 E). Your switch is equipped with a safety lock-off device. This device ignite the motor only if you follow first step I and than step II, as shown in figure 6. This prevents the wall saw from accidentally self-starting. Connection to a water supply Wet cutting reduces risks connected with dust spreading. We recommend to use your wall saw with water. If you want to cut without water wear a proper dust mask to protect yourself from dust. In wet cutting: check at regular intervals that none of the water system components are damaged. Check in particular the valve, the quick hose connector and the pipe; use only the water pipe provided with your wall saw. The water pipe includes also a valve and a quick hose connector; the maximum pressure of incoming water must be 4 bar; use just clean water; prevent water from entering the motor or other electrical components.
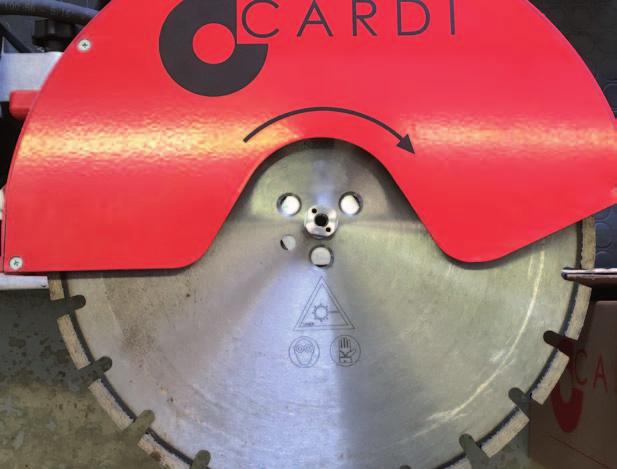
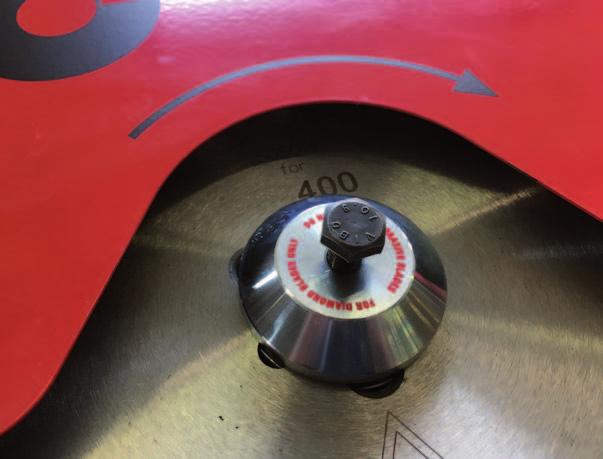
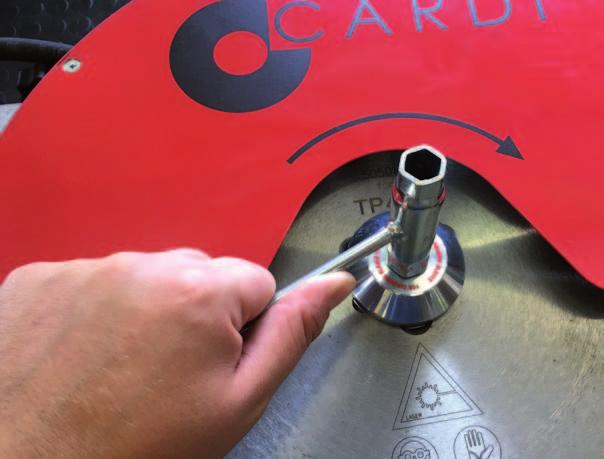
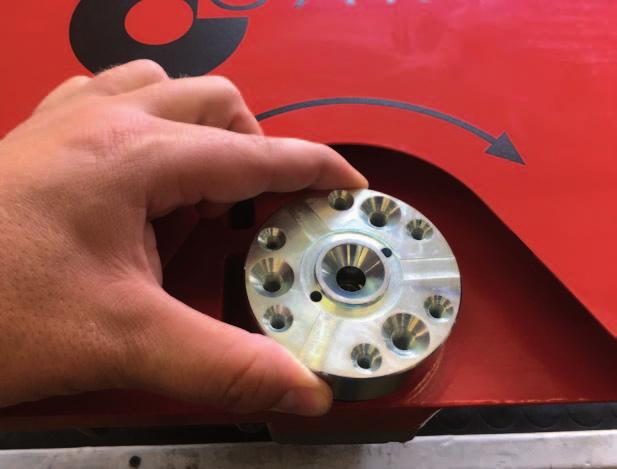
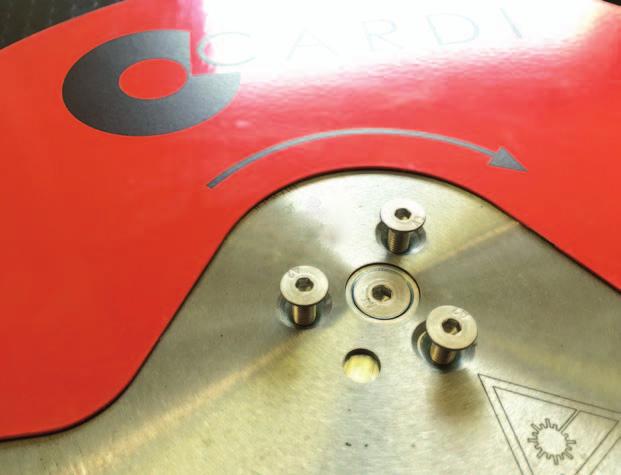
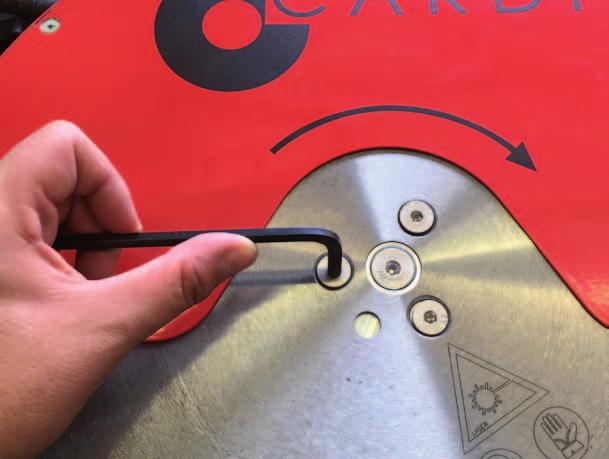
11 3 Checks and precautions to avoid structural damages and damages to the plant Before starting any cutting activity, talk with the construction manager or the planner in order to make sure that the cut doesn t: make any damage to the structure of the building and doesn t change the structural characteristics of the construction; damage any water or gas pipeline or any electric mains. Blade choice Your Cardi wall saw has been designed to cut building materials such as concrete, reinforced concrete, bricks, masonry, natural stones, tiles etc, using laser welded diamond blades (figure 9). Warning: Do NOT use circular saw blades or other kind of blades not laser-welded. Failure to follow this warning may result in serious personal injury. See figure 8 and 9. Ask your dealer about the best blade for your application. The blade must have: maximum diameter: 400 mm; hole diameter 30 mm or 25,4 mm. Check the correct diameter of the hole accordingly to the specification on the Technical Data Sheet supplied together with the machine; thickness between 2 and 3 mm; maximum rotating speed, given by the blade manufacturer, higher than the maximum rotating speed of the wall saw, shown on the data plate (see figure 12 I). Use blades with diameter, hole dimension and rotating speed compatible with your specific wall saw model. Use of blades with inappropriate dimensions can result in misalignment, vibrations, irregular rotation and loss of control causing serious injury. Check the blade before use. Do not use damaged blades. Blade mounting and replacement Before mounting or replacing the blade (figure 1 H) make sure the wall saw is disconnected form the electric supply. For blade mounting or replacement, follow these directions, referring to figure 10: unscrew the blade-tightening screw (10/A), using the tubular spanner provided with your wall saw; remove the blade-tightening screw and the flange (10/B); insert the new blade or replace the old one (10/C); insert the flange (10/D); insert the blade-tightening screw (10/E) tight the blade-tightening screw (10/F); Mounting and replacement of the FLUSH CUT BLADE Before mounting or replacing the blade (figure 1 H) make sure the wall saw is disconnected form the electric supply. For blade mounting or replacement, follow these directions, referring to figure 11: unscrew the blade-tightening screw (11/A), using the tubular spanner provided with your wall saw; remove the blade-tightening screw and the flange (11/B); insert the flange for flush cut blade (11/C); insert the flange tightening screw (11/D); tight the flange tightening screw (11/E); insert the new blade or replace the old one (11/F); insert the blade-tightening screws (11/G); tight the blade-tightening screws (10/H); Fixing the material to be cut and dimensional limits of the material to be cut if the material you are cutting is a block not part of a construction, fix the block in order to prevent its movement; prevent the block from shifting or tearing the anchorages when you are cutting. Environmental conditions do not expose the wall saw to rain, ice or snow; prevent water or any other liquid from coming into contact with the electric parts of your machine; do not use the wall saw in explosive atmospheres, for instance inflammable liquids, gas or dust. The electric wall saw produces sparks which can ignite dust or smoke. Overhead cutting (ceiling cutting) Warning: your wall saw is NOT intended to perform overhead cutting (upward). Operating Instructions After having followed the instructions given in the previous Preliminary operations paragraph, follow these directions in order to perform the cut. Warning: do not touch any moving parts of your wall saw, in particular the blade, when operating. switch your wall saw on and move closer to the material to be cut. When the blade touches the material push till you reach the desired cutting depth; your wall saw is intended to perform just straight cuts; avoid friction between the blade-side and the material: move the wall saw just forward avoiding side movement of the blade. The friction can overload the motor; Warning: when cutting, the blade can bind in the cut causing the saw to kickback. In this case the saw tends to move toward or away from the operator. The kickback is dangerous for the operator and it can cause serious injury. use the handles and hold your wall saw firmly with both hands and be ready to resist to a possible kickback; cutting materials containing wood, cork, rubber, foam polystyrene can result in problems moving forward the machine. If you have this kind of problems, stop cutting and remove all materials
12 4 listed before and proceed with cutting operations. If you cannot remove these materials, stop cutting and cut in another position; in case the electric power goes off, trigger off the switch to prevent the machine from accidentally self starting; when you complete the cut, trigger the switch off and wait till the blade comes to a complete stop. Then pull the wall saw out of the cut and close the water valve. Watch out! The blade and the cutting area can be very hot ad cause severe burns. Electronic devices Your wall saw is equipped with a CARDI multifunction electronic device that includes a soft-start and an electronic clutch: the soft-start allows the motor soft-start, reduces current peak that occurs when you switch the motor on, helps you when you begin cutting, allowing gradual blade rotation and avoiding jerks at the operator s arm, and allows you to use your wall saw connected to the household electric system equipped with high sensitivity automatic switch; the electronic clutch ensures that the current absorbed by your wall saw, proportional to the motor load, is below the safety upper limit. In case the current absorbed exceeds the limit, it cuts off power toward the motor, preventing damages. When the overload is over, the device gives back power to the motor that begins working again; if the electronic clutch operates frequently means that the wall saw is not used properly. Possible causes can be a not suitable forward speed, an excessive friction between the blade-side and the material, excessive cutting depth. In these cases, stop cutting and let the machine turn with no load for some seconds, helping the motor cool down. Maintenance - Service - Warranty Periodic maintenance at the end of the work, after having removed the blade, blow compressed air inside the rotating motor in order to remove dust and powder. Do this operation wearing protective goggles; before starting any other cleaning, maintenance or lubrication operation make sure that the wall saw is unplugged; keep your wall saw clean and dry, in particular its handles and its moving parts; never use solvents or other harsh chemicals for cleaning your wall saw; after use put your wall saw in a dry, safe and inaccessible to children place; we recommend to lubricate hinges, joints and pivots belonging to cutting-depth setting system with a suitable water-repellent spray gears are lubricated by lubricating oil and grease which are suited for any external temperature. You don t have to check the oil level or to fill it up. always unplug the wall saw during check or blade replacement; never unplug the wall saw pulling the cord; inspect often the feeding cable and extension cords, making sure that they don t have any Service damage like cuts, abrasions or live conductors. If you find a damage, ask to a CARDI authorized service centre for replacement; do not use the wall saw with damaged components or with malfunctions, in particular when the switch doesn t work properly. In these cases, ask a CARDI authorized service centre for replacement. after 250 hours worked, bring your wall saw to a CARDI authorized service centre for periodical check; any repairing on your wall saw must be carried out by CARDI authorized service personnel only. Ask your dealer for the list of the CARDI authorized service centres; your machine's serial number is stamped on the machine or printed on the data plate as shown in figure 7; Use original CARDI spare parts only. Warranty Your product is under CARDI warranty for 12 months, starting from the date of purchase. This warranty is against faulty workmanship, flaws material and design problems. The warranty covers free components replacement, manpower needed for replacement and wearing materials such as oil and lubricants if intact before the repairing operation. The warranty doesn't cover the replacement of: components of the product replaced or modified by people not authorized by CARDI; components damaged by carelessness, not suitable use or overloaded; components of products from which safety devices have been removed; worn wearing parts replaced during repair. This warranty does not apply to products that have been damaged by carelessness like water entering the wall saw, lack of periodic cleaning and maintenance, damage of the threaded components or the spindle etc. The life of wearing parts is variable depending on using time and the kind of job they are used for. Examples of wearing parts are: cables, switches and plugs, brushes, commutators, clutch plates, ball and roller bearing not in oil, sealing rings, transmission spindles, filters, etc. If during repairing under warranty, a wearing part is worn and this can affect the safety and the operation of your product, the customer is asked to pay for the replacement of these components not under warranty. If the customer refuses this, no repairing operation will be carried out. The warranty covers free replacement of components which are defective due to wrong manufacturing or assembly, if the product is brought to an authorized service centre and if: the product is together with a purchasing document stating when the product has been purchased. Valid purchasing documents are invoices or delivery certificates; maintenance operations have been carried out every 250 working hours, replacing the worn wearing parts; no unauthorized people have operated on the product; the product has not been misused and it has been used accordingly with the directions given in this user manual; all safety directions have been followed. Your CARDI product is not under warranty if:

13 5 the product has been serviced by people not authorized by CARDI. damages are due to incorrect use and/or carelessness. Dents due to drops or strokes will be considered evidence of carelessness; damages have been caused by mechanical or electrical overload; damages have been caused by water, mud or any other liquid entering the product. When your product is under warranty, in some cases, like if the CARDI authorized service personnel think the repairing is too expensive to be carried out, the free substitution of the product is possible. In addition, the substitution under warranty is provided after two fruitless reparation attempts and after the authorization of a CARDI service manager. In case of substitution, the customer is, usually, requested to pay for the worn wearing parts of the replaced product. Ask your dealer for a CARDI service centres address list. Package Contents For the list of contents refer to the Spare Parts List, specific for your model, located in the package together with this manual. User-replaceable components No components of your CARDI product can be replaced by the user. Replacement must be carried out by CARDI authorized personnel only. CARDI service centres - Address list: WARNING: THE MANUFACTURER DECLINES ALL RESPONSABILITY IN CASE OF NO RESPECT OF THE ABOVE WRITTEN "SAFETY AND OPERATING INSTRUCTIONS". Products to the end of their life. The symbol on the left, that you can find on the product or on its packaging indicates that this product may not be treated as household waste. At the end of its life the products must be handed over to the applicable collection point for the recycling of electrical and electronic equipment. Be sure that this product is disposed correctly. You will help prevent potential negative consequences for the environment and human health. For more detailed information about what to do when your product doesn't work and is not fixable, contact the dealer where you did purchase the product. Your product has been introduced new on the market after August 13 th This manual is subject to modifications without notice.
14 CARD I
15
16 CARDI s.r.l. via Leonardo da Vinci, 21 I Pontida (BG), Italy tel fax
READ THIS MANUAL CAREFULLY BEFORE ASSEMBLY, TESTING & OPERATING
 The Operator must thoroughly read and understand this manual before operating the dust collector or commencing any servicing. Care should be taken to follow all safety rules and warning instructions. READ
2200-Lb. Semi-Electric Stacker OWNER S MANUAL
 2200-Lb. Semi-Electric Stacker OWNER S MANUAL WARNING: Read carefully and understand all ASSEMBLY AND OPERATION INSTRUCTIONS before operating. Failure to follow the safety rules and other basic safety
24 Portable Saw Mill OWNER S MANUAL
 24 Portable Saw Mill OWNER S MANUAL WARNING: Carefully read and understand all ASSEMBLY AND OPERATION INSTRUCTIONS before operating. Failure to follow the safety rules and other basic safety precautions
20 Portable Saw Mill OWNER S MANUAL
 20 Portable Saw Mill OWNER S MANUAL WARNING: Carefully read and understand all ASSEMBLY AND OPERATION INSTRUCTIONS before operating. Failure to follow the safety rules and other basic safety precautions
LASER GUIDED PARKING SYSTEM
 LASER GUIDED PARKING SYSTEM Model 94318 ASSEMBLY AND OPERATING INSTRUCTIONS Due to continuing improvements, actual product may differ slightly from the product described herein. 3491 Mission Oaks Blvd.,
DIGITAL PLATFORM SCALE
 DIGITAL PLATFORM SCALE 154 LB. WEIGHT CAPACITY Model 99969 Set up And Operating Instructions Not legal for trade or postal use. Diagrams within this manual may not be drawn proportionally. Due to continuing
Rocker Tool Post ASSEMBLY AND OPERATING INSTRUCTIONS
 Rocker Tool Post 94540 ASSEMBLY AND OPERATING INSTRUCTIONS Machine tool shown in photo not included. Due to continuing improvements, actual product may differ slightly from the product described herein.
6 Closet light. Model Due to continuing improvements, actual product may differ slightly from the product described herein.
 6 Closet light Model 95792 Assembly And Operation Instructions Due to continuing improvements, actual product may differ slightly from the product described herein. 3491 Mission Oaks Blvd., Camarillo,
DBR-32HD REBAR STRAIGHTENER
 OPERATING/SAFETY ORIGINAL INSTRUCTIONS DBR-32HD REBAR STRAIGHTENER TO REDUCE THE RISK OF INJURY, YOU MUST READ AND UNDERSTAND THIS INSTRUCTIONS I KK CO., LTD. 396-59, Ashitaka, Numazu-City, Shizuoka Pref.
55-Gallon Tilting Drum Ring
 55-Gallon Tilting Drum Ring Owner s Manual WARNING: Read carefully and understand all ASSEMBLY AND OPERATION INSTRUCTIONS before operating. Failure to follow the safety rules and other basic safety precautions
FW66 FORESTRY WINCH FW66. Owner s Manual 19/02/2016
 FW66 FORESTRY WINCH FW66 19/02/2016 Owner s Manual TABLE OF CONTENTS INTRODUCTION ---------------------------------------------------------------------------------- 2 INTENDED USE -----------------------------------------------------------------------------------
1.5HP CYCLONE DUST COLLECTOR MANUAL
 1.5HP CYCLONE DUST COLLECTOR MANUAL MANUAL FILTER CLEANING LAGUNA TOOLS 2072 Alton Parkway Irvine, California 92606 Ph: 800.234.1976 www.lagunatools.com 2018, Laguna Tools, Inc. LAGUNA and the LAGUNA Logo
2200 lb. Semi-Electric Stacker
 2200 lb. Semi-Electric Stacker Owner s Manual WARNING: Read carefully and understand all ASSEMBLY AND OPERATION INSTRUCTIONS before operating. Failure to follow the safety rules and other basic safety
OPERATION MANUAL 1.5HP Dust Cyclone
 OPERATION MANUAL 1.5HP Dust Cyclone MODEL NO.: CDC-1090P The Operator must thoroughly Read and understand this Manual before operating the Dust collector or commencing Any servicing. Care should be Taken
1 TON PORTABLE GANTRY CRANE Model LB. PORTABLE GANTRY CRANE Model 94831
 1 TON PORTABLE GANTRY CRANE Model 94884 660 LB. PORTABLE GANTRY CRANE Model 94831 ASSEMBLY AND OPERATING INSTRUCTIONS Due to continuing improvements, actual products may differ slightly from the products
2200-Lb. Stacker. Fixed Straddle Leg OWNER S MANUAL
 2200-Lb. Stacker Fixed Straddle Leg OWNER S MANUAL WARNING: Read carefully and understand all ASSEMBLY AND OPERATION INSTRUCTIONS before operating. Failure to follow the safety rules and other basic safety
7 2 i n. x 9 i n. Tr i - Fo l d R a m p s OWNER S MANUAL
 7 2 i n. x 9 i n. Tr i - Fo l d R a m p s OWNER S MANUAL WARNING: Read carefully and understand all ASSEMBLY AND OPERATION INSTRUCTIONS before operating. Failure to follow the safety rules and other basic
4 rotary milling table
 4 rotary milling table Model 97208 Set up And Operating Instructions Diagrams within this manual may not be drawn proportionally. Due to continuing improvements, actual product may differ slightly from
booster EX2 / EX3 Operating Manual Extrusion Welder Weldy AG Galileo-Strasse 10 CH-6056 Kaegiswil / Switzerland TECHSPANGROUP
 booster EX2 / EX3 Extrusion Welder Operating Manual Weldy AG Galileo-Strasse 10 CH-6056 Kaegiswil / Switzerland TECHSPANGROUP Australia: Tel. 1-800 148 791 Fax. 1-800 148 799 www.weldy.com.au New Zealand:
UNIVERSAL UTILITY TRUCK RACK
 UNIVERSAL UTILITY TRUCK RACK Owner s Manual WARNING: Read carefully and understand all ASSEMBLY AND OPERATION INSTRUCTIONS before operating. Failure to follow the safety rules and other basic safety precautions
8 DIAL CALIPER. Model Diagrams within this manual may not be drawn proportionally.
 8 DIAL CALIPER Model 97389 Set up And Operating Instructions Diagrams within this manual may not be drawn proportionally. Due to continuing improvements, actual product may differ slightly from the product
ALUMINUM TRI-FOLD RAMP
 ALUMINUM TRI-FOLD RAMP OWNER S MANUAL WARNING: Read carefully and understand all ASSEMBLY AND OPERATION INSTRUCTIONS before operating. Failure to follow the safety rules and other basic safety precautions
Welding & Fabrication Tools Mini VaR Tool Kit
 With Volta Tools You Can Never Go Wrong! Fast and simple belt installation. Unique and versatile design - compact, rugged and easy-to-use. Designed for both shop and field use. Light-weight construction.
Double-Drum Forklift Gripper
 Double-Drum Forklift Gripper Owner s Manual WARNING: Read carefully and understand all ASSEMBLY AND OPERATION INSTRUCTIONS before operating. Failure to follow the safety rules and other basic safety precautions
Y SIDE ALUMINUM TRUCK RACK
 Y SIDE ALUMINUM TRUCK RACK Owner s Manual WARNING: Read carefully and understand all ASSEMBLY AND OPERATION INSTRUCTIONS before operating. Failure to follow the safety rules and other basic safety precautions
Machinery Mover. Owner s Manual
 Machinery Mover Owner s Manual WARNING: Read carefully and understand all ASSEMBLY AND OPERATION INSTRUCTIONS before operating. Failure to follow the safety rules and other basic safety precautions may
ALUMINUM CURB RAMP. Model 98037
 ALUMINUM CURB RAMP Model 98037 Set up And Operating Instructions Diagrams within this manual may not be drawn proportionally. Due to continuing improvements, actual product may differ slightly from the
DISSTON WELDING PRODUCTS TIG/MMA-160/180/200/250D. Welding Machines
 DISSTON WELDING PRODUCTS TIG/MMA-160/180/200/250D Welding Machines FOR SAFE OPERATION: Keep the work area clean. Cluttered work areas invite injuries (indoor and outdoor). Consider the work environment.
11, 000- L b. E x t r e m e - D u t y P a l l e t Tr u c k OWNER S MANUAL
 11, 000- L b. E x t r e m e - D u t y P a l l e t Tr u c k OWNER S MANUAL WARNING: Read carefully and understand all ASSEMBLY AND OPERATION INSTRUCTIONS before operating. Failure to follow the safety rules
1000-LB. CAPACITY STEEL LOADING RAMPS (PAIR)
") 1000-LB. CAPACITY STEEL LOADING RAMPS (PAIR) OWNER S MANUAL WARNING: Read carefully and understand all ASSEMBLY AND OPERATION INSTRUCTIONS before operating. Failure to follow the safety rules and other
1000-LB. CAPACITY STEEL LOADING RAMPS (PAIR) OWNER S MANUAL WARNING: Read carefully and understand all ASSEMBLY AND OPERATION INSTRUCTIONS before operating. Failure to follow the safety rules and other
Mobile Drum Carrier. Owner s Manual
 Mobile Drum Carrier Owner s Manual WARNING: Read carefully and understand all ASSEMBLY AND OPERATION INSTRUCTIONS before operating. Failure to follow the safety rules and other basic safety precautions
Cargo Carrier with Ramp 50In.L x 30 1/4In.W.
 Cargo Carrier with Ramp 50In.L x 30 1/4In.W. Owner s Manual WARNING: Read carefully and understand all ASSEMBLY AND OPERATION INSTRUCTIONS before operating. Failure to follow the safety rules and other
RCS1940 ORIGINAL INSTRUCTIONS. Electric Chainsaw
 RCS940 ORIGINAL INSTRUCTIONS Electric Chainsaw Important! It is essential that you read the instructions in this manual before assembling, operating and maintaining this machine. Subject to technical modification.
78-RK VARIABLE SPEED HEAVY DUTY VIBRATOR OPERATING MANUAL
 78-RK VARIABLE SPEED HEAVY DUTY VIBRATOR OPERATING MANUAL IMPORTANT INSTRUCTIONS WARNING! FOR YOUR SAFETY PLEASE READ INSTRUCTIONS BEFORE OPERATING TOOL & WEAR EYE PROTECTION FD.08/2009 THANK YOU FOR PURCHASING
Cargo Carrier with Ramp 60In.L x 30 1/4In.W.
 Cargo Carrier with Ramp 60In.L x 30 1/4In.W. Owner s Manual WARNING: Read carefully and understand all ASSEMBLY AND OPERATION INSTRUCTIONS before operating. Failure to follow the safety rules and other
A B FZP 6005-E
 FZP 6005-E 3 4 2 3 8 A B FZP 6005-E 5 4 2 1 A 5 A B 8 6 6 7 22 FZP 6005-E 7 8 27 9 30 0 15 0 0 0 8 10 B 9 A 11 A FZP 6005-E 9 12 28 17 13 31 32 19 29 30 10 14 A B 34 15 16 37 32 38 0,6 mm 35 36 FZP 6005-E
Heavy-Duty Aluminum Arched Ramps 10,000-Lb. Capacity Per Pair.
 Heavy-Duty Aluminum Arched Ramps 10,000-Lb. Capacity Per Pair. Owner s Manual WARNING: Read carefully and understand all ASSEMBLY AND OPERATION INSTRUCTIONS before operating. Failure to follow the safety
ELECTRIC CHAINSAW MODEL NO: CECS405B
 WARNING: Read these instructions before using the machine ELECTRIC CHAINSAW MODEL NO: CECS405B PART NO: 3402072 OPERATION & MAINTENANCE INSTRUCTIONS LS0612 INTRODUCTION Thank you for purchasing this Electric
OPERATION MANUAL. A220 Arc Welding Machine. Serial Number: Where Purchase: Date of purchased:
 OPERATION MANUAL A220 Arc Welding Machine Serial Number: Where Purchase: Date of purchased: CONTENT 1.Safety... 2 2. Summary... 4 3. Electrical principle drawing... 5 4. Specifications... 6 5. Operation
72IN. X 9IN. STEEL TRI-FOLD RAMPS (PAIR)
") 72IN. X 9IN. STEEL TRI-FOLD RAMPS (PAIR) OWNER S MANUAL WARNING: Read carefully and understand all ASSEMBLY AND OPERATION INSTRUCTIONS before operating. Failure to follow the safety rules and other basic
72IN. X 9IN. STEEL TRI-FOLD RAMPS (PAIR) OWNER S MANUAL WARNING: Read carefully and understand all ASSEMBLY AND OPERATION INSTRUCTIONS before operating. Failure to follow the safety rules and other basic
VISE MOUNTED. Model 97359
 VISE MOUNTED Small English wheel Model 97359 Set up And Operating Instructions Diagrams within this manual may not be drawn proportionally. Due to continuing improvements, actual product may differ slightly
Aluminum Bi-Fold Pet Ramp
 Aluminum Bi-Fold Pet Ramp 300-Lb. Capacity. Owner s Manual WARNING: Read carefully and understand all ASSEMBLY AND OPERATION INSTRUCTIONS before operating. Failure to follow the safety rules and other
Aluminum Bi-Fold Arched Ramps
 Aluminum Bi-Fold Arched Ramps 3000-Lb. Capacity Per Pair Owner s Manual WARNING: Read carefully and understand all ASSEMBLY AND OPERATION INSTRUCTIONS before operating. Failure to follow the safety rules
INSTRUCTION MANUAL FOR WIRE WELDING MACHINE
 INSTRUCTION MANUAL FOR WIRE WELDING MACHINE IMPORTANT: BEFORE STARTING THE EQUIPMENT, READ THE CONTENTS OF THIS MANUAL, WHICH MUST BE STORED IN A PLACE FAMILIAR TO ALL USERS FOR THE ENTIRE OPERATIVE LIFE-SPAN
Cutlass Fasteners, Inc. 83 Vermont Ave., Unit 6, Warwick, RI Tel: (401) Fax: (401) cutlass-studwelding.com
 Fax: (401) cutlass-studwelding.com") MODEL : PHM-12 ARC WELD GUN PART NO. : PHM-12 (PHM-12-RS) SERIAL NO. : PLEASE READ THIS OPERATION AND MAINTENANCE MANUAL CAREFULLY BEFORE USING YOUR NEW CUTLASS STUD WELDER. COPYRIGHT CFI 2009 email: sales@
MODEL : PHM-12 ARC WELD GUN PART NO. : PHM-12 (PHM-12-RS) SERIAL NO. : PLEASE READ THIS OPERATION AND MAINTENANCE MANUAL CAREFULLY BEFORE USING YOUR NEW CUTLASS STUD WELDER. COPYRIGHT CFI 2009 email: sales@
ENel Sp. z o. o. - WROCŁAW DESIGN AND MANUFACTURE OF POWER ELECTRONIC DEVICES INVERTER WELDING MACHINE ENEL250A USER MANUAL DEALER:
 ENel Sp. z o. o. - WROCŁAW DESIGN AND MANUFACTURE OF POWER ELECTRONIC DEVICES INVERTER WELDING MACHINE ENEL250A USER MANUAL DEALER: . INTRODUCTION This manual contains information that will allow to take
Cutlass Fasteners, Inc. 83 Vermont Ave., Unit 6, Warwick, RI Tel: (401) Fax: (401) cutlass-studwelding.com
 Fax: (401) cutlass-studwelding.com") MODEL : A-58 ARC WELD GUN PART NO. : 602-378A SERIAL NO. : PLEASE READ THIS OPERATION AND MAINTENANCE MANUAL CAREFULLY BEFORE USING YOUR NEW CUTLASS STUD WELDER. COPYRIGHT CFI 2009 email: sales@ PAGE -
MODEL : A-58 ARC WELD GUN PART NO. : 602-378A SERIAL NO. : PLEASE READ THIS OPERATION AND MAINTENANCE MANUAL CAREFULLY BEFORE USING YOUR NEW CUTLASS STUD WELDER. COPYRIGHT CFI 2009 email: sales@ PAGE -
5500-Lb. Capacity Pallet Jack
 5500-Lb. Capacity Pallet Jack Owner s Manual WARNING: Read carefully and understand all ASSEMBLY AND OPERATION INSTRUCTIONS before operating. Failure to follow the safety rules and other basic safety precautions
RCS36X3550HI RCS36B35 ORIGINAL INSTRUCTIONS. Cordless Chainsaw
 RCS36X3550HI RCS36B35 ORIGINAL INSTRUCTIONS Cordless Chainsaw Important! It is essential that you read the instructions in this manual before assembling, operating and maintaining this machine. Subject
self level laser Model Set up And Operating Instructions
 self level laser with multi-beams Model 96959 Set up And Operating Instructions This Self Level Laser may be used with a Tripod (not included). Diagrams within this manual may not be drawn proportionally.
Manual For Log Saw LS500. For Your Safety Read And Understand The Entire Manual Before Operating Machine. Save This Manual For Future Reference
 Manual For Log Saw LS500 For Your Safety Read And Understand The Entire Manual Before Operating Machine. Save This Manual For Future Reference 1. Proper use The firewood drag saw is designed for cross-cutting
Stainless steel rolling cabinet
 Stainless steel rolling cabinet Model 97320 Set up And Operating Instructions Diagrams within this manual may not be drawn proportionally. Due to continuing improvements, actual product may differ slightly
PMA 31-G. English. Printed: Doc-Nr: PUB / / 000 / 00
 PMA 31-G English 1 Information about the documentation 1.1 About this documentation Read this documentation before initial operation or use. This is a prerequisite for safe, trouble-free handling and
SQ-1 ROOF TRUSS WEG-IT TABLE
 WEG-IT Steel Top Table SQ1 Service SQ-1 ROOF TRUSS WEG-IT TABLE Operators Manual FOREWORD This manual explains the proper maintenance of Square 1 Design Roof Truss WEG-IT Table as well as periodic inspection
HEAVY DUTY WELDING CART
 HEAVY DUTY WELDING CART 43615 ASSEMBLY AND OPERATING INSTRUCTIONS 3491 Mission Oaks Blvd., Camarillo, CA 93011 Visit our Web site at http://www.harborfreight.com Copyright 2000 by Harbor Freight Tools.
LOAD RAMP 1000 LB. CAPACITY
 LOAD RAMP 1000 LB. CAPACITY 55424 ASSEMBLY AND OPERATING INSTRUCTIONS Safely roll Dirt Bikes and more into your Pickup! 3491 Mission Oaks Blvd., Camarillo, CA 93011 Visit our Web site at http://www.harborfreight.com
CPT 60 Powerfloat. User & Safety Instructions
 CPT 60 Powerfloat User & Safety Instructions This handbook contains operating and maintenance instructions for the Refina CPT60 Power float Please keep it in a safe place. You may need to refer to it at
Royal Sovereign RSL 2701 Laminator
 Royal Sovereign RSL 2701 Laminator Instruction Manual Provided By http://www.mybinding.com http://www.mybindingblog.com TABLE OF CONTENTS Introduction -----------------------------------------------------------------------------------
DIE CAST ALUMINUM & THERMOPLASTIC SUMP PUMP
 INSTRUCTION MANUAL DIE CAST ALUMINUM & THERMOPLASTIC SUMP PUMP Vertical Switch Models WSSP3V 1/3 HP WSSP5V 1/2 HP Tethered Switch Models WSSP3 1/3 HP WSSP5 1/2 HP WARRANTY: PRODUCT DEFECTS COVERED 12 MONTHS
1-300 SERIES Endover Rotator Operator s Manual for Morse End-Over-End Drum Rotators Series
 Contents Page Receiving Procedures.................... 1 Warranty............................. 1 Safety Information..................... 1-2 Machine Description................... 3 Operating Instructions....................
Owner s Manual & Safety Instructions
 Owner s Manual & Safety Instructions Save This Manual Keep this manual for the safety warnings and precautions, assembly, operating, inspection, maintenance and cleaning procedures. Write the product s
USER MANUAL TOOLGRINDER FME-TG-01
 USER MANUAL TOOLGRINDER FME-TG-01 TABLE OF CONTENTS 1. GENERAL INFORMATION 3 1.1 Machinery Information 3 1.2 IIB-Marking 4 2. INTRODUCTION 5 2.1 Staff 5 2.2 Individual Means Of Protection 6 2.3 Workplace
Blender. Instruction Manual
 Blender Model BL-020B Instruction Manual Version 1 3115 Pepper Mill Court, Mississauga, ON, L5L 4X5 4450 Witmer Industrial Estates, Unit 4, Niagara Falls, NY, 14305 1-800-465-0234 www.omcan.com Table of
INVERTER ARC WELDER. 120 Amp WARRANTY INSTRUCTION MANUAL SPECIFICATIONS. ozito.com.au IWR-120 WHAT S IN THE BOX
 MIN 120A WHAT S IN THE BOX INVERTER ARC WELDER 120 Amp INSTRUCTION MANUAL SPECIFICATIONS Welding Current: Arc Electrode Size: Duty Cycle: Weight: ozito.com.au 20-120A 1.6-3.2mm 20%@120A (24.8V) DC 60%@69A
Telescoping Pole Saw/Chainsaw Model: 52959
 Telescoping Pole Saw/Chainsaw Model: 52959 CALIFORNIA PROPOSITION 65 WARNING: You can create dust when you cut, sand, drill or grind materials such as wood, paint, metal, concrete, cement, or other masonry.
Operation Manual. 120V Lithium Ion Cordless Chainsaw MODEL #
 120V Lithium Ion Cordless Chainsaw MODEL # 106493 Operation Manual This safety alert symbol identifies important safety messages in this manual. Failure to follow this important safety information may
SQ-1 INTELLIGENT ROOF
 SQ-1 INTELLIGENT ROOF ROOF TRUSS TABLE With Intelligent Gantry. Zone Eject Automated Jigging TRUSS TABLE Operators Manual FOREWORD This manual explains the proper maintenance of Square 1 Design Roof Truss
1 YEAR FROM DATE OF PURCHASE
 INSTRUCTION MANUAL CAST IRON SUMP PUMP WSSPC5V 1/2 HP WARRANTY: PRODUCT DEFECTS COVERED 1 YEAR FROM DATE OF PURCHASE. RECEIPT AND PRODUCT DATE CODE REQUIRED FOR WARRANTY CLAIM. This pump is controlled
INSTRUCTION MANUAL WARNING: BEFORE USING THE MACHINE READ THE INSTRUCTION MANUAL CAREFULLY!
 INSTRUCTION MANUAL WARNING: BEFORE USING THE MACHINE READ THE INSTRUCTION MANUAL CAREFULLY! SECTION 1 : PRODUCT AND COMPANY IDENTIFICATION PRODUCT NAME : SYNONYMS : PRODUCT CODES : Weldability ARC140i
Owner s Manual & Safety Instructions
 Owner s Manual & Safety Instructions Save This Manual Keep this manual for the safety warnings and precautions, assembly, operating, inspection, maintenance and cleaning procedures. Write the product s
General Safety. Safety Instructions All Operators Must Read These Instructions Before Use. General Safety WARNINGS! SAVE THESE INSTRUCTIONS
 OPERATOR S MANUAL R ELECTRIC WOOD CHIPPER + SHREDDER 15-AMP 17:1 REDUCTION RATIO A Division of Snow Joe, LLC Model CJ602E Form No. SJ-CJ602E-880E-MR1 IMPORTANT! Safety Instructions All Operators Must Read
Industrial flue gas probes. Instruction manual
 Industrial flue gas probes Instruction manual 2 1 Contents 1 Contents 1 Contents... 3 2 Safety and the environment... 4 2.1. About this document... 4 2.2. Ensure safety... 4 2.3. Protecting the environment...
Operator s Manual Model ARC Amp DC Welder
 Operator s Manual Model ARC200 200 Amp DC Welder WARNING: Do not assemble, install, or operate this equipment without reading ALL of this manual and the safety precautions and warnings illustrated in this
OPERATOR S MANUAL Model 56A Prefeed / Dereeler
 110 Fairgrounds Drive P.O. Box 188 Manlius, NY 13104-0188 USA 315.682.9176 FAX: 315.682.9160 OPERATOR S MANUAL Model 56A Prefeed / Dereeler PRODUCTION WIRE PROCESSING EQUIPMENT Website: www.carpentermfg.com
Proweld Equipment Owner & Maintenance Manual FIELD 12 TRENCH (Widos 4900)
") Proweld Equipment Owner & Maintenance Manual FIELD 12 TRENCH (Widos 4900) 35 Green Street, PO Box 653, Malden, MA 02148 Tel: (781) 321-5409 - Fax (781) 321-4421 - Toll Free: (800) 343-3618 www.asahi-america.com
Proweld Equipment Owner & Maintenance Manual FIELD 12 TRENCH (Widos 4900) 35 Green Street, PO Box 653, Malden, MA 02148 Tel: (781) 321-5409 - Fax (781) 321-4421 - Toll Free: (800) 343-3618 www.asahi-america.com
15-AMP ELECTRIC WOOD CHIPPER + SHREDDER Model CJ602E
 15-AMP ELECTRIC WOOD CHIPPER + SHREDDER Model CJ602E Form No. SJ-CJ602E-880E-M A Division of Snow Joe, LLC OPERATOR S MANUAL IMPORTANT! Safety Instructions All Operators Must Read These Instructions Before
FLARING MACHINE MAINTENANCE & INSTRUCTIONS MANUAL. Allswage UK. Roebuck Street, West Bromwich, B70 6RB
 FLARING MACHINE MAINTENANCE & INSTRUCTIONS MANUAL A. WARRANTY AND RESPONSIBILITY Warranty: It's the supplier's responsibility to guarantee the conformity of the product, assuring that it's manufactured
INSTALLATION AND OPERATION MANUAL
 PLEASE READ THE ENTIRE CONTENTS OF THIS MANUAL PRIOR TO INSTALLATION AND OPERATION. BY PROCEEDING YOU AGREE THAT YOU FULLY UNDERSTAND AND COMPREHEND THE FULL CONTENTS OF THIS MANUAL. FORWARD THIS MANUAL
PORTABLE GARAGE CAR CANOPY
 PORTABLE GARAGE CAR CANOPY 40544 ASSEMBLY INSTRUCTIONS 3491 Mission Oaks Blvd., Camarillo, CA 93011 Copyright 1999 by Harbor Freight Tools. All rights reserved. No portion of this manual or any artwork
Operator s Manual for Morse Kontrol-Karrier with Spark Resistant Parts and Air Power Tilt
 Contents Page Receiving Procedures.................... 1 Warranty............................. 1 Safety Information..................... 1-2 Machine Description................... 2 Assembly Instructions..................
OWNERS OPERATING MANUAL
 OWNERS OPERATING MANUAL CONGRATULATIONS ON YOUR PURCHASE OF A QUALITY WELDCORP WELDER MANUFACTURED IN ITALY, IT WILL PROVIDE YEARS OF RELIABLE OPERATION. TABLE OF CONTENTS SAFETY INSTRUCTIONS Page 4 INVERTER
Wealtec Corp. E-Centrifuge Microcentrifuge Operation Manual. Version 3.0 Item # *This instrument is intended for laboratory use only
 Wealtec Corp. E-Centrifuge Microcentrifuge Operation Manual Version 3.0 Item # 03010-1 *This instrument is intended for laboratory use only http://www.wealtec.com E-mail: support@wealtec.com Packing List
OPERATOR S MANUAL. LINKIT Series LKS300/LKS450 Portable Conveyor. InterQuip USA LLC interquip.net DISTRIBUTED BY: OPERATOR S MANUAL
 OPERATOR S MANUAL LINKIT Series LKS300/LKS450 Portable Conveyor DISTRIBUTED BY: InterQuip USA LLC 203.322.2600 interquip.net 1 IMPORTANT Read, understand and obey these safety rules and operating instructions
USER MANUAL BR LED Headlight Rev /05/2016
 www.optomic.com OP-HL15 LED HEAD LAMP 0. Index 0. INDEX... 2 1. WARNINGS... 3 1.1. QUALIFIED TECHNICAL PERSONNEL... 4 2. NOMENCLATURE... 5 3. APPLICATIONS... 6 4. MAIN CHARACTERISTICS... 7 5. OPERATION...
HORSE SHELTERS 6, 12, 15, 18, & 24 SHELTERS ASSEMBLY MANUAL
 HORSE SHELTERS 6, 12, 15, 18, & 24 SHELTERS ASSEMBLY MANUAL Read this manual before using product. Failure to follow instructions and safety precautions can result in serious injury, death, or property
Owner s Manual & Safety Instructions
 Owner s Manual & Safety Instructions Save This Manual Keep this manual for the safety warnings and precautions, assembly, operating, inspection, maintenance and cleaning procedures. Write the product s
ENGLISH Compact Half Coupler 50 mm, SWL: 50 kg
 MANUAL ENGLISH Compact Half Coupler 50 mm, SWL: 50 kg V3 Highlite International B.V. Vestastraat 2 6468 EX Kerkrade the Netherlands Table of contents Warning... 2 Safety Instructions... 2 Operating Determinations...
OPERATOR S SAFETY MANUAL
 June 2011 OPERATOR S SAFETY MANUAL Sumner Pipe Jacks www.sumner.com 7514 Alabonson Road Houston, TX 77088 U.S.A ph: 281.999.6900 fax: 281.999.6966 470 Collier MacMillan Drive Unit 2 & 3 Cambridge, ON N1R
X-Series System Manual Part 2: General safety notes
 X-Series System Manual Part 2: General safety notes Version check: Version No. Date Version 3.1 April 2012 Version 3.0 April 2011 Version 1.0 October 2007 Mettler-Toledo Garvens GmbH Kampstrasse 7 31180
PE45 AMAZON MONKEY BARS OWNER'S MANUAL
 PE45 AMAZON MONKEY BARS OWNER'S MANUAL WARNING! The disassembled product may contain small parts which pose a choking hazard to children under 3. IMPORTANT: This product may contain sharp points and small
DJ Switch 10F V2 ORDERCODE 50365
 DJ Switch 10F V2 ORDERCODE 5035 Congratulations! You have bought a great, innovative product from Showtec. The Showtec DJ Switch brings excitement to any venue. Whether you want simple plug-&-play action
INSTALLATION AND OPERATION MANUAL
 Pneumatic Wheel Lift Model: RWL-50T REV. A PLEASE READ THE ENTIRE CONTENTS OF THIS MANUAL PRIOR TO INSTALLATION AND OPERATION. BY PROCEEDING YOU AGREE THAT YOU FULLY UNDERSTAND AND COMPREHEND THE FULL
WISCONSIN WOODLANDS. Getting Ready Safety Equipment. Adjusting chain tension G3205
 - G3205 WISCONSIN WOODLANDS The chain saw is a versatile and efficient tool, but many accidents result from its improper use. This publication covers the fundamentals of safe tree harvesting with a chain
HRO-50 Water Purifier
 HRO-50 Water Purifier Product Installation & Operation Manual Honeywell Environmental & Combustion Controls (Tianjin) Co., Ltd. Content Important Notes P2 Product Functions P3-P5 Installation Instructions
POWER PINNER BENCH HAND WELDER 7250 OPERATOR S MANUAL
 POWER PINNER BENCH HAND WELDER 7250 OPERATOR S MANUAL Copyright: November 20, 2018 Revised: Serial No. Gripnail Corporation An Employee Owned Company 97 Dexter Road East Providence, Rhode Island 02914-2045
OCS1825BL. ORIGINAL INSTRUCTIONS Cordless Chainsaw
 OCS85BL ORIGINAL INSTRUCTIONS Cordless Chainsaw Important! It is essential that you read the instructions in this manual before assembling, operating and maintaining the product. Subject to technical modification.
OVERLOAD OFF. Peak Current: Earth Clamp WARRANTY WARNING
 WHAT S IN THE BOX OVERLOAD ON ARC WELDER 140 Amp INSTRUCTION MANUAL OVERLOAD ON Arc Welder SPECIFICATIONS Arc Electrode Holder Input Voltage: Current Range: Peak Current: Duty Cycle: Electrode Size: 240V
Instruction Manual ODY-1765
 INSPIRING IMAGINATION Instruction Manual ODY-1765 We hope you enjoy your purchase of the Stealth NX-2 Drone and use this Instruction Manual to get your drone to take off! Included Contents 1. Stealth NX-2
ELECTRIC SILENT WOOD CHIPPER + SHREDDER 15-AMP 1.7-INCH 21:1 REDUCTION RATIO
 OPERATOR S MANUAL R ELECTRIC SILENT WOOD CHIPPER + SHREDDER 15-AMP 1.7-INCH 21:1 REDUCTION RATIO A Division of Snow Joe, LLC Model CJ603E Form No. SJ-CJ603E-880E-M IMPORTANT! Safety Instructions All Operators
Tomato Squeezer. Instruction Manual
 Tomato Squeezer Models 9008N (9107N), 9004N (9103N) and 9000N (9101N) Instruction Manual Version 1 3115 Pepper Mill Court, Mississauga, ON, L5L 4X5 4450 Witmer Industrial Estates, Unit 4, Niagara Falls,