Installation Guide. Danfoss ECmat Aqua. electricheating.danfoss.com
|
|
|
- Leonard Peters
- 6 years ago
- Views:
Transcription

1 electricheating.danfoss.com
2 Table of Contents 1 Product specifications Potential application examples Installation instructions Initial planning Preparation and cleaning Laying the mat Intermediate test Covering & final test Danfoss VIEGG102
3 1 Product specifications is a hot-water floor heating mat with low construction height (approximately 10 mm), which makes it especially suitable for renovation jobs in existing buildings. The capacity of your installation is strongly dependent on the capacity of the circulation pump. Please consult your plumber to determine the capacity of your heating system. Each room with floor heating should be equipped with its own thermostatic room temperature control, such as a Danfoss RTL valve with TH function (not included). UK 1.1 Potential application examples Surface Substrate Floor leveling compound Timber flooring (parquet, boarding) or on existing thermal insulation Load distribution mat, min. 9 mm, glued (not screwed) Construction height min. 13 mm, including pipe Laid in staggered sections Anhydride screed Load distribution mat, min. 9 mm, glued (not screwed) Construction height min. 28 mm, including pipe Laid in staggered sections Substrate Surface Floor leveling compound Anhydride screed Primer Primer Screed, concrete, stone, etc. Construction height min. 13 mm, including pipe Construction height min. 28 mm, including pipe Laid in staggered sections Laid in staggered sections Please note! Consult your plumber for any work on your existing heating system. They have the necessary experience and will be pleased to assist you Remember to fit expansion joints at the junctions of heated and unheated areas Proper thermal insulation of the substrate enhances the performance of Danfoss ECmat Aqua. Take suitable measures before installation. Danfoss VIEGG102 3
4 0,5 м Plan: Date: 4 Danfoss VIEGG102
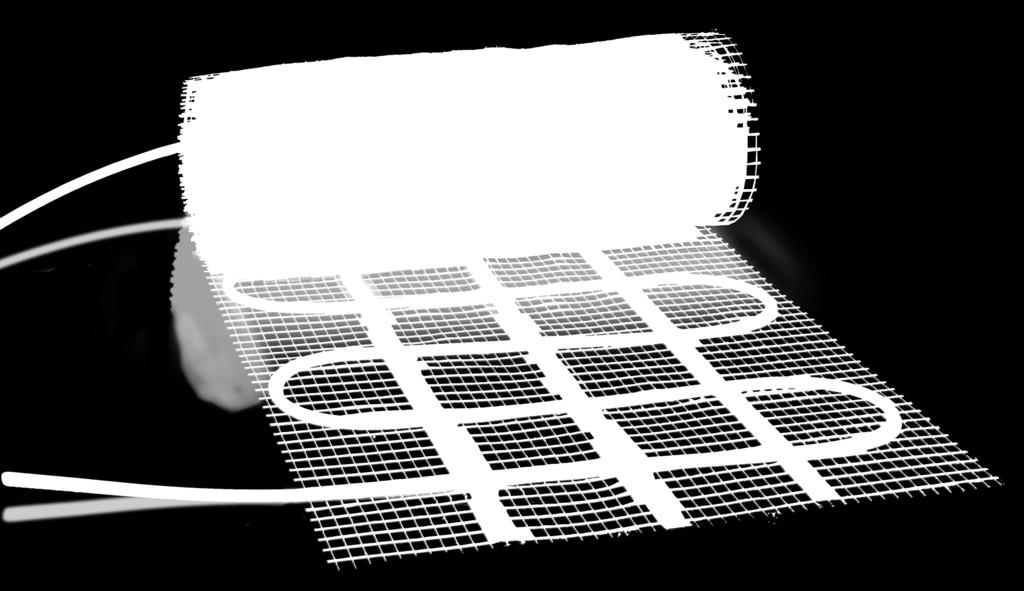
5 2 Installation instructions Congratulations on the purchase of your new Danfoss product Please observe the following installation guidelines in order to obtain good results and longterm trouble-free operation. UK 2.1 Initial planning Please take the manufacturer s data into consideration with regard to subsequent covering of the heating mat with floor levelling compound, screed or the like. The selected materials must be suitable for use on top of a floor heating system and should have a certain degree of elasticity Installation is considerably simplified if the fitting location for control is specified in the planning stage. The control and accessories, such as the manifold, should remain easily accessible after installation. Plan: Follow the Danfoss installation instructions step by step. This will avoid any problems during mat installation and adjustment. Sketch the floor plan of your room on the mat sheet (Figure 1) Draw your mat (width 48 mm) on the floor plan with a separation of 2 cm between the runs. The woven glass net can be cut as necessary to change directions (Figure 2). Figure 1 Figure 2 Transfer the markings from your drawing to the floor so you can see exactly where you should start and stop 2.2 Preparation and cleaning Before installing the heating mat, you must prepare the floor surface (Figure 3). The substrate must be level, structurally sound, and free from dust, grease and oil. Danfoss VIEGG102 5
6 You should preferably start laying the heating mat close to the connection point. All connections should remain readily accessible afterwards. Always connect the RTL valve (not included) to the end of the hose (supply line), not to the start. Figure 3 It may be necessary to apply a bonding agent (primer), depending on the substrate. This ensures proper bonding of the heating mat. If you use an RTL control with TH function to adjust the room temperature, install the RTL valve (not included) ahead of the heating mat (see the installation instructions for Danfoss controls). 2.3 Laying the mat Remove the protective film from the mat and roll it out according to your floor plan, with the selfadhesive side facing down (Figure 4). Figure 5a Figure 4 When you encounter an obstacle (wall, cabinet, toilet, end of the room, etc.), cut the woven glass net (but not the pipe) and continue laying in another direction (Figures 5a & 5b). The length of the pipe attached to woven mat has been selected to match the required connection length. The pipe length is calculated to ensure that in the worst case, you can always return the pipe along the same path as you used when rolling out the mat. You can use the pipe couplings and angle connectors available as accessories to replace a damaged pipe section or extend a pipe that is too short, if necessary. 6 Danfoss VIEGG102
7 Before lengthening the pipe, you should obtain the approval of your plumber. Note that when more than one mat is installed, all mats must be the same size. Examples: 5 m² = 2 x 2.5 m², corresponding to 2 x 3 m² (mats must be shortened) UK 6 m² = 2 x 3 m², corresponding to 2 x 3 m² (packing unit) 7 m² = 3 x 2.33 m², corresponding to 3 x 3 m² (mats must be shortened) Figure 5b If you intend to install several Danfoss ECmat Aqua mats in the same room, you must select the right distributor in advance. Distributors are available for installation of a single mat as well as for installation of two or three mats. At this point you should have arrived at the manifold with the ends of the connecting lines. Cut the pipes to length with straight, unchamfered and burr-free edges. This is necessary to ensure secure fitting of the connector components. Note: Push the ends of the connecting lines into the manifold until they reach the stop. Attached pipes can be disconnected by slightly lifting the locking ring. This intelligent technology eliminates the need for tools. 2.4 Intermediate test After completing all the installation steps, you should recheck the entire procedure. The piping of the mat should now become warm. Check that all parts have been installed or connected properly. Are all connectors firmly secured? Start up your heating system again with the RTL valve (not included) closed. After slowly filling the system with water, check all connections and joints for leaks (visually or by touch). Correct any installation errors by following the above procedure, and then repeat the leak test. If everything is okay, close the RTL valve (not included) for the Danfoss ECMat Aqua. (See also the installation instructions for Danfoss controls.) This intermediate test must be performed before the mat is covered with floor levelling compound or screed. Danfoss VIEGG102 7
8 2.5 Covering & final test After the mats have been laid as desired, press them firmly against the floor again to ensure good adhesion. the manufacturer s data for the materials that are used (Figures 6 & 7). Figure 6 Then cover the mats with an elastic levelling compound, levelling filler or the like. Observe Figure 7 The floor heating should be switched off during the curing phase. 8 Danfoss VIEGG102
9 UK Produced by Danfoss 09/2015 VIEGG102 9
10 10 Produced by Danfoss 09/2015 VIEGG102
11 UK Produced by Danfoss 09/2015 VIEGG102 11
12 Danfoss A/S Electric Heating Systems Ulvehavevej Vejle Denmark Phone: Fax: Danfoss can accept no responsibility for possible errors in catalogues, brochures and other printed material. Danfoss reserves the right to alter its products without notice. This also applies to products already on order provided that such alterations can be made without subsequential changes being necessary in specifications already agreed. All trademarks in this material are property of the respective companies. DEVI and the DEVI logotype are trademarks of Danfoss A/S. All rights reserved. 12 Danfoss VIEGG10M
Indoor Heating Applications Mats and cables
 MAKING MODERN LIVING POSSIBLE Installation Guide Indoor Heating Applications Mats and cables www.heating.danfoss.com Table of Contents 1 Introduction.................................................. 3
Ultra slim mats, only 3.5mm in height, ensure the ECmat is suitable for virtually any new build or renovation project.
 Electric Underfloor Heating The safe choice in underfloor heating Ready to lay and easy to use the EC range offers a luxurious, and reliable solution to electric underfloor heating Ultra slim mats, only
DEVImat and DEVIflex Indoor Heating Applications DSVF DTIF DTIR DTCE
 Intelligent Heating Installation Guide DSVF DTIF DTIR DTCE www.devi.com 0 Index 1 Introduction................................................ 1 1.1 Safety Instructions........................................
The Unique Click System in Electric Floor Heating. Devidry - The Click System in Floor Heating
 Devidry - The Click System in Floor Heating The Unique Click System in Electric Floor Heating With Devidry fitting of electric floor heating is even more simple. The Click System Electric Floor Heating
Channel Drain Shower Base. Aqua Line pro. Installation Instructions
 Channel Drain Shower Base. Aqua Line pro Installation Instructions 02 JACKOBOARD Aqua Line pro System components a JACKOBOARD Aqua Line pro b JACKOBOARD Aqua Line pro - Horizontal Drain (Art. No. 4510370)
Ice and snow melting Pavements, roads and ramps
 Installation Guide Ice and snow melting Pavements, roads and ramps electricheating.danfoss.com Table of Contents 1 Introduction.................... 3 1.1 Safety Instructions...............3 1.2 Installation
Outdoor Heating Applications Mats and cables
 MAKING MODERN LIVING POSSIBLE Installation Guide Mats and cables www.heating.danfoss.com Tabel of Contents Introduction................................................... Safety Instructions...........................................
Heating cables in concrete Concrete > 3 cm
 Installation Guide Heating cables in concrete Concrete > 3 cm electricheating.danfoss.com Table of contents 1 Introduction.................... 2 1.1 Safety Instructions...............2 1.2 Installation
Premium Electric Underfloor Heating Mat
 Premium Electric Underfloor Heating Mat Installation Instructions IMPORTANT SAFEGUARDS WHEN USING ANY ELECTRICAL APPLIANCE, BASIC SAFETY PRECAUTIONS SHOULD ALWAYS BE FOLLOWED. PLEASE READ ALL INSTRUCTIONS
Veria Quickmat 1C 100/150W/m²
 Veria Quickmat 1C 100/150W/m² Installation guide Installationsanleitung Navodila za montažo Руководство по установке Instalãcija Instrukcija Manuel d installation Manuale di installazione Installatiehandleiding
Cofloor Dry-build system
 Technical information Description: The Oventrop dry-build system Cofloor is co-ordinated for use in living areas, offices and business premises. The system components offer different options for an individual
Roth Compact system. German quality since Installation 1/6
 Roth Compact system Installation German quality since 1947 1/6 Installation, Roth Compact system Description The Roth Compact system is specially developed for the installation of underfloor heating where
On load-bearing floors with LK Slotted Board EPS 16
 On load-bearing floors with Design LK Under Floor Heating using LK Slotted Board EPS 16 is for laying on a load-bearing floors only; giving exceptionally low construction height. The product is intended
Installation instruction Danfoss Reflect - EFCI Dry
 Installation instruction Danfoss Reflect - EFCI Dry GB Technical data: Construction Polystyren with aluminium U value 3 W/(m²*K) Size 50 x 100 cm Thickness 13 mm Alu. thickness 0,8 mm Insulation 12 mm
Thermotube. Installation Guide YOUR STEP-BY-STEP GUIDE TO THE PERFECT INSTALLATION
 PLEASE ENSURE YOU HAVE READ AND FULLY UNDERSTOOD THIS GUIDE BEFORE INSTALLATION Thermotube Installation Guide YOUR STEP-BY-STEP GUIDE TO THE PERFECT INSTALLATION STOCK NO 100 INSTALLATION GUIDE: THERMOTUBE
Installation Instructions
 GB/DAS Installation Instructions devimat DSVK-300 deviflex DSVK-25 single-conductor heating cable for asphalt intelligent varme Notes deviflex DSVK heating cable and devimat deviflex and devimat DSVK heating
Electric Underfloor Heating EVERYTHING TO KNOW YOU NEED. Pocket Guide
 Electric Underfloor Heating EVERYTHING YOU NEED TO KNOW Pocket Guide Overview Electric underfloor heating (AKA dry systems) There are 2 main types of electric underfloor heating systems; loose cables and
Safe-t-WIRE Installation Guide
 CONFIGURATION NOTES While the installation procedure for the heating elements is usually to a set configuration, it may be necessary to depart from this in some instances. Illustrated below, are some alternative
ThermMAT. Please read these instructions in conjunction with the Guarantee Card enclosed with your ThermFloor heating system.
 Installation Instructions ThermMAT ThermMAT is suitable for a wide range of floor coverings ceramic, slate, terracotta, porcelain, marble, stone or limestone. A ThermMAT electrical underfloor heating system
premium click optimum click
 5 golden rules Install your floor between 18 and 30 C. 48h Pergo Vinyl must be acclimatized in the room of installation between 18-30 (64-86 F) for a period of at least 48 hours before installation. This
Heating. Product Selection Guide
 UNderfloor Heating Product Selection Guide First floor Mat160 Warm Floor Luxury More and more homes are enjoying the luxury of warm floors in bathrooms, kitchens, conservatories or any where else in the
premium click optimum click
 1 In order to obtain a good result, we advise to follow all given instructions carefully. PREPARATION We recommend to order all panels for the same flooring project at the same time. 2 Always store and
Dow - Building Solutions. Professional Roofing Adhesive
 Dow - Building Solutions Professional Roofing Adhesive INSTA-STIK the portable roofing adhesive INSTA-STIK roofing adhesive for professionals has been developed for the attachment of insulation boards
TECHNICAL BULLETIN TB029
 TECHNICAL BULLETIN TB029 TB029.012 Ardex Australia 2003-2016 ARDEX K15, K80, K12N, K120, K220 & K55 OVER HEATED CONCRETE & ARDITEX NA ON TIMBER OR COMPRESSED FIBRE-CEMENT SUBFLOORS EXISTING IN SLAB & SELECTED
INSTALLATION INSTRUCTIONS FOR WICANDERS 2G FLOORS
 INSTALLATION INSTRUCTIONS FOR WICANDERS 2G FLOORS GENERAL INFORMATION Wicanders 2G floors are intended for indoor use only. Please read the following instructions before installation. Store planks at room
1. PREPARATION 2. INSTALLATION 3. FINISHING 4. MAINTENANCE
 In the following text vinyl floor(s) refers to floors from the Quick-Step Livyn Ambient Glue+ and Balance Glue+ collections. The branded accessories refer to the specific Quick-Step vinyl accessories.
Use a special underlay above 45 C. Click-it! Never use a hammer or tapping block. Keep indoor climate conditions above 0 C.
 GOLDEN RULES 8-0 C Install your fl oor between 8 and 0 C. Quick-Step Livyn must be acclimatized in the room of installation between 8-0 C (- 8 F) for a period of at least 8 hours before installation. This
optimum glue Preparation INSTALLATION INFORMATION We recommend to order all panels for the same commercial flooring project at the same time.
 Preparation We recommend to order all panels for the same commercial flooring project at the same time. Always store and transport your vinyl floor carefully to prevent distortions. Store and transport
RMF Intercell. NBS Specification 2013 K41
 RMF Intercell NBS Specification 2013 K41 InterfaceFLOR BV. K41 Specification 40mm, 60mm, 80mm, 90mm and 110mm K41 Raised access floors To be read with Preliminaries/ General conditions. TYPES OF RAISED
TECHNICAL BULLETIN TB029
 TECHNICAL BULLETIN TB029 TB029.013 ARDEX Australia 2003-2018 ARDEX K15, K80, K12N, K120, K220 & K55 OVER HEATED CONCRETE & ARDITEX NA ON TIMBER OR COMPRESSED FIBRE-CEMENT SUBFLOORS EXISTING IN SLAB, HOT
Installation Guide. Ice and snow melting. Pavements, roads and ramps. Intelligent solutions with lasting effect. Visit DEVI.com
 Installation Guide Ice and snow melting Pavements, roads and ramps Intelligent solutions with lasting effect Visit DEVI.com Table of Contents 1 Introduction.................... 3 1.1 Safety Instructions...............3
Underfloor Heating. BS8425 Code of Practice for Installation of Laminate Floorcoverings and the Code of Practice issued by the
 Underfloor Heating Overview Underfloor heating (UFH) is now an appealing and potentially cost-effective source of heating, hence its increased popularity within the UK market. The type of floorcovering
Solid Floor Systems. Underfloor heating for solid or screeded floors. Clip rail and staple system. Red Floor Panel
 Solid Floor Systems System shown: Red Floor Panel Underfloor heating for solid or screeded floors Predominately installed in new build or renovation where a floor requires excavation - Polypipe Underfloor
HEATING FLOOR WOOD CARPET VINYL. Excellence in heating solutions.
 HEATING FLOOR WOOD CARPET VINYL Excellence in heating solutions. Hard wearing foil for a long lasting installation and efficient heat transfer Accessible cable loops for easy cut and return style installation
LivingHeat THE UNDERFLOOR HEATING EXPERTS
 LivingHeat THE UNDERFLOOR HEATING EXPERTS Bringing Heat To Life VB0617 For Use Under Tiles Stone Wood Laminate Carpet Vinyl Concrete 01803 316060 www.livingheat.co.uk FITTING INSTRUCTIONS Welcome To The
TILING SPECIFICATIONS
 TILING SPECIFICATIONS SPECIFICATION NUMBER: NR204-16 PREPARED BY: Mike Cubley PREPARED FOR: Porcelain Plus ATTENTION: Kirk Pollock INSTALLATION: 712 Turner Floor and Wall Tiling Specification. M40 STONE/
INSTALLATION INSTRUCTIONS FOR WICANDERS 5G-C FLOORS
 INSTALLATION INSTRUCTIONS FOR WICANDERS 5G-C FLOORS GENERAL INFORMATION Wicanders 5G-C floors are intended for indoor use only. Please read the following instructions before installation. Store planks
Most products will act differently when installed over an UFH system than when installed on a standard unheated subfloor.
 Guidance Note on Underfloor Heating DRAFT FOR COMMENT Overview Underfloor heating (UFH) is now an established and appealing and potentially cost effective source of heating, hence its increased popularity
INSTALLATION INSTRUCTIONS
 INSTALLATION INSTRUCTIONS INSTALLATION INSTRUCTIONS FOR MIKASA TM REAL WOOD FLOORS These instructions are for all MIKASA TM real wood flooring products made using - - a unique and proven glue - less mechanism
AmberMat. Installation Manual
 AmberMat Installation Manual Thank you for investing in our Amber underfloor heating system In this instruction manual you will find important information regarding the installation of your underfloor
GUIDE TO DUKKABOARD AQUA 77
 GUIDE TO DUKKABOARD AQUA 77 Dukkaboard Telephone 08701 271300 support@dukkaboard.com www.dukkaboard.com Dukkaboard 2013 Issue DK1 11.13 E & OE For a totally waterproof solution, choose Dukkaboard tile
Nu-Heat UNDERFLOOR & RENEWABLES
 UNDERFLOOR HEATING UNDERFLOOR & RENEWABLES 14mm Fastflo with low profile diffuser panels in a floating floor with Knauf board Supplied by 14mm Fastflo tubing TriPanel 25mm EHD polystyrene Heat transfer
INSTALLATION INSTRUCTIONS FOR HYDROCORK AS GLUE DOWN
 INSTALLATION INSTRUCTIONS FOR HYDROCORK AS GLUE DOWN GENERAL INFORMATION Hydrocork floors are intended for indoor use only. Please read the following instructions before installation. PRIOR TO INSTALLATION
Installation Instructions. deviflex heating cables deviflex DTIP-8 and DTIP-10 for thin floors, wooden floors and frost protection of pipes
 Installation Instructions deviflex heating cables deviflex DTIP-8 and DTIP-10 for thin floors, wooden floors and frost protection of pipes Ž Notes deviflex DTIP-8 and DTIP-10 heating cables deviflex DTIP-8
Under Tile Heating Mat Installation Instructions
 Under Tile Heating Mat Installation Instructions Under Tile Heating Mat ambi-heat brand manufactured by Thermopads Before you begin installing please read through these instructions carefully & check that
INSTALLATION. The no mess, fast and easy, Peel & Stick flooring underlay and installation system... Quick Glance - Features and Benefits
 The no mess, fast and easy, Peel & Stick flooring underlay and installation system... Ezy-Install is a new, environmentally friendly, acoustic underlay and flooring installation system with a unique Peel
Insulation Adhesive The fast and reliable solution for bonding insulation materials
 Insulation Adhesive The fast and reliable solution for bonding insulation materials Icopal Insulation Adhesive Icopal Insulation Adhesive offers optimum application properties and ensures perfect results.
FERMACELL DRY FLOORING ELEMENTS: IMPROVED LIVING CONDITIONS THROUGH BETTER ACOUSTIC AND THERMAL INSULATION. Dry Lining
 DRY FLOORING ELEMENTS: IMPROVED LIVING CONDITIONS THROUGH BETTER ACOUSTIC AND THERMAL INSULATION Dry Lining DRY FLOORING ELEMENTS: FOR NEW BUILD AND REFURBISHMENT, FOR SOLID AND TIMBER FLOORS No more creaking
CHAPTER 10: Finishes CONTENTS 10.1 PLASTERWORK 10.2 SECOND AND THIRD FIX FINISHES. Chapter 10
 CONTENTS 10.1 PLASTERWORK 10.2 SECOND AND THIRD FIX FINISHES 283 Chapter 10 FUNCTIONAL REQUIREMENTS FUNCTIONAL REQUIREMENTS 10.1 PLASTERWORK Workmanship i. All workmanship must be within the tolerances
Underfloor heating for solid screeded floors
 Solid Floor Systems Solid Floor Systems All systems Solid floor systems are compatible with our 15mm, 16mm and 18mm pipe ranges. Polypipe Underfloor Heating Systems can be used with the following solid
CHAPTER 10: Finishes CONTENTS 10.1 PLASTERWORK ND AND 3 RD FIX FINISHES
 CONTENTS 10.1 PLASTERWORK 10.2 2 ND AND 3 RD FIX FINISHES FUNCTIONAL REQUIREMENT 10.1 Plasterwork Workmanship Design Technical Manual TS-011-09-010412 i. All workmanship must be within defined tolerances
INSTALLATION MANUAL. Cable and mains connection junction boxes are not provided by us and should be obtained from your installing electrician.
 INSTALLATION MANUAL EP warmfloor is a 24 Volt under floor heating system that is connected to the mains electricity via a transformer. The heating elements are made of carbon impregnated polyethylene which
Sticky Mat Installation Instructions
 Sticky Mat Installation Instructions Ambient Brand Premium Range Before you begin installing please read through these instructions carefully & check that you have all the components required. The system
Installation Engineered Flooring
 VERSION 2.161027 woodandbeyond.com The installation method will be determined by the type of flooring you are buying and also by the type of sub floor you have. There are 3 common categories for subflooring:
Bluethermal Underfloor Heating Mat
 Bluethermal Underfloor Mat Energy efficient Maintenance free Zone controllable Easy to install adhesive mats Offers design freedom by removing radiators 00W/m & 0W/m options available.m cold lead cable
Sopro FDP 558 tile insulation board
 Sopro FDP 558 tile insulation board Rotproof, resin-bonded, polyester fibreboard as separating layer on critical substrates impact-sound insulating thermal insulation available in six different thicknesses
STONE PRODUCT COMPOSITE (SPC) FLOORING INSTALLATION INSTRUCTIONS
 FLOORING INSTALLATION INSTRUCTIONS") Read all instructions before installing. Incorrect installation will invalidate and void warranty. IMPORTANT Goodfellow Dubaï is guaranteed for use only as a floor covering. Goodfellow Dubaï is intended
Read all instructions before installing. Incorrect installation will invalidate and void warranty. IMPORTANT Goodfellow Dubaï is guaranteed for use only as a floor covering. Goodfellow Dubaï is intended
WARMUP TILED SHOWER SOLUTION
 WARMUP TILED SHOWER SOLUTION INSTALLATION INSTRUCTIONS NOTE: this instruction detail is specific to the requirements of the Tiled Shower solution and must be read in conjunction with the ARDEX WPM750 membrane
J41 Reinforced bitumen membrane roof coverings
 J41 Reinforced bitumen membrane roof coverings To be read with Preliminaries/ General conditions. TYPES OF COVERING 115A SINGLE LAYER REINFORCED BITUMEN MEMBRANE WARM DECK ROOF COVERING warm roofing system
Wooden suspended floors
 UPONOR PEX PRODUCTION UNDERFLOOR HEATING WOODEN SUSPENDED FLOORS Wooden suspended floors 08 2006 Uponor Underfloor Heating in Wooden suspended floors Wooden suspended floors The term suspended floors in
BIG DISCOUNTS AVAILABLE ON SEMPATAP
 DIY Warmer Walls BIG DISCOUNTS AVAILABLE ON SEMPATAP THERMAL INSULATION What s it all about? The DIY Warmer Walls Scheme is a discount initiative for Local Authorities to help and encourage householders
INSTALLATION INSTRUCTION
 INSTALLATION INSTRUCTION EGGER LAMINATE FLOORING with glueless locking system just clic! www.egger.com INSPECTION RESPONSIBILITY / SUB FLOORS 1. INSPECTION RESPONSIBILITY Laminate flooring from EGGER is
hüma PARKETTSYSTEM GmbH INSTALLATION GUIDE
 hüma PARKETTSYSTEM GmbH INSTALLATION GUIDE www.huema.co.uk Content Content GENERAL INFORMATION... 4 INSTALLATION NOTES... 6 ACCLIMATISATION... 6 CHECK FOR FAULTS IN THE MATERIAL... 6 REQUIREMENTS FOR
SUBSTRATES FOR WOOD FLOOR SETTING
 SUBSTRATES FOR WOOD FLOOR SETTING UNDER- & SUBFLOORS FROM CONCRETE TO SCREEDS First: Concrete Slab Typical thickness: 20 cm (housing) Long drying times required (months) Shrinking during whole drying period
Installation Recommendations Ceramic Floor and Wall Tiles. Floor Tiles
 Installation Recommendations Ceramic Floor and Wall Tiles This information is based on the recommendations given in the following codes of practice: BS 5385-1 The design and installation of internal ceramic
INSTALLATION INSTRUCTIONS FOR WICANDERS HYDROCORK
 INSTALLATION INSTRUCTIONS FOR WICANDERS HYDROCORK GENERAL INFORMATION Hydrocork floors are intended for indoor use only. Please read the following instructions before installation. Hydrocork connection
TI-LINE TILUX DURABASE. Borderless Shower Areas
 TI-LINE TILUX DURABASE Borderless Shower Areas Borderless Shower Areas TI-LINE The patented linear drainage system that makes a perfect junction with walls. An overview of all the system s components along
SECTION 4.2 RIW SCREEDSAFE
 WETROOMS SECTION PRODUCT SPECIFICATION GUIDE PEACE OF MIND GUARANTEED PRODUCT DETAIL Membrane) Membrane Primer Floor tiles is a self-adhesive waterproof membrane designed for use prior to the application
INSTALLATION INSTRUCTION
 INSTALLATION INSTRUCTION For EGGER FLOORING with glueless locking system PRO CLIC! PATENTED www.egger.com INSPECTION RESPONSIBILITY / SUB FLOORS 1. INSPECTION RESPONSIBILITY Laminate flooring from EGGER
Nu-Heat UNDERFLOOR & RENEWABLES
 UNDERFLOOR HEATING Nu-Heat UNDERFLOOR & RENEWABLES 14mm Fastflo in diffuser panels, installed between joists Supplied by Nu-Heat 400mm centres Supplied by others Decking 14mm Fastflo tubing Heat transfer
84 Lapping & Jointing 86 Service Pipe Penetrations 87 Sealing to Cavity Wall Constructions 88 Protecting Membranes System Components.
 84 Lapping & Jointing 86 Service Pipe Penetrations 87 Sealing to Cavity Wall Constructions 88 Protecting Membranes 90 System Components installation/ SYSTEM COMPONENTS INSTALLATION ADVICE LAPPING and JOINTING
fermacell Powerpanel H 2 O Linear Shower Outlet 2.0
 fermacell Product Data Sheet fermacell Powerpanel H 2 O Linear Shower Outlet 2.0 Product The prefabricated is the quick and economic dry solution for flush-to-floor installation of shower trays (included
STONE PRODUCT COMPOSITE (SPC) FLOORING INSTALLATION INSTRUCTIONS
 FLOORING INSTALLATION INSTRUCTIONS") PLEASE READ THE ENTIRE BEFORE PROCEEDING WITH THE INSTALLATION OWNER / INSTALLER RESPONSIBILITY The installer assumes all responsibility for final inspection of product quality. Inspection of the entire
PLEASE READ THE ENTIRE BEFORE PROCEEDING WITH THE INSTALLATION OWNER / INSTALLER RESPONSIBILITY The installer assumes all responsibility for final inspection of product quality. Inspection of the entire
RESIDENTIAL 15 YEARS W A RRANTY
 R I DE NT I AL ES W A Y 15 YEARS RRANT RESIDENTIAL 15 YEARS W A R R A N T Y KEY FEATURES SUNLITE LOOSELAY LVT TRADITIONAL LAMINATE Sun-proof (withstands direct sunlight) 4 4 7 7 Will not warp or deform
750ml INSTA-STIK roofing adhesive. Professional Roofing Adhesive
 750ml INSTA-STIK roofing adhesive Professional Roofing Adhesive INSTA-STIK roofing adhesive in a can: for highly portable and economical adhesion The 750ml INSTA-STIK roofing adhesive can has been designed
1850 x 40/50mm Raised Shower Tray Kit
 Installation Instructions 850 x 40/50mm Raised Shower Tray Kit Parts Supplied Description Qty Shower Tray Shower Tray Extension Parts Required (Fitting Kit) Materials Required Description Qty Description
IMPORTANT! DO NOT CROSS OR CUT THE HEATING CABLE. REMEMBER TO MEASURE, VERIFY AND RECORD THE RESISTANCE.
 IMPORTANT! DO NOT CROSS OR CUT THE HEATING CABLE. REMEMBER TO MEASURE, VERIFY AND RECORD THE RESISTANCE. USE A MEGGER TO TEST THE RESISTANCE TO GROUND. Installation Manual Danfoss TX-FH Heating Cables
Warmup helpline:
 Contents 3 4 5 6 Sizing guide Calculate the actual spacing of the heating element Technical notes Wiring configuration Your Warmup Undertile Heater has been designed so that installation is quick and straight
SOLID HARDWOOD FLOORS INSTALLING WITH CLIPS
 TIPS AND GUIDANCE SOLID HARDWOOD FLOORS INSTALLING WITH CLIPS CREATING EXCEPTIONAL SPACES BEFORE INSTALLING..! The building must be weather tight. The heating system must be installed, tested and during
Installation Plan. Washer-extractor PW 6088 EL LP. en - AU M.-Nr
 Installation Plan Washer-extractor PW 6088 EL LP en - AU 14.14 M.-Nr. 09 923 540 Australia: Miele Australia Pty. Ltd. 1 Gilbert Park Drive KNOXFIELD Victoria 3180 Tel. +61 3 97647-100 Fax +61 3 97647-129
In order to get the maximum comfort out of a radiant system, it is paramount to go through a precise design phase (ref. UNI EN 1264).
.") Business Area Technical Focus Radiant Systems Designing a Radiant System In order to get the maximum comfort out of a radiant system, it is paramount to go through a precise design phase (ref. UNI EN 1264).
Business Area Technical Focus Radiant Systems Designing a Radiant System In order to get the maximum comfort out of a radiant system, it is paramount to go through a precise design phase (ref. UNI EN 1264).
In-Floor Heating System. Installation Guide
 In-Floor Heating System Installation Guide CONTENTS TOOLS & MATERIALS REQUIRED FOR INSTALLATION............ 3 STEP 1 Ensure the installation surface is smooth and clean......... 4 Compatible sub-floors
a new liquid screed solution from
 a new liquid screed solution from McGraths have teamed up with Cemexa Technologies of France to develop a new product for the production of cement based liquid screeds. Cemfloor is a high performance
HYBRID. Pre-Laying Checks
 Warning Veles CK has been developed for exceptional stability in low and high temperatures, however, after installation extreme temperatures (under 5 C or over 50 C) should be avoided by use of interior
MAJESTIC FLOOR MEMBRANE PRODUCT GUIDE
 PRODUCT GUIDE p13 p7 p9 PRODUCT DETAIL The Majestic Floor Membrane is a self-adhesive waterproof membrane designed for use prior to the application of ceramic tiles and natural stone onto timber and solid
LAMINATE GENERAL INSTALLATION INSTRUCTIONS FOR ANGLE-TO-ANGLE FLOORING
 LAMINATE GENERAL INSTALLATION INSTRUCTIONS FOR ANGLE-TO-ANGLE FLOORING WARNING Prior to installation, please ensure that the product received is the correct style and color as well as to the customer s
Installation Manual (Undertile Heating Kit)
") Installation Manual (Undertile Heating Kit) Technical Helpline 0800 927 687 IMPORTANT Please read the ENTIRE Installation Manual before attempting to install your undertile heater. Incorrect installation
Installation Manual (Undertile Heating Kit) Technical Helpline 0800 927 687 IMPORTANT Please read the ENTIRE Installation Manual before attempting to install your undertile heater. Incorrect installation
Panel Installation Guide
 Panel Installation Guide Tool List: 1. Trowel A 1/32 or 1/16 inch square-notched trowel. You will be using this to spread out the glue. Remember to clean your trowel after each use. 2. Floor Roller This
Installation Manual. ThermMAT ThermCABLE FME. Technical Helpline:
 Installation Manual ThermMAT ThermCABLE FME Floor Preparation Installation Planning Heater MAT160,MAT200 FME ThermCable Testing FAQ 1 3 4 6 7 10 11 Technical Helpline: 08081 293020 Floor Preparation Before
CI/SfB (57.7) 2nd Edition. the warmth beneath your feet FREE NEXT DAY DELIVERY /0811
 2nd Edition. the warmth beneath your feet FREE NEXT DAY DELIVERY /0811") CI/SfB (7.7) nd Edition the warmth beneath your feet FREE NEXT DAY DELIVERY 00/08 Bluethermal TM Advantages of Electrical Electricity is used the world over for heating homes and is our most common energy
CI/SfB (7.7) nd Edition the warmth beneath your feet FREE NEXT DAY DELIVERY 00/08 Bluethermal TM Advantages of Electrical Electricity is used the world over for heating homes and is our most common energy
Roofing. Sarnacol Adhesive for Insulation Boards. Product Description. Product Data. Polyurethane-based humidity-hardening one-pack adhesive
 Roofing Product Data Sheet Edition 06.2016 Identification no: 020945072000000006 Version no. 01 Sarnacol 2162 Adhesive for Insulation Boards Roofing Product Description Uses Characteristics / Advantages
ThermaSheet. multi-purpose insulated tile backer panels
 ThermaSheet multi-purpose insulated tile backer panels A CODE PRODUCT DIMENSIONS RTTBB-06-1200 ThermaSheet Tile Backer Board 6mm 1200mm x 600mm RTTBB-10-1200 ThermaSheet Tile Backer Board 10mm 1200mm x
Installation Instructions
 GB/DAS Installation Instructions Deviflex heating cables Deviflex DTIE-/17 for thin floor constructions, cement floors, etc. www.devi.com Notes Deviflex DTIE- and DTIE 17 heating cables Deviflex type DTIE
BUILT-UP REINFORCED BITUMEN MEMBRANE WARM DECK ROOF COVERING Two layer, EXCEL/SPOT fully adhered waterproofing system
 J41 Reinforced bitumen membrane roof coverings To be read with Preliminaries/General conditions. TYPES OF COVERING 110A BUILT-UP REINFORCED BITUMEN MEMBRANE WARM DECK ROOF COVERING Two layer, EXCEL/SPOT
INSTALLATION Instructions EcoFitness Interlocking Tile
 Specification Data -- RESILIENT ATHLETIC FLOORING 09 65 66 INSTALLATION Instructions EcoFitness Interlocking Tile INTRODUCTORY NOTE: This installation guide is intended to provide the necessary information
INSTALLATION METHOD STATEMENT
 INSTALLATION METHOD STATEMENT 1.0 Introduction - Liquid screed is a flowing screed flooring system comprising a calcium sulphate binder, fine aggregate and water. - It is for internal use only, in general
WPC Vinyl Floor Installation Guide
 WPC Vinyl Floor Installation Guide Introduction This guide will take you through the necessary steps to install your Bel-Air WPC Vinyl Flooring. Make sure to carefully read through this guide so that you
INSTALLATION GUIDE HEAT FLOOR TILE STONE MESH. Excellence in heating solutions.
 INSTALLATION GUIDE MESH HEAT FLOOR TILE STONE MESH Excellence in heating solutions. Thank you for your purchase... This document will provide a step-by-step guide to a perfect installation as well as details
Installation Instructions
 Installation Instructions GB The surface-heating elements have been tested to VDE Standards in accordance with DIN EN60335-1, DIN EN60335-2-96 and DIN EN50366. These instructions must be read carefully