Thanks again & remember to tell your friends about your product from Component Playgrounds!
|
|
|
- Coral Morris
- 5 years ago
- Views:
Transcription
1 Dear Customer: Thank you for purchasing your equipment from Component Playgrounds!!! We are proud of our commercial grade products made for kids of all ages & sizes, and we are confident that you will enjoy your equipment for many years. Because you have purchased a top of the line commercial grade product, you will need to be aware of some specific shipping requirements that may be different from shipments you have received in the past through other delivery companies (such as UPS), and you should follow the guidelines below carefully. 1. In most cases your product will arrive via common carrier truck line directly to your home with curbside delivery only. This means the driver will facilitate the offloading of the shipment at the curb, or most reasonable place near the curb and your house. You are then responsible to have someone physically capable to help unload the product upon delivery and note the condition of the product as per below instructions. 2. Your product may arrive on a pallet and upon delivery locate the packing list (usually attached to the hardware box & orange & black in color) and verify that each piece listed is with the shipment. *** Please disregard any delivery driver stated time crunches or needs to leave quickly and inspect the product to your satisfaction = this is your product so make sure it is all there in good condition or noted properly before the driver leaves.*** 3. If there are any parts/pieces missing, note this directly on the delivery receipt BEFORE you sign and receive your copy of the receipt, with wording such as missing xyz part etc. Note: some shipments will have more than one pallet so check both before noting missing. 4. Similar to #3 above, also note the condition of the pieces and if any parts have been damaged in shipping note this directly on the delivery receipt BEFORE you sign and get your copy from the driver (in particular inspect slides for damage). 5. If your shipment appears to have damage and /or missing pieces, a freight claim must be fi led with the freight company w/in two business days. Component Playgrounds will assist you with this process if it is necessary. Contact the shipping manager toll for claims assistance. 6. Ask your driver to sign or initial the freight slip acknowledging any damage or discrepancies. 7. Get a copy of the signed delivery receipt from your delivery driver BEFORE he leaves. 8. If you are concerned or don t know what you should do with a certain situation regarding the shipment, please call the shipping manager toll before the driver leaves. All shortages and damaged items are the sole responsibility of the carrier. You are responsible to notify Component Playgrounds of any shortages or damage relating to your shipment w/in 2 business days of receipt of your equipment. After this time, any claim for shortage or loss cannot be honored. Component Playgrounds cannot be responsible for replacement of any parts, missing or damaged, that have not been properly noted on the delivery receipt. Component Playgrounds cannot be responsible for damaged or missing pieces due to the fault of, or loss by the freight company. Thanks again & remember to tell your friends about your product from Component Playgrounds!
2 Parts Identification HL50 Swing Set Quantity 1 2 Description Box Containing Swing Set Parts 2 3/8 x 9 Top rail 2 8 Upright Ladder with Sleeves (Actual Length 10 ) Horizontal Ladder 6 Total Pieces
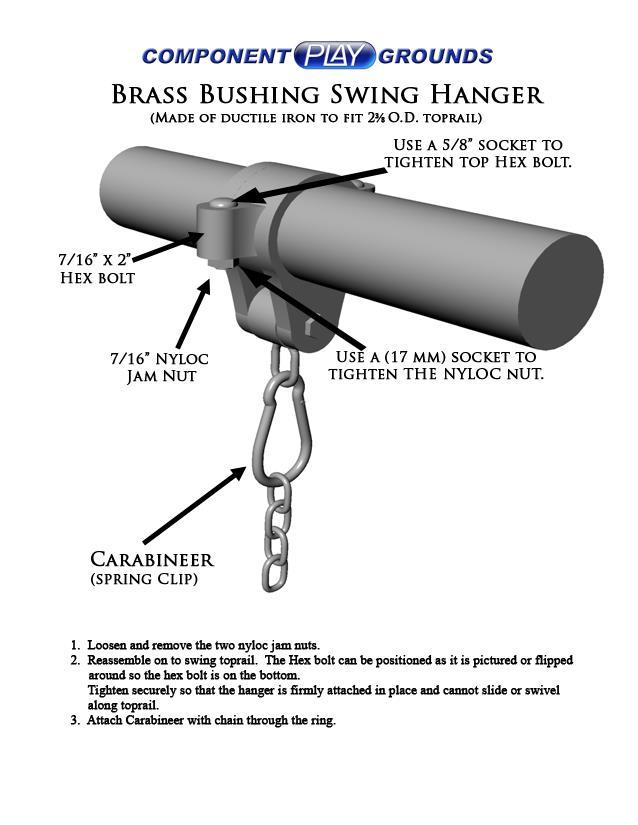
3 Installation Instructions HL50 Required Tools Wheelbarrow Shovel Tape Measure Digging Bar or Pick Open End or Box Wrenches: 5/8, 9/16, ¾ Allen Wrench (Provided) Marker Pen Ratchet Handle & Sockets: 5/8, 9/16, ¾, 17mm Ladder PLEASE READ AND UNDERSTAND ALL INSTRUCTIONS BEFORE BEGINNING *Before digging, please obey local laws by notifying your local utilities marking organization* 1. Select an area in your yard that is reasonably level and meets the space requirements for your equipment. Ground Space: 9 x 13 Play Space: 13 x Using the measurements from the top view diagram, measure and mark the position of the Swing Hangers and Upright Ladders on both 9 Top Rails. Place the Horizontal Ladder on to the ground in the desired location with Top Rails in the correct position on the ground. (Measure and adjust the Horizontal Ladder on the ground as necessary to provide for the proper play space.) 3. Move 9 Top Rails and set aside. 4. With the Horizontal Ladder in its proper position, mark the locations for the holes where the two Upright Ladders will stand. 5. Move the Horizontal Ladder and dig the holes (see #1 hole sizes for cementing). 6. Lay each Upright Ladder on the ground near the hole where it will eventually stand. Make a mark 15 from the top of the Ladder onto each Ladder Rail. 7. Move the Adjustable Sleeves to these marks and position them to receive the Horizontal Ladder. This is accomplished by turning them to point at a 90 degree angle toward what will become the inside of the structure. (The rungs are welded to what will become the outside of the structure.) Secure set screws. 8. Repeat the process on the other Upright Ladder. Secure set screws. 9. Place the Upright Ladders onto their sides with the bottom of the pipe just over the hole where it will eventually stand. Attach the Horizontal Ladder to the Adjustable Sleeves of the Upright Ladders and secure the set screws (see #3 Horizontal Ladder to Upright Ladder assembly). Hint: Do not push Horizontal Ladder tight against the Upright Ladders. Leave a ½ - 1 gap between the Upright Ladder Rails and the Horizontal Ladder. This will allow for easier adjustment of the Horizontal Ladder in the future. 10. Using two or three strong adults, stand the assembled Horizontal Ladder set into the holes. 11. Install plugs into the ends of the Top Rails. 12. Slide Top Rails into Top Sleeve of the Upright Ladders (see #2 Ladder to Top Rail assembly). Secure set screws. 13. Assemble and attach Swing Hangers to Top Rail (see Swing Hanger assembly sheet). 14. Attach swing chains, seats, trapeze bar and rings. 15. Measure the height of the Top Rails to insure proper swing height. 16. the swing set. 17. Mix concrete according to package directions and pour the appropriate quantities into each hole. 18. Allow cement to cure for 3-5 days and enjoy your Component Playground.

 24 Slide Top Rail into")


4 INSTALLATION INSTRUCTIONS HL50 GROUND SPACE 9 X 13 RESIDENTIAL PLAY SPACE 13 X 29 Upright Ladders Hole 28 x 20 x 24 (Approximately lb. bags of concrete mix per hole) 24 Slide Top Rail into place in the Ladder Top Sleeve & secure with two 3/8 x 3/8 Set Screws Top Rail Ladder #1 Hole Sizes for Cementing in the Set Set Screw Top Rail Upright Ladder Adjustable Sleeve #2 Ladder to Top Rail Assembly Horizontal Ladder Set Screws 3/8 x 3/8 Set Screw with Allen Wrench Set Screws #3 Horizontal Ladder to Upright Ladder Assembly
5 Place the 9 top rails, and 12 6 horizontal ladder in the play space as shown below. Mark where the ladder holes will need to be dug. Remove the top rails and horizontal ladder and dig the ladder holes to the measurements specified below


6 When digging be sure that the holes line up with the ladder and each other as shown below Hole size is 28 long by 20 wide by 24 deep. 28


7 After the holes are dug, move the 12 6 ladder to the side and lay both vertical ladders into the proper place. Then slide the 9 top rails into the top sleeve of each upright ladder. Top rail should be placed at 43.5 from each end to top sleeve. Once in place secure by inserting 3/8 x 3/8 set screws into the already drilled and tapped holes in the top sleeve, then tighten them down all the way
 Have one person on each side of the horizontal ladder and lift it to the proper elevation while the third person pushes each upright ladder into the horizontal.")
 #3 #1 #2 Have person #1 secure upright ladder to the horizontal with one 3/8 set screw.")
8 Now stand each upright ladder into the holes. (Next step works best with 4 people but can be done with 2 strong adults.) Have one person on each side of the horizontal ladder and lift it to the proper elevation while the third person pushes each upright ladder into the horizontal. As shown below. (With only two people have one position themselves in the middle of the horizontal ladder while the other places upright ladders into place.) #3 #1 #2 Have person #1 secure upright ladder to the horizontal with one 3/8 set screw. Then person #3 goes and places the other upright ladder into place while person #2 continues to hold horizontal ladder. #1 #2 #3


9 Now make whatever adjustments to ensure that your set is level. Tighten all set screws. Once this is complete you are ready to mix and poor the concrete.
10 When you are satisfied that the structure is level, mix and pour the concrete according to the package directions. You will use approximately five to seven 80 pound bags in the ladder holes. Concrete will cure faster in warm conditions and slower in cold conditions. The package directions on the concrete you buy will indicate approximate curing times. If you are in doubt, it is better to wait longer allowing the concrete more time to cure. We recommend 3-5 days before use. The amount of concrete to be used in each hole may vary. For example: If you are installing your play structure into a grassy area, you may want to leave the concrete about three to four inches below the top of the hole. This will allow you to replace the sod and have enough soil depth for the grass to continue growing. As a result of this, you will use a lesser amount of concrete than someone who chooses to fill the concrete to the top of the hole. The concrete should only be filled to the top of the hole if you are planning to install 6 12 inches of soft fall ground cover. The concrete footings should never be exposed as this presents a potential risk of injury to those who use this play equipment. Once the concrete has cured attach swing hangers, swings and enjoy.
11
12 Read Before Use Congratulations! You have just purchased one of the finest pieces of playground equipment available. Your family will enjoy many hours of fun with this fine equipment. Playground equipment can be most enjoyable, but there are some dangers if not used properly. You should be aware of the following: Equipment should be installed in a level area, free from obstructions, with enough space to allow for adequate clearance in all directions when equipment is in maximum use. Keep objects away from equipment that could interfere with persons using it or that could be hazardous. Misuse or abuse of this playground equipment is dangerous and can cause serious injury. This equipment should be inspected before each use and any worn, defective or missing parts should be replaced. Children should play on equipment only with adult supervision and should be duly warned of the potential hazards in this type of equipment when used improperly. Children should be instructed as to proper caution to take in its use. Equipment should NOT be used when it is wet or icy. Equipment should only be used in a well-lighted area. Do NOT use equipment when tired, under stress or emotionally upset. Do NOT overcrowd. Do NOT use equipment when under the influence of alcohol or drugs. Do NOT attempt somersaults or gymnastic stunts on or using this equipment. Know your own limitations and exercise caution at all times. Do not jump off of equipment when dismounting. It is a dangerous practice to jump on or off equipment. Do not attempt to use equipment for something other than the use for which it was designed and intended, or in a manner other than that for which it was designed and intended. While every attempt is made by Component Playgrounds to ensure the highest degree of safety in all of our equipment, we cannot guarantee freedom from injury. The user assumes all risk of injury due to use. All merchandise is sold on this condition, which no representative of the company can waive or change.
13 Maintenance of your playground We hope that you and your family will enjoy many of hours of great family fun while using your Component Playgrounds Products. We appreciate your business. Our goal is to provide safe, durable and fun products using the best materials available. Your product should be mostly maintenance free. However, you should consider the following suggestions with regard to the up keep of your new swing set. 1. Chains and Connectors: The chains are coated with the highest quality bright zinc coating and the highest quality polymer coatings available. However, over time the zinc coating may become discolored or eventually have surface rust appear. The polymer coating may also become discolored with time and may eventually crack. This depends mostly upon environmental conditions and normally will not affect the durability and safety of the product. However, these items should be inspected regularly for excessive wear and should be replaced as necessary. 2. Swing Hangers: These items are coated with a high quality galvanizing. However, swing hangers may become discolored or may eventually rust. Should this happen, a touch up using a cold galvanizing compound followed by a coat of silver aluminum spray paint will make them look new again. These items can be purchased in aerosol cans ( spray paint ) at most hardware stores and at Component Playgrounds. The brass bushings inside of the swing hanger are impregnated with lubricant and will not generally require any further lubrication. However, these should be periodically inspected for wear and replaced as necessary. Note: Twisting the chains while swinging will put extra wear on the swing hanger parts. If your children enjoy this practice, please inspect the swing hangers more frequently. 3. Tire Swing Knuckles (for sets with a tire swing): The tire swing knuckle arrives at Component Playgrounds pre-lubricated from the manufacturer. However, it is good practice to inspect the knuckle and be sure that there is adequate lubrication before it is used the first time. After that, the tire knuckles should be lubricated at least twice annually to prevent excessive wear and the eventual failure of the tire swing knuckle. 4. Welds: The heat from the welding process will damage the galvanizing that is on the pipe when it arrives to us from the manufacturer. This damage to the galvanizing is restricted to the actual weld. When your equipment is built, Component Playgrounds will repair this damage using a cold galvanizing compound spray along with a top coat of silver aluminum. This is a time tested and durable process. However, when you are inspecting your playground equipment, if you notice that some surface rust has appeared on the welds, simply apply a fresh coat of the cold galvanizing compound and the silver aluminum top coat to keep your structure looking new. (These spray products
14 can be purchased in aerosol cans ( spray paint ) at most hardware stores and at Component Playgrounds.) 5. Plastic Lumber Platforms: If you have purchased a structure which includes a platform, the plastic lumber does not need to be finished or stained. It is 100% maintenance free. However, you may need to occasionally hose it down to remove dirt and other debris that may collect after many hours of use by happy children. 6. Vinyl Canopies: If you have purchased a structure which includes a vinyl canopy, this product should be inspected occasionally for wear and will need to be replaced as necessary. Depending upon your environmental conditions, the normal life expectancy of the vinyl canopy is 3 5 years. 7. Swing Seats: These should be inspected at least twice annually and should be replaced as necessary. 8. Slides: Slides should never be lifted at the bottom. Lifting the slide at the bottom will almost always cause the slide to crack at the top where it has been attached to the platform or bracket. Cracks and wear such as is caused by this practice are easily identifiable and will not be covered under the product warranty. Slides should be inspected at least annually to ensure that the sliding surface is in good condition. Also inspect the side rails to be sure that the plastic has not been cut or gouged in any manner which would present the risk of injury while sliding. 9. Fasteners: All fasteners should be periodically inspected to make certain that they are tight and secure. Re-secure as necessary.

15 To Help Prevent Injuries from Falls & Other Hazards 1. Never attach, or allow children to attach the following items to your swing set: Ropes, jump ropes, clotheslines, pet leashes or any similar type of item to your swing set. Any item such as these may present a strangulation hazard. 2. Periodically inspect all nuts, bolts, set screws, clevis, and carabineer or S hooks. Make certain that these are functionally safe and secure. If you have any doubt as to the safety and security of any connector or fastener, replace it. 2a. You should periodically check the brass bushings in the swing hangers. Look for excessive wear in the bushing and replace as necessary. 2b. If your playground has a tire swing: The tire swing knuckle should be lubricated twice annually to prevent wear. 3. Never allow children to wear bicycle helmets when using playground equipment. 4. Remove drawstrings from hoodie s and jackets. Remove attached mittens and gloves. These can become entangled with the equipment and present the risk of strangulation or other hazards. 5. Playground surfaces can become hot in the sun. Children should be required to wear shoes and socks when using this or any playground equipment. 6. Check for and remove sharp points or edges in the playground equipment. 7. Remove tripping hazards from the playground area. Items such as exposed concrete footings, tree stumps, rocks or any item that may be present in your space that a child could trip over while playing should be removed. 8. Regularly check the play equipment and the surfacing surrounding it to be certain that both are in good condition. 9. Parental Supervision is recommended. The best ingredient for a safe playground is good parental supervision while the kids are using the equipment. 10. Remember to play safely, take turns, share with each other and have fun!
16 Residential Products Limited Lifetime Warranty Component Playgrounds works to build heavy duty products that will stand up to the heavy use of active children. You can trust Component Playgrounds because of the way we design and build our products. We make products that are simple to own, and easy to maintain. This adds up to the best value on playground products that you can count on, and that kids will play on time after time. Component Playgrounds warrants to the original purchaser/property owner that its residential grade products are free from defect in materials and workmanship. This warranty is non-transferrable and will be honored only after proper registration. This warranty is not extended to cosmetic items such as scratches, dents, fading, discoloring, paint wear, rust, weathering, or decorations. The warranty as stated is valid only if equipment is properly installed as detailed in the installation instructions provided and is used in a normal and expected manner. Excessive and or use above that which is normally expected may void the warranty. All parts are subject to normal wear for the purpose of which they were designed. When attached to the structure, plastic slides should not be lifted up from the bottom for any reason. Cracks at the top of the slide that result from lifting the bottom of the slide will not be covered under the terms of this warranty. This warranty is void should the equipment be subject to vandalism, misuse, neglect, abuse, improper installation, tampering, or accident. This equipment is not to be altered, or modified, by anyone other than Component Playgrounds or its authorized agent. This warranty does not cover damage resulting from flood, fire, catastrophe or other acts of nature. To the extent permitted by law, Component Playgrounds shall not be liable for any direct, indirect, special, incidental, or consequential damages. Should it be found that your product has parts that are defective within the warranty period, contact Component Playgrounds. Unauthorized returns will be refused and returned to sender. Defective part(s) must be photographed from a minimum of three different angles that clearly show the problem, and the installation of the defective part by its self and in relation to the rest of the structure. After speaking with a representative at Component Playgrounds: Return parts, freight prepaid, to the Component Playgrounds plant with proof of purchase for repair or replacement. Component Playgrounds will evaluate the part(s) and the photographs and decide if the part(s) in question should be repaired or replaced. This warranty does not cover costs related to removal, transportation and/or labor. This equipment is rated as commercial grade for residential use and is intended to be used in a private residential environment. This equipment may not meet all of the safety guidelines as described by the CPSC as it relates to public use/commercial playground equipment. For more information on public or commercial playgrounds, please visit Component Playgrounds sales representatives or its agents are not authorized to modify or substitute claims which are not part of this exclusive written warranty. This warranty is void if the product is in any way modified from its original state, or if it is used for purposes other than the purpose for which it was intended. *For children with special needs who may spend many hours of the day swinging, we recommend our heaviest swing set, the Arch Swing Model. This is the product for you!
17 WARRANTY REGISTRATION SHEET Note: To ensure your warranty is activated, complete and return this form within 10 days of installation. Return this form via fax to (801) , via to or via U.S. mail to: Component Playgrounds 1630 North Beck Street Salt Lake City, UT Today s Date: Sales Receipt/Invoice Number: Model(s): CUSTOMER INFORMATION Project Name: Contact Person: Address: City: State: Zip: Phone: Fax: Purchase Date: Completion Date: SALES REPRESENTATIVE/DEALER INFORMATION (If different from manufacturer) Organization: City: State: Zip: Sales Rep Name: Phone: Fax: INSTALLATION INFORMATION (If different from customer or sales representative) Installed By: Contact Person: Address: City: State: Zip: Phone: Fax:
Thanks again & remember to tell your friends about your product from Component Playgrounds!
 Dear Customer: Thank you for purchasing your equipment from Component Playgrounds!!! We are proud of our commercial grade products made for kids of all ages & sizes, and we are confident that you will
FITNESS PLAYGROUND ITEM NO: 8010
 FITNESS PLAYGROUND ITEM NO: 8010 OWNER S MANUAL CAUTION: This unit is designed to be used safely by up to 4 children between the ages of 3 years to 8 years old with a maximum weight of 100 pounds (45.4
Model # 357-MC. 8/13/2018 Page 1 of 12
 Model # 357-MC 8/13/2018 Page 1 of 12 /13/2018 Page 2 of 12 1675 Locust Street Red Bud, IL 62278 Phone: 618-282-8200 Fax: 618-282-8202 WARRANTY & TERMS WARRANTY: 5 Year Limited Warranty on Thermoplastic
Model # V. 1/31/2014 Page 1 of 8
 Model # 110-16V 1/31/2014 Page 1 of 8 /31/2014 Page 2 of 8 1675 Locust Street Red Bud, IL 62278 Phone: 618-282-8200 Fax: 618-282-8202 WARRANTY & TERMS WARRANTY: 5 Year Limited Warranty on Thermoplastic
1675 Locust Street Red Bud, IL Phone: Fax: WARRANTY & TERMS
 Model # 349S-P6 1675 Locust Street Red Bud, IL 62278 Phone: 618-282-8200 Fax: 618-282-8202 WARRANTY & TERMS WARRANTY: 5 Year Limited Warranty on Thermoplastic coated elements. Ultra Play guarantees all
Model #967- S6. 7/7/2016 Page 1 of 14
 Model #967- S6 7/7/2016 Page 1 of 14 /7/2016 Page 2 of 14 1675 Locust Street Red Bud, IL 62278 Phone: 618-282-8200 Fax: 618-282-8202 WARRANTY & TERMS WARRANTY: 5 Year Limited Warranty on Thermoplastic
Model # 338S-PR. 5/1/2014 Page 1 of 12
 Model # 338S-PR 5/1/2014 Page 1 of 12 /1/2014 Page 2 of 12 1675 Locust Street Red Bud, IL 62278 Phone: 618-282-8200 Fax: 618-282-8202 WARRANTY & TERMS WARRANTY: 5 Year Limited Warranty on Thermoplastic
Model # 600H-D. 4/2/2012 Page 1 of 6
 Model # 600H-D 4/2/2012 Page 1 of 6 4/2/2012 Page 2 of 6 1675 Locust Street Red Bud, IL 62278 Phone: 618-282-8200 Fax: 618-282-8202 WARRANTY & TERMS WARRANTY: 5 Year Limited Warranty on Thermoplastic coated
Model # 612H. 7/11/2016 Page 1 of 6
 Model # 612H 7/11/2016 Page 1 of 6 /11/2016 Page 2 of 6 1675 Locust Street Red Bud, IL 62278 Phone: 618-282-8200 Fax: 618-282-8202 WARRANTY & TERMS WARRANTY: 5 Year Limited Warranty on Thermoplastic coated
Model # 504S-P. 9/14/2011 Page 1 of 9
 Model # 504S-P 9/14/2011 Page 1 of 9 9/14/2011 Page 2 of 9 1675 Locust Street Red Bud, IL 62278 Phone: 618-282-8200 Fax: 618-282-8202 WARRANTY & TERMS WARRANTY: 5 Year Limited Warranty on Thermoplastic
Model # 338S-P. 7/31/2012 Page 1 of 13
 Model # 338S-P 7/31/2012 Page 1 of 13 7/31/2012 Page 2 of 13 1675 Locust Street Red Bud, IL 62278 Phone: 618-282-8200 Fax: 618-282-8202 WARRANTY & TERMS WARRANTY: 5 Year Limited Warranty on Thermoplastic
Model # 362S-RDP. 9/17/2012 Page 1 of 12
 Model # 362S-RDP 9/17/2012 Page 1 of 12 9/17/2012 Page 2 of 12 1675 Locust Street Red Bud, IL 62278 Phone: 618-282-8200 Fax: 618-282-8202 WARRANTY & TERMS WARRANTY: 5 Year Limited Warranty on Thermoplastic
Model # 358-R48. 7/7/2011 Page 1 of 11
 Model # 358-R48 7/7/2011 Page 1 of 11 7/7/2011 Page 2 of 11 1675 Locust Street Red Bud, IL 62278 Phone: 618-282-8200 Fax: 618-282-8202 WARRANTY & TERMS WARRANTY: 5 Year Limited Warranty on Thermoplastic
Model # 940S-P6-BB. 6/7/2017 Page 1 of 10
 Model # 940S-P6-BB 6/7/2017 Page 1 of 10 /7/2017 Page 2 of 10 1675 Locust Street Red Bud, IL 62278 Phone: 618-282-8200 Fax: 618-282-8202 WARRANTY & TERMS WARRANTY: 5 Year Limited Warranty on Thermoplastic
Model # 338S-RDP. 7/31/2012 Page 1 of 13
 Model # 338S-RDP 7/31/2012 Page 1 of 13 7/31/2012 Page 2 of 13 1675 Locust Street Red Bud, IL 62278 Phone: 618-282-8200 Fax: 618-282-8202 WARRANTY & TERMS WARRANTY: 5 Year Limited Warranty on Thermoplastic
Model # 800SM-PS3. 8/3/2016 Page 1 of 8
 Model # 800SM-PS3 8/3/2016 Page 1 of 8 /3/2016 Page 2 of 8 1675 Locust Street Red Bud, IL 62278 Phone: 618-282-8200 Fax: 618-282-8202 WARRANTY & TERMS WARRANTY: 5 Year Limited Warranty on Thermoplastic
Model # 5803SM. 6/15/2018 Page 1 of 5
 Model # 5803SM 6/15/2018 Page 1 of 5 6/15/2018 Page 2 of 5 1675 Locust Street Red Bud, IL 62278 Phone: 618-282-8200 Fax: 618-282-8202 WARRANTY & TERMS WARRANTY: 5 Year Limited Warranty on Thermoplastic
Model # 815P-VCA3. 3/31/2011 Page 1 of 10
 Model # 815P-VCA3 3/31/2011 Page 1 of 10 3/31/2011 Page 2 of 10 1675 Locust Street Red Bud, IL 62278 Phone: 618-282-8200 Fax: 618-282-8202 WARRANTY & TERMS WARRANTY: 5 Year Limited Warranty on Thermoplastic
Model # BT238-U6. 9/30/2014 Page 1 of 12
 Model # BT238-U6 9/30/2014 Page 1 of 12 /30/2014 Page 2 of 12 1675 Locust Street Red Bud, IL 62278 Phone: 618-282-8200 Fax: 618-282-8202 WARRANTY & TERMS WARRANTY: 5 Year Limited Warranty on Thermoplastic
Model # 158-P4. 12/12/2013 Page 1 of 11
 Model # 158-P4 12/12/2013 Page 1 of 11 2/12/2013 Page 2 of 11 1675 Locust Street Red Bud, IL 62278 Phone: 618-282-8200 Fax: 618-282-8202 WARRANTY & TERMS WARRANTY: 5 Year Limited Warranty on Thermoplastic
1675 Locust Street Red Bud, IL Phone: Fax: WARRANTY & TERMS
 Model # 347SM-V8 1675 Locust Street Red Bud, IL 62278 Phone: 618-282-8200 Fax: 618-282-8202 WARRANTY & TERMS WARRANTY: 5 Year Limited Warranty on Thermoplastic coated elements. Ultra Play guarantees all
Model # 238HS-P8. 4/27/2011 Page 1 of 11
 Model # 238HS-P8 4/27/2011 Page 1 of 11 4/27/2011 Page 2 of 11 1675 Locust Street Red Bud, IL 62278 Phone: 618-282-8200 Fax: 618-282-8202 WARRANTY & TERMS WARRANTY: 5 Year Limited Warranty on Thermoplastic
Model # 238-U6. 5/24/2013 Page 1 of 11
 Model # 238-U6 5/24/2013 Page 1 of 11 /24/2013 Page 2 of 11 1675 Locust Street Red Bud, IL 62278 Phone: 618-282-8200 Fax: 618-282-8202 WARRANTY & TERMS WARRANTY: 5 Year Limited Warranty on Thermoplastic
Model # 338S-OP. 9/30/2011 Page 1 of 13
 Model # 338S-OP 9/30/2011 Page 1 of 13 9/30/2011 Page 2 of 13 1675 Locust Street Red Bud, IL 62278 Phone: 618-282-8200 Fax: 618-282-8202 WARRANTY & TERMS WARRANTY: 5 Year Limited Warranty on Thermoplastic
Model # 338SM-OP. 9/30/2011 Page 1 of 12
 Model # 338SM-OP 9/30/2011 Page 1 of 12 9/30/2011 Page 2 of 12 1675 Locust Street Red Bud, IL 62278 Phone: 618-282-8200 Fax: 618-282-8202 WARRANTY & TERMS WARRANTY: 5 Year Limited Warranty on Thermoplastic
Model # 358-OP. 8/5/2014 Page 1 of 12
 Model # 358-OP 8/5/2014 Page 1 of 12 /5/2014 Page 2 of 12 1675 Locust Street Red Bud, IL 62278 Phone: 618-282-8200 Fax: 618-282-8202 WARRANTY & TERMS WARRANTY: 5 Year Limited Warranty on Thermoplastic
Model # 922-S4. 12/18/2013 Page 1 of 8
 Model # 922-S4 12/18/2013 Page 1 of 8 2/18/2013 Page 2 of 8 1675 Locust Street Red Bud, IL 62278 Phone: 618-282-8200 Fax: 618-282-8202 WARRANTY & TERMS WARRANTY: 5 Year Limited Warranty on Thermoplastic
Model #369S-RDP. 8/23/2016 Page 1 of 11
 Model #369S-RDP 8/23/2016 Page 1 of 11 /23/2016 Page 2 of 11 1675 Locust Street Red Bud, IL 62278 Phone: 618-282-8200 Fax: 618-282-8202 WARRANTY & TERMS WARRANTY: 5 Year Limited Warranty on Thermoplastic
Model #369S-PR. 8/23/2016 Page 1 of 11
 Model #369S-PR 8/23/2016 Page 1 of 11 /23/2016 Page 2 of 11 1675 Locust Street Red Bud, IL 62278 Phone: 618-282-8200 Fax: 618-282-8202 WARRANTY & TERMS WARRANTY: 5 Year Limited Warranty on Thermoplastic
Model # 964-S6. 2/3/2015 Page 1 of 8
 Model # 964-S6 2/3/2015 Page 1 of 8 /3/2015 Page 2 of 8 1675 Locust Street Red Bud, IL 62278 Phone: 618-282-8200 Fax: 618-282-8202 WARRANTY & TERMS WARRANTY: 5 Year Limited Warranty on Thermoplastic coated
Model # 95-S8. Page 1 of 8
 Model # 95-S8 Page 1 of 8 Page 2 of 8 WARRANTY & TERMS WARRANTY: 5 Year Limited Warranty on Thermoplastic coated elements. Ultra Play guarantees all items for one full year to be free of defects in workmanship
Model # 940PPS-V3. 2/12/2014 Page 1 of 10
 Model # 940PPS-V3 2/12/2014 Page 1 of 10 /12/2014 Page 2 of 10 1675 Locust Street Red Bud, IL 62278 Phone: 618-282-8200 Fax: 618-282-8202 WARRANTY & TERMS WARRANTY: 5 Year Limited Warranty on Thermoplastic
Model # BARK /26/2012 Page 1 of 5
 Model # BARK-430 6/26/2012 Page 1 of 5 6/26/2012 Page 2 of 5 1675 Locust Street Red Bud, IL 62278 Phone: 618-282-8200 Fax: 618-282-8202 WARRANTY & TERMS WARRANTY: 5 Year Limited Warranty on Thermoplastic/Canine
Model # 358PS-OP. 12/13/2013 Page 1 of 12
 Model # 358PS-OP 12/13/2013 Page 1 of 12 2/13/2013 Page 2 of 12 1675 Locust Street Red Bud, IL 62278 Phone: 618-282-8200 Fax: 618-282-8202 WARRANTY & TERMS WARRANTY: 5 Year Limited Warranty on Thermoplastic
Model # 358PS-RDP. 12/13/2013 Page 1 of 12
 Model # 358PS-RDP 12/13/2013 Page 1 of 12 2/13/2013 Page 2 of 12 1675 Locust Street Red Bud, IL 62278 Phone: 618-282-8200 Fax: 618-282-8202 WARRANTY & TERMS WARRANTY: 5 Year Limited Warranty on Thermoplastic
Model #369SM-RDP. 8/23/2016 Page 1 of 10
 Model #369SM-RDP 8/23/2016 Page 1 of 10 /23/2016 Page 2 of 10 1675 Locust Street Red Bud, IL 62278 Phone: 618-282-8200 Fax: 618-282-8202 WARRANTY & TERMS WARRANTY: 5 Year Limited Warranty on Thermoplastic
Model # 91-S6. 6/19/2014 Page 1 of 5
 Model # 91-S6 6/19/2014 Page 1 of 5 /19/2014 Page 2 of 5 1675 Locust Street Red Bud, IL 62278 Phone: 618-282-8200 Fax: 618-282-8202 WARRANTY & TERMS WARRANTY: 5 Year Limited Warranty on Thermoplastic coated
Model # 358H-PR. 4/8/2011 Page 1 of 12
 Model # 358H-PR 4/8/2011 Page 1 of 12 4/8/2011 Page 2 of 12 1675 Locust Street Red Bud, IL 62278 Phone: 618-282-8200 Fax: 618-282-8202 WARRANTY & TERMS WARRANTY: 5 Year Limited Warranty on Thermoplastic
Model #CL-36FT. 6/22/2017 Page 1 of 6
 Model #CL-36FT 6/22/2017 Page 1 of 6 /22/2017 Page 2 of 6 1675 Locust Street Red Bud, IL 62278 Phone: 618-282-8200 Fax: 618-282-8202 WARRANTY & TERMS WARRANTY: 5 Year Limited Warranty on Thermoplastic
Model # 940SM-V8. Page 1 of 10
 Model # 940SM-V8 Page 1 of 10 Page 2 of 10 WARRANTY & TERMS WARRANTY: 5 Year Limited Warranty on Thermoplastic coated elements. Ultra Play guarantees all items for one full year to be free of defects in
1675 Locust Street Red Bud, IL Phone: Fax: WARRANTY & TERMS
 Model # BARK-420 1675 Locust Street Red Bud, IL 62278 Phone: 618-282-8200 Fax: 618-282-8202 WARRANTY & TERMS WARRANTY: 5 Year Limited Warranty on Thermoplastic/Canine coated elements. guarantees all items
Model # BARK-358-RDP
 Model # BARK-358-RDP 1675 Locust Street Red Bud, IL 62278 Phone: 618-282-8200 Fax: 618-282-8202 WARRANTY & TERMS WARRANTY: 5 Year Limited Warranty on Thermoplastic/Canine coated elements. guarantees all
Model # 940SM-P8. Page 1 of 10
 Model # 940SM-P8 Page 1 of 10 Page 2 of 10 WARRANTY & TERMS WARRANTY: 5 Year Limited Warranty on Thermoplastic coated elements. Ultra Play guarantees all items for one full year to be free of defects in
1675 Locust Street Red Bud, IL Phone: Fax: WARRANTY & TERMS
 Model # BARK-470 1675 Locust Street Red Bud, IL 62278 Phone: 618-282-8200 Fax: 618-282-8202 WARRANTY & TERMS WARRANTY: 5 Year Limited Warranty on Thermoplastic/Canine coated elements. guarantees all items
Model # PR /21/2018 Page 1 of 10
 Model # PR-32 11/21/2018 Page 1 of 10 1/21/2018 Page 2 of 10 1675 Locust Street Red Bud, IL 62278 Phone: 618-282-8200 Fax: 618-282-8202 WARRANTY & TERMS WARRANTY: 5 Year Limited Warranty on Thermoplastic
Model # SV-R32AU. 2/13/2015 Page 1 of 11
 Model # SV-R32AU 2/13/2015 Page 1 of 11 /13/2015 Page 2 of 11 1675 Locust Street Red Bud, IL 62278 Phone: 618-282-8200 Fax: 618-282-8202 WARRANTY & TERMS WARRANTY: 5 Year Limited Warranty on Thermoplastic
1675 Locust Street Red Bud, IL Phone: Fax: WARRANTY & TERMS
 Model # BARK-480 1675 Locust Street Red Bud, IL 62278 Phone: 618-282-8200 Fax: 618-282-8202 WARRANTY & TERMS WARRANTY: 5 Year Limited Warranty on Thermoplastic/Canine coated elements. Bark Park guarantees
To Contact PS DOORS:
 MODELS Stainless Steel (SS) Powder Coat Yellow (PCY) Hot Dipped Galvanized (GAL) TABLE OF CONTENTS PAGE Warranty Information General Paired LSG Information Installing the Support Channels 3 Installing
Y SIDE ALUMINUM TRUCK RACK
 Y SIDE ALUMINUM TRUCK RACK Owner s Manual WARNING: Read carefully and understand all ASSEMBLY AND OPERATION INSTRUCTIONS before operating. Failure to follow the safety rules and other basic safety precautions
UNIVERSAL UTILITY TRUCK RACK
 UNIVERSAL UTILITY TRUCK RACK Owner s Manual WARNING: Read carefully and understand all ASSEMBLY AND OPERATION INSTRUCTIONS before operating. Failure to follow the safety rules and other basic safety precautions
Owner s Manual & Safety Instructions
 Owner s Manual & Safety Instructions Save This Manual Keep this manual for the safety warnings and precautions, assembly, operating, inspection, maintenance and cleaning procedures. Write the product s
Made in U.S.A. Moai Bike Rack Submittal Sheet. Materials: Finishes: Mount Options: Capacity: Setbacks: 2 Bikes
 Submittal Sheet Materials: 1. 5 Schedule 40 Steel Pipe (1.90 OD) Finishes: Galvanized An after fabrication hot dipped galvanized finish is available. Powder Coat Our powder coat finish assures a high level
2/24/2015 Page 1 of 5
 2/24/2015 Page 1 of 5 2/ 24/ 2015 Page 2 o f 5 WARRANTY & TERMS WARRANTY: 5 Year Limited Warranty on Thermoplastic/Canine coated elements. Guarantees all items for one full year to be free of defects in
Made in U.S.A. Sunrise Bike Rack Submittal Sheet. Materials: Finishes: Mount Options: Capacity: Setbacks:
 Submittal Sheet Materials: 1.5 Schedule 40 Steel Pipe (1.9 OD) Finishes: Galvanized An after fabrication hot dipped galvanized finish is available Powder Coat Our powder coat finish assures a high level
PE21 AMBER DOUBLE SWING OWNER S MANUAL
 PE21 AMBER DOUBLE SWING OWNER S MANUAL - Not suitable for children under 36 months due to small parts, cords and the design of the product. - For children ages 3-12 and must be used under adult supervision.
PE57 HOLT 2 DOUBLE SWING OWNER S MANUAL
 PE57 HOLT 2 DOUBLE SWING OWNER S MANUAL - Not suitable for children under 36 months due to small parts, cords and the design of the product. - For children ages 3-12 years and must be used under adult
Playground Review and Maintenance Process
 Playground Review and Maintenance Process Line of Business: General Liability Risk Control Strategy/Key Issues: Establish procedures for existing playground equipment review to comply with current safety
Mobile Drum Carrier. Owner s Manual
 Mobile Drum Carrier Owner s Manual WARNING: Read carefully and understand all ASSEMBLY AND OPERATION INSTRUCTIONS before operating. Failure to follow the safety rules and other basic safety precautions
Made in U.S.A. Wave Style Bike Rack Submittal Sheet. Materials: 1.5 Schedule 40 Steel Pipe (1.
 Submittal Sheet Materials: 1.5 Schedule 40 Steel Pipe (1.9 OD) Finishes: Powder Coat Our powder coat finish assures a high level of adhesion and durability by following these steps: 1. Sanded down 2. Washed
INSTALLATION INSTRUCTIONS HD MODERN TRIPOD SWING Please read the entire manual before beginning installation.
 INSTALLATION INSTRUCTIONS 581-240-8 8 HD MODERN TRIPOD SWING Please read the entire manual before beginning installation. 1 CTN 2 WF 7 PIPE 10 TOTAL PCS 365# WEIGHT CLASS 70 1 TAB SECTION INDEX 1. 3D AND
PAIRED LADDER SAFETY GATE Installation Instructions/Operation and Maintenance Manual
 PAIRED LADDER SAFETY GATE Installation Instructions/Operation and Maintenance Manual Models: All Models Contact Information Table of Contents: Safety Precautions... 2 Product Information... 2 Support Channel
66-Bin Wire Shelf Storage Rack
 66-Bin Wire Shelf Storage Rack Owner s Manual WARNING: Read carefully and understand all ASSEMBLY AND OPERATION INSTRUCTIONS before operating. Failure to follow the safety rules and other basic safety
Model T2642E Wall Mount. Television Wall Mount with Tilt Option
 Model T2642E Wall Mount Television Wall Mount with Tilt Option Getting Started Introduction Congratulations on the purchase of your new Audio Solutions T2642E Television Wall Mount. For maximum benefit,
1.0. Post Install Kit. For Use With All Vinyl Railing BOM V1 1/13. Owner's Manual. Assembly and Installation Instructions.
 Post Install Kit Assembly and Installation Instructions PLEASE READ OWNER'S MANUAL COMPLETELY BEFORE ASSEMBLING YOUR POST INSTALL KIT. For Use With All Vinyl Railing 34106837BOM V1 1/13 Owner's Manual
VISIT THE LIFETIME WEB SITE:
 04/21/2008 VISIT THE LIFETIME WEB SITE: WWW.LIFETIME.COM ** Do Not Contact the Store ** For Assistance, including missing or broken parts, Call Customer Service at: 1 (800) 225-3865 30 Shed Extension Kit
PE45 AMAZON MONKEY BARS OWNER'S MANUAL
 PE45 AMAZON MONKEY BARS OWNER'S MANUAL WARNING! The disassembled product may contain small parts which pose a choking hazard to children under 3. IMPORTANT: This product may contain sharp points and small
PAIRED LADDER SAFETY GATE Installation Instructions/Operation and Maintenance Manual
 PAIRED LADDER SAFETY GATE Installation Instructions/Operation and Maintenance Manual Contact Information Models: DBLLSG-9-GAL to DBLLSG-24-GAL DBLLSG-9-PCY to DBLLSG-24-PCY DBLLSG-9-SS to DBLLSG-24-SS
POOL STEP INSTRUCTIONS (NE1087WH)
") POOL STEP INSTRUCTIONS (NE1087WH) 6492 The sequence of the instructions may vary at points depending on the type of step system that you have purchased. If there are different instructions for your system,
POOL STEP INSTRUCTIONS (NE1087WH) 6492 The sequence of the instructions may vary at points depending on the type of step system that you have purchased. If there are different instructions for your system,
3.0. For Home, Haven, Standard & Heavy Duty Series. Aluminum Prebuilt Fence ALUMFENCEA_BOM V3 2/14. Owner's Manual Installation Instructions.
 Aluminum Prebuilt Fence ALUMFENCEA_BOM V3 2/14 Owner's Manual Installation Instructions PLEASE READ OWNER'S MANUAL COMPLETELY BEFORE ASSEMBLING YOUR FENCE. ALL STATED SIZES ARE NOMINAL DIMENSIONS. For
LK15 PRESTIGE PLAY KITCHEN OWNER'S MANUAL
 LK15 PRESTIGE PLAY KITCHEN OWNER'S MANUAL WARNING! The disassembled product may contain small parts which pose a choking hazard to children under 3. IMPORTANT: This product may contain sharp points and
TRUCK HOIST A TOP Safety Requirements Please Read!
 TRUCK HOIST A TOP Safety Requirements Please Read! Please thoroughly read and understand these instructions before installing your Hoist-A-Top and before lifting your top. When installing the Hoist-A-Top
Installation Instructions/Operation and Maintenance Manual. Models PLG-60 PLG-72. PS DOORS Contact Information. Website psdoors.
 Rev. 091416 Pallet Gate Installation Instructions/Operation and Maintenance Manual Models PLG-60 PLG-72 Table of Contents Product Information...2 Installation Instructions...3 Operation...6 Inspection
ODYSSEY FLOOR MODEL. Owner s Manual. O-6400-F shown rev 118
 Owner s Manual ODYSSEY FLOOR MODEL O-6400-F shown 67-1455 rev 118 3730 E. Southern Avenue, Phoenix, AZ 85040 USA 800-778-8779 Workhorseproducts.com 1 Table of Contents I. Introduction & Safety Information.
117-Bin Wire Shelf Storage Rack
 117-Bin Wire Shelf Storage Rack Owner s Manual WARNING: Read carefully and understand all ASSEMBLY AND OPERATION INSTRUCTIONS before operating. Failure to follow the safety rules and other basic safety
Heavy-Duty Aluminum Arched Ramps 10,000-Lb. Capacity Per Pair.
 Heavy-Duty Aluminum Arched Ramps 10,000-Lb. Capacity Per Pair. Owner s Manual WARNING: Read carefully and understand all ASSEMBLY AND OPERATION INSTRUCTIONS before operating. Failure to follow the safety
Minimo Product Specification Rotationally Molded Plastics All Rotationally Molded Products are manufactured from Low density polyethylene with U
 Minimo - 3.5 Product Specification Rotationally Molded Plastics All Rotationally Molded Products are manufactured from Low density polyethylene with UV-stabilized color. The tensile strength of this material
H 12 Heavy Duty Modern Tripod 8 Seat Swing Heavy Duty Hangers
 Page 1 IMPORTANT Please retain this instruction sheet in your files. It contains important replacement parts information. All equipment should be installed in accordance with these instructions. It is
GROUND MOUNT INSTALLATION MANUAL
 GROUND MOUNT INSTALLATION MANUAL Contents DISCLAIMER 1 CHECKLIST 2 1. ERECT BASe 3 2. CONNECT PIPES 3 3. PLACE RAILS 4 4. SECURE LUGS 4 5. CLAMP MODULES 5 DIAGONAL BRACES (OPTIONAL) 6 UNDER CLAMPS (OPTIONAL)
Pallet Gate Installation Instructions and Operators Manual
 Pallet Gate Installation Instructions and Operators Manual Models PLG-6084 PLG-7284 PLG-6084-SST PLG-7284-SST Table of Contents Product Information...2 Installation Instructions...4 Parts and Reordering...7
MODEL # MSC-4120-BM. Spring Breeze with Me and My Toddler Metal Swing Chair OWNER S MANUAL
 MODEL # MSC-4120-BM Spring Breeze with Me and My Toddler Metal Swing Chair OWNER S MANUAL ASSEMBLY, INSTALLATION, CARE, MAINTENANCE AND USER INSTRUCTIONS FOR RESIDENTIAL USE ONLY WARNING This product is
ALUMINUM CURB RAMP. Model 98037
 ALUMINUM CURB RAMP Model 98037 Set up And Operating Instructions Diagrams within this manual may not be drawn proportionally. Due to continuing improvements, actual product may differ slightly from the
LADDER SAFETY GATE Installation Instructions/Operation and Maintenance Manual
 LADDER SAFETY GATE Installation Instructions/Operation and Maintenance Manual Models: All Models Contact Information Table of Contents: Safety Precautions... 2 Product Information... 2 Operation... 3 Standard
LOAD RAMP 1000 LB. CAPACITY
 LOAD RAMP 1000 LB. CAPACITY 55424 ASSEMBLY AND OPERATING INSTRUCTIONS Safely roll Dirt Bikes and more into your Pickup! 3491 Mission Oaks Blvd., Camarillo, CA 93011 Visit our Web site at http://www.harborfreight.com
Operator s Manual for Morse Mobile-Karrier for 55-Gallon Plastic or Steel Drum
 Contents Page Receiving Procedures.................... 1 Warranty............................. 1 Safety Information..................... 1-2 Machine Description................... 3 Operating Instructions....................
WARNING! Please follow all these Safety, Maintenance and Assembly Instructions. Failure to do so could result in serious or fatal injury.
 HERACLES SEESAW INSTRUCTION MANUAL No. 8035 Ages: 3-8 DO NOT DISCARD: IMPORTANT LITERATURE. PLEASE READ & FOLLOW INSTRUCTIONS CAREFULLY BEFORE ASSEMBLY AND USE OF THIS PRODUCT. PLEASE KEEP THIS INSTRUCTION
Aluminum Bi-Fold Pet Ramp
 Aluminum Bi-Fold Pet Ramp 300-Lb. Capacity. Owner s Manual WARNING: Read carefully and understand all ASSEMBLY AND OPERATION INSTRUCTIONS before operating. Failure to follow the safety rules and other
55-Gallon Tilting Drum Ring
 55-Gallon Tilting Drum Ring Owner s Manual WARNING: Read carefully and understand all ASSEMBLY AND OPERATION INSTRUCTIONS before operating. Failure to follow the safety rules and other basic safety precautions
Festoon Manual Heavy Duty C-Track
 Festoon Manual Heavy Duty C-Track 966300.3 Heavy Duty C-Track Manual CONDUCTIX INCORPORATED The technical data and images which appear in this manual are for informational purposes only. NO WARRANTIES,
OWNER S MANUAL SERIES MDS-96-BK, SM, DR
 SERIES MDS-96-BK, SM, DR OWNER S MANUAL Introduction... 1 Bill of Materials... 2 Assembly Instructions. 3 Warranty....12 IMPORTANT NOTES, WARNINGS AND SAFETY INSTRUCTIONS Ensure that all employees understand
Customer Support: (03)
") Customer Support: (03) 9786 0055 Windsor Multi Play Set (MPS132B) Thank you for purchasing the Windsor Multi Play Set (MPS132B) Warning: Only for domestic outdoor use. This Play Set satisfies all the requirements
Customer Support: (03) 9786 0055 Windsor Multi Play Set (MPS132B) Thank you for purchasing the Windsor Multi Play Set (MPS132B) Warning: Only for domestic outdoor use. This Play Set satisfies all the requirements
Installation, Operating and Maintenance Instructions Incognito Series Air Curtain
 Installation, Operating and Maintenance Instructions Incognito Series Air Curtain Models: INC10036, INC10042, INC10048, INC10064, INC10072, INC10084, INC10096, INC10108, INC10120, INC10144. READ THIS OWNER
OWNER S MANUAL SERIES MDS-96-BK, SM, DR
 VESTIL MANUFACTURING CORP. 2999 N. Wayne St., Angola, IN 46703 Ph: 260-665-7586 Fax: 260-665-1339 E-mail: sales@vestil.com Website: www.vestil.com SERIES MDS-96-BK, SM, DR OWNER S MANUAL Introduction...
AQUA UNO TUB DOOR INSTALLATION INSTRUCTIONS
 AQUA UNO TUB DOOR INSTALLATION INSTRUCTIONS IMPORTANT DreamLine TM reserves the right to alter, modify or redesign products at any time without prior notice. For the latest up-to-date technical drawings,
Aluminum Bi-Fold Arched Ramps
 Aluminum Bi-Fold Arched Ramps 3000-Lb. Capacity Per Pair Owner s Manual WARNING: Read carefully and understand all ASSEMBLY AND OPERATION INSTRUCTIONS before operating. Failure to follow the safety rules
HATCHSAFE Installation Instructions/Operation and Maintenance Manual Models: All Models
 HATCHSAFE Installation Instructions/Operation and Maintenance Manual Models: All Models Contact Information Table of Contents: Safety Precautions... 2 Product Information... 2 Installation Instructions...
Installation Instructions
 Installation Instructions Thank you for choosing the Synergy Reef Shadow Overflow. Please note that this is a Do-It-Yourself project and can be installed in either glass or acrylic aquariums. Always keep