Cable kit (TPP) Installation Instructions
|
|
|
- Clemence Jones
- 6 years ago
- Views:
Transcription
")


1 Cable kit (TPP) Installation Instructions
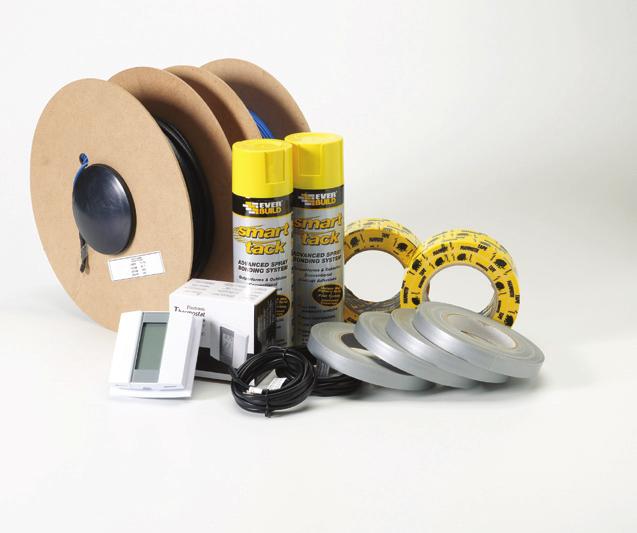
2 Cables (BLUE) ambi-heat brand manufactured by Thermopads Before you begin installing please read through these instructions carefully & check that you have all the components required. The system is designed for installation below tiles, stone or marble flooring, it may also be installed below vinyl, laminate & thin carpets but in these cases must first be covered with a suitable fibre reinforced levelling compound. Contents of heating kit: 3mm twin-core, earth screened heating cable on drum(s) Smart tack spray adhesives Double sided edge tapes High adhesion fixing tapes Digital thermostat with 2 x floor temperature sensors Guarantee Certificate (page 10 of this booklet) Installation Notes 2 The system requires a mains voltage 230/240v & must be connected by a suitably qualified person in accordance with part P building regulations. All wiring must conform to current IEE wiring regulations. The system is intended for heating tiled or stone floors, typical recommended outputs are: 130watts per sqm, achieved by spacing the cable at around 7.0cms between the loops. 150watts per sqm, achieved by spacing the cable at around 6.5cms between the loops. 165watts per sqm, achieved by spacing the cable at around 6.0cms between the loops. See supplementary instructions when calculating your actual cable spacing. The cable is double insulated & inside the first outer sheath (coloured black) there is an earth screen (the copper coloured braid). The cable also contains a built in return meaning that the cable only has to be connected to the thermostat from one end. Within the cable core there are 2 wires - one brown, one blue - these are the live & neutral. For larger areas, if two or more cables are supplied, these can usually be connected together at the thermostat or by using a small blank fronted connection box. Cables must be connected in parallel. The system is suitable for installing on any sub-floor which is sound and suitable for tiling, in general this will be concrete, plywood or cement faced tile-backer boards some water resistant composite boards may also be suitable, but it is not recommended to tile directly onto hardboard MDF or standard grade chipboard as these substances absorb moisture & subsequent swelling could cause tiles to crack or dislodge.

3 Note - if installing on a newly finished concrete screed the required minimum drying out or curing period should be followed before installing your heating. The electrical & electromagnetic fields generated are negligible & well within all recommended European & International guidelines. The Blue heater cable MUST NOT be cut, shortened or joined at any point. Electrical Provision Before starting the installation you should make provision for the electrical connections, for smaller areas this may be possible by means of a switched fused spur with an appropriately sized fuse or a combined RCD spur from an existing circuit - see above. However for larger areas a dedicated circuit from the consumer unit will be required you should always consult with your electrician concerning your specific requirements. Note - if installing in a bathroom or other wet room the thermostat must be located OUTSIDE of the room, for example in a bedroom or hallway/ landing. Preparation Ensure that the sub-floor is solid & suitable for tiling, free from dust & debris. Wood flooring with more than 30cms between the joists should ideally be reinforced to prevent flexing & the possibility of tiles dislodging. Wood flooring can be reinforced using WBP plywood or a reinforced cement coated tile-backer board. Insulation The insulation levels of a floor will affect both the performance & running costs of an underfloor heating system & adequate insulation is recommended wherever possible. It would not generally be considered necessary to insulate small areas where the requirement is simply to take the chill off the floor, however in cases where the heating is being installed over large areas, particularly as the primary heating source in a ground floor room or conservatory, insulation boards will greatly reduce warm-up times & running costs. Always use a reinforced cement coated insulation board where possible. Important Notes: The system MUST incorporate a 30ma RCD protection either at the distribution board or by replacing the fused spur with a combined fused spur/rcd. The blue heater cable MUST NOT be cut or joined at any point only the black cold cable & floor probe can be cut or lengthened. The joint between the blue heater cable & the black cold cable MUST be located under the floor, do not bend this connection. For larger areas a separate circuit will be required always consult your electrician concerning your specific requirements. The thermostat has a rating of 16amps loads in excess of 16 amps (3.6kw approx) will need to be connected via a suitable switched contactor consult your electrician on this. The thermostat MUST NOT be located in a bathroom. 3
4 Installation First prepare the sub-fl oor ensuring that it is clean & free from grease, dirt or debris. Note - if installing on a bitumen base, this must either be removed or covered with a suitable insulation board (Marmox) before proceeding. The most suitable sub-fl oors are: concrete, tile-backer boards, existing tiles, water-resistant timber e.g. WBP Ply. Supplementary instructions for Pro-installer cable packs (TPP) and (SC) Pro-installer pack contents. Heavy duty double sided tape, Smart tack spray adhesive, strapping tapes and additional (back up) fl oor temperature probe. Prior to installation of your heating cable system please ensure that correct size heating system has been ordered. Cable spacing - Measure the physical fl oor area to be heated (m²) and divide by total length(s) of cable to determine spacing between cable loops. Target Range 60mm 70mm (6.0cm 7.0cm). Do not attempt to lay cables if calculated spacing is below 50mm. 1. Vacuum the fl oor area thoroughly to remove dust and debris. 2. Apply smart tack spray adhesive as shown below, it is generally best to run heating cables at 90º to te thermostate wall. 3. Double sided adhesive tapes are bonded to spray adhesive coating after a few minutes drying time. Tapes are fi xed in twin parallel lines starting approximately 6cm out from the adjacent wall Cables are run between the taped lines at the pre-calculate intervals, loops are positions on the double sided tape and then secured with strapping tape, ensure that cables are pulled taught to keep them as fl at as possible to the fl oor.

5 5. Once cables are laid out and held securely in place across the loop ends additional strapping tapes are applied across the heating cables to run along the spray adhesive trails applied in step Primary and secondary floor probes are sited adjacent to each other between cable loops approx 300mm in the heated area. Spray adhesive and double sided tapes are used to hold probes securely in place. Only the primary probe is connected to the thermostat, the secondary or reserve probe is left disconnected and coiled up behind the thermostat. In the unlikely event of probe failure the secondary unit can be connected in place of the faulty unit. 5
6 Step 5 Calculate the cable spacing, this is a very important step & MUst be done correctly to ensure all the cable is used up & avoid extra work later. First measure the area to be heated in m² (do not include the area taken up by fi xed objects such as baths/showers & kitchen units), then divide this area by the length of the cable shown on the drum. The cable is 10 watts per linear metre so for example a 350 watt kit contains 35 metres of heating cable. The spacing is calculated by dividing the total m² of the area actual to be heated by the cable length in metres (cable length on side of packaging). Step 6 Once the spacing has been determined, leaving a perimeter of 5cms around the edge of the room, mark out the fl oor at the calculated intervals. This will usually be between 6 & 8cms if your calculated spacing is less than 5cms stop & do not install the kit size is too large for the room. A spacing of 8cms will in many cases will only take the chill off the fl oor to use as a heating source in most domestic situations the spacing would be between 6-7cms (this is always dependent on insulation levels & type of construction). Step 7 Once marked out, position one roll of tape in each corner of the room (Fig 3) & then begin to loop out the cable as shown (Fig 4). At this stage only use a single line of tape at each edge in case you have to adjust the spacing slightly later. You must ensure that the cable is only installed in the free fl oor area & is not routed below any fi xed objects or drains. Note the joint between the black cold cable & the Blue heater cable MUST be located under the fl oor tiles. Do not BenD the CoLD tail ConneCtion. Step 8 Adjust the spacing if necessary to ensure all the cable is used up & the fl oor has an even covering then tape over the cable at regular intervals, ensuring that it is well secured to the fl oor. Step 9 Position the sensor between two runs of cable & tape into position within a conduit. The conduit housing will need to be channelled in to your subfl oor to remain fl ush with the heating cable. The sensor wire can be shortened or lengthened, but if you need to cut it only cut the end containing the wires. Do not cut the end which contains the plastic sensor. 6 The connections to the thermostat can now be made but Do not turn the system on until it has been tiled. (See separate instructions with thermostat).

7 Step 10 Test the cables resistance again using a multi-meter. If you do not have access to a multi-meter, you may fi t a fused plug & plug the system into a socket for a few minutes to ensure that the cable starts to heat up. Do not leave the cable plugged in for more than 5 minutes & UnDeR no CiRCUMstanCes should you plug the system in when the cable is still on the drum or partly coiled up. Step 11 If desirable, cover the cables with a thin layer of latex based levelling screed (4-5mm), this will help protect the cables when tiling. There are many suitable products available. Details of manufacturers can be found later on. If you do not wish to use a latex levelling screed, you may tile directly over the cables in a single operation, however, extra care must be taken not to damage or dislodge the cables. If you are using a suitable vinyl or thin carpet as the fi nal fl ooring, we recommend a minimum 8mm (5+3) screed over the cables to ensure even heat distribution. Step 12 Tile the fl oor using a fl exible tile adhesive & grout as per industry standards & the manufacturer s instructions. Entire heating cable must be fully embedded. Finally wait at least one Week before turning the heating system on to allow time to dry. note The heating may be slow to react at fi rst, especially if installed on a new screed fl oor or in a new building start by setting the fl oor temperature at around 20-22º C and build up by 2 degrees per day until your desired temperature is reached (usually 25-28º C). Please see separate instructions for connection & operation of the digital thermostat. 7
8 Testing your Cables All Ambient / Thermopads heating cables and mats are tested prior to leaving the factory, however, it is important to carry out the resistance checks detailed on the guarantee card to ensure correct operation of the heating system and to ensure full compliance with the guarantee. Test the cables resistance again using a multi-meter. If you do not have access to a multi-meter, you may fi t a fused plug & plug the system into a socket for a few minutes to ensure that the cable starts to heat up. Do not leave the cable plugged in for more than 5 minutes & UnDeR no CiRCUMstanCes should you plug the system in when the cable is still on the drum or partly coiled up. The connections to the thermostat can now be made but Do not turn the system on until it has been tiled. (See separate instructions with thermostat). Do s & Dont s Do Fully embed the Heating cable Read through these instructions carefully before beginning work Use fl exible adhesives & grouts Test the cable BefoRe and after tiling Be careful not to damage or dislodge the cable during tiling Ensure the cable is spaced no closer than 50mm between loops Try to protect the cable with cardboard or carpet during tiling Wait at least 7 days before turning on the system Read the separate installation & operating instructions for the thermostat Ensure that the joint between the black & blue cable is fully embedded beneath the tiles Don t Attempt to cut the blue heater cable at any point Allow the wires to cross or touch Allow foot traffi c over the wire before tiling Cut tiles directly over the cable Place tools or stacks of tiles on top of the cable Do Ring your supplier for advice if in doubt regarding any aspects of your heating installation. technical support:


9 Resistance Tables 3mm Twin Wire Cables Watts (power) UnDeR tile CaBLes BY thermopads Length (Meters) Resistance (ohms) Resistance readings tolerance = +10 / -6% All cables are resistance tested post production, a specifi c reading for each cable will be shown on the side of the cable box. Insulation resistance L+N to Earth should be greater than 500mΩ Technical Support Tel: info@ambient-ufh.co.uk floor temperature PRoBe Resistance (ohms) 15 C - to - 20 C 9
10 Guarantee Certificate Ambient Electrical Ltd. Under tile Cables, Mats, in screed systems & thermolam This guarantee is only valid if installed by a qualifi ed electrician/electrical contractor. This installation must conform to Part P of the building regulations 2005 and be carried out in accordance with current IEE wiring regulations. In order to validate the guarantee the resistance values & signature of the installer must be completed. A currently calibrated piece of test equipment must be used. The guarantee covers reported manufacturing defects within the heating cable for the life time of your fl oor fi nish or 15 years whichever is the sooner; programmable thermostats and fl oor sensors are covered for a period of two years from date of original invoice. Faulty components covered by this guarantee are repaired or replaced at our discretion, where repair or replacement is not practical a refund of original purchase price may be offered. Other costs such as replacement or repair of fl ooring materials are not covered by this guarantee. The guarantee is invalid if faults are caused by damage attributable to incorrect installation, misuse or mechanical damage such as drilling or puncturing the fl oor. Please retain this guarantee along with your original purchase invoice. test Report PRoDUCt Wattage ResistanCe BefoRe fitting ResistanCe after fitting insulation ResistanCe 500v Pn-e Mat / Cable 1. Mat / Cable 2. Mat / Cable 3. Mat / Cable 4. Mat / Cable 5. Mat / Cable 6. Customer Name: Customer Address: Electrical installation by: Serial number of calibrated test equipment: Underfl oor Heating installation by: Date Signature 10
11 Professional Cable Kits (TPP) All TPP kits include: twin wire earth screened Thermopads heating cable, programmable digital thermostat with 2 x floor temp probe, adhesive strapping tapes, smart tack spray adhesive and double sided edge tapes. Part Number (W) Cable length(s) Coverage (M²) System Used (Please Tick) Invoice Number TPP m TPP140 14m TPP170 17m TPP m TPP290 29m TPP350 35m TPP400 40m TPP480 48m TPP560 56m TPP640 64m TPP700 70m TPP760 76m TPP820 82m TPP920 92m TPP m TPP m TPP m TPP m TPP m TPP m TPP m+104m TPP m+114m TPP m+125m TPP m+125m TPP m+145m TPP m+145m TPP m+160m TPP m+160m TPP m+180m TPP TPP TPP

12 Ambient Electrical Ltd
WARRANTY INSTALLATION MANUAL. Ultra thin cable. Easy to install. Fully compliant to latest regulations CE approved INSTALLATION MANUAL
 INSTALLATION MANUAL LIFETIME WARRANTY Ultra thin cable Easy to install Fully compliant to latest regulations CE approved Suitable for most fl oor coverings (always check with fl oor manufacturer) UNDERFLOOR
UNDERFLOOR HEATING SYSTEM INSTALLATION MANUAL LIFETIME WARRANTY INSTALLATION MANUAL. Ideal for large areas. Easy to install
 LIFETIME WARRANTY INSTALLATION MANUAL Ideal for large areas Easy to install Fully compliant to latest regulations CE approved Suitable for most floor coverings (always check with floor manufacturer) UNDERFLOOR
Warmup helpline:
 Contents 3 4 5 6 Sizing guide Calculate the actual spacing of the heating element Technical notes Wiring configuration Your Warmup Undertile Heater has been designed so that installation is quick and straight
NATURE INTERNATIONAL NEW ZEALAND LTD.
 Installation Manual Printed by: NATURE INTERNATIONAL NEW ZEALAND LTD. Post: PO Box 303358 north harbour, north shore 0751 AUCKLAND NEW Zealand E-mail: naturenz@hormail.com IMPORTANT Read this manual before
Installation Manual. ThermMAT ThermCABLE FME. Technical Helpline:
 Installation Manual ThermMAT ThermCABLE FME Floor Preparation Installation Planning Heater MAT160,MAT200 FME ThermCable Testing FAQ 1 3 4 6 7 10 11 Technical Helpline: 08081 293020 Floor Preparation Before
Undertile Heating Mat Installation Manual
 Undertile Heating Mat Installation Manual Contents Safeguards and Warnings... 3 1 General Information... 3 1.1 Use of the Manual... 3 1.2 Safety Guidelines... 3 1.3 Remember to measure resistance... 3
Installation Manual 150W/m²
 Installation Manual 150W/m² Technical advice available from Total Tiles: Tel: 08444876548 Email: enquiries@totaltiles.co.uk IMPORTANT - PLEASE READ INSTRUCTIONS FULLY BEFORE COMMENCING INSTALLATION 1 Contents
Installation Manual Loose Cable Heating
 Installation Manual Loose Cable Heating Technical advice available from Total Tiles: Tel: 08444876548 Email: enquiries@totaltiles.co.uk IMPORTANT - PLEASE READ INSTRUCTIONS FULLY BEFORE COMMENCING INSTALLATION
MESH FLOOR HEATING SYSTEMS INSTALLATION INSTRUCTIONS
 MESH FLOOR HEATING SYSTEMS INSTALLATION INSTRUCTIONS MESH FLOOR HEATING SYSTEMS TOLL FREE: 1.800.778.WARM(9276) PHONE: 604.529.4400 FAX: 604.529.4404 EMAIL: RES.customercare@pentair.com www.nuheat.com
Nuheat Mat FLOOR HEATING SYSTEM. Installation Guide TILE, STONE & MARBLE LAMINATE & ENGINEERED WOOD
 Installation Guide TILE, STONE & MARBLE LAMINATE & ENGINEERED WOOD Nuheat Industries Limited 2013 Nuheat Industries Limited. All rights reserved. The entire contents of this manual, including but not limited
Technical Helpline. Installation Manual. Warmup DCM-PRO. Electric Heating System
 Warmup DCM-PRO Installation Manual Technical Helpline 0345 345 2288 IMPORTANT! Please read this manual before attempting to install your Warmup product. Complete and submit your warranty form online at
Veria Quickmat 1C 100/150W/m²
 Veria Quickmat 1C 100/150W/m² Installation guide Installationsanleitung Navodila za montažo Руководство по установке Instalãcija Instrukcija Manuel d installation Manuale di installazione Installatiehandleiding
RADIANT PANEL SYSTEM PLANNING & INSTALLATION. Roth Radiant Heating Systems
 RADIANT PANEL SYSTEM PLANNING & INSTALLATION Roth Radiant Heating Systems INTRODUCTION The Roth Radiant Panel System was developed for the wood frame houses of the North American and Scandinavian markets.
Installation Guide. Floor heating. Vodoley CO
 Installation Guide Floor heating Vodoley CO Bulgaria, 5000 V.Tarnovo, 7 Ionovka str., Phone/Fax: +359 62 649652 E-mail: floorheating@vodoley91.com, vodoley98@hotmail.com www.vodoley91.com 2 Vodoley Co.
TempZone Custom Mat Electric Radiant Floor Heating System Installation Manual
 TempZone Custom Mat Electric Radiant Floor Heating System Installation Manual Free Design Service 24/7 Installation Support No Nonsense Warranty (800) 875-5285 www.warmlyyours.com INSTALLATION INSTRUCTIONS
ELECTRIC CABLE GUIDE
 ELECTRIC CABLE GUIDE LIMITED WARRANTY AND LIABILITY Infloor Radiant Heating, Inc. warrants to the original purchaser only, that if there are any defects in material or workmanship in any electric mat or
Nuheat Mat Installation Manual Nuheat Electric Floor Heating System
 Nuheat Mat Installation Manual Nuheat Electric Floor Heating System Includes installation guidelines for installing the Nuheat Floor Heating System under tile, stone and laminate / engineered wood surfaces.
TILING SPECIFICATIONS
 TILING SPECIFICATIONS SPECIFICATION NUMBER: NR204-16 PREPARED BY: Mike Cubley PREPARED FOR: Porcelain Plus ATTENTION: Kirk Pollock INSTALLATION: 712 Turner Floor and Wall Tiling Specification. M40 STONE/
Mat PRE-BUILT ELECTRIC FLOOR HEATING MAT INSTALLATION GUIDE
 Mat PRE-BUILT ELECTRIC FLOOR HEATING MAT INSTALLATION GUIDE THERMAL MANAGEMENT WWW.NUHEAT.COM1 TABLE OF CONTENTS SECTION 1: INSTALLATION PREPARATION 1.1 Product Overview... 4 1.2 How To Order... 5 1.3
Robust, 17 th Edition and Part L Compliant
 Robust, 17 th Edition and Part L Compliant 6mm Red In-screed Heating Cables 7mm Black Outdoor Heating Cables Fitting Guide Version 3 Call 01444 247020 for Technical Support COMPLIANT C OM P LIAN T Please
HYBRID. Pre-Laying Checks
 Warning Veles CK has been developed for exceptional stability in low and high temperatures, however, after installation extreme temperatures (under 5 C or over 50 C) should be avoided by use of interior
EverWarm FAQ - What is EverWarm? EverWarm How does EverWarm work?
 EverWarm FAQ - What is EverWarm? EverWarm carbon based electric heating film is a carbon based film with full coverage heat production. It is smooth, thin (the thickness of two business cards) and easy
UNDERFLOOR HEATING SYSTEMS ESTIMATE NOTES AND DETAILS
 UNDERFLOOR HEATING SYSTEMS ESTIMATE NOTES AND DETAILS UFH INFORMATION PACK DATA SHEET 1 MANIFOLD SET-UP & DIMENSIONS UFH INFORMATION PACK DATA SHEET 2 TYPICAL LAYOUTS Counterflow is a common circuit pattern
Type FLX Freezer Floor Frost Heave Protection DESIGN GUIDE
 Type FLX Freezer Floor Frost Heave Protection DESIGN GUIDE Commercial Products Type FLX TM Freezer Floor Frost Heave Protection DESIGN GUIDE Contents Introduction...2 Application Information... 2-3 Product
Installation Guide Details correct as of December 2013
 Installation Guide Details correct as of December 2013 Pre-installation checklist Solid/Screed floors 1. Insulation fitted neatly and stable with all gaps and joints taped 2. If using liquid screed, a
Product Data Sheet Waterproofing Membrane for Ponds and Water Features Description Uses Suitable Surfaces Additional Uses Specification
 Product Data Sheet Pondseal Waterproofing Membrane for Ponds and Water Features Description Pondseal is a polyurethane / acrylic co-polymer, water based coating which when fully cured, forms an impervious,
Installation Manual. Snowmelt Cable 25W/m (W25SM) TECHNICAL HELPLINE
 TECHNICAL HELPLINE") The World s best-selling floor heating brand TM Installation Manual Snowmelt Cable 25W/m (W25SM) TECHNICAL HELPLINE 0845 345 2288 IMPORTANT Read this manual before attempting to install your heating system.
The World s best-selling floor heating brand TM Installation Manual Snowmelt Cable 25W/m (W25SM) TECHNICAL HELPLINE 0845 345 2288 IMPORTANT Read this manual before attempting to install your heating system.
Commercial Resilient Sheet Flooring
 Commercial Resilient Sheet Flooring INSTALLATION 160 South Industrial Blvd. Calhoun, GA. 30701 MohawkGroup.com Technical Services Department 508 East Morris St. Dalton, GA 30721 800.833.6954 product_tech@mohawkind.com
DURABASE CI 1/5. Underlay mats for decoupling and waterproofing tiled flooring APPLICATIONS AND FUNCTION.
 Since the usage and finishing of the product is not under our control, we accept no liability for the success of the work and can therefore only guarantee the nature of our products as per the accompanying
REV:6-30/09/30. Liquid Rubber Timber Specification
 REV:6-30/09/30 Liquid Rubber Contents: 1. Preparation 2. Application 3. Additional Information 4. Things To Be Aware Of When Applying To Timber 1. Preparation: Prior to commencing ensure the decking is
MILLIMATTM - Underfloor heating mat
 MILLIMATTM - Underfloor heating mat N-HEAT COLLECTION www.nexans.com/nheat the inventor o f heating cables N-HEAT COLLECTION -1926 When choosing the N-HEAT electrical heating solutions you choose undisputable
TECHNICAL BULLETIN TB147 THE INSTALLATION OF ARDEX DS40 SOUND REDUCTION MATTING IN INTERNAL INSTALLATIONS
 TECHNICAL BULLETIN TB147 THE INSTALLATION OF ARDEX DS40 SOUND REDUCTION MATTING IN INTERNAL INSTALLATIONS TB147.004 Ardex Australia 2008-2014 Date, Wednesday, 12 March 2014 INTRODUCTION & SCOPE There is
SECTION LATEX-MODIFIED MEDIUM BED MORTAR
 SECTION 09305.24 LATEX-MODIFIED MEDIUM BED MORTAR This product guide specification can be used to specify Hydroment Big Tile & Stone Mortar, a latex-modified, medium bed mortar designed for setting large
PLATON RUGGED, DIMPLED HIGH-DENSITY POLYETHYLENE (HDPE) MEMBRANE THAT KEEPS FOUNDATIONS AND FLOORING DRY ADVANCED TECHNOLOGY EASY INSTALLATION
 MEMBRANE THAT KEEPS FOUNDATIONS AND FLOORING DRY ADVANCED TECHNOLOGY EASY INSTALLATION") DRAINAGE SOLUTIONS SINCE 1908 PLATON RUGGED, DIMPLED HIGH-DENSITY POLYETHYLENE (HDPE) MEMBRANE THAT KEEPS FOUNDATIONS AND FLOORING DRY ADVANCED TECHNOLOGY EASY INSTALLATION PROVEN PERFORMANCE ARMTEC.COM
DRAINAGE SOLUTIONS SINCE 1908 PLATON RUGGED, DIMPLED HIGH-DENSITY POLYETHYLENE (HDPE) MEMBRANE THAT KEEPS FOUNDATIONS AND FLOORING DRY ADVANCED TECHNOLOGY EASY INSTALLATION PROVEN PERFORMANCE ARMTEC.COM
Installation Manual for your TempZone Electric Radiant Floor Heating System (Twin Conductor)
") Installation Manual for your TempZone Electric Radiant Floor Heating System (Twin Conductor) Free Design Service 24/7 Installation Support No Nonsense Warranty (800) 875-5285 www.warmlyyours.com 1 Understanding
Installation Manual for your TempZone Electric Radiant Floor Heating System (Twin Conductor) Free Design Service 24/7 Installation Support No Nonsense Warranty (800) 875-5285 www.warmlyyours.com 1 Understanding
Elegant design with the high performance heating technology of tomorrow - today. Electric Combination Radiator Systems
 Elegant design with the high performance heating technology of tomorrow - today Electric Combination Radiator Systems A n e l e g a n t s o l u t i o n f o r a l l h e a t i n g s i t u a t i o n s The
Nuheat Cable FLOOR HEATING SYSTEM. Installation Guide TILE, STONE & MARBLE LAMINATE & ENGINEERED WOOD
 Installation Guide TILE, STONE & MARBLE LAMINATE & ENGINEERED WOOD Nuheat Industries Limited 2012 Nuheat Industries Limited. All rights reserved. The entire contents of this manual, including but not limited
1.3 Work shall include all reinforcement and accessories necessary to complete installation.
 CERAMIC TILING GENERAL INFORMATION 1.1 Ceramic mosaic tile floors and bases, glazed wall tile wainscots and walls, and marble thresholds. 1.2 Installation will typically be with latex-portland cement mortar
Cable ELECTRIC FLOOR HEATING SYSTEMS INSTALLATION GUIDE
 Cable ELECTRIC FLOOR HEATING SYSTEMS INSTALLATION GUIDE THERMAL MANAGEMENT WWW.NUHEAT.COM TABLE OF CONTENTS SECTION 1: INSTALLATION PREPARATION 1.1 Installation Guidelines... 4 1.2 Before You Start...
Geometric and Quarry Floor Tiling Installation Guide
 Geometric and Quarry Floor Tiling Installation Guide February 2017 1 Geometric and Quarry Tiling Installation Guide 1 Important Notes 3 Internal Floor Substrates & Preperation 4 Finished Floor Levels 4
Freedom One-Piece Barrier Free Showers Installation Instructions
 Tools & Materials you might need for proper installation Materials: 2-1 gallon buckets of solid wood flooring adhesive or 100% silicone adhesive (non-shrink) 20-1.25 wood screws 1-5 gallon bucket (to mix
INSTALLATION MANUAL
 INSTALLATION MANUAL www.wattsradiant.com 800-276-2419 2 HeatWeave WarmWire Installation Guidelines Welcome WarmWire is a simple, economical way to warm your floors, and provide years of lasting comfort.
Caparol System PRO Data sheet
 System features Expanded polystyrene insulation Cost effective solution Excellent detailing options Proven technology Wide variety of colours Reliable protection and crack resistance Proven track record
AQUATITE. Also designed as: Crack/gap filler for masonry and unglazed ceramics Sealants against leaks Repairer for roof cracks and gutters
 AQUATITE Revision Date: september 2007 Description Bondall AquaTite is a grey, brushable, waterproofing coating that forms a flexible yet tough, seamless membrane. This single pack product exceeds the
Schlüter -DITRA-HEAT-E Under tile and stone heating with Schlüter -DITRA technology Installation Manual
 Schlüter -DITRA-HEAT-E Under tile and stone heating with Schlüter -DITRA technology Installation Manual Installation Helpline: 01530 813396 28 27 26 25 24 23 22 21 20 19 18 17 16 15 14 6:00 h 8:00 h 10:00
GLUE-DOWN INSTALLATION VIRTUO 30 / 55
 Before laying the flooring, it is a good idea to inspect it and to identify any problems with the appearance. If there are any visible defects, please notify GERFLOR and wait to hear from them before laying
RMF Intercell. NBS Specification 2013 K41
 RMF Intercell NBS Specification 2013 K41 InterfaceFLOR BV. K41 Specification 40mm, 60mm, 80mm, 90mm and 110mm K41 Raised access floors To be read with Preliminaries/ General conditions. TYPES OF RAISED
Fiber Reinforced Tile and Stone Mortar
 , ANSI A 118.4, ANSI A 118.11 ARDEX X 77 MICROTEC Fiber Reinforced Tile and Stone Mortar The most advanced technology ideal for large format porcelain tile installations,exterior or interior, floor or
DURABASE CI. Underlay mats for decoupling and sealing tiled flooring 1/5 A P P L I C A T I ONS AND FUNCTION.
 Since the usage and finishing of the product is not under our control, we accept no liability for the success of the work and can therefore only guarantee the nature of our products as per the accompanying
3000 FLEX-WARM DIV 9 ANSI A118.12
 DESCRIPTION Flextile system is a unique floor warming and crack isolation system installed under thin-set installations of tile and stone. is a safe and efficient electric floor-warming product for interior
Floors Walls Roofs. Jabfloor Premium board Jablite Premium board Jabfloor board Jablite board. APPLICATION: Basements PRODUCTS: Vencel Resil Limited
 Floors Walls Roofs APPLICATION: Basements PRODUCTS: Jabfloor Premium board Jablite Premium board Jabfloor board Jablite board Vencel Resil Limited Head Office: Infinity House, Anderson Way, Belvedere,
Ground Terraces. bal-adhesives.com. Part B: Installation Guide
 Ground Terraces Part B: Installation Guide Enjoy problem-free ground terrace systems with Gutjahr System Technology from BAL market leaders in full tiling solutions. This step-by-step guide explains in
C&G 2382 BS7671: th Edition IEE Wiring Regulations. 25 Questions
 C&G 2382 BS7671:2008 17 th Edition IEE Wiring Regulations 25 Questions 1. BS7671 states that installation design must take into account a. current copper prices b. the effects of climate change c. a comparison
Kolorines Glass Mosaic Tiles Project Specification
 Kolorines Glass Mosaic Tiles Project Specification SUGGESTED SPECIFICATION Glass Mosaic Tile Installation for Swimming Pools NOTES TO SPECIFIER: 1. Specify PremiumPlus Thin-Set mixed with CustomFlex Additive
USA USA USA PURE CLICK
 MADE IN BELGIUM MADE IN BELGIUM 0. MADE IN BELGIUM 100 % QUALITY USA USA USA 100 100 % % QUALITY QUALITY PURE CLICK CLICK CLICK DESIGN CLICK DESIGN FLOOR FLOOR INSTALLATION MANUAL 2 Pure Click 40 is a
Application Guidelines
 Application Guidelines 1.0 SCOPE This document contains general instructions and recommended practices for the application of the SERVIWRAP cold applied tape coating system. The various coating grades
ECO OUTDOOR INSTALLATION TIPS FLOORING TORINO MELBOURNE SYDNEY BRISBANE ADELAIDE PERTH T ECOOUTDOOR.COM.AU
 ECO OUTDOOR INSTALLATION TIPS FLOORING TORINO MELBOURNE SYDNEY BRISBANE ADELAIDE PERTH T. 1300 13 14 13 ECOOUTDOOR.COM.AU Installations Tips Please note these tips are guides only and should be used in
TempZone Electric Radiant Floor Heating System (Twin Conductor) Installation Manual
 Installation Manual") TempZone Electric Radiant Floor Heating System (Twin Conductor) Installation Manual Free Design Service 24/7 Installation Support (800) 875-5285 www.warmlyyours.com Understanding The System How The System
TempZone Electric Radiant Floor Heating System (Twin Conductor) Installation Manual Free Design Service 24/7 Installation Support (800) 875-5285 www.warmlyyours.com Understanding The System How The System
1. Division 09 Section "Rough Carpentry."
 GREENSPOINT AND LAUDER RD. EC/PRE-KlK PAGE 1 SECTION 096400 - WOOD FLOORING PART 1 - GENERAL 1.1 RELATED DOCUMENTS A. Drawings and general provisions of the Contract, including General and Supplementary
Slate Floor Tiling Installation Guide
 Slate Floor Tiling Installation Guide February 2017 1 Slate Tiling Installation Guide Important Notes 3 Internal Floor Substrates & Preperation 4 Finished Floor Levels 4 Under Floor Heating 5 Hearths and
COMPOSITE (WPC) ENGINEERED VINYL FLOORING INSTALLATION
 ENGINEERED VINYL FLOORING INSTALLATION") COMPOSITE (WPC) ENGINEERED VINYL FLOORING INSTALLATION PLEASE READ ALL INSTRUCTIONS CAREFULLY BEFORE YOU BEGIN INSTALLATION! IMPROPER INSTALLATION WILL VOID WARRANTY. STOP! WPC Engineered Vinyl Flooring
COMPOSITE (WPC) ENGINEERED VINYL FLOORING INSTALLATION PLEASE READ ALL INSTRUCTIONS CAREFULLY BEFORE YOU BEGIN INSTALLATION! IMPROPER INSTALLATION WILL VOID WARRANTY. STOP! WPC Engineered Vinyl Flooring
Geometric and Quarry Floor Tiling Installation Guide
 Geometric and Quarry Floor Tiling Installation Guide February 5 th 2015 1 Geometric and Quarry Tiling Installation Guide 1 Important Notes 3 Website: 3 Useful Numbers: 3 Internal Substrates 4 Surface preparation:
Specialists in Acoustic Flooring and House to Flat Conversions
 Sound Solution Consultants Ltd Po Box 755 Capel St Mary Ipswich Suffolk IP9 2WF Tel No: 0845 5212096 Fax No: 0845 5212097 Email: mpconsultservice@aol.com Specialists in Acoustic Flooring and House to Flat
FOR TILES AND NATURAL
 EN FOR TILES AND NATURAL ILLUMINATED STONE SURFACES USER INFORMATION TILE PROFILES PROFILE TECHNOLOGY PROFILES OVERVIEW LED STRIPS ACCESSORIES TRANSFORMERS CONTROL INSTALLATION/ NEW CONNECTION LED STRIPS
The following instructions should be reviewed prior to installation. Shaw Industries will not be responsible for improper installation.
 Installation of Shaw Contract Group Modular Carpet (Ecoworx, Ecoworx ES, Ecologix, Ergoflex, Ergoflex ES) INSTALLATION GUIDELINES The following instructions should be reviewed prior to installation. Shaw
Channel Drain Shower Base. Aqua Line pro. Installation Instructions
 Channel Drain Shower Base. Aqua Line pro Installation Instructions 02 JACKOBOARD Aqua Line pro System components a JACKOBOARD Aqua Line pro b JACKOBOARD Aqua Line pro - Horizontal Drain (Art. No. 4510370)
SIKALASTIC-152 EXTERIOR WATERPROOFING MEMBRANE. Product. Scope. Appraisal No. 811 [2013] Appraisal No. 811 (2013) Amended 28 August 2017
![SIKALASTIC-152 EXTERIOR WATERPROOFING MEMBRANE. Product. Scope. Appraisal No. 811 [2013] Appraisal No. 811 (2013) Amended 28 August 2017](/thumbs/76/73001868.jpg "SIKALASTIC-152 EXTERIOR WATERPROOFING MEMBRANE. Product. Scope. Appraisal No. 811 [2013] Appraisal No. 811 (2013) Amended 28 August 2017") SIKALASTIC-152 EXTERIOR WATERPROOFING MEMBRANE Amended 28 August 2017 BRANZ Appraisals Technical Assessments of products for building and construction. Sika (NZ) Ltd PO Box 19 192 Avondale Auckland 1746
SIKALASTIC-152 EXTERIOR WATERPROOFING MEMBRANE Amended 28 August 2017 BRANZ Appraisals Technical Assessments of products for building and construction. Sika (NZ) Ltd PO Box 19 192 Avondale Auckland 1746
UNDER TILE HEATING INSTALLATION MANUAL FEBRUARY 2016
 UNDER TILE HEATING INSTALLATION MANUAL FEBRUARY 2016 Please read this instruction manual. It includes important information that will assist you and save you time and money. 1 CONTACT US PHONE 1300 340
Radon Vent Pipe System. Labeling Performance Indicators
 Section 6 Radon Vent Pipe Labeling Performance Indicators Radon Vent Pipe System Connected after sub-grade system installed Pipe cannot be trapped Provide space in chases Support at each floor level Discharge
HYDRATHANE INTERIOR WATERPROOFING MEMBRANE. Product. Scope. Building Regulations. Appraisal No. 959 [2017] Appraisal No. 959 (2017) BRANZ Appraisals
![HYDRATHANE INTERIOR WATERPROOFING MEMBRANE. Product. Scope. Building Regulations. Appraisal No. 959 [2017] Appraisal No. 959 (2017) BRANZ Appraisals](/thumbs/76/74150900.jpg "HYDRATHANE INTERIOR WATERPROOFING MEMBRANE. Product. Scope. Building Regulations. Appraisal No. 959 [2017] Appraisal No. 959 (2017) BRANZ Appraisals") Appraisal No. 959 [2017] HYDRATHANE INTERIOR WATERPROOFING MEMBRANE BRANZ Appraisals Technical Assessments of products for building and construction. Construction Chemicals Pty Ltd 49-57 Davis Street Wingfield
Appraisal No. 959 [2017] HYDRATHANE INTERIOR WATERPROOFING MEMBRANE BRANZ Appraisals Technical Assessments of products for building and construction. Construction Chemicals Pty Ltd 49-57 Davis Street Wingfield
RAUPEX SPEED SYSTEM Installation Guide
 RAUPEX SPEED SYSTEM Installation Guide INFORMATION AND SAFETY INSTRUCTIONS Validity The installation instructions are valid for North America. Other applicable technical information - Floor heating/cooling
Mapei systems for radiating floor heating with high thermal efficiency
 Mapei systems for radiating floor heating with high thermal efficiency PRODUCTS FOR CERAMIC TILES AND STONE MATERIAL ADHESIVES SEALANTS CHEMICAL PRODUCTS FOR BUILDING III MAPEI systems for radiating floor
Installation Instructions for CushionBac Renew Tiles
 Installation Instructions for CushionBac Renew Tiles Important Notices These Installation Instructions cover most installation procedures. If you run across a situation that isn t addressed in this document
ITEM 458 WATERPROOFING FOR STRUCTURES
 ITEM 458 WATERPROOFING FOR STRUCTURES 458.1. Description. This Item shall govern for the furnishing and placing of waterproofing on concrete and steel bridge decks of railroad structures and on other structures
SILASEC DESCRIPTION FEATURES AND BENEFITS SURFACE PREPARATION
 SILASEC WP0001 REVISED: JANUARY 2002 DESCRIPTION Bondall Silasec is a concentrated liquid waterproofing compound designed to be used with Portland type A or type GP cements to form a permanent waterproof
Highly Chemical Resistant Laminate System. Sika Asplit VEL is 2 part, glass fabric reinforced, vinyl-ester based coating and lining system.
 Construction Technical Data Sheet Edition 30 April 2013 Sika Asplit VEL Highly Chemical Resistant Laminate System Product Description Sika Asplit VEL is 2 part, glass fabric reinforced, vinyl-ester based
Application Instructions for Keystone Kool Deck on Existing Concrete
 Application Instructions for Keystone Kool Deck on Existing Concrete REQUIRED MATERIALS Keystone Kool Deck PTA Bonding Agent Water 20 Mesh Marble Sand White Portland Cement OPTIONAL TOOLS Mortex Pattern
LAMINATE FLOORING. 10 Year BUYING GUIDE. IKEA Lock Locking System. Easy Connect Locking System
 BUYING GUIDE LAMINATE FLOORING GOOD TO KNOW Can be laid on existing floors, except on wall-to-wall carpet. When laying floors, always use NIVÅ floor lining (sold separately). When laying floors on concrete
Suggested Specification for Tri-Patch Versatile Concrete Patching Compound
 Suggested Specification for Tri-Patch Versatile Concrete Patching Compound SURFACE PREPARATION for Interior and Exterior Floor-Covering Installations. (Vinyl Composition Tiles, Sheet Vinyl, Rubber, Indoor
ITALIAN CREATIVITY IN THE SERVICE OF DESIGN. Ginevra
 ITALIAN CREATIVITY IN THE SERVICE OF DESIGN Ginevra GINEVRA The effect of stone flakes cut into small mosaic like pieces and turned into compositions that are always different. colour grey thickness 0.6
Drying of Concrete TDS 183
 Drying of Concrete TDS 183 As the occurrence of fast track construction continues to rise, the need to install a finished floor on a wet concrete slab is typically far too soon for the floor covering.
WOOD FLOORING WOOD FLOORING
 09550 - WOOD FLOORING 09550-1 PART ONE: GENERAL 1.1 Description WOOD FLOORING 1.1.1 Work in this Section, as shown or specified, shall be provided by the Interior Contractor and shall be in accordance
TILE TILE
 09300 - TILE 09300-1 PART ONE: GENERAL 1.1 Description TILE 1.1.1 Work of this Section, as shown or specified, shall be provided by the Interior Contractor and shall be in accordance with the requirements
Shur-Shot X-Proof Hydrogen Fluoride Alarm Operations Manual
 Shur-Shot X-Proof Hydrogen Fluoride Alarm Operations Manual P/N 1000006053 Rev E $7%$QDO\WLFV// //& 733 Dairy Rd. Parkton, Md. 21120 www.atbanalytics.com (410) 733-6365 Table of Contents Chapter 1: Getting
SECTION HYDRAULIC CEMENT UNDERLAYMENT
 ARDEX GUIDE SPECIFICATION ARDEX Underlayment HC 100 High-Capacity Self-Leveling and V1200 Self-Leveling Flooring Underlayment Cement-based Self-Leveling Underlayment for use with ARDEX ARDIFLO System SECTION
SNOW-MELT Heating Cables Snow & Ice Melting Applications (Outdoor)
") About SNOW-MELT Cables Britech SNOW-MELT Cables are designed to provide sufficient heat to melt snow in residential and commercial applications across Canada. They are constructed of the finest heating
About SNOW-MELT Cables Britech SNOW-MELT Cables are designed to provide sufficient heat to melt snow in residential and commercial applications across Canada. They are constructed of the finest heating
REF : WEBSITE08. Monday, 12 December 2011
 REF : WEBSITE08 Monday, 12 December 2011 GENERAL SPECIFICATION FOR INSTALLING UNDER TILE HEATING ELEMENTS AND FIXING GLAZED CERAMIC FLOOR TILES OR PORCELAIN TILES ON INTERIOR SURFACE BEDS OR SUSPENDED
VINYL COMPOSITION TILE
 ASSET Reference Specification ASTM F 1066-99 Standard Specification for Vinyl Composition Floor Tile Products: Azrock s Vinyl Composition Tile -Standard Price Products -Premium Priced Products -Slip Resistant
VINYL TILE, SHEET & LAMINATED FLOORING TRADE SPECIFICATION
 VINYL TILE, SHEET & LAMINATED FLOORING TRADE SPECIFICATION GENERAL a) BDW Trading Limited Barratt Homes, David Wilson Homes and Ward Homes are all trading names of BDW Trading Limited the Company. b) Site
FLOORING FOR FLOOD-PRONE AREAS. Vinyl Flooring. Pros of Vinyl Flooring for Flood-Prone Areas
 FLOORING FOR FLOOD-PRONE AREAS By Ari Ziskin Protect your home with the best flooring for flood prone areas. There are many options for those areas that are prone to water damage, and we will help you
NUCLEAR POWER CORPORATION OF INDIA LTD. (A GOVT. OF INDIA ENTERPRISE) SPECIFICATION NO.PB-E-542/REV. No.0
 SPECIFICATION NO.PB-E-542/REV. No.0") REVISION NO. 0 NUCLEAR POWER CORPORATION OF INDIA LTD. (A GOVT. OF INDIA ENTERPRISE) SPECIFICATION NO.PB-E-542/REV. No.0 PAGE NO. 1 OF 24 DATE OF ISSUE (MONTH/YEAR) TOTAL NO. OF PAGES (Including cover
REVISION NO. 0 NUCLEAR POWER CORPORATION OF INDIA LTD. (A GOVT. OF INDIA ENTERPRISE) SPECIFICATION NO.PB-E-542/REV. No.0 PAGE NO. 1 OF 24 DATE OF ISSUE (MONTH/YEAR) TOTAL NO. OF PAGES (Including cover
When I started tiling, we didn t do our own shower pans that BATHS
 BATHS Preventing Leaks in Tiled Showers Detail the pan properly before any tile is installed BY TOM MEEHAN Photos by Roe Osborn When I started tiling, we didn t do our own shower pans that job fell to
Contura Floating Floor Underfloor Heating Installation Manual
 Contura Floating Floor Underfloor Heating Installation Manual Technical Helpline 0345 345 2288 Contents 3 Product Information 4 6 8 Important Information Installation Pressure Testing Screeding & Floor
Subfloor heating and cooling instructions for Hakwood flooring products Duoplank 20mm (¾ ) and Duoplank 15mm (⅝ )
 and Duoplank 15mm (⅝ )") Subfloor heating and cooling instructions for Hakwood flooring products Duoplank 20mm (¾ ) and Duoplank 15mm (⅝ ) Hakwood is the inventor of the Duoplank, the current standard for wide width, long length
Subfloor heating and cooling instructions for Hakwood flooring products Duoplank 20mm (¾ ) and Duoplank 15mm (⅝ ) Hakwood is the inventor of the Duoplank, the current standard for wide width, long length
Elegant design with the high performance heating technology of tomorrow - today. Electric Combination Radiator Systems
 Elegant design with the high performance heating technology of tomorrow - today Electric Combination Radiator Systems An elegant solution for all hard to The EHC Combination Electric radiators have been
Construction. Pulastic Coating-221 W. 2 Component Polyurethane
 Product Data Sheet: Version: 08/11 ONLY TO BE APPLIED BY A SIKA APPROVED CONTRACTOR Pulastic Coating-221 W 2 Component Polyurethane Construction Positioning Description Water based, 2-component polyurethane
PPC Cement TUTORIAL. how to screed a floor
 PPC Cement TUTORIAL how to screed a floor Pre-build: TOOLs & Materials ITEM Quantity Check. Builders bucket. Wheelbarrow 3. Shovel 4. Builder s line 5. 50mm steel pegs 6. Rigid timber forms 7. Flexible
INSTALLATION INSTRUCTIONS FOR ELECTRICAL CONTRACTORS
 INSTALLATION INSTRUCTIONS FOR ELECTRICAL CONTRACTORS Rev. 1.5 1.10.13 Toll free (800) 288-6000 or www.hubbell-wiring.com P a g e 0 IMPORTANT SAFETY INSTRUCTIONS SAVE THESE INSTRUCTIONS WARNING- When using
SpaVault TM Installation Guide for Bullfrog Spas (7-10 x 7-10 x 38 )
") SpaVault TM Installation Guide for Bullfrog Spas (7-10 x 7-10 x 38 ) WARNING - When unpacking SpaVault, DO NOT discard styrofoam pieces, these are not packaging materials. Step 1 Excavation Important:
SpaVault TM Installation Guide for Bullfrog Spas (7-10 x 7-10 x 38 ) WARNING - When unpacking SpaVault, DO NOT discard styrofoam pieces, these are not packaging materials. Step 1 Excavation Important:
TOUCH FOIL INSTALLATION GUIDE
 TOUCH FOIL INSTALLATION GUIDE ZYTRONIC THE WORLD AT YOUR FINGER TIPS A SINGLE TOUCH CAN BE THE BEGINNING OF A JOURNEY PG 2 TOUCH FOIL INSTALLATION GUIDE CONTENTS INTRODUCTION... PG 3 SPECIFICATIONS...