Getting started with A. Plan 2D. Main fonctions. Summary. View 3D. Projects Settings. Roofing. Location
|
|
|
- Louise Norah Singleton
- 5 years ago
- Views:
Transcription
1 Location Roofing Summary Main fonctions Plan 2D Getting started with A - Select a line - Precise adjusment of dimensions - Moving a slab or moving the entire building - Joining two slabs - Separate two slabs - Move the entire view when moving an item - Changing swing directions - What to do when an opening hides a wall - Thickness of exterior walls and interior walls - View 2D <=> 3D Projects Settings - Geographical location of the project - Insert a site plan image - Outline the limits of your property - More options Touch - Adding interior walls - Cut / detach the interior walls - Adding slabs - Change the level of a slab - Creating floors - Adding a straight staircase - Slab / floor openings - Adding a balcony - Adding new ramps / inclined planes - Adding furniture View 3D - Double slope roof - Hipped roof (4 slopes) - Mansard roofs - Curved roofs - Flat roofs - Roof windows Elevation Architectural Electrical Plans


2 2 settings Blank project (Tap to open) - Not saved out of subscription period - Create 1 free floor plan with furnitures and view 3D - saved without subscription - Models: available as examples Save a project, or share it with others, or use it on another ipad or to the cloud (ios8) Out of subscription periods, the lock sign indicates unmodifiable projects Purchase a subscription Information about your purchases
3 (with subscription)
4 4 Geographical location of the project: For more details refer to the help rubric «project» and «site plan» Info: can be empty to create a project Generate plans in a PDF file Info: Will be sent by or stored in the cloud (ios8 only) Tap to access the design plans Architectural Electrical Plans (with subscription)


5 This box is displayed when the project is first created you can change the values at any point using 5
. The slab can be removed completely (double Tap on the slab and ).")
6 6 Options: 1 Principles The floor plan designed starting from slab 1 displayed on new project. This slab represents the envelope of the house. To design your project, just move the walls, stretching or cuts without separating (Details on next page). The slab can be removed completely (double Tap on the slab and ). A new slab can be created in Options:.

7 7 Room 30 m2 Room 30 m2 Room 30 m2 Room 20.8 m Initial slab Use to place cut marks on walls Move selected wall Room surface is automatically computed.

8 8 Room 22.8 m2 Room 20.8 m2 Room 22.8 m2 Room 30.1 m2 Info: 1-Double Tap on or outside the building, the menu becomes orange, 2-the movement of the wall is slowed, adjustment of dimension becomes accurate. 3-Double tap on or outside the building the menu switches back to blue
9 Touch and hold the slab with two fingers to select it Move the slab with one finger 3 Use arrow to rotate it (all floors and roof) Touch and hold the interior of the building with three fingers to select it or Move the entire building with one finger (arrow to rotate it)


10 INFO: -Exterior walls are associated with a slab. -Deleting the slab also deletes walls and all objects positioned on it - A question mark appears when a confirmation or a choice is needed 10


11 11 Room 30.1 m2 Room 34.7 m2 Room 5.6 m2 double Tap Room 5.6 m2 Room 5.6 m


12 12 Method A Method B Room 4.8 m 2 Room 4.8 m 2 Info: the pointer is above your finger to avoid delete errors Room 4.8 m 2


13 13 Tap Room 8.6 m2 Room 8.6 m2 Room 12.1 m2 Room 4.5 m 2 Room Room 8.6 m m2 Room 6.9 m2
14 14


15 15 Cut wall Change color of the exterior openings
16 16 Room 4.8 m2 Info: the concerned object becomes yellow during a few seconds. To view this help again Refer to the Help topic For any question :
.")
17 How to move items 17 Touch and drag the end of a line to increase or decrease its length or change its angle If necessary Touch and drag the line to move it vertically (relative to its axis) If necessary Double tapping clear space with another finger when moving an item will deactivate the positioning guides (angle/alignment). The item will be displayed in yellow to indicate this change.
18 Improve your view when moving items 18 1 Tap the line to select it 2 Touch close to the selected item to activate the virtual finger pointer Displaying angles 90 and 180 angles are not labelled
19 Precise adjusment of dimensions or positioning of an item 19 Double tap: on the menu bar or outside the building for design plans or on the map when working with terrain reduces movement speed) If necessary deactivate the positioning guides (see page 1)
20 Moving a slab Touch and hold the slab with two fingers to select it Move the slab with one finger 3 rotate it with arrow 3 Moving the entire building (all floors and roof) Touch and hold the interior of the building with three fingers to select it or Move the entire building with one finger (rotate it with arrow) ooo

21 Move the entire view when moving an item Keep your first finger on the item you want to move Use a second finger to move the entire view at the same time Ensure you move the entire view instead of the item You can also increase or reduce the size of the design by using a third finger near to the second
22 Joining two slabs Slab separation marks (does not divide the rooms) Touch and hold the slab with two fingers close together, avoiding all other items Move the slab with one finger to join the two together The two slabs will join automatically Info: to remove the slab separation mark, double tap on the dotted line and join the slabs
23 Separate two slabs Touch and hold the slab you want to separate with two fingers close together to select it Move the selected slab with one finger to separate it


24 Changing swing directions for doors or windows: left, right, inward, outward 24 Moving openings to another wall: doors or windows 3 1 2
25 Select and move superposed items 25


26 What to do when an opening hides a wall Select exterior wall Tap on the opening 3 Move the wall with one finger Duplication of doors and windows 1 Tap on the opening 2 A 2 nd opening is added
 The item will be displayed in")
27 Displaying the function dialog box 27 Double tap one of the 4 functions Undo or redo (unlimited) The item will be displayed in yellow

28 Slab properties 28 Double tap the interior of the slab avoiding the room label Hmin: this height value may be very small or even zero if an attic is involved Δh: Determines the height difference between this slab and floor reference level 0 (+ / - )

29 Thickness of exterior walls 29 Double tap on an exterior wall To modify all the walls in the building, select

30 Thickness of interior walls on an interior wall 30 0,50 1,50 Enter a value to create a low wall Hmin is changed on provides information about the surface area and division of rooms

31 Label the rooms 31 Room name ok Room Room Living Room Room 22,3 m² Kitchen Master Bedroom Bedroom Double tap on the room label Enter the name or choose from the predefined list
 Purchase a subscription Information about your purchases Models available as examples Out of")
32 Projects Project management 32 Settings Blank project (Tap to open) - Not saved out of subscription period - Create 1 free floor plan with furnitures and view 3D - saved without subscription - save a project, or share it with others, or use it on another ipad or export to the cloud (ios8) Purchase a subscription Information about your purchases Models available as examples Out of subscription periods, the lock indicates the unmodifiable projects
33 Projects Organize your projects in folders (with subscription)


34 Projects Project details 34 Or Enter the project address Import an existing project Geolocate the project Or Create a site plan View the project elevations Create 2D plans Detailed surface area information plans in 2D and 3D PDF or PHOTOS Or elevations or Electrical Plans View the project in 3D Create roofing Architectural Electrical Plans

35 Settings Working parameters 35 To enter imperial units: 1 2" 3/4 or: 4.5" becomes 4" 1/ " becomes 1 2" 3/4 Details on next page Allows windows to be placed on interior walls (e.g.: where an interior wall opens on to an exterior due to complex roofing) Configure the period of time before Edition mode is reactivated after using one of the following options:

36 Settings Working parameters 36 Dimensions for the selected item only
37 Settings Working parameters 37


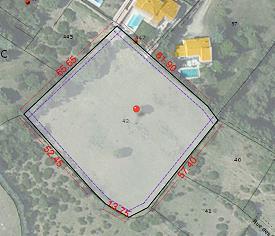
38 Location Geographical location of the project 38 Determine the exact location on the ground When the geolocation address is left blank, the location search must be carried out manually

39 Location Insert a site plan image 39 Import a site plan image, a scanned plot map etc. Photos See slide N 26

40 Location Outline the limits of your property Define the limits of your property with or without a site plan 40 See slide N 26 Close the property limits when the target changes from red to green Info: the initial outline can be approximate and is easily adjusted if necessary


41 Location Outline the construction limits of your property Higher zoom level than in Map mode 41 Info: the image facilitates the creation of the outline. Use the zoom adjustment to view the exact surface area of the property Precisely adjust the exact surface area of the property with this view


42 Location More options 42
43
 furnitures Home Home Project name Interior surface information: current floor and total (without basements) This box is displayed")
44 Plan 2D Basic design principles 44 The exterior walls determine the edge of the building. Therefore, they cannot be separated, but can be cuttable to create the required shape. Move between floors Navigation between floors, roof,elevation, 3D ( ) furnitures Home Home Project name Interior surface information: current floor and total (without basements) This box is displayed when the project is first created - you can change the values at any point using the
45 Plan 2D Adding interior walls Select the add wall option Touch the interior of the building to define the starting position Lift your finger from the screen when the starting point of the wall is reached Touch the screen, the wall will be created: move your finger to determine the wall length, lift your finger when complete Touch the screen in the same place to continue the wall, or elsewhere to create another new wall Repeat steps 2 and 3


46 Plan 2D Functions 46 Detach Or Cut Valid for both interior and exterior walls Only valid for interior walls Info: the «Cut» option can be used with other items such as stairs, floor openings etc.


47 Plan 2D Functions 47 1 Split the wall, 2 select Select then O O O 3 Re-align the split 4 Touch and hold with two fingers on the slab you 5 Move the slab with one finger want to move For more complex situations, see the next slide


48 4 Plan 2D Functions More complex situations ! 1 Split the slab line Not the interior wall line Indicates all possible split options Dotted lines must be fullly parallel to the wall A new slab is created 5 7 6


 Slab separation mark does not")
49 Plan 2D Functions: O O O Adding slabs 49 Solution A Select: O O O then or O O O Solution B Select a wall with one finger Place two fingers on the selected wall Move the wall towards the exterior: a new slab will be created (double tap the slab to change its level) Slab separation mark does not indicate a room


")
50 Plan 2D Change the level of a slab Delete the wall between the two slabs (double tap the slab) (double tap the dotted line)

51 Plan 2D Creating floors 51 double tap Closes the menu Choose the floor you want to copy Insert a copy of the floor above the original, using the various available options Info: to delete the unwanted parts of the copy, use the same method as for splitting slabs

 Note: Stairs height is automatically set to reach")
52 Plan 2D Adding a straight staircase Select Touch the screen to position the green cross at the starting point, then lift your finger Touch the screen to continue the staircase Rise height Move your finger to determine the required staircase length, then lift your finger to complete the process Going: distance between two steps (edge of nosing to edge of nosing) Note: Stairs height is automatically set to reach above level.


53 Plan 2D Adding a winder stairs 53 Solution A Select Create a straight staircase After lifting your finger, touch the screen in the same place Move your finger to create the size of winder that is required, then lift your finger. Repeat if necessary. Solution B Cut/detach


54 Plan 2D Placing a staircase on the same floor 54 A B A B A Slab properties 1 2 B Position the green rectangle on the lowest slab in this case it is 0 Drag/stretch it to the dotted line indicating the slab division


55 Plan 2D Example winder staircases 55 Winder With landings Zoom Select the staircase The values for all steps will be displayed


56 Plan 2D Slab/floor openings Example floor opening cut out Height between the staircase step and the slab (in red if the previous step is limited) 2 3 cut


57 Plan 2D Options: Adding a balcony


58 Plan 2D Options: Adding new ramps/inclined planes Starting point can be moved to another line Height of horizontal lines 3 double tap: opens the dialog box Info: walls and other objects can be placed on ramps or inclined planes


59 Plan 2D 16 Change height: red wall Yellow wall Options: 59


60 Plan 2D Adding furniture Open the furniture choice panel, Tap the type of furniture you want to add, Place your finger where you would like to position the furniture. Furniture will automatically align itself with the nearest wall Info: overlaying multiple items of furniture at different heights is possible

61 Plan 2D Resizing furniture 61 Double Tap to open the dialog box During rotation, you can put a second finger on the screen to temporarily translate the object, Tip: to resize furniture that has been placed on top of other furniture, you select items and move it


62 Plan 2D Duplicate furniture 62 Examples of automatic furniture modification Lit Kitchen block Fridge


63 View 3D Vertical cross section cut outs 63 Cancel the action double tap Touch and hold at the bottom of the screen and then move your finger upwards By moving your finger to the right or left, the cross sectional cut out can be pivoted


64 View 3D Horizontal cross section cut outs 64 Cancel the action double tap Move your finger: up or down to move the cut out Options: Saves the cut out Returns to the saved cut out

, 65 - When two roof outlines are placed on")
65 Roofing Basic principles - The roof item can be selected, moved and divided using the same basic principles as for slabs - Roofs are placed directly above the slab outline - The roof will adjust automatically to the height of the walls. The height is defined in the slab properties (double tap on the slab), 65 - When two roof outlines are placed on top of each other, tap slightly to the side of the roof you want to modify to select the required outline


66 Roofing Precise roof positioning 66 Slab properties Slab properties The roof line will cover the highest wall, therefore the roof will be placed on the highest wall Tip: ceiling height indicators displayed in red can help position the roof (see next slides)
 2 Select")
 Info: if the ridge tile height of")

67 Roofing Join two roofs 67 H= height from ground level Open the «Roof» dialog box (double tap on the roof item) 2 Select «Joined roof» on the side of the roof to join to the main roof (in the above example this is «left») Info: if the ridge tile height of the roof to be joined is too high or too low, the join is not possible. In this situation, use the roof dialog box and modify the following option:

 Select the roof you want to")
, calculate the difference between the")

68 Roofing Making two roofs the same height Select the reference roof (the roof at the correct height) and find the red value (3.00 in this example) Select the roof you want to adjust: find the red value (2.65), calculate the difference between the values (35 cm) Insert this value into the roof dialog box for the roof you want to adjust: (+ and values can be used)

69 Roofing Centering the ridge 69 The ridge is centered precisely and automatically
 To")

70 Roofing Mono/single slope roof 70 (double tap on the roof item) To change the direction of the slope, drag the indicator to the required edge
")

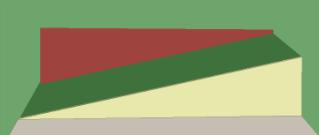
71 Roofing Double slope roof 71 (double tap on the roof item) Indicates the interior height A flat ceiling will not be assigned this value


72 Roofing Hipped roof (four slopes) 72 (double tap on the roof item) Info: Select «Hipped roof» to vary the roof slope at the gable end

 the angle of slope that is required.")
73 Roofing Special cases 73 For special cases, construct the roofs with a simple slope between them. For example: Place 3 roof items on the design and modify them as appropriate to achieve the required shape When the top of the roof is not parallel to the base line, move the slope indicator towards the base of the roof and indicate (using a negative value) the angle of slope that is required. (double tap on the roof item)


74 Roofing Other special cases: multiple hips (double tap on the roof item)


75 Roofing Mansard roofs 75 (double tap on the roof item)


76 Roofing Four sided Mansard 76


77 Roofing Curved roofs 77 ΔY slope of the arrow length of the arrow Info: The higher the angle, the more the extremity of the roof is curved. The longer the arrows, the more the general curvature is affected. Try various values to achieve the roof you require.


78 Roofing Flat roofs 78 Edge of roof Edge of roof With a parapet Without parapet: zero height (double tap on the roof item) With a parapet Without parapet: zero height


79 Roofing Roof window 79 Roof dormers Wall dormers To place a roof window, select the type of window and set it to the desired location on the roof. The dimensions are changed by moving the lines of the drawing.


 Selecting")
80 Roofing Roof window Roof dormers (double Tap on the roof item) Selecting the type of windows


81 Roof dormers Roofing Roof window 81


82 Roofing Roof window Wall dormers 82 Placing a desired window on the wall of the top floor Placing a main roof (double Tap on the roof item) LH: Lintel Height min: minimum height to incorporate window


83 Wall dormers Roofing Roof window 83


84 Roofing Simple Hole Flat roofs 84 Opening in the roof slab Placing a roof window


85 Elevations View 85 Select N W S - E elevation view Rotate right or left if default building orientation does not match your needs Info: Reference orientation is automatically adjusted to the building axis. You can use the Rotate function for custom angles. 85

86 Elevations Cross Section 86 Options: Label of a slab elevation Saves rotation angle and cross sections positions Returns to the saved cut out

.")
87 Plan generation Photos PDF - cloud 87 From the main menu Select elevations and cross-sections to generate. Cross-sections are based on positions saved in elevation preferences (see previous page). Orientations where no cross section is registered are not generated.


88 Architectural Electrical Plans From the main menu 88 Add lines Options: Info: Architectural Electrical Plans are available in «generate plans» screen
Roof Tutorial. Chapter 3:
 Chapter 3: Roof Tutorial The first portion of this tutorial can be completed independent of the previous tutorials. We ll go over some common roof styles that can be created using settings in the Wall
Roof Tutorial Wall Specification
 Roof Tutorial The majority of Roof Tutorial describes some common roof styles that can be created using settings in the Wall Specification dialog and can be completed independent of the other tutorials.
Roof Tutorial. Getting Started with Automatic Roof Styles
 Roof Tutorial The majority of Roof Tutorial describes some common roof styles that can be created using settings in the Wall Specification dialog and can be completed independent of the other tutorials.
Roof Tutorial. Chapter 3:
 Chapter 3: Roof Tutorial The majority of Roof Tutorial describes some common roof styles that can be created using settings in the Wall Specification dialog and can be completed independent of the other
Autodesk Revit Raising the Roof: Creating Roofs in Revit. David Cohn
 Autodesk Revit 2008 Raising the Roof: Creating Roofs in Revit David Cohn Course Summary: Roofs are one of the most complex architectural elements to model, but with Revit, you can create just about any
Archicad Tutorial: Roof By: Matthew Jourden Brighton High School Brighton, MI
 Archicad Tutorial: Roof By: Matthew Jourden Brighton High School Brighton, MI 1. Open Cabin Design 2. Create the following 2 layers a. Roof: Have roof panels attached b. Roof Outline: Lines showing overhang,
Excel 2011 Charts - Introduction Excel 2011 Series The University of Akron. Table of Contents COURSE OVERVIEW... 2
 Table of Contents COURSE OVERVIEW... 2 DISCUSSION... 2 OBJECTIVES... 2 COURSE TOPICS... 2 LESSON 1: CREATE A CHART QUICK AND EASY... 3 DISCUSSION... 3 CREATE THE CHART... 4 Task A Create the Chart... 4
New BIM Templates in Vectorworks 2015
 New BIM Templates in Vectorworks 2015 ferent flavors of BIM template: Imperial, Metric and UK Metric (which is organized according to the UniClass naming system and provides UK National Building Library
AECOsim Building Designer. Quick Start Guide. Chapter A09 Modeling Interior Walls Bentley Systems, Incorporated
 AECOsim Building Designer Quick Start Guide Chapter A09 Modeling Interior Walls 2012 Bentley Systems, Incorporated www.bentley.com/aecosim Table of Contents Modeling Interior Walls...3 Create Walls From
WoodWorks Design Office User Guide U.S. Shearwalls Tutorial Instructions
 WoodWorks Design Office Sizer Shearwalls Connections Database Editor 2017 User Guide U.S. Shearwalls Tutorial Instructions For Design Office 11 Canadian Wood Council American Wood Council Developed by
BIM - ARCHITECTUAL CREATING ROOFS
 BIM - ARCHITECTUAL CREATING ROOFS INTRODUCTION In this section, we will show you how to create Roof objects. There are many ways to create roof objects in Vectorworks. We'll start with the Create Roof
AECOsim Building Designer Quick Start Guide
 AECOsim Building Designer Quick Start Guide Chapter S01 Structural 2012 Bentley Systems, Incorporated www.bentley.com/aecosim Table of Contents Structural...3 Structural Members and Forms... 3 Parts/Families
Topics. Las Vegas, Nevada, December 3 6, Speaker Name: Timothy A. Del Vescovo. Course Title: Put A Lid On It Roofing Your Building
 Las Vegas, Nevada, December 3 6, 2002 Speaker Name: Timothy A. Del Vescovo Course Title: Put A Lid On It Roofing Your Building Course ID: AR41-5L Course Outline: One of the most powerful, misunderstood,
Unwedge v Tutorial 3 Perimeter Support. Topics Covered:
 Unwedge v. 4.0 Tutorial 3 Perimeter Support Topics Covered: Perimeter support design view Wedge apex height Adding a bolt pattern Bolt properties Editing a bolt pattern Bolt data tips Bolt support force
BIM MODELLING GUIDELINES ARCHI-CAD BIM MODELLING GUIDELINES ARCHI-CAD
 BIM MODELLING GUIDELINES ARCHI-CAD BIM MODELLING GUIDELINES ARCHI-CAD Contents 1. Single IFC file 2. Type IFC types 3. Storeys 4. Continuous structures by storey 5. Structure/Object placement 6. Wall connections
CONTENTS. Using Advanced CAD to Create 2D and 3D Objects in Chief Architect 1. Introduction..2
 CONTENTS SECTION 1 Using Advanced CAD to Create 2D and 3D Objects in Chief Architect 1 Introduction..2 CHAPTER 1 THE BASIC EDIT TYPES 3 Steps: Working with the Different Edit Types...3 Can You Do It?...11
Autodesk Revit Structure 2013 Fundamentals
 Autodesk Revit Structure 2013 Fundamentals SDC P U B L I C AT I O N S Schroff Development Corporation Better Textbooks. Lower Prices. www.sdcpublications.com Chapter 7 Adding Foundations In this chapter
Special Edition Library Illustrated Doors
 Special Edition Library Illustrated Doors 1 Table of Content 1. Introduction...3 2. Placing Doors...3 3. Visual Editing...6 4. Parameter Setting...8 4.1 Parameter List...8 4.2 Basic Parameters...9 4.3
BIM MODELLING GUIDELINES REVIT
 BIM MODELLING GUIDELINES REVIT Contents 1. Type IFC types 2. Levels 3. Continuous structures by level 4. Structure or Object placement 5. Wall connections Corners 6. Wall connections T-shaped walls 7.
Design Integration Using Autodesk Revit 2014
 Design Integration Using Autodesk Revit 2014 Architecture, Structure and MEP Daniel John Stine CSI, CDT Multimedia CD SDC P U B L I C AT I O N S Schroff Development Corporation Better Textbooks. Lower
Revit Architecture 2009
 Commercial Design Using Revit Architecture 2009 Daniel John Stine INSIDE: SDC MultiMedia DVD PUBLICATIONS Schroff Development Corporation www.schroff.com Better Textbooks. Lower Prices. Includes Supplemental
May 26 th, MWF Truss. User Guide
 May 26 th, 2017 MWF Truss User Guide 1 1. Introduction... 3 1.1 Things to Know Before Starting... 3 1.1.1 Revit Model... 3 1.1.2 Roof... 3 1.1.3 Adding Families... 4 2. Envelopes... 5 2.1 General Envelope
Permitted Development for Householders: Guidance from Communities and Local Government. March 2010 Department for Communities and Local Government
 Permitted Development for Householders: Guidance from Communities and Local Government March 2010 Department for Communities and Local Government Permitted Development for Householders: Guidance from Communities
RESIDENTIAL STAIRWAYS, HANDRAILS,
 City Of Austin 500 Fourth Avenue N.E. Austin, Minnesota 55912-3773 Building Department 507-437-9950 Fax 507-437-7101 RESIDENTIAL STAIRWAYS, HANDRAILS, *A Building permit is required for any alteration
DP200/DP102 DP201/DP202 2X / 2X DP303 1X / 1X DP302 3DWOX 1. 3DWOX Desktop Manual. 3dprinter.sindoh.com
 DP200/DP102 DP201/DP202 2X / 2X DP303 1X / 1X DP302 3DWOX 1 3DWOX Desktop Manual Read the User Manual before operating the product, and keep the manual at a convenient place near the product. 3dprinter.sindoh.com
Revit 2018 Architectural Command Reference
 Daniel John Stine CSI, CDT Jeff Hanson Autodesk Revit 2018 Architectural Command Reference SDC P U B L I C AT I O N S Better Textbooks. Lower Prices. www.sdcpublications.com ACCESS CODE UNIQUE CODE INSIDE
User Guide. for Eurocode Modules. Design+ Interface General Column Design Combined Wall Design Strip Foundation Design Design Parameters
 Solution for Structural Member Design with Drawing & Report midas Design + User Guide for Eurocode Modules Design+ Interface General Column Design Combined Wall Design Strip Foundation Design Design Parameters
Commercial Design Using Autodesk Revit 2019 Includes video instruction
 Daniel John Stine AIA, CSI, CDT Commercial Design Using Autodesk Revit 2019 Includes video instruction SDC P U B L I C AT I O N S Better Textbooks. Lower Prices. www.sdcpublications.com ACCESS CODE UNIQUE
ONE BUSINESS - ONE APP USER MANUAL
 ONE BUSINESS - ONE APP USER MANUAL 1 TABLE OF CONTENTS GETTING STARTED WITH SHOPBOX CREATE A PROFILE 4 CREATE A STORE 5 STARTING PAGE 5 HOW TO CREATE, EDIT AND DELETE CATEGORIES AND PRODUCTS CREATE CATEGORY
Village of Glencoe 675 Village Court, Glencoe, Illinois
 Village of Glencoe 675 Village Court, Glencoe, Illinois 60022 847-835-4111 March 1, 2002 June, 2002 Clarifications Added Dear Homeowner, Architect, and Contractor: The attached materials will help you
Main Floor Plan Scale: 1/8"=1'-0"
 16'-0" 1 6'-6" 1 36'-0" Future Deck 10'-6" 4'-11" 4'-11" 10'-6" 36'-0" Future Deck 1 6'-6" 1 16'-0" 6068 3030 3030 6068 1 20'-9 1/2" 20'-9 1/2" 1 D/W D/W 26'-4" 24'-8" 2'-0" '-4" '-4" '- 1/2" 20'-10 1/2"
Doors, Windows, Stairs & Fireplaces Doors Doors Outdoor Entry Outdoor Entry Doors Doors Outdoor Entry Outdoor Entry
 Doors, Windows, Stairs & Fireplaces Doors Outdoor Entry 36 minimum entry Main/guest entrance open to social area Easy use lever handles Doors Outdoor Entry Weather resistant surface Solid wood or foam
311.7 Stairways Width Headroom. Exception: Walkline Stair treads and risers Tread depth.
 311.7 Stairways. 311.7.1 Width. Stairways shall not be less than 36 inches (914 mm) in clear width at all points above the permitted handrail height and below the required headroom height. Handrails shall
Scheduling Work at IPSC
 Scheduling Work at IPSC Overview The purpose of this document is to describe and lay out the specific steps for how Work Orders will be scheduled in Maximo at IPSC. In general, Work Orders will be planned
CAT Enterprise. Supervisor Manual
 CAT Enterprise Supervisor Manual Version 1.6 Revised February 20, 2013 NOTICE AND DISCLAIMER The information contained herein (WORK) was prepared by or contributed to by various parties in support of professional
Architectural Commercial Design Using Autodesk Revit 2015
 Architectural Commercial Design Using Autodesk Revit 2015 Includes video instruction Daniel John Stine CSI, CDT Multimedia Disc SDC P U B L I C AT I O N S Better Textbooks. Lower Prices. www.sdcpublications.com
Guide to Weak-Story Tool
 Appendix A Guide to Weak-Story Tool A.1 Introduction The Guidelines introduce topics that may be unfamiliar to some engineers. Though the calculations required in Chapters 4 and 5 are not conceptually
MWF Pro Truss. User Guide. Last Updated on November 9 th 2015
 MWF Pro Truss User Guide Last Updated on November 9 th 2015 Table of contents 1. Introduction... 3 1.1 Things to Know Before Starting... 3 1.1.1 Revit Model... 3 1.1.2 Roof... 3 2. Envelopes... 4 2.1 General
NUDURA ESTIMATOR. User Guide Guest Login
 NUDURA ESTIMATOR User Guide Guest Login 1.0 Estimates Starting a New Estimate 1.1 Contact Info: Enter contact information to be included on estimate 2. Click the NEXT when complete Order Page 1. Enter
PRIVATE DWELLINGS CHAPTER 1 December 7, 2013 INTRODUCTION / DESCRIPTION
 CHAPTER 1 December 7, 2013 INTRODUCTION / DESCRIPTION 1. INTRODUCTION 1.1 Private dwelling fires challenge the expertise of firefighting forces and require a coordinated team operation. A significant number
VELUX Energy and Indoor Climate Visualizer 3.0 User guide
 VELUX Energy and Indoor Climate Visualizer 3.0 User guide April 2016 1/40 Contents General use... 3 Version... 3 Starting a new case... 3 Save... 3 Open... 3 Help and support... 3 Automatic check for updates...
Chapter 13 - Finish Framing
 Chapter 13 - Finish Framing Contents Chapter 13 - Finish Framing... 13-1 Timing & Prerequisites... 13-2 Remove Bottom Plates in Doorways... 13-2 Post LVLs and Girder Trusses... 13-2 Install Framing for
2003 International Residential Building Code
 2003 International Residential Building Code Section R305 Ceiling Height Habitable rooms, hallways, corridors, bathrooms, toilet rooms, laundry rooms and basements shall have a ceiling height of not less
CITY OF DANA POINT WINDOW REPLACEMENTS FOR R-3 B030 WINDOWS
 CITY OF DANA POINT COMMUNITY DEVELOPMENT BUILDING AND SAFETY 33282 Golden Lantern, Suite 209 Dana Point, CA 92629 949 248-3594 www.danapoint.org WINDOW REPLACEMENTS FOR R-3 B030 WINDOWS 2016 CALIFORNIA
Architectural Design Standards - Character
 RESIDENTIAL DESIGN STANDARDS - ALL BUILDINGS The design of individual residential buildings and groups of buildings shall employ a variety of design features. In addition to the design features used on
Invoices 3.3 User Guide
 ! Invoices 3.3 User Guide We Make Software - Ecleti.com Invoices 2007-2018 Ecleti - Roberto Panetta all rights reserved Every effort has been made to ensure that the information in this manual is accurate.
Creating Simple Report from Excel
 Creating Simple Report from Excel 1.1 Connect to Excel workbook 1. Select Connect Microsoft Excel. In the Open File dialog box, select the 2015 Sales.xlsx file. 2. The file will be loaded to Tableau, and
PROF. PAUL C. KING RA New York City College of Technology. Learning Community. Spring 2011
 Phase 3 Stage 2: ADDING THE STAIRS : ATRIUM & 2 EGRESS STAIRS Overview: We will add three stairs to the lab building. One will connect an extension of the second level slab to the atrium space and two
IBM TRIRIGA Version Getting Started User Guide
 IBM TRIRIGA Version 10.3.1 Getting Started User Guide Note Before using this information and the product it supports, read the information in Notices on page 82. This edition applies to version 10, release
WorldTrack Logistics QUICKGUIDE. WORLDTRACK Ejby industrivej 2, 2600 Glostrup
 2017 WorldTrack Logistics QUICKGUIDE WORLDTRACK Ejby industrivej 2, 2600 Glostrup Indhold Logistics... 2 Orders... 2 Import Orders... 4 Planning... 6 Table... 6 Map... 6 Information Block... 7 Filters
Americans with Disabilities Act Accessibility Survey
 Americans with Disabilities Act Accessibility Survey Self-Evaluation and Transition Plan Sarpy County Impound Facility 14242 S. 156th St. Springfield, Nebraska 68159 Prepared by Sarpy County Facilities
Bricks'n'Tiles. Easy Creation of Architectural Textures Tutorial Creating a seamless brick texture
 Bricks'n'Tiles Easy Creation of Architectural Textures www.bricksntiles.com Tutorial Creating a seamless brick texture Creating a seamless brick texture Welcome this this Bricks'n'Tiles Tutorial. Brick'n'Tiles
Visual Interpretation Of The
 Visual Interpretation Of The N T E R N A T I O N A L E S I D E N T I A L O D E 2006 IRC NEW JERSEY EDITION RESIDENTIAL BUILDING CODE SECTION R314 STAIRWAYS R314.1 Width. Stairways shall not be less than
STAIRWAYS, HANDRAILS, AND GUARDRAILS (RESIDENTIAL)
") 01/25/08 STAIRWAYS, HANDRAILS, AND GUARDRAILS (RESIDENTIAL) City of Austin International Residential Code: 500 Fourth Avenue NE R314.1 Width. Stairways shall not be less than 36 in clear width at all points
01/25/08 STAIRWAYS, HANDRAILS, AND GUARDRAILS (RESIDENTIAL) City of Austin International Residential Code: 500 Fourth Avenue NE R314.1 Width. Stairways shall not be less than 36 in clear width at all points
...13 With a Parrot Skycontroller 2 alone Accessing the general settings Piloting settings Position, Distances and Limits...
 USER GUIDE TABLE OF CONTENTS Compatibility...1 Drones...1 Smartphones...1 Follow...1 Me GPS & Visual tracking Getting...2 started Connecting...2 a drone and a smartphone Connecting...3 a drone and a Parrot
assembly an open space between the roof and ceiling of a building attic balloon frame a joist constructed of steel with bars in the verticle web space
 assembly two or more interconnected structural components combined to meet a specific function or design requirement attic an open space between the roof and ceiling of a building balloon frame a type
M.E.PRO PLUS II V.4.18
 M.E.PRO PLUS II V.4.18 11/17/2016 1 Table of Contents Getting Started ------------------------------------------------------------------------------- 3 Configure and Verify Sign/Site controller ---------------------------------------
CE 160 SAP 2000 Notes for 2D Problems. Element and Joint Drawing Tools Global Coordinates of Cursor Position Units in View Window
 CE 160 SAP 2000 Notes for 2D Problems SAP 2000 Main Screen Highlights Title of View Model Lock Zoom Controls Global Coordinate Plane of View Window Pull Down Menus Element and Joint Drawing Tools Global
CEMOS setup and controls guide. CLAAS LEXION combines
 CEMOS setup and controls guide CLAAS LEXION combines CEMOS setup and controls guide Company: Address: CLAAS of America Inc. 8401 South 132nd Street Omaha, NE 68138 Phone: 402-861-1000 Fax: 402-861-1003
APS Basic Set Up. Learn how to set up a basic APS scenario in beas Manufacturing
 APS Basic Set Up Learn how to set up a basic APS scenario in beas Manufacturing Boyum Solutions IT A/S Beas tutorials TABLE OF CONTENTS 1. INTRODUCTION... 3 2. PROCESS... 3 2.1. Master Data Tab... 5 2.2.
LSS Cloud Workorder Workorder/ Invoice Quick Start Guide
 LSS Cloud Workorder Workorder/ Invoice Quick Start Guide Complete the following fields to create and price your custom workorder/invoice. The number of workorders that can be added to the invoice are unlimited.
KORA_Req._for_Eng._Studies_on_Stouffer_Apts. KU Reference No
 000130 1 PURPOSE: Professional Engineering Consultants, P.A. (PEC) was engaged by University of Kansas Design & Construction Management to perform an assessment of Stouffer Place Apartment Building 20
Table of contents. EC3 Steel Design - Class 4 calculation of effective characteristics... 5
 What's New 2018 R2 Table of contents NEW OPTIONS & IMPROVEMENTS... 5 EC3 Steel Design - Class 4 calculation of effective characteristics... 5 Optimization of theoretical reinforcement according to EC2
Building Elements. Roof Wall. Slab/beam. Superstructure. Column. Basement. Substructure. Foundation
 Development Process Learning Objective Understand the development process describe the roles and function of the construction team explain the communication means and essential documents for the development
DatuFly. User Guide. Version January Datumate Geomatics Expert Systems
 DatuFly User Guide Version 1.2.0 January 2017 Datumate Geomatics Expert Systems For more information please visit our website at www.datumate.com, or contact us at support@datumate.com. 2016 by Datumate,
Basic Suspension Systems
 CEILING & WALL SYSTEMS Commercial Ceilings and Walls Solutions Guide Installing Armstrong Suspended Ceilings The ceiling system is made up of Armstrong panels which are supported by a suspension system
ADAPT-PTRC 2016 Getting Started Tutorial ADAPT-PT mode
 ADAPT-PTRC 2016 Getting Started Tutorial ADAPT-PT mode Update: August 2016 Copyright ADAPT Corporation all rights reserved ADAPT-PT/RC 2016-Tutorial- 1 This ADAPT-PTRC 2016 Getting Started Tutorial is
Scaffolding Software iscaf - Design v6.0. New Features. December 2014
 Scaffolding Software iscaf - Design v6.0 December 2014 2010-2015 iscaf - Design : 6.0 (December, 2014) Solid Building You can now show a solid building in 3D with the simple menu option. Use Build-> create
Appendix B Illustrations
 January 1, 2018 TOWN OF CLINTON A-B1 Appendix B Illustrations Arcade: A covered passageway with arches along one or both sides. (http://upload.wikimedia.org/wikipedia/commons/thumb/e/e4/tripoli_sidewalk.jpg/220px-tripoli_sidewalk.jpg)
Datumate Geomatics Expert Systems. For more information, please visit our website at or contact us at
 DatuFly User Guide Version 1.4.1 April 2018 Datumate Geomatics Expert Systems For more information, please visit our website at www.datumate.com, or contact us at support@datumate.com. 2016 by Datumate,
RCT Webinar Presented Thursday March 29, pm to 6 pm
 RCT Webinar Presented Thursday March 29, 2007 5 pm to 6 pm As you are all aware, there is a new RCT being used. Most of the RCT is the same, but there are some differences, which we will go over in this
Printed Documentation
 Printed Documentation Table of Contents GETTING STARTED... 1 Technical Support... 1 Overview... 2 Classifications... 4 Stages... 6 Adding and Deleting Job Folders... 9 Setting Job Defaults... 11 JOBS...
Advantage Mobile Users Guide 06/11/2015
 Advantage Mobile Users Guide 06/11/2015 Updated 06/11/2015 Page 1 of 11 Advantage Mobile Advantage Mobile allows you to access commonly used Webvantage modules from your mobile device. Modules in the first
Acceptable Solution F4/AS1
 1.0 Barriers in Buildings 1.1 Barrier heights 1.1.1 Minimum barrier heights are given in Table 1. COMMENT: Refer to NZBC Clause D1 for handrails on stairs. Handrails can be constructed as an integral part
Adult Family Home Inspections
 Adult Family Home Inspections 1 Color Key Building Inspectors Residential Care Services Licensors 2 Definitions An Adult Family Home (AFH) A residential home in which a person or an entity is licensed
MS Project 2007 Overview Table of Contents
 Table of Contents Microsoft Project Overview... 1 Terminology... 1 Starting Microsoft Project... 2 Projects on the Web... 2 Toolbars... 2 View Bar... 2 Views... 3 Setting Up the Project... 3 Identifying
General Building Information
 Software Module s Description Page 1 General Building Information BUILDING AREA AND HEIGHT - This module designed to determine the height and area of buildings on the basis of occupancy group classification
Introduction 2 The Guidance Existing Buildings Technical Specifications Materials and Workmanship Interpretation. Part K : The Requirement 3
 Contents Page Introduction 2 The Guidance Existing Buildings Technical Specifications Materials and Workmanship Interpretation Part K : The Requirement 3 Section 1 STAIRWAYS, LADDERS AND RAMPS 4 Introduction
FRAMING INSPECTION GENERAL
 FRAMING INSPECTION GENERAL 20 FRAMING INSPECTION GENERAL Tips Check habitable rooms for minimum light, ventilation and sanitation requirements. Check that stair framing meets headroom, width, and rise
Installation Guidelines
 Installation Guidelines Exteria Building Products provides these instructions as general guidelines only. Exteria Building Products neither installs siding nor has any control over any installation. The
4 th Example Masonry Structure Analysis and Design
 4 th Example Masonry Structure Analysis and Design 2 Contents OVERVIEW defined. Error! Bookmark not INTRODUCTION 5 THE NEW ENVIRONMENT 5 GENERAL DESCRIPTION 7 A. Geometry 7 B. Materials 7 C. Regulations
LOW DENSITY RESIDENTIAL ZONE RULES FOR HOME-OWNERS, ARCHITECTS, AND BUILDERS
 A BASIC GUIDE TO THE LOW DENSITY RESIDENTIAL ZONE RULES FOR HOME-OWNERS, ARCHITECTS, AND BUILDERS This guide identifies the key bulk and location rules that apply in the LOW DENSITY RESIDENTIAL ZONE only.
DIGITAL VERSION. Microsoft EXCEL Level 2 TRAINER APPROVED
 DIGITAL VERSION Microsoft EXCEL 2013 Level 2 TRAINER APPROVED Module 4 Displaying Data Graphically Module Objectives Creating Charts and Graphs Modifying and Formatting Charts Advanced Charting Features
PART R3-L ZONE, LOW DENSITY MULTIPLE DWELLING DISTRICT
 PART 3.2 - R3-L ZONE, LOW DENSITY MULTIPLE DWELLING DISTRICT Uses 1 The following uses are permitted: (a) single family dwellings; (b) two family dwellings; (c) multiple dwellings; (d) churches; (e) public
Talent Management System User Guide. Employee Profile, Goal Management & Performance Management
 Talent Management System User Guide Employee Profile, Goal Management & Performance Management January 2017 Table of Contents OVERVIEW... 1 Access the Talent Management System (TMS)... 1 Access the TMS...
RS-1 District Schedule
 District Schedule 1 Intent The intent of this Schedule is generally to maintain the single-family residential character of the District, but also to permit conditionally one-family dwellings with secondary
New Degree Day History Screen
 This document describes the various enhancements and modifications to DRM Windows that occurred between versions 9.1.270 and 10.2.280. New Degree Day History Screen This screen compares the current heating
Morningstar Direct SM Presentation Studio
 Presentation Studio is Morningstar Direct s platform for creating custom presentations. With access to Morningstar Direct s databases and flexible charting and reporting capabilities, Presentation Studio
TrackITSystem. Facility Manager Documentation Installation and User Guide
 TrackITSystem Facility Manager Documentation Installation and User Guide Pages 1 to 7 apply to the install and configuration for admins. The user guide begins on page 8 In a browser, go to the installation
RESIDENTIAL BUILDING REQUIREMENTS
 RESIDENTIAL BUILDING REQUIREMENTS Residential Building Requirements This is an informational booklet with some of the general residential construction requirements taken from the codes adopted by Campbell
Corrugated Compression Strength
 Corrugated Compression Strength Introduction The Strength Program allows you to evaluate the effects of a number of loading parameters and environmental conditions on the predicted individual case compression
Chapter Contents. Manage Employers Option Screen
 16: Manage Employers Chapter Contents Create an Employer Account (Registration)... 16-2 Add Employer Locations... 16-6 Assign a Case Manager... 16-8 Add Contacts... 16-9 Assist an Employer... 16-13 Search
Miller Collective Safety at Height Solutions EPIC ULTRA Barrier System EPIC Post-N-Barrier System EPIC Basic Barrier System
 For over 65 years the Miller brand has been synonymous with personal fall protection products and services. As the global leader in safety at height solutions, Honeywell Safety Products introduces a new
SUPPLEMENTARY PLANNING GUIDANCE DORMER EXTENSIONS. Introduction
 SUPPLEMENTARY PLANNING GUIDANCE DORMER EXTENSIONS Introduction Located at roof level dormer extensions can be prominent features affecting the character and appearance of the building and surrounding area.
ADAPT-Builder 2012 Getting Started Guide
 ADAPT-Builder 2012 Getting Started Guide Update: February 2013 Copyright ADAPT Corporation all rights reserved ADAPT Builder 2012 Getting Started Guide I TABLE OF CONTENTS 1 Overview of ADAPT-Builder
COPYRIGHTED MATERIAL. Index
 Index 2D Graphic, 12 3D Animation, 12 3D Mouse, 14 3D Warehouse, 7 9, 121, 169, 179 180, 242 243, 248, 251 Add Location, 49 Addy, Duane, 315, 317 Animation, 12, 37, 224, 271, 317 318, 322 324, 327, 329