USER MANUAL. smartsoft classic Plus. RELEASE DATE: 12-Sep-2011
|
|
|
- Morris Hicks
- 6 years ago
- Views:
Transcription
1 USER MANUAL smartsoft classic Plus. RELEASE DATE: 12-Sep-2011 Disclaimer The instructions in this document have been carefully checked for accuracy and are presumed to be reliable. Smart I Electronics Systems Pvt Ltd. and its writers assume no responsibility for inaccuracies and reserve the right to modify and revise this document without notice. It is Smart I s goal to supply accurate and reliable documentation. If you discover a discrepancy in this document, please your comments to support@smartisystems.com smartsoft classic plus User Manual : V-1.2 Updated Document Release Date: smartsoft classic Plus Version : V
2 Contents How to Use smartsoft : How to get data from the controllers... 5 A. Download Data from Hardware:... 5 B. Download Time logs: Employee Master: With this form the user can Steps to Search Employee: Steps to View Details of Employee: Steps to Delete An Employee:... 7 a. Employee Personal Details:... 7 b. Employee Shift Structure:... 8 c. Employee Attendance: Company Master: With this form the user can Edit Details Of Existing Companies: Department Master: With this form the user can Steps to add a Department: Delete/Edit Details Of Existing Departments: Designation Master: With this form the user can Steps to add a Designation: Delete/Edit Details of Existing Designations: Holiday Master: With this form the user can Steps to add a Holiday: Delete/Edit Details Of Existing Holidays: Leaves Code Master: With this form the user can Steps to add a Leave Code:
3 1.3 Delete/Edit Details of Existing Leaves: Leave Rules Master: With this form the user can Steps to add Leave Rules: Shift Roaster: Steps to create Daily Pattern Pattern Type : Weekly Pattern Type: Monthly Category Master: Setting Attendance Policies/Rules With this form the user can Steps to add Category: Shifts Master: With this form the user can Steps to add Shifts: Delete/Edit Details Of Existing Shifts: Manual Punches: Steps to add Manual punches: Assign Company: With this form the user can Steps to Assign Company: Assign Shifts: With this form the user can Steps to add Assign Shifts: Assign Category: With this form the user can Steps to assign category: Compensation Off: With this form the user can Steps to assign category: Condone Entry : With this form the user can
4 18. Tour Entry: With this form the user can Steps to add tour entry: Outdoor Entry: With this form the user can Late/Early Penalty: With this form the user can Steps to make Late/Early Penalty: Setting Leave Opening Balance: Leave Sanction: With this form the user can Change Password: Create Users: With this form the user can Steps to create User: Select Database Path : With this form the user can Reports: Monthly Reports : Continuous Reports : Leave Reports Tally report:

5 How to Use smartsoft : 1. How to get data from the controllers: A. Download Data from Hardware: smartsoft works on Employee Data and their time logs. This data is first transferred from the hardware through Data capturing Software ie Download Engine or smartengine 30 to their relevant Databases. So first you need to connect to a download engine or smartengine 30 and transfer all your machine data to it. smartsoft then connects to the database and then allows you to download the data to the server database. For this purpose you are provided with the form "Select Database Path" under "Settings" Menu. Select Database Path: The image at the right shows you how to select database. You are provided with a facility to connect to 2 types of databases i.e. MS-Access and MS-SQL Server. Then you can browse the required database file. The path is displayed in the textbox shown. Then you need to click on "Save Settings" which would save the settings to download data. 5
 such as - Employee Name; Card No; Employee Code - to the server database of")
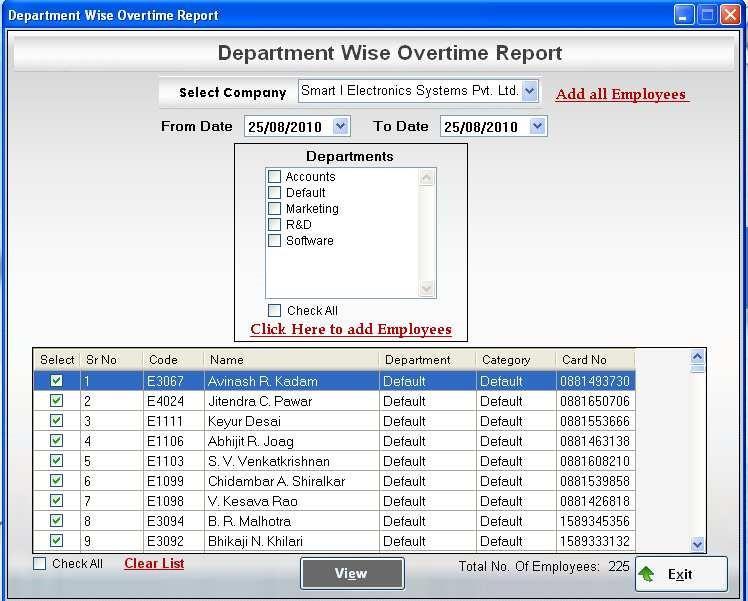
6 B. Download Time logs: In order to download time logs you need to first Select Controllers among the available list and then click on "Download Time Logs 2. Employee Master: smart SOFT classic plus provides the user with a facility to download the employee data (Information) such as - Employee Name; Card No; Employee Code - to the server database of smartsoft Advance from the database of the data capturing software viz smartengine or Download Engine. Later the user can edit, update or delete their details through various forms. The user can also assign Company, Shifts, Shift Roaster and Categories to these employees using various user forms provided to serve the purpose. When the user click on Employee" under "Master Menu" a form is shown to "Select Employee" as shown in the figure which also facilitates various search criteria to search employees. The user can search employee Company wise, by Employee code, by name along with the additional filters shown. 6

7 1.1 With this form the user can- 1. Search particular employee. 2. View details of that employee. 1.2 Steps to Search Employee: 1. Enter the desired search parameters. Click on "Search" button. The resultant employees are displayed in the grid below. 1.3 Steps to View Details of Employee: 1. Select any employee from grid. 2. Click on "Details button. The user will be redirected to the employee details page where the user can view employee s Personal details, Shift Details and also Attendance Details. 1.4 Steps to Delete An Employee: 1. Select any employee from grid. 2. Click on "Delete Employee" button. a. Employee Personal Details: With this form the user can- View Personal Details of an employee. Update details. Add the image of the employee by clicking on "Add Picture". This will help to browse the image to be displayed in the picture box shown. 7

8 Select another employee by clicking "Select another Employee". This will take to the previous "Search employee" form. View details of various employees using the Move to Button Panel provided for this purpose. Clicking on "Save" would save all the changes made. Clicking on "Reset" would reset all the details. b. Employee Shift Structure: With this form the user can- The user can view month wise Shift Structure of an employee. Assign Shifts, Shift Roaster or weekly off to the employee for a selected date range as shown in the form above. Select another employee by clicking "Select another Employee". This will take to the previous "Search employee" form 4. The user can also view details of various employees using the Move to Button Panel provided. 8

9 c. Employee Attendance: With this form the User can- View month wise Attendance Details of an employee. If the user select a particular date & click on View, the user can see the shift & punch details of that employee for that day below on the left side of the form. The user can also see the complete attendance details of the month which includes: a) Full Days 1) Half Days 2) Irregular Punch Days 3) Holidays 4) Weekly Off 5) Late/Early Details 6) Overtime details 4. The user can also search another employee by clicking on "Select another Employee". 5. The user can also view details of various employees using the Move to Button Panel provided. 9

10 3. Company Master: smartsoft classic plus provides the user only one company can be added. Company Master is the form provided to serve the purpose. The form structure is as shown in the figure. 10

11 1.1 With this form the user can- Set Leave Accounting year for that Company The user can also edit the details of the existing Company. 1.2 Edit Details Of Existing Companies: The user is also provided with the option of modify existing Company. A List box shown on the right side of the form displays a list of all the existing companies. In order to edit them the user need to take following steps: 1. Select Company name. On selecting the details are reflected in the details section. A panel of buttons gets visible as shown below. 2. To Edit Details: The textbox controls are currently disabled. Click on "Modify" to enable them. Edit the details and click on "Update". This will save the changes. 4. Department Master: smartsoft provides the user with a facility to maintain Multiple Department. The user can have Multiple Departments. Department Master is the form provided to serve the purpose. The form structure is as shown above. 11
12 1.1 With this form the user can- 1. Add a New Department. 2. The user can also edit the details or delete the existing Departments. 1.2 Steps to add a Department: Enter the Department Name which is mandatory. Enter other details required. Click "ADD" to save the Department details to the database. Now the user will observe that the entered Department name appears in the Available Departments list. Repeat the above steps for adding more Departments. 1.3 Delete/Edit Details of Existing Departments: The user is also provided with the option of modifying or deleting an existing Department. A List box shown on the right side of the form displays a list of the entire existing Department. In order to edit/delete them the user need to take following steps: 1. Select Department name. On selecting the details are reflected in the details section. A panel of buttons gets visible as shown below. 2. To Edit Details: The textbox controls are currently disabled. Click on "Modify" to enable them. Edit the details and click on "Update". This will save the changes. 3. To Delete: Just click on "Delete" and the Department will get deleted with all its details. 5. Designation Master: smartsoft provides the user with a facility to maintain Multiple Designations. The user can have multiple designations for employees. Designation Master is the form provided to serve the purpose. The form structure is as shown above. 1.1 With this form the user can- 1. Add a new Designation. 2. The user can also edit the details or delete the existing Designations. 1.2 Steps to add a Designation: 1. The user need to select the Company under which to add the Designation. Enter the Designation Name which is mandatory. Enter other details required. Click "ADD" to save the Designation details to the database. Now the user will observe that the entered Designation name appears in the Available Designations list. Repeat the above steps for adding more Designations. 1.3 Delete/Edit Details of Existing Designations: The user is also provided with the option of modifying or deleting an existing Designation. A List box shown on the right side of the form displays a list of all the existing Designation. In order to edit/delete them the user need to take following steps: 12

13 1. Select Designation name. On selecting the details are reflected in the details section. A panel of buttons gets visible as shown below. 2. To Edit Details: The textbox controls are currently disabled. Click on "Modify" to enable them. Edit the details and click on "Update". This will save the changes. 3. To Delete: Just click on "Delete" and the Designation will get deleted with all its details. 6. Holiday Master: smartsoft provides the user with a facility to maintain Multiple Holiday details. The user can have multiple Holidays. Holiday Master is the form provided to serve the purpose. The form structure is as shown. 1.1 With this form the user can- 1. Add a new Holiday. 2. The user can also edit the details or delete the existing Holidays. 1.2 Steps to add a Holiday: 1. The user need to select the Company under which to add the Holiday. Enter the Holiday Name which is mandatory. Select the Holiday date. Check the Checkbox provided for Fixed for All Year in case the holiday falls on the same date every year e.g. 15 th August Independence Day. 4. Click "ADD" to save the Holiday details to the database. Now the user will observe that the entered Holiday name appears in the Available Holidays list. Repeat the above steps for adding more Holidays. 13
14 1.3 Delete/Edit Details of Existing Holidays: The user is also provided with the option of modifying or deleting an existing Holiday. A List box shown on the right side of the form displays a list of all the existing Holidays. In order to edit/delete them the user need to take following steps: 1. Select Holiday name. On selecting the details are reflected in the details section. A panel of buttons gets visible as shown below. To Edit Details: The textbox controls are currently disabled. Click on "Modify" to enable them. Edit the details and click on "Update". This will save the changes. To Delete: Just click on "Delete" and the Holiday will get deleted with all its details. 7. Leaves Code Master: smartsoft provides the user with a facility to maintain Multiple Leaves details. The user can have multiple Leaves under Company maintained according to Leave Codes. Leaves Master is the form provided to serve the purpose. The form structure is as shown above. 1.1 With this form the user can- 1. Add a new Leave. 2. The user can also edit the details or delete the existing Leaves. 1.2 Steps to add a Leave Code: Enter the Leaves Code which is mandatory. Enter other details that are required. Click "ADD" to save the Leaves details to the database. Now the user will observe that the entered Leaves code appears in the Available Leaves list. Repeat the above steps for adding more Leaves. 1.3 Delete/Edit Details of Existing Leaves: The user is also provided with the option of modifying or deleting an existing Leaves. A List box shown on the right side of the form displays a list of all the existing Leaves. In order to edit/delete them the user need to take following steps: 1. Select Leave code. On selecting the details are reflected in the details section. A panel of buttons gets visible as shown below. To Edit Details: The textbox controls are currently disabled. Click on "Modify" to enable them. Edit the details and click on "Update". This will save the changes. To Delete: Just click on "Delete" and the Leave details will get deleted. 8. Leave Rules Master: smartsoft provides the user with a facility to set Leave Rules. Leave Rules can be applied to a particular leave under a particular Category. 14

15 Leave Rules Master is the form provided to serve the purpose. The form structure is as shown above. 1.1 With this form the user can- Set Leave Rules for a particular Leave. The user can also edit the details or delete the existing Leave Rules. 1.2 Steps to add Leave Rules: 1. The user need to select the Company, and Category to which the Leave is applicable. Select the leave code to which the leave rules are to be applied. The user needs to enter the required details. Allow Half Day Leave: Tick mark if the half is allowed for this leave. Min Days Allowed at a Time : Enter min nos. of days of leave that can be taken if half allowed is tick marked then min nos. of days shall be 0.5. Treat IN between Week Off as Leave: If tick marked then any leave falling on week off shall be treated as leave else shall be treated as Week off. Treat IN between Holidays as Leave: If tick marked then any leave falling on Holiday shall be treated as leave else shall be treated as Holiday. Click "ADD" to save the Leave Rules details to the database. Now the user will observe that the entered Leave Rules appears in the Available Leave Rules list. Repeat the above steps for adding more Leave Rules. Delete Details Of Existing Leave Rules: The user is also provided with the option of modifying or deleting an existing Leaves Rules. A List box shown on the right side of the form displays a list of all the existing Leaves Rules. 15
16 In order to edit/delete them the user need to take following steps: 1. Select Leave Rule. On selecting the details are reflected in the details section. A panel of buttons gets visible as shown below. 2. To Delete: Just click on "Delete" and the Leave Rules will get deleted. 9. Shift Roaster: Shift Roaster is use to create or define shift pattern for creating or managing rotation of the shifts of a single or a group of employees. The user can create or define 3 types of shift patterns Daily basis. Weekly basis. Monthly basis. Pattern Type: Daily. In this type of pattern the shift rotates on the numbers of days specified. E.g. there are 3 shifts that are defined in the shift master as under: 16

17 1.1 Steps to create Daily Pattern The user needs to select the Company, to which the Pattern is applicable. Select the Pattern Type Daily from the list. Enter the Pattern code. Enter the Pattern Name Select the Shifts for to create the pattern. Enter the numbers of days for the shift to run. Click on ADD button to save the pattern. The Newly created pattern will appear in the Available Roaster Pattern list along side. Shift Name Shift Code Shift Start Time Shift End Time Nos of days General G 09:00 18:00 5 General 2 G2 11:00 20:00 4 Night N 22:00 06:00 7 FOR THE PURPOSE OF EXPLANATION THE PATTERN STARTS ON 1 ST MAY 17
18 M T W T F S S The first cycle of the daily pattern is completed on 16 th of May and the next cycle begins on 17 th May and continuous up to 1 st June. This how the daily pattern continuous JUNE M T W T F S S Pattern Type: Weekly. In weekly pattern the shift changes on weekly basis. Steps to create Weekly Pattern: The user needs to select the Company, to which the Pattern is applicable. Select the Pattern Type Weekly from the list. Enter the Pattern code. Enter the Pattern Name Select the No. of Weeks for the weekly pattern. Select the Shifts for week for different weeks in the grid. Select the Week off. Click on ADD button to save the pattern. The Newly created pattern will appear in the Available Roaster Pattern list along side. G 09:00 18:00 G2 11:00 20:00 N 22:00 06:00 18

19 Refer above figure as example for setting the weekly pattern Shift Name Shift Code Shift Start Time Shift End Time General G 09:00 18:00 General 2 G2 11:00 20:00 Night N 22:00 06:00 In the example the pattern starts from 1 st of the month. May M T W T F S S
20 JUNE M T W T F S S Pattern Type: Monthly In monthly pattern the shift changes on monthly basis ie after every 30 days. Steps to create Monthly Pattern: The user needs to select the Company, to which the Pattern is applicable. Select the Pattern Type Monthly from the list. Enter the Pattern code. Enter the Pattern Name Select the No. of Weeks for the weekly pattern. Select the Shifts from the list of shifts and move to the list box alongside. Select the date of the month from where the shift must change. Click on ADD button to save the pattern. The Newly created pattern will appear in the Available Roaster Pattern list along side. G 09:00 18:00 G2 11:00 20:00 N 22:00 06:00 20

21 Refer the above diagram for e.g. Shift Name Shift Code Shift Start Time Shift End Time General G 09:00 18:00 General 2 G2 11:00 20:00 Night N 22:00 06:00 The shift in the pattern changes from 10 th of every month. May 21


22 JUNE JULY M T W T F S S G 09:00 18:00 G2 11:00 20:00 N 22:00 06:00 22


23 AUGUST 10. Category Master: Setting Attendance Policies/Rules smartsoft provides the user with a facility to set Category. Category can be prepared under the Company. Category Master is the form provided to serve the purpose. The form structure is as shown above. 1.1 With this form the user can- 1. Add Category for a particular Company. 2.The user can also edit the details or delete the existing Category. 1.2 Steps to add Category: The user needs to select the Company to which the Category is applicable. Enter the Category Code and name which is mandatory. Compensation off Settings: If the employee works on holidays and weekly off,those work hours can be transferred to some Absent day. For that the user need to set the compensation off. Specify Min. hours applicable to Comp. Off. It indicates that compensation off would be considered only after the user work for the specified hours. Also specify no. of comp. offs allowed in a month. Overtime settings: 1. Select radio button in order to apply or Ignore Overtime Settings. Set time interval after & before the shift work hours to start overtime. Select "+" to indicate time after Shift Work Hours. Select "-" to indicate time before Shift Work Hours. Select Grace Overtime Hours: This indicates the time interval that would be given as grace to the employee for Overtime consideration. The user can also provide settings for compulsory overtime before or after shift. Minimum OT hours Before Shift: If the user check this checkbox and specify certain time interval, Overtime will be calculated only if the employee works for that time before shift. Minimum OT hours After Shift: If the user check this checkbox and specify certain time interval, Overtime will be calculated only if the employee works for that time after shift. 23
24 Late/Early settings: Grace Late Time: It is time that employee is allowed to come late from the scheduled shift start time without any marking on a day s attendance. Grace Early Time: It is same as above except it denotes early going from the scheduled end time. Late allowed Limit: Late allowed limit is the time that an employee is allowed to come late with the day s attendance showing late mark. If the employee comes later than the specified time then the first half is marked absent for the employee Early Allowed Limit: It is same as above except it denotes early going from the scheduled end time.. If the employee leaves earlier than the specified time then the second half is marked absent for the employee. 1. Check the Checkbox at the top to Apply Early/Late Settings. Set Late/Early Count as interval. If After every interval check box is checked, then the following conditions are applied only after those many late counts. The user can either deduct leave or attendance days for late counts. If Deduct from Leave is True, then specified no. of leaves would be deducted from specified leave type. If Deduct from Attendance is true specified no. of days would be deducted from attendance. Other settings are same as Late/Early settings. Repeat the above steps for adding more Categories. Delete/Edit Details of Existing Categories: The user is also provided with the option of modifying or deleting existing Categories. A list shown on the left side of the form displays a list of all the existing Categories. In order to edit/delete them the user need to take following steps: 1. Select the Category. On selecting the details are reflected in the details section. A panel of buttons gets visible as shown below. 2. To Edit Details: The textbox controls are currently disabled. Click on "Modify" to enable them. Edit the details and click on "Update". This will save the changes. 3. To Delete: Just click on "Delete" and the Shift Calendar details will get deleted. 11. Shifts Master: smartsoft provides the user with a facility to set Shifts. Shifts can be applied to a particular employee under a particular Company. Shifts Master is the form provided to serve the purpose. The form structure is as shown. 24

25 1.1 With this form the user can- Add Shifts for a particular Company. 2. The user can also edit the details or delete the existing Shifts. 1.2 Steps to add Shifts: 1. The user need to select the Company to which the Shift is applicable. Enter the Shift name and Shift Code which is mandatory. The user also need to enter the shift start/end time and Break Start/End time. Shift work Hours are generated automatically. The user needs to specify work Hour duration for Half Days. Day Start Time & Day End Time: These fields are auto-generated. Generally applicable work duration for any employee is considered to be 24 hours. Day start/day end times are used to facilitate this duration. Day Start Time: It starts 1 hour before the Shift Start time. Day End Time: It indicates the 24 hour work duration completion. Night Shift: The user can also set a particular shift as night shift by checking the checkbox provided. Default Shift: The user can also set a particular shift as default. A default shift is applicable in case no shift is assigned to a particular employee. Accordingly the user needs to make all the settings. 4. Click "ADD" to save the Shifts details to the database. Now the user will observe that the entered Shift appears in the Available Shifts list. Repeat the above steps for adding more Shifts. 1.3 Delete/Edit Details Of Existing Shifts: The user is also provided with the option of modifying or deleting an existing Shift. 25

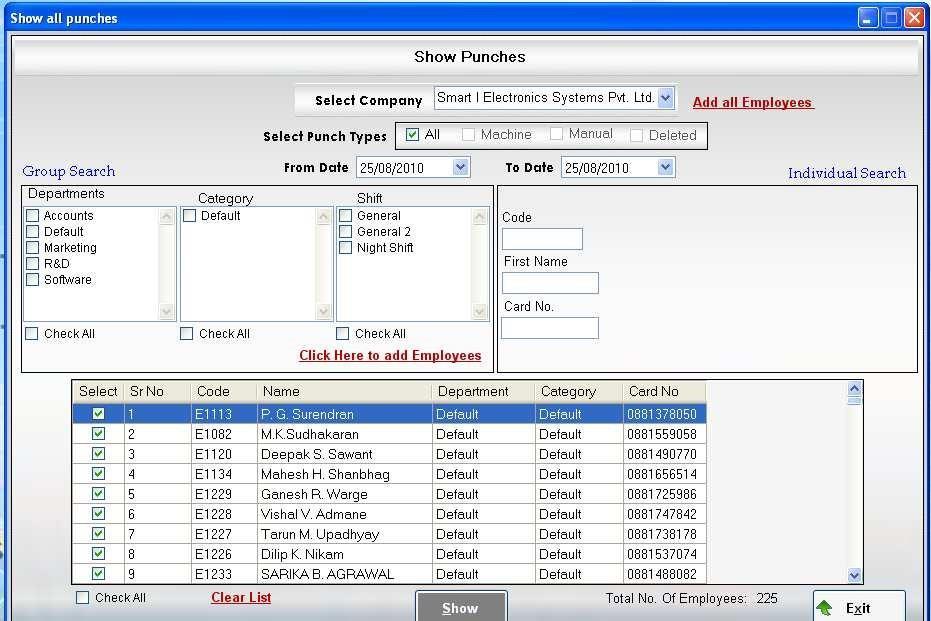
26 A grid shown at the bottom of the form displays a list of all the existing Shifts. In order to edit/delete them the user need to take following steps: 1. Select the Shift. On selecting the details are reflected in the details section. A panel of buttons gets visible as shown below. To Edit Details: The textbox controls are currently disabled. Click on "Modify" to enable them. Edit the details and click on "Update". This will save the changes. To Delete: Just click on "Delete" and the Shift details will get deleted. 12. Manual Punches: smartsoft provides the user with a facility to add manual punches for an employee or a no. of employees at a time. Manual Punches is the form provided to serve the purpose. The form structure is as shown below smartsoft works on Employee Data and their time logs and also provides facility to update the data. This software basically works on the time logs that are recorded across every employee. Punch timings are these time logs i.e. the time the employee enter or leave the company the employee punches the card at the attendance Card machine. These timing are called as Punch timings. These are saved date wise separately across each employee. These punches are generally read from the machine through a download engine into the database. But there might be circumstances when you need to add them manually. These puches are called "Manual Punches". 26

27 For e.g..when an employee forgets to carry the cards or the finger are injured etc. To handle such situations smartsoft provides the user an interface to add manual punches through a form named "Manual Punches" Punches: Punches generally represent the following events: 1. Check In 2. Break In 3. Break Out 4. Check Out Select Suitable Date Range: Here you need to first select a date range for which to add manual punches. Adding Manual Punch Timings: You can select multiple employees of a particular company. You can then add manual punches as shown.you can specify Check IN., Check OUT, break in and also Break Out timings as required i.e. all or any of them. And then Save the details by clicking on "Assign" which will update the database With this form the user can- 1. Add manual punches for an employee. 1.1 Steps to add Manual punches: 1. Select the Company. 2. Select the employee for which to add manual punches. 3. Enter the shift-timings 4. Click on Assign to assign manual punches. Repeat the above steps for adding manual punches. 13. Assign Company: smartsoft provides the user with a facility to assign employee to certain Company out of multiple companies. The user can assign Company to an employee or a number of employees at a time. Assign Company is the form provided to serve the purpose. The form structure is as shown above. Assign Employee Company: There is a form "Assign Employee Company where you can search employees by Emp Code or Name. Then, you can select multiple employees and assign any other company to them. As shown aside you can choose your search criteria. The search results are shown in a grid at the bottom. From this grid you can select multiple employees. Select a particular Company to assign and then click on "Assign". 27

28 This will update the company for all those employees in the database 1.1 With this form the user can- 1. Assign Company to the employees. 1.2 Steps to Assign Company: The user can search the employee according to employee code, first name or last name. Select the Company to assign to employee. Select the employees for which the user want to assign Company. 4. Click on Assign to assign Company to employees. Repeat the above steps for assigning shifts. 14. Assign Shifts: smartsoft provides the user with a facility to assign shifts to employee. The shifts can be assigned directly within particular dates or by using a shift calendar. Weekly-offs can also be assigned. Assign Shifts is the form provided to serve the purpose. The form structure is as shown above. Assign Shifts: There is a form "Assign Shifts where you can select multiple employees of a particular company directly or even department wise. You can also select a suitable date range and then assign Shifts or Shift Roaster or even Weekly Off for selected employees applicable for the date range selected. And then Save the details by clicking on "Assign" which will update the database. 28

29 1.1 With this form the user can- Assign shifts & weekly-offs for an employee using a shift-calendar or directly. User can also allow to assign Auto shift Logic: If there are some shifts defined in the system & employee can come in any shift, then in this case auto shift will be applied to him in which the shift which is nearby to his check in time,assigned to him for that Day Example to assign auto shift: Here Employee Ms. Anita s is having Auto shift assign. Manual punches: punches are 9:46 to 21: punches are 10:45 to 22: punches are punches are 6:45 29

30 1.2 Steps to add Assign Shifts: Select the Company. Select the employee-type & status to list the employees. Select the employee & dates within which to apply the shifts or weekly-offs. Shifts can be assigned employee-wise or department-wise i.e to all employees in a department. Click on assign to assign shifts. Repeat the above steps for assigning shifts. 15. Assign Category: smartsoft provides the user with a facility to set a category to an employee which contains the settings for the employee. Assign Category is the form provided to serve the purpose. The form structure is as shown above. Set Category: There is a form "Set Category where you can select multiple employees of a particular company also department wise. You can select the required Category to assign. You can also select a suitable date range and then save the changes by clicking on "Assign" which will update the database. 30

31 1.1 With this form the user can- 1. Assign the category for an employee--employee-wise or department-wise 1.2 Steps to assign category: 1. Select the Company. 2. Select the employee-type & status to list the employees. Select the employees. Select the category to be assigned and the dates within which that category is to be applied. Click on assign to assign the category. Repeat the above steps for assigning the category. 16. Compensation Off: smartsoft provides the user with a facility to allow compensation off for an employee. This is a form "Compensation Off where you can select an employee of a particular company. You can select the date for which to give compensation and also date on which to give the compensation. You can also view the time log details for the selected date. And then Save the changes by clicking on "Sanction" which will apply the compensation and update the database. 31

32 1.1 With this form the user can- 1. Allow compensation off for an employee & shift his punches to another date on which he is absent. 1.2 Steps to assign category: Select the Company. Select the employee-type & status to list the employees. Select the employee. Select the date for which he has worked on a holiday or weekly-off. Select the date for which he is given compensation-off. Click on Sanction to sanction compensation-off for that day. Repeat the above steps for allowing compensation-off. 17. Condone Entry : smartsoft provides the user with a facility to condone an employee. The "Condone Entry form under Updations Menu provides the user with the facility called Condone. This means giving consideration to the employee for being late or absent due to certain circumstances which are not under control of that employee. In such cases entries can be made as condone stating the consideration to be given i.e. whether to mark No Late or Present etc. and reason etc. which will be approved by the admin. Condone entries can also be deleted. 32

33 1.1 With this form the user can- 1. Make condone entry for an employee & delete existing condone entries. Steps to add condone entry: 1. Select the Company. 2. Select the employee-type & status to list the employees. 3. Select the employee, department, category, shift to list the employees. 4. Enter the condone mode-present, absent, no late, no early and the condone limit i.e. the time for which condone is allowed. 5. Click on Add Condone to add the condone entry. 6. Select an existing condone entry to delete. 18. Tour Entry: smartsoft provides the user with a facility to make tour entry for an employee who has gone for a tour for company-purpose. He may be marked as present or half-day. The tour-entry can be made employee-wise, department-wise, category-wise or shift-wise. There is a form called "Tour Entry" through which you can select multiple employees under a particular company. Select a suitable date range and thus make a tour entry for that duration. 33

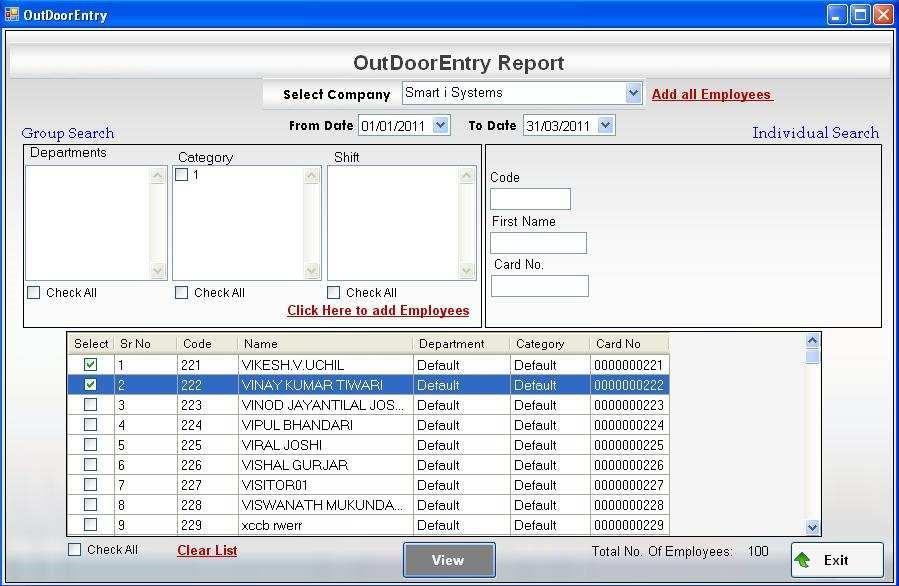
34 1.1 With this form the user can- 1. Make tour entry for an employee & delete existing tour entries for an employee. 1.2 Steps to add tour entry: 1. Select the Company. 2. Select the employee-type & status to list the employees. Select the employee & date for which to make tour entry. Select the mode i.e. present or half-day & click on Add Entry to make the tour entry. Select an existing entry to delete it. Repeat the above steps for adding tour entry. 19. Outdoor Entry: smartsoft provides the user with a facility to make outdoor entry for an employee i.e. punches can be selected to make outdoor entry. There is a form provided named "Outdoor Entry where you can select an individual employee of a particular company. Select a particular date for which to make Outdoor entries. You can see all the punches of that employee for that date in the form of a list as shown aside. You can select one or multiple punches made and then click on "Assign to mark those punches as Outdoor punches. 34

35 1.1 With this form the user can- 1. Make outdoor entry for an employee. Steps to add outdoor entry: 1. Select the Company. 2. Select the employee-type & status to list the employees. 3. Select the employee & date for which to make outdoor entry. 4. Select the punches for which to make outdoor entry. 5. Click on Add Entry to add the outdoor entry. Repeat the above steps for adding outdoor entry. 20. Late/Early Penalty: smartsoft provides the user with a facility to make Late/Early penalty manually. This penalties are generated as per the late/early rules set in the category Master for a particular category to which the employee belongs. Late/Early Penalty is the form provided to serve the purpose. The form structure is as shown 35

36 1.1 With this form the user can- 1. Execute the late/early penalty for a particular employee. The form shows the total number of penalty. The type of Penalty whether from the deduction is to be done from Attendance or from the Leave. The Balance Penalty to be executed. 1.2 Steps to make Late/Early Penalty: Select the Company. Select the Month in which the Late/Early penalty is to be executed. Select the employee from the list. Mark the date along side in the list box from which the penalty is to be effected. The First list shows the dates of full day present and the second list shows the date on which the employee was present for half day. Click on Add Button. Repeat the above steps for the other employees. 21 Setting Leave Opening Balance: In case of new installations; this form assigns number of pending leaves to each employee. 36


37 22 Leave Sanction: smartsoft provides the user with a facility to sanction leaves for an employee. Leave Sanction is the form provided to serve the purpose. The form structure is as shown above. 37

38 1.1 With this form the user can- 1. Sanction leaves for an employee & delete sanctioned leaves of an employee. Steps to Sanction Leaves: 1. Select the Company. 2. Select the employee-type & status to list the employees. 3. Select the employee & leave code applicable. 4. Select the dates for leave & click on sanction to sanction the leaves. 5. Select a sanctioned leave to delete it in case if an error has been done on the part of the operator. The Available leaves get updated in the grid shown along side. Repeat the above steps for sanctioning leaves. 23 Change Password: smartsoft provides the user with a facility to change the password. Change Password is the form provided to serve the purpose. The form structure is as shown above. 38


39 With this form the user can- 1. Change your Password. Steps to change Password: 1. Enter the old Password and New Password. Click on Change to change the Password. 24 Create Users: smartsoft provides the user with a facility to create users for the system and assign rights to them. Create Users is the form provided to serve the purpose. The form structure is as shown above. 1.1 With this form the user can- 1. Create new user for the system. 2. The user can also edit the details or delete an existing User. 39

40 1.2 Steps to create User: 1. Enter the Username & Password. 2. Select the Company the user. 3. Select the Privileges to assign to the user. 4. Click on Add New User to add the user. 5. Select an existing User to Update or Delete. 25 Select Database Path : 40

41 smartsoft provides the user with a facility to download data from a database file. Select Database Path is the form provided to serve the purpose. The form structure is as shown above. 1.1 With this form the user can- 1. Select a database file and download data from that file. The user can connect to two types of databases viz. MS-Access or MS SQLServer. Steps to select database path: Select the database type. Browse and select the database file. 3. Click on download employee to download the details of all the employees. 4. Click on download time logs to download the punch timings of all the employees. 5. Select the controllers for downloading the data. Import Excel Data: smartsoft provides the user with a facility to import data from Excel sheet. Import Excel Data is the form provided to serve the purpose. The form structure is as shown above. With this form the user can- 1. Import data from excel sheets for the masters. Steps to import excel data: 1. Select the Company. 2. Select the masters for which to import data. Browse & select the excel file. Enter excel sheet data & click on load to view excel data. 41

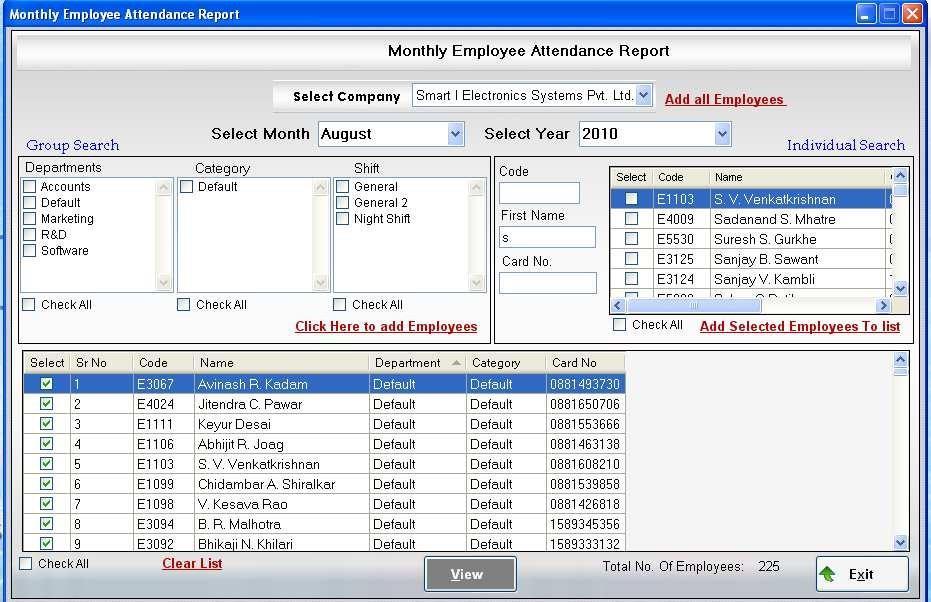
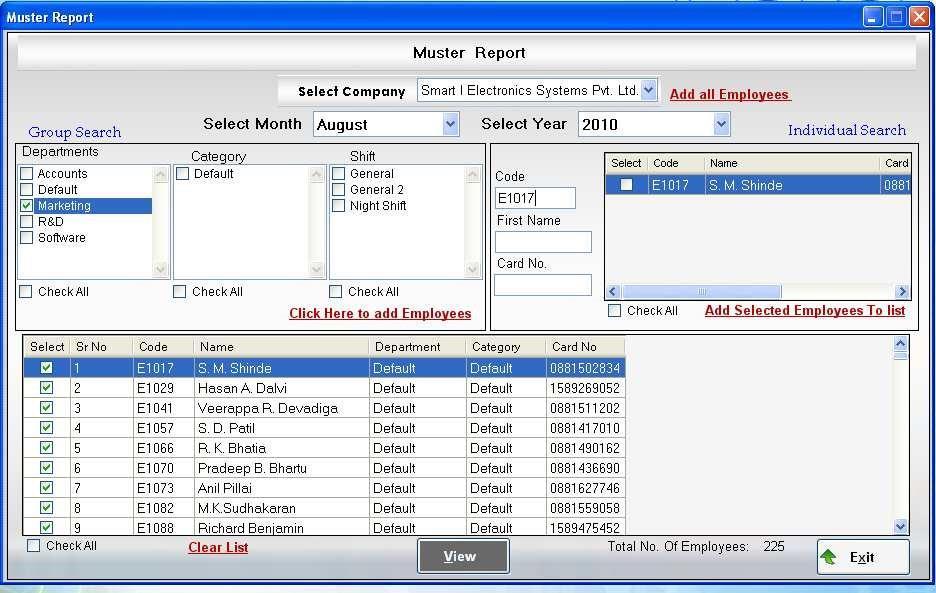
42 Click on Save to upload data. 26 Reports: Master Reports: 42


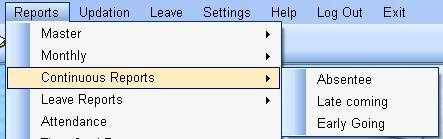

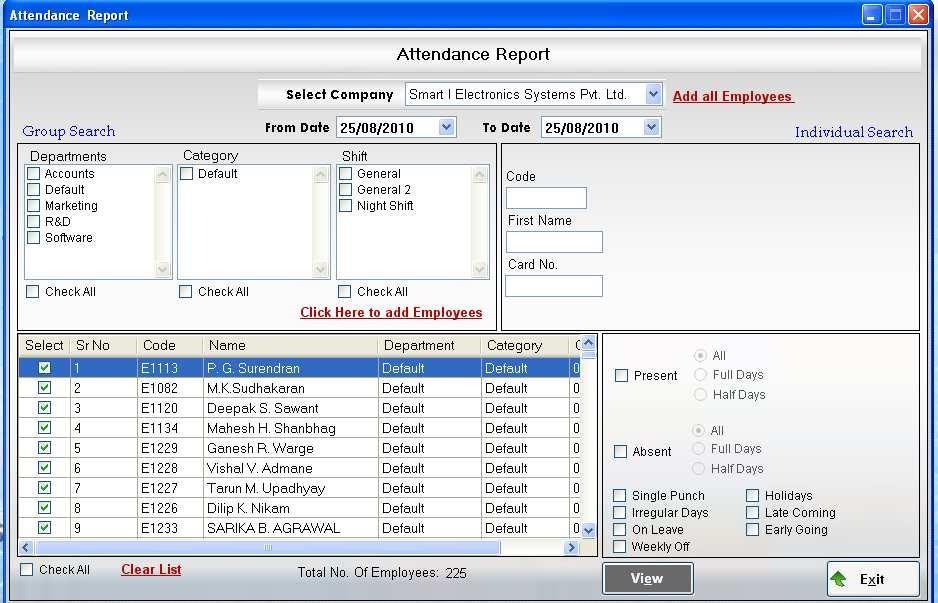
43 27 Monthly Reports : 28 Continuous Reports : 29 Leave Reports 43
44 44

45 45
46 46
47 47
48 48
49 49
50 50
51 51

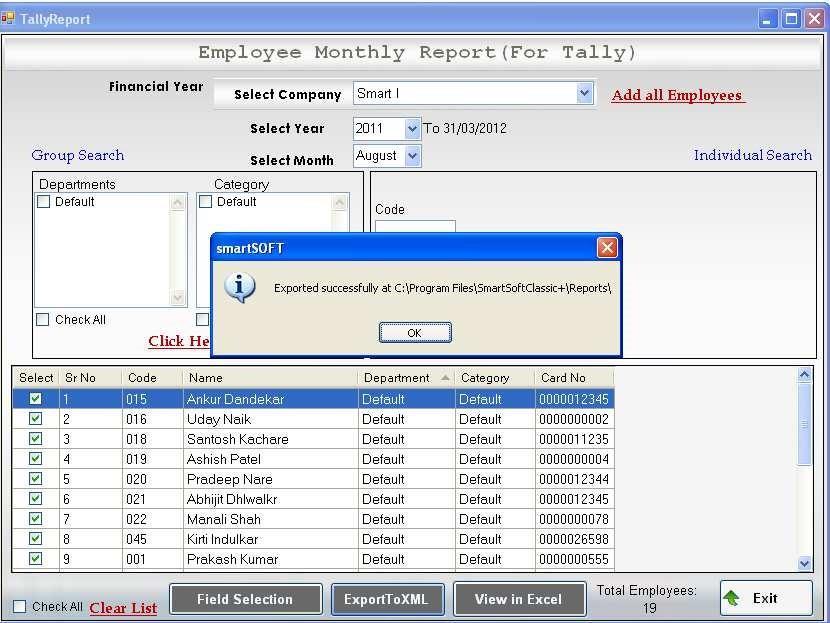
52 30 Tally report:- Employee Monthly Report (For Tally):- This form generates Employee monthly attendance report in excel and XML formats. Field selection: - Click on field selection and Enter the column names same as in tally in Import Fieldname. 52

53 Export to XML: - After clicking Export to XML it is exported in XML format at specified location which is further used to import in tally. View In excel: - Click it to view the attendance in excel format. 53
54 54
USER MANUAL. smartattendance (V ) RELEASE DATE: Disclaimer. smartattendance User Manual : Version : V
 RELEASE DATE: Disclaimer. smartattendance User Manual : Version : V") USER MANUAL smartattendance (V1.0.0.0) RELEASE DATE:31-12-2014 Disclaimer The instructions in this document have been carefully checked for accuracy and are presumed to be reliable. Smart I Electronics
USER MANUAL smartattendance (V1.0.0.0) RELEASE DATE:31-12-2014 Disclaimer The instructions in this document have been carefully checked for accuracy and are presumed to be reliable. Smart I Electronics
We provide security on finger tips
 etimetrack Lite We provide security on finger tips Backend Database Support: Compatible OS: XP sp2, Win7, Win server 2000 or later essl Recommend Computer Configuration to run the etimetracklite Desktop.
USER MANUAL FOR STAR TIME OFFICE SOFTWARE
 USER MANUAL FOR STAR TIME OFFICE SOFTWARE STAR LINK COMMUNICATION PVT. LTD. 1 INDEX Introduction 1. System 1.1 Password 1.2 Log off User 1.3 Calculator 1.4 Calendar 1.5 Import Data 2. Main 2.1 Company
User Quickstart Guide
 User Quickstart Guide November 2015 Page 2 The Two Minute Overview Campus User Quick Start Guide for VeriTime provides a full picture time and attendance by placing absences captured in Aesop alongside
User Manual TimeWatch
 Installation & User Manual TimeWatch Time Attendance System Powered By: Topics: Installation Process Operation User Manual Installation Manual: To install the TimeWatch application, insert the setup cd
User & Installation Manual
 User & Installation Manual Topics: Installation Process Operation User Manual Installation Manual: To install the CCL application, insert the setup cd in cd drive. In setup cd you will find these file.
Total Working Hrs Muster Monthly Attendance Summary Report Yearly Reports Attendance Summary... 35
 Time & Attendance software myattendance Software Manual Table of Contents What is My Attendance Software?... 5 Why should you use My Attendance Software?... 5 Features of My Attendance... 5 My Attendance
DATA SHEET ESS-TNA WE INDENTIFY SECURE AND INTEGRATE. IRIZ ID TECHNOLOGIES
 DATA SHEET ESS-TNA WE INDENTIFY SECURE AND INTEGRATE IRIZ ID TECHNOLOGIES www.irizid.com Introduction ESS SOFT is a web The based readers application in mustering built to centralize system are and categorized
RELEASE NOTE COSEC. DATE: 27 th September, 2016 VERSION: COSEC V10R02. AUTHOR: Vishal Govindiya
 RELEASE NOTE COSEC DATE: 27 th September, 2016 VERSION: COSEC V10R02 AUTHOR: Vishal Govindiya New Features Added Admin: Enterprise Profile Added provision to define contact details to be shown on Contact
Step-by-Step Instructions: Generating Time Summary Estimator and Time Card Approval Reports
 Step-by-Step Instructions: Generating Time Summary Estimator and Time Card Approval Reports Basic process to submit payroll Follow steps 1 3 to check and prepare to submit payroll in step 4. Confirm payroll
SECURITY SETUP. Version 5.5
 SECURITY SETUP Version 5.5 User Accounts This document offers step-by-step instructions to create and maintain user accounts for SmartLinx. It also contains a complete list of the permissions and definitions
Time and Leave Reporting User Guide for Full Time Employees. July, P age
 Time and Leave Reporting User Guide for Full Time Employees July, 2009 1 P age Table of Contents Introduction... 3 Login and Home Page... 3 Create, Edit and Submit Work Hours... 4 To Enter Work Hours...
Time and Leave Reporting User Guide for Full Time Employees. July, P age
 Time and Leave Reporting User Guide for Full Time Employees July, 2009 1 P age Table of Contents Introduction... 3 Login and Home Page... 3 Create, Edit and Submit Work Hours... 4 To Enter Work Hours...
How to Set Up Shifts
 How to Set Up Shifts 1..Go to Shift Configure: 2. Enter a name 1. Add 3. Select the number. 4. Save. 2. 3. You can select the category. Hours worked in this shift will be put under this category. See 1.
Supervisor Training Supervisor Training
 will review everything a supervisor needs to be successful in using their TimeForce system. Upon completions of supervisor Training, you will be able to change your TimeForce Preferences; fully understand
Step-by-Step Instructions: Using Manual Time Entry
 Basic process to submit payroll Follow steps 1 3 to check and prepare to submit payroll in step 4. Confirm payroll was submitted in step 5. Detailed instructions for step 1 are included in this document.
Table of Contents TRIM-P.O.S. Software Corp. (519) FLASHPOINT P.O.S. Software
 FLASHPOINT P.O.S. Software") Table of Contents TIME CLOCK...2 PUNCH IN / OUT...2 CLOCK IN / OUT BREAK...2 DAILY WAGE COST...3 Wage Cost Log...4 Wage Cost Setup...4 TODAY S TIME TOTALS...5 PAY PERIOD REPORT...5 PAY PERIOD SUMMARY REPORT...5
Table of Contents TIME CLOCK...2 PUNCH IN / OUT...2 CLOCK IN / OUT BREAK...2 DAILY WAGE COST...3 Wage Cost Log...4 Wage Cost Setup...4 TODAY S TIME TOTALS...5 PAY PERIOD REPORT...5 PAY PERIOD SUMMARY REPORT...5
Employer Self Service Portal. Employer Self-Service Handbook AASIS Employer Users Version
 Employer Self Service Portal Employer Self-Service Handbook AASIS Employer Users Version June 2017 Blank Page Contents OVERVIEW... 5 How to Use This Manual...7 ESS Roles and Tasks...8 Accessing COMPASS
RAMCO AVIATION SOLUTION VERSION 5.8 USER GUIDE TIME TRACKER
 RAMCO AVIATION SOLUTION VERSION 5.8 USER GUIDE TIME TRACKER 02 Time Tracker 2017 Ramco Systems Limited. All rights reserved. All trademarks acknowledged. This document is published by Ramco Systems Ltd.
We will cover the entire SoulCRM in a flow to make it easier for you to configure your system using this document.
 About SoulCRM SoulCRM is incredibly simple and efficient web based CRM software specifically designed for Indian businesses, it s a complete business solution that connects your business across marketing,
DISEWEB Version 1.1. DISEWEB User Manual. Web based data entry module for DISE software Available At
 DISEWEB User Manual Web based data entry module for DISE software Available At http://admis.hp.nic.in/diseweb DiseWeb is a web based application for data entry of State Govt Employees at districts for
Creating the Salary for the first time when a new company is started
 Creating the Salary for the first time when a new company is started 1. Open the software 2. Give the password to start the software 3. In the Selection menu select the Create to create a new company.
Supervisor Scheduler. Access the Scheduler. Filter the Display. Use the Search field to find specific pages or employees.
 Supervisor Scheduler Access the Scheduler Select Employee Schedules from the Employees menu or click the Schedules icon from the Supervisor Dashboard if it is a Header Shortcut on the Supervisor Dashboard.
ACTAtek Timesheet User Manual
 ACTAtek Timesheet User Manual Version 1.1 30 October 2008 ACTAtek UK Limited Revision History Revision Date Description Author 1.0 7 July 2008 Initial Release Nicola 1.1 16 October 2008 Sage Integration
Time and Attendance configuration and T&A report generation
 Time and Attendance configuration and T&A report generation Time and Attendance feature is used to calculate work time for created users, able to display when the user enters and leaves and calculate the
Administrator Quick Reference Virtual TimeClock 18 Pro Edition
 Administrator Quick Reference Virtual TimeClock 18 Pro Edition Your time clock program runs in either User or Administration mode. User mode is where workers clock in and out and view their timecard. Administration
WELCOME To Synchoes Login for Implant.
 WELCOME To Synchoes Login for Implant Login Page Click on Login Enter User Id Click here for forget password Enter Password 1. Login Procedure (Synchoes) (i) At the time of login at the login page, three
Steward Health Care. Steward University Manager User Guide
 Steward Health Care Steward University Manager User Guide Version 06102018 Contents Manager Reporting Overview... 3 How to Run Manager View of INDIVIDUAL Employee Training Completions and Incompletions...
BlueCross BlueShield of Montana. Consumer ebilling Training Guide
 BlueCross BlueShield of Montana Consumer ebilling Training Guide Table of Contents System Information...3 Logging in to the System...3 At Home with ebilling...6 Main Buttons...7 Navigation Tabs...7 Home
Board of Regents of the University System of Georgia etime Employee User Guide
 Board of Regents of the University System of Georgia etime Employee User Guide Project View Time Card for Benefited BiWeekly Employees Manager or Supervisor Updated 08/01/2009 Contents REGISTERING FOR
STOCKIEST PORTAL DOCUMENT FOR SUN STOCKIEST PORTAL. Internet Browser Requirement :
 STOCKIEST PORTAL DOCUMENT FOR SUN STOCKIEST PORTAL Internet Browser Requirement : Please Install Mozilla Firefox 3.6.2 / 3.6.13 version or any higher version of Mozilla Firefox browser. If already installed
HDPOS EASY. Hyper Drive Information Technologies (P) Ltd
 Ltd") HDPOS EASY Chapters 1. Getting Started 1.1. Download & Installation 1.2. Application Registration 2. Database 2.1. Sample database 2.2. Blank Database 2.2.1. Back up database 2.2.2. Restore database 3.
HDPOS EASY Chapters 1. Getting Started 1.1. Download & Installation 1.2. Application Registration 2. Database 2.1. Sample database 2.2. Blank Database 2.2.1. Back up database 2.2.2. Restore database 3.
Manager Training Package. Goal: To accurately and efficiently manage employee s time
 Goal: To accurately and efficiently manage employee s time Manager Training Package Table of Contents Pre Payroll Processing Checklist... 2 Review Time:...3 View Employee Time:... 3 Manage Time:... 4 Adding
Administrator Quick Reference Virtual TimeClock 15 Network Edition
 Virtual TimeClock Administrator Quick Reference Virtual TimeClock 15 Network Edition Your time clock program consists of a user status window and an administration window. The user status window is used
Personnel Master Data & Terminal
 Personnel Master Data & Terminal Explanation on beas Personnel Master Data & Terminal Boyum Solutions IT A/S Beas Tutorial TABLE OF CONTENTS 1. INTRODUCTION... 3 2. PROCESS... 3 2.1. Header from Master
Manager Training Package. Goal: To accurately and efficiently manage employee s time
 Goal: To accurately and efficiently manage employee s time Manager Training Package Table of Contents Pre Payroll Processing Checklist... 2 Review Time:...3 View Employee Time:... 3 Manage Time:... 4 Adding
Bridge. Billing Guide. Version
 Bridge Billing Guide Version 2.5.112 Table of Contents Page i Table of Contents Table Of Contents I Introduction 2 Managing Bill To Parties 3 Creating a New Bill to Party 3 Viewing and Navigating Bill
Helpful Hint Users will only have access to those employees who fall within their security role.
 Use the Employee Time Card to view and manage a single employee s time. Users may manage punches, edit employee time, delete employee time, add pay type transactions, change labor levels, send a message
Attendance Enterprise Manager Self Service
 Attendance Enterprise Manager Self Service Attendance Enterprise Manager Self Service A Companion Document to Attendance Enterprise 1.6 2011, InfoTronics, Inc. All Rights Reserved. InfoTronics, Attendance,
HealthEquity Employer Portal Guide HealthEquity All rights reserved.
 HealthEquity Employer Portal Guide 2013-2015 HealthEquity All rights reserved. INTRODUCTION 09 ACCESSING PENDING PAYMENTS 01 LOGIN PROCESS 09 MODIFYING EMPLOYER INFORMATION 01 ADDING INSURANCE INFORMATION
Epay Frequently Asked Questions
 Epay Frequently Asked Questions What is managed cost centers? Manage cost center is a set up in Epay that allows supervisors to manage all employees in the department assigned to them, or anyone that clocks
Office 365 Timesheet Add-In (User manual)
") Office 365 Timesheet Add-In (User manual) By For further information, visit us at www.ignatiuz.com For support, contact us at support@ignatiuz.com Version:- V 2.5.0.0 Created: November 2nd, 2018 1 Table
Office 365 Timesheet Add-In (User manual) By For further information, visit us at www.ignatiuz.com For support, contact us at support@ignatiuz.com Version:- V 2.5.0.0 Created: November 2nd, 2018 1 Table
User Manual. Acumatica - Magento Connector
 User Manual Acumatica - Magento Connector Connector Version: 2.2 Supported Acumatica Version: 6.0 Supported Magento Versions: CE 2.1.X and EE 2.1.X Kensium Solutions PHONE 877 KENSIUM (536 7486) FAX 312
DIRECT SUPPLIER ROSTER TOOL HOW TO GUIDE
 DIRECT SUPPLIER ROSTER TOOL HOW TO GUIDE Version 3.0 March 2015 Copyright 2013 Coles Supermarkets Australia Pty. Ltd. Contents 1 Overview 2 Log In 4 Create a Roster Set 9 Edit a Roster Set 11 Delete a
QuickBooks Integration Instructions for Attendance Rx
 Acroprint Time Recorder Company QuickBooks Integration Instructions for Attendance Rx Publication: ATRX-001 Date of Publication: February 18, 2005 Revision: B Introduction QuickBooks Integration from Attendance
WELCOME To Synchoes Reporting Manager login.
 WELCOME To Synchoes Reporting Manager login Login Page Enter User Id Enter Password Click on Login Click here for forget password 1. Login Procedure (i) At the time of login at the login page, three mandatory
KCTCS Self-Service Absence - Supervisor Approval Instructions
 KCTCS Self-Service Absence - Supervisor Approval Instructions Beginning August 1 st 2016, all employees (both exempt and non-exempt) should enter absence request data through the Time and Absence page
Warehouse Management System (WAMS) (Version 2.0)
 (Version 2.0)") Page 1 of 59 Warehouse Management System (WAMS) (Version 2.0) 0 20/01/2012 For Implementation S Khalkho NK Ghosh DK Kakkar Rev. No Date Purpose Prepared by Reviewed by Approved by INDEX Page 2 of 59 1.
Page 1 of 59 Warehouse Management System (WAMS) (Version 2.0) 0 20/01/2012 For Implementation S Khalkho NK Ghosh DK Kakkar Rev. No Date Purpose Prepared by Reviewed by Approved by INDEX Page 2 of 59 1.
1. LOGGING IN TO MANAGER SELF-SERVICE
 MSS 2017 > USER GUIDE OVERVIEW V 3.2 SECTION PAGE 1 Logging In 01 2 Home Page 02 3 Out of Office 03 4 To Do List 03 5 Person Section 05 6 Holiday Absence Section 08 7 Sickness Absence Section 10 8 Other
ANNOUNCEMENT RELEASE INSTRUCTIONS
 ANNOUNCEMENT SmartLinx is pleased to announce the availability of SmartLinx Version 5.6116 update on Thursday, February 6, 2014. This is a suitewide update with enhancements and bug fixes for Schedule
Table of Contents SMART STAFF EZ HR, SCHEDULING, TIME & PAYROLL INTEGRATION. - USER S MANUAL -
 SMART STAFF EZ HR, SCHEDULING, TIME & PAYROLL INTEGRATION SMART TECHNOLOGIES JAMAICA LTD. SHOP #9, ST. ANDREW PLAZA KINGSTON 19 931-9863, 779-1959 www.smarttechjm.com, info@smarttechjm.com smarttechnologies2016@gmail.com
Enterprise Edition Payroll Master Files and Personnel Setup
 Enterprise Edition Payroll Master Files and Personnel Setup Enterprise Edition Payroll Master Files and Personnel Setup, October 2014 Edition Copyright 2014 by HEALTHCAREfirst, Inc. All rights reserved.
Eclipse for Temps and Contractors
 / User Guide Eclipse for Temps and Contractors Page 1 Last Revised: June 2012 Eclipse for Temps and Contractors: Features and Related Topics: 1 Introduction:... 4 2 Configuring User Profiles:... 4 2.1
Board of Regents of the University System of Georgia etime Employee User Guide. Project View Time Card for Monthly Employees (Manager or Supervisor)
") Board of Regents of the University System of Georgia etime Employee User Guide Project View Time Card for Monthly Employees (Manager or Supervisor) Contents REGISTERING FOR SELF SERVICE... 4 ADDING ETIME...
Board of Regents of the University System of Georgia etime Employee User Guide Project View Time Card for Monthly Employees (Manager or Supervisor) Contents REGISTERING FOR SELF SERVICE... 4 ADDING ETIME...
EMPLOYEE TRAINING MANAGER GETTING STARTED. January 2018
 EMPLOYEE TRAINING MANAGER GETTING STARTED January 2018 Description This document describes how to get started using Employee Training Manager, a desktop software application that allows you to record and
Kronos Timesheet & Workforce Management Guide for Employees
 Kronos Timesheet & Workforce Management Guide for Employees Version 1.0 05/27/2015 Table of Contents I. Introduction..1 II. Getting Started 2 Logging On Changing Your Password Common Icons and Screen Functions
Multivendor Marketplace Basic for Magento 2
 by CedCommerce Products Documentation 1 / 41 1. Product Overview... 3 1.1. Multi Vendor Features for Admin... 3 1.1.1. Manage Vendor Configuration... 4 1.1.2. Manage Vendors... 9 1.1.3. Vendor Product...
Fairsail Collaboration Portal: Guide for Users
 Fairsail Collaboration Portal: Guide for Users Version 11 FS-HCM-CP-UG-201504--R011.00 Fairsail 2015. All rights reserved. This document contains information proprietary to Fairsail and may not be reproduced,
MANUAL FOR PAYROLL SOFTWARE
 MANUAL FOR PAYROLL SOFTWARE 1 INDEX Introduction 1. System 1.1. Password 1.2. Calculator 1.3. Calendar 1.4. Import A Setup window A.1 Formula Setup A.2 Payroll Setup A.3 Bank Master A.4 Employee Master
EmpowerTime Supervisor User Guide Table of Contents
 EmpowerTime Supervisor User Guide Table of Contents Supervisor Quick Guide. 1-2 Timecard Edits...3 Daily Tasks - Dashboard...4 Absences 5-6 Time Off Requests. 7-8 Approving Employee Timecards.9-10 Exceptions...
Editing an Existing Account on an Invoice Payment Creating a New Account on an Invoice Payment... 47
 ebilling User Guide Table of Contents About This Guide Chapter 1 ebilling Basics... 6 Getting Started with ebilling... 6 Logging into ebilling... 6 Working with the ebilling Home Page... 8 Updating Your
Cogito Time & Attendance. Version 3.0. User Manual
 Version 3.0 User Manual Copyright 2017 Averics Systems Inc. Table of Contents Cogito Time & Attendance... 3 Getting Started... 3 Home Page and Workspace... 4 Time & Attendance-Views and Reports... 6 Type
UCSB. Kronos 6.3. Manager Manual
 UCSB Kronos 6.3 Manager Manual TABLE OF CONTENTS i. Introduction 1 I. Non Exempt Employees 3 II. Exempt Employees 13 III. Managers 19 Definition of a Kronos Manager 20 General Navigation 21 Managing Timecards
Frontline Education s Absence Management Solution Reference Guide for Administrators Table of Contents
 Frontline Education s Absence Management Solution Reference Guide for Administrators Table of Contents Internet Feature Section A: Section B: Section C: Section D: Section E: Section F: Section G: Section
ServicePRO + PartsPRO User Guide
 ServicePRO + PartsPRO User Guide ServicePRO Version 2.0 PartsPRO Version 1.0 Page 1 of 82 1 WHAT IS SERVICEPRO + PARTSPRO?... 4 1.1 What is ServicePRO?... 4 1.2 What are the benefits of using ServicePRO?...
Employer Self Service Portal. Employer Self-Service Handbook
 Employer Self Service Portal Employer Self-Service Handbook March 17, 2017 APERS Employer Self-Service Handbook Table of Contents Overview How to Use This Manual 7 ESS Roles and Tasks 8 Accessing COMPASS
ALLDAY TIME SYSTEMS LTD. Allday Time Manager Lite User Guide
 Allday Time Manager Lite User Guide 1 Table of Contents Table of Contents... 2 Starting Allday Time Manager... 3 Logging In... 3 Adding a New Employee... 4 Viewing / Editing an Employees Record... 5 General
Basics of KRONOS Timekeeping for Supervisors
 Basics of KRONOS Timekeeping for Supervisors Manager Basics Managers should complete the following actions in Kronos: ON A DAILY BASIS Review and take action on employee exceptions Add missing punches
Payroll Process Guide
 HHAeXchange Payroll Process Guide Configuring and Running Payroll Copyright 2017 Homecare Software Solutions, LLC One Court Square 44th Floor Long Island City, NY 11101 Phone: (718) 407-4633 Fax: (718)
Supervisor User Guide
 Supervisor User Guide Clockwise by GHG Corporation Software Release: 7.5.3.9_#489 960 Clear Lake City Blvd Document By: Sarah Harmeyer Webster, Texas 77598 Published: September 2018 www.goclockwise.com
Advanced Scheduling Introduction
 Introduction The Advanced Scheduling program is an optional standalone program that works as a web site and can reside on the same server as TimeForce. This is used for the purpose of creating schedules
Exporter account User's Guide Table of Contents
 Exporter account User's Guide Table of Contents About Exportal... 2 2 Home Page... 3 Company Exporter... 5 Applicant commissioner... 6 Mobile Verification... 7 Registration... 8 Login... 11 Forgot Password...
Welcome to the course on the initial configuration process of the Intercompany Integration solution.
 Welcome to the course on the initial configuration process of the Intercompany Integration solution. In this course, you will see how to: Follow the process of initializing the branch, head office and
PAYGLOBAL EXPLORER USER GUIDE
 PAYGLOBAL EXPLORER USER GUIDE Table of Contents Revised March 2002 by Ian Johnson (PayGlobal Pty Ltd) to include changes for rate over-rides and breaks. Revised June 2002 by Ian Johnson (PayGlobal Pty
HOW TO LOGIN. 3. Enter your university login (e.g. bh51th) and password 4. click the login button
 and password 4. click the login button") HOW TO LOGIN 1. Use the Student Portal link provided in the MySunderland page 2. Once you have clicked on the link the following login screen will appear: 3. Enter your university login (e.g. bh51th) and
HOW TO LOGIN 1. Use the Student Portal link provided in the MySunderland page 2. Once you have clicked on the link the following login screen will appear: 3. Enter your university login (e.g. bh51th) and
After logging into PrintGizmo create your profile and complete the information requested by navigating the menu to Configuration > Profile.
 Printer Guide Quick Start Guide Step 1: Setup your Profile See Profile under Configuration After logging into PrintGizmo create your profile and complete the information requested by navigating the menu
KeyedIn Projects Project Manager User Guide
 KeyedIn Projects Project Manager User Guide Version 2.0 July 27, 2012 Project Manager User Guide 1 2012 KeyedIn Solutions, Inc. Welcome to the Project Manager User Guide. This user guide will provide you
Release Notes Assistance PSA Suite 2016 Spring Release
 Release Notes Assistance PSA Suite 2016 Spring Release (June 2016) New License Structure The Assistance PSA Suite License structure has changed In the new license model 3 licenses are available: - Essentials:
PROPRIETARY MATERIALS
 PROPRIETARY MATERIALS No use of these proprietary materials is permitted without the express written consent of or license from Thomson Reuters. Altering, copying, distributing or reproducing any of these
SUPPLEMENTS MANAGEMENT PROGRAM v2.1 Administrator User Guide. Table of contents
 1 SUPPLEMENTS MANAGEMENT PROGRAM v2.1 Administrator User Guide Table of contents Menu Functions Page(s) Pay dates 2-4 Category / Subcategory 5-7 Organizations 7-8 Program Settings 8-9 User Management 10-11
Follow step-by-step, and check off the tasks in order for the best LMN Time learning experience.
 TABLE OF CONTENTS STEP #1 Download & Setup...2 STEP #2 Learning the Taskbar...2-3 STEP #3 Creating Timesheets 5 STEP #4 Clocking Into Jobs....6-7 STEP #5 Clock In Employees..7-8 STEP #6 Review Task 9-10
V9 Jobs and Workflow Administrators Guide DOCUMENTATION. Phone: Fax:
 V9 Jobs and Workflow Administrators Guide DOCUMENTATION Phone: 01981 590410 Fax: 01981 590411 E-mail: information@praceng.com CHANGE HISTORY ORIGINAL DOCUMENT AUTHOR: MICHELLE HARRIS DATE: APRIL 2010 AUTHOR
User Manual Venue Walk-In System. Venue walk-in Establishment Admin / POS User. User Manual. Page 1
 Venue walk-in Establishment Admin / POS User User Manual Page 1 1. General Overview... 3 1.1 Venue Walk-in Module... 3 1.2 Venue Walk-in Establishment Admin... 3 1.3 Venue Walk-in POS User... 3 2. Application
The number of licences available for the company to assign is indicated at the bottom of this page.
 Admin: Organisation Company Details Admin > Organisations > Company Displays the Company Details. Click Tools > Edit to edit the details. Click Tools > Request Hot Folder. This will send a request email
INVENTORY MANAGEMENT
 support@magestore.com sales@magestore.com Phone: +1 (606) 657-0768 INVENTORY MANAGEMENT USER GUIDE Extension version 1.0.0 Magento version: CE 2.1 Inventory Management for Magento 2 v.1.0.0 1 Table of
Costpoint Training Guide: Employee Training Manual. Electronic Timekeeping
 Costpoint Training Guide: Employee Training Manual Electronic Timekeeping Table of Contents: Welcome:... 3 Activating Your Account:... 4 Password Requirements:... 5 Accessing the Portal:... 6 Logging into
COSEC REPORTS SECURITY SOLUTIONS
 COSEC REPORTS SECURITY SOLUTIONS SECURITY SOLUTIONS COSEC Reports Access Control Time and Attendance Leave Management Visitor Management Documentation Disclaimer Matrix Comsec reserves the right to make
NOVAtime 5000 User Guide
 NOVAtime 5000 User Guide Table of Contents Logging In... 4 Terminology... 4 Dashboard... 5 3.1 The Dashboard Gadgets...5 Changing Timesheet Status... 7 Changing Pay Periods... 8 Timesheet Icons Definitions...
Nimble Team NIMBLE ACCOUNTING LLC 200 MOTOR PKWY #26, HAPPAUGE, NY, 11788, USA
 Nimble Team NIMBLE ACCOUNTING LLC 200 MOTOR PKWY #26, HAPPAUGE, NY, 11788, USA Part - I: Setting Up Your Business with Nimble Accounting Chapter 1: Corporation Setup -----------------------------------------------------------------------------------------------06
Deltek Touch for Maconomy. Touch 2.2 User Guide
 Deltek Touch for Maconomy Touch 2.2 User Guide July 2017 While Deltek has attempted to verify that the information in this document is accurate and complete, some typographical or technical errors may
Unit4 PSA Suite Business Performance Edition
 for Microsoft Dynamics CRM Unit4 PSA Suite Business Performance Edition Release Notes Unit4 PSA Suite Business Performance Edition July 2017 v.31.07.2017 - MvB (C) Copyright 2017 Unit4 Table of Contents...
USER MANUAL. MageMob Inventory TABLE OF CONTENTS. Version: 1.0.1
 USER MANUAL TABLE OF CONTENTS Introduction...1 Benefits of MageMob Inventory...1 Installation & Activation...2 Extension Activation...7 How it Works?...8 Back End Configuration...8 Points to Note... 37
Xerox Configurator Pricing Manager Guide
 Xerox Configurator Pricing Manager Guide 2010 Xerox Corporation. All rights reserved. XEROX, XEROX and Design, are trademarks of Xerox Corporation in the United States and/or other countries. Document
Attendance Enterprise
 Attendance Enterprise Supervisor Training July 22, 2013 Agenda Login to Attendance Enterprise Updating Your Account Information Locating Employee Calendar Dashboard Employee Messages Editing Time Cards
PAC Timesheet Entry Training Guide. Visit the PAC Time and Absence page for more information on HR related policies, processes and training.
 PAC Timesheet Entry Training Guide Visit the PAC Time and Absence page for more information on HR related policies, processes and training. PAC Timesheets Time Reporters can complete timesheets in PAC
CENTRAL SUSQUEHANNA INTERMEDIATE UNIT Application: HR/Payroll
 CENTRAL SUSQUEHANNA INTERMEDIATE UNIT Application: HR/Payroll FIS-Staff Timesheet Entry Learning Guide Updated: 12/29/17 2017 Central Susquehanna Intermediate Unit, USA Page 1 Table of Contents Introduction...
Electronic Timesheet System Student User Guide Date Written 30 May 2017 Date Updated
 Electronic Timesheet System Student User Guide Date Written 30 May 2017 Date Updated 2018-04-24 Launching the Timesheet Management System (TMS)... 2 Recording Mentor Details... 3 Recording Hours, Breaks
Mobile for iphone User Guide
 Version 2.5 Copyright 2013, 2018, Oracle and/or its affiliates. All rights reserved. This software and related documentation are provided under a license agreement containing restrictions on use and disclosure
PREFACE. This is the Bills of Quantity reference guide for IQ Business & IQ Enterprise software systems.
 PREFACE This is the Bills of Quantity reference guide for IQ Business & IQ Enterprise software systems. The document will aid in understanding and configuration of the Bills of Quantity for it to function
Payroll Guide Guru Guide Version
 Payroll Guide Guru Guide Version 2017.01.13 Copyright 2017 PeopleGuru, Inc. All rights reserved. Information in this document is subject to change without notice. The software described in this document