FREE RANGE TM HEN HOTEL TM Chicken Coop
|
|
|
- Spencer Allan Bryan
- 5 years ago
- Views:
Transcription


1 FREE RANGE TM HEN HOTEL TM Chicken Coop Assembly Instructions This shelter is ideal for dogs, cats, chickens, rabbits, guinea pigs. Congratulations on purchasing your new FREE RANGE TM Hen Hotel TM Coop. Before commencing the assembly, we recommend that you read the instructions thoroughly. Your new coop comes with all the holes pre drilled to make for fast easy assembly. We recommend that you assemble the coop using a trestle table or sawhorses and planks. This will ensure that you are working off the ground and make it easier for you. Assembly is a two person job and should not be attempted in windy conditions. Step 1: Check all parts against the component list. Step 2: Assemble the rear wall panels. Step 3: Assemble the side wall panels. Step 4: Assemble the roof panels. Step 5: Assemble the front wall panel. Step 6: Assemble the front door. Step 7: Fit the panels together. 1

 with the enclosed anchor brackets. Concrete slab: Please ensure that your site is level.")

2 Concrete Slab: It is recommended that your new Coop is secured to a concrete slab as per the specifications in this manual. If you prefer not to use a concrete slab, and want to secure it to the ground, you may use earth anchors (not included) with the enclosed anchor brackets. Concrete slab: Please ensure that your site is level. It is recommended that your slab is 4 inches thick and you use builder s plastic and F52 reinforcing mesh. We recommend that you make your slab 4 inches bigger than the base dimensions of your coop. This will allow for a 2 inch edge around your coop. We recommend that you slope the 2 inch edges downward by ½ inch so that rain water can be drained away from your coop. 2
3 Tools that may be needed: Adjustable Wrench After market screws (not included) may be used in place of pop rivets. 3
4 Step 1:Check all parts against the component list Lay out all parts with number facing outwards and check off against parts list. Part Picture Description Component Location QTY No. Check Sheet 59 X 30.3 (1500x770) rear wall side wall 14D 4 Sheet 59 X 30.3 (1500x770) rear wall 14E 2 Sheet 59 X 30.3 (1500x770) side wall 14F 1 Sheet 59 X 30.3 (1500x770) side wall 14G 1 Sheet 63 X 30.3 (1600x770) roof 8A 4 Sheet 59 X 30 (1500x735) front 11C 1 Sheet 59 X 30 (1500x735) front 11D 1 4
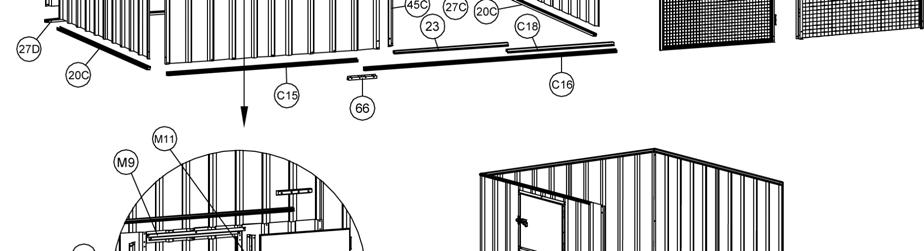
5 Door 57 X 30.3 (1500x770) door 5G 1 Mesh Panel 59 X 30.3 (1500x770mm) front 5H 1 Access Door 15.2 X 19.5 (385x495mm) front 5F 1 Channel 58.8 (1494mm) roof 27A 2 Channel 58.8 (1494mm) roof 27B 2 Channel 58.8 (1494mm) rear wall 27C 1 Channel 58.8 (1494mm) rear wall 27D 1 Channel 58.8 (1494mm) rear wall 27H 1 Channel 58.8 (1494mm) rear wall 27I 1 Channel 59.4 (1508mm) side wall 20C 2 Channel 59.4 (1508mm) side wall 20L 2 Channel 51.5 (1283mm) front C13 1 5
6 Channel (1705mm) front C14 1 Channel 51.5 (1283mm) front C15 1 Channel (1705mm) front C16 1 Channel 30.5 (775mm) front 23 1 Channel 28.3 (719mm) front C18 2 Channel 35.4 (900mm) inside C21 1 Jamb 30.5 (775mm) front 42 1 Jamb 60 (1498mm) front 45C 1 Jamb 21.4 (544mm) front M9 2 Jamb (397mm) front M10 1 Jamb (397mm) front M11 1 Lip 63 (1601mm) roof 51A 2 6
7 Laying shelf Stairs 17.2 X 38.6 (450x980mm) 12.2 X 32.5 (310x825mm) inside W1 1 inside B1 2 Channel connector Channel connector 7.4 (188mm) 66 6 FITTINGS PACK Picture Component QTY Picture Component QTY Self tapping screws(10mm) 260 Self tapping screws(16mm) 12 4*10mm Rivet 14 3*10mm Rivet 35 Pad bolt 2 Keeper 2 Anchor Bracket 9 5/16*19mm Hexagonal bolt 9 5/16 Hexagonal Nut 9 brace bracket 1 Sleeve anchor bolt 9 Self tapper safety cover 25 Qty checking date: Qty checking personal badge number: 7
8 Signature: In the unlikely event that you find you are missing a part, please contact Harris Farms, LLC at 1(800) or info@harrisfarmsllc.com and we will send the missing part directly to your address. Coop Overview 8


9 Step 2: Assemble the rear wall panels. 9

10 You will find it easier to assemble your coop using sawhorses with timber studs attached ( timber needs to be the same length as the coop (10 feet) or alternatively, a trestle table. Place 2 x 14D and 2 x 14E sheets on your work table and join them together with the self tapping screws per diagram. Now fit 27H,27I top channel and 27C,27D bottom channel to the sheeting by tapping it in ( diagram A ) or sliding it in ( diagram B ). Note that the small lip 10


11 of the channel is always facing out. This is to ensure that rain water can not build up inside your coop. Now apply 66 channel connectors on top and bottom channels to enhance the strength. Place a block under the shadowed area when screwing as a support. 11

 Step 3: Assemble the")
12 (The screw with cross mark must not be fixed in this stage.) Step 3: Assemble the side wall panels 12
13 Place 14D,14G sheets on your work table and tap or slide in 20L top channel and 20C bottom channel. Fix 20C bottom channel with the self tapping screws but not 20L the top channel (at this stage). Note that the small lip of the channel is always facing out. This is to ensure that rain water can not build up inside your coop. Place 14D,14F sheets on your work table and tap or slide in 20L top channel and 20C bottom channel. Fix 20C bottom channel with the self tapping screws 13

14 but not 20L the top channel at this stage. Note that the small lip of the channel is always facing out. This is to ensure that rain water can not build up inside your coop. Step 4: Assemble the roof panels. 14


15 Place 4 x 8A sheets on your work table and join together with the self tapping screws per the diagram. Now tap or slide in 2 x 27A and 2 x 27B channels onto the sheeting and fix them with the self tapping screws. Enhance the strength by applying 66 channel connectors. Note that screws are applied to both sides of the connectors. Now fit 51A and 51A side lips to the sheeting and fix them with the self 15
16 tapping screws. Step 5: Assemble the front wall panels 16

17 At owner s discretion, aftermarket screws may Step be used 6: Assemble in place the of rivets. front door. 17


18 At owner s discretion, aftermarket Step 7: Now fit pad bolts and keepers as per diagram screws may be used in place of rivets. 18

19 Step 8: Fit the panels together. 19


20 Attach the two side walls to the back wall, then the front wall, then the roof. Fix all the components with the self tapping screws. 20


21 Step 9: Now fit shelf and ladders as per diagram 21


22 Step 10: Fit latch as per diagram 22


23 This Warranty against defects is given by: 23
24 Harris Farms, LLC 7227 Haley Industrial Drive, Suite 200 Nolensville, TN Ph.: (615) Fax: (615) Details of Manufacturer s Warranty: This Product comes with a 10 year limited Structural Warranty ( the Warranty Period ) from the date of purchase. This Warranty also applies where there are missing or damaged parts identified in the parts list referred to in the instruction kit within the product packaging. Please ensure that you keep this warranty form in a safe place along with your proof of purchase. Product Place of Purchase City and State Date of Purchase../../ Process of claiming Warranty To make a claim under the Warranty within the Warranty Period, you will need to contact The Manufacturer directly by phone or Claims Department contact number: 1(800) Claims Department info@harrisfarmsllc.com You will be required to produce a Proof of Purchase (or may need to be presented upon at The Manufacturer s discretion) at the time of claim. The Manufacturer bears the cost of replacing the products or spare parts or repairing the products and reasonable direct expenses of claiming under this warranty: Where replacement of parts, the Manufacture will bear the cost of sending the spare part and will endeavour to deliver to the customer s nearest reseller within 10 working days for the customer to pick up. At such time the customer may be required to return the alleged faulty parts. Where assessment is required in case of replacing or repairing The Product, The Manufacturer will appoint an assessor within 10 working days to 24
25 identify should there be alleged defect. The Manufacturer will bear the costs of repairing by appointing a local tradesman. The Manufacturer may choose to replace The Product if the repair or the cost of repair is not feasible The Replacement Product will be available at the retailer within 10 working days. The Customer will bear the cost of assembly The Product if The Product is replaced. IMPORTANT 1. Manufacturer s Disclosure: This Warranty against defects shall not apply in the following situations: a) Where The Product is not assembled in accordance with the instructions provided in the product kit. b) Where The Product is used to store corrosive materials such as fertilizer, chlorine and etc; c) Where the damage to The Product is caused by storms. 2. Notes: This Product is weatherproof to a certain extent; however driving windy rain may cause The Product to leak. Condensation may also occur in some weather conditions such as extreme heat or cold. We strongly recommend using a waterproof sealant in any required area of The Product in order to minimize the risk of water entering. 3. Major Defects Upon The Manufacturer being satisfied that the defect is a major defect, the purchase price may be refunded in lieu of providing a replacement product or repairing the product. 25
MODEL NO: GSS1508G. Model No:...GSS1508G Overall Size (W x D X H*): x 800 x 1900mm Roof Type:...Skillion *Minimum Wall Height.
: x 800 x 1900mm Roof Type:...Skillion *Minimum Wall Height.") INSTRUCTIONS FOR: GALVANIZED STEEL SHED GREEN 1.5 x 0.8 x 1.9m MODEL NO: GSS1508G Thank you for purchasing a Sealey product. Manufactured to a high standard, this product will, if used according to these
INSTRUCTIONS FOR: GALVANIZED STEEL SHED GREEN 1.5 x 0.8 x 1.9m MODEL NO: GSS1508G Thank you for purchasing a Sealey product. Manufactured to a high standard, this product will, if used according to these
MODEL NO: GSS150819SDG
 INSTRUCTIONS FOR: GALVANIZED STEEL SHED 1.5 x 0.8 x 1.9m WITH SIDE DOOR. MODEL NO: GSS150819SDG Thank you for purchasing a Sealey product. Manufactured to a high standard, this product will, if used according
INSTRUCTIONS FOR: GALVANIZED STEEL SHED GREEN 1.5 x 0.8 x1.5m
 INSTRUCTIONS FOR: GALVANIZED STEEL SHED GREEN 1.5 x 0.8 x1.5m MODEL NO: GSS150815G Thank you for purchasing a Sealey product. Manufactured to a high standard, this product will, if used according to these
Absco Premier Garden Shed Assembly Instructions Model: 30232G
 Absco Premier Garden Shed Assembly Instructions FRONT: 3.00m SIDE:.6m HEIGHT:.00m 360mm CONCRETE SLAB 3100mm WHEN LAYING YOUR CONCRETE SLAB, CHAMFER THE 50mm EDGES DOWNWARDS BY 10mm. 50mm 10mm 50mm THIS
Absco Economy Shed Model: 15231F
 Model: 523F FRONT:.52m SIDE: 2.26m HEIGHT:.80m CONCRETE SLAB 2360mm 620mm WHEN LAYING YOUR CONCRETE SLAB, CHAMFER THE 50mm EDGES DOWNWARDS BY 0mm. 50mm 0mm 50mm THIS WILL ENSURE THAT WATER RUN OFF IS KEPT
Absco Space Saver Shed Assembly Instructions Model: 15151S
 Assembly Instructions Model: 55S FRONT BASE LENGTH:.52m SIDE BASE LENGTH:.52m FRONT WALL HEIGHT:.8m REAR WALL HEIGHT: 2.08m CONCRETE SLAB 620mm 620mm WHEN LAYING YOUR CONCRETE SLAB, CHAMFER THE 50mm EDGES
Wall 3000 with a double sliding doors
 Wall 3000 with a double sliding doors This module will enable you to construct a 3000mm x 1900mm wall with a double sliding door that will be used in your new garden shed. Before you begin the build Just
Absco Premier Garden Shed Assembly Instructions Model: 30302G
 Absco Premier Garden Shed Assembly Instructions Model: 3030G FRONT: 3.0m SIDE: 3.0m HEIGHT:.1m 3100mm CONCRETE SLAB 3100mm WHEN LAYING YOUR CONCRETE SLAB, CHAMFER THE 50mm EDGES DOWNWARDS BY 10mm. 50mm
Absco Premier Garden Shed Assembly Instructions Model: 30232G
 Absco Premier Garden Shed Assembly Instructions FRONT: 3.00m SIDE:.6m HEIGHT:.00m 360mm CONCRETE SLAB 3100mm CONCRETE WHEN LAYING YOUR CONCRETE SLAB, ENSURE THERE IS A REBATED EDGE 5mm DEEP AROUND THE
Wall 3000 with a single sliding door
 Garden Shed Assembly Instructions Wall 3000 with a single sliding door This module will enable you to construct a 3000mm x 1900mm wall with a single sliding door that will be used in your new garden shed.
1.0. Post Install Kit. For Use With All Vinyl Railing BOM V1 1/13. Owner's Manual. Assembly and Installation Instructions.
 Post Install Kit Assembly and Installation Instructions PLEASE READ OWNER'S MANUAL COMPLETELY BEFORE ASSEMBLING YOUR POST INSTALL KIT. For Use With All Vinyl Railing 34106837BOM V1 1/13 Owner's Manual
6x5. Assembly Manual CAUTION. Sharp Edges PATENTS ARE PENDING. Building Dimensions. Approximate Size. Storage Area. Interior Dimensions
 Assembly Manual 6x5 PATENTS ARE PENDING Building Dimensions Approximate Size Storage Area Exterior Dimensions Interior Dimensions Roof Edge to Roof Edge Wall to Wall Sq. Ft. Cu. Ft. Width Depth Height
External Steel Stud and Top Hat Walls. Details SYSTEMS 176 NON-FIRE RATED SYSTEMS 176 FIRE RATED SYSTEMS 178 BRICK VENEER SYSTEMS 183 INSTALLATION 185
 Details SYSTEMS 176 NON-FIRE RATED SYSTEMS 176 FIRE RATED SYSTEMS 178 BRICK VENEER SYSTEMS 183 INSTALLATION 185 GENERAL REQUIREMENTS 185 FRAMING 185 PLASTERBOARD LAYOUT 189 PLASTERBOARD FIXING 190 EXTERIOR
NOMINAL SIZE. (mm) 4ft extension ft extension ft extension ft extension ft extension 3720
 4ft extension ft extension ft extension ft extension ft extension 3720") NOMINAL SIZE 4ft extension 1240 6ft extension 1860 8ft extension 2480 10ft extension 3100 12ft extension 3720 Thank you for purchasing your new Robinsons greenhouse. We recommend you familiarise yourself
NOMINAL SIZE 4ft extension 1240 6ft extension 1860 8ft extension 2480 10ft extension 3100 12ft extension 3720 Thank you for purchasing your new Robinsons greenhouse. We recommend you familiarise yourself
PATENTS ARE PENDING. Building Dimensions. Exterior Dimensions Roof Edge to Roof Edge
 Assembly Manual 8x5 PATENTS ARE PENDING Approximate Size 7980303 Storage Area Building Dimensions Exterior Dimensions Roof Edge to Roof Edge Interior Dimensions Wall to Wall Sq. Ft. Cu. Ft. Width Depth
PATENTS ARE PENDING. Building Dimensions. Exterior Dimensions Roof Edge to Roof Edge
 Assembly Manual 8x9 PATENTS ARE PENDING Approximate Size 7640303 Storage Area Building Dimensions Exterior Dimensions Roof Edge to Roof Edge Interior Dimensions Wall to Wall Sq. Ft. Cu. Ft. Width Depth
GARDEN SHEDS 63, 65, 67, 69, 83, 85, 87, 89, 103, 105, 107 & 109 TRECO SHEDS ARE MANUFACTURED TO COMPLY WITH ALL AUSTRALIAN STANDARDS
 6 8 10 GARDEN SEDS 63, 65, 67, 69, 83, 85, 87, 89, 103, 105, 107 & 109 TRECO SEDS ARE MANUFACTURED TO COMPLY WIT ALL AUSTRALIAN STANDARDS Please visit the manuals section at our website for any updates
EasySHED 5StepAssembly
 Gable Roof Model OPTONL OULE OORS EasySHE 5Stepssembly R popular style with a large storage area for work and play Model 3.00m x 3.00m x 2.10m COMPONENT CHECK LST - EasySHE 4x Plain Sheets (Step 1) 780
12'W x 20'L x 10'H Run-in-Shed Assembly Instructions
 12'W x 20'L x 10'H Run-in-Shed Assembly Instructions Description Model # 12'W x 20'L x 10'H Run-In-Shed 51351 Recommended Tools Please read instructions COMPLETELY before assembly. This shelter MUST be
Duramax Storage Shed Limited Fifteen Year Warranty
 Duramax Storage Shed Limited Fifteen Year Warranty U.S. Polymer Inc. will send a replacement part free of charge, in the event of material defects and or workmanship for a period of fifteen years from
NOMINAL SIZE. (mm) 6ft extension ft extension ft extension ft extension 3720
 6ft extension ft extension ft extension ft extension 3720") NOMINAL SIZE (mm) 6ft extension 1860 8ft extension 2480 10ft extension 3100 12ft extension 3720 Thank you for purchasing your new Robinsons greenhouse. We recommend you familiarise yourself with the instructions
NOMINAL SIZE (mm) 6ft extension 1860 8ft extension 2480 10ft extension 3100 12ft extension 3720 Thank you for purchasing your new Robinsons greenhouse. We recommend you familiarise yourself with the instructions
Protective Capony RTC-16
 Protective Capony RTC-16 ASSEMBLY AND OPERATION MANUAL Protective Canopy RTC-16 Assembly and Operation Manual CONTENT: 1 APPLICATION...3 2 OPERATION CONDITIONS...3 3 TECHNICAL SPECIFICATIONS...3 4 DELIVERY
INSTALLATION MANUAL. All Types F Series Rev G
 INSTALLATION MANUAL All Types - 1570 F Series Page 1 of 16 TABLE OF CONTENTS DESCRIPTION PAGE GENERAL INFORMATION & ADVISORIES 2 PRODUCT INFORMATION 3 GET TO KNOW YOUR CBU 4 HARDWARE AND COMPONENTS 5 CONCRETE
GARDEN SHEDS 63, 65, 66, 67, 69, 83, 85, 87, 89, 103, 105, 107, 109 & 1010 TRECO SHEDS ARE MANUFACTURED TO COMPLY WITH ALL AUSTRALIAN STANDARDS
 SINGLE AND DOULE HINGED DOOR 6 8 10 GARDEN SHEDS 63, 65, 66, 67, 69, 83, 85, 87, 89, 103, 105, 107, 109 & 1010 TRECO SHEDS ARE MANUFACTURED TO COMPLY WITH ALL AUSTRALIAN STANDARDS Please visit the manuals
How to Construct a Feral Enclosure
 How to Construct a Feral Enclosure by Bob Breeze For questions and further information: bob.breeze@gmail.com April 2016 Please note, this is a living document. If you need further information or would
OWNER S MANUAL SERIES MDS-96-BK, SM, DR
 VESTIL MANUFACTURING CORP. 2999 N. Wayne St., Angola, IN 46703 Ph: 260-665-7586 Fax: 260-665-1339 E-mail: sales@vestil.com Website: www.vestil.com SERIES MDS-96-BK, SM, DR OWNER S MANUAL Introduction...
OWNER S MANUAL SERIES MDS-96-BK, SM, DR
 SERIES MDS-96-BK, SM, DR OWNER S MANUAL Introduction... 1 Bill of Materials... 2 Assembly Instructions. 3 Warranty....12 IMPORTANT NOTES, WARNINGS AND SAFETY INSTRUCTIONS Ensure that all employees understand
Greenix 3w Emergency Shelters. SIP Supply, LLC
 Greenix 3w Emergency Shelters SIP Supply, LLC Single Unit - Plan View 12.0 Feet Power Panel Generator Window 8.5 Feet Single Unit - Elevation Front View 12.0 Feet 7.5 Feet 4 x4 pressure treated timbers
Model T2642E Wall Mount. Television Wall Mount with Tilt Option
 Model T2642E Wall Mount Television Wall Mount with Tilt Option Getting Started Introduction Congratulations on the purchase of your new Audio Solutions T2642E Television Wall Mount. For maximum benefit,
Installation guidelines System: Cofraplus 220
 Edition: February 2012 Installation guidelines System: Cofraplus 220 ArcelorMittal Construction International Industriestrasse 19 8112 Otelfingen / Zürich Switzerland www.arcelormittal.com/arval Summary
Mbrico Tile Rooftop/Raised Floor Installation Guidelines
 Mbrico Tile Rooftop/Raised Floor Installation Guidelines *The following information is the installation guidelines Mbrico recommends when installing the Mbrico Tile Rooftop system. Installation guidelines
ThermaSteel Corporation ASSEMBLY MANUAL
 ThermaSteel Corporation ASSEMBLY MANUAL TABLE OF CONTENTS 1- INTRODUCTION 1.1 THERMASTEEL TM WALL PANELS 1.2 Drawing and Element Numbers 2- ASSEMBLY 2.1 Sequence of Assembly 2.2 Preparation of Foundation
Insulated Cabin. OWNER S MANUAL / Instructions for Assembly. Size 10 x 13 Ver: 1.0. Customer Service Hotline (800)
") A L L P U R P O S E I N S U L A T E D C A B I N S Insulated Cabin OWNER S MANUAL / Instructions for Assembly Size 10 x 13 Ver: 1.0 Customer Service Hotline (800) 483-4674 www.duramaxbp.com Strong & Secure
A L L P U R P O S E I N S U L A T E D C A B I N S Insulated Cabin OWNER S MANUAL / Instructions for Assembly Size 10 x 13 Ver: 1.0 Customer Service Hotline (800) 483-4674 www.duramaxbp.com Strong & Secure
Installation Instructions 2 Ft Ft. Planter Boxes
 Installation Instructions 2 Ft. - 15 Ft. es General Information Congratulations on your purchase of the Bloomz Box - Fiberglass. Before you begin planting, please refer to the parts list to ensure all
NOMINAL SIZE. (mm) 6ft extension ft extension ft extension ft extension 3720
 6ft extension ft extension ft extension ft extension 3720") NOMINAL SIZE (mm) 6ft extension 1860 8ft extension 2480 10ft extension 3100 12ft extension 3720 Thank you for purchasing your new Robinsons greenhouse. We recommend you familiarise yourself with the instructions
NOMINAL SIZE (mm) 6ft extension 1860 8ft extension 2480 10ft extension 3100 12ft extension 3720 Thank you for purchasing your new Robinsons greenhouse. We recommend you familiarise yourself with the instructions
AQUA UNO TUB DOOR INSTALLATION INSTRUCTIONS
 AQUA UNO TUB DOOR INSTALLATION INSTRUCTIONS IMPORTANT DreamLine TM reserves the right to alter, modify or redesign products at any time without prior notice. For the latest up-to-date technical drawings,
V 2.0 ASSEMBLY GUIDE. TS Platform Scale Series 2
 V 2.0 ASSEMBLY GUIDE Series 2 TABLE OF CONTENTS OVERVIEW General Specifications...1 Cautions and Disclaimers...1 Contents of Kit...1 Tools Required For Assembly...2 Time Required to Assemble...2 ASSEMBLING
Vinyl Fence Gates. Assembly and Installation Instructions PLEASE READ OWNER'S MANUAL COMPLETELY BEFORE ASSEMBLING YOUR FENCE.
 Vinyl Fence Gates Assembly and Installation Instructions PLEASE READ OWNER'S MANUAL COMPLETELY BEFORE ASSEMBLING YOUR FENCE. ALL STATED SIZES ARE NOMINAL DIMENSIONS. 34106391BOM V3 11/12 Models 73012354
APPLICATION AND LISTING
 DURALINER (SDL) 6"-8" DIAMETER (ROUND & OVAL) INSTALLATION INSTRUCTIONS MH14420 CMH1329 THESE INSTALLATION AND OPERATION INSTRUCTIONS COVER DURALINER MASONRY RELINING SYSTEM A MAJOR CAUSE OF CHIMNEY RELATED
Do-It-Yourself Portable Patio Deck
 Do-It-Yourself Portable Patio Deck Installation Instructions Owner s Manual Warranty www.udecx.com INDEX Recommended Uses Page 2 Installation Instructions Page 6 Warnings Page 2 Installation Instructions
Plot Plan for Decks Date. Name Phone # Address Zip APN # _- _- _ (see property tax bill or call the assessor s office ) FRONT PROPERTY LINE
 FRONT PROPERTY LINE") City of Beaumont Plot Plan for Decks Date Name Phone # Address Zip APN # _- _- _ (see property tax bill or call the assessor s office 955-600) FRONT PROPERTY LINE House REAR PROPERTY LINE - Show patio
City of Beaumont Plot Plan for Decks Date Name Phone # Address Zip APN # _- _- _ (see property tax bill or call the assessor s office 955-600) FRONT PROPERTY LINE House REAR PROPERTY LINE - Show patio
Vinyl Garden Shed. Vinyl Garden Shed
 TM A Product of A L L P U R P O S E V I N Y L G A R D E N S H E D S Vinyl Garden Shed Vinyl Garden Shed OWNER S MANUAL / Instructions for Assembly 0 Ft WoodSide Size 0 Ft x 8 Ft / 3. m x.4 m (Approx.)
Installation Instructions
 Installation Instructions Flue Gas System Basic Kit GA-K - Chimney Flue Gas System for GB125 Oil Condensing Boiler For trained and certified installers Please read carefully prior to installation. 6 720
Manufacturer of Coolers, Freezers, Step-Ins, Refrigeration Trailers and Sliding Doors COOLER AND FREEZER INSTALLATION MANUAL
 Manufacturer of Coolers, Freezers, Step-Ins, Refrigeration Trailers and Sliding Doors COOLER AND FREEZER INSTALLATION MANUAL http://www.walkincoolersandfreezers.com 786-286-2926 1 BEFORE INSTALLATION Please
Tourmaster 3-Step Riser
 Assembly Manual Tourmaster 3-Step Riser Note: Shade variations may be present from step to step due to the nap of the carpet. contents Safety Precautions.................................. Warranty..........................................
ROOF MOUNT KIT OWNERS MANUAL
 ROOF MOUNT KIT OWNERS MANUAL Made in the USA by: Southwest Windpower, Inc. 1801 W. Route 66 Flagstaff, Arizona 86001 Phone: (928) 779-9463 Fax: (928) 779-1485 E-mail: info@windenergy.com Web: www.windenergy.com
ALPINE PATIO COVER INSTALLATION INSTRUCTIONS
 ALPINE PATIO COVER INSTALLATION INSTRUCTIONS Contact us at: 1-800-851-0865 or www.americana.com Before You Begin: Consult your local building department for any required permits You may be required to
OZARK PATIO COVER INSTALLATION INSTRUCTIONS
 OZARK PATIO COVER INSTALLATION INSTRUCTIONS Contact us at: 1-800-851-0865 or www.americana.com Before You Begin: Consult your local building department for any required permits You may be required to obtain
Mounting the shell walls or VE-element consisting of two concrete panels forming permanent formwork for casting of walls
 31 GSA Walls Installation of concrete shell walls Mounting the shell walls or VE-element consisting of two concrete panels forming permanent formwork for casting of walls Pre-conditions Preparation Self-control
FREQUENT QUESTIONS AND QUERIES AND TROUBLE SHOOTING
 1 ISSUE: 6 FREQUENT QUESTIONS AND QUERIES AND TROULE SHOOTING 1. PART NUMERS - You may find that the door top and bottom don t match up with the instruction book. This is because of a error in manufacturing.
Note on the assessment:
 Excerpt from: Transitional shelter: 8 designs, IFRC, 2012 Note on the assessment: The following is an excerpt from the Book Transitional Shelters: 8 Designs, IFRC, 2012, available from www.sheltercasestudies.org.
Installation Instructions
 Installation Instructions Dynarail Safety Ladder System Corrosion Resistant Nonconductive Fire Retardant High Strength-To-Weight Ratio Long, Low Maintenance Life Meets OSHA, BOCA & Other Building Code
TABLE OF CONTENTS. 1.0 INTRODUCTION 1.1 Greenstone Structural Engineered Panels 1.2 Drawing and Element Numbers
 version 2.5 updated as of 08.04.2017 2 TABLE OF CONTENTS 1.0 INTRODUCTION 1.1 Greenstone Structural Engineered Panels 1.2 Drawing and Element Numbers 2.0 ASSEMBLY 2.1 Sequence of Assembly 2.2 Preparation
ROOF MOUNT KIT OWNERS MANUAL
 ROOF MOUNT KIT OWNERS MANUAL Made in the USA by: Primus Wind Power, Inc. 938 Quail St. Lakewood, CO 80215 Phone: (303) 242-5820 www.primuswindpower.com AIR is a trademark of Primus Wind Power, Inc. ROOF
DESCRIPTION SAFETY: WARNINGS ORDERING INFORMATION T01-B INSTALLATION INSTRUCTIONS DROP-IN AND FREESTANDING BATH K-11343T / K-11344T
 INSTALLATION INSTRUCTIONS DROP-IN AND FREESTANDING BATH K-11343T / K-11344T BEFORE YOU BEGIN Turn off the water supply. The plumbing installation must comply with all local water supply and building regulations.
Niagara / DLG-85 Shower Cabin Installation and User s guide
 Niagara / DLG-85 Shower Cabin Installation and User s guide I. Mounting Preparation 1. After opening the case, read this introduction carefully, check all the packed parts, examine the shower cabinet for
MONOLITH. Basin System. installation + maintenance
 MONOLITH Basin System installation + maintenance contents 3 Monolith 5 4 Components List 5 Technical Data 6 Before you Install 10 Installation 14 ADA Compliance 15 Operation 15 Maintenance 16 Cleaning
CYPRUS STONEX SHOWER FLOORS
 page 1 of 14 Arena lanco Cemento Pizarra SPECIFICATIONS Recommended use Material Colour Availability Outlet Position Waste Type ase Height Size Availability & Weight Features Domestic, Hotel and Commercial
Flat Bank SERIES 05FB AND 07FB. Options CONSTRUCTION FEATURES EQUIPMENT OPTIONS PRODUCT DATA CLEAN-LINE TM SERIES 05FB/07FB PD-CLFB-03A JANUARY 2003
 PRODUCT SERIES 05FB/07FB PD-CLFB-03A FILTRATION EQUIPMENT SERIES 05FB AND 07FB 2" AND 4" FLAT BANK FILTER HOUSINGS Flat Bank CONSTRUCTION FEATURES 16 GAUGE ALUMINIZED STEEL FACTORY ASSEMBLED (2) HINGED
Euro Corner Entry Shower Screen Installation Instructions
 Euro Corner Entry Shower Screen Installation Instructions Corner Entry Space Saving Design Dual Sliding Doors, magnetic seals Silver Frame 6mm Clear Safety Glass Can be installed on shower base or tiled
RSH ENGINEERING, INC. END OF BUILDERS WARRANTY INSPECTION REPORT INSP#: K00001 DATE: 00/00/11 PAGE #: 1
 PAGE : 1 1 2 3 4 LEFT SIDE OF HOUSE: SEE. 3 TO. 10 FOR DETAILS. LEF T SIDE OF HOUSE: GENERAL NOTE: SOFFIT VENTS ARE MISSING AND/OR IS INADEQUATE ADD SOFFIT VENTS. PROVIDE ADEQUATE OF SOFFIT VENTS TO MEET
Cornerview Shower Enclosure & Base
 Cornerview Shower Enclosure & Base SHOWER ENCLOSURE AND BASE INSTALLATION INSTRUCTIONS IMPORTANT DreamLine reserves the right to alter, modify or redesign products at any time without prior notice. For
RACK HAT / STRIP DOOR
 RACK HAT / STRIP DOOR USER GUIDE AND ASSEMBLY INSTRUCTIONS Design and specifications are subject to change without notice. Proprietary Notice: The information contained in this user guide is the sole property
ITEM 442 METALS FOR STRUCTURES
 AFTER NOVEMBER 1, 2008 ITEM 442 METALS FOR STRUCTURES 442.1 Description. These specifications shall govern for materials such as structural steel, wrought iron, bronze, and other metals used in structures,
See the IRC for additional information. See CPD-DS Information Bulletin 100 for Requirements for 1 & 2 Family Dwelling plan submittals.
 As a customer service initiative, the Kansas City, Missouri, City Planning and Development Department/Development Services, in cooperation with the Greater Kansas City Home Builders Association, has developed
DIVISION 5 - STRUCTURAL STEEL AND IRON WORK
 DIVISION 5 - STRUCTURAL STEEL AND IRON WORK SECTION 05100 STRUCTURAL METAL FRAMING PART 1.00 GENERAL 1.01 SCOPE OF WORK A. Work Included: 1. 2. Structural steel complete in place. Steel joists complete
SEISMIC PROTECTION SYSTEMS Bracing Products for Racks & Cabinets
 SEISMIC PROTECTION SYSTEMS Bracing Products for Racks & Cabinets Seismic Frame Two-Post Rack Page 11-3 Seismic Protection Products - Racks Page 11-6 Seismic Protection Products - Runway Page 11-8 Seismic
ODYSSEY FLOOR MODEL. Owner s Manual. O-6400-F shown rev 118
 Owner s Manual ODYSSEY FLOOR MODEL O-6400-F shown 67-1455 rev 118 3730 E. Southern Avenue, Phoenix, AZ 85040 USA 800-778-8779 Workhorseproducts.com 1 Table of Contents I. Introduction & Safety Information.
MECHANICAL LEVELERS. P.O. Box 338 Spring Hill, Tennessee /486/ /251/3382 Fax 931/486/0316
 EDE & BLE Owner s Manual MECHANICAL LEVELERS P.O. Box 338 Spring Hill, Tennessee 37174 931/486/2296 800/251/3382 Fax 931/486/0316 www.pioneerleveler.com SM SECTION 1 RECEIVING: INSTALLATION INSTRUCTIONS
Installation Instructions
 Installation Instructions Flue Gas System Basic Kit HT-K - Horizontal Flue Gas System For GB125 Oil Condensing Boiler For trained and certified Installers Please read carefully prior to installation. 6
Owner s Manual Shelf Lip Accessory
 Owner s Manual Shelf Lip Accessory Full Length Shelf Lip Half Length Shelf Lip CONTENTS Safety...................................................................2 General..............................................................2
150MM FREE STANDING WOOD FIRE FLUE KIT MKIII INSTALLATION INSTRUCTIONS
 150MM FREE STANDING WOOD FIRE FLUE KIT MKIII INSTALLATION INSTRUCTIONS WARNING: THIS FLUE KIT HAS BEEN MANUFACTURED IN ACCORDANCE WITH AS/NZS 2918:2001 AND TESTED TO APPENDIX F. TO ENSURE SAFETY THIS FLUE
150MM FREE STANDING WOOD FIRE FLUE KIT MKIII INSTALLATION INSTRUCTIONS
 150MM FREE STANDING WOOD FIRE FLUE KIT MKIII INSTALLATION INSTRUCTIONS WARNING: THIS FLUE KIT HAS BEEN MANUFACTURED IN ACCORDANCE WITH AS/NZS 2918:2001 AND TESTED TO APPENDIX F. TO ENSURE SAFETY THIS FLUE
Leveling Foot RB210. Leg Extender RLT66
 Landing for Right & Left Turn R342 ITEMS # 0254049, 0254061, 0254072, 0254076, 0016567, 0254099, 0254110, 0054116, 0254117, 0254126, 0254140, 0254150, 0254156 CUSTOM ACCESS RAMP SYSTEM MODELS # R100, R242,
SHEDS4U LTD /STEELSPAN LIMITED - TERMS, CONDITIONS & GENERAL SPECIFICATIONS
 SHEDS4U LTD /STEELSPAN LIMITED - TERMS, CONDITIONS & GENERAL SPECIFICATIONS Kitset Structure Pricing: This Sheds4U/Steelspan Limited Kitset Price quotation relates to the supply of the listed kitset structure
OWNER S MANUAL AND INSTALLATION GUIDE FOR. LoDock Leveler (LD)
") OWNER S MANUAL AND INSTALLATION GUIDE FOR LoDock (LD) (800) 433-2212 Fax (817) 293-7570 9201 South Freeway Fort Worth, TX 76140 www.bluffmanufacturing.com 01032017 DO NOT INSTALL, OPERATE OR SERVICE PRODUCT
OWNER S MANUAL AND INSTALLATION GUIDE FOR LoDock (LD) (800) 433-2212 Fax (817) 293-7570 9201 South Freeway Fort Worth, TX 76140 www.bluffmanufacturing.com 01032017 DO NOT INSTALL, OPERATE OR SERVICE PRODUCT
TM-LCD FLAT-PANEL TECHMOUNT OWNERS MANUAL
 TM-LCD FLAT-PANEL TECHMOUNT OWNERS MANUAL 1 www.visionaudiovisual.com/techmount/tm-lcd 2 DECLARATION OF CONFORMITY Where applicable Vision products are certified and comply with all known local regulations
Porcher Solutions Wall Mount, Pedestal and Above Counter Lavatories
 ASSEMBLY & INSTALLATION INSTRUCTIONS Porcher Solutions Wall Mount, Pedestal and Above Counter Lavatories Thank you for selecting our Porcher product. To ensure that your installation proceeds smoothly,
INVITATION TO BID B I D F O R M. Please submit bid on or before 2:15 pm 101 North Halagueno Street June 6, 2013, at the office of the
 BID NO.: 2013-30 INVITATION TO BID B I D F O R M Refuse Containers, Roll-Out Refuse Containers, Lids, Lid Assemblies, Front & Rear Replacement Lids, Piano and Loop Hinges City of Carlsbad Please submit
ALPINE PATIO COVER INSTALLATION INSTRUCTIONS
 ALPINE PATIO COVER INSTALLATION INSTRUCTIONS Contact us at: 1-800-851-0865 or www.americana.com Before You Begin: Consult your local building department for any required permits You may be required to
The Ashland Project. Total Area: 1,778 Sq.Ft. 3 Bedroom, 2 Bath, 2 Car Garage
 The Ashland Project Total Area: 1,778 Sq.Ft. 3 Bedroom, 2 Bath, 2 Car Garage The garage and bedroom extend from the front of this three bedroom home, drawing you visually into the entryway. Brick and stucco
assembly and installation guide
 The Arqua Fountain DF4 is a high-quality water bubbler designed to provide accessible, fresh drinking water in public environments. This technical pack includes: Assembly and Installation guide Care and
YOUR LITE-DECK SECTIONS
 General Information Warning - Serious injury or death may result from safety hazards caused by improper use or installation. When in doubt about proper use or installation of Lite-Deck, immediately contact
PRODUCT EVALUATION Effective Date: June 1, 2013 GDR-39
 TEXAS DEPARTMENT OF INSURANCE Engineering Services / MC 103-3A 333 Guadalupe Street P.O. Box 149104 Austin, Texas 78714-9104 Phone No. (512) 322-2212 Fax No. (512) 463-6693 PRODUCT EVALUATION Effective
NetShelter. Four-Post Rack. Installation and Quick-Start Manual
 NetShelter Four-Post Rack Installation and Quick-Start Manual Contents Product Overview....................................... 1 Product Inventory....................................... 2 Features of the
BUILDING A NEW HOME. Construction Permit Tips For Home Owners
 BUILDING A NEW HOME Construction Permit Tips For Home Owners This publication provides guidelines for constructing a detached singlefamily home. The code requirements herein are not all inclusive and should
MASONRY ANCHORS AND CONNECTORS May 6, 2014
 Page - 1 This section includes specification text to assist in describing a variety of masonry anchors, connectors, and accessories intended for masonry construction. This document contains prepared master
INSTALLATION MANUAL. B-710/760 H20 SERIES MODULAR UST to AST TRANSITION SUMP
 INSTALLATION MANUAL B-710/760 H20 SERIES MODULAR UST to AST TRANSITION SUMP H20-RATED B-710 WITH 2 RISERS, RACK SYSTEM AND BOLLARDS B-710 SPLIT LID TRANSITION SUMP SHOWN WITH H20-RATED DIAMOND PLATE LID
Cabin Specifications:
 The Luxury cabin Cabin Specifications: Price: $15,900 including GST for the basic kit Built size: Cabin = 5.85m x 4.45. Veranda = 5.85m x 2.25m. Height 2.47m/3.57 Flat packed: 5.85m x 2.25m. Height 1.5m
Architectural & Structural Design
 B&W.dwg, 01/05/ 11:16:31 ص SMOH G.o.S. - Sudan Architectural & Structural Design Location: Tarbeba Locality: Baida - State: West Darfur Sudan B&W.dwg, 01/05/ 11:16:42 ص Key : DOORS SAMPLES TO BE APPROVED
SUBJECT: NEW 2000 INTERNATIONAL RESIDENTIAL CODE (IRC) DATE:
 DATE:") IRC CODE UPDATES TO: RESIDENTIAL BUILDING CONTRACTORS FROM: GARY STABER, BUILDING OFFICIAL SUBJECT: NEW 2000 INTERNATIONAL RESIDENTIAL CODE (IRC) DATE: 6/1/2003 INTERNATIONAL RESIDENTIAL CODE (IRC) APPLICABILITY:
IRC CODE UPDATES TO: RESIDENTIAL BUILDING CONTRACTORS FROM: GARY STABER, BUILDING OFFICIAL SUBJECT: NEW 2000 INTERNATIONAL RESIDENTIAL CODE (IRC) DATE: 6/1/2003 INTERNATIONAL RESIDENTIAL CODE (IRC) APPLICABILITY:
Valance Installation. For Units with Beam Style Coils
 Valance Installation For Units with Beam Style Coils 1. Before installation of valance units, determine if drapes are to be used, or if any wall construction will protrude into room. If either drapes or
Clenergy ezrack SolarRoof Code-Compliant Planning and Installation With Australia AS/NZS1170
 Clenergy ezrack SolarRoof Code-Compliant Planning and Installation With Australia AS/NZS1170 The ezrack has been developed as a universal system for roof-mounting on pitched roofs. The use of patented
Important Information
 Hinged Door Instruction Manual CL Important Information Toughened glass is completely safe for use in our shower enclosures and bath screens; providing our products are installed according to our guidelines.
MRac Tile Roof Installation Guide
 MRac Tile Roof Installation Guide Tile Interface 117HA AS/NZS1170.2 Content 1. Product Introduction-------------------------------------------------------P2 2. Installation Tools& Components---------------------------------------P3
SERVICE PARTS LIST SPECIFY CATALOG NO. AND SERIAL NO. WHEN ORDERING PARTS
 See Pages,, and for Service Replacement parts for the different Magazine Attachments SERVICE PARTS LIST SPECIFY CATALOG NO. AND SERIAL NO. WHEN ORDERING PARTS CATALOG NO. M FUEL Finishing Nailers 0-0,
ANY SPECIFICATION DRAWINGS OR DATED PRIOR TO SEPTEMBER 2015 WILL NOT BE HONORED.
 November 30, 2015 Dear STEMC Member and Contractors, Over the years, STEMC has made many changes to its member requirements for new services and specifications associated with those requirements. As a
Preassembled steel stairs with concrete-filled treads.
 SECTION 055113 - PART 1 - GENERAL 1 RELATED DOCUMENTS Drawings and general provisions of the Contract, including General and Supplementary Conditions and Division 01 Specification Sections, apply to this
TORERO TUB DOOR INSTALLATION INSTRUCTIONS
 TORERO TUB DOOR INSTALLATION INSTRUCTIONS IMPORTANT DreamLine TM reserves the right to alter, modify or redesign products at any time without prior notice. For the latest up-to-date technical drawings,