PV-ezRack SolarTerrace III
|
|
|
- Philippa May
- 5 years ago
- Views:
Transcription

1 PV-ezRack SolarTerrace III Planning and Installation Guide Complying with AS/NZS1170.2:2011 Contents 1 Introduction 2 2 Installation Tools & Components 3 3 Installation Guide 5 4 Service 11
2 1. Introduction Clenergy PV-ezRack SolarTerrace III is a pre-assembled ground mount system suitable for large scale commercial and utility scale installations. PVezRack SolarTerrace III has been developed to fit any PV module. The innovative and patented SolarTerrace III T-Rails simplify and improve the accuracy of the installation. Using high quality engineered components SolarTerrace III saves developers and installers, time and money when delivering large scale projects. Please review this manual thoroughly before installing your SolarTerrace III system. This manual provides (1) supporting documentation for building permit applications relating to PV-ezRack SolarTerrace III Mounting system, and (2) planning and installation instructions for SolarTerrace III. SolarTerrace III parts, when installed in accordance with this guide, will be structurally adequate and will meet the AS/NZS 1170 standards. During the installation and especially when working on the roof inform yourself about the appropriate safety regulations, and please also pay attention to the relevant regulations of your local region. Please check that you are using the current version of the installation manual by contacting Clenergy Australia by on sales@clenergy.com.au, or your local representative. The installer is solely responsible for: Complying with all applicable local or national building codes, including any that may supersede this manual; Ensuring that PV-ezRack and other products are appropriate for the particular installation and the installation environment; Using only PV-ezRack parts and installer-supplied parts as specified by PV-ezRack (substitution of parts may void the warranty and invalidate the letter of certification on page 2); How to recycle: according to the local relative statute. How to disassemble: Reverse installation process. Ensure that there are no less than two professionals working on panel installation. Ensure the installation of relative electrical equipment is performed by professional electrician. Ensuring safe installation of all electrical aspects of the PV array.


 Inter Clamp 3) T Rail")
3 2. Installation Tools & Components 2.1 Installation Tools Allen Key Power Tool Adjustable Spanner String 2.2 Component List Overview of system components End Clamp Inter Clamp T-Rail Rail Clamp Splice for T Rail Assembly Support 2.3 System Components 1) End Clamp 2) Inter Clamp 3) T Rail 4) Rail Clamp 5) BackBase 6) Front Base 7) T Rail Splice 8) Truss support
4 2.4 Installation Planning Clenergy PV-ezRack SolarTerrace III is compatible for panels up to 1800mm long. Design for panels 1800mm long Design for panels 1580mm long
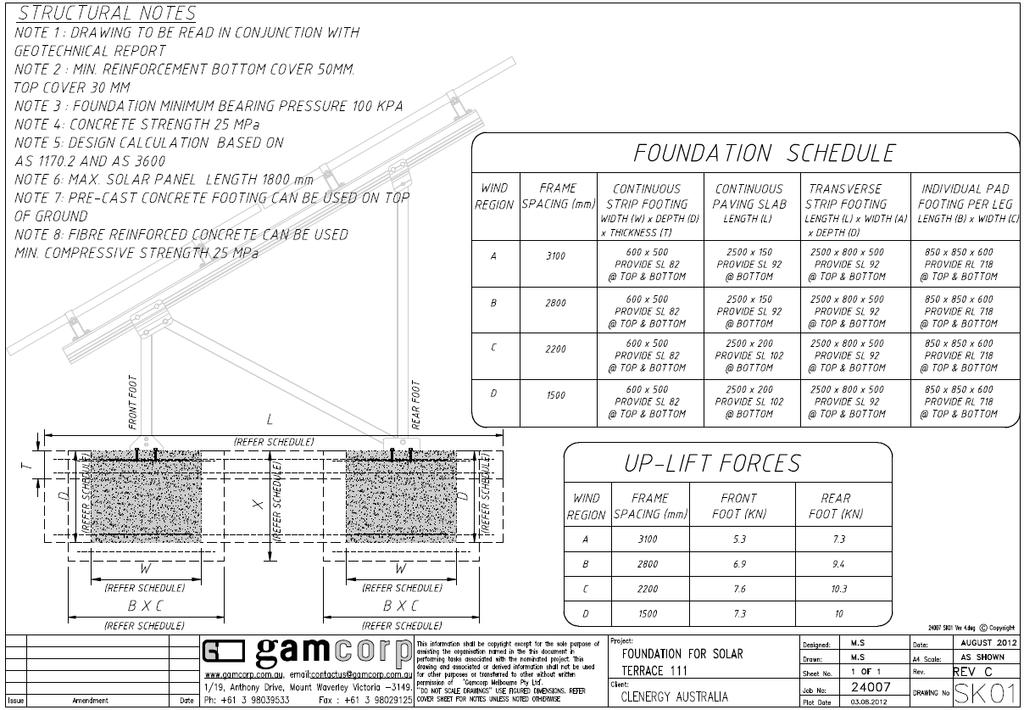
5 Minimum spacing between 2 legs: L STIII Panels Up To 1.80m Wind Zone Region A Region B Region C Region D Wind Speed(m/s) Leg Spacing(m) Footing design: We recommend using M16 Grade 5.8 Carbon Steel anchor studs with Ramset Chemset REO502 chemical injection anchoring system. Minimum anchor embedment depth of 90mm with concrete strength of 25MPa. For concrete specifications see STIII engineering certificate.
6


7 3. Installation Process 3.1 Installing the single Truss Support Unfold the folded Truss support then Bolt the enforcement tube to the bottom of the back leg. Fasten the bolts and nuts pre-assembled to secure the structure Connect the front and rear legs to the bolts preinstalled on the ground or screw the legs using anchor screws Make sure the other connections on the components are tighten. PV-ezRack Solar Terrace III_Planing and Installation Guide_V1.2 (Rev 1) Page 7 of 11

8 3.1.4 According to the planning, repeat the above operation. Note that the all Tri-Groove Beam must be in the same line. 3.2 Installing the T Rails Before installing the T Rails, mark the position of the rails on the beam. Note: Clenergy will preassemble the bottom rail clamp when supplying the product for large projects Before installing the T Rails to the Tri-groove beam, make sure the rail is long enough, otherwise connect the T rails using T rail splice. It s recommended to connect the rails before installing them on the Tri-groove Beam PV-ezRack Solar Terrace III_Planing and Installation Guide_V1.2 (Rev 1) Page 8 of 11


9 3.2.3 Install the rails according to Mark the panel array perimeter and attach T Rail to Trigroove Beam with one T Rail Clamp on each side Install the other rails. Note: The end of the rails must line up. PV-ezRack Solar Terrace III_Planing and Installation Guide_V1.2 (Rev 1) Page 9 of 11


10 3.3 Installating PV panels Install the panels by using patented Clenergy End Clamps and Inter Clamps. Clenergy recommends mm rail overhang at the end of the array. It can be maximum 50% of the spacing between the STIII supports Install the second row of panels making sure to leave an 18mm gap between the two rows Now the installation is completed. PV-ezRack Solar Terrace III_Planing and Installation Guide_V1.2 (Rev 1) Page 10 of 11
11 10 Years Standard Warranty Terms and Conditions 20 Year Designed Service Life Clenergy international co. Ltd warrants to the original purchaser ( Purchaser ) of product(s) that it manufactures ( Product ) at the original installation site that the Product shall be free from defects in material and workmanship for a period of ten (10) years, except for the anodised finish, which finish shall be free from visible peeling, or cracking or chalking under normal atmospheric conditions for a period of five (5) years, from the earlier of 1) the date the installation of the Product is completed, or 2) 30 days after the purchase of the Product by the original Purchaser ( Finish Warranty ). The Finish Warranty does not apply to any foreign residue deposited on the finish. All installations in corrosive atmospheric conditions are excluded. The Finish Warranty is VOID if the practices specified by AAMA 609 & Cleaning and Maintenance for Architecturally Finished Aluminium ( are not followed by Purchaser. This Warranty does not cover damage to the Product that occurs during its shipment, storage, or installation. This Warranty shall be VOID if installation of the Product is not performed in accordance with Clenergy s written installation instructions, or if the Product has been modified, repaired, or reworked in a manner not previously authorized by Clenergy IN WRITING, or if the Product is installed in an environment for which it was not designed. Clenergy shall not be liable for consequential, contingent or incidental damages arising out of the use of the Product by Purchaser under any circumstances. If within the specified Warranty periods the Product shall be reasonably proven to be defective, then Clenergy shall repair or replace the defective Product, or any part thereof, in Clenergy s sole discretion. Such repair or replacement shall completely satisfy and discharge all of Clenergy s liability with respect to this limited Warranty. Under no circumstances shall Clenergy be liable for special, indirect or consequential damages arising out of or related to use by Purchaser of the Product. Manufacturers of related items, such as PV modules and flashings, may provide written warranties of their own. Clenergy s limited Warranty covers only its Product, and not any related items. PV-ezRack Solar Terrace III_Planing and Installation Guide_V1.2 (Rev 1) Page 11 of 11
PV-ezRack SolarTerrace II
 PV-ezRack SolarTerrace II Code-Compliant Planning and Installation Complying with AS/NZS1170.2:2011 Amdt 3 2013 Contents 1 Introduction 2 2 Installation Tools & Components 3 3 Installation Guide 7 4 Service
PV-ezRack SolarTerrace III-A Installation Guide V1.2
 PV-ezRack SolarTerrace III-A Installation Guide V1.2 CONTENT 1. Introduction...2 2. Tools & Components...3 3. Installation Guide. 10 4. Service..12 Clenergy Australia 11/20 Duerdin St, Clayton VIC 3168
PV-ezRack SolarMatrix Pro
 PV-ezRack SolarMatrix Pro Planning and Installation Guide Contents 1 Introduction 2 2 Installation Tools & Components 4 3 Installation Instruction 6 4 Service 10 1. Introduction PV-ezRack SolarMatrix Pro
PV-ezRack Trapezoidal Installation Guide V2.0
 PV-ezRack Trapezoidal Installation Guide V2.0 Introduction Clenergy s PV-ezRack Trapezoidal is the most simple and cost-effective flat roof mounting system suitable for trapezoid metal sheet roof. The
Radiant Solar Tripod Planning and Installation Guide V1.2 With Australia AS/NZS1170.2
 Radiant Solar Tripod Planning and Installation Guide V1.2 With Australia AS/NZS1170.2 The Solar Tripod System has been developed as a universal system for roof-mounting on flat roofs. The use of patented
MRac Trapezoidal Metal Roof Mounting System. Installation Guide
 MRac Trapezoidal Metal Roof Mounting System Installation Guide Content 1. Introduction ------------------------------------------------------ P2 2. Installation Tools ------------------------------------------------
Radiant PV-Solar Tripod System Planning and Installation With Australia AS/NZS1170.2:2011 AMDT
 Radiant PV-Solar Tripod System Planning and Installation With Australia AS/NZS1170.2:2011 AMDT 2-2012 The PV-Solar Tripod System has been developed as a universal system for tilt solar panel roof-mounting
PV-ezRack SolarRoof Klip-Lok Interface
 PV-ezRack SolarRoof Klip-Lok Interface Code-Compliant Planning and Installation Complying with AS/NZS1170.2:2011 AMDT 2-2012 CONTENT 1. Introduction.. 2 2. Component List.. 3 3. Planning.. 4 4. Service
Radiant PV-RoofTopRac System Planning and Installation With Australia AS/NZS1170.2:2011 AMDT
 Radiant PV-RoofTopRac System Planning and Installation With Australia AS/NZS1170.2:2011 AMDT 2-2012 The PV-RoofTopRac System has been developed as a universal system for roof-mounting on pitched roofs.
Clenergy ezrack SolarRoof Code-Compliant Planning and Installation With Australia AS/NZS1170
 Clenergy ezrack SolarRoof Code-Compliant Planning and Installation With Australia AS/NZS1170 The ezrack has been developed as a universal system for roof-mounting on pitched roofs. The use of patented
PV-ezRack SolarRoof Longline Interface
 PV-ezRack SolarRoof Longline Interface ode-ompliant Planning and Installation omplying with AS/NZS1170.2:2011 AMDT 2-2012 ONTENT 1. Introduction.. 2 2. omponent List.. 3 3. Planning.. 4 4. Service 13 Installation
MRac Tile Roof Installation Guide
 MRac Tile Roof Installation Guide Tile Interface 117HA AS/NZS1170.2 Content 1. Product Introduction-------------------------------------------------------P2 2. Installation Tools& Components---------------------------------------P3
Ground Mounting System I Installation Manual
 Ground Mounting System I Installation Manual Thank You For Choosing AIMS Power! Why Hopergy 1. AIMS Power is a leading supplier of solar products, specializing in PV mounting systems. We have experienced
Solar Panel Mounting Kits
 We are now one the largest companies in Australia that supply high quality Australian Made Solar Panel Mounting Kits. We manufacture the highest quality Solar Panel Mounting Kits. Unlike our competitors
GROUND MOUNT INSTALLATION MANUAL
 GROUND MOUNT INSTALLATION MANUAL Contents DISCLAIMER 1 CHECKLIST 2 1. ERECT BASe 3 2. CONNECT PIPES 3 3. PLACE RAILS 4 4. SECURE LUGS 4 5. CLAMP MODULES 5 DIAGONAL BRACES (OPTIONAL) 6 UNDER CLAMPS (OPTIONAL)
DPA Solar Racking Solutions Ground Mount Installation Guide V1.5
 DPA Solar Racking Solutions Ground Mount Installation Guide V1.5 Introduction It is important to note that the installer is responsible for the following: Complying with all applicable local or national
PRR. Flush Mount Racking System. Installation Manual
 PRR Flush Mount Racking System Installation Manual Release, September 2014 Table of Contents 1. Introduction 1.1 Product Overview 1.2 About This Manual 1.3 Product Liability 1.4 Standards Compliance 1.5
STP Mount Series. Installation Manual. STP-LSCR-MAN 2017 Edition v1.0. For models: STP-SCR/045 STP-SCR/060 STP-SCR/070 STP-LCR/090 STP-LCR/120
 Installation Manual STP-LSCR-MAN 2017 Edition v1.0 For models: STP-SCR/045 STP-SCR/060 STP-SCR/070 STP-LCR/090 STP-LCR/120 Table of Contents Introduction... 1 Customer Support... 1 Tools Required... 2
The Racking System Designed By Installers for Installers
 The Racking System Designed PV Racking Ground System Installation Instructions Key benefits: Easy installation. No clamps! No more straining to lean over and fasten bolts! Module installation time is far
PRB. Flush Mount Racking System. Installation Manual
 PRB Flush Mount Racking System Installation Manual Released 5th April 2015 TABLE OF CONTENTS 1. INTRODUCTION 1.1 Product Overview 1.2 About This Manual 1.3 Product Liability 1.4 Standards Compliance 1.5
SnapNrackTM GROUND MOUNT CODE COMPLIANT INSTALLATION MANUAL
 SnapNrackTM PV MOUNTING SYSTEM GROUND MOUNT CODE COMPLIANT INSTALLATION MANUAL Table of Contents 1. INTRODUCTION...2 1.1 Overview of the Ground Mount System...2 1.2 Overview of this manual...3 1.3 Your
Mounting systems for solar technology
 Mounting systems for solar technology ASSEMBLY INSTRUCTIONS CROSSRAIL TILT KIT 7 / 0 / 5 TILT FOR LOW-SLOPE AND STEEP-SLOPE ROOFS TABLE OF CONTENTS TABLE OF CONTENTS THE COMPANY SAFETY REGULATIONS MATERIALS
DynoRaxx EVOLUTION PR Quick Guide Installation Steps
 DynoRaxx EVOLUTION PR Quick Guide Installation Steps Publication Number 100611 866.620.2410 dynoraxx.com Installer Responsibilities: Thank you for choosing Evolution PR, a revolutionary technology for
Aurora Genmounts Install LT Installation Manual
 Aurora Genmounts Install LT Installation Manual TABLE OF CONTENTS 1.0 INTRODUCTION 2.0 PRODUCT OVERVIEW 3.0 TECHNICAL SPECS 4.0 INSTALLER RESPONSIBILITY 5.0 SITE SELECTION 6.0 TOOLS REQUIRED 7.0 COMPONENT
PRU-D INSTALLATION MANUAL MONO-LEG SYSTEM. PRU-D / Portrait - Revision B July 31 st, 2017 Polar Racking Inc.
 PRU-D INSTLLTION MNUL MONO-LEG SYSTEM Table of Contents Table of Contents... 2 1. Safety... 3 Basic Safety Considerations... 3 Warnings and Symbols... 3 Responsibilities of the Installer... 3 Responsibilities
STRUCTURAL DESIGN CERTIFICATE No: CSM SC Job No: 14S 391
 Date of Issue: 19/12/2014 3:30 PM STRUCTURAL DESIGN CERTIFICATE No: CSM SC057 2014 Job No: 14S 391 Plant Description: RoofTopRac system solar panel mounting structure with fasteners, Base Rail 40 x 40.
HD Firewall Mount 850 all, S/V , C ipd #
 PI-394 10/10 Dedicated to improving vehicle fun, safety & performance Installation Instructions PI394 HD Firewall Mount 850 all, S/V70 1998-2000, C70 1998-2004 ipd #21.0001 SUGGESTED TOOLS Metric End Wrenches
Modular. Lighter. Quicker.
 Modular. Lighter. Quicker. PR-1 2.0 Ballasted Rooftop Mounting System Installation Manual *Supports all 60 and 72-cell Framed Modules. Table Of Contents Table Of Contents 1. Introduction 4 1.1 Product
Tourmaster 3-Step Riser
 Assembly Manual Tourmaster 3-Step Riser Note: Shade variations may be present from step to step due to the nap of the carpet. contents Safety Precautions.................................. Warranty..........................................
ASSEMBLY INSTRUCTIONS RESIDENTIAL SOLUTION CROSSRAIL GROUND MOUNT SYSTEM USA
 ASSEMBLY INSTRUCTIONS RESIDENTIAL SOLUTION CROSSRAIL GROUND MOUNT SYSTEM USA TABLE OF CONTENTS TABLE OF CONTENTS SAFETY REGULATIONS MATERIALS REQUIRED ASSEMBLY ENGINEERING DRAWINGS TERMS AND CONDITIONS
WHY VG-Solar. Material. Standard. Installati. Quality. Environs. Guarante
 WHY VG-Solar VG-solar support people with a desire to have available to them. Deliver mounting solutions with freedom, flexibility, fewer cost and guide you through the design process from beginning to
Always be your solar support
 Always be your solar support Installation Manual Rail IV Pitched Roof Solution Version 2016 1.0 www.antaisolar.com GENERAL INTRODUCTION Antaisolar Roof Mounted solutions, accommodating a wide range of
Unirac Code-Compliant Installation Manual
 Planning and Assembly Installer responsibility The installer is solely responsible for: Complying with all local or national building codes, including any that may supercede this manual. Ensuring that
SECURE. UNIVERSAL. MOUNTING. Tilt Kit Installation Manual
 SECURE. UNIVERSAL. MOUNTING Tilt Kit Installation Manual 1.0 INTRODUCTION... 3 2.0 KITS / PRODUCT RANGE... 4 2.1 Leg Kits... 4 2.2 Rail Kits... 4 3.0 PREPARATION FOR INSTALLATION... 5 3.1 Applications...
Structural Design Documentation
 Gamcorp (Melbourne) Pty Ltd A.C.N 141 076 904 A.B.N 73 015 060 240 www.gamcorp.com.au melbourne@gamcorp.com.au 1/19 Anthony Drive, Mount Waverley VIC 3149. Tel: 03 9803 9533 Fax: 03 9802 9125 Structural
SWH Solar Racking Ground Mount Installation Guide
 Version 16.02.v1 SWH Solar Racking Ground Mount Installation Guide Installer responsibility The installer is solely responsible for: Complying with all local or national building codes, including any that
Stealth Residential Roof Mount System Installation Manual
 www.pvracking.com Stealth Residential Roof Mount System Installation Manual 2703 Listed PV Mounting System Table of Contents OVERVIEW OF COMPONENTS... 3 COMPONENTS... 3 OVERVIEW... 6 PV STEALTH ROOF INSTALLATION...
Adjustable S-Tile Installation Manual
 Adjustable S-Tile Installation Manual Contents Check List SolaRack Components Marking Recommended Spacing Mounting Instructions: Portrait Mounting Instructions: Landscape Grounding & Electrical Diagram
OWNER S MANUAL SERIES MDS-96-BK, SM, DR
 SERIES MDS-96-BK, SM, DR OWNER S MANUAL Introduction... 1 Bill of Materials... 2 Assembly Instructions. 3 Warranty....12 IMPORTANT NOTES, WARNINGS AND SAFETY INSTRUCTIONS Ensure that all employees understand
TRAPEZOIDAL SHEET METAL RAIL LIFT/VARIO for trapezoidal sheet metal roofs
 Photovoltaic mounting systems Assembly Instructions TRAPEZOIDAL SHEET METAL RAIL LIFT/VARIO for trapezoidal sheet metal roofs 1 Table of contents 1 Introduction 1.1 Intended use 3 1.2 About the document
Rack-in-a-BoxTM INSTALLATION MANUAL
 INSTALLATION MANUAL TM 1.0 INTRODUCTION 3 2.0 PRODUCT RANGE 4 2.1 Systems 4 2.2 Accessories 4 3.0 PREPARATION FOR INSTALLATION 5 3.1 Applications 5 3.2 Tools for Installation 5 3.3 Additional Materials
SECTION ORNAMENTAL ALUMINUM FENCING
 SECTION 032300 ORNAMENTAL ALUMINUM FENCING PART 1 - GENERAL 1.1 RELATED DOCUMENTS A. Drawings and general provisions of the Contract, including General and Supplementary Conditions and Division 01 Specification
Installation Instructions/Operation and Maintenance Manual. Models PLG-60 PLG-72. PS DOORS Contact Information. Website psdoors.
 Rev. 091416 Pallet Gate Installation Instructions/Operation and Maintenance Manual Models PLG-60 PLG-72 Table of Contents Product Information...2 Installation Instructions...3 Operation...6 Inspection
OWNER S MANUAL SERIES MDS-96-BK, SM, DR
 VESTIL MANUFACTURING CORP. 2999 N. Wayne St., Angola, IN 46703 Ph: 260-665-7586 Fax: 260-665-1339 E-mail: sales@vestil.com Website: www.vestil.com SERIES MDS-96-BK, SM, DR OWNER S MANUAL Introduction...
The Racking System Designed by Installers for Installers. PV Stealth Roof System Installation Instructions
 PV Stealth Roof System Installation Instructions Key Benefits: Available in Black or Mill finish. Modules can be seated without any bolts, clamps or clips. Module Hold Down Area is more than 10x that of
Model m x 1.98 m NPRM with Roof Pads For 1.2 m Antenna Systems
 Installation Instructions 800026-0 Model 60057-03.98 m x.98 m NPRM with Roof Pads For.2 m Antenna Systems ASC Signal Corporation 35 Industrial Park Drive Smithfield, NC 27577 USA Telephone: +-99-934-97
EJOT Solar Fastenings. Installation Manual
 EJOT Solar Fastenings Installation Manual Setscrew DIN 913 M10 x Lg A2 with internal hex drive SW5 Locknut DIN 985 M10 Plain washer M10 Hexagon nut M10 Precise defined depth (control) stop Washer E16/8
Pallet Gate Installation Instructions and Operators Manual
 Pallet Gate Installation Instructions and Operators Manual Models PLG-6084 PLG-7284 PLG-6084-SST PLG-7284-SST Table of Contents Product Information...2 Installation Instructions...4 Parts and Reordering...7
Composition L-Foot Kit Installation Manual
 Composition L-Foot Kit Installation Manual Contents Check List SolaRack Components Marking Recomended Spacing Mounting Instructions: Portrait Mounting Instructions: Landscape Grounding & Electrical Diagram
Installation Manual Solar Mounting System (Flat Roof Tilted Solution)
") Installation Manual Solar Mounting System (Flat Roof Tilted Solution) Version 2017 2.0 2.1 www.antaisolar.com CONTENTS General Introduction... 2 Technical Specification... 3 Safety and Installer Responsibilities...
Installation Manual Solar Mounting System (Flat Roof Tilted Solution) Version 2017 2.0 2.1 www.antaisolar.com CONTENTS General Introduction... 2 Technical Specification... 3 Safety and Installer Responsibilities...
1.0. Post Install Kit. For Use With All Vinyl Railing BOM V1 1/13. Owner's Manual. Assembly and Installation Instructions.
 Post Install Kit Assembly and Installation Instructions PLEASE READ OWNER'S MANUAL COMPLETELY BEFORE ASSEMBLING YOUR POST INSTALL KIT. For Use With All Vinyl Railing 34106837BOM V1 1/13 Owner's Manual
Installation instructions Roxtec GH frames
 Safety information Roxtec recommends that all installations are performed without facility operation. Follow national regulations and installation codes. ny action affecting the routed service should be
Uncovered Decks & Porches
 Uncovered Decks & Porches Building Guides for Homeowners Why Do I need a Permit? D I D Y O U K N O W? As owner-builder you are the responsible party of record on such a permit. If your work is being performed
K364. Fitting Kit. Fitting Instructions for Basic Carrier. x 6 x 1 x 1 x 2. x 6 x 2 x 2 x 2. x 1 x 1. Revision No: 5C 1
 Fitting Kit Fitting Instructions for Basic Carrier x 6 x 1 x 1 x 2 x 6 x 2 x 2 x 2 x 1 x 1 Revision No: 5C 1 MAX kgs (lbs) W/P WHD Mitsubishi Montero, 5dr SUV 99-06 EU 75 kgs (165 lbs) 75 kgs (165 lbs)
Installation instructions Roxtec GH frames
 Installation instructions Roxtec GH frames Installation of bolted G series frames For installation of sealing system components in the frame, the latest revision of the standard installation instructions
Top Dry Ladders, Safety Cage, and Platforms
 Top Dry Ladders, Safety Cage, and Platforms Assembly Manual PNEG-1877 Date: 04-04-12 PNEG-1877 All information, illustrations, photos, and specifications in this manual are based on the latest information
Model T2642E Wall Mount. Television Wall Mount with Tilt Option
 Model T2642E Wall Mount Television Wall Mount with Tilt Option Getting Started Introduction Congratulations on the purchase of your new Audio Solutions T2642E Television Wall Mount. For maximum benefit,
ARCHITECTURAL SPECIFICATIONS
 ARCHITECTURAL SPECIFICATIONS CIG JAN PRODUCTS LTD VISUAL DISPLAY BOARDS Part 1-General 1.01 RELATED DOCUMENT A. The provision of the General Conditions. Supplementary Conditions and the Sections included
Mounting systems for solar technology
 Mounting systems for solar technology ASSEMBLY INSTRUCTIONS SPEEDRAIL system GB Table of contents TABLE OF CONTENTS THE COMPANY SAFETY REGULATIONS MATERIALS REQUIRED TOOLS REQUIRED ASSEMBLY 2 3 4 5 7 8
FSR - Roof Guardrail with Rubber Counterweights. Fold down option available. Lockinex. ea i, ea u i R2_11/17
 FSR - Roof Guardrail with Rubber Counterweights Fold down option available Lockinex ea i, ea u i R2_11/17 INTRODUCTION Lockinex FSR-Freestand Roof Guardrail system utilises Lockinex Key Clamps,Tubing &
General Guidelines. Tools Required. Safety. Deluxe Steel Folding Scooter & Wheelchair Carrier Instructions for Part # SC500-V3
 Deluxe Steel Folding Scooter & Wheelchair Carrier Instructions for Part # SC500-V3 General Guidelines It is the user s responsibility to read and follow all instructions. Keep these instructions with the
Installation and Use Instructions for the Big Ass Workbench Manufactured by Mercer Innovation, LLC
 Introduction Mercer Innovation, LLC has proudly and domestically manufactured the first in a line of industrial benches and furniture for serious shop use, as described below. Description The Big ASS workbench,
4-PIECE SHOWER WITH E-Z Pin INSTALLATION
 4-PIECE SHOWER WITH E-Z Pin INSTALLATION Suggested Tools Please consult all local and state building codes and read the entire installation instructions prior to beginning the installation of this unit
DGF-P 2001 CONVEYORS
 Technical Documentation CONVEYORS Each serial number is unique to that specific conveyor and provides mk North America with complete order details. The conveyor serial number is located on the frame at
V 2.0 ASSEMBLY GUIDE. TS Platform Scale Series 2
 V 2.0 ASSEMBLY GUIDE Series 2 TABLE OF CONTENTS OVERVIEW General Specifications...1 Cautions and Disclaimers...1 Contents of Kit...1 Tools Required For Assembly...2 Time Required to Assemble...2 ASSEMBLING
Installation instructions Roxtec HD 32 with HD modules
 Safety information Roxtec recommends that all installations are performed without facility operation. Follow national regulations and installation codes. Any action affecting the routed service should
ALPINE PATIO COVER INSTALLATION INSTRUCTIONS
 ALPINE PATIO COVER INSTALLATION INSTRUCTIONS Contact us at: 1-800-851-0865 or www.americana.com Before You Begin: Consult your local building department for any required permits You may be required to
OZARK PATIO COVER INSTALLATION INSTRUCTIONS
 OZARK PATIO COVER INSTALLATION INSTRUCTIONS Contact us at: 1-800-851-0865 or www.americana.com Before You Begin: Consult your local building department for any required permits You may be required to obtain
Tuscany II Pergola Manual and Installation Instructions. Please read these instructions before removing parts from crate
 Tuscany II Pergola Manual and Installation Instructions Please read these instructions before removing parts from crate Introduction Thank you for your purchase from The Outdoor GreatRoom Company. The
ODYSSEY FLOOR MODEL. Owner s Manual. O-6400-F shown rev 118
 Owner s Manual ODYSSEY FLOOR MODEL O-6400-F shown 67-1455 rev 118 3730 E. Southern Avenue, Phoenix, AZ 85040 USA 800-778-8779 Workhorseproducts.com 1 Table of Contents I. Introduction & Safety Information.
ALPINE PATIO COVER INSTALLATION INSTRUCTIONS
 ALPINE PATIO COVER INSTALLATION INSTRUCTIONS Contact us at: 1-800-851-0865 or www.americana.com Before You Begin: Consult your local building department for any required permits You may be required to
Drag Chain Conveyor Installation and Operation Manual
 Drag Chain Conveyor Installation and Operation Manual Material Handling Equipment Sales, Incorporated 310 S. Section Line Rd Delaware, OH 43015 Phone: (989) 430-4005 Fax: (740) 363-9004 WARRANTY MATERIAL
PV s Most Versatile Mounting System
 THE STANDARD IN PV MOUNTING STRUCTURES PV s Most Versatile Mounting System Flush Mount Low Profile High Profile www.unirac.com SolarMount is much more than a product. It s a system of engineered components
SQ-1 ROOF TRUSS WEG-IT TABLE
 WEG-IT Steel Top Table SQ1 Service SQ-1 ROOF TRUSS WEG-IT TABLE Operators Manual FOREWORD This manual explains the proper maintenance of Square 1 Design Roof Truss WEG-IT Table as well as periodic inspection
Conergy SolarFamulus II
 Conergy SolarFamulus II Installation manual www.conergy.com Table of Contents Table of Contents SolarFamulus II for universal use on flat roofs 1 Introduction 1 1.1 Short description 1 1.2 Intended use
MOUNTING SYSTEMS PRODUCT CATALOG
 MOUNTING SYSTEMS PRODUCT CATALOG MOUNTING SYSTEMS Reliable solar modules support Mounting systems, as solar modules supporting equipment, represent an important part of the final solar solution. Integrated,
Benefits in Speed and Logistics using the RL System. snapnrack.com
 Benefits in Speed and Logistics using the RL System snapnrack.com Agenda About SnapNrack Overview of Residential Solar Mounting Systems Benefits of railless systems What you should look for in a railless
RAPIDRAC G10. Unirac Code-Compliant Installation Manual. Code-Compliant Installation Manual 650. Table of Contents. Bright Thinking in Solar
 APIDAC G10 Code-Compliant Installation Manual 650 Table of Contents i. Installer s esponsibilities...2 Part I. Procedure to Determine Wind Design Load [1.1.] Using the Analytical Method ASCE 7-05...3 [1.2.]
Festoon Manual Heavy Duty C-Track
 Festoon Manual Heavy Duty C-Track 966300.3 Heavy Duty C-Track Manual CONDUCTIX INCORPORATED The technical data and images which appear in this manual are for informational purposes only. NO WARRANTIES,
4-PIECE SHOWER & TUB/SHOWER w/ E-Z Pin INSTALLATION
 4-PIECE SHOWER & TUB/SHOWER w/ E-Z Pin INSTALLATION Suggested Tools Please consult all local and state building codes and read the entire installation instructions prior to beginning the installation of
SQ-1 INTELLIGENT ROOF
 SQ-1 INTELLIGENT ROOF ROOF TRUSS TABLE With Intelligent Gantry. Zone Eject Automated Jigging TRUSS TABLE Operators Manual FOREWORD This manual explains the proper maintenance of Square 1 Design Roof Truss
PS-31 (SUS304, 300 mm) PS-31 (SUS304, 1,000 mm)
 PS-31 (SUS304, 1,000 mm)") CSM_PS-_S(R)_-31_DS_E_7_1 Separate s for Water Supply and Drainage Control in Buildings. Small, Lightweight s for Use as Built-in Components. The PS-@S(R) are separate s that allow the s to be withdrawn
CSM_PS-_S(R)_-31_DS_E_7_1 Separate s for Water Supply and Drainage Control in Buildings. Small, Lightweight s for Use as Built-in Components. The PS-@S(R) are separate s that allow the s to be withdrawn
SINGLE SWING DOOR PAIRED SWING DOOR
 Rev. 091416 SINGLE SWING DOOR PAIRED SWING DOOR Drawing No.: Revision: Date: If you need to contact Customer Service Please complete the following information and retain for future reference: Serial Number:
A. The extent of extruded aluminum walkway covers is shown on the Drawings and as specified herein.
 SECTION 10530 - EXTRUDED ALUMINUM WALKWAY COVERS PART I - GENERAL.1 RELATED DOCUMENTS A. Drawings and general provisions of Contract, including General, Supplementary, and Special Conditions and Division
Mounting systems for solar technology
 Mounting systems for solar technology ASSEMBLY INSTRUCTIONS S-DOME SYSTEM GB TABLE OF CONTENTS TABLE OF CONTENTS THE COMPANY SAFETY REGULATIONS MATERIALS REQUIRED TOOLS REQUIRED ASSEMBLY 2 3 4 5 8 9 Table
YINGLI SOLAR TWINMAX MODULES Installation and User Manual
 YINGLI SOLAR TWINMAX MODULES Installation and User Manual Revision Date Aug 3rd, 2016 Applicable for IEC certified products This manual applies to photovoltaic TwinMAX modules ( TwinMAX modules, also commonly
Conergy SunTop IV Price List. Made in. USA & Ontario, CANADA
 Conergy SunTop IV Price List The total residential mounting solution Made in USA & Ontario, CANADA Conergy: world s only manufacturer of turn-key solar power system solutions. Conergy s expertise and knowledge
Do-It-Yourself Portable Patio Deck
 Do-It-Yourself Portable Patio Deck Installation Instructions Owner s Manual Warranty www.udecx.com INDEX Recommended Uses Page 2 Installation Instructions Page 6 Warnings Page 2 Installation Instructions
00MK-MA0160-EN00. Mounting System ASSEMBLY INSTRUCTIONS. Little Plan and Little Plan Light systems, for corrugated sheet metal roof
 00MK-MA0160-EN00 Mounting System ASSEMBLY INSTRUCTIONS Little Plan and Little Plan Light systems, for corrugated sheet metal roof Rev.02 November 2014 Table of contents General instructions 2 General safety
Pallet Jack 4,400 Lbs Capacity Model #31001
 SKU # 217-0162 Pallet Jack 4,400 Lbs Capacity Model #31001 Owner s Manual and Assembly Instructions Questions? Problems? DO NOT RETURN TO STORE Please call our customer help line: (888) 315-3080 M-F 8-5
A. Division 01: Administrative, procedural, and temporary work requirements apply to this section.
 Copyright 2016 Metal Roof Innovations, Ltd. www.s-5.com SECTION 26 31 00.01 PHOTOVOLTAIC COLLECTOR ATTACHMENT SYSTEM PART 1 - GENERAL 1.1 SUMMARY A. Section Includes: 1. Photovoltaic Collector Attachment
Ballasted Roof Mounting Installation Manual
 Ballasted Roof Mounting Installation Manual www.ironridge.com 800-227-9523 Rev C, July 2012 This manual s part #: BRM-MAN-IM Copyright 2012 IronRidge, Inc. All rights reserved. 2 Ballasted Roof Mounting
DSF290 TRUSS MOUNT FOR 12 TRUSS WITH 2 OUTER DIAMETER TUBING
 DSF290 TRUSS MOUNT FOR 12 TRUSS WITH 2 OUTER DIAMETER TUBING 40" - 90" (102-229 cm) MAX 175 lb (79 kg) SF640 SF650 Mount Compatability for DSF290 SF660 ST640 ST650 ST660 SP850 FPS-1000 PS-1 PS-2 DS-VW765-LAND
GC-X360S-W GC-X360S-B
 GC-X360S-W GC-X360S-B Game Console Security Cover for Xbox 360S 1 date:01/22/13 #:125-9401 WARNING ENG - This product was designed to be installed on wood stud, solid concrete or cinder block walls. Before
TETON PATIO COVER INSTALLATION INSTRUCTIONS
 TETON PATIO COVER INSTALLATION INSTRUCTIONS Contact us at: 1-888-442-2928 or www.americana.com Before You Begin: Consult your local building department for any required permits You may be required to obtain
Chiko V Solar Ground Mount
 Chiko V Solar Ground Mount ---Comply with Australian Standard AS1170.2 Specification Installation Site: open ground Systems tilt degree: 20 / 25 / 30 / 35 / 40 / 45, custom degree System material: hot-galvanized
Model Defibrillator Platform OPERATIONS/MAINTENANCE MANUAL. IMPORTANT Keep manual on file at all times.
 IMPORTANT Keep manual on file at all times. Model 6080 170 Defibrillator Platform OPERATIONS/MAINTENANCE MANUAL For Parts or Technical Assistance 1 800 784 4336 Table of Contents Warranty Obtaining Parts