PeoplePlus Payroll User Guide
|
|
|
- Esther Fields
- 5 years ago
- Views:
Transcription


1 PeoplePlus Payroll User Guide Version : 1.2 Date Issued : September 2011
2 1 Table of Contents Table of Contents... 2 Introduction... 3 Logging In... 3 PeoplePlus Welcome page... 4 PeoplePlus Payroll Basics... 5 PeoplePlus Payroll Navigation... 6 Quick Manual Navigation... 8 Section 1: Company Setup... 9 Introduction... 9 Purpose... 9 Section 2: Field Allocation Introduction Purpose Section 3: Backups Introduction Purpose Section 4: Update/Process Introduction Purpose Section 5: Reports Introduction Purpose Section 6: Loans Introduction Purpose Section 7: Garnishees Introduction Purpose Section 8: Payroll Audit Log Introduction Purpose Control Page 2

3 2 Introduction PeoplePlus The complete Employee Relationship Management solution Welcome to the PeoplePlus Payroll, a premiere collaborative package that spans all facets of Payroll Management in small to medium businesses. With this release, we introduce functionality that will form the foundation for all Payroll processes. Logging In The PeoplePlus Payroll system is provided in the PeoplePlus Employee Relationship Manager (ERM) Human Resources system, as a hosted solution or as a locally installed platform. To enter the System, go to the PeoplePlus website, using the following URL: To login, enter your login details in the existing clients section, as indicated below: Page 3

4 Forgot Your Password If you ve forgotten your password, click on the Forgot Your Password? link, enter your address in the space provided and click Send. The system will forward your login details to your supplied address. PeoplePlus Welcome page Once you have logged in, the system will open to the Welcome Page in a new window: Page 4
5 3 PeoplePlus Payroll Basics This chapter familiarises you with the main components of the PeoplePlus Payroll screens, and teaches you the basic skills you ll use every time you work with the program. You will learn how to: Set up your Company rules, information settings/preferences. Add new employees and amend existing employee information. Input employee permanent or temporary financial data. Terminate employees. Process a payroll run. Generate, print or download reports to MS Excel. Print pay slips. Generate Bank Files in order to pay employees. Generate EMP201 reports. Generate UIF declaration submission files. Do a pre-close off of period back up. Close payroll period. Do a post-close off of period back up. Restore a back up Perform Tax year end processes, generate reports and do submissions. Generate annual COID submission reports. Generate annual BEE reports. Page 5

6 PeoplePlus Payroll Navigation In this manual, we refer to 2 menus, as indicated below: The ERM and Payroll System uses a number of buttons and tools. Below are the images that may be used to navigate through the Payroll System: Accessing the payroll. Contact the support team via . Log User out of system. Preview Payslip. Edit Employee Details. Page 6
7 To hide the Module Menu, click on the arrow (as indicated) to see the entire listing of the section that was selected, without having to scroll down. To unhide the Module Menu, click on the arrow again. Page 7
8 Quick Manual Navigation This section will assist you with quick navigation through the manual. This manual explains all features and steps through the use of screen layouts taken from the system. By selecting the hyperlink, you will be navigated to the relevant section in the manual. To select the hyperlink, hold your pointer over the name, hold Ctrl + click your mouse. Section 1: Company Setup Section 2: Field Allocation Section 3: Backups Section 4: Update/Process Section 5: Reports Section 6: Loans Section 7: Garnishees Section 8: Payroll Audit Log Page 8

9 4 Section 1: Company Setup Introduction Purpose All the Payroll Company s details will be recorded here. These details will be used in all relevant reports, submissions and some calculations. The purpose of this section is to provide step by step guidance to facilitate the use of the Company Setup. Click on the Payroll tab in the Module Menu. Click on Company Setup under the Payroll tab in the Module Menu. The screen will refresh, displaying the Company Setup page. Click Edit to update your Company Details. Page 9

10 Once you have updated all of your Company Details, click Update. Your Details will be saved. Page 10

11 Section 2: Field Allocation Introduction Purpose All the PeoplePlus Payroll item codes will be found here. These codes will determine the outcome of the payslips, as well as Benefits and Company contributions. The purpose of this module is to provide step-by-step guidance to facilitate the use of the Field Allocation facility. When adding a new employee, the UIF, SDL, PAYE and COID will automatically be allocated, as these are mandatory. The exception will be the SDL, but only if you change the percentage to zero on the Company Setup, as this will lead to no SDL being calculated on your payroll. This you will only do if the annual gross income for your Company is less than R500, Click on Field Allocation under the Payroll tab in the Module Menu. Alternatively, you can click on the Field Allocation tab at the top of the screen, as indicated below: The screen will refresh, displaying the Field Allocation page. Page 11

12 If you click on the blue arrows on the left of each pay type, they will drop down, displaying all of the pay codes in that pay type, as shown in the examples below: Income: Deductions: Page 12

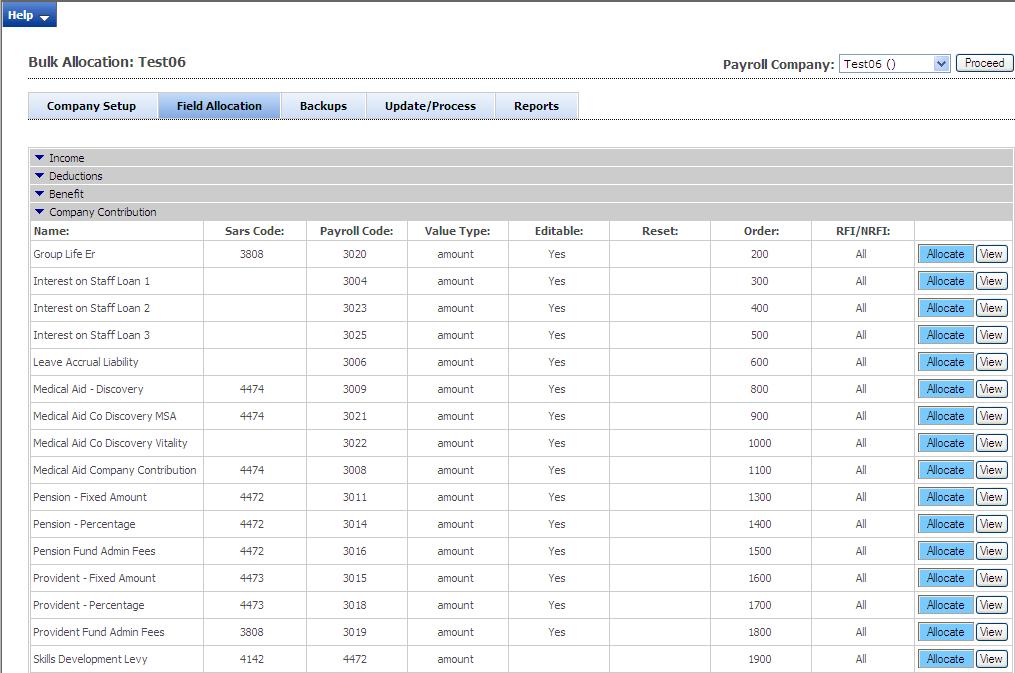
13 Benefit: Company Contribution: Page 13


14 Other: Example of Field Allocation: To bulk allocate the basic salary to all employees, go to Field Allocation, click on Income, then click on Allocate for Day Shift. A new window will open, displaying the Payroll Batch screen: If you want to allocate the Day Shift pay type as a permanent pay type to all employees, click on Select All As Permanent, and click on submit. Page 14
. Once you have made the relevant selection(s), click on Submit.")
15 If you want to allocate the Day Shift pay type as a temporary pay type to all employees, click on Select All As Temporary, and click on submit. Should you want to add the Day Shift pay type to only selected employees, tick the block next to the relevant employee(s). Once you have made the relevant selection(s), click on Submit. The following pop-up will appear, indicating that your allocations have been done: Page 15

16 Section 3: Backups Introduction Purpose This is where you will be able to see create and restore Backups of your Payroll. The purpose of this module is to provide step-by-step guidance to facilitate the use of the Backups facility. Click on the Backups tab at the top of the screen, as indicated below: The screen will refresh, displaying the Backups page. To create a Backup of your Payroll, click on Create Backup. A pop-up will appear with a warning: To go ahead with the Backup, click OK. Your Backup will automatically display in the lower half of the screen. You can also Restore previous Backups, but PLEASE NOTE that all changes made after that Backup was made will be lost. Page 16
17 Section 4: Update/Process Introduction Purpose This is where you will be able to see what is currently in your payroll and to do any financial changes. The purpose of this module is to provide step-by-step guidance to facilitate the use of the Update and Process facility. Click on Update/Process under the Payroll tab in the Module Menu. Alternatively, you can click on the Update/Process tab at the top of the screen, as indicated below: The screen will refresh, displaying the Update/Process page. Page 17


18 Should you need to make changes to an employee, click Edit. The screen will refresh, opening all fields for editing. Once you have made the relevant changes in the relevant fields, click Update Values. A popup will appear, indicating that the system is calculating the changes, as below: When this pop-up disappears, your changes have been made, calculated and saved. On the Update screen, you can also: View Previous Pay Periods Page 18

19 o To view Previous Pay Periods, select the required Period from the drop down, and click View. A pop-up will open, displaying that Period s figures for each employee: o When you are finished, close the pop-up, and continue with your current Pay Period. View errors that have been picked up o To view the Errors, Warnings or Notices that have been found, click View. The yellow Errors block will expand, displaying the errors, warnings or notices that have been found: Page 19


20 o When you have corrected all of the problems, click View again, and the yellow block will contract, and the screen will appear as before. Create and Upload Import Templates o o To create an Import Template, select the required Import topic from the drop down, and click Create. A pop-up will appear. Select if you would like to Open, Save or Cancel the Import Template. If you click Save, a pop-up will open. Select where on your computer you would like to save the Import Template. To Upload an Import Template that you have previously created, click Browse. A pop-up will appear. Navigate through your computer to the required Template and double-click on it. The directory address for this Template will appear in the open field next to Browse. Click on Upload to upload the Template. Preview employees Payslips Page 20

21 o To see a Preview of an employee s Payslip, click on the next to the Employee Number. A pop-up will appear, while generating the Payslip. Once generated, the Payslip will appear. You can zoom in on the Payslip to see more details. Edit employees Details o To Edit an employee s Details, click on the next to the Employee Number, or on the Employee Number itself. A pop-up will appear, and the employee s Details will load. To Edit the Details, navigate using the tabs at the top: o To Edit the Details, click on Edit, make the relevant changes, and click on Update. Once all changes have been made, close the pop-up. To process the current period s Payroll, click on Process Payroll. A pop-up will appear to confirm that you want to do the Payroll Run for the current period: Page 21


22 If you click OK, the system will lock the current Payroll run, so that no further changes can be made, as shown below: To go back and make any necessary changes, click on Undo Payroll Run. Once all necessary changes have been made in the Update screen, come back to the Process screen, and click on the Payroll Run button again. To confirm all details, and to roll-over to the next Payroll Period, click on Sign Off Period. A pop-up will appear with a warning, as shown below: If you click OK, the period will roll over, and the new period s details will appear. Page 22
 The purpose of this module is to provide step-by-step guidance to facilitate the use of the Reports facility.")
23 Section 5: Reports Introduction Purpose This is where you will be able to either print, or save to Excel all the relevant reports needed for checking, balancing, paying third parties or distributing to employees (e.g. pay slips, IRP5 s etc) The purpose of this module is to provide step-by-step guidance to facilitate the use of the Reports facility. Click on Reports under the Payroll tab in the Module Menu. Alternatively, you can click on the Reports tab at the top of the screen, as indicated below: The screen will refresh, displaying the Reports page. Select the required report from the drop down menu: Page 23

. Select the month and year from the drop down lists on top, then click on the date.")
24 Once you have selected a report, select the Pay Period from the drop down menu: Select the Date From and Date to for the required report by clicking the calendar icon next to the open field. The calendar pop-up will open. (If the pop-up does not appear, your pop-up blocker might be on. To turn off your pop-up blocker, go to Tools on the menu bar in your Internet Browser, select "Pop-up Blocker and select "Turn off pop-up blocker". If this does not work, press CTRL + click on the icon to overwrite the blocker.). Select the month and year from the drop down lists on top, then click on the date. If the date is today s date, click Today below the dates. The pop-up will close, uploading the date. Select which employees you would like the report to include by clicking on the drop down menu: Page 24

25 If you select All Employees, every employee on the Payroll will be included in the report. To select specific employees, click on Selected Employees, then select the Company/Department/Branch that the employee works in. Click on the number of employees, and then on the name of the employee. Click Add Selected > >. The selected employee(s) will move to the Selected Employees block. Click Generate. A new window will open, and the report will be generated. To see more detail, you can zoom in to the report. Page 25

26 Section 6: Loans Introduction Purpose This is where you will add Loans to employees. The purpose of this module is to provide step by step guidance to facilitate the use of the Loans facility. Click on Loans under the Payroll tab in the Module Menu. The screen will refresh, displaying the Loans page. To add new Loans to employees, click Add. The screen will refresh, displaying the Add a New Loan screen: Click on the Employee drop down menu to select which employee you would like to add a Loan to. Enter the amount of the loan into the open field. If you would like to charge the employee interest, enter the percentage to be applied in the open field. Enter the number of months that the employee has in which to repay their loan. Page 26
27 Enter the current balance of the Loan, including Interest (if applicable), into the Balance field. As soon as you have entered the Loan Amount, Interest (if applicable) and Loan Period into the fields, the Total Amount and Instalment fields will automatically display the calculated figures. Click Save. Once you have saved the Loan, it will display in the lower half of the screen. Page 27

28 Section 7: Garnishees Introduction Purpose This is where you will add Garnishees to employees. The purpose of this module is to provide step-by-step guidance to facilitate the use of the Garnishees facility. Click on Garnishees under the Payroll tab in the Module Menu. The screen will refresh, displaying the Garnishees page. To add new Garnishees to employees, click Add. The screen will refresh, displaying the Add a New Garnishee screen: Page 28
29 Click on the Employee drop down menu to select which employee you would like to add a Garnishee to. Enter the name of the entity to which the Garnishee must be paid into the open field. Enter the entity s address into the open field. Enter the entity s bank details into the open fields. Enter the total Garnishee Amount into the open field. Enter the amount per Pay Period that will be deducted from the employee into the open field. Enter the current Balance of the Garnishee into the open field. Click save. Once you have saved the Garnishee, it will display in the lower half of the screen. Page 29
30 Section 8: Payroll Audit Log Introduction Purpose This is where you can track all changes made to the Payroll. The purpose of this module is to provide step-by-step guidance to facilitate the use of the Payroll Audit Log facility. Click on Payroll Audit Log under the Payroll tab in the Module Menu. The screen will refresh, displaying the Payroll Audit Report page. Page 30

31 The default view will be the full Payroll Audit. To narrow down the Audit, you can use the drop down menus and Date fields at the top of the screen, and click Go to generate the Payroll Audit Report on the parameters that you d like. You can print the Audit Report by clicking on the print icon at the top of the screen. Page 31
32 Control Version Date Changed By Version /08/2011 Tanya Figueira Version /09/2011 Tanya Figueira Page 32
CONTENTS SECTION A YEAR END PROCEDURES FOR VANILLA PAYROLL. Checking the software version 2. Automatic updates 3. Checking your Employer Details 4
 VANILLA PAYROLL YEAR END PROCEDURES CONTENTS SECTION A YEAR END PROCEDURES FOR VANILLA PAYROLL PAGE Checking the software version 2 Automatic updates 3 Checking your Employer Details 4 Reconciliation of
PROCAS Time User Instructions
 PROCAS Time User Instructions PROCAS, LLC Copyright 2013 PROCAS, LLC, All rights reserved Table of Contents i TABLE OF CONTENTS Introduction... iii Chapter 1 PROCAS Time User Basics... 1 Establish a Password...
DSV XPress. Customer User Guide. 1 DSV XPress (Version: )
") DSV XPress Customer User Guide 1 DSV XPress (Version: 31-01-2017) Content 1.0 Start... 3 2.0 Log-in... 3 2.1 Reset and change your password... 3 3.0 Home Screen... 4 4.0 Shipment Entry... 5 4.1 Shipping-
DSV XPress Customer User Guide 1 DSV XPress (Version: 31-01-2017) Content 1.0 Start... 3 2.0 Log-in... 3 2.1 Reset and change your password... 3 3.0 Home Screen... 4 4.0 Shipment Entry... 5 4.1 Shipping-
UC LEARNING CENTER Manager Guide
 UC LEARNING CENTER Manager Guide Table of Contents Introduction 3 UCLC Overview 3 Browser Capability 3 Obtaining a Logon ID 4 Logging into the UC Learning Center 4 Help Contact 4 Navigation 5 Home Page
Alberta Prorate IRP System. Online Services User Guide
 Alberta Prorate IRP System Online Services User Guide Document Version: 1.1 Status: Final Date: February 7, 2012 Amendment History - Document Status (e.g. Draft, Final, Release #): Version Modified Date
DCC Kronos Supervisor Handbook
 Logging in You can log into Kronos through MYDCC. Select the Working @ DCC tab and then click on the Kronos link located in the upper left hand corner of the screen. If you use the MYDCC portal, you will
SchoolsBPS. User Manual Version 7.0. Orovia Software
 SchoolsBPS User Manual Version 7.0 Orovia Software 1 SchoolsBPS User Manual Table of Contents Logging In... 4 Roles, Access Rights and Users... 4 Changing a Password... 5 10 minute Save... 5 Account Codes...
Paymaster Online Tutorial
 Paymaster Online Tutorial Adding Employees We have setup our company, and now we need to get the people onto the system. This is done in a nice, neat workflow so everything required for the employee is
CONTENTS BI-ANNUAL SUBMISSION PROCEDURES FOR VANILLA PAYROLL PAGE. Checking the software version 2. Automatic updates 3
 VANILLA PAYROLL BI-ANNUAL SUBMISSION PROCEDURES CONTENTS BI-ANNUAL SUBMISSION PROCEDURES FOR VANILLA PAYROLL PAGE Checking the software version 2 Automatic updates 3 Checking your Employer Details 4 Creating
Online Payment Requests
 Table of Contents Requesting a Payment... 2 Additional Features... 5 Modifying a Saved or Denied Request... 6 Payment Request Notifications and Approvals... 7 Stopping a Payment Request... 8 Approving
Taleo Enterprise. Taleo Compensation Manager Guide
 Taleo Enterprise Taleo Compensation Feature Pack 12B August 31, 2012 Confidential Information and Notices Confidential Information The recipient of this document (hereafter referred to as "the recipient")
Booking Help Guide Effective: February 5, 2017
 New MOLpower.com: Booking Help Guide Effective: February 5, 2017 New MOLpower.com Booking Help Guide Contents Slides 3-5 Slide 8 Slide 17 Slide 21 Slide 25 Slide 29 Slide 32 New features and icons Creating
Web TimeSheet Integration Manager for Microsoft Project Server. Version 2.6 USER GUIDE
 Web TimeSheet Integration Manager for Microsoft Project Server Version 2.6 USER GUIDE Notices 2004-2006 Replicon, Inc. All rights reserved. All parts of this manual are the property of Replicon Inc. No
Contractor Data Systems (CDS) Monthly Amounts Paid and EPI Submissions May 2017 v2
 Monthly Amounts Paid and EPI Submissions May 2017 v2") Contractor Data Systems (CDS) Monthly Amounts Paid and EPI Submissions v2 New CDS Website https://hosting.portseattle.org/cds Used by Port Contractors and Consultants to submit, edit and view EPI (electronic
Contractor Data Systems (CDS) Monthly Amounts Paid and EPI Submissions v2 New CDS Website https://hosting.portseattle.org/cds Used by Port Contractors and Consultants to submit, edit and view EPI (electronic
 www.farmplan.co.uk 01594 545022 support@farmplan.co.uk Contents Section 1: Getting Started... 4 Training... 4 Help Notes... 4 Farmplan Support Line... 5 Farmplan Website... 5 Section 2: Installation Instructions...
Contents 1 Welcome to BTOE 1 Getting started 2 Finding your way around 2 Functions available 3 Employer details 3 Pay Centre details 4 Employee detail
 BT Online Employer Easy User Guide BT Business Super Contents 1 Welcome to BTOE 1 Getting started 2 Finding your way around 2 Functions available 3 Employer details 3 Pay Centre details 4 Employee details
Overview 3 Installation 3 Registration 3 Default Username and Password 3
 Overview 3 Installation 3 Registration 3 Default Username and Password 3 Getting Started 4 Creating a Company 4 Creating Additions/Deductions 5 Creating Employees 5 Employee Pay Rates 5 Paying Employees
HealthEquity Employer Portal Guide HealthEquity All rights reserved.
 HealthEquity Employer Portal Guide 2013-2015 HealthEquity All rights reserved. INTRODUCTION 09 ACCESSING PENDING PAYMENTS 01 LOGIN PROCESS 09 MODIFYING EMPLOYER INFORMATION 01 ADDING INSURANCE INFORMATION
PlatinumPay Xpress. User Manual. Created: Thursday, November 01, Copyright Execupay Software, LLC.. All Rights Reserved.
 PlatinumPay Xpress User Manual Created: Thursday, November 01, 2012 Copyright Execupay Software, LLC.. All Rights Reserved. 1 Contents Getting Started... 4 System Requirements... 5 Signing In... 5 The
Bridge. Billing Guide. Version
 Bridge Billing Guide Version 2.5.112 Table of Contents Page i Table of Contents Table Of Contents I Introduction 2 Managing Bill To Parties 3 Creating a New Bill to Party 3 Viewing and Navigating Bill
LET S TALK (916)
") Uploading a payroll file Using SchARP This page is intended to provide a quick overview of the payroll process. The following pages will explain in more detail if necessary. If at any time you would like
Uploading a payroll file Using SchARP This page is intended to provide a quick overview of the payroll process. The following pages will explain in more detail if necessary. If at any time you would like
INPEX CONTRACT MANAGEMENT SYSTEM
 INPEX CONTRACT MANAGEMENT SYSTEM Contractors Manual - Prequalification Document No.: PROCON-00256 Document no.: PROCON-00256 Page 1 1 RECEIVING & VIEWING A PREQUALIFICATION INVITATION... 4 2 LOGGING INTO
Manager Dashboard User Manual
 Manager Dashboard User Manual Manager User Guide The Manager User Guide is designed to provide a supervisor or a manager with step-by-step instructions for their daily tasks. Although every database will
Administrator Guide. Advanced HR 2.0
 Administrator Guide Advanced HR 2.0 Copyright 2018 by Asure Software. All rights reserved. Printed in USA. The contents of this guide and the software described are copyrighted. No part of this guide or
Getting Started Tutorial
 Getting Started Tutorial Welcome This tutorial will introduce you to the main functions of your MYOB accounting software. You can use this tutorial with the current versions of MYOB Accounting, MYOB Accounting
Sage Pastel Payroll. PAYE Tax Year End Guide. Sage Pastel Payroll February 2018
 Sage Pastel Payroll PAYE Tax Year End Guide Sage Pastel Payroll February 2018 PAYE Tax Year End Guide Introduction Are you prepared for the 2017/2018 PAYE Tax Year End? We understand your day-to-day challenges;
To record a manual check, select Manual Check from the Payroll tile on the Main Menu.
 s Manual Check If an employee was left out of a payroll or needs to be paid an additional amount, you can do a manual check for that employee through the Paycom system. The manual check will calculate
Strength Development Plan
 Strength Development Plan The Strength Development Plan is an automated tool that will connect competencies or organizational development statements to the top talent of an individual based on their structured
Employee Self Service Portal Guide
 1 Employee Self Service Portal Guide Contents EMPLOYEE SERVICES... 2 EMPLOYEE SUPPORT... 2 EMPLOYEE RESPONSIBILITIES... 2 ESS PORTAL ACCESS... 3 EMPLOYEE DASHBOARD... 3 PERSONAL DETAILS... 4 Bank Account
Dovico Timesheet Hosted - May 2014 BEST PRACTICES
 Hosted - May 2014 Audience and Context This document is intended to help clients plan the configuration and use of Dovico Timesheet. It is to be used as a guide since the diversity of circumstances and
Connecting Time Matters/Billing Matters and QuickBooks. 35*45 Consulting - Global 7 Second System
 Why Choose QuickBooks... 3 Why Use Billing Matters... 3 Question to Ask... 3 Getting Started in Billing Matters... 4 Getting Started in QuickBooks... 11 Linking Billing Matters and QuickBooks... 14 Using
Tabs3 Quick Start Guide
 Tabs3 Quick Start Guide Tabs3 Quick Start Guide Copyright 2017 Software Technology, LLC 1621 Cushman Drive Lincoln, NE 68512 (402) 423-1440 Tabs3.com Tabs3, PracticeMaster, and the pinwheel symbol ( )
Welcome to the Service Provider Portal
 Welcome to the Service Provider Portal Table of Contents Welcome!... 3 What is the Portal?... 3 Visibility and Privacy... 3 Getting Started... 5 Computer System Requirements... 5 BCeID Requirements and
Once you have copies of your existing employer files stored in a safe location you are ready to install the upgrade.
 BEFORE INSTALLING THE UPGRADE It is essential that you make backup copies of all your existing employer files before you install any upgrade to Intercode Payroll. This will ensure that your original payroll
HSA EMPLOYER RESOURCE GUIDE. Fifth Third Bank Health Savings Account
 HSA EMPLOYER RESOURCE GUIDE Fifth Third Bank Health Savings Account Contents Welcome 3 Your Fifth Third Bank HSA Implementation Checklist 4 Your HSA Maintenance Checklist 7 Customer Service Information
AgileElite Office User Guide
 AgileElite Office User Guide The University of Waterloo s Central Stores department provides courier shipping services for the University. The AgileElite system supports the service. AgileElite enables
HUMAN RESOURCES: HR SYSTEMS. HR Online USER GUIDE
 HUMAN RESOURCES: HR SYSTEMS HR Online USER GUIDE THIS PAGE INTENTIONALLY LEFT BLANK 2 Contents All staff members: Page 1 Logging On How to log on and access HR Online 3 2 Screen Layout Where to find the
SUBMITTING TIMESHEETS AND EXPENSES
 SUBMITTING TIMESHEETS AND EXPENSES CANDIDATE GUIDE Quick links: 01. Logging in to Track >> 02. Navigating Track >> 03. Submitting timesheets >> 04. Submitting expenses >> 05. FAQs >> 06. Contact/help/feedback
Before you work in Kronos, you should have a Payroll Calendar available to you. From the Ferris
 Before you work in Kronos, you should have a Payroll Calendar available to you. From the Ferris State University Web page (ferris.edu), search "Admin Finance". 1 Click on the link that says "Welcome to
Guide to setting up and using your employer portal. Employer user guide v12 EM /14
 Guide to setting up and using your employer portal Employer user guide v12 EM00051.0416/14 1 STEP 1 Logging in You will have received a web link via e-mail and the first thing you must do is log in using
PIMS User Guide USER GUIDE. Polaris Interview Management System. Page 1
 USER GUIDE Polaris Interview Management System Page 1 September 2017 Additional PIMS Resources Job Aid: Competency Identification Worksheet Job Aid: Legal Considerations When Interviewing Video: How to
Morningstar Direct SM Performance Reporting
 Performance Reporting is specifically designed to monitor the performance of investments organized into groupings based on your own custom classifications. You can assign benchmarks, define data, and perform
END-USER GUIDE. The Procure-to-Pay Process
 END-USER GUIDE The Procure-to-Pay Process Version 1.1 June 30, 2016 Contents 1 The E-Procurement Process... 2 2 Creating Requests... 4 2.1 Shopping Catalogs... 4 2.2 Shop Off-Catalog... 7 2.3 Shopping
HIA Timesheets - User Guide for Hosts Mobile
 HIA Timesheets - User Guide for Hosts Mobile Table of Contents 1 Introduction... 1 2 Conventions... 1 3 Log In... 2 3.1 Forgotten Password... 3 4 Timesheets... 4 4.1 Approve Timesheet... 4 4.2 Allowances...
WELCOME TO CLIENT MANAGER PORTAL
 COMMERCIAL BANKING WELCOME TO CLIENT MANAGER PORTAL Click here to view a demonstration of the Supplier Finance website Welcome HOW TO ACCESS YOUR WORKING CAPITAL Log on to Client Manager Portal Pick the
FRESENIUS LEARNING CENTER QUICK START GUIDE
 FRESENIUS LEARNING CENTER QUICK START GUIDE TABLE OF CONTENTS 1. How do I get to the Fresenius Learning Center? 03 2. How do I login? 04 3. What do I do if I can t remember my password? 05 4. What do I
ETI 2017 Online Consultation Customer Checklist
 ETI 2017 Online Consultation Customer Checklist Step Action Required 1. Confirm that all your companies have been rolled over to March 2017 and that VIP has been updated to Release 4.8a. Take Note: For
Quick Payroll & HR. February PAYE Tax Year End Guideline
 Quick Payroll & HR February 2018 PAYE Tax Year End Guideline PAYE Tax Year End Guide Introduction Are you prepared for the PAYE Tax Year End? We understand your day-to-day challenges; that is why we want
Creating a batch of Manual checks
 Creating a batch of Manual checks These instructions will guide you through the process of starting a new payroll and creating a batch of manual check(s) If you have previously created your current payroll
Department of Management Services People First. People First! New Employee Orientation. Working together to put People First! Last Updated
 ! New Employee Orientation Last Updated 09-19-08 Working together to put! Table of Contents Click on the topic to jump to that section. Service Center EEO-Veterans-AAP How to Log in to Emergency Contact
NOVAtime 5000 User Guide
 NOVAtime 5000 User Guide Table of Contents Logging In... 4 Terminology... 4 Dashboard... 5 3.1 The Dashboard Gadgets...5 Changing Timesheet Status... 7 Changing Pay Periods... 8 Timesheet Icons Definitions...
Table of Contents. HVAC Remote Manual 2010
 Table of Contents Installation and Upgrades Download of Remote Technician Program Installation of Remote Technician Program Update of Remote Technician Program Using the Update Program Getting Started
Bulk Freeze or Unfreeze Payslips Payroll Processing
 Bulk Freeze or Unfreeze Payslips Payroll Processing The Bulk Freeze Payslip functionality allows you to freeze a group of employees payslips. This means that no more input will be allowed on the employee
GMS Connect Client User Guide
 GMS Connect Client User Guide V1.0 March 8, 2018 Page 1 of 18 Table of Contents Getting Started 2 Navigation 2 Employee Details 3 Payroll 4 Time Sheet 5 Approving Payroll 6 Terminations 7 Employee Loans
itempaid Timesheets User Guide Temps/Candidates
 itempaid Timesheets Page 1 Table of Contents Guide to Icons and Buttons on Website...3 Activating and Accessing Your Account Via Browser...4 itempaid Account Processes...5 EXAMPLE [A] - WITH YOU, THE TEMP,
KRONOS EMPLOYEE TRAINING GUIDE
 KRONOS EMPLOYEE TRAINING GUIDE C o n t e n t s Navigating Through Workforce Central... Lesson 1 Timecard Edits... Lesson 2 Approvals... Lesson 3 Reporting... Lesson 4 Editing & Scheduling PTO... Lesson
Shift Swapping Quick-Guide
 Shift Swapping Quick-Guide (v 3.6.0) Shift Swapping Quick-Guide Login to Lawson Workforce Management Self Service: 1. Open Internet Explorer and type in http:// in the address bar to access the Lawson
Introduction to Cognos Analytics and Report Navigation Training. IBM Cognos Analytics 11
 Introduction to Cognos Analytics and Report Navigation Training IBM Cognos Analytics 11 Applicable for former IBM Cognos 10 report users who access CBMS Cognos to run and view reports March 2018 This training
Universal Time Clock TM. QuickBooks Plug-in User Guide
 Universal Time Clock TM QuickBooks Plug-in User Guide Table of Contents Table of Contents...2 Chapter 1: Getting Started...3 Support and Troubleshooting... 3 System Requirements... 3 Installing the QuickBooks
Remote Payroll Entry Getting Started Guide IRIS Payroll
 18/02/2014 Remote Payroll Entry Getting Started Guide IRIS Payroll April 2018 Contents IRIS Remote Payroll Entry (RPE)... 3 Introduction... 3 Remote Payroll Entry App... 3 Getting Started with Remote Payroll
Clarity Accounts Payable Year-end Procedure Guide 2017
 Clarity Accounts Payable Year-end Procedure Guide 2017 Clarity Accounts Payable Year-end Procedure Guide - 2017 Table of Contents Caselle Clarity Accounts Payable Year-end Checklist 2017... 1 Welcome back!...
CASELLE Classic Cash Receipting. User Guide
 CASELLE Classic Cash Receipting User Guide Copyright Copyright 1987-2008 Caselle, Inc. All rights reserved. This manual has been prepared by the Caselle QA documentation team for use by customers and licensees
CCI Online Management System (OMS) Documentation Section: HR
 Documentation Section: HR") CCI Online Management System (OMS) Documentation Section: HR 1.1.Getting Started...2 1.2.Adding a New Employee...2 1.3.Editing & Submitting Employees...5 1.3.1 Editing Employee Information...7 7 1.3.2
CCI Online Management System (OMS) Documentation Section: HR 1.1.Getting Started...2 1.2.Adding a New Employee...2 1.3.Editing & Submitting Employees...5 1.3.1 Editing Employee Information...7 7 1.3.2
The QuickBooks Guide to Converting QuickBooks Desktop. to QuickBooks Online. Version 8.18
 The QuickBooks Guide to Converting QuickBooks Desktop to QuickBooks Online Version 8.18 Conversion Roadmap Welcome! This guide is for anyone converting from QuickBooks Desktop (Pro or Premier) to QuickBooks
WEB TIME EMPLOYEE GUIDE
 Revised 10/27/2017 WEB TIME EMPLOYEE GUIDE CLIENT RESOURCE PAYLOCITY.COM TABLE OF CONTENTS Web Time... 3 Web Kiosk... 10 Home... 29 My Timesheet... 43 My Pay Adjustments... 57 Employee Time Off Calendar...
Bank Staff User Guide. Sections in this guide are:
 BANKSTAFF USERGUIDE Bank Staff User Guide Sections in this guide are: 1. Logging in for the first time 2. Changing Password 3. Changing Security Question and Answer 4. Requesting a Shift 5. Authorise a
V9 End User Guide Dashboards, TaskPads and the Menu DOCUMENTATION. Phone: Fax:
 V9 End User Guide Dashboards, TaskPads and the Menu DOCUMENTATION Phone: 01981 590410 Fax: 01981 590411 E-mail: information@praceng.com CONTENTS V9 End user Guide to Dashboards, Taskpads and Menus... 3
Croner Simplify. Croner Simplify. ~ Employee Training Workbook ~ Version 3.0. P a g e 1
 ~ Employee Training Workbook ~ Version 3.0 P a g e 1 Employee View An Employee logging on to is known as a Self-Service Employee. An employee can see and manage information about themselves. An employee
Attendance Enterprise Manager Self Service
 Attendance Enterprise Manager Self Service Attendance Enterprise Manager Self Service A Companion Document to Attendance Enterprise 1.6 2011, InfoTronics, Inc. All Rights Reserved. InfoTronics, Attendance,
SECURITY SETUP. Version 5.5
 SECURITY SETUP Version 5.5 User Accounts This document offers step-by-step instructions to create and maintain user accounts for SmartLinx. It also contains a complete list of the permissions and definitions
Getting Started with Report Center
 Getting Started with Report Center 1 Getting Started with Report Center Data and reports are key when it comes to audit trails and managing employee and company information. Paycom s Report Center has
... Evo-Remote User s Manual
 Evolution By.......... Evo-Remote User s Manual EVO-REMOTE 4. Reporting 1. Employee Maintenance 4 EASY STEPS TO A SUCCESSFUL PAYROLL 3. Pre- Process/Submit 2. Entering Payroll Legend UPPER CASE BOLD =
Getting Started Guide
 18/02/2014 Getting Started Guide IRIS Payroll Business April 2018 Contents Getting to know your IRIS Payroll Business... 5 Application Button... 5 Ribbon... 6 Quick Access Toolbar... 7 More Commands...
Lewis & Clark College. Hiring in PeopleAdmin
 Lewis & Clark College Hiring in PeopleAdmin What is PeopleAdmin? PeopleAdmin is an applicant tracking system which you can use to post your work-study positions. Students can apply for the position directly
Proteus MMX Enhancements (3.7)
") Proteus MMX Enhancements (3.7) Contents 1. Working Hours tab added in employee module... 2 Add Working Hours... 4 2. Labor Planner added in Personnel module... 5 3. Time Zone is removed from Users and
Proteus MMX Enhancements (3.7) Contents 1. Working Hours tab added in employee module... 2 Add Working Hours... 4 2. Labor Planner added in Personnel module... 5 3. Time Zone is removed from Users and
Completing an Internal Audit User Guide For the Reliance Assessment Database
 Completing an Internal Audit User Guide For the Reliance Assessment Database Contents Logging into Reliance... 2 Creating an Audit Plan: Planning Your Internal Audit... 4 Approving an Audit Plan... 20
Welcome to the Merchant Website Training
 Welcome to the Merchant Website Training An essential guide to managing your Account online, quickly and simply. LET S GET STARTED Merchant Website Training How to manage your Account online, quickly and
Key Features and Enhancements included in this version:
 Release Version 2017.3.1.0 Key Features and Enhancements included in this version: System Setup/Company Optional Require Invoice #? Vendor Approval Process Accounts Payable Duplicate Vendor Warning Audit
ServiceCEO User's Guide
 ServiceCEO User's Guide User s Guide Copyright 2006 by Insight Direct, Inc. All rights reserved. No part of this book may be reproduced or copied in any form or by any means graphic, electronic, or mechanic
Paycom Payroll Processing Instructions
 1. From any web browser go to Paycom.com 2. Click on Login > Click on Client Paycom Payroll Processing Instructions 3. Enter your log in credentials provided by OnePoint 4. Click Process Payroll 5. Click
Findmyshift - Getting started with Findmyshift
 Findmyshift - Getting started with Findmyshift Managers Creating your first schedule Adding employees to your team Inviting your employees to log in Choosing your settings Entering shifts Publishing shifts
Copyright Basware Corporation. All rights reserved.. Vendor Portal User Guide Basware P2P 17.3
 Copyright 1999-2017 Basware Corporation. All rights reserved.. Vendor Portal User Guide Basware P2P 17.3 Table of Contents 1 Vendor Portal Registration... 4 1.1 Register for Vendor Portal...4 2 Vendor
Welcome. Logging into the system
 HCM GUIDE Contents Welcome... 2 Logging into the system... 2 Add a New Hire... 3 The Tax Menu... 7 The Child Support Screen... 9 Direct Deposit Screen... 10 Scheduled E/Ds... 11 The Delivery Screen...
HIA Timesheets - User Guide for Hosts
 Table of Contents 1 Introduction... 1 2 Conventions... 1 3 Login... 2 3.1 Forgotten Password... 3 4 Main Menu... 4 4.1 Timesheets... 5 4.1.1 View Timesheet... 5 4.1.2 Email notification for submitted timesheets...
HR Recruiting Solutions
 HR Recruiting Solutions Automated Request to Advertise User Guide Contact Us: web www.csus.edu/irt/acs/services/cms/training/reference.stm phone (916) 278-7337 Service Desk Last updated 4/29/2015 Overview
18/02/2014. IRIS Bureau Payroll. Getting Started Guide 18/02/2014
 18/02/2014 IRIS Bureau Payroll Getting Started Guide 18/02/2014 Important Note: Using the Demonstration Company You will be using the Demonstration Company for this tutorial. To open the Demonstration
 You have confirmed that you will be using an alternative system to assess your workers. We ll send any workers who join the pension scheme our terms and conditions with their welcome pack. The welcome
KeyedIn Projects Project Manager User Guide
 KeyedIn Projects Project Manager User Guide Version 2.0 July 27, 2012 Project Manager User Guide 1 2012 KeyedIn Solutions, Inc. Welcome to the Project Manager User Guide. This user guide will provide you
ALLDAY TIME SYSTEMS LTD. Allday Time Manager Lite User Guide
 Allday Time Manager Lite User Guide 1 Table of Contents Table of Contents... 2 Starting Allday Time Manager... 3 Logging In... 3 Adding a New Employee... 4 Viewing / Editing an Employees Record... 5 General
Accessing the Manager Self Service Module in PeopleSoft for Approvers. Table of Contents:
 Accessing the Manager Self Service Module in PeopleSoft for Approvers Table of Contents: Manager Self Service Overview. 2 Quick Start Instructions 2-5 Detailed Instructions (with screenshots)..6-18 1 Manager
Nexsure Training Manual - CRM. Chapter 12
 Nexsure Training Manual - CRM Audits In This Chapter Adding an Audit Updating the form Invoicing the Audit Tracking the Audit Posting the Audit Adding an Audit Audits are processed on policies where an
Talent Profile Guidebook
 Talent Profile Guidebook MC Talent Management System MC Talent Management Learning Resources: http://www.montgomerycollege.edu/tmslearning Questions? Email Lisa Borg lisa.borg@montgomerycollege.edu 11/28/2012
MANUAL MY.DHLPARCEL.NL
 DHL PARCEL MANUAL MY.DHLPARCEL.NL Log in As soon as we have registered you, you will receive your activation link via e-mail. Log in with your email address, set your own password and start preparing your
Welcome to the ICM Service Provider Portal
 Welcome to the ICM Service Provider Portal Table of Contents Welcome!... 3 What is the Portal?... 3 Visibility and Privacy... 3 Getting Started... 4 Computer System Requirements... 4 BCeID Requirements
Quick Start Guide. Taking A Payment & Printing A Receipt
 Quick Start Guide Taking A Payment & Printing A Receipt Table of Contents Key Terms...3 Billing Types... 3 Premium Sent.. 3 Financing.. 3 Agency Fees....3 Taking A Payment.. 4 When Issuing A Policy 4 Agency
Administrator Quick Reference Virtual TimeClock 15 Network Edition
 Virtual TimeClock Administrator Quick Reference Virtual TimeClock 15 Network Edition Your time clock program consists of a user status window and an administration window. The user status window is used
Peoples Bank Benefit Manager. Employer User Guide. Member FDIC
 Peoples Bank Benefit Manager Employer User Guide www.peoplesbank-wa.com/benefitmanager Member FDIC Contents Welcome... 3 Login to the Employer Portal... 4 First-time Use... 4 Login... 4 Forgot Your Password?...
Infor HR Specialized Service Provider Self-Appraisal Guide
 Putting the Pieces Together The Specialized Service Provider (SSP) growth and performance system ensures that all SSPs receive meaningful feedback every year based on their performance. This guide outlines
Your Guide to the CARS System
 CERF COUNTY EMPLOYEES RETIREMENT FUND Your Guide to the CARS System CERF Contact Information: Toll-Free: 877-632-2373 Tel: 573-632-9203 Fax: 573-761-4404 E-mail: IT@mocerf.org www.mocerf.org 1 Table of