QUICKBOOKS ONLINE ACCOUNTANT. QuickBooks Online Certification Training Guide
|
|
|
- Hugh Riley
- 6 years ago
- Views:
Transcription
1 QUICKBOOKS ONLINE ACCOUNTANT QuickBooks Online Certification Training Guide
2 QuickBooks Online Certification Training Legal Notices 2017 Intuit Inc. All rights reserved. Intuit, the Intuit logo, QuickBooks, the QuickBooks logo, QB, the QB logo, and QuickBooks ProAdvisor, among others, are trademarks or registered trademarks of Intuit Inc. in Canada and other countries. Other parties marks are the property of their respective owners. Notice to Readers The publications distributed by Intuit Inc. are intended to assist accounting professionals in their practices by providing current and accurate information. However, no assurance is given that the information is comprehensive in its coverage or that it is suitable in dealing with a client s particular situation. Accordingly, the information provided should not be relied upon as a substitute for independent research. Intuit Inc. does not render any accounting, legal, or other professional advice nor does it have any responsibility for updating or revising any information presented herein. Intuit Inc. cannot warrant that the material contained herein will continue to be accurate, nor that it is completely free of errors when published. Readers should verify statements before relying on them. Contact Information Intuit Canada ULC 5100 Spectrum Way, Mississauga, ON L4W 5S
3 QuickBooks Online Certification Training TABLE OF CONTENTS QuickBooks Online Certification Training Overview... 7 QuickBooks Online Certification Exam... 7 QuickBooks Online Accountant Sign-up... 7 Chapter 1 - Getting started in Quickbooks Online Accountant... 8 Objectives... 8 Single sign on... 9 Navigating QuickBooks Online Accountant Clients Bookkeeping Team Connecting to your Client Chapter 2 Getting started in QuickBooks Online Objectives Dashboard Create menu Navigation Bar Company Menu Shortcuts How Quickbooks is Built Working with Transactions Chapter 3 Sales & Customers in QuickBooks Objectives Sales workflow overview Invoices in QuickBooks Online Customer Payments
4 QuickBooks Online Certification Training Make Deposits Sales Receipts Delayed charges overview Credit memos & refund receipts Sales Reports Customer Statements Chapter 4 - Expenses in QuickBooks Online Suppliers & expenses overview Objectives Cheques vs. bills in QuickBooks Adding Suppliers Enter Bills in QuickBooks Online Pay Bills Adding Expenses Cheques in quickbooks online Supplier Credits Supplier Reports Reporting on expenses Reimbursable expenses Chapter 5 Banking & Company activities in QuickBooks Online Objectives Bank Transfer Bank Reconciliation Filing Sales Taxes Chapter 6 Automation in Quickbooks Online Objectives Bank feed in QuickBooks
5 QuickBooks Online Certification Training Setting up Bank Feeds Processing Transactions in the Bank Feed Bank rules Recurring entries Attachments QuickBooks Online Mobile Downloading the Mobile App Open QuickBooks Mobile Navigating QuickBooks Mobile Add Customers on mobile Create Invoices Process bank transactions on Mobile Chapter 7 Client File Setup Objectives Company setup QuickBooks subscriptions Company Setup Chapter 8 Reports in QuickBooks Objectives Report Centre Customizing reports Sending Reports to Excel Automated Reports Conclusion Appendix i Automation using Apps
6 QuickBooks Online Certification Training Additional Resources Payments, Payroll and Apps Social Media

7 QuickBooks Online Certification Training QUICKBOOKS ONLINE CERTIFICATION TRAINING OVERVIEW QuickBooks Online Certification is designed to help you better serve and support your clients. It is designed to help you learn how your clients use QuickBooks and how you ll use it as an accounting professional to work with your client s files. QUICKBOOKS ONLINE CERTIFICATION EXAM After attending this course in a classroom session or viewing the self-paced video training, you ll be prepared to take the certification exam. The exam is a 60 question, multiple choice exam that will help you prepare to serve and support your clients on QuickBooks Online. Please visit the ProAdvisor tab in QuickBooks Online Accountant to take the exam. QUICKBOOKS ONLINE ACCOUNTANT SIGN-UP If you have not already signed up for QuickBooks Online Accountant, sign up for free at: 1. Visit: 2. Click Sign Up for Free. 7
8 QuickBooks Online Certification Training CHAPTER 1 - GETTING STARTED IN QUICKBOOKS ONLINE ACCOUNTANT QuickBooks Online Accountant (QBOA) is designed to help you manage your client s files in QuickBooks Online. It s designed to increase your efficiency and provide the tools and resources you need to work effectively with clients. It s seamless integration with QuickBooks Online makes it easy to work in client files. QuickBooks Online Accountant lets you do the following: Access client files anywhere, anytime with an internet connection Single sign on unlimited access to client files Manage less technology; no complicated networks or servers Reduce time spent on client file management Use specific tools designed for accountants and bookkeepers QuickBooks Online lets you and your client work together to do the following: Handle all day-to-day transactions including sales invoices, payments, deposits, receipts Handle all expense transactions like bills, cheques, credit and debit card receipts Download bank transactions using your client s online banking Manage bank deposits and account reconciliations Manage small business payroll Create business reports OBJECTIVES After completing this chapter, you should be able to: Login to QuickBooks Online Accountant Navigate the client list Understand the components of the dashboard Add Team members Login and view client files Use the navigation bar Use the Company menu Connect to a client 8

9 QuickBooks Online Certification Training SINGLE SIGN ON To access single sign in to your client files, go to ca.qbo.intuit.com. Login to your QuickBooks Online Accountant account. You ll see the Client list that includes all your client files in one window. 1. Enter your or User ID 2. Enter your Password Click Sign In. 9

10 QuickBooks Online Certification Training After signing in, QuickBooks displays the client list. This list includes all the company files that you re working with in QuickBooks Online Accountant. NAVIGATING QUICKBOOKS ONLINE ACCOUNTANT 1. Click to go back to the Client Dashboard from wherever you are in QuickBooks. This acts as a Home button for QuickBooks Online Accountant. 2. Click to toggle to another client s file. 3. Click the to add a new Client or add a new User. 10

11 QuickBooks Online Certification Training 4. Click the Gear icon to view the menu. This menu includes: Menu options to work within your own Your Books QuickBooks file Your Account and Your Team Link to the Sample Company Link to Resolve Duplicate Clients CLIENTS Click the client name to display more detailed information: Notes add notes for client files in the Notes section Bookkeeping click this link to review the client s file status such as the Closing Date, Last Signed In, and Last Download and review key accounts in your client file. Click the items under the Review in QuickBooks section to review problem areas in QuickBooks. 11

12 QuickBooks Online Certification Training Payroll click this link to review the Next pay date, Last pay date and View All pay cheques or Run Payroll o Click the drop-down menu to choose Recent tax payments or Recent Form Filings Shared Documents You can upload documents for clients. Clients can also upload documents for you as needed. Both you and your client can download these documents. Click upload to upload documents to the QBOA Shared documents tab. 12
13 QuickBooks Online Certification Training Click the icon to open the company file. 13
14 QuickBooks Online Certification Training BOOKKEEPING For Review in this column QuickBooks Online highlights potential problem areas in your client file. Key information that ll appear in this column is the following: Unaccepted transactions Change to closed books Failed download Cheque without payee Change to reconciled 14
15 QuickBooks Online Certification Training Banking - Review the status of the recent online banking downloads Payroll - Review the status of your client s payroll status and Items due. Tax Start Review of your client file in QuickBooks Online Accountant Working Papers (Learn more about this in QuickBooks Online Accountant Advanced Certification) 15

16 QuickBooks Online Certification Training TEAM In QuickBooks Online accountant you ll add members of your firm in the Team section. This lets you setup users within your firm and give them rights to your firm books as well as access to work in client files. To add a Team member: 1. Click Team Add User 2. Enter the Name and Click Next 3. Choose the access for the user to the Firm Books 4. Click Next 16

17 QuickBooks Online Certification Training 5. Specify which clients the new user will have access to Click Save. 17
18 QuickBooks Online Certification Training CONNECTING TO YOUR CLIENT There are two ways to get connected to your client s in QuickBooks: 1. They can invite you to be an accountant user. 2. You can setup a client from scratch and they ll be added to your client list automatically. To connect with your client, have them client invite you using the following steps: 1. Click the Gear icon to open the menu. 2. Click Manage Users Click Invite Accountant. 3. Your client now enters the name of the accounting professional. 4. Enter the address Click Next. 5. Click Finish. NOTE: Every company file in QuickBooks Online can have 2 Accounting Firms as users in their company file. The accountant user is considered a free user. 18

19 QuickBooks Online Certification Training CHAPTER 2 GETTING STARTED IN QUICKBOOKS ONLINE QuickBooks Online (QBO) is designed to be intuitive, fast, and simple to use. The click and go navigation makes it easy for you to find what you need quickly so you spend less time doing the books and more time working on your business. The user interface is simple and contains fewer menus, which results in fewer clicks to find the transactions and other information you are looking for. OBJECTIVES After completing this chapter, you should be able to: Use the Create menu Use the Navigation bar Use the Company menu NOTE: QuickBooks Online works best in Google s Chrome browser, but it also works with Firefox (IE and Safari are not recommended and are not fully supported). It s useful to bookmark your login page. 1. Your clients will sign into QuickBooks Online at ca.qbo.intuit.com. They ll see the same window you see when logging in, but they will not view QBO through the QBOA version. 19

20 QuickBooks Online Certification Training DASHBOARD The Dashboard is the first window you view when you open QuickBooks Online. It includes a basic Profit & Loss for your client s business. It also includes recent activity and banking information. 20
21 QuickBooks Online Certification Training CREATE MENU Most of your client s day-to-day work will be recorded using the create menu at the top of the QuickBooks window. 1. Click the + at the top of the QuickBooks window to view the menu. 2. Click any link to open the transaction. 21

22 QuickBooks Online Certification Training NAVIGATION BAR The left-hand navigation bar lets you find the information you enter using the Create menu. The navigation bar lets you find information based on the name or by the transaction type. 1. Click Sales to view your Customers, Products and Services and a sales listing. 2. Click Expenses view the Suppliers list and expense transactions. 3. Click Banking to view the Online Banking and Bank Rules. 4. Reports lets you find information about the client file in report format. 5. Taxes you ll access this area to setup and file sales taxes and to view Payroll tax information 6. Click Accounting to view the Chart of Accounts and the Reconcile window. 7. My Accountant - includes a link for the client to invite you to be their accountant. 22

23 QuickBooks Online Certification Training COMPANY MENU The Company menu is in the top right corner of your QuickBooks Online window, and is accessed by clicking your Gear icon. The Gear icon is used for important but less frequently used tasks, activities, and transactions. 23
24 SHORTCUTS There is a handy list of shortcuts in QuickBooks Online. It can be accessed by pressing the following keys at the same time: CTRL + ALT +? When you press this shortcut, QuickBooks Online displays the list of shortcuts. This window also displays the client s Company ID. In addition to these shortcuts, you can access date shortcuts on transactions. To use the date shortcuts, place your cursor in any date field in QuickBooks online and use the following shortcut keys: T enters today s date W enter the first day in the week K enters the last day in the week Y enters the first day in the year R enters the last day in the year M enters the first day in the month H enters the last day in the month 24
25 HOW QUICKBOOKS IS BUILT QuickBooks uses a few basic elements to make it easy for you and your client to enter information and do the required accounting tasks. QuickBooks uses lists and transactions to make the accounting entries. Lists QuickBooks lists include customers, suppliers, employees, products & services, and the chart of accounts, etc. You add entries to a list so they can be used whenever needed. This means that you don t have to enter names or accounts each time they re used. The purpose of lists in QuickBooks are: Make it easy for your client to fill out transaction forms. Save time on data entry. Chart of Accounts The chart of accounts is in the Transactions menu on the navigation bar and it also located in the Gear icon. To add a new account: 1. Click the Gear icon Chart of Accounts 2. Click New 25

26 3. Choose the Category Type and Detail Type. Note: these are required fields. 4. Enter the Name. Note: The Detail Type is a required field, although it has no effect on anything in QuickBooks. This is a placeholder for future development of the product. Selecting the Detail Type gives the account a name which can be edited in the Name field. 26

27 Expense Accounts You ll add expense accounts like any other account, but you ll have an additional option to add a tax code. Adding a tax code ensures that your client adds tax to their expense transactions. Subaccounts Add subaccounts to track more detail about your client s expenses. Subaccounts will display indented below their parent account on the chart of accounts. You can view the details on reports or you can collapse information into the parent account. To add a sub-account, create the account and select the Is sub-account option Choose the parent account in the menu below. 27

28 Products & Services List To easily track the services and products that your clients sell, you ll add them to the client s Products and Services list. There are 3 purposes of the products and services list: 1. Make it easy for your client to fill out transaction forms 2. Act as pointers to do correct accounting entries. Debit and Credits are done using the accounts linked to the product or service and the type of form. 3. Keep track of inventory on hand. To create a new service: 1. Click Gear Icon Click Products and Services. 2. Click Add New Choose the Type of item to setup. 28
. 6.")
29 3. Complete the information including the Name of the service. This will be what displays on the customer s sales form. 4. Enter the Sales information and Sales price/rate if necessary. These are optional fields, as they can be added to each sales form as needed. 5. Choose the Income Account (account to be credited each time a sale is made). 6. Add the Tax Code (This ensures that your clients are adding sales tax to sales) Click Save and Close. 29


30 Sales Tax Rate List To view the sales tax rates in QuickBooks; click Sales Tax on the Navigation bar. In this window, you see all the taxes you ve setup for your client. When you setup taxes for the first time, QuickBooks enables the sales tax for the province where the business is located. You can add sales tax for different provinces if necessary. Click Edit GST/HST to find more details. When you turn on sales tax, you can add sales taxes to account setup and to transaction forms. Customer List Click the Sales link on the navigation bar and then Customers. Click anywhere on the Money Bar to filter the customer list by Estimates, Unbilled activity, Overdue invoices, etc. 30
 by selecting Is sub-customer c. Add payment and billing details on the Payment and billing tab. 3. Click Save. 31")
31 To Add a new customer. 1. Click the New customer button. 2. Complete the information on the new customer window. a. The Display name as lets you choose what naming convention to use on the customer list. b. Create Sub-customers (jobs or projects) by selecting Is sub-customer c. Add payment and billing details on the Payment and billing tab. 3. Click Save. 31

32 Forms QuickBooks uses forms to make the accounting entries in QuickBooks simple for your clients. Each form in QuickBooks is going to create a journal entry behind the scenes. Your clients will enter almost all forms in the same way. To display a form: 1. Click Create Click Invoice 2. There are simple ways to complete it for your client. a. Who Customer b. When Date c. What Products/Service sold to their customer d. How much Quantity, Amount, and Sales tax 3. Click Save and Close to enter any form. 32
33 WORKING WITH TRANSACTIONS There are a lot of tips and tricks to help you work more effectively with transactions in QuickBooks Online. More Menu The more menu in QuickBooks is available on any Saved transaction. The More menu lets you have access to additional information and tools to work with the transaction. Click More to see the following options: Copy copy any transaction in QuickBooks saving time when creating duplicate entries Void void any transaction Delete delete the transactions 33
34 Transaction Journal click this option to view the journal entry behind any saved transaction. 34
35 CHAPTER 3 SALES & CUSTOMERS IN QUICKBOOKS Making sales is critical for your client s business. QuickBooks makes it easy to create customer sales, track them, and receive customer payments. In this chapter, you ll learn about customers and sales transactions. OBJECTIVES After completing this chapter, you should be able to: Complete the Sales workflow including: o Invoices, o Receive payments o Deposits Create sales receipts Enter credit memos Create Delayed Charges SALES WORKFLOW OVERVIEW Depending on how your clients make sales you may choose to do either invoices or sales receipts or a combination of the two different methods of making sales. You would use the following in each of these cases: Sales Receipt When your client gets paid at the time of the sale and needs to record the customer payment, or they need to print a receipt. Invoice When your client uses Accounts Receivable. 35

36 INVOICES IN QUICKBOOKS ONLINE Creating an invoice in QBO will create an accounts receivable for your clients. There are several ways to create invoices. You can create invoices from the Sales page. 1. Click Sales and then click Customers. The customer list displays. 2. To create an invoice for specific customer, you can do one of the following: a. Click the Drop-down menu and then Create Invoice next to the customer name. The invoice window displays. b. You can click the Create menu at the top of the QuickBooks window to enter an invoice. 3. Complete the Invoice form. There are several key elements to completing the form. They are the following: a. Choose the Customer. b. If the customer s address does not appear to the right of the name, you can enter the address. This address lets you invoices and will help automate the process for your client. c. The billing address should display for you. You can update the address here if necessary to save it to the customer record. d. Choose the Terms if applicable. The terms let you offer discounts and other payment terms to customers. e. Choose the Invoice date and Due date if applicable. 36
37 f. Choose the tax situation i. Exclusive of sales tax - The price or cost of items shown in the Amount column does not include sales tax (net price). Only the total amount includes sales tax; line and subtotal amounts do not. The sales tax amount is shown as a separate amount at the bottom of the form and is not included in the subtotal. ii. Inclusive of sales tax - The price or cost of items shown in the Amount column includes sales tax (gross price). Sales tax is included in each of the amounts (line, subtotal, and total) of the sales form. The total amount of sales tax is also shown at the bottom of the form. iii. Out of scope of sales tax - Items are not subject to sales tax. 37
38 g. Choose the Product/Service. QuickBooks will complete the Description if it is included in the product or service setup. If it is not, you can enter a description for the customer. Repeat this step for each product you add to the invoice. h. Enter a Quantity. i. QuickBooks may also enter a Rate from the product or service setup. If it does not, you can enter the sales rate. j. QuickBooks completes the Amount for you. k. Choose the Sales Tax rate. 38
39 l. Attach any documents at the bottom of the invoice window. This lets you add any relevant documents to the customer transaction. You can add documents up to 25 MB. These documents can be sent via as attachments with a customer invoice. 4. After completing the invoice, click Save and Close. 5. Alternatively, you can click Save and send. 6. Click Send to complete the process. 39
40 CUSTOMER PAYMENTS After creating an invoice, you can receive a customer payment and apply it against the invoice. To receive a customer payment: 1. Click Customers. 2. Click Receive Payment on the customer name. The Receive Payment window displays. 3. Enter the Payment Method. 4. Enter a Reference No. This can be a cheque number or some other form of reference information. 5. Choose the Deposit to account. NOTE: This is important to ensure that your clients select the correct account from the account options. There is no default that will force the client to choose undeposited funds. This is considered best practice to choose undeposited funds. This will serve as a control account. 6. Enter the Amount Received. QuickBooks automatically applies the payment(s). 7. You can edit how they are applied in the Outstanding Transactions section of the window. 8. Click Save and close. 40
41 MAKE DEPOSITS After you have received customer payments the next step is to deposit the funds. You can create new transactions from the Quick Create menu To make a deposit: 1. Click the Create + menu. 2. Click Bank Deposit. 3. Select the Existing Payments to deposit. 4. Click Save and New. 41
42 SALES RECEIPTS Instead of creating invoices to record sales, your clients may receive funds at the time of the sale. Record these sales using Sales Receipts. The Sales Receipt is meant to record an immediate acceptance of payment while an invoice represents an expected payment in the future. This transaction lets you create the sale and record payment information on one form. To create sales receipts: 1. Click the Create + menu Click Sales Receipt. 2. Choose a customer Choose a Payment method. 3. Enter a Reference. No. Choose the Deposit to account. 4. Enter the sales using the Product/Service lines. Enter the descriptions, QTY, Rate and Sales Tax. 5. Click Save & Close. 42
43 DELAYED CHARGES OVERVIEW Record delayed charges to record charges over a period to be invoiced later (This feature is only available in QuickBooks Online Plus). Delayed charges let your clients accumulate charges to clients and add them at a later time to a customer invoice. These are non-posting transactions until you convert the charges into an invoice. This feature is only available in the QuickBooks Online Plus version. Delayed Charges To create delayed charges: 1. Click the Create + menu. 2. Click Delayed Charges. 3. Enter the charges as you would on a regular invoice. 4. Click Save and close. 43
44 To Invoice for Delayed Charges: 1. Click the + Create menu. 2. Click Invoice. 3. Enter the Customer that has delayed charges on their account. After choosing the customer, QBO displays a drawer that slides in from the right-hand side of the invoice. 4. Choose the charges to add to the customer invoice. Click Add to add charges to the invoice. 44
45 CREDIT MEMOS & REFUND RECEIPTS There are several additional important transactions that your clients may enter in QuickBooks. In this section, you will learn about the following transactions: Credit Memos enter a credit memo to record a credit to a customer. The Credit memo is usually used to issue credits when customers have accounts receivable or outstanding invoices. Refund Receipts Record to refund given to a customer. The Refund Receipt is used when a customer has purchased a product or service from the business using a Sales Receipt. Credit Memos Your client will record a credit memo to offer credits for a variety of reasons. The credit memo creates a negative invoice for the client. They can apply it against the oldest outstanding invoice (QuickBooks setting) for the customer or apply it against an invoice of their choice. To create a credit memo and apply it automatically for the client, do the following: 1. Click Create Credit Memo. 2. Complete the Credit Memo (complete this form like the invoice form). 3. Click Save and Close. NOTE: By default, QuickBooks automatically applies the payment against the oldest outstanding invoice. You can edit this setting. See next page. 45
46 Credit Memos Settings QuickBooks Online automatically defaults a setting related to QuickBooks credit memos. This setting automatically applies credits against the oldest customer invoice. If you don t want to have QuickBooks automatically apply credits you would do the following: 1. Click the Gear icon 2. Company Settings 3. Click Advanced 4. Click Automation to edit. 5. Deselect Automatically Apply Credits 46
47 This changes the way that you apply credits. To apply an outstanding credit, do the following: 1. Create the credit memo 2. Click Create Receive Payments 3. Select the invoice that you are receiving a payment against. 4. QuickBooks Displays the outstanding Credits. Select the credit(s) that you want to apply against the invoice. 5. Click Save to complete the step of applying the credit against the invoice. NOTE: If you applied a partial amount, QuickBooks keeps the remaining amounts open on the credit memo, to be applied later. 47
48 Refund Receipts After creating a sale receipts your clients may need to issue a refund for products and services. To issue a refund to a customer, you ll create a Refund Receipt. 1. Click Create > click Refund Receipt 2. Complete the form including what account you are issuing the refund from. 3. Click Save & Close. 48
49 SALES REPORTS QuickBooks includes many default reports for tracking sales and accounts receivable. A/R Aging To create an A/R aging report: 1. Click Reports All Reports 2. Manage Accounts Receivable A/R Aging Summary 49
50 Customer Balance Detail 1. Click Reports Click All Reports 2. Click Manage Accounts Receivable Click Customer Balance Detail 50


51 CUSTOMER STATEMENTS Your clients can create statements for their customers. To create a statement: 1. Go to the Create menu. 2. Click Statement. 1. Choose the Statement Type Enter the Statement Date. 2. Enter the dates as needed Print of Preview to view the statements. 51
52 CHAPTER 4 - EXPENSES IN QUICKBOOKS ONLINE QuickBooks Online lets you manage expenses of all types including debit, credit card, entering and paying bills and others. Simple transaction forms let your clients make entries easily and efficiently. SUPPLIERS & EXPENSES OVERVIEW Managing your client s suppliers and expenses information is critical to their success. In this section, you learn about how to enter day-to-day expense transactions. Many expense transactions can be automated if you d like to avoid regular data entry. Expense transactions let you record different payment methods including debit, credit card, online payment, and whatever payment method that your clients use. OBJECTIVES After completing this lesson, you should be able to: Add Suppliers Expenses vs. Accounts Payable Enter expense transactions including credit card, debit card and others Enter Bills Pay Bills Supplier Credits Writing Cheques CHEQUES VS. BILLS IN QUICKBOOKS QuickBooks handles a variety of expense related transactions. Depending on the complexity of your client businesses you may use a combination of QuickBooks transactions. Many clients do not understand when you to expenses vs. Bills in QuickBooks. Bills Pay Bills This workflow should be used when accounts payable is important to your clients. This workflow required two steps. Enter bills then pay bills. Bills can be paid using different payment methods. Expenses The expense transactions should be used whenever a cheque is not going to be created. QuickBooks has an expense form that can be used for credit and debit card transactions, automatic withdrawals, EFT, and other transactions used by your clients. 52
53 ADDING SUPPLIERS Before entering expenses, it is a good idea to add suppliers. To add a new supplier in QuickBooks Online: 1. Click the Suppliers link on the left-hand pane of the QBO window. 2. Click New Supplier. 3. Complete the Supplier Information. 4. Click Save. 53

54 ENTER BILLS IN QUICKBOOKS ONLINE To enter accounts payable in QuickBooks Online, click Create +. This bill window is best used to record bills to be paid later. Most other expenses can be recorded using the expense type of transaction. To Enter Bills: 1. Click Bills Enter the Supplier. 2. Enter the expense Account Enter a Description. 3. Enter the Amount and choose the Tax Rate. 4. Click Save and Close. 54

55 PAY BILLS To pay multiple suppliers at one time you can use the Pay Bills window. This is a great feature for larger clients who may need to do large batches of payables transactions. To pay bills from the Pay Bills window: 1. Click the + button and choose Pay Bills Click Filter to filter the bills. 2. Select the Bills to Pay from the Payee column. 3. Edit the amount to pay in the AMT to PAY column Select Print Later to print cheques later. 4. Click the Save option. You can click Save and Close or Save and Print. 55
56 ADDING EXPENSES Using the Expense transaction in QuickBooks Online you can create different types of expense transactions like Debit, Wire, Online Banking payments and more. This feature lets you create multiple types of transactions from one window. To create an expense transaction: 1. Click the Create + menu Click Expense. 2. Choose a Supplier Enter the Date. 3. Choose a Payment Method Choose an account. 4. Enter a Description Choose the Sales Tax rate. 5. Click Save and Close. 56
57 CHEQUES IN QUICKBOOKS ONLINE On rare occasions, your clients may write a cheque without a bill. This can be handled in QuickBooks. Create cheques in QuickBooks as needed using the Cheque option under the create menu. 1. Click the + sign and click Cheques Choose the Supplier. 2. Choose the Bank account Choose the expense Account. 3. Enter a Description Enter the Amount and choose Sales Tax. 4. Click Save and Close. 57
58 SUPPLIER CREDITS Your client will create supplier credits if they must return goods to a supplier or if they receive a credit from a supplier to be applied against. 1. Click Create Supplier Credit 2. Complete form including Supplier name, Account. 3. Enter the Amount and Sales Tax. 4. Click Save & Close. NOTE: QuickBooks automatically applies the credit against the oldest outstanding bill. 58
59 SUPPLIER REPORTS To create reports for payables to your client s suppliers, QuickBooks provides several key reports. AP Aging Summary Create the A/P Aging detail report to view the detailed outstanding bills by supplier. Run the report by: 1. Click Reports 2. Click Manage Accounts Payable 3. Click A/P Aging Summary 59
60 REPORTING ON EXPENSES To find out details about where your clients spend their money you can create the Expenses by Supplier Summary. To create this report: 1. Click Reports 2. Review Expenses and Purchases 3. Expenses by Supplier Summary 60

61 REIMBURSABLE EXPENSES Many service businesses will invoice for their time/service plus the expenses they incur. QuickBooks Online can track reimbursable expenses to customers and remind the user to add those reimbursable expenses to invoices. The reimbursable expenses feature is only available in the Plus version of QuickBooks Online. The feature needs to be enabled before tracking expenses to customers. To enable the feature: 1. Click Gear Company Settings 2. Click Expenses 3. Click Edit Select Track expenses and items by customer 4. Click Make expenses and items billable 5. Click Save Click Done. 61

62 Note: You can track billable expenses and items as income in a single account or multiple accounts. This is setup in the chart of accounts. 62

63 After enabling the feature, you can add expenses to customers and make them billable. To do this open any expense transaction including purchase orders, expenses, cheques and bills. 1. Click Create Expense. 2. Enter the expense information as you usually would. 3. In the Customer field, choose the customer to whom you want to track the expenses for reimbursement. 4. Select the Billable checkbox. 5. Create an invoice for the customer and QuickBooks will prompt you to add the reimbursable expenses to the invoice. 6. Click Add to add the expenses to the invoice Click Save to complete the process. 63
64 CHAPTER 5 BANKING & COMPANY ACTIVITIES IN QUICKBOOKS ONLINE Banking is a critical day-to-day function of small business. QuickBooks makes data entry and account reconciliations easy with bank feeds. If your clients want to save time and reduce data entry task they can use the automated bank feeds in QuickBooks to feed transaction information directly into QuickBooks. OBJECTIVES After completing this chapter, you should be able to: Make a bank transfer Reconcile an account File Sales taxes BANK TRANSFER An important transaction in QuickBooks is recording bank transfers. You can record a transfer that your client does online or at the bank in QuickBooks. To create a transfer: 1. Click Create > Transfer 2. Complete the Transfer Funds From and Transfer Funds To fields to include the accounts you are transferring between. 3. Enter the Amount and Date. 4. Click Save and Close. 64
65 BANK RECONCILIATION The purpose of your bank reconciliation is to: 1. Match individual transactions from QBO to your transactions on your bank statement 2. Match your ending balance from your bank statement to the cleared balance in QuickBooks Online. To reconcile your bank account: 1. Click Gear Icon/Company Menu, and then click Reconcile. 2. Choose the Account under the Which account do you want to reconcile? 3. Complete the Enter the following from your statement section including the Ending balance and Ending date. 4. Complete the Enter the service charge or interest earned, if necessary section. NOTE: this is optional. You can enter these transactions using another type of transactions like expense or journal entry. 5. Click Start reconciling. 65

66 6. Select the transactions that have cleared the bank account on the bank statement. Reconciliation Tips Click the down arrow in the summary section to expand the window. This lets you view the details of the reconciliation as you reconcile. This section of the window displays the Balances, Payments, and Deposits. Filter the reconciliation window by clicking the one of the 3 options of Payments, Deposits, or All. QuickBooks default view is All. Sort the list of transactions by clicking the column heading. 7. After you ve completed marking the cleared transactions from your bank statement, click Finish Now or click the down arrow to Save for Later or Close without Saving. NOTE: As part of the QuickBooks Online Accountant edition you can undo the reconciliation for your client. Your client does not have access to this feature in their version of QBO. 66
67 FILING SALES TAXES To file your client s sales taxes: 1. Click the Taxes. QBO displays the Sales Tax Centre, which includes all the taxes that you track in your business. QuickBooks displays a summary view of the next return to file. 2. Click View Reports to create a sales tax liability report. 67
68 3. Click View summary to review the summary report for the filing period. 68

69 4. After reviewing and printing the report, click Sales Tax, and then click Prepare Return. 5. The return window will match the sales tax report, you just created. Click Mark as Filed to complete the GST/HST Return. 69
70 NOTE: QBO marks each of these transactions as filed. It gives you a message indicating that QuickBooks will close the books for the tax period. 6. QuickBooks marks each transaction in the period as filed. Click Continue. 7. Click Record Payment to pay for this sales tax filing. 8. Enter the payment information including the Account, Payment date and Payment amount. 9. Click Save to complete the payment. 70
71 71
72 CHAPTER 6 AUTOMATION IN QUICKBOOKS ONLINE Automating the work that you do in QuickBooks will help you save time and enter data in the most accurate and efficient way possible. QuickBooks lets you automate a variety of transactions using bank feeds and recurring transactions. You can automate additional date entry when you use partner apps to integrate with QuickBooks. OBJECTIVES After completing this chapter, you should be able to: Setup a bank feed Categorize client bank feeds Create Bank Rules Create recurring transactions Create and send reports automatically Understand how apps can help automate your practice BANK FEED IN QUICKBOOKS The Banking page is where you connect your accounts and download transactions. This is sometimes known as "bank feeds." Once you begin adding and matching your bank feed transactions into QuickBooks, the process gets easier and faster over time. QuickBooks learns from your decisions and offers smart suggestions to speed the work for you. Note: The first download after setting up the bank feed will include the last 90 days of transactions. If you ve already added and reconciled these transactions, they can be excluded. 72
73 SETTING UP BANK FEEDS 1. Click Home, then Connect Account. 2. Search for your bank or credit card name or choose from the list of common banks. 73
74 3. Enter the client s banking or credit card information. 4. Click Sign In. 5. QuickBooks may require extra information. This is a security feature. NOTE: Some accountants get a read-only access bank card for this purpose. It has limited access but meets the requirements to setup a client bank account. 74
75 6. In the Connect an Account choose the QuickBooks account that the online account will link to. 7. Click Connect. 8. Click Let s go! to complete the connection. 75
76 PROCESSING TRANSACTIONS IN THE BANK FEED With your transactions now in QuickBooks Online, you are ready to allocate them to the required expense categories. There are 4 types of transactions that you will work with in the bank feed. Matched transactions that QuickBooks recognizes that match the bank download Rule a rule that you add to QuickBooks that automatically categorizes transactions QuickBooks Rule suggestion that QuickBooks makes based on historical information from QuickBooks Uncategorized Expense/Uncategorized Income QuickBooks needs your help to categorize the transaction. 1. Click Home. 2. Click To Review. QuickBooks displays the bank feed window. 76
77 3. In the For Review tab, first review the Match transactions. 77


78 4. After reviewing the transactions, click Match to confirm and enter the transactions in QuickBooks Online. 5.For transactions labeled in Green, QuickBooks suggests a category you can click Add if the category is correct, or click the transactions to expand it and edit the category and other information as needed. 6. For transactions that are not matching, you ll click on the transaction to process. 7. Complete the information as needed. 8. Click Add to complete the transaction. NOTE: After adding transactions to QuickBooks, they move from the For Review tab to the In QuickBooks tab. NOTE: When you first download, QuickBooks downloads the last 90 days. If these are not needed, select the transactions click Batch Actions Click Exclude Selected. 78
79 BANK RULES On the Banking page, you can set up rules to tell QuickBooks what to do with bank items that meet conditions. Rules help you control, customize, and automate how you use the Banking page in QuickBooks. Even without rules, QuickBooks makes it easier for you to accept bank transactions quickly. When QuickBooks downloads your bank transactions, it does the following: Cleans up cryptic bank descriptions Suggests logical categories based on bank descriptions Remembers changes you made before, and applies those changes to similar transactions Looks for matches among the transactions you already entered into QuickBooks Rules go beyond the automatic processing to give you a finer level of control. They scan downloaded bank items for certain criteria you specify, and then assign particular payees, categories, classes, locations, and more to them. Rules can even help automatically split items between categories and more. To add a rule: 1. In the navigation bar click Transactions > Banking. 2. Click drop-down arrow Manage rules from the list. 79

80 3. Click New rule. 4. Enter a descriptive name and select whether the rule is for a money-in or money-out transaction. 5. Rule names can have only letters, numbers, and spaces. 6. Select the bank account the rule applies to. 7. Set up the conditions QuickBooks should look for when downloading bank items: 80
81 RECURRING ENTRIES Creating an invoice in QBO will create an accounts receivable for your clients. You can automate the invoice by clicking Make Recurring at the bottom of the invoice window. 1. To create an invoice for specific customer, click Create Invoice next to their name. The invoice window displays. 2. Complete the Invoice form. There are several key elements to completing the form. They are the following: a. Choose the customer b. Choose the Invoice date and Due date if applicable. c. Choose the Product/Service Enter a Quantity Rate d. Choose the Sales Tax rate. 3. Click Make recurring. 4. Click Save Template. This will not only create the invoice but also send it automatically on the assigned date. 81
82 ATTACHMENTS QuickBooks Online lets your client upload and save attachments on any transaction. This makes referencing the client s source document easier and more efficient. To add an attachment: 1. Open an invoice 2. Click attachments icon 3. Browse for the attachment 4. Click Save NOTE: Now QuickBooks Online lets you view the source document when viewing the transaction. This is helpful for receipts, bank statements, copies of transactions, etc. 82

83 QUICKBOOKS ONLINE MOBILE A powerful component of QuickBooks Online is the ability to use QuickBooks Online on mobile devices. You can download the mobile app from the itunes store or the Google Play store. DOWNLOADING THE MOBILE APP To download the mobile app, you can visit the itunes store to download the free QB application. You can also download the app from the Google Play store. The QB app is a free app designed to help your clients who are on the go to capture and enter information on their mobile devices. 83

84 OPEN QUICKBOOKS MOBILE After downloading the iphone app from the itunes store, you can access the app from your home screen. You can do the following activities in the mobile app: Add Customers Add Notes Add Products & Services Add Suppliers & create expenses Create Estimates, Sales Receipts, Invoices, & Customer Payments Process bank transactions Activities like filing sales tax, bank reconciliations and other accounting specific tasks can only be completed in a web browser. To open the QuickBooks mobile app: 1. Tap the QuickBooks app. 2. Enter your User Name. 3. Enter your Password. 4. Click Sign In. 84


85 NAVIGATING QUICKBOOKS MOBILE After signing into the QBO mobile app, QuickBooks displays two tabs; a Dashboard and Activity. Tap the Menu option in the top-left corner of the app. 85
86 ADD CUSTOMERS ON MOBILE To add customers using the QBO App: 1. Tap the Customers + 2. Enter the Customer information. 3. Click Save. 86
87 CREATE INVOICES 1. Tap the + symbol. 2. Tap Invoice. 87

88 3. Tap Invoice. 4. Enter the Inv. # 5. Date, Due Date, and other information 6. Tap Add Line Item to items for sale. 7. Choose the Tax 8. Click Save. 9. Review the completed invoice after you click Save. NOTE: The mobile app lets you invoices directly from your mobile device. 88


89 PROCESS BANK TRANSACTIONS ON MOBILE 1. Tap the Menu tap Banking. 2. Tap New Transactions. 3. Tap a transaction to add information. 89
90 CHAPTER 7 CLIENT FILE SETUP Setting up a new client file can be fast and efficient in QuickBooks Online using the tools provided by QuickBooks Online Accountant. QuickBooks lets you setup the basics and then you can add information as needed based on the client s needs. OBJECTIVES After completing this chapter, you should be able to: Setup a client file and add team members Set wholesale pricing for a client file Import list information including chart of accounts Edit company settings Sales form setup User setup COMPANY SETUP You can setup QuickBooks Online for your client from the QuickBooks Online Accountant. In the QBOA window, click the Add Client button. QBO displays basic information for your company. 1. Enter the Client contact information. 2. Click the Add more info link to add contact details for the client. 90
91 3. Choose the QuickBooks subscription for your client (see next section for details on Wholesale discount) QUICKBOOKS SUBSCRIPTIONS As part of the QuickBooks Online Accountant version you have the benefit of offering your client s wholesale pricing. There are two wholesale billing options. Option #1 Wholesale discount (firm is billed) In this option your firm will pay for the client s subscription. You ll receive the wholesale pricing discount of 50%. In this option the wholesale pricing details are the following: Discount 50% off Duration Life of the Subscription Consolidated Billing all your clients that are included in your client list under wholesale pricing will display on one consolidated bill per month with one charge to your credit card Unlimited Users For your clients where your firm pays, your clients can have unlimited users in their company file (regular company files are limited to 1,3, or 5 users) 91
92 Benefits 50% off for the life of the subscription Consolidated Bill one credit card charge and one bill that includes all your clients included under wholesale billing. Option #2 Direct discount (client is billed) When you choose this option, your client will pay for their subscription. The client will receive wholesale pricing. In this option the wholesale pricing details are the following: Discount 50% off Duration 1 year 4. Choose the subscription for your client. QuickBooks displays the following window. If you ll be the Master Admin of the client s QuickBooks, click Make me the Master Admin of this client s QuickBooks Company. 92
93 5. Under the Team Access section of the client setup, you can select which team members in your firm can access your client. 6. Click Save. 7. Enter the Wholesale Billing Information if required. 93
94 COMPANY SETUP Following the basic setup, open the client file in QuickBooks Online Accountant. Answer the remaining setup questions. 1. What s your business called? 2. How long have you been in business? 3. Click Next. NOTE: If you re converting a client from QuickBooks Desktop you ll select I ve been using QuickBooks Desktop and want to bring in my data. 4. Choose the options available that apply to your client s business. 5. Click All set. 94
95 6. QuickBooks Online opens the company file to the Home page. The items chosen on the previous window now display at the top of the Home page. Click any item to complete the task. NOTE: It is recommended you setup the client s bank feed from this window. See Chapter 6 for review. Importing Your Data If you are currently using QuickBooks desktop or another accounting software program you can import list information into QuickBooks Online from Microsoft Excel. To import a data file: 1. Go to the Gear icon 2. Click Import Data. 3. Then choose the type of data you would like to import. 4. Find your data. 5. Click Next. 95

96 6. Review the data to ensure it is mapping correctly. 7. Click Next. 96

97 8. Click Import to complete the import. 97

98 Company Settings In QuickBooks Online, there are settings that let you customize QuickBooks Online to your client s business. You can use these settings for a wide variety of purposes. The settings are where you enable features, disable features, and select options to customize QuickBooks Online around your company needs and your personal working style. In this section, you ll only learn some of the basic settings needed when you first setup a client in QuickBooks Online. 1. Click the Gear icon menu in the top right corner. 2. Click Account and Settings. 3. The Account and Settings window displays for you. There are over 60 settings that can be edited in this window. When you first setup QuickBooks Online, it s not necessary to edit every setting. There are several important settings to edit. Other settings can be updated later. 98
99 Company Contact Information The company information section at the top of the window is important. This contains the company contact information. This information will be completed with the information that you entered when you first setup the company file. If the company contact information changes this is the location where you will update the information. The contact information is entered in the Company Settings. Enter the Business number in the appropriate field. Update, add or remove information in the Contact info. section. 99
100 Accounting Information You can update the Accounting information under the Advanced section. 1. Click Advanced. 2. Click Accounting. 3. To save any changes, click Save. Set the fiscal year for your client, Closing Date, and other information in this section. Note: Clients sometimes make mistakes that you want to avoid. QuickBooks Online has a feature called, Close the Books to help your clients avoid making these entries. 100
101 Close the Books 1. Select the Close the books option. 2. Enter the Closing date in the Closing date field. Enter a closing date. In addition to setting a closing date, QuickBooks Online lets you select one of two warning options. a. First, you can choose, Allow changes after viewing a warning. This option will warn users that they are about to save a transaction that is dated prior to the closing date. If they choose, they can continue and save the transaction. b. Second, you can choose Allow changes after viewing a warning and entering password. This option warns the user that they are about to save a transaction dated prior to the closing date as well as requires the user to enter a password. This is the best practice to ensure that users do not save entries in previous accounting periods. 3. Enter the password again in the Confirm password field. Now you know that Big Time Fitness cannot make errors in previous periods. 4. Click Save. 101
102 Date, Time & Warning Settings QuickBooks Online lets you edit the date and time setting within the software. 1. Click Advanced. 2. Click Edit next to the Other preferences settings. 3. Click Date Format. 4. Edit the Date Format for your client needs. 5. Click Save. 6. Select 7. Click Done to close the Company Settings window. 102
103 Basic Sales Tax Setup Before your clients record any sales or expenses, it s important to make sure that sales tax is setup. QuickBooks knows the location of your client s business based on their company information entered during the setup. To complete the setup, you must enable the sales tax option. To turn on sales tax: 1. Click Taxes. 2. Click Set up sales tax. 3. Choose your Province or Territory. 103
104 4. Add the appropriate tax information for your client s business. 5. Click Next. QuickBooks confirms the setup of sales tax. 104
105 Chart of Accounts The chart of accounts is a critical part of QuickBooks Online. Click the Gear icon to view the Chart of Accounts. Who sets up the client file will determine what type of chart of accounts your clients have. The two different scenarios are the following: 1. Client sets up QuickBooks Online: If your clients purchase and setup QBO they will be asked for an industry type and they QBO will setup a chart of accounts for your client. This is convenient for your client because they will have sufficient information to get started. However, if you want to standardize the chart of accounts for all your clients, you will have some work to do. 2. ProAdvisor sets up QuickBooks Online: If you setup you client files from the QuickBooks Online Accountant version QuickBooks will provide you with a minimal chart of accounts. This lets you import or add a standard chart of accounts. Customize invoices To customize invoice templates: 1. Click the Gear icon. 2. Click Custom Form styles. 105

106 3. Click New Style. d Invoice, Estimate or Sales Receipt 4. There are 2 main elements that you can edit in the customization of forms. They are the Design of the form and the Content the form will contain. 106

107 5. Click Design to customize the appearance of the form. From this window, you can do the following: o Change the template. Click Change up the Template, and then choose from one of the 5 template options. o Click Make Logo Edits. Add or remove the logo, resize the logo and place it on the form, from this section. 107


108 o Click Try Other Colours. Choose from the color palette available or enter your own. o Click Get Choosy with your Font. Select a font that works for your form. o Click When in Doubt Print it out to edit the margins. 108

109 6. Click Content to customize the body of the form. 7. Click one of the three sections on the form template to the right. Click the Header, Body, or Footer to edit each section. 109


110 8. Click Header to edit the following: o Business name, phone, , and other contact information. o Enter the Form name and choose Form Number options. o Add or remove fields to display under the Display options. 9. Click the Table section to edit the body portion of the template. 110


111 Add or remove columns from the body of the template. Reorder the columns by dragging the icon to the left of the field up or down. Click Edit Labels and Widths to edit how the columns display. 10. Click the Footer portion of the page to edit the footer. Add or remove information from the footer. 11. Click Done to complete the setup of the form. 111
112 Setup Users You can add users for your client and assign them limited permissions within QuickBooks. There are 4 types of users: Regular or custom user Company Administrator Reports only Time Tracking only To add a user: 1. Click the Gear Icon click Manage Users. 2. Click New. 3. Choose a type of user Next. 112
113 4. Select the user s access rights click Next. 5. Select the user s administrative rights Click Next. 6. Enter the address of the user to add Click Next Click Finish to send the invitation to the user to complete the setup. 113
114 CHAPTER 8 REPORTS IN QUICKBOOKS There are many preset reports in QuickBooks Online that provide information for your client. They are listed in the Reports page on the navigation bar. Click the navigation bar to view what reports are available. OBJECTIVES After completing this chapter, you should be able to: Create default reports for your client Customize a report using filters, and column customization Save reports as.pdf and.xls Save customized reports REPORT CENTRE Click the Reports link in the navigation bar to open the report centre. The report centre includes several different categories of reports. Recommended reports that are commonly run reports for small business Frequently run reports frequently run by your client My Custom Reports customized reports created by your client or shared by you with your client Management Reports financial statements All Reports list of all reports sorted into categories 114

115 To view Accountant reports: 1. Click All Reports 2. Click Accountant Reports Click any category of reports in the Accountant Reports section to view specific reports about your client business. 115
116 Profit & Loss Report This report is also called an income statement. It summarizes your income and expenses for each income or expense account on your chart of accounts, so you can tell if you're operating at a profit or a loss. To create a profit and loss report: 1. On the Reports link, under Company Reports, click Profit & Loss. QuickBooks creates the reports based on the year to date information. 116
117 Balance Sheet Report To create a Balance Sheet report: 1. In Accountant Reports, 2. Click Balance Sheet. 117
118 CUSTOMIZING REPORTS To change the view on any report: 1. On any report, click Customize. 2. Edit the report using the two menu options on the report. You can sort the information add notes and edit the header of the report. 3. Click the right-side menu option to save the report or to send it to excel. Click the Gear icon to customize the columns. 118
119 4. Click Customize continue to customize the report. You can customize the report by changing the following: o o o Report period Number format Rows/Columns Select columns to add or remove Drag and drop the columns to reorder 119
120 5. Click Filter. o Select Filter Choose more details 6. Click Header/Footer to edit the report information. 7. Click Run Report. 120


121 SENDING REPORTS TO EXCEL QuickBooks is a powerful reporting tool. To further analyze you may want to use Excel to do further financial analysis. QuickBooks helps you get started by exporting reports to excel with one click exports. QuickBooks maintains the formulas and formatting after sending the report to Excel. To export a report to Excel: 1. Go to Reports and run a report. 2. On the report click the Export report icon. 3. QuickBooks saves the report and downloads it to your computer. Click the report to open. 121
122 AUTOMATED REPORTS Using QuickBooks Online, you can have reports automatically sent by to yourself and others at regular times (e.g. 1st of the month). Any customized reports can be saved as part of a Report Group. 1. In My Custom Reports, click Edit to edit the Report Group Settings. 2. Click Set schedule. 3. Edit the schedule for your client. 122
123 CONCLUSION To take the QuickBooks Online Certification exam, login to your QuickBooks Online Accountant account and then click the ProAdvisor tab. Click the Certification tab and click Take exam. You can take additional training classes online or in classrooms across Canada. You can view all upcoming training classes in the Certification tab. 123

124 APPENDIX I AUTOMATION USING APPS There are many apps in the Apps centre in QuickBooks that will help you be more efficient as a bookkeeper or accountant. Apps to automate data are going to help you reduce or eliminate data entry. This can save you and your teams time and money. In this section, we review several common apps that accountants and bookkeepers are using to automate their data entry work and other processes in their practice and for their clients. Notes: The information presented in this section will not appear on the QBO Certification exam. There are many apps available in the Apps Centre. We ve chosen common apps but there are many alternatives to these apps if you search for them. Automation of Accounts Payable and Expenses One of the most challenging parts to data entry is recording credit card receipts, bills, and other expenses. The bank feed does a great job entering some of this data. There are two apps that will help with these tasks. Hubdoc Hubdoc.com Hubdoc is an app designed to fetch your client s statements and bills and automatically enter them in QuickBooks. It also manages the receipts and bills that you can scan from your computer or using the mobile app. Using this app will automate the data entry of bills and many expenses. To Setup Hubdoc you do the following: 1. From the QuickBooks Apps centre find Hubdoc and click Get App now. 2. Create an account. 124

125 3. Click Launch from the My Apps tab in the App Centre. 4. Click Add account to add a new supplier bill or statement. 125


126 5. Like the setup of QBO bank feeds, enter your online credentials with the supplier. 6. Click Add account. 7. Hubdoc adds the supplier. 126
 click Configure. 9.")
127 8. Setup the supplier account by going to the bill. Click the Edit icon (far-right on the bill) click Configure. 9. Update the information and then click Publish. 127

128 Plooto Plooto.co Plooto works with QuickBooks to automate online bill payment. You can pay bills from Plooto that come from QuickBooks. When they re paid, they are paid in QBO, automating the Pay Bills process. To setup Plooto: 1. Go to the App Centre and click Get App Now. 2. Click Authorize. 3. Plooto synchronizes your bills from QuickBooks automatically. 4. Select the bills to Pay and QuickBooks will receive updated information for Plooto to automate the Bill Payments. 128

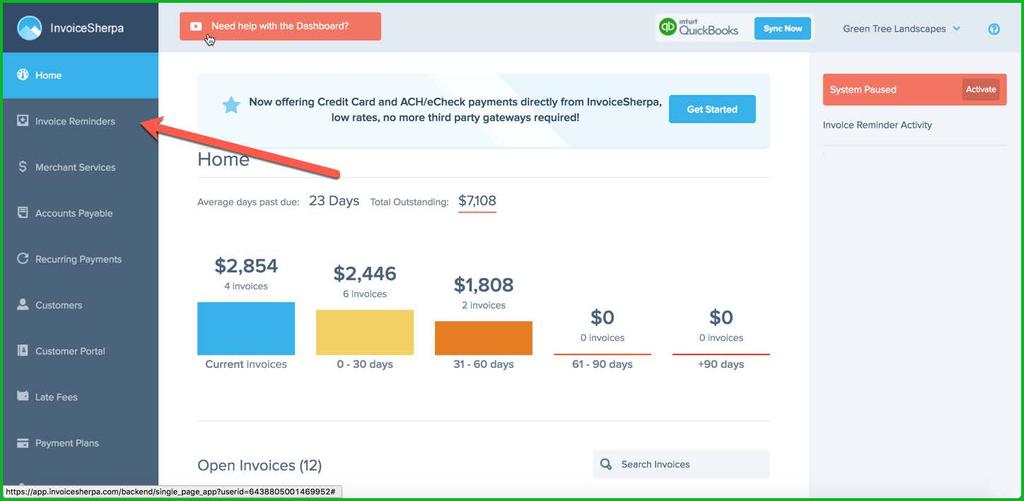
129 Automation of Accounts Receivable InvoiceSherpa Invoicesherpa.com Automate accounts receivable for your clients. This app lets you setup automated reminders for your client s customers. You can customize automated reminders using s and text messaging. Setup recurring payments for your clients or even your own firm. To setup InvoiceSherpa: 1. Go to the Apps centre find InvoiceSherpa. 2. Click Get App Now. 3. Click Authorize. 4. Click Invoice Reminders. 129
130 130


131 5. Drag and drop the type of reminder you want to setup for your client or for your firm. Choose to setup reminders for before the invoice is due or when it is past due. 6. Click Customer Portal to preview the customer s view in the portal 131

132 Report Automation Fathom Reporting Fathomhq.com Fathom is designed to help you get more out of QuickBooks reports. It s designed to provide Key performance indicators, and other powerful visual reports. To connect Fathom: 1. Go to the App centre and find Fathom click Get App Now. 2. Click Add a Company 3. Click Select to choose QBO as the data source. 132

133 4. Click Connect to QuickBooks 5. Sign-in to QuickBooks. 133

134 6. Click Authorize. 7. Choose the date range for the data import. 134

135 8. Click the 3 icons to edit the Settings, run Analysis or Reports. 9. Click Analysis to view a visual representation of QuickBooks data. 135
QUICKBOOKS ONLINE ACCOUNTANT. QuickBooks Online Certification Training Guide
 QUICKBOOKS ONLINE ACCOUNTANT QuickBooks Online Certification Training Guide QuickBooks Online Certification Training Overview Legal Notices 2017 Intuit Inc. All rights reserved. Intuit, the Intuit logo,
Customers and Sales Part II
 QuickBooks Online Student Guide Chapter 7 Customers and Sales Part II Chapter 2 Chapter 7 In this chapter, you ll learn how QuickBooks handles advanced features and transactions in the area of sales and
Customers and Sales Part II
 QuickBooks Online Student Guide Chapter 7 Customers and Sales Part II Chapter 2 Chapter 7 In this chapter, you ll learn how QuickBooks handles advanced features and transactions in the area of sales and
Customers and Sales Part I
 QuickBooks Online Student Guide Chapter 3 Customers and Sales Part I Chapter 2 Chapter 3 Lesson Objectives In this chapter, you ll learn the steps necessary to set up customers, and enter sales in QuickBooks
QUICKBOOKS ONLINE CERTIFICATION COURSE. Supplemental Guide. Module 6: Payroll and Other Transactions
 QUICKBOOKS ONLINE CERTIFICATION COURSE Supplemental Guide Module 6: Payroll and Other Transactions Copyright Copyright 2017 Intuit, Inc. All rights reserved. Intuit, Inc. 5601 Headquarters Drive Plano,
Getting Started. QuickBooks Online. Quick tips to get you up and running. Create and manage invoices Track expenses See how you re doing
 Getting Started QuickBooks Online Quick tips to get you up and running Create and manage invoices Track expenses See how you re doing See inside to learn how you can get the most out of QuickBooks Online
QuickBooks Online Certification Training. Presented by: Heather D. Satterley, EA
 QuickBooks Online Certification Training Presented by: Heather D. Satterley, EA 5 Additional Resources QuickBooks Training: qbtrainingevents.com QuickBooks Online Blog: qboblog.com Intuit Proprietary and
QUICKBOOKS 2018 STUDENT GUIDE. Lesson 1. Getting Started
 QUICKBOOKS 2018 STUDENT GUIDE Lesson 1 Getting Started Copyright Copyright 2018 Intuit, Inc. All rights reserved. Intuit, Inc. 5100 Spectrum Way Mississauga, ON. L4W 5S2 Trademarks 2018 Intuit Inc. All
Lesson 1 Getting Started
 Q U IC K BOOKS 2017 STUDEN T GUIDE Lesson 1 Getting Started Copyright Copyright 2017 Intuit, Inc. All rights reserved. Intuit, Inc. 5100 Spectrum Way Mississauga, ON. L4W 5S2 Trademarks 2017 Intuit Inc.
Lesson 1 Getting Started
 Q U IC K BOOKS 2016 STUDEN T GUIDE Lesson 1 Getting Started Copyright Copyright 2016 Intuit, Inc. All rights reserved. Intuit, Inc. 5100 Spectrum Way Mississauga, ON. L4W 5S2 Trademarks 2016 Intuit Inc.
Lesson 1 Getting Started
 Q U IC K BOOKS 2017 STUDEN T GUIDE Lesson 1 Getting Started Copyright Copyright 2017 Intuit, Inc. All rights reserved. Intuit, Inc. 5100 Spectrum Way Mississauga, ON. L4W 5S2 Trademarks 2017 Intuit Inc.
Lesson 3 Working with Lists
 Q U IC K BOOKS 2017 STUDEN T GUIDE Lesson 3 Working with Lists Copyright Copyright 2017 Intuit, Inc. All rights reserved. Intuit, Inc. 5100 Spectrum Way Mississauga, ON. L4W 5S2 Trademarks 2017 Intuit
QUICKBOOKS 2018 STUDENT GUIDE. Lesson 3. Working with Lists
 QUICKBOOKS 2018 STUDENT GUIDE Lesson 3 Working with Lists Copyright Copyright 2018 Intuit, Inc. All rights reserved. Intuit, Inc. 5100 Spectrum Way Mississauga, ON. L4W 5S2 Trademarks 2018 Intuit Inc.
Lesson 3 Working with Lists
 Q U IC K BOOKS 2017 STUDEN T GUIDE Lesson 3 Working with Lists Copyright Copyright 2017 Intuit, Inc. All rights reserved. Intuit, Inc. 5100 Spectrum Way Mississauga, ON. L4W 5S2 Trademarks 2017 Intuit
1. What lists can be imported from Excel spreadsheets, when setting up a QuickBooks Online company?
 QuickBooks Online Practice Test (with answers) 1. What lists can be imported from Excel spreadsheets, when setting up a QuickBooks Online company? A) Locations, Classes, Products and Services, and Vendors
SMALL BUSINESS ACCOUNTING. User Guide
 SMALL BUSINESS ACCOUNTING User Guide Welcome to QuickBooks We're going to help you get paid, pay others, and see how your business is doing. Use this guide to learn key tasks and get up and running as
QUICKBOOKS ONLINE CERTIFICATION COURSE. Supplemental Guide. Module 4: Common Workflows Sales
 QUICKBOOKS ONLINE CERTIFICATION COURSE Supplemental Guide Module 4: Common Workflows Sales Copyright Copyright 2017 Intuit, Inc. All rights reserved. Intuit, Inc. 5601 Headquarters Drive Plano, TX 75024
Connecting Time Matters/Billing Matters and QuickBooks. 35*45 Consulting - Global 7 Second System
 Why Choose QuickBooks... 3 Why Use Billing Matters... 3 Question to Ask... 3 Getting Started in Billing Matters... 4 Getting Started in QuickBooks... 11 Linking Billing Matters and QuickBooks... 14 Using
Getting Started. QuickBooks Online. Quick tips to get you up and running. Create and manage invoices Track expenses See how you re doing
 Getting Started QuickBooks Online Quick tips to get you up and running Create and manage invoices Track expenses See how you re doing See inside to learn how you can get the most out of QuickBooks Online
QuickBooks Best Practices for Law Firms
 Opening Separate Bank Accounts Reconciling accounts and preparing for tax time is much easier if you separate personal from business bank accounts. Same goes for credit card and line-of-credit accounts.
Improving Your Workflow with QuickBooks Online Accountant. Presented by: MB Raimondi, CPA.CITP
 Improving Your Workflow with QuickBooks Online Accountant Presented by: MB Raimondi, CPA.CITP MB Raimondi, CPA.CITP Masters of Taxation Advanced Certified QuickBooks ProAdvisor Online & Desktop, Enterprise
tyuiopasdfghjklzxcvbnmqwertyuiopas
 qwertyuiopasdfghjklzxcvbnmqwertyui opasdfghjklzxcvbnmqwertyuiopasdfgh jklzxcvbnmqwertyuiopasdfghjklzxcvb nmqwertyuiopasdfghjklzxcvbnmqwer QuickBooks Instructional Manual MiraCosta College tyuiopasdfghjklzxcvbnmqwertyuiopas
Getting Around in QuickBooks
 Lesson 1 Getting Started Getting Around in QuickBooks Getting Around in QuickBooks The QuickBooks Learning Center provides access to information to help you get started. Manage your open windows QuickBooks
Getting Started. QuickBooks Online. Quick tips to get you up and running. Create and manage invoices Track expenses See how you re doing
 Getting Started QuickBooks Online Quick tips to get you up and running Create and manage invoices Track expenses See how you re doing See inside to learn how you can get the most out of QuickBooks Online
Company Activities Part II
 QuickBooks Online Student Guide Chapter 12 Company Activities Part II Chapter 2 Chapter 12 In this chapter, you ll learn how QuickBooks handles advanced transactions and tasks in QuickBooks. Growing businesses
Sage 50 Accounting. Getting started guide
 Sage 50 Accounting Getting started guide Getting started Getting started Welcome to Sage 50 Accounting! Use this guide to help you set up your company so that you are up and running as quickly as possible.
HOW INTEGRATION WORKS...3
 Contents INTRODUCTION...1 How to Use This Guide... 1 Software Editions Supported... 2 HOW INTEGRATION WORKS...3 INTEGRATION RULES... 4 INTEGRATION SETTINGS... 8 Send Settings... 8 Get Settings... 9 Account
The QuickBooks Guide to Converting QuickBooks Desktop. to QuickBooks Online. Version 8.18
 The QuickBooks Guide to Converting QuickBooks Desktop to QuickBooks Online Version 8.18 Conversion Roadmap Welcome! This guide is for anyone converting from QuickBooks Desktop (Pro or Premier) to QuickBooks
Entrepreneur. Getting Started
 Entrepreneur Getting Started G u i d e Entrepreneur Getting Started 1 Setting Up Your Company 5 Setting Up Customers & Suppliers 14 Setting Up Items 17 Essential Tasks 18 Reporting 23 System Administration
Prepare QuickBooks Online for Job Costing
 I m sure you re still hearing rumors that QuickBooks Online does not do job costing. This is simply not true. QuickBooks Online has been able to job costing for 1099 contractor costs and other expenses
Sage Simply Accounting. Getting Started Guide First Step
 Sage Simply Accounting Getting Started Guide 2012 First Step Sage Simply Accounting Getting Started Guide First Step 2012 Getting Started... 1 Setting Up Your Company... 3 Setting Up Customers and Vendors...
Q U IC K BOOKS 2016 STUDEN T GUIDE. Lesson 2. Setting Up
 Q U IC K BOOKS 2016 STUDEN T GUIDE Lesson 2 Setting Up Copyright Copyright 2016 Intuit, Inc. All rights reserved. Intuit, Inc. 5100 Spectrum Way Mississauga, ON L4W 5S2 Trademarks 2016 Intuit Inc. All
Q U IC K BOOKS 2017 STUDEN T GUIDE. Lesson 2. Setting Up
 Q U IC K BOOKS 2017 STUDEN T GUIDE Lesson 2 Setting Up Copyright Copyright 2017 Intuit, Inc. All rights reserved. Intuit, Inc. 5100 Spectrum Way Mississauga, ON L4W 5S2 Trademarks 2017 Intuit Inc. All
Getting Started Tutorial
 Getting Started Tutorial Welcome This tutorial will introduce you to the main functions of your MYOB accounting software. You can use this tutorial with the current versions of MYOB Accounting, MYOB Accounting
QUICKBOOKS 2018 STUDENT GUIDE. Lesson 2. Setting Up
 QUICKBOOKS 2018 STUDENT GUIDE Lesson 2 Setting Up Copyright Copyright 2018 Intuit, Inc. All rights reserved. Intuit, Inc. 5100 Spectrum Way Mississauga, ON L4W 5S2 Trademarks 2018 Intuit Inc. All rights
QUICKBOOKS WELCOME GUIDE. 10 easy tasks to get started
 QUICKBOOKS WELCOME GUIDE 10 easy tasks to get started Contents Find your way around 1 Customize and send an invoice 2 Receive a payment 3 Track expenses 4 Manage your contacts 5 Connect your bank accounts
Accounts Payable PARTICIPANT WORKBOOK
 Accounts Payable PARTICIPANT WORKBOOK INTEGRATED SOFTWARE SERIES Accounts Payable PARTICIPANT WORKBOOK Version 3 Copyright 2005 2009 Interactive Financial Solutions, Inc. All Rights Reserved. Integrated
INTRODUCTION TO QUICKBOOKS PRESENTED BY SHARPER TRAINING SOLUTIONS
 INTRODUCTION TO QUICKBOOKS PRESENTED BY SHARPER TRAINING SOLUTIONS CEIL HEARN Email: info@stsico.com Material: www.stsico.com/books Newsletter: www.computerkindergarten.com INTRODUCTION WHAT IS QUICKBOOKS?
5. When two companies are open what function cannot be performed in the secondary window?
 4. What does the toggle function do? a) enables a second company file to be opened b) enables the user to view the version of QuickBooks that the client has c) allows the user to have more than one window
Lesson 10 QuickBooks Inventory
 Q U IC K BOOKS 2016 STUDEN T GUIDE Lesson 10 QuickBooks Inventory Copyright Copyright 2016 Intuit, Inc. All rights reserved. Intuit, Inc. 5100 Spectrum Way Mississauga, ON L4W 5S2 Trademarks 2016 Intuit
reimbursement of expenses incurred, and not to pay bills received from other vendors such as utility bills.
 Contractor DD Q: Will the $2 fee only apply to contractors whom have DD info input? A: The fee will only apply to contractors who have been paid at least once in the month by direct deposit. Simply entering
Lesson 12. Doing Payroll with QuickBooks
 QUICKBOOKS 2016 STUDENT GUIDE Lesson 12 Doing Payroll with QuickBooks Copyright Copyright 2016 Intuit, Inc. All rights reserved. Intuit, Inc. 5601 Headquarters Drive Plano, TX 75024 Trademarks 2016 Intuit
ACCOUNTING TRAINING. Training. About Centerbase Accounting Chapter 1. Introduction. Requirements
 Introduction Chapter 1 Introduction Requirements Feature Overview Centerbase Accounting integrates fully with our existing billing features to provide a truly all in one solution for law firm financials.
Table of Contents. QuickBooks 2018 Chapter 2: Working with Customers 21. QuickBooks 2018 Chapter 1: Introducing QuickBooks Pro 1
 Table of Contents Preface UNIT 1: ESSENTIAL SKILLS QuickBooks 2018 Chapter 1: Introducing QuickBooks Pro 1 Presenting QuickBooks Pro 2 Editions of QuickBooks 2 Determining the Edition 2 Types of Tasks
QuickBooks Online Student Guide. Chapter 10. Inventory
 QuickBooks Online Student Guide Chapter 10 Inventory Chapter 2 Chapter 10 In this chapter, you ll learn how QuickBooks handles inventory. You can use QuickBooks to track the items you keep in inventory
What s New in QuickBooks 2017
 What s New in QuickBooks 2017 www.woodard.com Copyright Copyright 2016 Intuit, Inc. All rights reserved. 5601 Headquarters Drive Plano, TX 75024 Trademarks 2016 Intuit Inc. All rights reserved. Intuit,
Lesson 7 Vendors and Expenses Part 1
 Q U IC K BOOKS 2016 STUDEN T GUIDE Lesson 7 Vendors and Expenses Part 1 Copyright Copyright 2016 Intuit, Inc. All rights reserved. Intuit, Inc. 5100 Spectrum Way Mississauga, ON L4W 5S2 Trademarks 2016
Lesson 13 Estimating and Progress Invoicing
 Q U IC K BOOKS 2017 STUDEN T GUIDE Lesson 13 Estimating and Progress Invoicing Copyright Copyright 2017 Intuit, Inc. All rights reserved. Intuit, Inc. 5100 Spectrum Way Mississauga ON. L4W 5S2 Trademarks
QUICKBOOKS 2018 STUDENT GUIDE. Lesson 13. Estimating and Progress Invoicing
 QUICKBOOKS 2018 STUDENT GUIDE Lesson 13 Estimating and Progress Invoicing Copyright Copyright 2018 Intuit, Inc. All rights reserved. Intuit, Inc. 5100 Spectrum Way Mississauga ON. L4W 5S2 Trademarks 2018
Company Activities Part II
 QuickBooks Online Student Guide Chapter 12 Company Activities Part II Chapter 2 Chapter 12 In this chapter, you ll learn how QuickBooks handles advanced transactions and tasks in QuickBooks. Growing businesses
QuickBooks 2011 What's New and Improved
 QuickBooks 2011 What's New and Improved By Laura Madeira www.quick-training.com A brief review of the new and improved features and tools available for QuickBooks Pro 2011, QuickBooks Premier 2011, QuickBooks
QUICKBOOKS ONLINE PLUS: A COMPLETE COURSE Chapter 6 Sales and Receivables: Product and Service Items
 QUICKBOOKS ONLINE PLUS: A COMPLETE COURSE 2016 Chapter 6 Sales and Receivables: Product and Service Items Lecture Focus 2 Add Company Logo Customize Business Forms Create Locations and Classes Set up Sales
The Sales Process. Restore this File: This chapter uses Sales-15.QBW or Sales-16.QBW. See page 9 for more information.
 33 Chapter 2 Topics In this chapter, you will learn about the following topics: Tracking Company Sales (page 33) Setting Up Customers (page 36) Job Costing (page 42) Recording Sales (page 43) Receiving
Contents. Part One: Setting Up QuickBooks. The Missing Credits... xi. Introduction...
 The Missing Credits.... xi Introduction.... What s New in QuickBooks 2015...xv When QuickBooks May Not Be the Answer...xvii Choosing the Right Edition... xviii Accounting Basics: The Important Stuff...
The Force is Strong With This One Darth Vader, Star Wars Episode IV, Quick Start Page 1 of 14 Workamajig
 The Force is Strong With This One Darth Vader, Star Wars Episode IV, 1977 Quick Start Page 1 of 14 Workamajig Quick Start Guide This section is designed for users that wish to get started with Workamajig
QUICKBOOKS 2018 STUDENT GUIDE. Lesson 14. Multicurrency in QuickBooks
 QUICKBOOKS 2018 STUDENT GUIDE Lesson 14 Multicurrency in QuickBooks Copyright Copyright 2018 Intuit, Inc. All rights reserved. Intuit, Inc. 5100 Spectrum Way Mississauga, ON. L4W 5S2 Trademarks 2018 Intuit
Step Action See: 1 Install MYOB AccountEdge page 3. 2 Upgrade your files page 3. 3 Read about the new features in MYOB AccountEdge page 6
 MYOB AccountEdge v6 Release Notes MYOB Licence Agreement IMPORTANT READ THIS CAREFULLY BEFORE PROCEEDING. This Product (consisting of the user documentation and the installation CD or other media containing
Archdiocese of Chicago Parish QuickBooks Reference Manual
 Archdiocese of Chicago Parish QuickBooks Reference Manual April, 2016 A publication of the Archdiocese of Chicago Parish Operations INTRODUCTION... 2 USING FORMS... 2 USING LISTS... 2 USING REGISTERS...
QuickBooks Enterprise Solutions. User Guide
 QuickBooks Enterprise Solutions User Guide Copyright Copyright 2007 Intuit Inc. All rights reserved. First printing, September 2007 STATEMENTS IN THIS DOCUMENT REGARDING THIRD-PARTY STANDARDS OR SOFTWARE
Introducing Sage One Accounting
 Introducing Sage One Accounting Sage One Accounting is a simple, easy-to-use system that manages your business cycle. You can: Manage your package subscription efficiently from a central location. Use
QuickBooks Practice Test
 QuickBooks Practice Test Setup 1. During the Advanced Setup, you can turn on and off which features in the EasyStep Interview? a. Sales taxes b. Inventory c. Progress Invoicing d. All of the above 2. During
QuickBooks in the Classroom Lesson Exercises with Answers
 QuickBooks in the Classroom Lesson Exercises with Answers This document provides several multiple-choice and open-ended questions based upon the concepts introduced in each chapter. As an instructor, there
Chapter 3 Inventory. Objectives. QuickBooks Tools for Tracking Inventory
 Chapter 3 Inventory Objectives After completing this chapter, you should be able to: Activate the Inventory function (page 47). Set up Inventory Items in the Item list (page 48). Use QuickBooks to calculate
QuickBooks Fundamentals For QuickBooks Pro, Premier and Accountant 2018
 QuickBooks Fundamentals 2018 For QuickBooks Pro, Premier and Accountant 2018 Copyright 2018 Product Name QuickBooks Fundamentals - Version 2018 ISBN: 978-1-942417-22-4 Trademarks Intuit, the Intuit logo,
City National Book2Bank User Guide MARCH 2018
 City National Book2Bank User Guide MARCH 2018 Copyright 2018 City National Bank City National Bank is a subsidiary of Royal Bank of Canada Page 2 Contents BOOK2BANK OVERVIEW... 4 What is Book2Bank? 4 What
Good Practice Guide. QuickBooks Online
 Good Practice Guide QuickBooks Online WYCAS provides a range of specialist services designed to meet the needs of the third sector One to one support and training Preparation of year-end accounts Independent
QUICKBOOKS DESKTOP 2017 CERTIFICATION COURSE. Supplemental Guide. Module 2: QuickBooks Chart of Accounts and Items
 QUICKBOOKS DESKTOP 2017 CERTIFICATION COURSE Supplemental Guide Module 2: QuickBooks Chart of Accounts and Items Copyright Copyright 2016 Intuit, Inc. All rights reserved. Intuit, Inc. 5601 Headquarters
Accounts Payable Users Guide
 Accounts Payable Users Guide Updated 05/28/2014 Page 1 of 9 Accounts Payable The accounts payable application is used to enter records that require cash disbursement (computer check, manual check, virtual
ArchiOffice QuickBooks Integration
 Office and Project Management Solution ArchiOffice QuickBooks Integration Advanced Integration Guide BQE Software, Inc. 2601 Airport Drive Suite 380 Torrance CA 90505 Support: (310) 602-4030 Sales: (888)
QUICKBOOKS ONLINE PLUS: A COMPLETE COURSE Chapter 7: Payables, Purchases, and Inventory
 QUICKBOOKS ONLINE PLUS: A COMPLETE COURSE 2016 Chapter 7: Payables, Purchases, and Inventory Lecture Focus 2 Prepare Purchase Orders Add Inventory Items Receive Inventory Items Close Purchase Orders Merchandise
HealthEquity Employer Portal Guide HealthEquity All rights reserved.
 HealthEquity Employer Portal Guide 2013-2015 HealthEquity All rights reserved. INTRODUCTION 09 ACCESSING PENDING PAYMENTS 01 LOGIN PROCESS 09 MODIFYING EMPLOYER INFORMATION 01 ADDING INSURANCE INFORMATION
BillQuick Peachtree Integration
 Time Billing and Business Management Software Built With Your Industry Knowledge BillQuickPeachtree Integration Integration Guide BQE Software, Inc. 2601 Airport Drive Suite 380 Torrance CA 90505 Support:
QuickBooks Premier 2018 Level 1
 Courseware 1767 QuickBooks Premier 2018 Level 1 Accounting Series Course Description This course introduces basic accounting tasks using the Canadian version of QuickBooks Premier Accountant Edition 2018.
Track 1. Track 2. Grow Your Practice with QuickBooks Online Virtual Conference: July 12, Eastern Time 10:45 AM to 11:00 AM 11:00 AM to 11:15 AM
 Grow Your Practice with QuickBooks Online Virtual Conference: July 12, 2018 Eastern Time 10:45 AM 11:00 AM 11:00 AM 11:15 AM 11:15 AM 11:30 AM Track 1 Eastern Time Networking Lounge, Exhibit Hall Open
1
 1 2 3 4 5 6 7 8 9 10 QuickBooks Online Training Agenda 1. Security & Backup a. Intuit Security Specs b. Backup Options 2. General Navigation a. Navigation Bar i. Dashboard ii. Banking iii. Sales iv. Expenses
QuickBooks Complete For QuickBooks Pro, Premier and Accountant 2018
 QuickBooks Complete 2018 For QuickBooks Pro, Premier and Accountant 2018 Copyright 2018 Product Name QuickBooks Complete - Version 2018 ISBN: 978-1-942417-21-7 Trademarks Intuit, the Intuit logo, QuickBooks,
Welcome to QuickBooks Online Certification Training
 Welcome to QuickBooks Online Certification Training Module 3 Banking, Payroll, Apps and Reporting Presenter Member of: QuickBooks ProAdvisor, Diamond Level Intuit Trainer/Writer Network Trainer: Weekly
Copyrights and Trademarks. Copyrights and Trademarks. Sage One Accounting Getting Started Guide 1
 Copyrights and Trademarks Copyrights and Trademarks Sage One Accounting Getting Started Guide 1 Copyrights and Trademarks Copyright 2002-2016 by Us. We hereby acknowledge the copyrights and trademarks
Accounting Master Update for Version 14.2
 Accounting Master Update for Version 14.2 Date: October 2014 From: MACC s Product Development Team Re: Version 14.2 Release The following enhancements have been made to the Accounting Master software application.
BillQuick 2015 Update Log
 BillQuick 2015 Update Log List of Items addressed in release 16.0.20.0 February 10, 2016 (SP3A) 1. BillQuick QuickBooks sync was not working due to certification issue. This was fixed. List of Items addressed
transactions, 298 transfers, 237 vendors, 223 entering bills, 174 payments, 201 addresses, Company Information,
 index A accepting credit cards, 358-359 license agreements, 27 access files, 369 firewalls, 23 Access importing, 49 integration, 3, 363-365 accountant reviews, 306-307 files creating journal entries, 316
QuickBooks in Your Own Office Best Practices for Increasing Efficiency. Part A Managing Your Practice & Invoicing Your Clients
 QuickBooks in Your Own Office Best Practices for Increasing Efficiency Managing Your Practice & Invoicing Your Clients Copyright Copyright 2008 Intuit, Inc. Intuit, Inc. All rights reserved. PO Box 7850,
Workflow Process: Sales Orders
 Workflow Process: Sales Orders Click on the Sales Order icon on the Home Page or go to Customers => Create Sales Orders. Sales orders are used for tracking a customer s order prior to shipping. The information
QuickBooks in the Classroom Lesson Exercises
 This document provides several multiple-choice and open-ended questions based upon the concepts introduced in each chapter. As an instructor, there are many uses for these exercise questions, such as:
Getting started
 Getting started 2016.3 Getting started Getting started Welcome to Sage 50 Accounting! Use this guide to help you set up your company so that you are up and running as quickly as possible. If you have not
ArchiOffice QuickBooks Integration
 Office and Project Management Solution ArchiOffice QuickBooks Integration Integration Guide BQE Software, Inc. 2601 Airport Drive Suite 380 Torrance CA 90505 Support: (310) 602-4030 Sales: (888) 245-5669
Sage What's new. March 2017
 Sage 300 2017 What's new March 2017 This is a publication of Sage Software, Inc. 2017 The Sage Group plc or its licensors. All rights reserved. Sage, Sage logos, and Sage product and service names mentioned
Tip #1: Data Entry Tricks Practice these tips in my Core Training Interactive Tutorial
 21 QuickBooks Tips and Tricks with Penny Lane 2011 Tip #1: Data Entry Tricks Practice these tips in my Core Training Interactive Tutorial 1 Use the Tab Key to move between fields. When you use the Tab
Sage What's new. March 2017
 Sage 300 2017 What's new March 2017 This is a publication of Sage Software, Inc. 2017 The Sage Group plc or its licensors. All rights reserved. Sage, Sage logos, and Sage product and service names mentioned
New for 2009! Detecting and Correcting with the Client Data Review Feature
 Chapter 17 New for 2009! Detecting and Correcting with the Client Data Review Feature Introduction: Features and Benefits Starting a Client Data Review Customizing the Client Data Review Center Account
Mastering QuickBooks: Software Updates, General Ledger and Tips & Tricks. Presented by Dharma Diaz-Azcuy, CPA Fall 2015
 Mastering QuickBooks: Software Updates, General Ledger and Tips & Tricks Presented by Dharma Diaz-Azcuy, CPA Fall 2015 Introductions WBL is a full service accounting firm WBL s Client Accounting Group
QUICKBOOKS ONLINE PLUS: A COMPLETE COURSE Chapter 4: Payables and Purchases
 QUICKBOOKS ONLINE PLUS: A COMPLETE COURSE 2016 Chapter 4: Payables and Purchases Lecture Focus 2 Record and Pay Bills Create Bills Edit Bills Prepare Checks Using Pay Bills Write Checks for Direct Payment
O U T C O M E S B Y D E S I G N WORKBOOK1
 WORKBOOK1 XERO TRAINING HANDBOOK 1. BANK RECONCILIATION The biggest, and most time-saving feature of Xero is its usage of bank data feeds. This makes reconciling your bank statement an easy process without
Sage MAS 90 and 200 Product Update 2 Delivers Added Value!
 Sage MAS 90 and 200 Product Update 2 Delivers Added Value! The second Sage MAS 90 and 200 4.4 Product Update 4.40.0.2 is available via a compact download from Sage Online. Delivering additional features
Copyright Basware Corporation. All rights reserved.. Vendor Portal User Guide Basware P2P 17.3
 Copyright 1999-2017 Basware Corporation. All rights reserved.. Vendor Portal User Guide Basware P2P 17.3 Table of Contents 1 Vendor Portal Registration... 4 1.1 Register for Vendor Portal...4 2 Vendor
IntegraPay + Xero. Setup guide
 IntegraPay + Xero Automated invoice payments and reconciliation Setup guide Australia and New Zealand P: 1300 592 283 (AUS) 0800 480 054 (NZ) E: admin@integrapay.com www.integrapay.com Introduction IntegraPay
Billing Methods Guide
 Billing Methods Guide Copyright 2013-2018 Software Technology, LLC 1621 Cushman Drive Lincoln, NE 68512 (402) 423-1440 Tabs3.com Tabs3, PracticeMaster, and the pinwheel symbol ( ) are registered trademarks
Lesson 12 QuickBooks Payroll
 Q U IC K BOOKS 2017 STUDEN T GUIDE Lesson 12 QuickBooks Payroll Copyright Copyright 2017 Intuit, Inc. All rights reserved. Intuit, Inc. 5501 Spectrum Way Mississauga ON. L4W 5S2 Trademarks 2017 Intuit
Lesson 13. Estimating and Progress Invoicing
 QUICKBOOKS 2016 STUDENT GUIDE Lesson 13 Estimating and Progress Invoicing Copyright Copyright 2016 Intuit, Inc. All rights reserved. Intuit, Inc. 5601 Headquarters Drive Plano, TX 75024 Trademarks 2016
MYOB Accounting Plus v16 MYOB Accounting v16
 MYOB Accounting Plus v16 MYOB Accounting v16 Release Notes MYOB Licence Agreement IMPORTANT READ THIS CAREFULLY BEFORE PROCEEDING. This Product (consisting of the user documentation and the installation