PLETTAC METRIX USER GUIDE
|
|
|
- Myra Cannon
- 6 years ago
- Views:
Transcription

1 PLETTAC USER GUIDE Providing quality products and services at a competitive price. Valid Only For Genuine Equipment
2 DISCLAIMER: Whilst TRAD Hire & Sales Ltd and the author have made every reasonable effort to ensure that the information contained within this user guide is correct at the time of printing, you should be aware that TRAD Hire & Sales Ltd and the author do not accept any liability for any inconvenience, loss or damage caused by the result of any inaccuracy, or omission, within this publication. PLEASE NOTE You should read and ensure you understand this manual in its entirety prior to commencing work. Only trained and competent operatives should erect, dismantle or modify PLETTAC scaffolding at all times. 1 PLETTAC User Guide

3 TABLE OF CONTENTS 3 About TRAD Hire & Sales Ltd 5 About PLETTAC 7 PLETTAC & Safety 9 Manual Handling 10 Safety on Site 11 General Rules for Safety 13 Components 29 Erection & Dismantling Guidance 43 Bracing 45 Loading 46 Tying 49 Safe Working Heights of the PLETTAC System 51 Stability & Buttressing 53 Staircase Towers 59 Loading Towers 63 Static & Mobile Towers 65 Ladder Access Towers 67 Internal Birdcages 69 Circular Access 73 Other Products TABLE OF CONTENTS GUIDANCE NOTE This manual is valid only for the use of Genuine PLETTAC system scaffold, manufactured by Altrad Plettac and supplied by TRAD Hire & Sales Ltd. TRAD Hire & Sales Ltd and Altrad Plettac reserve the right to alter or amend without notice the design and / or specifications of any of the equipment forming part of the PLETTAC system, in the interests of improvement. TRAD Hire & Sales Ltd

4 ABOUT TRAD HIRE & SALES LTD ABOUT TRAD Hire & Sales Ltd TRAD Hire & Sales Ltd, a member company of the TRAD Group, is one of the UK s market leaders for the supply of system scaffolding, scaffold tube, fittings, boards, stair towers, temporary roofing systems and associated equipment. All the products we stock are of the highest quality and comply fully with all relevant British or European Standards. In addition, with our commitment to exceeding all safety standards, all our products, whether sourced internationally or within the UK, are subject to thorough testing by qualified external UK & European testing bodies. From the smallest requirement up to complete hire or sale packages, our UK-wide network of depots have the resources and capabilities to meet every demand. TRAD Hire & Sales Ltd is a full non-contracting member of the National Access & Scaffolding Confederation (NASC) and is a fully accredited ISO 9001 company. The TRAD Group is a member of the Altrad Group of companies. FS PLETTAC User Guide
5 4
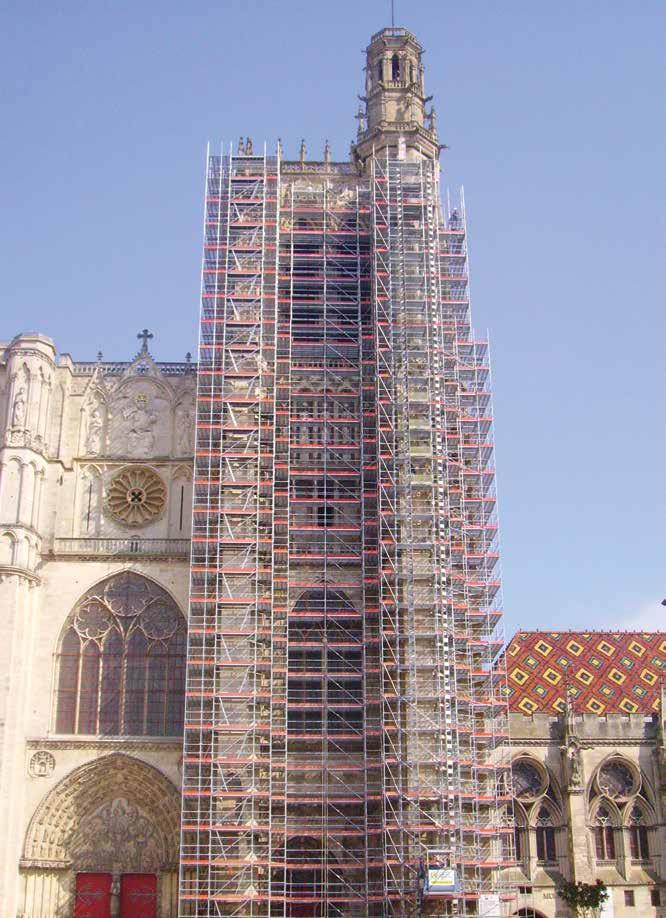
6 ABOUT PLETTAC ABOUT PLETTAC PLETTAC is a hot-dipped galvanized scaffold system which utilizes a wedge head, welded to the end of the horizontal members (such as ledgers and transoms). This head fits exactly round the perforated rosettes, which contain specially formed openings capable of taking up to eight horizontals / diagonals at any one time. These rosettes are welded to the vertical support members (standards) at 500mm intervals. Due to the way the rosette openings are formed virtually any angle can be set. The wedges are driven home with a 500g hammer, until the jarring blow, giving a rigid and secure connection by friction. PLETTAC is a revolutionary rosette system, where the sizes of horizontal members are divisible by a combination of other sizes. This has the advantage of allowing extra verticals within the bay length or breadth, by using smaller horizontals on one side. For example a 2.5m bay may be split on the opposing side using 1.5m and 1m horizontals. This is a unique feature, no other rosette or ring system achieves this with standard tubular equipment in both horizontal directions. PLETTAC uses base collars for setting out allowing one operative to base the scaffold out safely, and requires no further levelling once the base lift has been set out. It is generally faster to erect, adapt and dismantle than other system scaffolds, and over 60% quicker than conventional tube and fittings. PLETTAC can be used with three types of platform, galvanized steel decks; aluminium decks; or combined aluminium & plywood decks. PLETTAC is a true modular scaffolding system that is easily adaptable, and is particularly suitable for use in heavy duty industrial and civil engineering applications. This guide sets out the basic components of the system and how to use them. This system can be used for all types of access scaffold work, from the basic to the complex. For information on PLETTAC components and applications not shown in this guide, please contact your nearest TRAD Hire & Sales Branch (locations are detailed on the rear cover of this guide). 60º 15º 60º 15º 120º 90º 5 PLETTAC User Guide
7 PLETTAC offers many advantages over other forms of scaffolding, including: Divisibility Strength PLETTAC s unique feature allows the use of extra vertical members within the middle of a bay, with the use of smaller ledger or transom sizes. PLETTAC s rosette and wedge head system forms a positive, frictional locking connection that makes it extremely robust with load capacities in excess of those provided by conventional tubes & fittings and other system scaffolds. ABOUT PLETTAC Speed Compatibility Cost Savings PLETTAC s rosette and wedge head fixing device makes PLETTAC system scaffold faster and simpler than most other system scaffolds. PLETTAC can also be used in conjunction with traditional tubes, fittings & boards. PLETTAC s lack of loose components coupled with the galvanised finish make the system easy to use and exceptionally cost effective. PLETTAC is tested in line with the ISO 9001 series of quality management systems and has met or exceeded the criteria to satisfy BS EN 12810, BS EN and the NASC Code of Practice. PLETTAC and its associated products offer compliance with the current editions of the following: BS EN Part 1 Façade Scaffolds made of prefabricated components: Product Specifications BS EN Part 2 Façade Scaffolds made of Prefabricated Components: Particular Methods of Structural Design BS EN Part 1 BS EN Part 2 BS EN Part 3 BS EN 39 Part 1 BS EN 74 Series BS 2482 Scaffolds - Performance Requirements & General Design Information on Materials Temporary Works Equipment - Load Testing Metal Scaffolding, Couplers and Special Couplers in Steel Couplers, Spigots and Base Plates for use in Falsework and Scaffolds Timber Boards for use in Scaffolding PLETTAC holds the following Designations under BS EN : EN N SW09/300 H2 B LS EN N SW09/300 H2 A LS EN N SW09/250 H2 A LS EN N SW06/300 H2 B LS EN N SW06/300 H2 A LS TRAD Hire & Sales Ltd
8 PLETTAC & SAFETY PLETTAC & SAFETY 1 Competence of Erectors Work at Height / Fall 2 Prevention Competence of individuals working at height is now a direct requirement of the current Work at Height regulations. Consequently, employers have a duty to ensure that all individuals involved in the erection, modification or dismantling of any scaffolding equipment have received the training necessary to enable them to carry out their work in a safe manner. The Construction Industry Scaffolders Record Scheme (CISRS) is currently recognised as a world-leader in providing specific system training through the System Scaffold Product Training Scheme (SSPTS), which ultimately provides the requisite level of competence. SSPTS is available through our nationally accredited training partners. For further information, please contact your local TRAD Hire & Sales depot, details of which can be found on the rear cover of this guide or visit The current edition of the Work at Height Regulations places a duty on employers to protect individuals from harm. Scaffolding inevitably carries a risk of falling from height and consequently, it is of paramount importance that all activities are assessed for risk, planned and a safe system of work is adopted during any scaffold activity. It is therefore strongly recommended that the procedures outlined in the NASC s guidance note SG4 - Preventing Falls in Scaffolding Operations are followed. SG4 describes several safe methods of work, including the use of collective fall protection systems such as an advanced guardrail or scaffolder s steps. PLETTAC has a system exclusive permanent advanced guardrail system, which provides collective fall protection for scaffold operatives, and all other trades, from erection to dismantle. Advanced Guardrail Permanent Advanced Guardrail 7 PLETTAC User Guide
9 3 Harness and Lanyard Anchor Points To ensure the safety of PLETTAC erectors, it is important that fall protection equipment is only attached to those components that are capable of withstanding any likely imposed loads. This section details the key components acceptable for attachment, based on all scaffolds being erected in accordance with this guide. PLETTAC & SAFETY GUIDANCE NOTE ATTACHMENT CAN ONLY BE MADE TO THE FOLLOWING COMPONENTS! PLETTAC rosette 2m above the platform the erector is standing on, and secured by transom and ledger. PLETTAC rosette 1m above the platform the erector is standing on, and secured by transom or ledger. PLETTAC tubular horizontals (only those of 48.3mm outside diameter), in order of preference: 2m above the platform the erector is standing on; at guardrail height; and then, as a last resort, at foot level. All horizontals must be secured at both ends. 4 Rescue of Suspended Casualties While the current Work at Height Regulations requires that work at height be carried out safely, they also require that contingency plans be made for any eventuality. This extends to making plans to rescue personnel suspended by fall arrest equipment. Personnel should be fully trained to use all relevant rescue equipment for the event of a suspended casualty. Note: Details relating to rescue and what should be considered can be found in the latest editions of the NASC guidance notes SG4 & SG19 (SG19 - A Guide to Formulating a Rescue Plan ). TRAD Hire & Sales Ltd
10 MANUAL HANDLING MANUAL HANDLING The following basic rules should be adhered to when manually handling the PLETTAC system and associated components. Plan lay down / storage areas in advance, to reduce the distance materials have to be manually handled. Always check the transit route before manual handling, to ensure that it is suitable and free from obstructions and any tripping hazards. When handling long materials, beware of damaging property, overhead electric lines, other people and moving vehicles. Only tackle loads that can be reasonably handled by the individuals involved i.e. consider personal physical capabilities. Manual handling operations should be eliminated where possible, by using mechanical handling equipment and manual handling aids whenever possible. These include light-lines, gin wheel, forklifts and cranes etc. Use the correct knots and hitches if using rope to lift equipment. Note: Details relating to manual handling and what should be considered can also be found in the latest edition of the NASC guidance note SG6 Manual Handling in the Scaffolding Industry. GUIDANCE NOTE Always use the correct kinetic handling technique: Make sure your feet are on a firm level base, a comfortable distance apart ( Approx. 300mm ). Use your legs and not your back to bend. Raise your head slightly and tuck in your chin to keep your spine straight. Avoid turning / twisting the trunk of the body. 9 PLETTAC User Guide
11 As is the case with any scaffold, only trained and authorised scaffold operatives should carry out the erection, dismantling or modification of a PLETTAC structure. Consideration must always be given to those that may be affected by the works being carried out. To ensure that the highest standards of safety performance are maintained, consideration should be given to the following: SAFETY ON SITE If the scaffold is on rough or uneven ground, ensure that it is erected on adequate timber sole boards which are properly levelled and bedded, and that the ground is capable of withstanding the proposed loadings. All working platforms must be complete with double guardrails and a toe board, and free from trip hazards or projections. Where there is a risk of items falling, the use of the brick guards should be considered. Do not overload the working platforms with brick or any other materials. If you require to stack large quantities of material at platform level, then a PLETTAC loading tower should be utilised. All scaffolds require adequate bracing and ties. Neither should be removed without giving consideration to firstly installing alternative bracing or ties, to ensure the continued safety of the scaffold (further design may be required). Stair access towers or ladders must be provided for all working platforms. Staircase towers provide safe and convenient access for operatives and materials. Staircases should be the preferred choice for access. For shorter duration projects where the use of ladders is acceptable for access, ensure they are founded on a solid base and are securely fixed at the top Head protection Protective overalls Steel toe cap boots All scaffolds must be erected in strict accordance with this user guide. Any configurations outside of this guide including sheeting, netting or other similar wind sails should be referred to a person competent in the design of PLETTAC. Any unauthorised interference should be immediately reported to site management with any incomplete or unsafe parts of the scaffold being clearly marked and access restricted. All PLETTAC components require visual inspection before use. No damaged equipment should be used within the scaffold structure. Any equipment found damaged should be immediately set aside in a quarantined area, clearly marked and senior management informed. Maintenance and repair procedures should only be carried out by qualified / approved personnel. Always wear appropriate PPE with Hi-Vis where required. Typical PPE requirements Eye protection (when required) Full harness fall arrester Protective gloves SAFETY ON SITE TRAD Hire & Sales Ltd
12 GENERAL RULES FOR SAFETY GENERAL RULES FOR SAFETY Always Always ensure all who erect, adapt and dismantle the scaffold are trained and competent to do so. Always ensure all risk assessments and method statements have been carried out, then communicated to those concerned, and understood. Always ensure that there is adequate storage space for the materials. Always ensure that there is clear access to the work area and that the ground is level and suitable for the scaffold. Always work to current SG4 guidelines. Always ensure that there are adequate tying points. Always ensure loads are evenly distributed. Always ensure scaffold inspections are carried out and recorded as per current legal requirements. Always ensure that all defects are notified to the site management immediately. Never Never let untrained persons erect, modify or dismantle the scaffold. Never remove guardrails, toe boards or brick guards. Never remove ties without prior approval. Never create gaps in platforms by removing decks or boards. Never remove restrictions or warning signs from the scaffold structure. Never undermine the scaffold by digging trenches underneath or near the base. Never add sheeting or netting without prior approval. Never use damaged materials. Never allow unqualified / unapproved personnel to repair damaged equipment. Never load directly on to the access scaffold s working platform (always use a loading tower). Never overload the scaffold. REMEMBER Safety is no accident. Don t risk it - if in doubt ask! The information given in this PLETTAC user guide relates solely to genuine PLETTAC equipment supplied by TRAD Hire & Sales Ltd. 11 PLETTAC User Guide

13 TRAD Hire & Sales Ltd
14 COMPONENTS MAIN COMPONENTS 1 COMPONENTS Standards These items form the vertical members of the scaffold and are made from 48.3mm diameter x 3.2mm thick high-grade steel tube. They incorporate the distinctive rosettes which are welded at 500mm centres. The lowest rosette is located at 400mm from the bottom of the standard, to the upper surface of the rosette. The rosettes are the fixing points for up to eight further components (ledgers, transoms, diagonals, etc.). At the top of the standards, there is a 200mm crimped spigot that allows the vertical connection of further standards. Where there is a need for transmission of heavy tension loads (hung scaffolds for example) standards are available with bolted spigots. At the bottom and top of each standard, there are corresponding drilled holes to allow two standards to be bolted together. Crimped Spigots Code Height (m) Overall Height (m) Weight (kg) Bolted Removable Spigots Code Height (m) Overall Height (m) Weight (kg) PLETTAC User Guide
15 2 Base Collar 4 Divisible Metrix Ledgers Used at the base of the scaffold in conjunction with the adjustable base jacks, or in the forming of cantilevered scaffolds. Code Height (m) Weight (kg) These components form the longitudinal ledgers of the system, and for widths of up to 1.00m can also be used as the transoms. The wedge heads welded at each end locate around the rosettes of the standards, to form the basic bay sizes. When ledgers are used as transoms, the PLETTAC decks fit directly onto the 48.3mm diameter tubular member of the ledger. COMPONENTS These components are also used to form the guardrails on boarded platforms. 3 Adjustable Base Jacks The 6 tonne adjustable base and head jack comes in three sizes, and is used in conjunction with base collars, to accommodate variations in ground levels. Code Height (m) Weight (kg) Code Standard Spacing (m) Overall Length (m) Weight (kg) MAIN COMPONENTS TRAD Hire & Sales Ltd
16 COMPONENTS 5 Reinforced Double Ledgers / Transoms Used as a transom where increased load capacity is required or, where a width of over 1m is necessary. PLETTAC decks fit directly onto the tubular upper chord member. 6 Vertical Diagonals (Brace) This component forms all types of vertical bracing that is required for a PLETTAC scaffolding structure. Brace come in differing lengths to suit any bay length combined with a 2m lift height. A swivelling wedge head is positioned at each end of the brace to allow connection to the structure, both ends must be fixed. Double Ledgers Alternative sizes of vertical brace may be available for differing lift heights. MAIN COMPONENTS Code Standard Spacing (m) Overall Length (m) Weight (kg) Code Standard Spacing (m) Overall Length (m) Weight (kg) Transoms Code Standard Spacing (m) Overall Length (m) Weight (kg) PLETTAC User Guide
17 7 Horizontal Diagonal Plan Brace Used to stabilise 1.0m wide PLETTAC scaffold on structures which are not fully decked. An angled wedge head is positioned at each end of the brace to allow connection to the structure, both ends must be fixed. 8 Code Size (m) 1.00m x 2.50m Overall Size (m) Diagonal Ledger Plan Brace Weight (kg) Used to stabilise 2.5m square PLETTAC scaffold structures, particularly useful in forming plan brace or wing ties in buttresses or loading towers. A wedge head is positioned at each end of the brace to allow connection to the structure, both ends must be fixed. Code Size (m) 2.50m x 2.50m Overall Size (m) Weight (kg) Steel Decks Used to form the working platform, these decks are manufactured from galvanised steel. They are laid directly onto the tubular supports, and come complete with handles, wind clips, anti-tilting devices and slots for toe boards. Available in both 0.30m an 0.20m wide. The allowable working load is 6kN/m². Note: Integral handles are for manual handling only, they are not to be used as a fixing point for ropes, light-lines or other lifting apparatus. Code Length (m) Width (m) Weight (kg) COMPONENTS MAIN COMPONENTS TRAD Hire & Sales Ltd
18 COMPONENTS 10 Steel Scaffold Boards A replacement for conventional timber scaffold boards and used predominantly as a lap-board to cover gaps in the main deck at awkward corners, etc. These boards come equipped with small spigots to the underside which are fixed through the holes on the main deck and secured with a 3mm diameter security pin. 11 Security Pin A 3mm diameter security pin to secure the steel scaffold boards. Code Weight (kg) MAIN COMPONENTS Code Length (m) Width (m) Weight (kg) Composite Trapdoor Decks Used to form openings within the working platform, to allow access / egress, these are manufactured with an aluminium frame, and a composite timber sheet for the platform. They are laid directly onto the tubular supports, and come complete with handles, wind clips, anti-tilting devices and slots for toe boards. Only available in 600mm wide. The 3m and 2.5m lengths come complete with an aluminium ladder. Code Length (m) Width (m) Weight (kg) PLETTAC User Guide
19 13 Aluminium Ladder A lightweight ladder designed to span between 2m lifts. Can be used with all types of trapdoor decks. 15 Timber Toe Board A 150mm high treated timber toe board. Has steel pins which fit in the corresponding slots on the decks. COMPONENTS Code Length (m) Weight (kg) Code Length (m) Weight (kg) Steel Toe Board A 150mm high electroplated steel toe board. The fitment on the end locates round the standards. Code Length (m) Weight (kg) Lite Console Hop-Up Bracket This item is located at the standard, to provide support outwith the main platform, for a 300mm wide deck. Code Length (m) Weight (kg) MAIN COMPONENTS TRAD Hire & Sales Ltd
20 COMPONENTS ACCESS MAIN COMPONENTS 17 Reinforced Console Hop-Up Bracket These components are designed to increase the width of the overall working platform, by supporting additional decks beyond either face of the scaffold. They incorporate a wedge head at both ends for attachment to the main scaffold, and to locate base collars or standards on the opposing face. The 0.7m wide can also support an aluminium stair flight. Code Length (m) Weight (kg) One Metre Reinforced Console Hop-Up Bracket These components are designed to increase the width of the overall working platform, by supporting additional decks beyond either face of the scaffold. They incorporate a wedge head at both ends for attachment to the main scaffold, and to locate base collars or standards on the opposing face. They can also support an aluminium stair flight. Code Length (m) Weight (kg) Ledger to Ledger Side Bracket 18 Coupler Console Hop-Up Bracket This item is located (via a half-coupler) at the standard, to provide support outwith the main platform, for a 200mm wide deck. Code Length (m) Weight (kg) This item is located in any position between two standards, and is supported by two ledgers at the same level. They provide deck support outwith the main platform. Code Platform Width (m) Side Width (m) Weight (kg) PLETTAC User Guide
21 21 This item is located in any position between two standards, and is supported by two ledgers on different levels (one above the other, 500mm apart). They provide deck support outwith the main platform. 22 Intermediate Console Hop-Up Bracket Code Length (m) Weight (kg) Intermediate Transom (Ledger to Ledger) 23 Used to create an opening in a platform between a deck and a ledger. 24 Intermediate Transom (Deck to Ledger) Code Length (m) Weight (kg) Intermediate Transom (Deck to Deck) COMPONENTS ACCESS MAIN COMPONENTS Used where the platform requires intermediate support, they span between the inner and outer ledgers and are secured in place by a locking device at one end, to prevent movement during use. Code Length (m) Weight (kg) Used to create an opening in a platform between two decks. Code Length (m) Weight (kg) TRAD Hire & Sales Ltd
22 COMPONENTS ACCESS ANCILLARY COMPONENTS COMPONENTS This section details components not covered by other categories, and completes the PLETTAC system range of products. 1 Permanent Advanced Guardrail This product is manufactured from galvanised steel and is used as an alternative to traditional ledgers and guardrails. As the guardrails are installed from the secured level below, scaffold operatives are constantly within a protected area. Code Length (m) Weight (kg) ANCILLARY COMPONENTS 2 Permanent Advanced Side Guardrail The guardrails are installed from the secured level below, perpendicularly to the permanent safety guardrails, for towers between 1.5m and 3m wide. Code Length (m) Weight (kg) Safety Swing Gate A self-closing gate that is used to allow safe access to and from the working platform, where a ladder access is provided. Code Length (m) Weight (kg) PLETTAC User Guide
23 4 Steel Cover Plate 6 Universal Filler Deck A 0.28m wide plate used to cover small gaps in the scaffold. Particularly useful at return corners with inside decks. Secured to the steel decks with four cover plate screws. Code Length (m) Weight (kg) These optional steel plates are used to cover the ledger between the main platform and the inside decks. Code Length (m) Weight (kg) COMPONENTS ACCESS ANCILLARY COMPONENTS 5 Cover Plate Screw 7 Swivel Base Jacks Manufatured from high density polyethylene (PEHD) these are used to secure the steel cover plates to the steel decks. To support standards on sloping ground, up to 45-degrees from the horizontal. These should always be secured to a timber sole board using the holes provided. Code Weight (kg) Code Length (m) Weight (kg) TRAD Hire & Sales Ltd
24 COMPONENTS 8 Castor Wheel Used in place of adjustable base jacks when PLETTAC is erected to form mobile towers. Load carrying capacity 11.9kN for centric load introduction. Code Weight (kg) Protection Fan Bracket Fits to the outside standards of the scaffold structure and are linked with PLETTAC decks and ledgers to form a protection fan. Must be supplemented with raking tubes to support the outer edge at each location. It is acceptable to use EN 39 tube and EN 74 load bearing couplers. Code Length (m) Weight (kg) ANCILLARY COMPONENTS 9 Trim Beam 50mm deep galvanised steel beam with two wedge heads either side. Used where the scaffold width needs to be changed from 1m to 0.7m, or vice versa m Starting Standard Code Length (m) Weight (kg) Can be used in place of the base collar, when connecting to the outer wedge head of the console hop-up brackets. Code Weight (kg) PLETTAC User Guide
25 12 Wedge Spigot for Standard Use in place of, or where a half coupler cannot be fixed, to allow a puncheon standard to be fixed. 14 U-Head Ledger Spigot for Standard Use where a half coupler cannot be fixed, to allow a puncheon standard to be fixed. COMPONENTS Code Weight (kg) Code Weight (kg) Coupler Ledger Spigot for Standard 15 U-Head Beam Spigot for Standard ANCILLARY COMPONENTS Attached to a lattice beam or ledger, via the half-coupler, to allow a puncheon standard to be fixed. Use where a half coupler spigot cannot be attached, to allow a puncheon standard to be fixed to a wedge head beam. Code Weight (kg) Code Weight (kg) TRAD Hire & Sales Ltd
26 COMPONENTS ANCILLARY COMPONENTS 16 Galvanised Steel Wedge Head Beams 50mm deep galvanised steel beam with two wedge heads either side. Used to create openings within the scaffold. Code Length (m) Weight (kg) Adjustable Base Jack Retainer Used to secure the adjustable base jacks, when lifting PLETTAC scaffold by crane. 19 Code Length (m) Weight (kg) Corner Deck 17 Wedge Head Fittings Used for connecting conventional 48.3mm diameter scaffold tube to an PLETTAC scaffold at the rosette. Available in two types, swivel and perpendicular. These galvanised steel units allow inside platforms at internal corner returns. A wedge head locates around the rosette of the standard, while hooks fit directly over the adjacent Console Hop-Up Brackets or Ledgers. Also available in other sizes. Code Size (m) Weight (kg) x Code Type Weight (kg) Perpendicular Swivel PLETTAC User Guide
27 20 U-Head Intended for use with standards with no spigots. U-Heads provide placement to hold aluminium, steel and timber beams. 22 Toe Board Clip Used to fix conventional scaffold boards as toe boards, and also where the fixing of proprietary toe boards is not possible in the normal manner. COMPONENTS Code Length (m) Weight (kg) Code Weight (kg) Lifting Spigot 23 Rosette Coupler ANCILLARY COMPONENTS Replaces the spigot in the top of a bolted spigot standard, to allow lifting by crane. Maximum load not to exceed 700kg per spigot, and must be fixed with two nut / bolt sets per spigot. Code Weight (kg) Used to fix PLETTAC components to the standards at any level between the welded rosettes. Code Weight (kg) TRAD Hire & Sales Ltd
28 COMPONENTS COMPONENTS USEFUL DIMENSIONS 1 Crimped Standards 3 Base Jacks USEFUL DIMENSIONS / 1000 / 1500 / 2000 / 2500 / 3000 / Base Collar / 610 / Bolted Standards Rosette 60º 115º 44º º All dimensions in mm unless stated. 27 PLETTAC User Guide
29 6 Ledgers COMPONENTS (300) (400) (500) (700) (1000) (1300) (1500) (2000) (2500) (3000) 7 Vertical Diagonals (Brace) USEFUL DIMENSIONS (700x2000) (1000x2000) (1500x2000) (2000x2000) (2500x2000) (3000x2000) 8 Steel Decks 300 / / All dimensions in mm unless stated. TRAD Hire & Sales Ltd

30 ERECTION & DISMANTLING GUIDANCE For every bay size there is a corresponding colour code on the ledgers and the vertical diagonal brace, making each corresponding size easily identifiable, and leaving no room for error in the preparation of works. One colour of ledger and diagonal brace on one bay. BAY SIZE COLOUR CODING 0.7m 1m 1.3m 1.5m 2m 2.5m 3m 29 PLETTAC User Guide
31 ERECTION & DISMANTLING GUIDANCE This section describes the basic erection and dismantling procedures for PLETTAC scaffolds. As with all scaffolding, only trained, competent operatives should erect, dismantle or modify PLETTAC scaffolds at any time. TRAD Hire & Sales Ltd recommends, that as a minimum, the working practices for all scaffold activities set out in the NASC s document SG4 Preventing Falls in Scaffolding are applied at all times. Prior to commencing work, make sure all method statements, risk assessments and permits are in place, and that suitable tie points are available. Ensure that the ground is level and firm and capable of taking the imposed load of the completed scaffold. Where required, use wooden sole boards of the correct size to spread the load over the ground. Set out the scaffold according to the ground levels and working platform heights required. If using inside boards, determine the set-off distance required from the building. Start from the most convenient point, usually at the highest ground level, adjacent to the corner of the building. It is recommended that erecting and dismantling the scaffold is carried out by a minimum of two operatives. Current legislation states that, when complete, a scaffold is required to be inspected: Before being used for the first time. Following significant alteration. At least every seven days from the date of the last inspection. Following adverse weather or any event likely to have affected its strength or stability. Further advice on inspection and handover requirements can be found in the current edition of the NASC s publication SG35 Guidance on the Handover of Scaffold Structures Note: If using advanced guardrails or scaffolder s steps, information relating to the use of these products should be obtained from the original supplier. ERECTION & DISMANTLING GUIDANCE ACCESS BASIC ERECTION COMPONENTS PROCEDURE BASIC ERECTION PROCEDURE Step 1 Step 2 Screw adjustable base jacks to their estimated height, and layout with wooden sole boards or plastic pads (dependent on the make-up of the supporting ground), along with ledgers and transoms in their approximate positions (Fig.1). Place a base collar over each base jack as shown (Fig.2). Fig. 1 Fig. 2 TRAD Hire & Sales Ltd
. The scaffold base can now be extended to the required length, by adding further components to the existing bay, using the same procedures described (Fig. 5).")
32 ERECTION & DISMANTLING GUIDANCE BASIC ERECTION PROCEDURE Step 3 Step 5 Connect the rosettes of the base collars with the chosen size of ledgers and transoms, by locating the wedges in the appropriate hole (Fig. 3). The scaffold base can now be extended to the required length, by adding further components to the existing bay, using the same procedures described (Fig. 5). Note: Once the scaffold is levelled and aligned for all base lifts, no further levelling of the scaffold is required. Fig. 3 Fig. 5 Step 4 Step 6 You may complete the first bay by levelling the scaffold structure using the adjustable base jacks with the aid of a spirit level, making any adjustments necessary (Fig. 4). Drive the wedges home, with a 500g hammer, until the jarring blow is identified. Standards are now set in the base collars. In this example three and four metre standards are used (Fig. 6). Although not necessary with PLETTAC, it is considered good practice to alternate the standard sizes in scaffolds above 6m high. This allows joints to be set within different levels. Fig. 4 Fig PLETTAC User Guide
33 Step 7 Step 9 If required, the bottom level may be decked at this point and a single handrail may be installed to create a protected work area for scaffolders. This is followed by the construction from below of the first working platform, by connecting ledgers and transoms at the required height (Fig. 7). The appropriate sizes and type of decks, are then located upon the transoms (Fig. 9). Where required, a trap deck and ladder may be installed. ERECTION & DISMANTLING GUIDANCE Fig. 7 Fig. 9 Step 8 Step 10 Once the steel for the first level is complete, the face brace is fixed to the rosettes and should span from lift level to lift level (Fig. 8). Note: Please see page 44 for the frequency of brace required. Each deck is equipped with a wind clip at either end. Turn the clips under the tubular transom to prevent any uplift in case of strong winds (Fig. 10). ACCESS BASIC ERECTION COMPONENTS PROCEDURE Fig. 8 Fig. 10 TRAD Hire & Sales Ltd
. Note: It may be necessary to top-out the standards before guardrails may be fixed.")
34 ERECTION & DISMANTLING GUIDANCE ACCESS BASIC ERECTION COMPONENTS PROCEDURE Step 11 The working platform and access area can now be completed, by adding double guardrails / toe boards / safety gates, and paying particular attention to the current NASC guidance note SG4 Preventing Falls in Scaffolding (Fig. 11). Note: It may be necessary to top-out the standards before guardrails may be fixed. Step 12 Additional lifts can be constructed, simply by adding further standards onto the spigots of the lower lift. Ledgers, transoms and decks are then used, as previously described, to create the next level (Fig. 12). Note: Always ensure that the scaffold is braced and tied in accordance with bracing and tie patterns specified in this user guide. Fig. 11 Fig. 12 BASIC ERECTION PROCEDURE ADVANCED GUARDRAIL SYSTEM Steps 1 to 6 Proceed as described in the previous sections 1 to 6. Note: When using the permanent advanced guardrail system it is necessary to always have two rosettes above the next lift level available. This enables the fixing of the guardrails from the level below. This is achievable by forward planning, and the use of various different standard sizes. Step 7 If required, the bottom level may be decked at this point and a single handrail may be installed to create a protected work area for scaffolders. The framework for the next working platform can now also be installed by connecting the transoms and the inside ledgers only, in the same manner as before (Fig. 13). Fig PLETTAC User Guide
. Note: The advanced guardrail system is more easily fixed by holding the panels to the outside of the scaffold structure.")
35 Step 8 Step 10 Install the permanent advanced guardrail units by locating the top hooks into the rosettes at upper guardrail height, then connect the lower wedge heads to the rosettes at ledger level (Fig. 14). Note: The advanced guardrail system is more easily fixed by holding the panels to the outside of the scaffold structure. Step 9 Step 11 The appropriate sizes and type of decks, are then located upon the transoms. Remember to turn the wind-clips as described previously. Where required, a trap deck and ladder may be installed (Fig. 16). Fig. 14 Fig. 16 COMPONENTS ERECTION & DISMANTLING GUIDANCE ACCESS BASIC ERECTION COMPONENTS PROCEDURE The face brace should now be connected to the structure at the rosettes on the bottom lift, and should span from lift level to lift level on the bottom lift only (Fig. 15). The working platform and access area can now be completed by adding toe boards / safety gates / double inside guardrails if necessary, and paying particular attention to the current NASC guidance note SG4 Preventing Falls in Scaffolding (Fig. 17). Fig. 15 Fig. 17 TRAD Hire & Sales Ltd
.")

. Fig.")
36 COMPONENTS ERECTION & DISMANTLING GUIDANCE ACCESS BASIC ERECTION COMPONENTS PROCEDURE Step 12 Additional lifts can be constructed, as before, simply by adding further standards onto the spigots of the lower lift. Ledgers, transoms, advanced guardrail units and decks are then used, as previously described, to create the next level (Fig. 18). Note: Always ensure that the scaffold is braced and tied in accordance with bracing and tie patterns specified in this user guide. 1 BASIC ERECTION PROCEDURE Fixing of Ledgers When positioning ledgers, firstly place the wedge head at one end of the ledger, on top of the rosette, hooking the wedge into the appropriate hole. This prevents the ledger becoming loose while the opposing end is positioned correctly and fixed. Move the wedge head into the correct position and drive the wedge home once the second end is secure (Fig. 19). Fig. 18 TIPS AND TRICKS 2 Through the Trap Method A safe method of work can be adopted by fixing the guardrails of the next lift by sitting in the trap door of the ladder access. This allows the operative to then move into a safe area. Operatives must have their harnesses attached to an appropriate fixing point until all wedges on the guardrails are driven home and there is no possibility of falling (Fig. 20). Note: The far end of the guardrail must initially be fixed as per Fig 19. Fig. 19 Fig PLETTAC User Guide
37 CORNER RETURNS AND INSIDE PLATFORMS This section completes the erection process, by showing methods in which PLETTAC scaffolding can be used to create corner returns and inside platforms. Corner returns can be formed by using either a configuration of divisible ledgers or perpendicular wedge head fittings. 1 Corner Returns using Divisible Ledgers Due to the revolutionary nature of the PLETTAC system s divisible ledgers, corner returns can be formed by using a combination of ledgers of differing sizes, linking two scaffold runs together, at right angles. If a ledger is positioned to the inside within the last bay, of an existing run of PLETTAC scaffold remove this first. Position an inside standard, equipped with a collar and jack (at the required height and correct distance from the building face) at the inner face of the last bay of the existing scaffold. The new standard is then linked, using the required smaller sizes of ledger, to the existing inside standards of the first run of scaffold (some minor height adjustments may be required with the aid of a spirit level). This now forms the first set of standards for the corner return (Figs. 21 & 22). If the distance from the new standard to the existing end standard is greater then the desired width of the new elevation, then a second new standard (equipped with a collar and jack at the required height) is positioned between, and linked with the required length of ledger (Fig.23). Continue erecting the new elevation, fixing components in the sequence and manner described in the basic erection guide. Console hop-up brackets are used to create inside platforms, which allow most building projections to be overcome Fig. 21, Divisible Ledger Method Fig. 22, Divisible Ledger Method COMPONENTS ERECTION & DISMANTLING GUIDANCE ACCESS CORNER COMPONENTS RETURNS AND INSIDE PLATFORMS Fig. 23, Divisible Ledger Method TRAD Hire & Sales Ltd
38 ERECTION & DISMANTLING GUIDANCE CORNER RETURNS AND INSIDE PLATFORMS 2 Corner Returns using Wedge Head Fittings ( Fly-past ) Corner returns can be formed by using perpendicular wedge head fittings to link two PLETTAC scaffold runs together, at right angles. This allows for the fly-past method to be adopted, eliminating the need for non-standard bays. Attach a wedge head fitting, via the half coupler, to the bottom, inner ledger of the existing scaffold, at the correct distance from the building face. Position an inside standard, equipped with its collar and jack (at the required height), alongside and connect to the wedge head in the normal way. Fix a second wedge head fitting at the next lift level, plumb and secure the standard into position. Now, place the outside standard with collar and jack (set at the correct height) alongside the inner ledgers of the existing scaffold. Connect the inside and the outside standards, firstly at the base lift level and then the next lift level, with ledgers of the required size. Wedge head fittings can now be used to fix these standards to the existing ledgers (some minor height adjustments may be required with the aid of a spirit level). This now forms the first set of standards for the corner return (Fig. 24). Continue erecting the new elevation, fixing components in the sequence and manner described in the basic erection guidance, taking care to cover any gaps with a suitable board or deck. 3 This item is located (via a half-coupler) at the standard, to provide support outwith the main platform, for a 200mm wide deck, and can be positioned anywhere between the rosettes. The decks prevent the brackets from spreading. It is particularly useful in forming a step from the scaffold to another level (Fig. 25). Where required, use conventional scaffold boards or steel boards to cover any remaining gap in the inside platform. 4 Using the Coupler Console Hop-Up Bracket Fig. 25 Using the 0.4m Reinforced Console Hop-Up Bracket These components are fixed to the standards at the required height in the usual manner. Once the hop-up brackets are connected insert one 300mm deck per bay to create the inside platform. The decks prevent the brackets from spreading (Fig. 26). Where required, use conventional scaffold boards or steel boards to cover any remaining gap in the inside platform. Fig. 24, Fly-past method Fig PLETTAC User Guide
39 Using the 0.7m Reinforced Console Hop-Up Bracket These components are fixed to the standards at the required height in the usual manner. Once the hop-up brackets are connected insert two 300mm decks, or one 600mm wide deck per bay to create the inside platform. The decks prevent the brackets from spreading (Fig. 27). Where required, use conventional scaffold boards or steel boards to cover any remaining gap in the inside platform. TR ME 6 Using the 1m Reinforced Console Hop-Up Bracket These components are fixed to the standards at the required height in the usual manner. Once the hop-up brackets are connected insert three 300mm decks, or one 300mm plus one 600mm wide deck per bay to create the inside platform. The decks prevent the brackets from spreading (Fig. 29). Where required, use conventional scaffold boards or steel boards to cover any remaining gap in the inside platform. IX TR TR TR IX ME Fig. 27 The 700mm wide console hop-up bracket can also be used to support a 600mm wide aluminium staircase unit (Fig. 28). IX IX Fig Inside Platform Guardrails Where required, an inside platform guardrail can be created by attaching a collar to the brackets, which incorporate an inside wedge head. Standards of the appropriate size are then placed in the collars, to allow the location of ledgers in the rosettes to form the inside guardrails. Fig. 28 CORNER RETURNS AND INSIDE PLATFORMS ME ME ERECTION & DISMANTLING GUIDANCE 5 Note: W here reinforced console hop-up brackets are used to support aluminium staircase units, or where the inside deck arrangement is wider than the main deck, qualified design input must be sought from a competent temporary works / scaffold design engineer, regarding the design and positioning of ties and the connection between vertical standards. TRAD Hire & Sales Ltd
. Fig.")

40 ERECTION & DISMANTLING GUIDANCE CORNER RETURNS AND INSIDE PLATFORMS 8 Using the Ledger to Ledger Side Bracket This item is located in any position between two standards, and is supported by two ledgers at the same level. They provide deck support outwith the main platform (Fig. 30 & 31). Fig It is permissible to use conventional tube, fittings and boards, to supplement the PLETTAC system, where required. Examples of this are: Tying In Additional Bracing Cantilever Platforms Rakers Inside Platform Guardrails Non-standard bays Joining off-set bays / runs This list is not exhaustive. For further information and supply, please contact your local TRAD Hire & Sales Ltd depot, details of which can be found on the rear cover of this guide. Note: All tube and fittings must comply with the relevant standards detailed on page 6 of this manual. Fig PLETTAC User Guide
41 TYPICAL DECK LAYOUTS 0.3m ledger = 1 No. 200mm wide deck 0.5m ledger = 2 No. 200mm wide deck 0.4m ledger = 1 No. 300mm wide deck 0.7m ledger = 2 No. 300mm wide deck ERECTION & DISMANTLING GUIDANCE TYPICAL DECK LAYOUTS 1m ledger = 3 No. 300mm wide deck 1.3m ledger = 4 No. 300mm wide deck 1.5m ledger = 4 No. 300mm wide deck + 1 No. 200mm wide deck 2m ledger = 5 No. 300mm wide deck + 2 No. 200mm wide deck 2.5m ledger = 8 No. 300mm wide deck 3m ledger = 9 No. 300mm wide deck + 1 No. 200mm wide deck TRAD Hire & Sales Ltd
42 ERECTION & DISMANTLING GUIDANCE BASIC DISMANTLING PROCEDURE BASIC DISMANTLING PROCEDURE Step 1 Prior to commencing work, make sure all method statements, risk assessments and permits are in place. Step 2 Check that the scaffold is still in the properly erected condition. Make sure that all components and ties have not been interfered with and all platforms are clear of any loose material and debris prior to dismantling. Step 3 Decide on the safe lowering method by which the components shall be removed to the ground, for example hand to hand, crane, hoist, forklift truck or hand-line. Under no circumstances should bombing be used to lower equipment. Once the components are safely on the ground they should be stacked neatly ready for transportation. Step 5 All components fixed above the top platform s guardrails should be removed by un-securing the wedges via a hammer blow and removing the component from the rosette. Components should then be lowered to ground level. Step 6 The top working platform can now be dismantled, paying particular attention to the current NASC guidance note SG4 - Preventing Falls in Scaffold Operations. If using an advance guardrail or scaffolder s step information relating to the use of these products should be obtained from the original supplier. Step 7 Remove any toe boards and associated brackets, and transfer to the ground. Step 4 To allow access and also for the removal of materials, make sure that there is a minimum of one bay of the scaffold that is a safe working platform, i.e. fully boarded & guardrailed for the full height of the scaffold. Step 8 If using ledgers as guardrails, un-secure their wedges as previously described. Removing all the guardrails from the rosettes and any topped out standards as you go, move progressively along the scaffold towards the access point. Components should then be lowered to ground level. 41 PLETTAC User Guide
43 Step 9 From a safe working platform directly below remove all decks. These components should either be lowered to the ground or used to create a platform on the next level, if the scaffold is not fully boarded. Note: If the scaffold is not fully boarded, a temporary safe working platform must be installed, below each lift, during the progressive dismantle. Step 12 At ground level, remove all standards from the collars, then work progressively towards the last bay, removing components from the rosette of the collars. Remove the collars from the adjustable base jacks when they are no longer attached. ERECTION & DISMANTLING GUIDANCE Step 10 Un-secure the wedges at the previous platform level. Remove all components progressively and lower to the ground. When dismantling face bracing they must be removed in one action. Brace should not be left hanging from one fixing point. Step 11 Repeat steps 6 to 10, dismantling and lowering the scaffold in the sequence described. Step 13 If any element of this dismantling sequence cannot be complied with, please seek advice from your local TRAD Hire & Sales Ltd depot, details of which can be found on the rear cover of this guide. BASIC DISMANTLING PROCEDURE Note: Ties should be dismantled progressively, and only be removed when they prevent further dismantling. GUIDANCE NOTE When dismantling long elevations of PLETTAC scaffolding it may be easier to dismantle the scaffold in sections ( i.e. five or six bays at a time ). Always make sure that any remaining scaffold is left in a safe and secure condition. TRAD Hire & Sales Ltd
44 ABOUT BRACING TRAD HIRE AND SALES LTD Fig. 32 Fig PLETTAC User Guide

45 BRACING 1 Diagonal Face Bracing 2 Ledger Bracing PLETTAC system scaffolding requires a certain amount of diagonal face brace to eliminate any tendency for the scaffold to distort or sway. Where ledgers are used as guardrails, face bracing is required one bay in every 15m maximum, i.e. every fifth 3m bay or sixth 2.5m bay, for the full height of the scaffold structure. The brace in each subsequent bay should face the opposite direction from those in the previous (Fig. 32). When used in an independent access scaffold erected in 2.0m lift heights, up to a maximum height of 24.0m, the PLETTAC permanent advanced guardrail system stabilises the structure. It is therefore only necessary to fix face brace from the ground level to the first level of the structure that these handrails are located, with the frequency and direction as previously described. The permanent advanced guardrails must be fitted to all further lifts, or face bracing must be applied as normal (Fig. 33). When the permanent advanced guardrails are used in situations other than which is previously described, face brace must be fixed as normal. If possible bracing of the end bays should be avoided. PLETTAC structures do not generally require ledger bracing under normal use. Ledger bracing can be used when ties cannot be located in the correct positions, or where scaffolds extend above the building. Advice must be sought from a competent temporary works / scaffold design engineer in these situations. 3 Plan Bracing PLETTAC structures only require plan bracing under certain conditions. Where the structure is not fully decked, plan brace must be fitted at each un-decked level. In this situation the plan brace is fixed to each bay which has face brace attached (one bay in every 15m maximum). Where systemised brace is not available, the use of BS EN 39 tube and BS EN 74 fittings is acceptable as an alternative, in all cases. Scaffold tubes of the appropriate length can be fixed to the standards with right angled couplers within 300mm of the node point, directly below the lift. Plan bracing may also be required where ties cannot be located in their correct positions. For information relating to this, or any other situation not detailed, please refer to a competent temporary works / scaffold design engineer. ABOUT BRACING TRADLOK TRAD Hire & Sales Ltd
46 LOADING 1 LOADING Working Platform The maximum loading for a PLETTAC system scaffolding is 6kN/m² (BS EN load class 6), based on 2.5m bay lengths and 1m bay widths (using reinforced transoms). For scaffolds with more than one working lift, the maximum loading is one platform at 6kN/m² + one other at 3kN/m². All working platforms are checked under each load case in accordance with EN :2003, table 3, for the 3m, 2.5m and the 2m ledger sizes. 2 Loads Imposed Upon the Foundations of an PLETTAC Scaffold The foundations for a PLETTAC scaffold should be adequate to carry and disperse the loads imposed, both locally at each standard and, in general, to carry the whole weight of the scaffold. The responsibility for the adequacy of the foundations should be established and approved prior to erection. The client for the scaffold and / or the contractor may need to be consulted. The foundation for a scaffold should be maintained in an adequate condition during the life of the scaffold. Regular inspection procedures must be completed in line with current legislation and the use of the scaffold should be suspended if there is found to be any loss of support. 3 Component Capacities For individual component load capacities please contact your nearest TRAD Hire & Sales Branch (locations are detailed on the rear cover of this guide). 45 PLETTAC User Guide
47 1 TYING Forces Upon the Building Structure from Ties All access scaffolds will impose forces upon the structure they are fixed to, through their ties. An assessment should be initially made regarding the ability of the structure they are fixed to, either globally, due to its own instability, or locally, as a result of defective finishes. Loadings from the ties into the supporting structure are dependent upon the live loading to the working platforms, the height of the scaffold, the wind loading imposed upon the scaffold, and the cladding status of the scaffold. Where ties cannot be positioned in the correct pattern, qualified design input must be sought. ABOUT TYING TRADLOK 2 Tie Connections Appropriate continuous lengths of tube, or the proprietary tie tubes should be fitted to the inside and outside standards or ledgers of the PLETTAC structure (Fig. 34). The positioning of the tie axis must be within 300mm of the node point, although within 150mm is considered good practice. Where required to satisfy the Headroom Class, H2, of BS EN , the tie axis must be no more than 200mm from the node point. Standard BS EN 39 tube and BS EN 74 right angle fittings can be used to form the tie connection in conjunction with a proprietary tie system (Figs. 35 & 36). Note: Where ties cannot be positioned within 300mm of the node point, or where clear headroom is required, standard or light duty ties may be fixed to only the inside standards or ledgers. However, qualified design input must be sought from a competent temporary works / scaffold design engineer, regarding their design and positioning. Fig. 34 Fig. 35 Fig. 36 TRAD Hire & Sales Ltd
48 TYING In addition to masonry anchors, the following tie assemblies (Figs ) may also be used to ensure the stability of the PLETTAC system. Where suggested configurations cannot be used, qualified design input must be sought. Fig. 37 Fig. 38 Fig. 39 Fig. 40 Note: A minimum of three ties must be tested and at least 5% (1 in 20) thereafter. These should be chosen at random and spread evenly throughout the structure. 47 PLETTAC User Guide
49 1 Tie Patterns The following grids (Figs ) detail the tie patterns to be used with PLETTAC scaffold (Max. lift heights 2m). ABOUT TYING TRADLOK Additional ties are to be positioned on the two outer sets of standards, the maximum distance between being 4m. In all other cases the maximum vertical distance on one row, between ties is 8m. Horizontally the ties must be positioned at every second row of standards. The maximum vertical distance between each horizontal row of ties is 4m, with alternate standards being tied from the last preceding row. Note: Where ties cannot be positioned in the correct pattern, qualified design input must be sought. Fig. 41, Ties every 24m 2 Additional ties are to be positioned on the two outer sets of standards, the maximum distance between being 2m. In all other cases the maximum vertical distance on one row, between ties is 4m. Horizontally the ties must be positioned at every second row of standards. The maximum vertical distance between each horizontal row of ties is 2m, with alternate standards being tied from the last preceding row. Where this pattern is not possible, it is acceptable to fix ties at every row of standards, every second lift, to achieve ties every 12m². Fig. 42, Ties every 12m 2 Note: Where ties cannot be positioned in the correct pattern, qualified design input must be sought. TRAD Hire & Sales Ltd
50 SAFE WORKING HEIGHTS OF THE PLETTAC SYSTEM LOAD CASE BAY LENGTH (m) SCAFFOLD DESIGNATION BAY WIDTH (m) TRANSOM TYPE CLADDING TYPE Max Height in Metres (m) TIES AT ALTERNATE LIFTS (24m 2 ) TIES AT EVERY LIFT (12m 2 ) TUBULAR NONE DEBRIS NET REINFORCED NONE DEBRIS NET TUBULAR NONE DEBRIS NET TUBULAR NONE DEBRIS NET REINFORCED NONE DEBRIS NET TUBULAR NONE DEBRIS NET TUBULAR NONE DEBRIS NET TUBULAR NONE DEBRIS NET 24.0 The maximum height to which a PLETTAC Scaffold may be erected is dependant upon a number of factors, the most important of which are: The vertical and horizontal distances between tied points on a standard. The lift height. Wind loading. The vertical loadings in the legs due to the self-weight, and the working platform loading. Whether or not the foot ties are used. The inclusion of Debris Netting or Sheeting to the Scaffold. Whether or not the cantilever platforms are used. 49 PLETTAC User Guide
51 SAFE WORKING HEIGHTS OF THE PLETTAC SYSTEM The Safe Height Table shown is based on all scaffolds being limited to a maximum height of 24m (12 lifts) incorporating a maximum of two working lifts. This is due to the increased potential for wind loading to vary from the standard guidance because of local conditions. Scaffolds in excess of this height and / or incorporating more than two working lifts can be constructed, but special consideration should be given to their design. Please contact your local TRAD Hire & Sales depot or a competent temporary works / scaffold design engineer for guidance if these or any of the conditions below are to be exceeded. The Safe Working Height table is based on: Tie patterns being adhered to at all times. 2m lift heights. PLETTAC scaffold s wind loads being calculated to BS EN 12811, where the in service wind speed is 18.05m/s, and the out of service wind speed varies between 22.23m/s and 30.55m/s. All locations have no significant local features such as cliffs, steep hills, ridges, in coastal locations, to tall structures surrounded by other tall structures which may cause funnelling of the wind pressures, or altitudes in excess of 100m above sea level and within 100km of the closest distance to sea upwind. If the site; is at least 2km inside a town terrain, is shielded by buildings within 100m and the average height of the surrounding buildings are 5m or more then it is classified as a Town site. All other locations are considered to be Country. The safe height table and section capacities contained within this PLETTAC user guide are based upon live loading from the intended use only. Additional loading may accrue on the working platforms or components as a consequence of atmospheric precipitations such as ice, snow, sand or dust. The working processes may also cause debris such as sand, grit or demolition debris to accumulate on the working platforms or components, which will also increase the live loading above that allowed for. Where this is seen to occur or is expected to occur, further guidance should be sought from a competent temporary works / scaffold design engineer, which may result in a downgrading of the Load Class of the scaffold. The parameters detailed in this manual are based on calculations, and are the results of extensive testing by accredited independent testing facilities. PLETTAC has achieved the status of an NASC approved system, and complies fully with the NASC s Code of Practice. Note: For pavement lifts and floor height lifts greater than 2m, the advice of a competent temporary works / scaffold design engineer should be sought. ABOUT SAFE WORKING TRADLOK HEIGHTS OF THE PLETTAC SYSTEM Two working lifts: one fully loaded and one at 50% loading. Foot ties fitted to all scaffolds. Any debris netting spans from lift height to lift height. TRAD Hire & Sales Ltd
52 STABILITY & BUTTRESSING STABILITY & BUTTRESSING 1 Rakers On structures where it may not be suitable to use physical tie arrangements, a PLETTAC scaffold, which is not sheeted or debris netted, can be supported up to a height of 6m using raking tube arrangements. Single galvanised BS EN 39 tubes up to a maximum length of 6.4m may be used as rakers. These are preferably fixed at the top to the ledgers with BS EN 74 right angle couplers, or secondly fixed to the standards using BS EN 74 swivel couplers. These raking tubes are then tied back to the standards at the foot and mid-levels using galvanised tube and BS EN 74 right-angled couplers. The rakers are then joined horizontally at these lower levels by galvanized tube ledgers and right-angled couplers. The angle of the raking tube should be at no more than 2:1 (vertical to horizontal). At the foot of the raker, a galvanised tube should be driven into the ground at a 45-degree angle, to a depth of approximately 1.2m. The capacity of these anchors is dependent on the ground conditions. If these anchors are not suitable, kentiledge weight may be used as an alternative. Please contact your local TRAD Hire & Sales depot or a competent temporary works / scaffold design engineer for guidance (Fig.43). Fig. 43, Typical Raker Detail 51 PLETTAC User Guide
53 2 Buttresses Again on structures where it may not be suitable to use physical tie arrangements, it is possible to achieve stability of a PLETTAC scaffold, which is not sheeted or netted, by using fully braced buttresses. Typically, buttresses will be erected using a 2.5m x 2.5m bay or a 3m x 3m bay, and positioned at a frequency of one in every four bays. The remaining standards on the main access scaffold (between buttresses) require to be plan braced (wing-tied) to the outer standard of the nearest buttress, using galvanised tube and right-angled couplers. To prevent any tendency for the scaffold to fall inwards, small lengths of tube must butt against the wall, or structure. These tubes must be connected to the inside face of the scaffold with BS EN 74 Class B right angled fittings, within 300mm of the node points. If the preceding is not suitable, it may be necessary to anchor the outside standards of the buttress to the ground, or use kentiledge weight as an alternative. Information and guidance relating to these arrangements should be sought from a competent temporary works / scaffold design engineer. The maximum height to which a 2.5m x 2.5m buttress arrangement can support a 1m wide independent PLETTAC scaffold is 10.5m, while a 3m x 3m buttress may support the same to 12m high. Advice must to be sought from a competent temporary works / scaffold design engineer for heights in excess of this level (Fig. 44). ABOUT STABILITY TRADLOK & BUTTRESSING Fig. 44, Typical Buttress Detail TRAD Hire & Sales Ltd
54 STAIRCASE TOWERS PLETTAC Typical Staircases Fig. 45 Fig. 46 Fig. 47 Fig. 48 Valid Only For Genuine Equipment 53 PLETTAC User Guide
55 STAIRCASE TOWERS PLETTAC staircase towers provide a safe, user-friendly solution and are quick and simple to erect, allowing improved access and egress for site personnel. PLETTAC staircase towers are available in different configurations, according to load capacity and height requirements. Special staircase components can be used with standard PLETTAC equipment to form staircase towers. Aluminium staircase units are placed within either a 2.5m or 3m long bay which are either 1.5m or 2m wide. Certain staircase towers need not have separate landing platforms, these are incorporated within several models of the aluminium units. 2 Staircase Unit with Landing These units are available in varying sizes, for maximum flexibility. Units have hooks, at the top and bottom platforms, that locate over the ledger. Code Size (m) Weight (kg) x 2.0 x x 2.0 x x 1.0 x x 2.0 x x 2.0 x x 1.0 x ABOUT STAIRCASE TRADLOK TOWERS These staircase towers should be tied at every standard, every other lift. 1 Staircase Unit without Landing These units are only available for a 2.5m bay with 2m lift height. All units come complete with hooks, at the top and bottom of the stair stringers, that locate over the ledgers. Code Size (m) Weight (kg) x Internal Guardrail Liaison These provide internal edge protection to close any gap at the landings, between internal guardrails. It comes in two sizes, the longer length for the 3.0m stair and the shorter for the 2.5m stair. Code Length (m) Weight (kg) TRAD Hire & Sales Ltd
56 STAIRCASE TOWERS 4 Internal Guardrail 6 Landing Guardrail These aluminium units provide internal edge protection to the staircase units with landings, they are attached with four 10mm diameter nuts and bolts. Provides edge protection on landings of a 2.5m or 3m tower. Code Stair Size (m) Weight (kg) Code Size (m) Weight (kg) x x External Guardrail 7 Junction Plate These steel units provide external edge protection to the staircase units with landings, they are attached to the standards via wedge heads. Junction plate between two stair units of 900mm at adjacent landings. Code Stair Size (m) Weight (kg) Code Stair Size (m) Weight (kg) PLETTAC User Guide

57 ABOUT TRADLOK TRAD Hire & Sales Ltd
58 STAIRCASE TOWERS PLETTAC Typical 4-Leg 3m x 1.5m Bay Staircase Quantity List Code Description 2m 4m 6m 8m 10m 12m tonne Adjustable Base Jack Collar m Standard m Standard m Standard m Ledger m Ledger m Reinforced Ledger m x 2m Vertical Diagonal m x 2m Vertical Diagonal m x 0.3m Steel Deck m x 0.2m Steel Deck m x 2m x 0.6m Staircase with Landing m External Guardrail m Internal Guardrail m x 0.5m Landing Guardrail Internal Guardrail Liaison m Steel Toe Board m Steel Toe Board m Steel Toe Board continued on next page 57 PLETTAC User Guide
59 continued Code Description 14m 16m 18m 20m 22m 24m STAIRCASE TOWERS tonne Adjustable Base Jack Collar m Standard m Standard m Standard m Ledger m Ledger m Reinforced Ledger m x 2m Vertical Diagonal m x 2m Vertical Diagonal m x 0.3m Steel Deck m x 0.2m Steel Deck m x 2m x 0.6m Staircase with Landing m External Guardrail m Internal Guardrail m x 0.5m Landing Guardrail Internal Guardrail Liaison m Steel Toe Board m Steel Toe Board m Steel Toe Board TRAD Hire & Sales Ltd
60 LOADING TOWERS PLETTAC Typical Loading Tower Fig. 49 Valid Only For Genuine Equipment 59 PLETTAC User Guide
61 LOADING TOWERS The PLETTAC loading tower (see Fig. 49) uses standard PLETTAC components along with a special safety gate, to form a strengthened platform specifically for the loading of materials by forklift truck or crane. Depending on the load capacity required standard steel decks are placed on either reinforced ledgers or the steel wedge head beams. The standard loading tower has a plan depth of 2.5m and can be either 2m, 2.5m or 3m wide on the opening side. They can be erected either as part of the main scaffold structure or a stand-alone tower. In both cases, suitable ties are required, along with façade and plan bracing (wing ties). LOADING TOWERS 1 Loading Tower Safety Gate In order to provide leading edge protection before, during and after loading of materials onto the loading tower, the loading tower safety gate should be used. This system uses an up-and-over counterbalance mechanism providing a continuous guardrail before, during and after loading, ensuring the operator is at all times protected (Fig.50). Must be used in conjunction with two U-Head Ledger Spigot for Standards (code ). Code Size (m) Weight (kg) Fig. 50 TRAD Hire & Sales Ltd
62 LOADING TOWERS 2 Loading Tower Working Detail Depending on the load capacity required, either reinforced ledgers, or steel wedge head beams are fixed to both sides of the tower. They span from the front to the rear standards and connect to either one or two node points (rosettes) on each standard. Ledgers of required size are then used to complete the rectangle / square of the tower. The loading tower can now be boarded using standard steel decks (see page 40 for configuration). Guardrails to the side of the tower are formed, using a 1m standard connected to a support spigot, which is located on the top chord of the reinforced ledger or wedge head beam. Between the 1m standard and the existing tower standards 1m ledgers are fixed on one side, with 1.5m ledgers to the other, completing the guardrail. Leading edge protection is formed from the loading tower safety gate that is attached to the top rosette of the 1m guardrail standards. As the wedge head beam covers two node points, when using this component, the lowest point on which the first working lift on the scaffold can be located is at the second rosette height. A foot-tie must be used and sole boards of the correct size must be placed beneath each adjustable base jack. The loading tower must be braced on all four sides where possible. However, if multiple platforms are being used and the tower is part of a larger PLETTAC structure, then the loading tower must be braced on the front elevation from foot-tie level, to the first working lift (if possible), and on both sides for the full height of the scaffold. Loading towers that are part of a larger main scaffold require to be plan braced (wing-tied) from the outer standard to the main scaffold on both sides of every lift. Note: All loads must be spread evenly across the platform. For loading towers with more than one working lift, the maximum loading is one platform at 100% loading (see table below) + one other at 50% loading. Code Component Description Gate Width (m) Safe Working Load (kn) Safe Working Load (kn/m 2 ) m Reinforced Ledger 3.00m m Reinforced Ledger 2.50m m Reinforced Ledger 2.00m m Wedge Head Beam 3.00m m Wedge Head Beam 2.50m m Wedge Head Beam 2.00m PLETTAC User Guide

63 LOADING TOWERS TRAD Hire & Sales Ltd
64 STATIC & MOBILE TOWERS PLETTAC Typical Mobile Tower Fig. 51 Valid Only For Genuine Equipment 63 PLETTAC User Guide
65 STATIC & MOBILE TOWERS PLETTAC towers can be erected using standard components, standard adjustable base jacks, or bespoke castor wheels, for full mobility (Fig. 51). Static towers may be erected to a maximum height of 24m, provided they are secured in line with the tie pattern shown in figure 52. Heights above this are possible but should be referred to a competent temporary works / scaffold design engineer. STATIC & MOBILE TOWERS All towers must be fitted with façade bracing on all external faces throughout the full height of the PLETTAC tower. Additional plan bracing is also required where the frequency between decked levels exceeds 4m throughout the tower. Plan bracing can be installed using BS EN 39 scaffold tubes and BS EN 74 fittings. Note: Scaffold ties must be fitted to both inside and outside standards. Fig. 52 TRAD Hire & Sales Ltd
66 LADDER ACCESS TOWERS PLETTAC Typical Ladder Access Fig. 53 Fig. 54 Valid Only For Genuine Equipment 65 PLETTAC User Guide
67 LADDER ACCESS TOWERS PLETTAC ladder access towers can be used within a PLETTAC main scaffold structure, or as an independent ladder access tower. The ladder access tower framework should be erected in accordance with the procedures set out in the basic erection guide, being normally built within a 2.5m or 3m bay. A trap door deck replaces two 300mm wide decks on the scaffold platform. The 3m and 2.5m trapdoor deck platforms have an integral aluminium ladder attached, while aluminium ladders need to be attached to smaller sized trapdoor decks. Trapdoors can be positioned at almost any position in a PLETTAC scaffold with clever use of the three types of intermediate transoms and trapdoor decks (Fig. 55). When ladder towers are required as the access to a PLETTAC main scaffold structure, their location should be given careful consideration, taking into account the following recommendations: platform to remain intact. The end guardrails provide a firm handhold above the platform. When an external ladder access tower is not feasible, the ladder access should be positioned to the end of a scaffold run. This will keep any disruption to the working platform to a minimum. The end guardrails provide a firm handhold above the platform. Only as a last resort should the ladder access be positioned in the general run of the main scaffold. Where this is the case other measures to ensure a firm handhold should be provided, at least 1.05m above the landing place. Conventional scaffold ladders may be used, and should be secured as per the recommendations set out in the latest edition of the NASC s guidance note TG20. In this scenario any gaps left in the platform must be covered, or surrounded with a guardrail with access provided by a swing safety gate. Where necessary conventional tube and fittings may be used to form the guardrail. LADDER ACCESS TOWERS An external ladder access tower should be erected to the side of the main scaffold where possible, allowing the working Note: Independent ladder access towers follow the same criteria regarding bracing and ties as static towers. Fig. 55 TRAD Hire & Sales Ltd
68 INTERNAL BIRDCAGES PLETTAC Typical Internal Birdcage Fig. 56 Valid Only For Note: Scaffolders safe-zone guardrails omitted for clarity. Genuine Equipment 67 PLETTAC User Guide

69 INTERNAL BIRDCAGES PLETTAC birdcage scaffolds provide one of the most cost effective methods of providing access to large areas such as ceilings and atriums. Standard components are used in conjunction with reinforced ledgers as transoms, allowing a combination of bay sizes to cover the floor area required. Steel decks can be laid in parallel (Fig. 57), or alternatively, they can be laid perpendicularly in each alternate bay, giving increased load capacity (Fig. 58). Vertical diagonal bracing is fixed using normal PLETTAC diagonal braces, and is required throughout all PLETTAC birdcage scaffolds. They are required on every line of standards, at a frequency of one in every fifth bay, for the full height of the scaffold. Where lift heights are less than 2m, ledger to ledger bracing is installed using BS EN 39 tubes with Swivel wedge head fittings and / or BS EN 74 fittings. Scaffold tubes of the appropriate length should preferably be fixed to the ledgers with right angle couplers, or alternatively, to the standards with swivel couplers, allowing minimum obstruction to any working platform. Ledger to ledger bracing must be fixed within 300mm of the node point. When a PLETTAC birdcage scaffold is to be built internally as a free standing structure, the maximum height achievable is four times the smallest base dimension, to a maximum of 10.5m high. There must be no horizontal wind load, every line of vertical standards must be supported from the ground and be braced as previously described. It is recommended however, that if an anchoring facility exists then this should be made use of, to increase the stability of the scaffold structure. Advice on the placement of ties, and heights required outside of this guidance, should be referred to a competent temporary works / scaffold design engineer (the client and / or the contractor may also need to be consulted). Plan bracing is not usually required, although where deemed to be necessary systemised brace can be used. Where systemised brace is not available, the use of BS EN 39 tube and BS EN 74 fittings is acceptable as an alternative. Scaffold tubes of the appropriate length tubes can be fixed to the standards with right angled couplers within 300mm of the node point, directly below the lift. Advice must be sought from a competent temporary works / scaffold design engineer when PLETTAC birdcages are to be built externally. INTERNAL BIRDCAGES Fig. 57, Decks in parallel BAY WIDTH (m) UNIFORMLY DISTRIBUTED LOAD (kn/m 2 ) BAY LENGTH (m) Fig. 58, Decks perpendicular BAY WIDTH (m) UNIFORMLY DISTRIBUTED LOAD (kn/m 2 ) BAY LENGTH (m) TRAD Hire & Sales Ltd
70 CIRCULAR ACCESS PLETTAC Typical Circular Access Fig. 59 Fig. 60 Valid Only For Genuine Equipment 69 PLETTAC User Guide
71 CIRCULAR ACCESS PLETTAC system scaffold provides a simple solution to creating circular scaffolds. Using standard equipment, with a number of bespoke components, circular structures can be erected with speed and ease. Dependent on the curvature required every bay or every alternate bay can be erected using these specialised components. The inner standard is connected to the outer standards by special right or left hand vessel transoms. These transoms are fixed to the larger holes of the rosette on the inner face and the small hole on the outer. Within any bay where the right and left vessel transoms are used, the inner standards are connected by the straight vessel ledger. CIRCULAR ACCESS On the inside face of the scaffold one standard is common to two bays, whereas on the outside there are two, forming a triangular infill bay. The outer standards are connected by normal ledgers of the desired length at the main bay, while the adjustable ledgers are fixed to the triangular infill bay. The scaffold is then decked as normal, with the triangular infill bay being covered with either of the two tank decks, steel or conventional scaffold boards. PLETTAC circular scaffolds must have diagonal vertical brace fixed every second bay, for the full height of the scaffold. 1 Adjustable Ledger Left & Right Hand Vessel 3 Transom Adjustable ledger for tank, replaces tube and coupler links. Right or left angled ledger, exists in 0.7m and 1m. Code Weight (kg) Code Hand Length (m) Weight (kg) 2 Straight Vessel Ledger Right Left Right Left Straight ledger for the inside face, exists in 1.6m, 2.1m, 2.6m and 3.1m. Code Length (m) Weight (kg) TRAD Hire & Sales Ltd
 Weight (kg) 285388 0.70 10.")
72 CIRCULAR ACCESS 4 Tank Deck with Integrated Toe Board Used to complete the platform, covers the triangular infill bay. Comes complete with integrated toe board. Code Length (m) Weight (kg) Tank Deck Used to complete the platform, covers the triangular infill bay. Must be fixed to the deck below to prevent movement. Code Length (m) Weight (kg) PLETTAC User Guide

73 TRAD Hire & Sales Ltd


74 OTHER PRODUCTS 1 OTHER PRODUCTS ALTRIX Temporary Roof System ALTRIX is an all aluminium modular temporary roofing and weather protection system, which utilises the slide sheet keder model. ALTRIX is more than just a roof. The chords and vertical posts of the beams are manufactured from 48.3mm diameter alloy tube making them suitable for use in many normal scaffold applications. With 3.0m, 2.5m, 2.0m and 1.5m bay sizes ALTRIX is designed to work particularly efficiently with PLETTAC, although it is not limited to this application. ALTRIX can be used with almost any scaffold type. 2 Scaffold Sheeting and Netting TRAD Sheeting and Debris Netting is a cost effective and versatile temporary containment and weather protection solution. TRAD Sheeting is manufactured from clear low-density polythene, reinforced with high-density polythene yarn. TRAD Debris Netting is manufactured from high-density polythene monofilaments that have been UV stabilised. 3 Tools & Tool Holders 4 Harnesses & Lanyards 73 PLETTAC User Guide


75 5 Galvanised Tubes BS EN 39 6 Steel Bins OTHER PRODUCTS 7 Scaffold Fittings BS EN 74 8 Post Pallets 9 Alloy Beams 10 Tags & Signs TRAD Hire & Sales Ltd

76 Contacts Head Office TRAD Hire & Sales Ltd TRAD House Cromwell Road Bredbury Stockport SK6 2RF Tel: Fax: Glasgow Depot TRAD Hire & Sales Ltd TRAD Wharf 244 Bernard Street Glasgow G40 3NX Tel: Fax: London Depot TRAD Hire & Sales Ltd Renwick Road Barking Essex IG11 0SB Tel: Fax: Stockport Depot TRAD Hire & Sales Ltd TRAD House Cromwell Road Bredbury Stockport SK6 2RF Tel: Fax: Leeds Depot TRAD Hire & Sales Ltd TRAD House, Unit 1b 16 Cross Green Way Cross Green Industrial Estate, Leeds LS9 0SE Tel: Fax: Birmingham Depot TRAD Hire & Sales Ltd TRAD House Brickhouse Lane West Bromwich West Midlands B70 0DY Tel: Fax: Andover Depot TRAD Hire & Sales Ltd 58 Whittle Road West Portway Industrial Estate Andover, Hampshire SP10 3FB Tel: Fax: FS User guide created by Alan Slater Edition 2, May 2016
TRAD HIRE & SALES SCAFFOLDING SUPPLIER USER GUIDE PLETTAC METRIX FOCUSSED ON SERVICE
 TRAD HIRE & SALES SCAFFOLDING SUPPLIER PLETTAC USER GUIDE FOCUSSED ON SERVICE DISCLAIMER: Whilst TRAD Hire & Sales Ltd and the author have made every reasonable effort to ensure that the information contained
USER S MANUAL HAKI PUBLIC ACCESS STAIR
 USER S MANUAL HAKI PUBLIC ACCESS STAIR HAKI AB 2017 Important information HAKI s product liability and user s manuals apply only to scaffolds that are entirely composed of components that have been made
USER S MANUAL. HAKI Loading Tower
 USER S MANUAL HAKI Loading Tower HAKI AB 2018 Important information HAKI s product liability and user s manuals apply only to scaffolds that are entirely composed of components that have been made and
USER S MANUAL HAKI COMPACT STAIR TOWER
 USER S MANUAL HAKI COMPACT STAIR TOWER HAKI AB 2018 Important information HAKI s product liability and user s manuals apply only to scaffolds that are entirely composed of components that have been made
USER S MANUAL HAKI PUBLIC ACCESS STAIR
 USER S MANUAL HAKI PUBLIC ACCESS STAIR HAKI AB 2018 Important information HAKI s product liability and user s manuals apply only to scaffolds that are entirely composed of components that have been made
USER S MANUAL HAKI COMPACT STAIR TOWER
 USER S MANUAL HAKI COMPACT STAIR TOWER HAKI AB 2018 Important information HAKI s product liability and user s manuals apply only to scaffolds that are entirely composed of components that have been made
2017 RING SYSTEM TECHNICAL MANUAL HIRE ONLY UNITED KINGDOM
 2017 TECHNICAL MANUAL HIRE ONLY UNITED KINGDOM Table of Contents INTRODUCTION... 3 INTRODUCTION TO AT-PAC... 3 QUALITY FACTORS... 4 DESIGNATION OF... 4 COMPONENT SAFE WORKING LOAD CAPACITIES... 5 NODE
8 Rung Industrial Tower
 A SAFER WAY TO REACH NEW HEIGHTS 8 Rung Industrial Tower Instruction Manual Mobile Access Tower 3T - Through the trap method Introduction This Assembly Guide is intended to provide you with step-by-step
Industrial Aluminium Towers
 Industrial Aluminium Towers SINGLE WIDTH LADDERSPAN & VERTICAL LADDER ERECTION MANUAL TO BS-EN 1004-2004 Using 2 rung frames (Recommended) Using guardrail frames HORIZONTAL BRACE 1.8m (2040) 2.7m (2041)
TRAD HIRE & SALES SCAFFOLDING SUPPLIER USER GUIDE ALTRIX TEMPORARY ROOFING SYSTEM FOCUSSED ON SERVICE
 TRAD HIRE & SALES SCAFFOLDING SUPPLIER ALTRIX TEMPORARY ROOFING SYSTEM USER GUIDE FOCUSSED ON SERVICE DISCLAIMER: Whilst TRAD Hire & Sales Ltd and the author have made every reasonable effort to ensure
COMPONENT SCHEDULE SINGLE WIDTH SPAN TOWERS WITH LADDER FRAMES TO BSEN RUNG STARTER FRAMES
 COMPONENT SCHEDULE SINGLE WIDTH SPAN TOWERS WITH LADDER S TO BSEN 1004-2004 STARTER S PLATFORM HEIGHT METRIC 2.4 2.9 3.4 3.9 4.4 4.9 5.4 5.9 6.4 6.9 7.4 7.9 DESCRIPTION IMPERIAL 7 10 9 6 11 2 12 10 14
TEMPORARY ROOFING SYSTEM USER GUIDE
 TEMPORARY ROOFING SYSTEM USER GUIDE Providing quality products and services at a competitive price. Valid Only For Genuine Equipment DISCLAIMER: Whilst TRAD Hire & Sales Ltd and the author have made every
Industrial Aluminium Towers
 Industrial Aluminium Towers SINGLE WIDTH LADDERSPAN & VERTICAL LADDER ERECTION MANUAL HORIZONTAL BRACE 1.8m (2040) 2.7m (2041) REVISED EDITION TOE BOARD 1.8m (2065) 2.7m (2067) LADDERSPAN TRAP PLATFORM
distribution Modular Scaffolding
 Modular Scaffolding Modular scaffolding PDM Universal scaffolding system plettac-pl PDM Application A characteristic feature of plettac PDM system is the use of wedge joint which provides quick and safe
Industrial Aluminium Towers
 HORIZONTAL 1.8m (2040) 2.7m (2041) TOE BOARD 1.8m (2066) 2.7m (2068) Industrial Aluminium Towers DOUBLE WIDTH SPAN & VERTICAL ASSEMBLY GUIDE TO BS-EN 1004-2004 Using the 3T (Through the Trap ) Assembly
USER S MANUAL HAKI STAIR TOWER
 USER S MANUAL HAKI STAIR TOWER HAKI AB 2018 Important information HAKI s product liability and user s manuals apply only to scaffolds that are entirely composed of components that have been made and supplied
Mobile Towers - 3T Method
 Safety First Safety First INTRODUCTION SAFE USE Mobile Towers - 3T Method Please read this guide carefully. Please note that diagrams are for illustrative purposes only. User guides are also available
2017 AT-PAC RINGLOCK SAFETY MANUAL & USER GUIDES UNITED KINGDOM
 2017 AT-PAC RINGLOCK SAFETY MANUAL & USER GUIDES UNITED KINGDOM Table of Contents INTRODUCTION... 4 RINGLOCK QUALITY FACTORS... 5 DESIGNATION OF RINGLOCK... 5 SAFETY GUIDELINES AND SAFE USE... 6 NEVER...
Configuration. User Guide. Version: Copyright 2017 Computer and Design Services Ltd GLOBAL CONSTRUCTION SOFTWARE AND SERVICES
 Configuration User Guide Version: 2018.0 Copyright 2017 Computer and Design Services Ltd GLOBAL CONSTRUCTION SOFTWARE AND SERVICES Contents Introduction... 1 Create a new project... 2 Open the configuration...
1450/850. Instruction Manual. Mobile Access Tower
 A SAFER WAY TO REACH NEW HEIGHTS 1450/850 Instruction Manual Mobile Access Tower 3T - Through the trap method Introduction This Assembly Guide is intended to provide you with step-by-step instructions
Industrial Aluminium Towers
 Industrial Aluminium Towers SINGLE WIDTH LADDERSPAN & VERTICAL LADDER ASSEMBLY GUIDE TO BS-EN 1004-2004 Using 2 rung frames (Recommended) Using Guardrail frames HORIZONTAL BRACE 1.8m (2040) 2.7m (2041)
CLIMA 3T. Mobile Aluminium Tower with Climbing Frame 1450/850 3T - Through the Trapdoor Method USER GUIDE
 CLIMA 3T Mobile Aluminium Tower with Climbing Frame 1450/850 3T - Through the Trapdoor Method USER GUIDE Safety First Mobile Towers - 3T Method Introduction Please read this user guide carefully. Please
Genlok User Guide.
 Leaders in the supply of non-mechanical access equipment and builder s products to the construction industrial sectors User Guide www.generationhireandsale.co.uk index Page Duration: Two Days Overview:
BoSS Climalite Camera and lighting tower
 Contents Safety First Safety First Quantity Schedules Toeboard 2 9 13 33 INTRODUCTION Please read this guide carefully. Please note that diagrams are for illustrative purposes only. User guides are also
SAFETY SYSTEM. G-Deck Consideration. Manual Handling
 INTRODUCTION The G-Deck load deck system is a high strength, low cost access platform which is quick to erect, durable and flexible enough to meet your site access needs. Safety is a priority and G-Deck
CLIMA 3T. Mobile Aluminium Tower with Climbing Frame 1450/850 3T - Through the Trapdoor Method USER GUIDE
 CLIMA 3T Mobile Aluminium Tower with Climbing Frame 1450/850 3T - Through the Trapdoor Method USER GUIDE Safety First Mobile Towers - 3T Method INTRODUCTION Please read this Userguide carefully. Please
LADDERSPAN AGR. BoSS Camlock Advance Guardrail Mobile Aluminium Tower 1450/850 Frames USER GUIDE
 LADDERSPAN AGR BoSS Camlock Advance Guardrail Mobile Aluminium Tower 1450/850 Frames USER GUIDE Contents Safety First Safety Checklist Quantity Schedules Assembly and Dismantling Procedure Toe Boards Stabilisers
3T - Through The Trapdoor Method
 ALTO HEAVY DUTY SINGLE WIDTH LADDERSPAN TOWER Mobile Aluminium Access Tower ISSUE 5 Instruction Manual EN 1298-IM-EN The ALTO HD Ladderspan Tower is certified to BS EN 1004:2004 3T - Through The Trapdoor
MOBILE ACCESS TOWER INSTRUCTION MANUAL SHALLOW BRACE. Incorporating the 3T method of assembly
 MOBILE ACCESS TOWER Incorporating the 3T method of assembly SHALLOW BRACE INSTRUCTION MANUAL 2 INTRODUCTION This instruction manual contains all the information required to correctly assemble the OCTO
CLIMA AGR. Mobile Aluminium Tower with Climbing Frames 1450/850 Camlock Advanced Guardrail USER GUIDE
 CLIMA AGR Mobile Aluminium Tower with Climbing Frames 1450/850 Camlock Advanced Guardrail USER GUIDE Contents Safety First Safety Checklist Quantity Schedules Assembly and Dismantling Procedure Toe Boards
SAFE ERECTION AND USE OF ALUMINIUM TOWERS/SCAFFOLDS
 SAFE ERECTION AND USE OF ALUMINIUM TOWERS/SCAFFOLDS PERSONNEL DIVISION Revised 2002 CONTENTS Page 1 INTRODUCTION 1 2 APPLICATION 1 3 ERECTION AND INSPECTION 1 4 ERECTION 1 4.1 Before erection of tower
Sales Hire Erections
 LTD www.scafhire.ie Sales Hire Erections Scaffolding Specialists Company History Since its modest inception in 1980 Scafhire Ltd has progressed to a position of very high prominecnce and respectability
LADDERSPAN 3T USER GUIDE. Mobile Aluminium Tower 1450/850 Ladderspan. 3T - Through the Trapdoor Method
 LADDERSPAN 3T Mobile Aluminium Tower 1450/850 Ladderspan 3T - Through the Trapdoor Method USER GUIDE Safety First Mobile Towers - 3T Method INTRODUCTION Please read this user guide carefully. Please note
Since it was established in 1989, with a small manufacturing base in Qwa Qwa, Uni-Span has grown to become one
 access scaffolding Since it was established in 1989, with a small manufacturing base in Qwa Qwa, Uni-Span has grown to become one of the major players in the scaffolding and formwork industry in South
CUPLOK SGB CUPLOK SGB Group
 CUPLOK USER S MANUAL CONTENTS Page Introduction 5 The CUPLOK locking procedure 6 CUPLOK safety information 7 General site safety 9 Core components 11 Scaffold system components 12 Ancillary components
ASSEMBLY.
 ASSEMBLY www.proscaf.com ASSEMBLY SECTION Points to Consider These assembly instructions are generic and may not apply to all applications. If you have questions regarding specific applications contact
USER S MANUAL HAKI CONTINENTAL
 USER S MANUAL HAKI CONTINENTAL HAKI AB 2003 HAKI User s Manual and product liability applies only to scaffolding containing components manufactured and supplied by HAKI. Building scaffolding using components
Safety First Mobile Towers - 3T Method INTRODUCTION
 BoSS Room-Mate 3T - Through the Trap Method Safety First Mobile Towers - 3T Method INTRODUCTION Please read this guide carefully. Please note that diagrams are for illustrative purposes only. User guides
ROOM-MATE. 3T - Through the Trapdoor USER GUIDE
 ROOM-MATE 3T - Through the Trapdoor USER GUIDE Safety First Introduction Please read this user guide carefully. Please note that diagrams are for illustrative purposes only. User guides are also available
MiniMax USER GUIDE. Mobile Aluminium Trade Quality Access Tower System. 3T - Through The Trapdoor Method
 MiniMax Mobile Aluminium Trade Quality Access Tower System 3T - Through The Trapdoor Method USER GUIDE Contents Safety First Component Diagram Component Quantity & Safety Data Schedule Build Method Pre-use
Mobile Tower 3T Method (Through The Trapdoor) Please read this guide carefully. Please note that diagrams are for illustrative purposes only.
 Please read this guide carefully. Please note that diagrams are for illustrative purposes only.") Mobile Tower 3T Method (Through The Trapdoor) INTRODUCTION Please read this guide carefully. Please note that diagrams are for illustrative purposes only. LOYAL mobile aluminium towers are light-weight
Mobile Tower 3T Method (Through The Trapdoor) INTRODUCTION Please read this guide carefully. Please note that diagrams are for illustrative purposes only. LOYAL mobile aluminium towers are light-weight
PERI UP Easy * The lightweight and fast frame scaffold for safe working on facades
 PERI UP Easy * The lightweight and fast frame scaffold for safe working on facades Product Brochure * If approval is required for the scaffolding system PERI UP Easy to be placed on the market in a country,
BRIO Modular scaffolding
 BRIO Modular scaffolding // Versatile and multifunctional // Table of content Features Benefits Solutions Basic components 2 4 6 13 // Features BRIO Modular Scaffolding covers the different configurations
USER S MANUAL HAKI UNIVERSAL ALUMINIUM
 USER S MANU HAKI UNIVERS UMINIUM HAKI AB 2005 Important information HAKI s product liability and erection instructions apply only to scaffolds that are entirely composed of components that have been made
USER S Manual. HAKI Bridge System (HBS)
") USER S Manual HAKI Bridge System (HBS) HAKI AB 2018 Important information HAKI s product liability and user s manuals apply only to scaffolds that are entirely composed of components that have been made
USER S Manual HAKI Bridge System (HBS) HAKI AB 2018 Important information HAKI s product liability and user s manuals apply only to scaffolds that are entirely composed of components that have been made
Rolling Towers. Layher Rolling Towers Uni Wide. Safety Structure Instructions for Assembly and Use. Mobile working platforms to DIN EN 1004:
 Layher Rolling Towers Uni Wide Safety Structure Instructions for Assembly and Use Mobile working platforms to DIN EN 1004:2005-03 Working platform 1.5 x 2.85 m Rolling Towers max. working height: indoors
BoSS. Mobile Aluminium Tower 1450/850 Ladderspan. 3T - Through the Trapdoor Method
 BoSS Mobile Aluminium Tower 1450/850 Ladderspan 3T - Through the Trapdoor Method USER GUIDE Edition November 2011 Safety First Mobile Towers - 3T Method INTRODUCTION Please read this guide carefully. Please
A SAFER WAY TO REACH NEW HEIGHTS. Instruction Manual. Mobile Access Tower. 3T - Through the trap method
 A SAFER WAY TO REACH NEW HEIGHTS UTS1450/850 Instruction Manual Mobile Access Tower 3T - Through the trap method Introduction This Assembly Guide is intended to provide you with step-by-step instructions
3T - Through The Trapdoor Method
 ALTO MEDIUM DUTY STAIRWELL TOWER Aluminium Access Tower ISSUE 3 Instruction Manual EN 1298-IM-EN The ALTO MD Stairwell Tower 3T - Through The Trapdoor Method Lakeside Industries Ltd www.altoaccess.com
PLETTAC METRIX COMPONENT CAPACITIES. Providing quality products and services at a competitive price.
 PLETTAC METRIX COMPONENT CAPACITIES Providing quality products and services at a competitive price. Valid Only For Genuine Equipment COMPONENT CAPACITIES COMPONENT CAPACITIES Loads given in this document
SafeDeck Supported Scaffold System
 SafeDeck Supported Scaffold System Table of Contents Origination 1 Range of Motion 1 Installation Efficiency 2 Third-Party Testimonial 2 SafeDeck Specifications 3 Competent Person 4 Tools Required 4 Components
BoSS Clima USER GUIDE. Mobile Aluminium Tower with Climbing Frame 1450/850. 3T - Through the Trapdoor Method
 BoSS Clima Mobile Aluminium Tower with Climbing Frame 1450/850 3T - Through the Trapdoor Method USER GUIDE Edition April 2009 Safety First Mobile Towers - 3T Method INTRODUCTION Please read this guide
USER S MANUAL HAKI UNIVERSAL
 USER S MANUAL HAKI UNIVERSAL International version HAKI AB 2015 Important information HAKI s product liability and user s manuals apply only to scaffolds that are entirely composed of components that have
TAKING YOU TO NEW HEIGHTS IN SAFETY... kwikstage
 limited one bay kwikstage stair unit user guide One Bay Stair Tower used in conjunction with Kwikstage System Scaffolding and designed to conform to all current British and European Standards. With only
Generation Hop up brackets to be removed and boards moved to lift above.
 Denotes Ladder for Access from 2nd Lift to Extenda Bracket Generation Hop up brackets to be installed to manufacturer's instructions. Installed at 1200mm c/c max & 1050mm down from top of wall section.
Home Builders Health and Safety Forum Generic Scaffold Specification Template
 Home Builders Health and Safety Forum Generic Scaffold Specification Template Rev 2 Draft April 2014 Page 1 of 13 Contents Purpose Page 3 1.0 Scope Page 4 2.0 Standards Page 4 3.0 Materials Page 5 4.0
Safety First Mobile Towers - 3T Method INTRODUCTION
 Safety First Mobile Towers - 3T Method INTRODUCTION Safety First SAFE USE BoSS Mobile Aluminium Tower 1450/850 Ladderspan 3T - Through the Trapdoor Method Please read this guide carefully. Please note
BASIC SCAFFOLDING KNOWLEDGE QUESTIONS
 Garnsworthy Square 46, 62 & 64 Garnsworthy St Springvale rth Victoria 3171 Updated on 22/02/08 STC105 Name BASIC SCAFFOLDING KNOWLEDGE QUESTIONS THE PROFESSIONAL Scaffold Tools Scaffold Belts Couplers
Turnlok 355 System Scaffolding
 Turnlok 355 System Scaffolding VR Access Scaffolding Limited Turnlok 355 Guide Issue 2 May 2015 Turnlok 355 has exceeded the criteria for Quality, Technical Specification and Compliance to EN 12810, EN
Allround Scaffolding. Layher Allround Bridging System Instructions for Assembly and Use. Modular truss system for wide spans
 Layher Allround Bridging System Instructions for Assembly and Use Modular truss system for wide spans Certification according to DIN ISO 9001/EN 29 001 by TÜV-CERT Allround Scaffolding } CONTENT 1. Introduction...3
Safety First Mobile Towers - 3T Method
 USER GUIDE Edition Aug 2011 MiniMax Mobile Aluminium Trade Quality Access Tower System 3T - Through the Trapdoor Method Safety First Mobile Towers - 3T Method INTRODUCTION Please read this guide carefully.
Allround Scaffolding
 .. Allround Scaffolding I n g e n i o u s. S t r o n g. L i m i t l e s s. Faster. Stronger. Safer. More Profitable. Introduction Layher s Allround scaffolding makes an ideal propping system: being both
USER S manual HAKI UNIVERSAL. International version
 USER S manual HAKI UNIVERSAL International version HAKI AB 2014 Important information HAKI s product liability and erection instructions apply only to scaffolds that are entirely composed of components
This User Guide provides you with step by step instructions to ensure your system is erected easily and safely.
 INTRODUCTION Please read this guide carefully. Please note that diagrams are for illustrative purposes only. Trade King 730 mobile aluminium towers are light-weight scaffold towers used throughout the
RINGLOCK Introduction Ringlock is world most widely used scaffold system. It is a fully galvanized multi purpose steel scaffold system suitable for pr
 RINGLOCK ACCESS SCAFFOLD SYSTEM 9 RINGLOCK Introduction Ringlock is world most widely used scaffold system. It is a fully galvanized multi purpose steel scaffold system suitable for providing general access
INSTRUCTIONmanual. BoSS COMPACT SIDE CANTILEVER TOWER SCAFFOLD 3T Method - Through the Trap Door
 INSTRUCTIONmanual BoSS COMPACT SIDE CANTILEVER TOWER SCAFFOLD 3T Method - Through the Trap Door Drawn: 26/02/2018 Issue: E Page: 2 OF 21 CONTENTS Safety First Component Diagram Component Quantities & Safety
BRIO Modular scaffolding
 BRIO Modular scaffolding // Versatile and multifunctional // Table of content Features Benefits Solutions Basic components 2 4 6 13 // Features BRIO Modular Scaffolding covers the different configurations
NEBOSH International Certificate in Construction Safety and Health Unit ICC1 MANAGING AND CONTROLLING HAZARDS IN INTERNATINAL CONSTRUCTION ACTIVITIES
 NEBOSH International Certificate in Construction Safety and Health Unit ICC1 MANAGING AND CONTROLLING HAZARDS IN INTERNATINAL CONSTRUCTION ACTIVITIES element 10: WORKING AT HEIGHT - HAZARDS AND RISK CONTROL
Lattice Beam User Guide USG001-
 Lattice Beam User Guide Foreword DESSA offers efficient lightweight temporary roofing, encapsulation solutions, aluminium lattice girders and safety products. DESSA s unique and distinctive aluminium
Uniscaff User Guide. Uniscaff. George Roberts Total Reliability of Supply. George Roberts Total Reliability of Supply
 George Roberts Total Reliability of Supply User Guide George Roberts Total Reliability of Supply www.scaffoldingsales.co.uk Tubes Scaffold Staircases Beams Formwork Fencing K-Lok User Guide Contents Introduction
BoSS Room-Mate. 3T - Through the Trap Method
 BoSS Room-Mate 3T - Through the Trap Method User Guide Edition 2: 2010 Safety First Mobile Towers - 3T Method INTRODUCTION Please read this guide carefully. Please note that diagrams are for illustrative
ESSENTIAL STANDARD no.17. Scaffolding
 ESSENTIAL STANDARD no.17 Scaffolding KEY MESSAGES Check that scaffolding meets the standards in this guidance. Ensure that regular inspections are carried out on scaffolding by a suitably qualified person.
Safety First Mobile Towers - 3T Method
 Safety First Mobile Towers - 3T Method INTRODUCTION Please read this guide carefully. Please note that diagrams are for illustrative purposes only. User guides are also available to download from our website
Single Width Tower Assembly Guide
 Unit 1 Bellingham Trading Estate Franthorne Way London SE6 3BX T: 0845 257 599 E: info@scaffold-tower.co.uk W: www.scaffold-tower.co.uk This document will provide all users of Lewis Access Towers with
Modular Scaffolding MEKA 48
 Modular Scaffolding MEKA 48 MODULAR SCAFFOLDING MEKA 48 MODULAR SCAFFOLDING The Modular Scaffolding MEKA 48 is designed to adapt to the most complex scaffold structures. Its versatility offers a wide range
Safety Documents > Safety Manual > Scaffolds
 Safety Documents > Safety Manual > Scaffolds D. Scaffolds 1. General Requirements for All Scaffolds a. Scaffolds shall be furnished and erected in accordance with this standard for persons engaged in work
Safety First Mobile Towers - 3T Method INTRODUCTION. Please read this guide carefully. Please note that diagrams are for illustrative purposes only.
 BoSS Mobile Aluminium Tower 0/80 Ladderspan T - Through the Trapdoor Method Safety First Mobile Towers - T Method INTRODUCTION Please read this guide carefully. Please note that diagrams are for illustrative
Span 300 Manual. DESIGNATION EN1004 CEN 1298 IM - en. CEN designation of this instruction manual EN 1298 IM en
 Span 300 Manual DESIGNATION EN1004 CEN 1298 IM - en CEN designation of this instruction manual EN 1298 IM en WARNING NEVER STAND ON AN UNGUARDED PLATFORM SAFE WORKING LOADS AND WORKING HEIGHTS The safe
Reliant Holdings Ltd Safety Management System
 Preparation: Safety Mgr Authority: President Issuing Dept: Safety Page: Page 1 of 7 Purpose The purpose of this program is to prevent injuries due to falls from elevated work areas and ensure employees
INSTRUCTION MANUAL MOBILE ACCESS TOWER
 INSTRUCTION MANUAL MOBILE ACCESS TOWER CONTENTS Safety First.......... 3-6 Component Diagrams......... 7-9 Component Quantity & Safety Data Schedule.... 10 Build Method.......... 11-24 Pre-use Safety Inspection
TAKING YOU TO NEW HEIGHTS IN SAFETY...
 limited one bay cuplok Stair Unit user guide One Bay Stair Tower used in conjunction with Cuplok System Scaffolding and designed to conform to all current British and European Standards. With only five
Universal Panels & Accessories
 Universal Panels & Accessories Erection Procedures INTRODUCTION Use common sense when working with Scaffold Your Safety is our #1 Concern Universal Scaffolds are designed with your safety in mind every
Contents 2017 VR ACCESS SOLUTIONS ALL RIGHTS RESERVED.
 Issue 1 February 2017 Contents Introduction... 1 NASC Compliance... 2 Safety Information... 3 Component Details... 4 Component Load Capacities... 7 Deck Arrangements... 9 Bracing and Tying... 11 Safe Working
LEWIS Miniscaff Folding Tower Assembly Guide
 LEWIS Miniscaff Folding Tower Assembly Guide This document is a complete guide for the LEWIS Miniscaff Towers The user should read the entire contents of this document before commencing assembly and pay
USER S GUIDE for HAKITEC 750. TEMPORARY ROOF with HAKI Trak Sheeting ( Hand-Built )
") USER S GUIDE for HAKITEC 750 TEMPORARY ROOF with HAKI Trak Sheeting ( Hand-Built ) HAKI LTD 2007 INTRODUCTION Temporary roof structures are by their very nature amongst the most difficult and demanding
USER S GUIDE for HAKITEC 750 TEMPORARY ROOF with HAKI Trak Sheeting ( Hand-Built ) HAKI LTD 2007 INTRODUCTION Temporary roof structures are by their very nature amongst the most difficult and demanding
OSHA Rules for Scaffolding
 OSHA Rules for Scaffolding A) Objectives: 1. 2. 3. Don t let the scaffold fall. Don t fall off the scaffold. Don t let the material fall off the scaffold. Name of Competent Person: Name of Qualified Person:
Construction Safety Education Forum. 6 March Scaffolding. Dimitri Barlas, State Coordinator Construction Work Health and Safety Division DRAFT
 Construction Safety Education Forum 6 March 2013 Scaffolding Dimitri Barlas, State Coordinator Construction Work Health and Safety Division DRAFT SRWSD in confidence 1 Presentation Outline Introduction
scaffoldings/ coverings
 scaffoldings/ coverings 198 MDS 222 temporary covers Scaffoldings / Coverings 197 SCAFFOLDINGS / COVERINGS MDS MDS multidirectional scaffolding The MDS multidirectional scaffolding is the modern solution
TEMPORARY EDGE PROTECTION SYSTEM DESCRIPTION CTS. Combisafe International AB
 TEMPORARY EDGE PROTECTION SYSTEM DESCRIPTION CTS Combisafe International AB CTS Combisafe International AB Contents Safety instructions... 3 Important... 4 General... 4 Data... 5 Safety posts 4140/4145/4150...
Span 400 Instruction Manual
 Span 400 Instruction Manual DESIGNATION SPAN 400 Double Width EN 004 3 8/2 XXCD SPAN 400 Single Width EN 004 3 8/8 XXCD CEN designation of this instruction manual EN 298 IM en Rev-00 WARNING NEVER STAND
Span 300 Instruction Manual
 Span 300 Instruction Manual DESIGNATION SPAN300 Double Width EN 1004 3 8/12 XXCD SPAN 300 Single Width EN 1004 3 8/8 XXCD CEN designation of this instruction manual EN 1298 IM en Rev-00 WARNING NEVER STAND
Erection manual. Tube-Lock Concept. van Thiel United b.v Page: 1 of 15
 Erection manual Tube-Lock Concept 2013-02 Page: 1 of 15 Contents Subject Page Illustration of Tube-Lock Concept 3 Parts of Tube-Lock concept 4 Legislation 5 Erecting a Tube-Lock Concept scaffold 6 Technical
SAFESTAND Ltd. SafeStand Training Guide
 SAFESTAND Ltd SafeStand Training Guide 1 CONTENTS SafeStand Components Page 4 Before Commencing Page 5 Erection Guide Page 6 Inspection Page 20 Dismantling Guide Page 21 SafeStand Gate Page 30 SafeStand
modular scaffolding R+
 modular scaffolding R+ 1. Stand 6. Transverse U-transom Stand is the main element of modular scaffolding. Made of 48.2x3.2 mm steel pipe. Every 0,5m on the whole stand length are installed steel plates
user s guide for ( Hand-Built )
") user s guide for hakitec 750 MONOPITCHED TEMPORARY ROOF with HAKI Trak Sheeting ( Hand-Built ) HAKI LTD 2011 INTRODUCTION Temporary roof structures are by their very nature amongst the most difficult and
user s guide for hakitec 750 MONOPITCHED TEMPORARY ROOF with HAKI Trak Sheeting ( Hand-Built ) HAKI LTD 2011 INTRODUCTION Temporary roof structures are by their very nature amongst the most difficult and
BoSS SOLO 700. One Man Aluminium Tower EN /4 EN1298-IM-EN 3T - Through the Trap Door USER GUIDE
 BoSS SOLO 700 One Man Aluminium Tower EN1004-3-4/4 EN1298-IM-EN 3T - Through the Trap Door USER GUIDE Edition August 2013 Contents Safety First 2 Component Diagram 7 Quantity Schedules 9 Stabalisers 10
INTER-DEPARTMENTAL PROCEDURE
 INTER-DEPARTMENTAL PROCEDURE OPERATIONS - DUKHAN FIELDS Operations Manager, Dukhan Fields Director Operations Rev. Date Reason A4 Mar13 Issued for use OSD / QC: Rev No. Rev Date DOCUMENT CHANGE HISTORY
Modular Scaffold MEKA 48
 Modular Scaffold MEKA 48 Imperial units NA MODULAR SCAFFOLD MEKA 48 MODULAR SCAFFOLD The Modular Scaffold MEKA 48 is designed to adapt to the most complex scaffold structures. Its versatility offers a
Scaffolding Update Including TG20:13 2 years on NEW SG4:15. Ray Johnson BSc Joint Managing Director
 Scaffolding Update Including TG20:13 2 years on NEW SG4:15 Ray Johnson BSc Joint Managing Director Impact of TG20:13 A new set of guidance, not merely a revision Changes are far reaching, effecting most
HANDING-OVER CERTIFICATE - SCAFFOLDING
 HANDING-OVER CERTIFICATE - SCAFFOLDING Contractor : Site : Contractor. customername Site. Site name Date : Time : Erected by : Signature : Description of section handed over Job specification. description