INSTALLING WATER-RESISTIVE BARRIERS & FLASHING
|
|
|
- Jonah Strickland
- 6 years ago
- Views:
Transcription
1
2


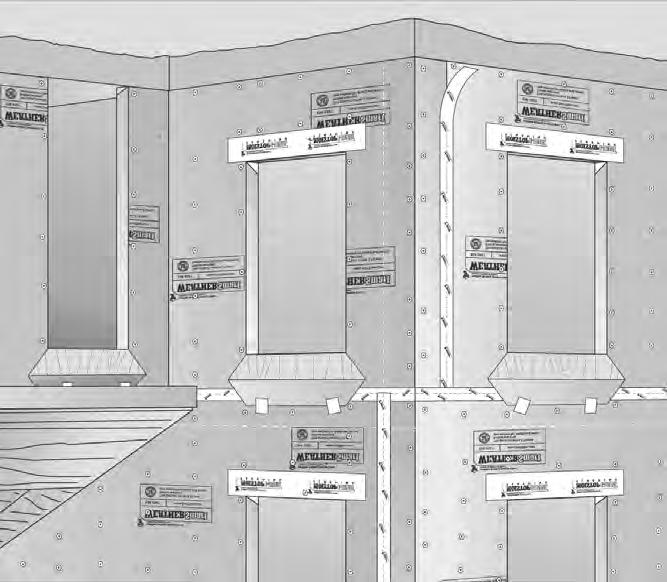
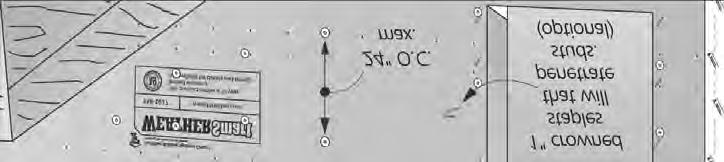
3 INSTALLING WATER-RESISTIVE BARRIERS & FLASHING IN A TWO-LAYER STUCCO APPLICATION Fortifiber Building Systems Group provides this guide to assist installers by demonstrating a two-layer installation of water-resistive barriers for stucco applications as required by the 2012 International Building Code. This installation guide provides an efficient and effective method for installing water-resistive barriers in common residential and light commercial settings. The back of this document has details regarding integrating these products with window flashing. This two-layer installation differs from a two-ply installation in that each layer is installed individually, where the inner layer is integrated with flashing to provide a continuous drainage plane. The outer layer serves to separate and protect the inner layer from the stucco. Compliance with the building code and proper installation are critical in reducing potential water leakage points. It is the responsibility of the architect or builder to ensure that these standards are met. This guide applies to Jumbo Tex, Super Jumbo Tex 60 Minute, Two-Ply Jumbo Tex, Two-Ply Super Jumbo Tex, PlyDry and WeatherSmart. 1 INSTALLING WRB 2 Following installation of windows and flashing, install water-resistive barrier over an approved exterior sheathing. Starting at the bottom of one end of the wall, place the waterresistive barrier roll horizontally (overlapping the corner by a minimum of 6") and roll out the first course evenly, integrating with flashing at window and door openings. Place the membrane so that it is tight and flat. Apply enough fasteners to hold the waterresistive barrier in place until the final wall cladding is installed. Begin roll a minimum of 6" away from corner Fasten all corners FASTENING The size of fasteners used and the spacing required is determined on the job site. Apply enough fasteners to hold the water-resistive barrier in place until final cladding is applied Under normal conditions, attaching the water-resistive barrier with a quality exterior grade staple is acceptable. A higher grade of galvanized fastener, or large headed galvanized nail may be required in certain settings or weather conditions. It is the responsibility of the architect, builder, or foreman to decide the type of exterior grade fastener that will best suit the job at hand and how many of these fasteners are required.
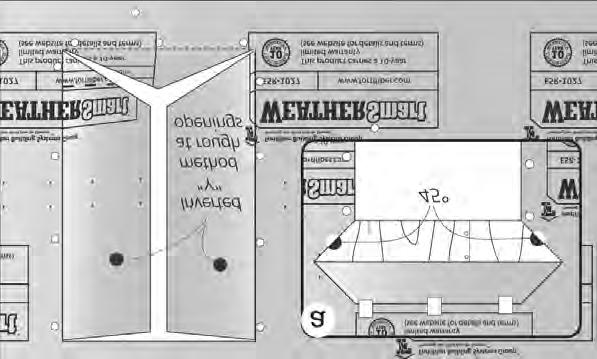
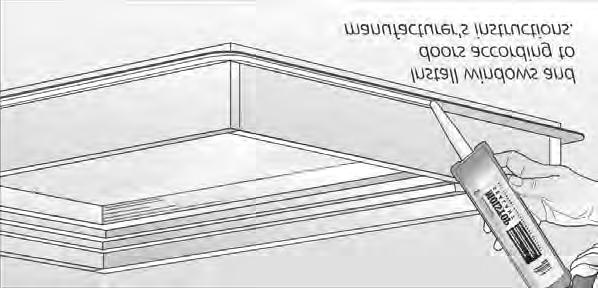
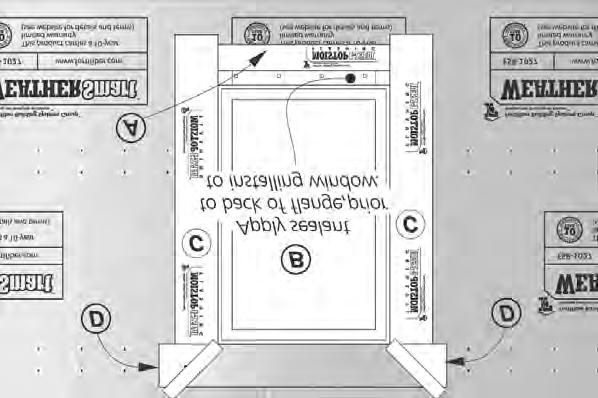
4 3 SEAM OVERLAPS 4 WRB AND WINDOWS 6" minimum vertical overlap 3" recommended horizontal overlap 2" required horizontal overlap Upper layers of weather-resistive barrier covers jamb flashing Tuck weather-resistive barrier under sill window flashing At vertical seams, apply a minimum 6" vertical overlap. When going around corners, make sure the water-resistive barrier is pulled tightly and properly fastened. 5 INSTALL JUMBO TEX The outer layer of Jumbo Tex is installed over the window flashing When a course of the water-resistive barrier first crosses the path of any window, it needs to be properly integrated with the window sill and jamb flashing for quality moisture management. To do this, tuck water-resistive barrier under the sill and jamb flashing as shown above. The courses above this point can butt into the window jamb. WRB AND FLASHING Windows, window flashings, and weather barriers must be properly integrated in order to form a comprehensive moisture control system. The windows shown in this guide follow the Method B manner of window flashing. A detailed guide for this method of flashing can be found at Also, you can find other detailed instructions on how to integrate water-resistive barriers and window flashings at the Fortifiber web site. Listed below are some of the common settings that you ll encounter when installing a water-resistive barrier. WHEN WATER-RESISTIVE BARRIER IS INSTALLED AFTER THE WINDOW An outer layer of Jumbo Tex is now installed over the first water-resistive barrier layer in weather-board fashion, following the same requirements for overlaps and fasteners. However, this layer is not integrated with the window flashing, but is instead installed over the integrated flashing and first water-resistive barrier. WHEN WATER-RESISTIVE BARRIER IS INSTALLED BEFORE THE WINDOW NATIONAL SALES OFFICE Fernley, NV (11/6/13)


5

6
7
8
9
10

11 WeatherSmart Air Barrier Installation Guide 1
12 The intent of this document is to provide a guide for the installation of WeatherSmart as both a Weather Resistive Barrier (W.R.B.) and an Air Barrier Material (A.B.M.) in residential and light commercial construction. It is not meant to be a comprehensive procedure for an Air Barrier System. The purpose is to identify critical interfaces that need to be addressed when a membrane material is installed on residential and light commercial walls as one element of an Air Barrier System. R E F E R E N C E I N F O R M A T I O N D E F I N I T I O N S : AIR BARRIER ACCESSORY products designated to maintain air tightness between air barrier materials, air barrier assemblies and air barrier components, to fasten them to the structure of the building, or both (e.g., sealants, tapes, backer rods, transition membranes, fasteners, strapping, primers). AIR BARRIER ASSEMBLY the combination of air barrier materials and air barrier accessories that are designated and designed within the environmental separator to act as a continuous barrier to the movement of air through the environmental separator. AIR BARRIER COMPONENT pre-manufactured elements such as windows, doors and service elements that are installed in the environmental separator. AIR BARRIER MATERIAL (A.B.M.) a building material that is designed and constructed to provide the primary resistance to airflow through an air barrier assembly. AIR BARRIER MEMBRANE Polymeric housewraps that qualify, liquid applied barriers or self adhesive air barriers. AIR BARRIER SYSTEM the combination of air barrier assemblies and air barrier components, connected by air barrier accessories that are designed to provide a continuous barrier to the movement of air through an environmental separator. SELF-ADHESIVE MEMBRANE (S.A.M.) also known as self-adhesive flashing such as FortiFlash, FortiFlash 40 or FortiFlash Butyl. WEATHER RESISTIVE BARRIER (W.R.B) A barrier material that protects the wall system from water damage while allowing moisture vapor to escape. Some W.R.B.s also can act as an air barrier. 2
13 G E N E R A L I N S T A L L A T I O N I N S T R U C T I O N S Air barrier membranes, such as WeatherSmart Housewrap/Air Barrier, are only one element of a total air barrier system. As such, the placement of the air barrier membrane in the building envelope must be determined prior to construction to insure that it is installed in the proper position and integrated properly to all air barrier components and accessories in the envelope. Because the various elements of the air barrier system are typically installed by multiple trades it is essential that the contractor take the lead in coordinating all installation activities. A pre-construction meeting with all parties involved is highly critical. The contractor can then ensure that the intent of constructing the building enclosure with a continuous air barrier system to control air leakage into, or out of, the conditioned space is achieved. To be most effective, air barriers should be installed in an integrated sequence during wall construction BEFORE windows and doors are placed and with particular attention to sequencing with step flashings and kick out flashings. If the air barrier membrane is installed AFTER windows and doors are placed, the perimeter of all openings must be air sealed while still providing drainage for windows and doors, especially at sill locations. To seal use Fortifiber Sheathing Tape, FortiFlash, FortiFlash 40, Fortiflash Butyl, or a bead of Moistop Sealant under the air barrier membrane. 3
14 A I R B A R R I E R M E M B R A N E I N S T A L L A T I O N S E Q U E N C E S T E P 1 F O U N D A T I O N / F L O O R R I M J O I S T C O N N E C T I O N This connection must be sealed as part of the air barrier system by either wrapping the bottom of the wall, sealing the membrane to the foundation or other method. For the wrapping method install WeatherSmart on the sill gasket and foundation wall using 20" (508 mm) wide rolls. Attach WeatherSmart onto the inside wall to hold it in place. Build the floor structure and wrap WeatherSmart up and around the floor rim joist as shown below. WeatherSmart must be shingled over flashing and properly taped to allow drainage of any liquid water that penetrates the cladding. The architect is responsible for detailing how both air barrier and drainage performance are to occur simultaneously. (See Drawing 1 below) Drawing 1 For the sealing method, appropriate self-adhesive membrane (S.A.M.), mastic or sealant can be used to seal the bottom edge of the air barrier membrane directly to the foundation. The S.A.M., mastic or sealant adheres to the bottom edge of the membrane, bridges the critical sheathing/rim joist/foundation interface and adheres to the concrete below the rim joist forming an air tight seal. Typically a primer will be needed on the concrete surface for S.A.M. to attain proper adhesion. Mastics and sealants may not need a primer if designed for application to concrete. Follow the manufacturer s instructions in either case. (See Drawing 2 on following page) 4
15 Drawing 2 S T E P 2 S T A R T T H E F I R S T C O U R S E As with all building wraps, start wrapping at the bottom of one end of the wall overlapping the corner by a minimum of 12" (305 mm), place the membrane roll horizontally and roll out the first course evenly. To ensure proper shingling with the wrapped rim joist method, the bottom edge of the membrane should extend over the sill wrap by at least 6" (152 mm) and sealed using Fortifiber Sheathing Tape. When sealing to the foundation wall extend the membrane at least 2" (51 mm) below the sill plate and seal to the concrete with an appropriate S.A.M., sealant, or mastic. For slab on grade foundations extend the membrane to the bottom of the sill plate and seal it to the concrete with an appropriate below grade S.A.M., sealant, or mastic. For stucco exteriors, integrate the membrane with the weep screed to form a continuous air seal while maintaining proper drainage. The architect is responsible for detailing how both air barrier and drainage performance are to occur simultaneously. 5
16 A I R B A R R I E R M E M B R A N E I N S T A L L A T I O N S E Q U E N C E S T E P 3 W R A P T H E F I R S T C O U R S E Continue to wrap the perimeter of the building covering rough openings or pre-installed windows and doors. Overlap the starting point vertically by 6" (152 mm) to 12" (305 mm). Stud marks are printed on WeatherSmart at 8" (203 mm) intervals to aid in alignment with the studs. (See Step 5 Attaching the Membrane) S T E P 4 W R A P A D D I T I O N A L C O U R S E S To wrap a second course repeat step 2 with a horizontal overlap of at least 6" (152 mm) over the first course. To start using a new roll of WeatherSmart a vertical overlap of at least 6" (152 mm) is required. Repeat for additional courses using the 6" (152 mm) overlaps in both directions. To provide for proper water shedding, work from the bottom of the wall up, using the weatherboard methodology. S T E P 5 A T T A C H I N G T H E M E M B R A N E As with all air barriers, WeatherSmart can be secured to the exterior sheathing by either of the following methods. Method 1: Continuous furring strips installed vertically along stud lines to reduce the risk of failures. Method 2: Cap-nails installed along stud lines with a nailing pattern sufficient to prevent damage to the membrane from wind during construction. Suggested spacing is 16" (406 mm) O.C. for normal wind loads and 8" (203 mm) O.C. for wind loads greater than 60 mph (97 kph). Additional cap-nails should be installed to support WeatherSmart bridging across any opening in the sheathing board. Brick ties can be substituted for cap-nails in masonry veneer construction. Note: Do not fasten closer than 9" (229 mm) at the head of a rough opening. S T E P 6 I N T E G R A T I O N O F W I N D O W A N D D O O R F L A S H I N G As mentioned in Step 3, rough openings or pre-installed windows and doors are covered by the air barrier membrane during installation. The flashing must now be integrated into the Air Barrier System. 6
17 The following table is a guide to choosing the proper flashing installation method for various installation sequences and additional details needed for air barrier performance: A I R B A R R I E R M E M B R A N E I N S T A L L E D B E F O R E W I N D O W S A N D D O O R S Type of Window or Door Recommended Flashing Type Additional Details Flanged Self-Adhesive Non-Sill pan: Apply a continuous bead of sealant to all flanges of the perimeter. For Sill pans: Ensure air sealing at back dam and full perimeter with sill pans. Non-flanged/Brick Mold Self-Adhesive - Head & Sill Non-sill pan: When a sill starter bib is used under Mechanical or S.A.M. - Jambs S.A.M. apply a bead of sealant under the top edge to prevent air leakage. Apply a bead of sealant under all mechanically attached flashing at the perimeter of the rough opening. For sill pans: Use sealant or S.A.M. to prevent air leakage under the sill pan. Ensure that air sealing is provided at the back dam and full perimeter, and that drainage is promoted at the front of the pan. A I R B A R R I E R M E M B R A N E I N S T A L L E D A F T E R W I N D O W S A N D D O O R S Type of Window or Door Recommended Flashing Type Additional Details Flanged Self-Adhesive Tuck the air barrier membrane under the starter bib at the sill. For mechanically attached bibs apply sealant in an inverted U pattern and tape at the jamb sides. Mechanical (See Drawing 3 on following page) For a self-adhesive bib a split release liner is needed for a 2-step installation sequence. For barrier flashing systems apply sealant to the underside of the flange on the entire Self Adhesive - Head & Sill perimeter of the window. Mechanical or S.A.M. - Jambs For sill pans ensure that air sealing is provided at the back dam and full perimeter, and that drainage is allowed at the front. Non-flanged/Brick Mold Self Adhesive - Head & Sill Apply an additional bead of sealant under the top Mechanical or S.A.M. - Jambs edge of the starter bib. 7
18 A I R B A R R I E R M E M B R A N E I N S T A L L A T I O N S E Q U E N C E Drawing 3 S T E P 7 T A P I N G O F S E A M S All vertical and horizontal seams shall be taped with approved sheathing tape. Taping all vertical and horizontal seams is part of the requirement. Tape must be applied in weatherboard fashion, from bottom to top. 8
19 S T E P 8 I N T E G R A T I N G A D D I T I O N A L C O N N E C T I O N S F O R C O N T I N U I T Y Top of Wall Connection - Sloped Roof This is the most common discontinuity in residential air barrier construction. Option I: Seal at top plate. (Drawing 4) A common practice is to seal the air barrier membrane to the exterior sheathing at the level of the top plate. Note location of the S.A.M. with a minimum of a 2" (51 mm) lap onto the membrane and the sheathing. Use mastic along the top edge of the self-adhesive flashing as added protection against water and air intrusion. Drawing 4 Option II: Membrane overlap and seal to interior and wall membranes. (Drawing 5) To ensure continuity of the air barrier membrane, install WeatherSmart as shown in the drawing. Overlap the ceiling and wall air barrier membranes and seal with a continuous strip of sheathing tape or self-adhesive membrane. Option III: I: Vented attics Integrate wall membrane to air tight drywall ceiling or air tight spray foam. (See Drawing 6 on following page) Drawing 5 9
20 A I R B A R R I E R M E M B R A N E I N S T A L L A T I O N S E Q U E N C E Drawing 6 10
21 Knee-wall Coordination of roof and knee-wall construction is important to ensure continuity of the air barrier. Option I: Support and fasten WeatherSmart over lower floor ceiling area. Tape all seams. Option II: Integrate with airtight drywall. Option III: Integrate with spray foam. (Drawing 7) Drawing 7 11
22 Cantilever Floor (Drawing 8) Wrap WeatherSmart under and up the cantilever floor and fold the WeatherSmart up the sides of the cantilever wall a minimum of 6" (150 mm). Tape all corners and seams. Use proper shingling by ensuring that the top layer of the air barrier goes over the bottom layer by a minimum of 6" (150 mm). Properly insulate the floor joist cavities to provide airtightness. Recommendation is spray foam or rigid foam with edges sealed with spray foam or compatible sealant. Note: Get the inside corner as tight as possible using a piece of lumber 1x4 (25 x 100 mm) or similar. Drawing 8 12
23 Roof-Wall Interface - Low Slope (Drawing 9) Lap WeatherSmart over all flashing at roof-wall interfaces and adhere WeatherSmart to the flashing with sheathing tape or one of Fortifiber s S.A.M. products. Ensure that the WeatherSmart and tape or flashing is protected by cladding. To prevent creating a reversed lap at the parapet; where feasible, lap the roof membrane flashing over the W.R.B./A.B.M. Drawing 9 13
24 A I R B A R R I E R M E M B R A N E I N S T A L L A T I O N S E Q U E N C E Penetrations There are multiple penetrations in exterior walls due to dryer vents, bathroom exhaust fans, exterior electrical outlets, exterior lights, gas lines, etc. All of these holes need to be sealed to attain the performance of the air barrier system. To seal the WeatherSmart around all electrical, HVAC, plumbing or other penetrations: 1. Fill open gaps with low expansion foam sealant. 2. After the foam sealant has hardened, trim off any excess material. 3. Flash around the penetration with an approved sealant, Fortifiber s S.A.M. products or preformed accessories made for this purpose. a. When using tape or flashing start at the bottom of each penetration. b. After the first layer, apply sealant over the slit in the flashing. c. Shingle another layer of flashing over the bottom layers for proper drainage. 4. Apply the weather-resistive barrier over the flashed penetration. Products with flanges should be integrated into the air barrier system using Fortifiber s S.A.M. products. Follow shingle lapping procedures and sequencing as in a window installation. 14
25 15
26 Handling Tears and Holes During the course of installing the air barrier, minor tears may occur that must be repaired. Tears can easily be repaired with approved sheathing tape or one of Fortifiber s S.A.M. products. Larger holes (greater than 1" or 25 mm) may require a cut piece of WeatherSmart to cover the hole. Use methods that maintain proper shingling of layers that form the patch. 1. Make a cut 2" (50 mm) above the hole and extending a minimum of 2" (50 mm) on each side of the hole. 2. Measure and cut a piece of WeatherSmart as a patch large enough to cover the hole. Tuck the WeatherSmart patch into the cut. Tape along the perimeter by starting at bottom of the patch, shingling the side tapes over the bottom tape and ending with a top tape covering the cut and shingled over the side tapes. 16
27 A P P E N D I X A The Air Barrier Association of America (ABAA) provides useful information in defining the critical elements of an Air Barrier System. See ABAA Master Specification Section offers the following guidance. 1. The Air Barrier System shall have the following characteristics: a. It must be continuous, with all joints sealed. b. It must be structurally supported to withstand positive and negative air pressures applied to the building enclosure. c. Connection shall be made between: 1) Foundation and walls. 2) Walls and windows and/or doors. 3) Different wall systems. 4) Wall and roof. 5) Wall and roof over unconditioned space. 6) Walls, floor and roof across construction, control and expansion joints. 7) Walls, floors and roof to utility, pipe and duct penetrations. In addition: 8) Balcony decks and decks over living spaces. 9) Soffits at cantilevered floors. 2. Air Barrier Penetrations: All penetrations of the air barrier and paths of air infiltration / exfiltration shall be sealed Fortifiber Building Systems Group. Fortifiber, FortiFlash, FortiFlash Butyl, Moistop Sealant, WeatherSmart, and Protecting Your World from the Elements are trademarks of Fortifiber Corporation. 17
28 Toll Free: Phone: Fax: Web: /12
DuPont Tyvek Air Barrier Installation Guidelines. Canadian Version. Version 2
 DuPont Tyvek Air Barrier Installation Guidelines Helping you get the job done right Canadian Version Version 2 Table of Contents Applicable Products...2 Required Materials...2 Code Requirements...3 General
DuPont. Tyvek Sheathing Membrane Installation Guidelines. Version 2. Canadian Version
 DuPont Tyvek Sheathing Membrane Installation Guidelines Helping you get the job done right Canadian Version Version 2 Table of Contents Applicable Products...2 Required Materials...2 Code Requirements...3
SINGLE FAMILY USER S BULLETIN FOR INSTALLATION OF DUPONT WEATHERIZATION SYSTEMS PRODUCTS
 USER S BULLETIN SINGLE FAMILY USER S BULLETIN FOR INSTALLATION OF DUPONT WEATHERIZATION SYSTEMS PRODUCTS CONTENTS Introduction...1 Use of This Residential Single Family User s Bulletin...1 DuPont Residential
WARRANTY PROVIDER ACCEPTED A REFERENCE GUIDE OF TYPICAL RAINSCREEN WALL AND WINDOW DETAILS
 WARRANTY PROVIDER ACCEPTED A REFERENCE GUIDE OF TYPICAL RAINSCREEN WALL AND WINDOW DETAILS Per: 2006 B.C.B.C. Part 9 DISCLAIMER: THE INFORMATION CONTAINED IN THIS DOCUMENT REPRESENTS CURRENT WOOD FRAME
Pella 250 Series. Wood Frame Construction with Vinyl Siding... V250-ID-888 Wood Frame Construction with Brick Veneer...
 SECTION DIRECTORY General Information Introduction... V250-ID-886 Installation Accessories and Applications... V250-ID-886 Typical Sealant Placement Details... V250-ID-887 Fin Installation Details Wood
Feature Zone IECC 2009 IECC
 Feature Zone 3 2006 IECC 2009 IECC Window U factor 0.65 0.50 Skylight U factor 0.65 0.65 Window SHGC 0.40 0.30 Ceiling R value 30 30 Wood frame R value 13 13 Mass wall R value 1 5 5/8 Floor R value 19
SURESILL WATER MANAGEMENT GUIDE
 THE SURE LEVEL OF PROTECTION SURESILL WATER MANAGEMENT GUIDE FOR WINDOWS AND DOORS *1 SLOPED SILL PAN ASSEMBLY Cut the channel plate ¼ smaller than the rough opening. Check the fit with end caps before
RevealShield SA Penetrations
 Penetrations For Larger Penetrations, use VaproLiqui-Flash tooled at least 2" onto the face and 2" out along all sides of the penetration Apply sufficient Dow 758 Sealant to completely seal fastener penetrations
NCMA TEK TEK 19-5A FLASHING DETAILS FOR CONCRETE MASONRY WALLS
 NCMA TEK National Concrete Masonry Association an information series from the national authority on concrete masonry technology FLASHING DETAILS FOR CONCRETE MASONRY WALLS TEK 19-5A Water Penetration Resistance
MULTI-FAMILY USER S BULLETIN FOR INSTALLATION OF DUPONT WEATHERIZATION SYSTEMS PRODUCTS
 USER S BULLETIN MULTI-FAMILY USER S BULLETIN FOR INSTALLATION OF DUPONT WEATHERIZATION SYSTEMS PRODUCTS CONTENTS Introduction...1 Use of this Residential Multi-Family User s Bulletin...1 DuPont Multi-Family
How do you install yours?
 How do you install yours? Darrell Paul Qualistat Building Performance Consultants CSA 440 Just about adding Peel & Stick? 1 Window and door problems Photos / videos Video available for viewing at INSTAGRAM
Perimeter Relief and Control Joints in Fire-Rated Gypsum Board
 Perimeter Relief and Control Joints in Fire-Rated Gypsum Board In multi-family residential construction, involving fire-rated assemblies stress relief in the firerated assemblies is important, but often
Senergy Platinum CI Stucco Typical details for an impact resistant cement plaster stucco system featuring Neopor GPS Plus Rigid Insulation Board
 Senergy Platinum CI Stucco Typical details for an impact resistant cement plaster stucco system featuring Neopor GPS Plus Rigid Insulation Board NOTES Senergy Platinum CI Stucco Typical details for an
BUILDING SUCCESSFULLY WITH DRYVIT RESIDENTIAL SYSTEMS.
 BUILDING SUCCESSFULLY WITH RESIDENTIAL S. DS504 THE FOLLOWING IS A LIST OF MAJOR CONSIDERATIONS THAT WILL HELP ENSURE A QUALITY INSTALLATION. SUBSTRATES (INSPECTION/WALK-AROUND) Prior to starting a job,
breathability to prevent the potential for moisture condensation within exterior walls...
 Provides Part of a Complete Moisture Control System Jumbo Tex is part of a complete Moisture Control System for walls engineered by the Fortifiber Building Systems Group, which has been chosen by builders
Senturion TM III Wall System
 Senturion TM III Wall System TYPICAL DETAILS 1017666 1. Senturion III Wall System Application (Plan VIew) 2. Senturion III Wall System Application (Isometric View) 3. Aesthetic Groove (Plan VIew) 4. Insulation
BULLETIN FROM THE FIRST COAST CHAPTER ICC~BOAF
 FIRST COAST CHAPTER INTERNATIONAL CODE COUNCIL (ICC) AND BUILDING OFFICIALS ASSOCIATION OF FLORIDA, INC. (BOAF) SERVING BAKER, BRADFORD, CLAY, DUVAL, NASSAU, PUTNAM, ST. JOHNS & UNION COUNTIES BULLETIN
ELEVATION FOR DETAIL REFERENCE ONLY
 6 7 8 10 OUTSIDE CORNER 19 20 4 5 11 21 22 15 16 13 12 OPENING 14 SOFFIT 18 END WALL 17 INSIDE CORNER 9 6 7 8 ELEVATION FOR DETAIL REFERENCE ONLY CCV-01 CCV-02 CCV-03 CCV-04 CCV-05 CCV-06 CCV-07 CCV-08
MID-RISE DESIGN & CONSTRUCTION
 TECHNICAL BULLETIN No.38-021616 Rev072116 MID-RISE DESIGN & CONSTRUCTION Logix effective R-values range from R-24 to R-28+ Insulated concrete forms (ICF) are becoming a main stream choice for the construction
for New Construction Applications
 INSTALLATION GUIDE for New Construction Applications Designing and building instructions for ThermalStar LCi are described in the following manual. General installation, fastening details and instructions
Hardin County Planning and Development Commission
 Location by Climate Zone: Hardin County (per Table N1101.2), and the entire state of Kentucky is located in Climate Zone 4, the HDD is 4000 to 4999. Building Requirements; Building Thermal Envelope The
Inspection of New One- and Two- Family Dwellings
 Building Safety Division 8500 Santa Fe Drive Overland Park, KS 66212 (913) 895-6225 Fax (913) 895-5016 Email: permitservices@opkansas.org Inspection of New One- and Two- Family Dwellings Planning and Development
Quality Inspection 8618 London Heights San Antonio, TX Phone: (210)
") Quality Inspection 8618 London Heights San Antonio, TX 78254 Phone: (210) 240-0476 PRE DRYWALL INSPECTION REPORT Prepared For: DELETED (Name of Client) Concerning: DELETED, San Antonio, TX 78258 (Address
Quality Inspection 8618 London Heights San Antonio, TX 78254 Phone: (210) 240-0476 PRE DRYWALL INSPECTION REPORT Prepared For: DELETED (Name of Client) Concerning: DELETED, San Antonio, TX 78258 (Address
Date Rater Verified. Rater Verified. Slab / Pre-Drywall / Thermal Inspection
 Slab on Grade & Basements: A capillary break is installed on top of all footings Slab / Pre-Drywall / Thermal Inspection A minimum of 4" of clean or washed gravel (0.5" diameter or greater) is placed over
ELEVATION FOR DETAIL REFERENCE ONLY
 6 7 8 10 26 19 20 14 15 22 SOFFIT OUTSIDE CORNER INSIDE CORNER 23 25 24 25 5 27 28 29 16 11 OPENING 17 18 END WALL 21 12 13 9 6 7 8 ELEVATION FOR DETAIL REFERENCE ONLY CSH-01 CSH-02 CSH-03 CSH-04 CSH-05
ELEVATION FOR DETAIL REFERENCE ONLY
 8 4 5 6 9 16 10 15 11 SOFFIT 19 OUTSIDE CORNER 20 21 INSIDE CORNER 3 22 23 12 13 OPENING 14 END WALL 17 18 7 4 5 6 ELEVATION FOR DETAIL REFERENCE ONLY CSV-01 CSV-02 CSV-03 CSV-04 CSV-05 CSV-06 CSV-07 CSV-08
Presentation Overview: NC Energy Code RESNET Standards HERS Index HERS Verification Process
 Presentation Overview: NC Energy Code RESNET Standards HERS Index HERS Verification Process NC Energy Code Requirements ENERGY STAR and NC Energy Code in Alignment RESNET Standards HERS Index A scoring
AcroWall-ES System. Class PB Exterior Insulation and Finish System providing a primary moisture barrier. Typical Details
 Typical Details AcroWall-ES System Class PB Exterior Insulation and Finish System providing a primary moisture barrier 1. Typical AcroWall-ES System Application 2. Typical Aesthetic Reveal 3. Typical Window
Tech Solutions WEATHERMATE Straight Flashing. Commercial Installation Guide
 Tech Solutions 536.0 WEATHERMATE Straight Flashing Commercial Installation Guide Table of Contents Product Overview.................................................................................3 Benefits
ELEVATION FOR DETAIL REFERENCE ONLY
 5 6 8 9 1 10 15 SOFFIT OUTSIDE CORNER 16 18 19 12 OPENING 11 END WALL INSIDE CORNER 17 1 7 5 6 ELEVATION FOR DETAIL REFERENCE ONLY IWV-01 IWV-02 IWV-0 IWV-0 IWV-05 IWV-06 IWV-07 IWV-08 IWV-09 IWV-10 INDEX
ACCESSORY STRUCTURE Building permit information For 1 & 2-family dwellings
 ACCESSORY STRUCTURE Building permit information For 1 & 2-family dwellings Building Safety Department 400-2 nd Street South St. Cloud, MN 56301 (320) 255-7239 A building permit is required for any accessory
NEXT GENERATION HIGH PERFORMANCE WALLS
 CONSTRUCTION GUIDE NEXT GENERATION HIGH PERFORMANCE WALLS CLIMATE ZONES 3-5 PART 2: 2X4 Walls with 1" 1.5" Exterior Insulative Sheathing V. Kochkin and J. Wiehagen Home Innovation Research Labs June 2017
Encapsulated, Sealed & Closed Crawlspace Installation Manual
 YourCrawlSpace, Inc. 1007 Johnni4 Dodds Blvd. Mt. Pleasant, SC 29464 Toll Free: 877-44-CRAWL (27295) Local: (843) 593-1115 Encapsulated, Sealed & Closed Crawlspace Installation Manual Copyright 2017 Your
NOVABRIK MORTARLESS CONCRETE BRICK VENEER SPECIFICATION. MASTERFORMAT SECTION (Mortarless Concrete Brick Veneer)
") NOVABRIK MORTARLESS CONCRETE BRICK VENEER SPECIFICATION MASTERFORMAT SECTION 04818 (Mortarless Concrete Brick Veneer) Spec_USA_En_18102005.doc 12/1/2005 Novabrik Page 2 Section 04818 NOVABRIK MORTARLESS
NOVABRIK MORTARLESS CONCRETE BRICK VENEER SPECIFICATION MASTERFORMAT SECTION 04818 (Mortarless Concrete Brick Veneer) Spec_USA_En_18102005.doc 12/1/2005 Novabrik Page 2 Section 04818 NOVABRIK MORTARLESS
Moisture Considerations for Insulated Building Assemblies
 PHRC Webinar Series Tuesday, November 10, 2015 @ 1pm Description Moisture Considerations for Insulated Building Assemblies Brian Wolfgang Housing Systems Specialist One critical design consideration in
Exterior Stucco and Siding Installation
 Exterior Stucco and Siding Installation CITY OF NEWARK, CALIFORNIA BUILDING INSPECTION DIVISION 37101 Newark Boulevard, Newark, CA 94560-3796 510-578-4261 Fax 510-578-4307 e-mail: building.inspection@newark.org
Finestone Stucco System
 Typical Details Finestone Stucco System Cement Plaster Stucco 1. Typical Finestone Stucco System with Steel Framing 2. Typical Finestone Stucco System with Wood Framing 3. Typical Finestone Stucco System
The better way to build TM. Installation Manual FOUNDATION SIPs & FROST WALLS SIPs
 The better way to build TM Installation Manual FOUNDATION SIPs & FROST WALLS SIPs November 2016 PWF FOUNDATION & FROST WALL SIPs Installation Manual Table of Contents Topics General Requirements....................................
General. Moisture. Secondary Water-Resistive Barrier. Storage. Gaps & Sealants. Stud Spacing. Flashing, Windows, Doors & Openings
 application instructions STRAND SUBSTRATE 38, 76 AND 190 SERIES PRIMED PANEL SIDING INCLUDING SILVERTECH & SMARTFINISH General At the time of manufacture, siding meets or exceeds the performance standards
Residential Building Inspections
 Residential Building Inspections Foundations, Grade Beams, Pile Caps, Foundation Pads 1. All trenches or excavations and formwork shall be in accordance with the size(s) and configuration(s) as per approved
INSTALLATION MANUAL. ZIP System R12 Sheathing. Contents. 07 ZIP System R12 Sheathing Window Installation 08 ZIP System R12 Sheathing Siding Guidelines
 ZIP System R12 Sheathing INSTALLATION MANUAL Contents 02 ZIP System R12 Sheathing General Notes, Guidelines and Limitations 03 ZIP System R12 Sheathing Installation 05 ZIP System R12 Sheathing Non Structural
A. Source Limitations: Obtain each type of building insulation through one source.
 SECTION 07210 - BUILDING INSULATION PART 1 - GENERAL 1.1 RELATED DOCUMENTS A. Drawings and general provisions of the Contract, including General and Supplementary Conditions and Division 1 Specification
DuPont RainVent Batten Installation Guidelines
 DuPont RainVent Batten Installation Guidelines Purpose: To improve the ventilation and draining space behind a cladding system or 3-coat stucco system in residential construction. The DuPont RainVent Batten
The Ashland Project. Total Area: 1,778 Sq.Ft. 3 Bedroom, 2 Bath, 2 Car Garage
 The Ashland Project Total Area: 1,778 Sq.Ft. 3 Bedroom, 2 Bath, 2 Car Garage The garage and bedroom extend from the front of this three bedroom home, drawing you visually into the entryway. Brick and stucco
Fundamentals of Door Installation START
 Fundamentals of Door Installation START Course Description This program provides a general overview of best-practice installation procedures for wood and clad/wood doors, including a discussion on opening
ELEVATION FOR DETAIL REFERENCE ONLY
 4 5 6 8 18 13 10 15 SOFFIT OUTSIDE CORNER INSIDE CORNER 16 17 3 19 20 11 9 OPENING 12 END WALL 14 7 4 5 6 ELEVATION FOR DETAIL REFERENCE ONLY EH-01 INDEX EH-02 STANDARD PANEL OFFERING EH-03 SIDE LAP DETAILS
Senershield -R / Senershield -VB
 Senershield -R / Senershield -VB Air / Water-Resistive Barrier Typical Details 1. Termination at Grade - Sheathing Overlapping Foundation 2. Termination at Grade - Sheathing Overlapping Foundation with
PLYWOOD FLOATING FLOOR
 PLYWOOD FLOATING FLOOR Read First These suggestions represent generally accepted procedures for successful installation of Enka Building Products. These instructions may be followed, modified, or rejected
Low-cost Construction for High-energy Savings. Brian J. Wimmer Construction Manager Rochester Area Habitat for Humanity
 Low-cost Construction for High-energy Savings Brian J. Wimmer Construction Manager Rochester Area Habitat for Humanity construction@rahh.org Objectives: 1. Control air & moisture in high-performance, low-cost
LP SmartSide Perfection Shingle
 Application Instructions Fiber Substrate Lap Siding A A - Lap Siding ON SITE STORAGE Store off the ground well supported, on a flat well-drained surface. (Diagram 1a) Additional support may be required
E. Section Polymer Modified Cement Waterproofing. K. Section Sub drainage: Foundation perimeter drainage.
 DELTA -DRAIN Section 07 10 00 Dampproofing and Waterproofing PART 1 GENERAL 1.1 SECTION INCLUDES A. Below grade drainage sheets. B. Plaza deck and planter drainage sheets. 1.2 RELATED SECTIONS A. Section
Chapter 2 Understanding The Problem
 Chapter 2 Understanding The Problem What Causes Most Of The Problems With Stucco? EIFS was originally intended to seal and insulate the exterior of the home from the elements. Problems occur when poorly
Boulder City NV Prepared by (Print Name) Signature Date
 Signature Date") City of Boulder City Community Development Department Building & Safety Division 401 California Avenue Boulder City, NV 89005-2600 702-293-9282 (Main Line) 702-293-9392 (Fax) 2009 International Energy
City of Boulder City Community Development Department Building & Safety Division 401 California Avenue Boulder City, NV 89005-2600 702-293-9282 (Main Line) 702-293-9392 (Fax) 2009 International Energy
10 Steps to Save Energy in Your House
 10 Steps to Save Energy in Your House Sealing and insulating your home is one of the most cost-effective ways to make your home more comfortable and energy efficient. You can do it yourself. In this chapter,
Michigan Energy Code Training and Implementation Program
 Michigan Energy Code Training and Implementation Program 1.0 Hour Advanced Program Course Number 16201 Residential Energy Air Sealing School of Planning, Design & Construction Michigan State University
INSULATION OWENS CORNING INSULATION PRODUCTS IN THIS SECTION:
 OWENS CORNING PRODUCTS What exactly is an insulating system? The answer starts with the role insulation plays in your home. All insulating products are based on a single basic principle: heat moves from
PREP + INSULATION. DISCLAIMER: These tools are for illustrative purposes only and
 PREP + INSULATION HOME ENERGY UPGRADES What every contractor needs to know. Copyright 2012 Advanced Energy. All Rights Reserved 103 HOME ENERGY UPGRADES Prep + Insulation Contents Air sealing is a challenging
Water Intrusion Into Buildings Forensic Investigations
 Water Intrusion Into Buildings Forensic Investigations How does water flow? Let me count the ways. Major building structural and operational failures are caused by three problems: water, water, and water.
Finestone Stucco Ultra Wall System
 Finestone Stucco Ultra Wall System Premium impact and puncture resistant, rain screen design cement plaster stucco system with enhanced water management Typical Details BLANK PAGE Finestone Stucco Ultra
HPW Protocol Reference Manual
 1 HPW Protocol Reference Manual Change Log: UPDATED BY DATE UPDATED VERSION UPDATE DETAILS 2 Table of Contents: HIGH PERFORMANCE WALL ASSEMBLY... 4 THERMAL SPECIFICATION... 4 REQUIREMENTS FOR HPW INSULATION...
OSB.COMFORT INSTALLATION GUIDE * 1 RECOMMENDED USE PANEL COMPOSITION
 STYRO RAIL 07-0 Expanded Polystyrene Rigid Insulation combined to an Oriented Structural Board INSTALLATION GUIDE * 9 mm [8 ] The OSB.Comfort boards manufactured by Styro Rail are composed of type expanded
Administrative Changes
 Revised 11/29/06 Knox County Residential Building Codes Significant Changes From The 1995 CABO One And Two Family Dwelling Code To The 2006 International Residential Code All one and two family dwellings
IRC 2012 Key Changes
 IRC 2012 Key Changes Overview of changes between the 2009 and 2012 IRC A Webinar Provided by The Pennsylvania Housing Research Center November 4, 2011 Presented by Mike Turns; Associate Director, PHRC
Tensile ASTM D1970 MD = 939 psi / CD = 1252 psi Self Sealability / water penetration resistance around nails. ASTM D1970 Section 7.
 TECHNICAL DATA SHEET Protecto Universal Primer Free Membrane Self-adhered Flashing / Air Barrier / Vapor Retarder Thru-Wall Flashing / Below Grade Waterproofing Membrane with Super Stick technology TECHNICAL
2006 INTERNATIONAL ENERGY CONSERVATION CODE
 2006 INTERNATIONAL ENERGY CONSERVATION CODE DOCUMENTATION Code Change No: EC28-06/07 Original Proposal Sections: IECC: 202, 402.5, 402.5.1 (New), Table 402.5.1 (New), 402.5.2 (New), 402.5.3 (New), 402.2.8,
Avoiding Air Barrier Pitfalls When sub-trade activities are not in sync with air barrier requirements, installation can go poorly.
 48 D+D NOVEMBER 2013 Building Envelope Avoiding Air Barrier Pitfalls When sub-trade activities are not in sync with air barrier requirements, installation can go poorly. By Brian H. Neely, AIA, CDT, CBST,
Introducing TJ Insulated Structural Framing Components
 #TJ-9009 SPECIFIER S GUIDE TJ INSULATED HEADERS, RIM BoaRD, AND CORNERS Introducing TJ Insulated Structural Framing Components Helps meet the 2011 Federal Energy Star Homes and 2009 International Energy
Water Penetration Resistance - Design and Detailing
 Technical Notes on Brick Construction 7 114 Commerce Park Drive, Reston, Virginia 20191 www.gobrick.com 703-620-0010 Water Penetration Resistance - Design and Detailing Abstract: Proper design, detailing
Radon Vent Pipe System. Labeling Performance Indicators
 Section 6 Radon Vent Pipe Labeling Performance Indicators Radon Vent Pipe System Connected after sub-grade system installed Pipe cannot be trapped Provide space in chases Support at each floor level Discharge
The Disclaimer located on the reverse side of the title page of the OAA Rain Penetration Practice Guide applies to each section of the Guide.
 Note: This document has been divided into several sections in order to suit the limitations of the website. The Disclaimer located on the reverse side of the title page of the OAA Rain Penetration Practice
SECTION 07530CP EPDM MEMBRANE ROOFING
 PART 1 GENERAL 1.1 SUMMARY SECTION 07530CP EPDM MEMBRANE ROOFING A. Section includes: 1. Adhered membrane roofing and flashing 2. Mechanically fastened roof insulation 3. Walkway pads 1.2 ARCHITECTURAL
2010 National Building Code Adoption and Associated Process Changes
 Building Inspection City of Moncton 655 Main Street Moncton, NB E1C 1E8 Phone: (506) 856-4375 Fax: (506) 856-4348 Bulletin No. 14 From: Randy Richard Date: February 9, 2015 Subject: 2010 National Building
Energy Efficiency: Designing Wood-Frame Buildings for Occupant Comfort
 Please add relevant logo here Energy Efficiency: Designing Wood-Frame Buildings for Occupant Comfort Presented by: Peter J. Arsenault, FAIA, NCARB, LEED-AP Disclaimer: This presentation was developed by
BENCHMARK Evolution Axis
 Sheet List EVO VT 00 B DIRECTION OF PREVAILING WIND VERTICAL PANEL JOINT & FASTENER LOCATIONS DIRECTION OF LAY FACTORY APPLIED WEATHER SEAL CONCEALED PANEL FIXING NOTE: FASTENER NUMBERS DEPEND ON THE ACTUAL
HIDDEN HOLES IN WOOD FRAMED BALCONY WATERPROOFING
 HIDDEN HOLES IN WOOD FRAMED BALCONY WATERPROOFING ROCCO ROMERO, RA WISS, JANNEY, ELSTNER ASSOCIATES, INC. 960 South Harney St., Seattle, Washington 98108 Phone: 206-622-1441 Fax: 206-622-0701 E-mail: rromero@wje.com
The Inspection Process. Waxhaw N.C.
 The Inspection Process In Waxhaw N.C. This information is provided by the Waxhaw Enforcement Division to assist you in the progression of your project. Nothing in this document should be considered "Code"
PROJECT LOCATION SECTION COPPER METAL PLATE WALL PANELS
 SECTION 07 4213.25 PART 1- GENERAL 1.01 SECTION INCLUDES A. Copper metal plate wall panels. 1.02 RELATED REQUIREMENTS A. Section 05 4000 Cold-Formed Metal Framing: Wall panel substrates support framing.
EXCEL Medical Waste - Equipment Installation Section SECTION GYPSUM BOARD
 SECTION 09 29 00 GYPSUM BOARD PART 1 - GENERAL 1.1 DESCRIPTION This section specifies installation and finishing of gypsum board. 1.2 RELATED WORK A. Installation of steel framing members for walls, partitions,
Colphene BSW Training and Application Guide. Colphene BSW Waterproofing Membrane. 1. Prepare substrate
 Colphene BSW Training and Application Guide Colphene BSW Waterproofing Membrane. 1. Prepare substrate Substrate must be structurally sound. Surface must be free of voids, spalled areas, loose aggregate,
Detail Drawings THE BEST PANEL COMPANY. from. 126 Old Highway 60 East Hardinsburg, Kentucky Office:
 Detail Drawings from Rev. 4/2017 126 Old Highway 60 East Hardinsburg, Kentucky 40143 Office: 270-788-3535 www.bestpanelcompany.com Dri-Plane screen / similar / Similar Non-Corrosive Fastener designed to
2006 Building Code Flashing Changes & Challenges. Builder Breakfast and Luncheon Series Presented by:
 2006 Building Code Flashing Changes & Challenges Builder Breakfast and Luncheon Series Presented by: 1 Speakers 2006 Building Code Flashing Changes & Challenges Mick Ryan, President, Siding Contractors
(Project Location) (your firm's name)
 (your firm's name)") SECTION 07 21 00 THERMAL INSULATION PART 1 GENERAL 1.1 RELATED DOCUMENTS A. Drawings and general provisions of the Contract, including the Conditions of the Contract and Division 01 Specification Sections
SECTION 07 21 00 THERMAL INSULATION PART 1 GENERAL 1.1 RELATED DOCUMENTS A. Drawings and general provisions of the Contract, including the Conditions of the Contract and Division 01 Specification Sections
FACADES - ACM BASE AT OVERHANG (WITH BASE FLASHING) INDEX SHEET
 INDEX SHEET") KPH-DS-01-MTLV KPH-PJ-01-MTLV KPH-PJ-02-MTLV KPH-PJ-03-MTLV KPH-PJ-04-MTLV KPH-PJ-05-MTLV KPH-BS-01-MTLV KPH-BS-02-MTLV KPH-BS-03-MTLV KPH-BS-04-MTLV KPH-OC-01-MTLV KPH-IC-01-MTLV KPH-SF-01-MTLV KPH-SF-02-MTLV
KPH-DS-01-MTLV KPH-PJ-01-MTLV KPH-PJ-02-MTLV KPH-PJ-03-MTLV KPH-PJ-04-MTLV KPH-PJ-05-MTLV KPH-BS-01-MTLV KPH-BS-02-MTLV KPH-BS-03-MTLV KPH-BS-04-MTLV KPH-OC-01-MTLV KPH-IC-01-MTLV KPH-SF-01-MTLV KPH-SF-02-MTLV
Weather Resistant Barrier
 Weather Resistant Barrier Welcome to CertainTeed For more than 100 years, homeowners and building professionals have trusted CertainTeed to provide the highest quality building products, and to continually
Managing Rainwater at the Window-Wall Interface
 Managing Rainwater at the Window-Wall Interface Prepared by : Silvio Plescia (CMHC) and Michael Lacasse (NRC) ANHWP, Edmonton and Calgary, 23-24 September 2009 CMHC SCHL Introduction The problems you know
Eclipse Energy Guard. Product Information & Installation Manual General Installation Requirements
 Product Information & Installation Manual 01 Important Notice to Buyers and Users of RoyOMartin wall system These instructions are not intended to cover every installation requirement, application, detail
2003 International Residential Building Code
 2003 International Residential Building Code Section R305 Ceiling Height Habitable rooms, hallways, corridors, bathrooms, toilet rooms, laundry rooms and basements shall have a ceiling height of not less
Quick Reference Guide for 2009 IECC Residential Energy Efficiency Climate Zone 6
 Quick Reference Guide for 2009 IECC Residential Energy Efficiency The International Energy Conservation Code (IECC) contains energy-efficiency criteria for new construction, but keeping up with changes
KS SERIES - VERTICAL INSTALLATION
 CS-DS-01-KSV CS DISCLAIMER CS-PP-01-KSV PANEL PROFILES CS-PP-02-KSV PANEL PROFILES CS-PP-03-KSV PANEL PROFILES CS-PJ-01-KSV KS SERIES EXPANDED PANEL JOINT CS-PJ-02-KSV KS SERIES ENGAGED PANEL JOINT CS-PJ-03-KSV
FMA_AAMA_WDMA Installation Committee Update FMA Conference May 8, Naples, FL. Jim Katsaros FMA_AAMA_WDMA Installation Committee
 FMA_AAMA_WDMA Installation Committee Update FMA Conference May 8, 2013 - Naples, FL Jim Katsaros FMA_AAMA_WDMA Installation Committee Representing the FMA/AAMA/WDMA Installation Coordination Committee:
INSPECTION GUIDELINES: JOIST AND UNDERFLOOR COMBO
 Joist and Underfloor Combo Page 1 of 7 Revision Date: 10/02/2017 DEVELOPMENT SERVICES BUILDING INSPECTION INSPECTION GUIDELINES: JOIST AND UNDERFLOOR COMBO INSPECTION CODE: 212, 213 SCOPE: RESIDENTIAL
Metafor Panel System Installation Guide
 Installation Guide innovative cladding design solutions Product Description Universal Flashing Kit Supplemental Guide for VM Pro-Zinc Training To enroll in a VM PRO-ZINC Training Course contact: UMICORE
Start the installation at one corner of the building. Unroll the first sheet of MiraPLY-H square/parallel to the building wall, starting at one corner
 Installation Instructions C A R L I S L E C O A T I N G S & W A T E R P R O O F I N G Carlisle Coatings & Waterproofing Incorporated (CCW) has prepared this installation guide to assist applicators in
PLATON FOUNDATION WRAP
 DRAINAGE SOLUTIONS SINCE 1908 PLATON FOUNDATION WRAP RUGGED, DIMPLED HIGH-DENSITY POLYETHYLENE (HDPE) MEMBRANE THAT KEEPS FOUNDATIONS DRY ADVANCED TECHNOLOGY EASY INSTALLATION PROVEN PERFORMANCE ARMTEC.COM
WEB BASED CORE APPLICATION SPECIFIC INSTALLATION INFORMATION AND METHODS
 CORE WEB BASED CORE APPLICATION SPECIFIC INSTALLATION INFORMATION AND METHODS Installation Application Variations: Frame-In Although all possible measures have been taken to insure the accuracy of the
FMA / AAMA / WDMA Installation Committee Update. Jim Katsaros / DuPont Building Innovations FMA Installation Committee April 24, 2012
 FMA / AAMA / WDMA Installation Committee Update Jim Katsaros / DuPont Building Innovations FMA Installation Committee April 24, 2012 Topics for discussion. Review & Update on FMA/AAMA/WDMA Window & Door
SLAB ON GRADE Insul-Joint or Expansion Joint Material as Required by A/E Specifications AquaCheck Liquid Coating 400 (Waterproofing Membrane) with Aqu
 with Aqu") INSTALLATION INSTRUCTIONS Note: The following installation instructions are based off of ASTM E 1643 (Standard Practice for Installation of Water Vapor Retarders Used in Contact with Earth or Granular
INSTALLATION INSTRUCTIONS Note: The following installation instructions are based off of ASTM E 1643 (Standard Practice for Installation of Water Vapor Retarders Used in Contact with Earth or Granular
Six Proven Ways to Build. Walls
 Six Proven Ways to Build Energy-Smart Whether you build new homes or remodel, these alternative framing techniques will allow you to reach R-40 or better Walls by Bruce Coldham 2-in. sheathing Fiberglass
A M E R I C A N A R C H I T E C T U R A L M A N U F A C T U R E R S A S S O C I A T I O N
 A M E R I C A N A R C H I T E C T U R A L AAMA 2410-13 Standard Practice for Installation of Windows with an Exterior Flush Fin Over an Existing Window Frame M A N U F A C T U R E R S A S S O C I A T I
Lock In Energy Savings For Life
 Lock In Energy Savings For Life AN ENVIRONMENTALLY FRIENDLY HOME IS A GREAT BENEFIT FOR YOU, YOUR FAMILY AND THE ENVIRONMENT. TAKE AN ACTIVE ROLE IN HELPING REDUCE GREENHOUSE GASES, THUS SLOWING THE EFFECTS